second chance games

Search This Website of delight

Showing posts with label navy. Show all posts

I had some trepidation in starting to read this book as it is a fairly weighty tome at just under 600 pages. However, it quickly became ...

The Japanese Navy in World War II The Japanese Navy in World War II

For your Wargamer, Toy soldier collector, MiniFig collector, military history nut. Reviews, interviews, Model Making, AARs and books!

navy


I had some trepidation in starting to read this book as it is a fairly weighty tome at just under 600 pages. However, it quickly became apparent that the Author/Editor David Evans has deftly married the recollections and considered opinions of former WWII Imperial Japanese Navy (IJN) officers into a very readable and well-structured narrative of the IJN's engagements throughout the war.


 Each of the book's seventeen chapters cover a major battle or is an analysis of Japanese naval doctrine. Each chapter opens with the briefest of summaries of the historical situation as it was at the time before the vast majority of the chapter is dedicated to an eye-witness account of those events. In reading every single account I was constantly struck with how erudite and thoughtful each author was, and it did make me wonder how much we have either lost or gained in translation. Most of the accounts are from very senior IJN officers and their education and insight is evident.


IJN aircraft aboard Shokaku - 7 Dec 1941

As I discovered after finishing the book, many of these accounts have been published elsewhere and can be considered, if not the pinnacle, then some of the very best naval writing about the exploits of the IJN in WWII. This book then is an anthology of some of the very best essays on the IJN during WWII. 

One chapter, regarding the sinking of the Battleship Yamato, is truly excellent. In it, the author recounts his experience serving as a junior radar officer at the time of her last battle off of Kyushu. I made a note to remark in this review that the author, Yoshida Mitsuru could have written books for a living. This book's editor has included a postscript that summarises each contributor's life after the war. It turns out that aside from having a successful career with the Bank of Japan, Mitsuru-San also wrote several books on naval subjects. The account in this book is an abridgement from his book, "The End of the Battleship Yamato - Senkan Yamato No Saigo"; which is now considered a classic amongst Japanese books on WWII.

Yamato - under attack and starting to list
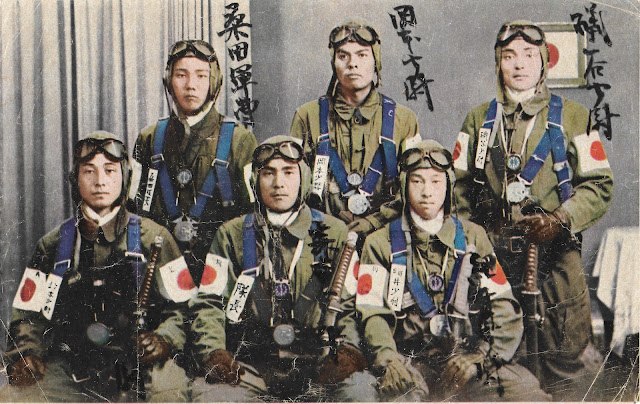
I found many of the chapters quite moving, which I think is quite a rare thing for a military history book. However, in these chapters, we have insights into sailors and men, in desperate situations fighting for their very existence. I was particularly moved by the Chapter "The Kamikaze Attack Corps", in which we read the very first flight leader on a kamikaze attack was to be a Lieutenant Seki, a recently married and skillful pilot.

I think this book does a good job at dispelling some of my preconceived ideas about the Japanese during WWII. I have always assumed that kamikaze attacks were an ever-present threat to US Forces that could potentially sink the largest of battleships and carriers. The reality is that kamikaze attacks started in the last few months of the war and their efficacy was dubious at best. The book cites the total number of suicide missions flown compared to the destruction wreaked on US Forces and it is not a favourable comparison.

USS Bunker Hill - CV17 after kamikaze attack
One outspoken critic of the Suicide attacks, Vice Admiral Yokoi Toshiyuki stated: 
"The battle for Okinawa proved conclusively the defects of suicide air attacks. Such operations cannot be successful  ...  It would have been far wiser for the sadly depleted Japanese military to have conserved its manpower instead of squandering it as was done."
He goes on and concludes the chapter on the Battle of Okinawa with:
"... It was a real scourge of Japan's military forces that permitted human life to be treated so lightly through a misinterpretation of the true spirit of Bushido  ...  Japan's suicide air operations mark the Pacific War with two scars that will remain forever in the annals of battle: one, of shame at the mistaken way of command; the other, of valor [sic] at the self-sacrificing spirit of young men who died for their beloved country."

A recurring theme throughout most of the accounts is that the Japanese Navy, throughout the war, was attempting to engage the US Navy in a big decisive fleet battle. This battle never materialised. This may have been a reasonable aspiration early in the war, but as their resources dwindled, they still desperately clung onto the ‘big decisive fleet battle’ doctrine. All contributors who comment on this admit that many mistakes were made by the Japanese military leadership; primarily the inflexibility of their strategic thinking i.e. not being able to move away from their desired decisive battle. I would also include, probably their most egregious error of all, attacking America in the first place.

Apparently, no more than 20% of US naval power was ever engaged in the Pacific, which puts into perspective just how futile Japanese efforts were to be in a prolonged naval campaign, in which nearly all of their resources were dedicated to Pacific operations.


Battleship Row - Pearl Harbor
Pearl Harbor is the very manifestation of the big attack doctrine, and unfortunately for the Japanese, the American carrier fleet was not in port at the time of the attack. If the Japanese had managed to engage the Americans in a major fleet battle at the outset of the war, their hope to dominate the rest of the Pacific may have had a slight chance. Instead, it is my opinion that despite the valiant and courageous efforts of the Japanese sailors and airmen, their inter-service rivalry and lack of coherent command and control, albeit exacerbated by American attacks, left them little to no chance of victory.

Every major naval battle in the Pacific Theatre is included, Philippines, Midway, Guadalcanal, Leyte Gulf, Okinawa and the book predictably starts with the attack on Pearl Harbor. I have read several books on most of these battles and even visited Pearl Harbor and Ford Island. I think I have a good grasp on the events themselves.


However, this book and the perspective of the IJN Officers has increased my appreciation for all those involved, particularly the tenacity and dedication of the Japanese Navy and the skill and professionalism of the US Forces. It has also given me a new perspective on the human tragedy of large naval engagements.


In short, this book has done more to educate, inform and engage me than any other book I have read about the PTO and if you're at all interested in the Pacific Theatre of WWII then I would consider it essential reading. 


This book is available from Pen & Sword Publishing and is currently on sale at £15.99. (RRP £19.99) - Sep 2017.


Book: The Japanese Navy in World War II
Author: David C. Evans
Publisher: Naval Institute Press

GATO LEADER As promised, my next undertaking is an AAR for Gato Leader .  I decided on this route, because a review would have simp...

GATO LEADER AAR GATO LEADER  AAR

For your Wargamer, Toy soldier collector, MiniFig collector, military history nut. Reviews, interviews, Model Making, AARs and books!

navy

GATO LEADER


As promised, my next undertaking is an AAR for Gato Leader.  I decided on this route, because a review would have simply been about 95+ % a replication of my review of U-Boat Leader As a prelude, these are the few differences, none critical, as they mainly reflect the historical backgrounds.

Gato Leader :

Includes some differing Special Missions, such as Mine and Recon/Rescue.

Wolfpacks are handled differently.  In fact, I would personally have called them something else, as I don't think that the Americans used this term.  Essentially, you chose whether or not a number of submarines begin as a group together in the same port.  So, no seeing whether a Convoy turns out to be a valuable target and then trying to call in other subs.

Takes us up to 1945, whereas U-Boat only goes as far as 1943, so there is more possibility of using radar.

Provides Forward Operating Bases [that can be purchased with Special Ops points]which allow for removing Stress points and reloading torpedoes.

Takes account of  the inferior quality of torpedoes by having a set of rules for dud torpedoes and a chart to roll on.  At its worst , none of your torpedoes may hit and in plenty of cases at least half will be duds! [Technically, this is not a totally new rule addition as U-Boat Leader 2nd edition has an optional rule for dud torpedoes.]

Allows for reloading torpedoes while on the Tactical Display.


These last two seem to me the most significant differences and one seems in part to balance the other.  However, I do not think that the ability to reload while on the Tactical Display is the big deal some comments on the game have made it out to be.


One other point worth mentioning is that the Event cards can be far more deadly than in U-Boat Leader and, overall, you will probably have to draw more too!


So, with that said, on to ...


Campaign Mission :
Turning The Tide
Short Scenario.


Stategic Segment


This gives me 40 SOs with which to purchase my submarines and any Special items.


I spend 36 SOs on submarines and the remaining 4 SOs on Special items.


Here's everything set up for the start of the Campaign, including my trusty dice tower!  On the left is the mounted play board which  has areas along the top for the Merchant Cards, the Escort Cards and the Naval cards and then beneath is nearly all the necessary information for conducting the Tactical Segment of a turn.  On the right is the Campaign Mission card with the map on which the subs operate in the Operational Segment of the turn.  The very blurred, vaguely bluish shapes are my four subs in groups of two.


Slap bang in the centre is the mounted Tactical Display board on which [surprise, surprise] the Tactical Segment takes place.   On the left side of this board are the holding boxes for the Event cards and Convoy cards and the rest is the lovely depiction of a sonar screen.  It's worth pointing out that this Tactical Display is part of the expansion pack.  It's brilliant, but the one that comes with Gato Leader itself is half the size and not as impressive because of the reduced area to play on.


My choices were:


Guardfish [Trained level + Torpedo Modifier]

Gudgeon  [Trained level + Radar] 

Both placed in Peal Harbour and formed as a wolfpack.  So, these two will operate together.

Silversides [Veteran + Torpedo Modifier]
Tautog       [Veteran + Radar]

Both placed in Freemantle and formed as a wolfpack.  So, these two will also operate together.

My decisions were based on the following reasons: the radar would gain a modifier in locating Convoys and the Torpedo Modifier would mean that the sub would roll one column better when checking for dud torpedoes.


A closer look at Guardfish, loaded up with 10 torpedoes Ready and another 14 Stored on board. 

It has markers showing its 6 gunnery factors and the Torp modifier.


Operations Segment


My first two subs left the port of Freemantle for the South China Sea, each drawing two Event cards.


Silversides


A Fatal Error                   + 3 Stress

Equipment Malfunction  + 2 Stress


[See what I mean about Event cards!  my sub is almost nearly up to its Shaken level and it hasn't even started to look for the enemy.]


Tautog

Lone Merchant - expend 1 torpedo and score 1 VP
Rough Seas         + 2 Stress


My other two subs left Pearl Harbour for the Marianas, each drawing two Event cards.

Guardfish

Nimitz Takes Notice  -  gain 2 SOs if you score equal or more than 10 VPs this turn.
Clear Weather            - no effect

[Well that draw went a bit better.]

Gudgeon

Rough Seas - + 2 Stress
Minefield [condition N/A, so gained default] + 1 Stress


The unfortunate Silversides which has picked up 5 Stress pts

just by sailing in to the South China Sea


 Tactical Segment


[N.B. all die rolls use a d10]


Tautog rolls for Contact


Contact die roll 6  mods +2 [number of subs in wolfpack],

+1[ radar], -3 [sub moved during the Operations segment].


Result 6 = 2 Contacts


Place Contact marker on the Campaign map board, draw a Convoy card and flip Contact marker from 2 to 1.

Contact card drawn is Card 043 [6 Merchants and 3 Escorts]  Unidentified markers are placed on the Tactical Display for all nine ships.


Convoy card 043 showing where the relevant unknown ship markers should be placed


The card only shows the 4 Centre Convoy Sectors and the 8 Short Range Sectors.  Beyond those are the 8 Medium Range Sectors and finally the 8 Long Range Sectors.  


Here are the six blue unidentified Merchant ship markers and the three unidentified escort ship markers, before I place my two subs in any of the outer Long Range Sectors.  


Once I do that, I choose for both submarines to submerge and move one sector nearer the revealed Escort Ikuna and the following enemy are revealed because of range : Merchants Santyo Maru, Katori Maru, Nanrei Maru and Hoten Maru.


As a result of Lag Movement, the two submarines move one sector towards the Convoy's wake.  [The top of the board is marked as the Convoy's course and the bottom is the Convoy's wake.]  The Escort Ikuna rolls for detection of the subs.  A 1 fails to detect the sub Silversides, but a roll of 8 detects Tautog and so, the other two unidentified Escorts converge along with Ikuna on Tautog.  The other Escorts are revealed as the Momi and Etorofu.  Ikuna and Etorofu are now directly in the same sector as my sub Tautog!


Also, the last two Merchants are revealed as the Harbin Maru and the Sakito Maru.


The image shows all the ships now identified and two Escorts in the same sector as the detected Tautog.  Tautog is just about to Deep Dive to try to avoid the Escorts attacks which are not rolled for, but Damage chits are automatically drawn.  In this case, it would have meant drawing 7 Heavy Damage chits in total - in all probability this would have been fatal for my sub!

*[At this point, with two Escorts at range zero, panic set in and I forgot that Tautog had the Aggressive quality and could have fired at the Escorts before they could fire at him.] 

Instead, not too surprisingly, the sub opts to Deep Dive to attempt to avoid the imminent attacks, first it takes 2 Stress points as a result of making the Deep Dive.  Though avoiding drawing damage tokens for attacks from the three Escorts, the sub still has to roll against its evasion rating and is successful for two of the three attacks, but fails against the other and so takes a temporary Flooding marker.  Not good, but could have been much, much worse if the Escorts' attacks had gone in.

[Crash Dive, which is what you do if you are attacked while on the surface, states quite clearly that an Evasion roll is made for each Escort attacking you.  With a Deep Dive, the rules are not 100% clear as to whether you make an Evasion roll for each separate Escort, as I did, or whether it's a single die roll.]

Because the Tautog has dived, it cannot attack. 

[Again, a point worth raising. In both Gato and U-Boat Leader, there are no restrictions on Escorts sailing into and through Convoy Sectors.  In my review of U-Boat Leader, I queried the historical validity of this total freedom.  Still not sure how appropriate this is.]

The other sub Silversides, however, now unleashes a spread of 5 torpedoes at the Katori Maru and another spread of 5 at the Hoten Maru.

Resolve those against the Katori Maru first.  The die roll for duds means that only half run true [i.e. 3 torpedoes out of the 5].  So, modifiers are +2 [3-1 for torpedo spread] +2 [sub's Torpedo Skill] -1 for range, giving a final mod of +3.

The torpedo rolls are 1,3, 9, becoming 4, 6 and 12.  Taking the highest result 12, this is compared with the target's stats and as 12 well passes the target's third number, the Katori Maru settles beneath the waves.  Silversides chalks up 4 VPs and 3 Experience Points.

So, the focus turns to the attack on the Hoten Maru.  All five torpedoes run true; no duds this time.  Modifiers: +4 [5-1 for torpedo spread, +2 [sub's Torpedo Skill] -2 [range] = +4.

Die rolls for the five torpedoes are 3, 7, 8, 9 becoming 7, 11, 12, 13.  like its sister ship, a final result of 13 is more than enough to sink the Hoten Maru and Silversides gains another 3 VPs and 2 Experience Points.

The Combat Resolution phase is over and so the Deep Dive marker is removed from the Tautog and a new round begins.

Silversides surfaces and moves 2 sectors away to the western most Long Range sector, while Tautog opts to attempt Silent Running and rolls a 1 [hurrah], so the detection marker is removed  and the sub's speed drops to zero.  As a result, in the Lag Movement phase, Tautog drifts two sectors south and out of detection range of the Escorts.


[In the image above, Tautog has just successfully rolled for Silent Running and its speed drops to zero.  Consequently, in the Lag Movement phase, the sub will move two Sectors due south, towards the Convoy's wake.]

* [I realised much later, I had made a mistake here.  The attack by Silversides would have placed an Alert counter on the Tactical Display which would have increased the Escorts' detection range by one and put Silversides in potential detection range of the Escorts.] 

Consequently, the Escorts roll for random movement.  End of Combat round.

For the next 3 rounds, the two subs lurk on the fringes, out of escort range, while Silversides reloads 2 torpedoes per round.

On the next round, both subs move into firing range of the Merchants.

Tautog fires 6 torpedoes at the Sakito Maru and half run true.  Modifiers +2 [3-1 for torpedo spread] +1 [sub's Torpedo Skill] -2 range = +1

Torpedo dice rolls are 10, 7, 1 becoming 11, 8 , 2

The Sakito Maru is sunk and Tautog gains VPs 4 : Experience Points 2.

Silversides launches 5 torpedoes at the Harbin Maru, but a pathetic die roll of 2 means that only one torpedo runs true and one of the torpedoes that miss errs dramatically off-course and hits its own sub!  This causes 3 Heavy Hits on the sub;  the first adds 2 Stress, the second is No Effect and the third causes lasting Hull damage.

To counter this appalling SNAFU, the 1 torpedo that strikes the Merchant rolls a 10 and with +1 total modifier the Harbin Maru is added to Silversides' growing total, gaining 3 VPs and 2 Experience Points.

On the next round, both subs surface in order to be able to move two sectors.  The Tautog is able to exit the Tactical Display, but Silversides can only reach the Western Long Range sector and so is easily detected by the Escorts who converge for the kill.  Silversides opts to Crash Dive and adds 1 Stress, so that the sub is now at 8 Stress, one away from the maximum it can take before becoming Unfit!  But all evasion rolls are successful.

On the next Combat round, the sub can exit the Tactical Display and the situation moves to the Post-Combat Resolution Phase.

Silversides records his 10 VPs and 7 Experience Points on the Campaign Log.

Tautog records 4 VPs and 2 Experience points.

Each sub gains 1 Stress at this stage.

Silversides moves to 9 Stress, and so I decide to place the sub back onto the Campaign Map in the Area's Searched Box.

Tautog, now at Stress 5, fully reloads and with 1 Convoy-sighted marker still on the Tactical Display, I decide to continue the Tactical Segment and draw a new Convoy card which reveals two Merchant ships and Escorts.  A second Convoy card is then drawn for its random Event.

Tautog decides to fire off 5 torpedoes at each Merchant ship [this causes them to be revealed as the Anyo Maru  and the Tatuwa Maru]. 

Firing at the Tatuwa Maru -  the roll on the dud table is low and only one torpedo hits the ship doing no damage, while one of the misses hits his own sub adding 1 Stress, Lasting Electrics damage and No Effect.

The other 5 torpedoes fired at the Anyo Maru all run true and with the best of his five dice being a 10, plus a small modifier, a final Merchant ship is sunk adding 4 VPs and 3 Experience Points to the tally.

In the next Combat round, Tautog immediately exits the Tactical Display to add one more Stress in the Post-Combat Phase, so the sub's Stress is now at 7.

Tautog also records 4 VPs and 3 Experience points.

With virtually no torpedoes left to reload and a high Stress level, I decide to call it quits and place Tautog in the Searched Box where Silversides has already been placed.

[... It was now the turn of my other two subs in the Marianas and I hope that you will allow me to draw breath at this point and pass over their exploits, until another day.  Otherwise this AAR is going to ... argh my two typing fingers have gone numb!

Some time later...

Once all your subs have been activated and gone through the processes that I've detailed, you move to the last Segment Refit.]

Re-fit Segment

Promote Submarines

Silversides  spends 5 of Experience points to promote the sub's commander to Ace level.

Tautog spends 3 Experience points to promote the sub's commander to Ace level.

As there is no Forward Operating Base in the area, neither sub can reduce their Stress level and neither sub has the Cool Special Ability which would allow 1 Stress point to be removed.

Any temporary damage received is removed, but lasting damage remains on the sub.

Finally the submarines are put back from the Searched Box into the South China Sea area and the process starts again.

With neither sub fit for much action, I simply return them to the Port of Freemantle from which they had started.  Of course, if subs travel further afield, you can head for the nearest Port or journey back drawing Event cards for moving into areas as you do so.  Thankfully for these two battered heroes, Freemantle borders the South China Sea and so they go straight into the Port Box.

Once in Port, each sub can remove the appropriate amount of damage, in this case 5 Stress points each for Freemantle Port.

This concludes 1 Patrol for each submarine which is the maximum they can do in a Short Mission.

Between them the Silversides & Tautog had notched up 18 Victory pts, enough to get me exactly half way to scoring the minimum total of VPs to earn the Adequate level in game terms!!


A FINAL FEW WORDS

First of all, this was a hugely enjoyable experience, though it took 10 A-4  pages of careful record keeping just to cover the details that covered half of the Campaign and several sessions that tallied about nine hours in total.  To play the game, without all the written record keeping to produce this AAR, is [I can assure you] a whole lot quicker!

I'd like to thank DVG, who very kindly sent with the game the Expansion Ship Miniatures and Battle Board which provides a mounted Tactical Display board twice the size of the smaller board in the game itself. But, as mentioned in my review of U-Boat Leader, the latter is rather small for the number of counters and markers likely to be placed on it. 

I love the expansion, but it does add another £22.99 to the cost of the overall package.

Both U-Boat Leader 2nd Edition and Gato Leader are for me excellent additions to my solitaire experience.  I imagine that the UK gamer may well settle for the former and the US gamer for the latter.  Both give equally satisfying and rewarding experiences.


Sailing to Victory on the Seas of Glory First from Ares , there was Wings of War which later became Wings of Glory .  If you know eit...

Sails of Glory by Ares Games: Review Sails of Glory by Ares Games: Review

For your Wargamer, Toy soldier collector, MiniFig collector, military history nut. Reviews, interviews, Model Making, AARs and books!

navy

Sailing to Victory on the Seas of Glory


First from Ares, there was Wings of War which later became Wings of Glory.  If you know either previous incarnation of this game, you will have some idea of what to expect in Sails of Glory.  Moving from aerial dogfights in WWI, this game's subtitle spells out the shift back in time to the Napoleonic Wars and that time of British naval supremacy typified by the phrase "the Nelson touch".

So, it's lashings of rum and lashings with the cat o' nine tails,
hard 'a starboard, avast ye lubbers and "Every man expects!"
- sorry, got carried away there!

With Sails of Glory, Glory's the key word for me, as this is truly a glorious production from first catching sight of the evocative box artwork of a naval engagement at its climax: ships with billowing sails, wreathed in the smoke of thundering close-range broadsides.  Unlike its WWI counterpart, which began purely with cards representing the planes and only later did exquisitely painted models follow, Sails of Glory lures us immediately with four detailed and superbly painted warships.  These are on display through the clear protective cover, as they nestle in their moulded hollows that form part of the large plastic insert that holds all the game contents.


The box in all its Glory

Delving further into the box, you encounter a host of other quality components.  First of all, each ship comes with its own ship card with a full colour picture of the ship and its stats and an oblong plastic base into which fits a deep blue base card with bow, stern and full broadside firing arcs marked in grey, over which fits a plastic overlay that both protects the card and contains a hole into which the ship's locating peg fits.  It is simple, elegant, practical details like this that give the game its finished look of polished quality.

Having said that, there have been a few complaints that, though the ships' hulls, decks and masts [the latter a curious yellow] are beautifully painted, the spars [like the sails themselves] are left a plain white.  For me this was a minor detail, but if you're a miniatures aficionado it may irritate more and you may wish to paint those details.  Not being a dab hand with any sort of brush, I have been happy to let mine remain as received.


 Each ship also comes with its own individual deck of manoeuvre cards, a Ship Mat and its own Ships Log, both in very sturdy cardboard and attractively designed and coloured - more about these later.  Rounding out the package are a Wind Gauge, two separate Wind Indicators, one for each player, some terrain in the form of four full-colour islands and six reefs, two cardstock measuring sticks and shed-loads of damage markers and action markers.


The final essential item to mention is the rule book.  At approximately 27 cm x 15 cm, it is a curious size, with just over 60 pages that at first sight might seem surprisingly long.  However, DO NOT BE PUT OFF - these rules cater for both the absolute beginner to the player wanting a fairly detailed and accurate depiction of naval warfare in the Age of Sail with miniatures. Consequently they are divided into 4 sections:- Basic, Standard, Advanced and Optional.  Basic really couldn't get more ... er, well basic!  Despite taking up 16 pages of the rules, they are very simple, introducing four Phases : Planning, Movement, Combat, Damage and Reloading. 

So, why such length? Mainly because of the wealth of illustrative photographs to make each simple point abundantly clear. 


BASIC RULES

Planning


Though the terminology is suitably nautical, with words like Running, Reaching, Beating and Taken Aback introduced, understanding and determining which applies to your ship at that particular moment couldn't be easier. As mentioned earlier, each ship sits on a base card that indicates firing arcs, but the card is also edged in three different colours: red, orange and green.  Just line up the Attitude indicator with the central mast of your ship and look at which colour the indicator crosses.  In the Basic rules, you then choose a Manoeuvre card from the ship's individual deck of cards depending on what colour the Attitude Indicator passed through on the edge of the card.

Movement

Generally, you will place the Manoeuvre card in front of the ship and advance your ship until its stern touches the tip of the movement line on the card.  Sometimes [when your ship is Taken Aback], you will have to align the card with the stern of the ship and then follow the same procedure.  The only other thing to consider is whether two ships might collide.  If there is that potential, then a simple rule determines which ship moves first and then the other ship is moved until its base is in contact with the first ship.  Surprisingly neither ship takes any damage for colliding!  That really is it for Movement and Combat is even easier. 

Combat

Each side of the ship has a Loaded marker face down in its Broadside box and can fire once after Movement, if there is an enemy ship in range.  Use the measuring stick, which for this simplest level of the game refers purely to short or long range. Make sure there's nothing in the way - sorry you can't fire through your own ships or islands [what a surprise!].  Choose randomly from the appropriate lettered pile of damage markers [either A or B in the Basic game - they are also distinguished by colour, so it's really easy when setting up the game and the current strength of the ship firing tells you how many markers to draw. Allocate the damage to the enemy and, if the ships are close enough, there will be a round of Musketry fire following exactly the same process, but drawing from the pile of E markers.                     And REMEMBER  - all firing is simultaneous. 

Finally, turn the Loaded marker face up to show that you have fired this turn.

RELOADING

The last action of each turn is first to take any facedown Loaded marker from the Reloading box and move it back into its Broadside box.

Then move any face-up Loaded marker from the Broadside box, turn it face down and move it into the Reloading box.

You now know all that is necessary for playing the game at its simplest level and frankly the next stage Standard Rules add so little more that I would be tempted to say that most players will add these in immediately.

But, before moving on to this next stage, there is probably one question those of you reading this review are asking.  Where are these different markers for each ship placed?  Well that's where each ship's combined Ship Mat and Ship Log come in.

Below is a photo of such a combined display set up for the first turn of a Standard level game to begin.


The Ship Log seen here is for HMS Terpsichore and is made up of the three interlocking sections which sit inside the Ship Mat frame.  The top row is where you place damage markers allocated to the hull of your ship and the bottom row is for damage markers allocated to crew of your ship.  When either of those rows is full of damage markers, a ship surrenders and is removed from game play.  When one side has lost all its ships, the other side has won.  To quote that ubiquitous meerkat :
"SIMPLES!"

STANDARD  RULES


So, what does this next level add.  Instead of planning one Manoeuvre card each turn, you start the game by planning Turn 1 and Turn 2's Manoeuvre cards putting them into the slots on the Ship Mat.  On Turn 1, turn up the first planned  Manoeuvre card, carry it out. move the 2nd card into its slot still face down and plan your next  Manoeuvre card to go into the second slot.

Which Manoeuvre card can be chosen will depend on the ship's Veer capacity [the number in the photo next to the wheel symbol].

Remember collisions , well now two friendly ships colliding do damage to each other.  Strangely an enemy ship and a friendly ship colliding don't do any damage.  Weird, that's one minor point I don't understand.  For me, it's House Rule time - an enemy ship and a friendly ship colliding do damage each other.

In Combat, ship's can now choose between three different types of ammunition: Ball, Chain and Grape.  If you know your Hornblower novels [or more youthful players may know the TV series], one type's for the hull, one's for the sails and one's for the crew.  Each time you reload you can choose whichever of the three you like.  The final addition is that if your cannons fire directly through the bow or the stern of the enemy ship, then additional damage tokens are drawn.

Again, that's it!  I think you can see why my advice is just jump straight in with the Standard rules.

And so we come to the real meat of the rules...

ADVANCED RULES

Even here the physical length of the rules is only 6 more pages!  The most significant area of change is in Planning.  To the simple plotting of two manoeuvre cards is added the planning of crew actions and this is where the other 210 markers start to make an appearance in the game..  On the Ship Mat there are 4 spaces for placing concealed action markers.  As your ship takes hits on the Crew that number of actions will decrease.  A list of some of those actions will give you a flavour of what is introduced.  Raise/Lower sails, Pump Water, Load Left/Right Broadside, Reload Left/Right Broadside, Musketry Fire, Repair Damaged Rudder, Extinguish Fire etc.

All of these introduce new elements.  First of all the icons on the Damage markers at last play a part and, as you can imagine from some of the actions mentioned in the previous paragraph, damage now can be very specific: the mast may be broken, the rudder shot away, fire breaks out or the ship begins to let in water.  As the situation becomes tense, can you afford to load the guns or must you concentrate on putting out the fire first.

Next sailing your ship becomes more complex, as the Raise or Lower Sail actions introduce the fact that on the Manoeuvre card you choose, there are three different possible lengths of movement for your ship depending on whether your sails are set at Full, Battle or Backing.  On your Ship Mat you will now have a Sail Status marker to move along to show just how your sails are set.

That brief description gives you the gist of the these Advanced rules, but how you put them into effect does take considerable careful reading of these very compact additional rules.  For some, they may be a step too far and, if so, just go back happily to the Standard level of rules.  For others they will be just the extra depth required and hugely enhance the feel of this game.

If, like me, they are what you want, then a worthwhile bit of pimping your game is worth the time and effort.  At this level of the game your Ship Mat and Log can get fairly crowded and I'd strongly recommend making individual plywood templates to glue each Ship mat onto.  That way you can easily pick them up and put them on one side when you've completed your planning or added current new damage markers and not risk disastrous dislocation of the layout.

As you can see in the picture below a simple oblong of plywood, sanded and varnished is all you need to glue your display onto.


The final section of the rules are the Optional ones.  What I like about these are that they aren't just a final level of complexity.  Some can be used in conjunction with all three levels of rules.  Indeed, the very first Optional rule is just such a one: Let The Men Drink, this uses the Grog counter.  All it does is let you cancel a damage marker once in the game.  I'm sure those of you so inclined can make up an addition to this rule that forces you to swig something appropriate! [Do I hear some of you wanting this to be allowed to happen more than once in the game?  Or is it just my wishful thinking!]

Similarly, an Entanglement rule can replace the collision rule at any level of the game, as do Continuous Fire and First Broadside, with virtually no cost in effort.  However, a few provide substantial and significant new additions;  among these are Boarding and the use of Terrain.  The latter will allow you to use the reefs and shoals that come with the game, but if you want the full benefit which is the introduction of Coastal Batteries, then for a little more money you'll need to buy the Coastal batteries and terrain expansion.

Last but not least are the four generic scenarios [plus one solitaire], perhaps the weakest element in the package, as they are very straightforward.  Nonetheless, they do give you the typical main naval encounters.  Their titles are self-explanatory: In Shallow Waters, Force The Blockade, Against The Outpost and Supplies Are Coming.

Just in case you are left in any doubt, this game totally gets my thumbs up.  It is real value for money whatever your chosen level of play.  Excellent as an introductory level game and engrossing if you do want depth.  I have only one proviso.  As the game comes, you can only play two ships on a side,  so, only small engagements and fairly generic ones.  In one way this is no problem, as there are many additional ships that you can buy, but a single player would still be hard pressed to manage more than three ships, particularly if you are using the Advanced rules. 

For larger battles, I think the cardboard world of say Flying Colours has to be turned to, but for accessibility, feel and atmosphere and detail too, if you want it, this is my choice. 


[Voices echo eerily:  Now where's that Grog counter?.......Can't find a cat o' nine tails anywhere.....Where's that little guy with an eye-patch?...........Mind the - SPLASH!]
 
 
>
hpssims.com