second chance games

Search This Website of delight

World in Flames Deluxe Collectors Edition by Australian Design group Review Part One   So, this game is like a ...

World in Flames Deluxe Collectors Edition by Australian Design Group World in Flames Deluxe Collectors Edition by Australian Design Group

For your Wargamer, Toy soldier collector, MiniFig collector, military history nut. Reviews, interviews, Model Making, AARs and books!


by


Review Part One


  So, this game is like a kid getting a life-sized chocolate rabbit for Easter. We are going to have to gnaw on this critter for a while. This beast comes with 1600 counters for the basic game! We do not have as many of these monster games as we once did. It seems like we do not have the time or the space anymore for them. This is the  end all and be all of games, especially with all of the add-ons, about the entire Second World War. This not only throws in the kitchen sink, but also adds in the plumbing and the bathroom sink to boot. A word of warning, this is not for the newbie. If a newbie were to just see the contents of the box they would run away screaming to their Risk box. This is grognard territory. Hoary old and gray grognard territory. Sorry, but that is what most of us are :). We will have to go back in time a bit to underscore exactly what you get within this fifteen pound game box:

1) Four Large (574mm x 830mm) full-color hard-mounted maps of the world
2)One (297mm x 420mm) full-color hard-mounted map of the Americas
3) One (297mm x 420mm) full-color hard-mounted turn record chart
4) One (297mm x 420mm) full-color hard-mounted Task Force display
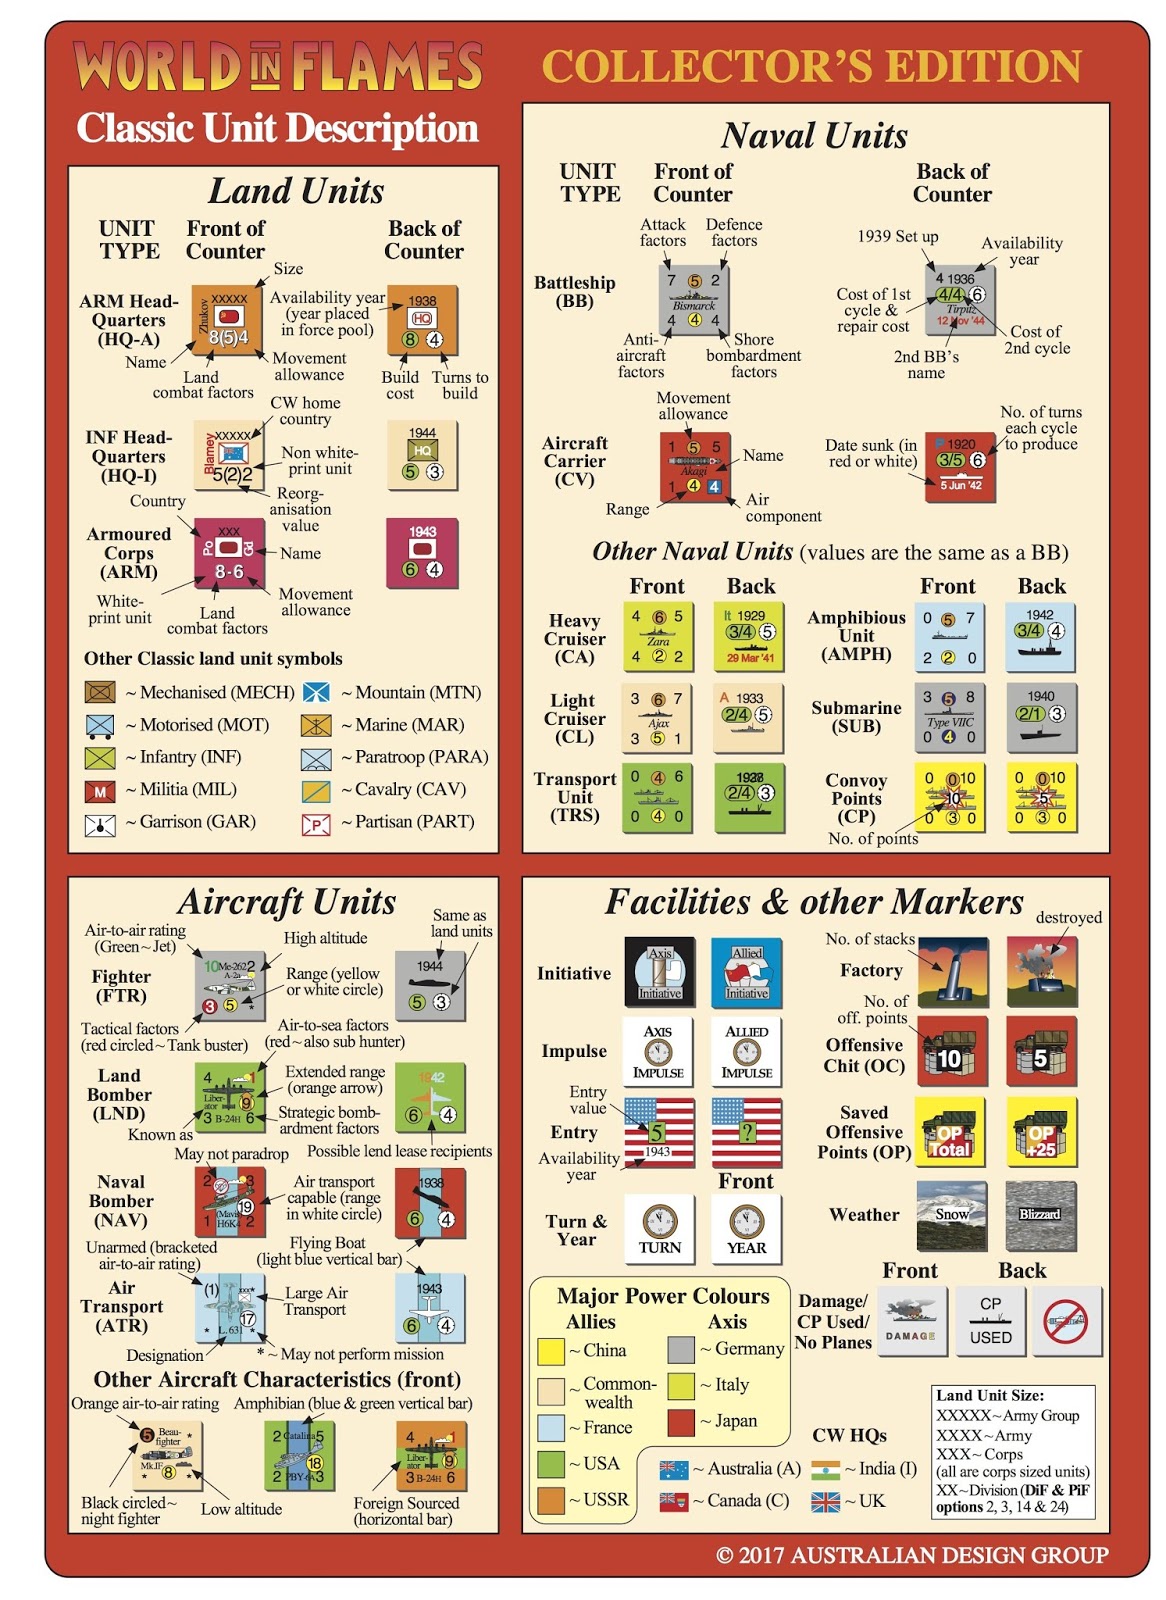
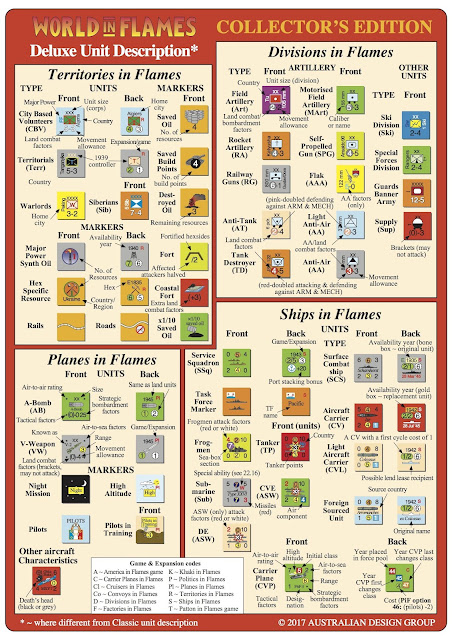
5) 4800 (12.7mm x 12.7mm) full-color counters of all of the armies, navies, and air forces of World War II (Including Planes in Flames, Ships in Flames (Including Cruisers in Flames, Convoys in Flames, and Carrie Planes in Flames), Divisions in Flames, and Territories in Flames).
6) Full-color rule book
7) Full-color campaign book
8) Five x A3 full-color games charts
9) Two ten-sided die


 This is a link to my unboxing:


  Now we have to get a few things out of the way. I am not someone who sets up a board game and analyzes every move or combination to figure out the best strategies to win within the system or rules. I try to play historically, as much as I can, any game that I am playing. The other point is that my gaming habit is almost always driven by my reading, and I am a voracious reader. So, I might have an ancients game on the table one week and a World War II naval game the next. I know there are more than a few World In Flames aficionados that have analyzed every move and have had the game up for years on end. My apologies to these people right off the bat. I could never equal your knowledge of the game. I am just not put together that way. World in Flames is one of those games that some people do get caught up in and have sometimes built there lives around. So with that out of the way what are the scenarios you can play in World in Flames? Here is the list:

 There are five one-map campaigns ranging from:

Victory in the West: May/June 1940 - Jan/Feb 1941, to
Battle of the Titans: The Russian Campaign: May/Jun 1941 -
 May/Jun 1945     

 There are four two-map campaigns ranging from:
  
Fascist Tide: War in Europe Sep/Oct 1939 - May/Jun 1945
Rising Sun: Tojo's War: Jul/Aug 1937 - Jul/Aug 1945

 There are six four-map campaigns ranging from:

Missed the Bus: The end of the beginning: Jul/Aug 1940 - Jul/Aug
  1945
Decline and Fall: Allied Ascendancy : May/Jun 1944 - Jul/Aug
  1945
If you have the add-ons Days of Decision, America in Flames, and
  Patton in Flames there are a few more scenarios to add to the mix:


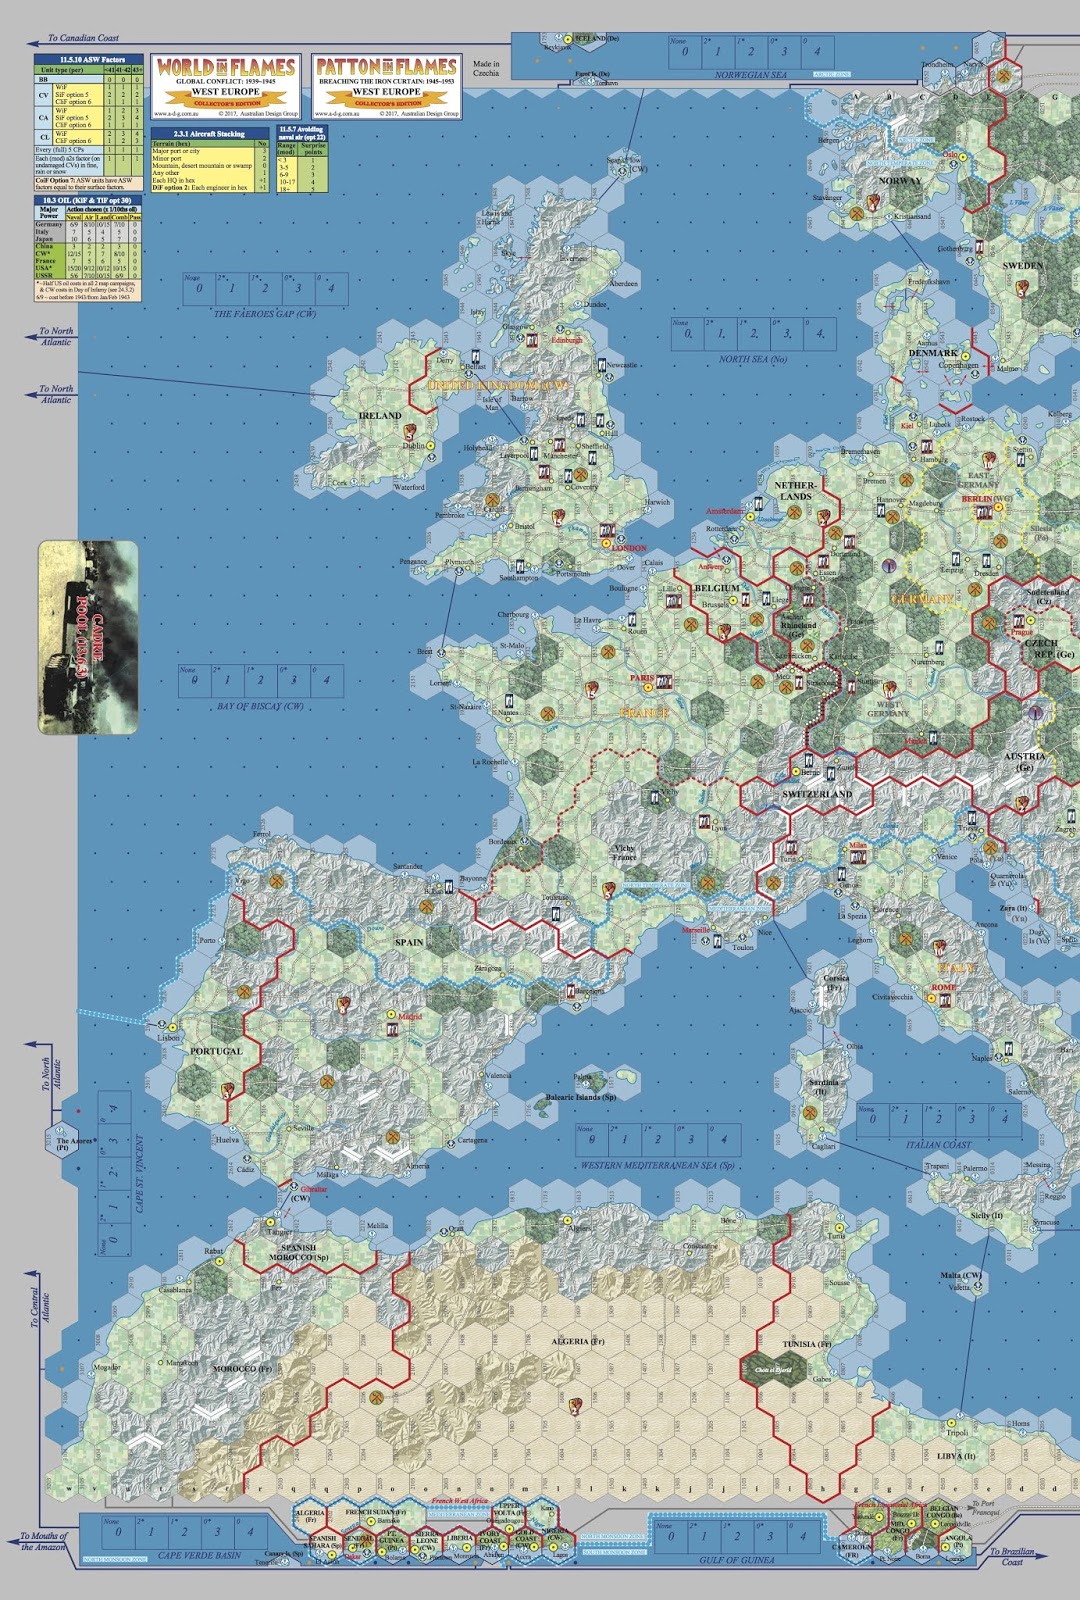
 It has been about six years since I played World in Flames and that was the fourth edition. So, we are going to take baby steps and start with the one-map campaign Victory in the West. Germany is already at war with France and the Commonwealth. To get down to gaming we have to envision the situation the Allies and Germany are in. The Maginot Line covers almost all of the border of France and Germany. Historically the Western Allies sent the bulk of their better forces into the Low Countries when Germany attacked them. This resulted in Manstein's famous 'sickle cut' that chopped the Allied forces in half. No one in their right mind is going to play that gambit in a wargame, unless they are forced to by the rules. This game starts before the invasion of Belgium and the Netherlands and also gives both sides freedom of setting up their counters/units where they want (mostly). What usually happens in most games that replay this campaign is pretty much a hoplite shoving match or a repeat of World War I on the Northeastern French border. This is pretty much the introduction scenario. It really only deals with land and air units, with very little naval units or rules (for my second part of the review I will play the campaign for Guadalcanal).


 So we have to start by setting up the map and units. The map is the one piece that has Western Europe on it. The units, well that is a bit of a different story. Because the game pretty much gives a player the chance to set up his units anyway and where he wants, it is  more involved than most games. Most games have hex wxyz printed on the unit so you know where they were set up historically. This game separates the units of a country by the year. What this means is there might be too many units for a given year for say Germany in this scenario. The scenario calls for two armored units, but there are actually four in the counter mix. There are also two that are being built and will be available later in the year for Germany. Now, this seems simple. Unfortunately the units have different strengths and movement numbers listed on them. You actually have to read both the rulebook and Campaign and Players Guide to find out how to deal with this situation. Then you will see that in this case the owning player simply draws them out of a cup chit style. I assume that the missing other units are actually defending on the Soviet border. I would have liked the setup to say, and think it would be easier, that x, say forty-five, infantry strength steps are needed in Western Germany for this scenario. Although in this instance it might lead to cherry picking by the owning player, because said units have different movement speeds. So I do think that setup could have been handled differently, and possibly easier. As of now, you check the Campaign and Players guide for the scenario and then cross-check the list for setup in the back of said book. You will have to remember to check that against anything about setup in the actual rulebook. Let's go back to the actual scenario. Now because the scenario is very dependent victory point wise on Paris, there is not much incentive to defend the Low Countries. Paris is worth three victory points whilst Amsterdam, Brussels, and Antwerp are worth five total. This is compensated by the following cities being worth one victory point each Lille, Lyon, Marseilles, and Metz. So if the Western Allies player can keep the Germans at the French border in the North, he will have seven to five victory points to start with. It is only tilted more to the Allies' non-intervention because the Western Allied player receives points for delaying the game to the Jul/Aug turn to the tune of this amount per turn: Jul/Aug - one victory point, Sep/Oct - three victory points, Nov/Dec - six victory points, Jan/Feb 1941 - ten victory points. You do also get points for destroyed HQs and armored and mechanized units. Thus you can see that the German player has his work cut out for him. It is possible that Barbarossa would have to be postponed or forgotten about if the casualties in Northern Europe are too high for the Germans. In retrospect I think this helps the Allies a lot in the bigger campaigns. Sacrificing French manhood to bleed the Germans more than France was willing at the time would be the opportune strategy for the Western allies player in the longer games. Now there is one rule that I really like that is important here. That is, units of different countries even if they are allied cannot stack together. There is also another rule that does help the German side of the equation. The Commonwealth Lord Gort can only command two units in France. So the scenario description does recommend that you put your Commonwealth units into Belgium. This allows you to have two units in both Belgium and France with the caveat if your Commonwealth units are pushed back into France, any units above two will have to be eliminated. Realistically the French nation had lost so much blood in World War I, it was inherently not ready for another blood bath on its Northern border. I think that a house rule could be added that if France loses x amount of units something happens. Perhaps the loss of another unit picked by the French player to represent morale loss?


 So what are the main points we are taking from this game and scenario? The scenario is tough for both sides. Setup, Setup, Setup is the biggest rule of thumb on both sides of the border. The Germans not only have to get to Paris, they have to get there fast. This is 1940 and the Luftwaffe is as strong as it ever was. You have a whole Air Force that is built to destroy and hamper enemy ground units; use it. The Allied player has to stop them at the border of France and fight for every hex to the teeth. The game complexity for this scenario and the other one map ones I have set up and played or set up and looked at is about the same. They are no harder or more intricate than others in the same ilk of game. I think there is the rub. I have not played a real monster game in a while. I am probably making the rules and setup seem harder than they really are. The scope of the game means that the rules etc. have to have the same sort of scope. By design, World in Flames is meant to make you think and possibly pull your hair out, if you have any left. The rules are long and the Campaign and Players Guide at times is somewhat arcane, at least to me. This is one of the games that I recommend that you get a cup of coffee or three, and set aside a few hours to read through the rules before you even think about cutting a counter out. This is not a knock on the game; we have longed for this game, and dreamed about this game for exactly this reason. Tune in to the same bat time and same bat channel for my third part of the World in Flames Deluxe Collectors Edition review.


Harry's setup of Victory in The West

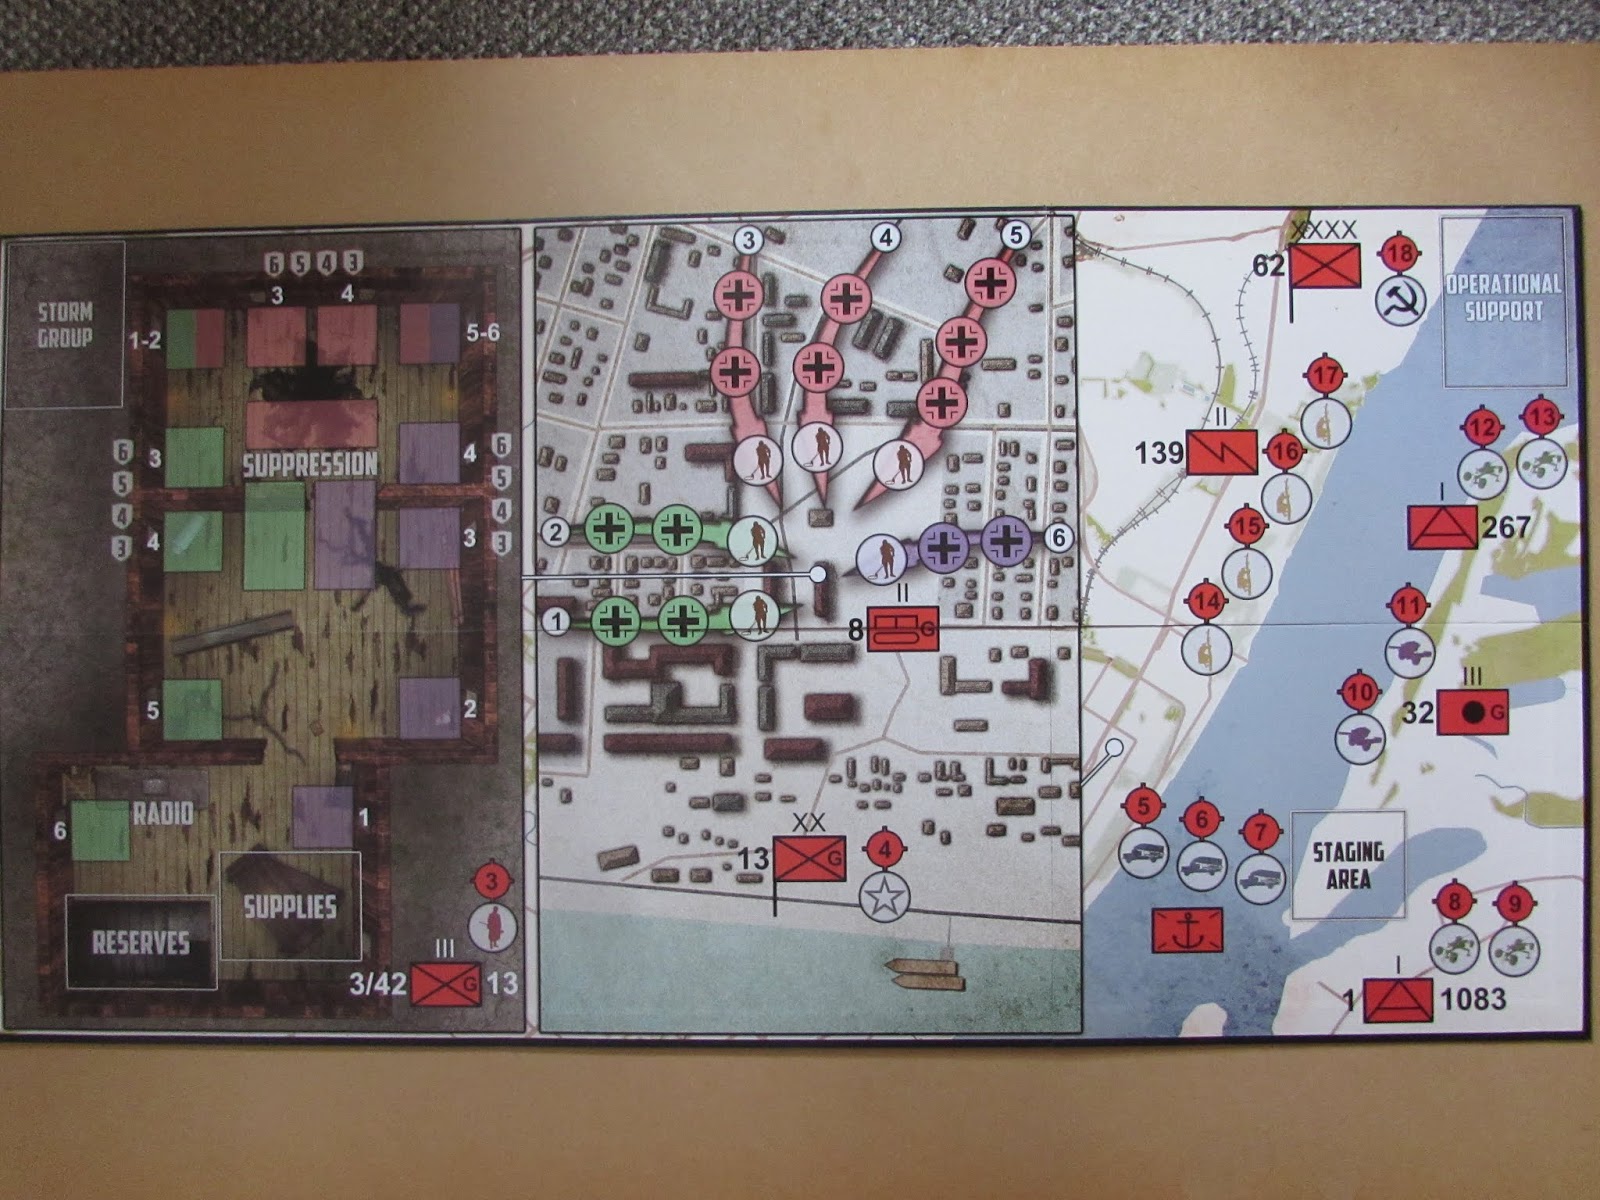
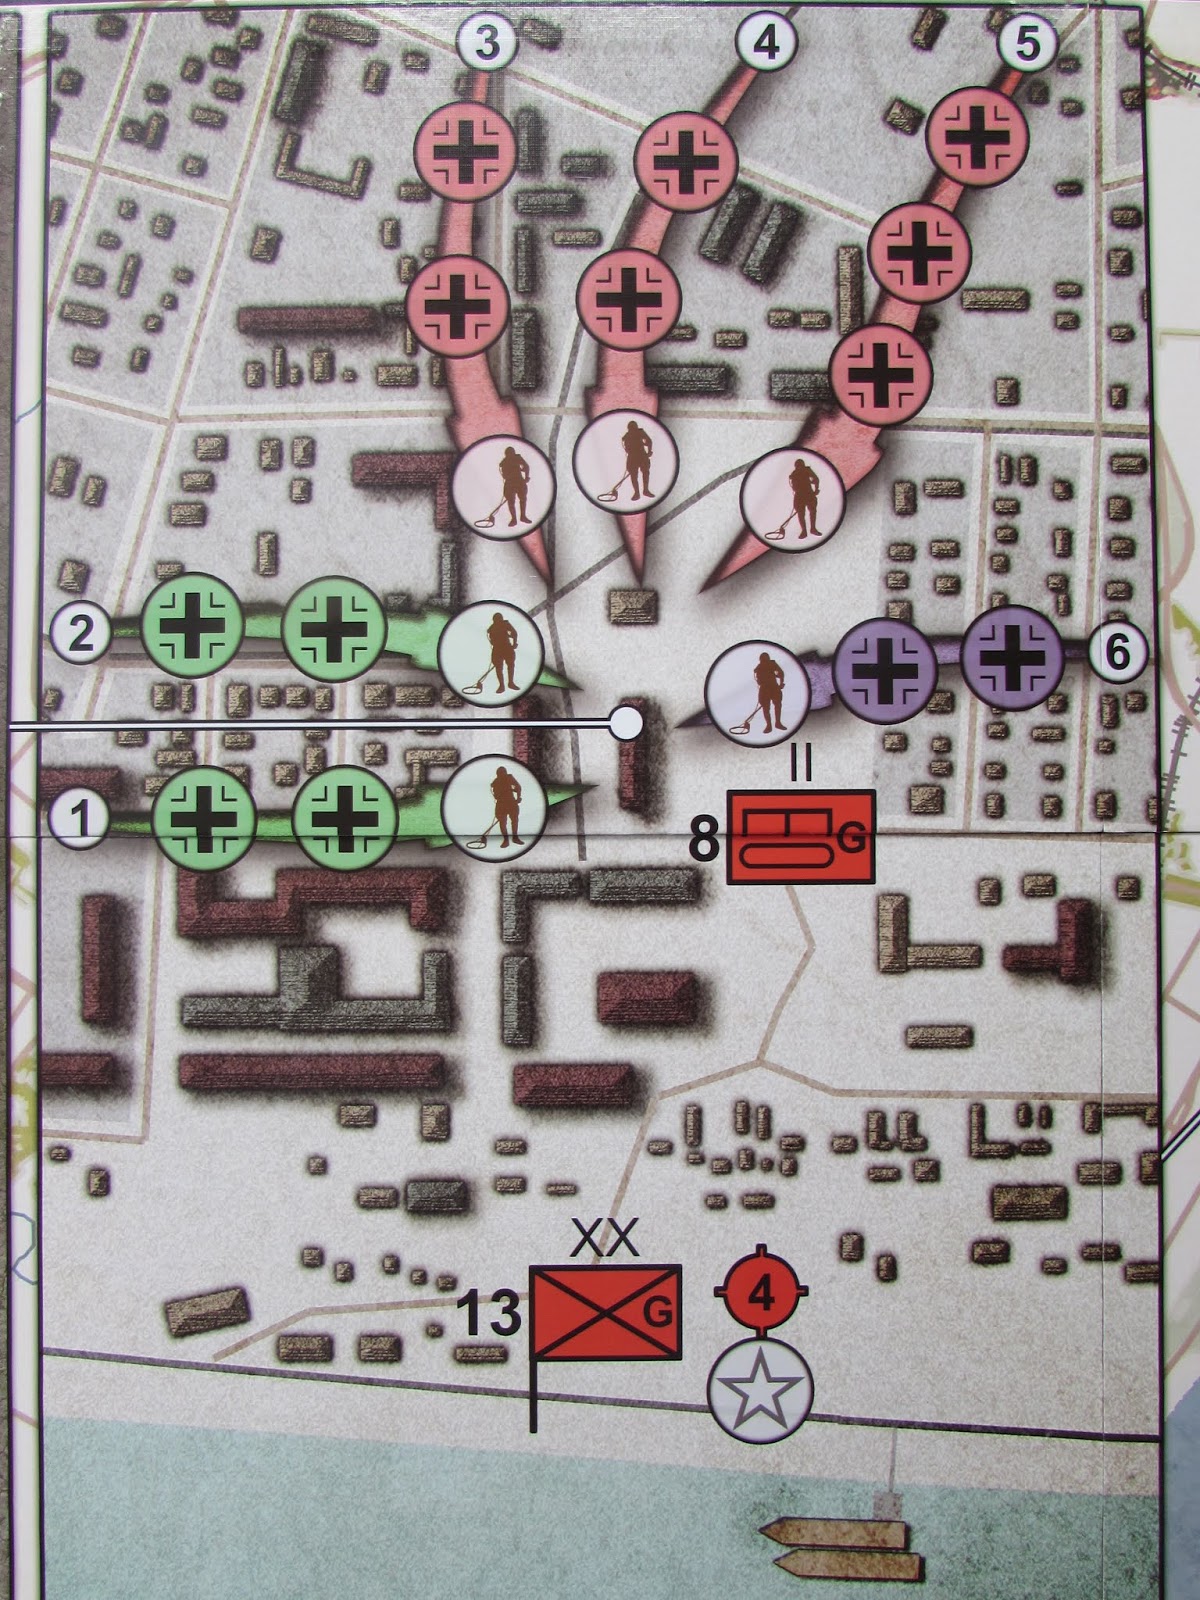
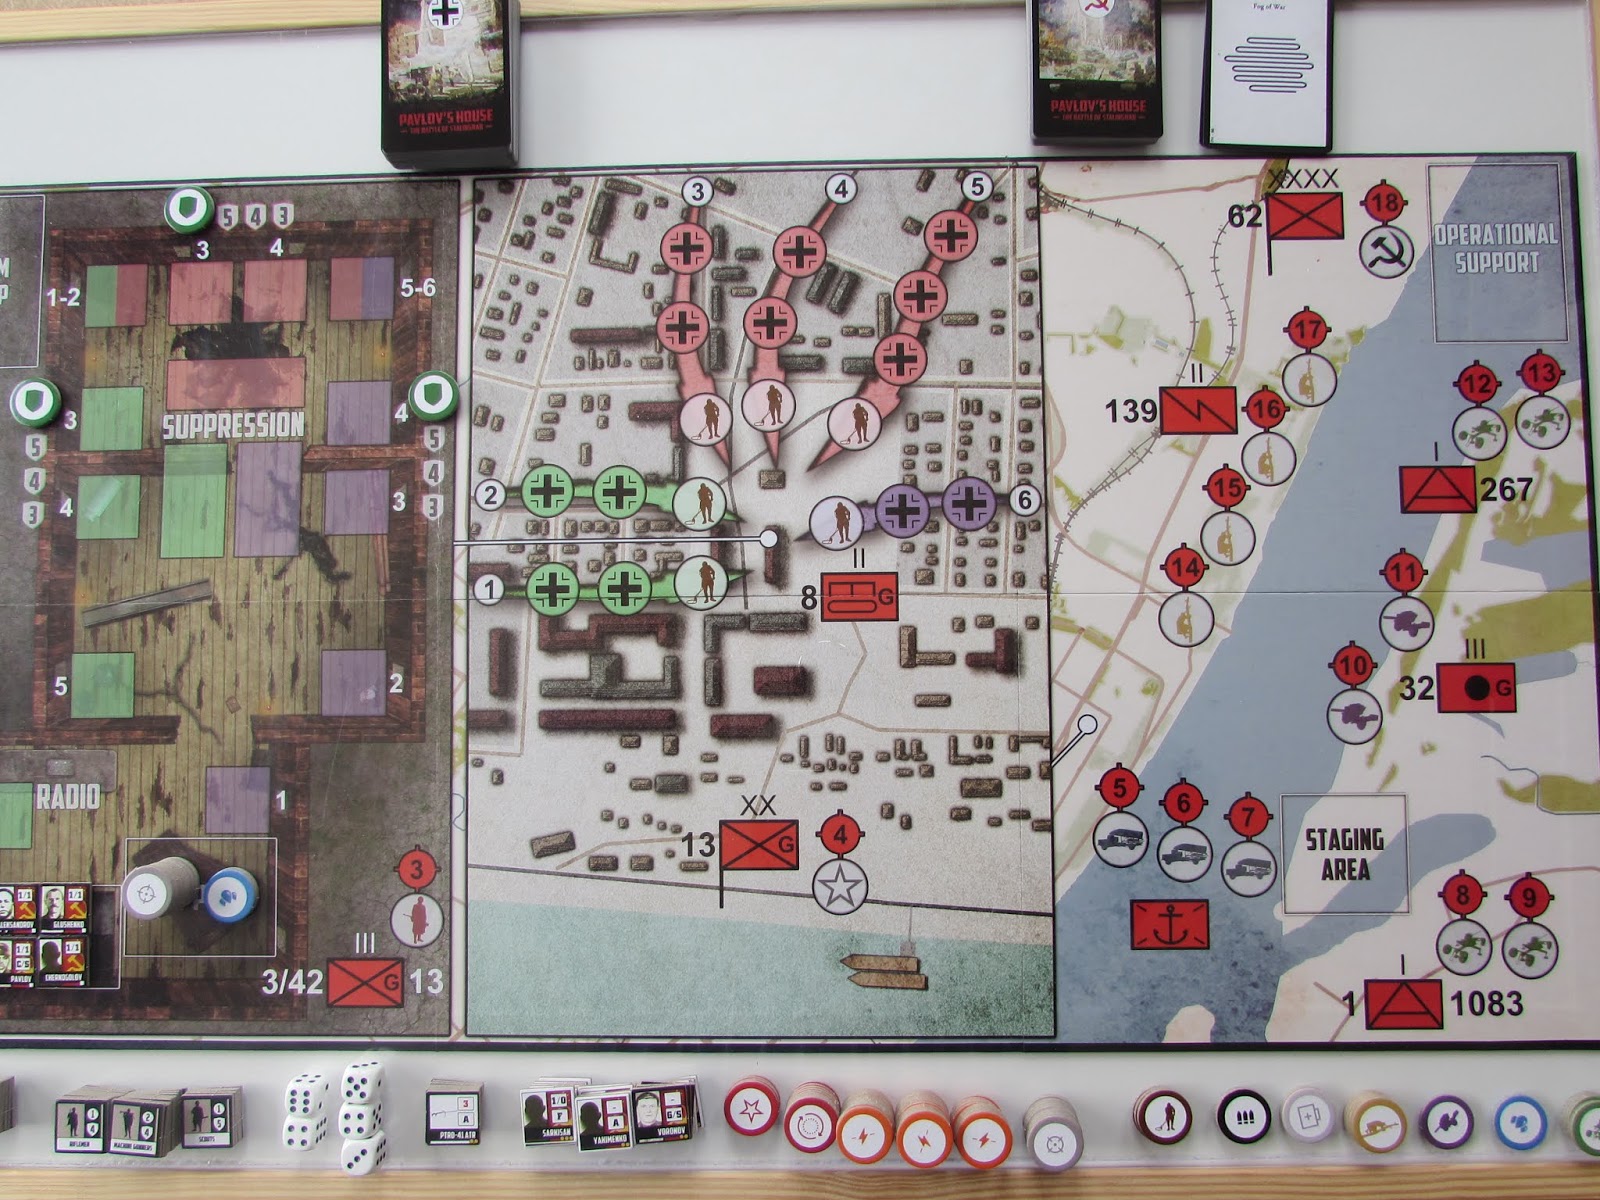
  The above is from the Vassal mod for World In Flames that is on Australian Design Group's website. Here is the link:

https://www.dropbox.com/s/y93vgnnoxxdltin/WiF%20CE%20Fall%20of%20France%20Vassal%20scenario.zip?dl=0


Robert


PAVLOV'S HOUSE from DVG Pavlov's House has become an iconic and mythic episode in the siege of Stalingrad during what the...

PAVLOV'S HOUSE PAVLOV'S HOUSE

For your Wargamer, Toy soldier collector, MiniFig collector, military history nut. Reviews, interviews, Model Making, AARs and books!

PAVLOV'S HOUSE

from

DVG
Pavlov's House has become an iconic and mythic episode in the siege of Stalingrad during what the Russians call the Great Patriotic War and is almost as celebrated in the gaming world.  I'd already gamed the situation through a Lock 'N Load scenario and an adaptation of the ASL scenario.  So, from the time that the possibility of a game of this epic defense was mooted and appeared in print and play format, I had been keenly waiting a professional publishing.  That DVG [Dan Verssen Games] became that very publisher meant for me the expectation of an outstanding treatment.

When my review copy arrived recently, unboxing did not disappoint those high expectations and many thanks to DVG for giving me the opportunity to explore this package,  The cover art by David Thompson, who is even more importantly the designer of this great game, is immensely effective and wholly in keeping with the subject.  The bullet and shell pocked brickwork with a superimposed part of a stylised Russian soldier's helmeted face in monolithic concrete couldn't be more appropriate.  Not only does it convey an implacable defense, but seems to leap straight from the ranks of Soviet propaganda posters.

The game board is just as striking and innovative.  In three panels, it moves from left to right on the micro-tactical level to the wider operational  one on the right.  The centre panel reminded me strongly of elements familiar from Victory Point Games' Siege Series and the battle for Pavlov's House has certainly gone down in the annals of siege situations.


Mapboard prior to set-up
On the left panel is a representation of the interior of the house, with various locations, in the centre are the avenues of attack for the German troops in the near vicinity [9th January Square panel] while to the right is the broader situation [the Volga panel] that impacts on the total scene.


Pavlov's House


9th January Square

The Volga
Game all ready to start
Matching the quality of the boards are the many counters, especially the fighting units.  All are substantial, glossy items that press out cleanly with ease.  Only one feature initially worried me and that was the array [59 in all] of modern faces that stared out at me from the counter sheets and the many distinctly non-Slavic features and names on the counters.  Thankfully, I soon realised that these were the product of the special backing campaign and thus extras that were in no way intended for most of us to play this simulation.
Modern names and faces

Instead, for all of us there are 34 essential single-man counters with historical names and faces [where still available from the archives].  
The 34 historical soldiers
On the German side, units are generic infantry and armour - note that there is an error in the rulebook which states there are 62 of them - the total is in fact 39.  Added to these are 99 circular markers that cover a wide range of eleven functions from Action tokens to Anti-aircraft tokens.  If by any chance you somehow don't want to use these quality pieces, there are an equal number of suitably coloured wooden cubes to use instead.  So, if you want to have to remember that a white cube is First Aid etc that's up to you.  I much prefer the visual and easily understood effect of the cardboard tokens.
Generic German Counters

Being in essence a solitaire game, there are several decks of attractive cards.  The core of them are the Soviet and German decks, with additional Tactic cards and Support Cards for more detailed and difficult levels of play.  I hasten to add that this is "difficult" in the sense of winning, not understanding!

This factor leads me perfectly to the rule book.  For those who have at times complained about the clarity of rules in parts of DVG games [an aspect I've often disagreed with], these rules are excellent.  They are not as extensive as many in the Leader, Field Commander or Warfighter series and are clear and thorough, with some of the best illustrated examples of every element of the game that I've seen from any games company.

An overview of the turn presents you with an elegant simplicity of three Phases: the Soviet Card Phase, the Wermacht Card Phase and the Soviet Counter Phase.

In the Soviet Card Phase, you draw four cards and use them to perform 3 Actions [in the right circumstances 4 Actions]. Each card has 2 different Actions on them.  So, a typical turn will provide a maximum of 8 Actions to choose from, but there are restrictions as you cannot choose both of the Actions on a single card.  In addition, your deck of 28 cards is seeded with 3 Fog of War cards that have no Actions on them.  Consequently sometimes your choices will be slightly more limited and, as the game progresses, up to 4 more FOW cards may be added to your deck.
A sample of the dual-use Soviet Action Cards
As the game lasts for a maximum of 21 turns, your Soviet Deck will have been cycled through completely twice before the end of the game.  Initially some choices may not be viable as the units or necessary tokens may not yet be available to perform them and, as the game progresses, the states of Suppression, Exhaustion or Disruption will prevent other choices.  In case you think that this may make the game rather limited, it doesn't.

It simply adds to the rampant tension throughout the game, as there are three sudden death conditions whereby you lose:- if a Wermacht Counter advances beyond the end of its track on the central board, if there are no Soviet units  left in Pavlov's House and if you place a 2nd Disrupted Token in the 62nd Command Post location on the right hand map section.  Even if you survive to the end of the game, you still have victory points to add up to see your level of success or failure from Epic Victory to Major Defeat!

I love this aspect of the game, as it means that you have to pay attention to your actions on all three sectors of the mapboard.  This is also essential, because what you do in one sector will directly impinge on what you can do on other sectors.  [If you don't want any advice at all, I suggest you skip over this short section in brackets.  Two tips then - early in the game I suggest [1] you make sure that you get more food into Pavlov's House and [2] you position some anti-aircraft guns.]
A rush of German units and Pavlov's House falls!
Moving on to the Wermacht Phase, this is much simpler and easier, as there are no choices to be made.  You simply draw three cards, one at a time and carry out the Action on each one.  At first this will need you to refer to the rule book until you become familiar and easy in executing them, but it's surprising how soon that happens and how easy it is using the rule book.   The Actions are the following: Attack Defender, Suppress Defender, Attack Building, Bomb Stalingrad, Place a Wermacht Unit and Assault.
Some of the Actions on the Wermacht Cards
Included in the Wermacht Deck are three special cards called Resupply.  When one of these occurs, the Soviet player must feed his troops in Pavlov's House and any that cannot be fed are eliminated.  If you cannot feed any of them [i.e. there are no Food Tokens in Pavlov's House], then they all die and you LOSE immediately!  Once this has been done, the card is turned over to its Storm Group side which allows the Soviet player to launch a major Assault in a later Soviet Card Phase, if the necessary card and circumstances allow.  If successful, you gain the card and its VPs towards your score at the end of the game [if you survive that far!].  Whether successful or not, you run the risk of any or all of your units that you assigned to that Assault failing a die roll and ending up in the dead pile.

A very good point is that the Storm Group  card remains on the board until either you decide to launch the Assault or it is replaced when the next Resupply card turns up. The only aspect of this I don't like is that you know exactly when each of these cards will occur.  However, this is an important feature for your planning and creates another of the fine points of tension in the game as you struggle to get food into Pavlov's House while time ticks away.

The last Phase, the Soviet Counter Phase, allows you to move three men within Pavlov's House and then carry out three Actions.  Most Actions result in the man becoming Exhausted [a simple flip of the counter to its shaded reverse side].  As it takes an Action to flip a man back to his active side, you need to build up a team of combatants and make careful use of the few special personages [obviously Pavlov is one of them] who can spend one Action to flip three other men back to active.

There are so many good features in this section of the game.  Here are just a few to whet your appetite. Two men with the same attribute, located in the same position and with the necessary weapon counter - e.g. machine-gun/anti-tank weapon or mortar - are needed to fire each of these type of weapons.  A man with the Forward Observer attribute is needed to fire an artillery unit that has previously been positioned on the Volga sector of the map.  The need to bring men into the house with a range of skills.  The utter simplicity of the Line of Sight rule - there are three colours of location in the house for the Soviet units and a matching three colours of location for your German units.  Match colours and your man can see the German unit and fire.

Should you eventually find this all too easy and romp through the basic game as victor [oh yeah, who're you kidding?] or you simply want to see how difficult you can make the task.  Then you can introduce one or both of two other decks of cards.  The first deck contains the Operational Support Cards [only 8 of them].  These abstractly introduce some of the other famous locations in the Siege of Stalingrad, such as the Barrikady factory or Mamyev Kurgan.  These provide you with victory points, but at the cost of removing specific tokens from your stock, if you meet specific requirements.  This very neatly and simply simulates the demands of battle elsewhere that make your task even harder here at Pavlov's House.
Half the Operational Support deck
The final cards [30 in number], the Tactics Deck, introduce a whole new level of pain.  For the Veteran Level of play you turn up the top card each turn and apply its effects to that turn and then discard at the end of the turn.  For the Elite Level[ aka insanely difficult!], you turn up two tactics cards per turn and apply their effects.  You have been warned!
A sample of the Tactics Cards
If all this weren't enough, you are offered three other options.
[1] Play a two-player cooperative game, with one player handling the Soviet Card Phase and the other the Soviet Counter Phase.
[2] Play a two-player competitive game with one player Soviet and the other German.  If you choose this variant, the German player must use the Tactics Deck and draws four cards from the German Deck at the beginning of the game and chooses which three to use and in which order, while the one card not used is kept in hand. On all subsequent turns, another three cards are drawn and the same process repeated.
[3] A three player game, with two Soviet players and a German one.

All in all, this is a fantastic package with so many options.

Finally just a few thoughts and suggestions on how to learn the game.
[1] Skim through the rule book to gain an overall impression of the types of Action both sides can take, but don't try to absorb at this point how exactly to go about taking each Action.  This I feel is particularly true of the Soviet Card Phase.
[2] Familiarise yourself with what sectors of the board each Soviet Action relates by looking at both the Soviet cards and the relevant section of the rule book.
[3] Use the rule book and mapboard to become familiar with what you can do with Soviet units in the Soviet Counter Phase.
[4]  Set the game up and draw your first four Soviet cards.  Choose three Actions and carry them out by referring to the rule book.
[5] Move on to the Wermacht Card Phase and as you draw each card refer to the rule book to execute the Action.
[6] In the Soviet Counter Phase look more closely once again at the rule book for the choices and carry out three Actions.
The well designed play aid for the Soviet cards
After several turns following this pattern, you should be getting a good feel for the game and begin to be able to use the very good play aids that summarise Soviet and Wermacht Card Actions.  I would also suggest that an even easier and swifter way to learn is if you can play with a friend so that one of you takes the Soviets and the other the Germans and then swop roles.  That way you can focus attention on one side's rules at a time.

By now you should be well aware of my liking for this game.  I rate this as one of DVG's best games, ticking all boxes for quality of all components, one of their very best rule books, ease of rule assimilation, very good play aids and highly immersive, tense game play.  Overall I still personally give the edge to the  Warfighter series, but the ease of set-up and being straight in to play probably means that it will hit my table more often.  For those who tend to fight shy of the preparatory planning in many of DVG's games, I suspect Pavlov's House is going to hit the sweet spot perfectly.

There can be no other conclusion than this should be in your collection.


US price $59.99 from DVG

UK price
£54.99


Longstreet Attacks A Game of the Second day at Gettysburg by Revolution Games   It's July 2nd 1863 in a t...

Longstreet Attacks by Revolution Games Longstreet Attacks by Revolution Games

For your Wargamer, Toy soldier collector, MiniFig collector, military history nut. Reviews, interviews, Model Making, AARs and books!


A Game of the Second day at Gettysburg

by


  It's July 2nd 1863 in a town in Pennsylvania; its only claim to fame is that it is a crossroad for several of the major roads in the area. The early concentrated attack that General Lee was hoping for this day was not going to happen. The afternoon hours were ticking by. Longstreet does not seem to have ever wanted to attack at Gettysburg. Was he suffering the 'slows', or did he actually believe that the best course for the Army of Northern Virginia was to fight on the defensive? No one knows for sure. There have been millions of pages written about this battle and about this particular day of the larger battle. This was probably the closest Lee ever came to inflicting a large defeat on the Army of the Potomac on Union soil. Would it have crushed the Union? Highly doubtful, the defenses around Washington were very impressive. Even a half routed Army of the Potomac could have held off the ANV until the Union could  call in reserves from everywhere. Would Lincoln have been reelected after a defeat like that? 


 So enough of the history. Let's look at the game and see what you get with it:
Rulebook
One Union Aid Sheet
One Confederate Aid Sheet
Two CRT, Cohesion Test Tables, and Terrain Key Sheet
One Turn Record Track, and Victory Point Sheet
One 22" x 34" Map
Two Counter Sheets, Counters are 5/8" in size


 This is the sequence of play:
1) Command Decision Phase
2) Both players choose event chits and setup draw cup 
3) Artillery Phase
  a. Union Artillery Step
  b. Confederate Artillery Step
  c. Both sides alternate steps 'a' and 'b' until both sides have       
     activated all units or passed
  d. Artillery Rally/Rebuild Phase
4) Chit Draw Phase
  a. Held Event Chit Step
  b. Draw Chit Step
5) Brigade Activation Phase
  a. Orders Step
  b. Fire Combat Step
  c. Movement Step
  d. Close Combat Step
  e. Rally Step
  f. If any chits remain in the Draw Cup, return to Phase 3. 
     Otherwise, go to Phase 5.
6) End Turn Phase
  a. Held Chit Play Step
  b. Victory Point Awards Step
  c. Broken Track Adjustment Step
  d. Brigade Activation Markers Reset Step
  e. CSA Attack Coordination, USA AOP Reinforcements


It's the Map, it's the Map, it's the map

The rulebook is plain black and white. It is thirty-two pages long. The rules themselves are twenty-one pages long; the rest is the different scenario setups. It is well set out and easy to read. The counters artwork is very well done. However to me, the map makes them pale in comparison. The map is one of the best looking ones I have seen, and I have seen a lot. The map is very different from most. For one, it is very busy. Most maps look pretty spartan for the player to be able to differentiate from different heights and terrain. This one is very colorful, almost like a painting done of a map. The height differences on the map and hex-side slopes are also very easy to distinguish. Each hex is approximately 140 yards across. One strength point equals about fifty men or a single gun. Each game turn represents twenty minutes. Two of the Players' Aids are in black and white. The other three are in color. For roughly five hours of fighting on one part of a large battlefield, this game comes with a bunch of scenarios to choose from. These are:


The Round Tops - Six Turns
The Whirlpool - Ten turns
Assault on Emmitsburg Road - Nine Turns
Hammerin' Sickles - Fourteen Turns
Sickles Follows Orders - What If Scenario  - Fourteen Turns


No introduction needed

 This is the second Hermann Luttmann design I have played, and I have been impressed by both of them. This game is part of the Blind Swords System that is also used in these other two games by Revolution Games:

Stonewalls's Sword: The Battle of Cedar Mountain
Thunder in the Ozarks: The Battle of Pea Ridge 


 Here is a link to the rulebook:

 http://www.revolutiongames.us/Gettysburg-LA/LA_Rules_Booklet.pdf


 This game has been rated very highly by many of its players. The depth and amount of rules do not make it a good game for a tyro, or to try and get someone interested in wargaming. On the other hand, the grognard will find it to be an excellent game on a subject that usually is just a scenario in larger games about the Battle of Gettysburg. The relatively small map and space needed means a wargamer can easily find a place to play it. The rules are very clear and walk the reader through the rulebook. The counter density is not too bad. You will have some congestion because of the very nature of the terrain. There has been talk of one of the follow up games to be on the Battle of the Wilderness. If it happens, it will be one of the few games I buy into before release. Great effort, wonderful artwork, and it is based on a tried and true formula. What more could you ask for in a game?


Robert


Age of Belisarius A DLC for Field of Glory II by Slitherine Games   Justinian was an emperor that did not deser...

Age of Belisarius a DLC for Slitherine's Field of Glory II Age of Belisarius a DLC for Slitherine's Field of Glory II

For your Wargamer, Toy soldier collector, MiniFig collector, military history nut. Reviews, interviews, Model Making, AARs and books!

Age of Belisarius


A DLC for Field of Glory II

by

Slitherine Games


 Justinian was an emperor that did not deserve his wife or his generals. This new DLC from Slitherine is for their smash hit Field of Glory II. The Roman empire had risen on their heavy infantry. After Byzantium, or Constantinople if you prefer, became the second and then the only capitol of the empire. Their new enemies required the Romans to rethink their reliance on infantry. Justinian dreamed of reconquering the lost provinces of the Western Roman Empire. This would have only been a pipe dream if he did not have the services of the generals Belisarius and Narses. Belisarius only lost one battle, and that was forced on him early in his career. 


 So let us look at what you get with this DLC:
  • 11 new named factions: Avars, Byzantines, Franks, Gepids, Lombards, Ostrogoths, Slavs, Turks, Vandals, Visigoths, Welsh.

  • 17 new units: Byzantine Lance/Bow cavalry, Veteran Byzantine Lance/Bow cavalry, Byzantine Flankers, Dismounted Armoured Noble Lancers, Dismounted Noble Lancers, Dismounted Armoured Horse Archers, Sabir Foot, Indian Light Horse (javelins), Indian Light Foot (javelins), Bedouin Cavalry (lancers), Bedouin Light Horse (lancers), Bedouin Foot, Pre-Islamic City Arab foot, Bulgar Cavalry, Bulgar Light Horse, Spearmen (Dark Age), Raw Spearmen (Dark Age).

  • 29 new army lists (which expands the total number of army lists to 166).

  • 6 new Epic Battles: Dara 530 AD, Tricamarum 533 AD, Taginae 552 AD, The Volturnus 554 AD, Bukhara 557 AD, Raith 596 AD (each playable from either side).

  • 37 new Quick Battles (each playable from either side).

  • Expanded Field of Glory II Custom Battles module now includes all 166 army lists from Immortal Fire, Rise of Rome, Legions Triumphant and Age of Belisarius. (Purchase of the appropriate DLCs is necessary to access them all).

  • Expanded Field of Glory II Sandbox Campaigns module now includes all 166 army lists from Immortal Fire, Rise of Rome, Legions Triumphant and Age of Belisarius. (Purchase of the appropriate DLCs is necessary to access them all).

  • 4 new historically-based campaigns:

o   Belisarius

o   Clovis I of the Franks

o   King of Kings 2 (Sassanid Persia)

o   Rise of the Avars


 The base game of FOG II has been updated continually since its release. One excellent choice that Slitherine has made is that all of the upgrades for the base game are available to the player even without buying all of the planned DLCs. So the only thing a person would miss out on would be the new troop types, battles, and campaigns from each DLC.


 As far as the DLC, there is not much to say. The game is the best game as yet released for the computer dealing with tactical ancient warefare. The DLCs just make the experience that much better and wider in scope. If you are interested in early Byzantine or later Roman Empire tactical battles, this is what you have been waiting for. If you haven't picked up the base game, why not! It is as good as everyone has said. The Age of Belisarius DLC is worth its price tag and much more.


One of the big additions in this DLC to the game is cavalry units that can dismount and fight on foot. The sandbox feature has also had an upgrade. Now you are able to pit any of the armies that you have in your stable against any other one you own. This is not only in the Custom Battles, but also the Custom Campaigns. So join the fun and try to recreate the Roman Empire. This time you do not have to worry about Justinian becoming jealous and removing you from command. The next DLC that is coming for FOG II goes in the other direction in time; it is the Rise of Persia. I cannot wait to be able to command Assyrians.


Robert

Red Dragon Blue Dragon Against The Odds #45   I have reviewed one other ATO magazine ( http://www.awargamersneedfulthi...

Red Dragon Blue Dragon Against The Odds #45 Red Dragon Blue Dragon Against The Odds #45

For your Wargamer, Toy soldier collector, MiniFig collector, military history nut. Reviews, interviews, Model Making, AARs and books!


  I have reviewed one other ATO magazine (http://www.awargamersneedfulthings.co.uk/2018/05/against-odds-magazine-issue-42-with.html). Once again the ATO magazine is a real stunner. The articles are all well done and very interesting. The game in this issue is about the campaign for China during the latest Chinese Civil War in 1948 and 1949. This was the last real showdown between the Nationalists (Kuomintang, GMD) and the Communists (PLA). The game rules use GMD and PLA to differentiate. The background history article is fascinating reading. One of the facts I was not aware of is how many American advisors in China were actually more on the side of the Communists than the Nationalists. This did cost them later when they all seem to have been caught up in the McCarthy era anti-communist purges after returning to the US. From a purely armaments point of view, the Nationalists should have won. Unfortunately for them, the Communists were able to successfully fight for the hearts and minds of the Chinese people.


Back of the boxed version


This is a list of the articles:


Red Dragon Blue Dragon
On Guards: The "China Hands"
Sowing The Wind: The National Air Races 1929-1939 
The Fulda Gap Sandbox: Comparing a Hobby Wargame and a 
  Computer Simulation from the Cold War Era
And The Data Shows On The Move: Kingdoms In Exile
Long Spear, Short Legs: Operational Limitations and 
  Wintergewitter
The Power Of Airpower
Designing 'Dueling Eagles'
Simulation Corner    

 As you can see the articles are varied, and they are also well interspersed with pictures and maps. 


Map from the Nationalist side


 The game is an operational one about the Battle of Huai-Hai. This was a fight for the center of China. The Communists had pretty much overrun the North, and the Nationalists had the South. The Communist party had decided that they were ready to capture the strategic city of Xuzhou. The Nationalists have tanks and air support. The Communists are armed with a jamboree of weapons from the Nationalists themselves to captured Japanese ones. Make no mistake, in these battles the Nationalists are the underdog.


Counters Front


 The map is scaled to twenty kilometers per hex. The game is played in one week turns. The units are mostly Nationalist Corps and Communist Columns. These are anywhere from 15,00-40,00 men. The rules call the PLA Columns Corps for ease. Artillery units represent 36-54 pieces. Armor Battalions are 18-30 tanks. The GMD air units equal roughly 40 aircraft. The actual map portion is small, but it is well done. The small map size allows all of the extras, like the turn track etc, to be on it. The counters are your normal magazine sized counters, but they are well done and easy to read. 


 Nationalist defection is one of the pivotal parts of the game. The Battle for Xuzhou has been described as the Gettysburg of the Chinese Civil War. The soldiers on both sides of the battle came to about a million men. Oddly enough, considering Korea and Vietnam, the U.S. refused to get involved. So let us look at the game play.


 Sequence of play:

Weather Phase
China News! Phase
Interdiction Phase
GMD Movement Phase
  Reinforcement and Replacement Segment
  FDP Relief Check Segment
  GMD Movement Segment
PLA Movement Phase
  PLA Reinforcement and Replacement Segment
  PLA Movement Segment
PLA Combat Phase
GMD Combat Phase
Turn End Phase


Counters Back

 One of the most interesting and innovative rules had to do with one of the events that can happen when checking the China News Table. This is the PLA Political Offensive. This Political Offensive lasts for three turns. During these turns the PLA can move but not attack. They are allowed to do POPAs (Political Offensive Propaganda Attacks) against the GMD units. These propaganda attacks can cause the GMD units to defect. This propaganda offensive actually happened historically. It was caused by a tremendous amount of casualties suffered by the PLA, and the fact that the Communist hierarchy (Mao) wanted to win an ideological war. Historically this was followed by the US shutting off aid to the GMD. This was really the last nail in the GMD coffin. The flight to Taiwan was the next step for the GMD after the battle of Huai Hai.


'China News Table'

 There is also an explanation of the seeming change in the names of Chinese cities and areas in the last fifty years. The difference is that the older names we were used to reading were from the Wade-Giles system of translation. The newer Pinyin system is the reason the names changed. So Peking was Wade-Giles and Beijing is Pinyin. The author of the game's background piece shows both to help the reader.


CRT etc.

 In all ATO games there is a side that has their back up against the wall. As mentioned, in this game it is the Nationalist/GMD. Historically the amount of troops that defected from the GMD was large. So playing as the GMD, you have to be ready for anything. It is a tough side to play. The victory conditions are fortunately skewed a bit to help you. The PLA must get a sudden death victory or annihilate the GMD forces. A sudden death victory is if the PLA occupy Xuzhou with a supplied PLA unit on turns one through three. Do not get me wrong, the game does not all go the PLA's way. When the Political Offensive shows up, the PLA player is pretty much hamstrung. As the designer puts it "The Political Offensive can really wreck what seemed to be a victorious PLA campaign. The PLA player needs to be ready for it; it will happen. This means making hay while the sun shines; do not think that you can afford to take a 'slack turn' just because you are ahead (Unless the Political Offensive has already occurred!)"

 All in all, a great issue, and a pretty good game about a very unknown (to the West) campaign. The background history of the campaign is stellar.


Robert


Mark Walker\ Crowbar Interview Transcript  AWNT received a package containing two tape recordings of what appears to be the in...

Interview with Mark Walker Interview with Mark Walker

For your Wargamer, Toy soldier collector, MiniFig collector, military history nut. Reviews, interviews, Model Making, AARs and books!

Mark Walker\Crowbar Interview Transcript


 AWNT received a package containing two tape recordings of what appears to be the interrorga..sorry interviews, of two people. Below is the transcript of the first recording. Though not all was clear we have done our utmost to record as precisely as possible what is being said on the tape.

Interview of Mark Walker.


 Mark Walker first of Lock n Load boardgame fame and now the man behind Flying Pig Games needs little introduction within the Wargaming community. His games, mainly at the tactical scale, cover a wide range of conflicts (both historical aswell as sci-fi) are well loved and well known. This man of many gifts is also a prolific author of a genre he has made his own, it’s military fiction crossed with the supernatural.

Now onto the transcript…

Hello Mark, please don’t panic. Let me quickly explain. We tried, oh we tried to do this the proper way Mark. We really did. Not only did we send you an email requesting an interview we also messaged you on that facethingymajig. We waited, yes, we waited three days!! Nothing. So this was our last resort Mark. So now, all you have to do is answer a few little questions and we will put you right back where we, er, picked you up from. OK.What’s that..oh sorry (background..”he still has tape on his mouth, take it off you cretin….”). Painful tearing sound. Sorry about that, now OK to start? One thing, just ignore the wires. You’re connected to ACME 1555 1\3 lie detector, just so you know. OK here we go.

Name?

Uh? Mark (base line stick with it)


Age?

As young as I feel on any given day. In general, my wife claims that I’m a large nine-year old.


Current Location? 

South-central Virginia.


Favourite TV program?

 Castle Rock


Favourite Music genre? 

Alternative Rock


Favourite band\musician?

Plimsouls


Favourite Film?

Sucker Punch


Favourite period of history? 

Tomorrow


Favourite Superhero?

Forever Carlyle


Favourite colour?

Blue over tan, like the beach.


Favourite animal? 

Dog


Lucky number?

8


Hurricane or BF109? 

P-51 Mustang. (clever)


WW2 or Vietnam?

WW3 (like it, leftfield)


Werewolf or Vampire?

Katarina (interesting)


Tactical or Operational?

Tactical (me too)


Patton or McArthur

Patton


Excellent! That’s the levels sorted, sorry I mean the, we know you better, part done.


When did you first get involved with wargames and at what point did you decide to make a career out of it? 

First game I played was TAHGC’s Gettysburg when I was 9. Decided to make a career of it in 2006 when I opened LNLP.


How difficult was it to get off the mark with your first product? Trying to get this website out there to the communities that would be interested has been the hardest part by far with regards to AWNT. I imagine trying to make a living out of your venture adds the pressure ten fold with regards to getting your name out there. 

It was difficult. I remember the first screen shot I posted of a village in Forgotten Heroes. It was on Consimworld. Some smart ass said, “Where’s the cocktail waitress.”


What was your first successful game design?

I’m not sure any of my designs have been successful. My first published designed was Lock ‘n Load.


Looking back at your game releases what if any are your standout games? Not necessarily from a profit viewpoint but more from a personal view and why is that?

Dark War RPG, because it’s my first RPG and the game everyone wants to play when they come over to my house. Of course, Lock ‘n Load was a lot of fun too. Strange thing about that game was that it worked right away. Some games, like ’65, take quite a while to make click. I like ’65 and Night of Man because of the way they play. The card-driven mechanism makes them feel bigger, richer than a typical tactical game. And World at War? Geez but I love me some WW3 gaming.


Your games go from historical through to WW3 horror and lots in between! Do you have a favourite with regards to the design process?

Not sure I understand this question, but… if you mean a favourite era/genre, it would be military horror. Like Dog Soldiers.  (great film)


What scale is your favourite to design for? I’d love to see man vs man scale, does that scale ring your bell so to speak?

Well, Dark War is man vs man/woman/beast/demon. I guess that squad-level is my favorite scale, but platoon-level is a close second.


What’s your thoughts on Solo games? Many struggle with regards to finding an opponent so solo wargames suit them. Have you thought about designing solo only boardgames?

Although I didn’t design it, we have an excellent solo wargame, Crowbar! The Rangers at Pointe du Hoc, on Kickstarter right now. I like solo wargames, or I guess that I mean that I like the idea of solo wargames, but I find it difficult to find time to solo game. It’s when I get together with friends that I make myself sit down and game.


When did you first come across Herm Luttman and the Crowbar! Tabletop game?

I’ve known Herm for a few years. He suggested Crowbar! To me and I said, not yes, but hell yes. If Herm designed a game about dog poop, I’d publish it. Fortunately, Crowbar! Isn’t about dog poop, it’s an immersive game about the Ranger’s assault on Pointe du Hoc. It’s a push-your-luck type game. The longer and harder you push your luck, the greater the chance for a big fall.


The KickStarter has done extremely well. How pleased are you and Herm about how successful it’s been?

Very pleased and I think there is a good chance to unlock more stretch goals as we approach the finish. It’s exciting stuff.


As mentioned earlier I have an interest in Solo wargames and for me there is always room for solo tactical wargame. What was it about Crowbar! That grabbed your attention? Did the Solo aspect have any say? 

I love the way that Herm puts story into his games. I had played In Magnificent Style and I loved the game.


Will we see expansions or new standalone releases? If so I do hope we get to play as the Germans..pref in Stalingrad pretty please? 

Sure, there are expansions included in the Kickstarter, and yes you get to play as the Germans. 😊 (colour me excited!)


DO you have any tactical advice for the future players of Crowbar?

Don’t push your luck too far! 😊


Finally it’s been a pleasure speaking with you, Just sit tight I’m sure the good men about to burst in are now expert at untying people strapped to a chair..(loud smash) been tickety bo..must dash..bye…(sounds of footsteps and cursing fades into distance. Possibly Marks voice thanking someone and something about unhinged and need treatment..tape ends)


Crowbar the tabletop game has just had a very successful Kickstarter. I highly recommend you go check it out. Mark hasn't let us down yet, and he hasn't dropped the ball on this one either!


Good luck to Herm and Mark!


Coming soon Herm Luttmans interrogation!


Napoleon's Commentaries on the Wars of Julius Caesar Translated by R. A. Maguire  The master does a critique o...

Napoleon's Commentaries on the Wars of Julius Caesar translated by R. A. Maguire Napoleon's Commentaries on the Wars of Julius Caesar translated by R. A. Maguire

For your Wargamer, Toy soldier collector, MiniFig collector, military history nut. Reviews, interviews, Model Making, AARs and books!


Translated by


 The master does a critique of an earlier great general. Napoleon's comments on the wars of Caesar are well worth the price of admission. The tidbits that are thrown in from his own time are just amazing. I have been reading military history about the Napoleonic era for about fifty years, and I have not seen these items. The other thing about this book is the absolutely staggering brilliance and memory of Napoleon's own mind. Remember, this book was dictated on St. Helena. There was no library or anything for Napoleon to consult except for his own encyclopedic brain. This next piece from the book will show what I am talking about. This is commenting on his own bridging of the Danube, and comparing it to Caesar's bridging of the Rhine. He then discusses the properties of cork for pontoons:

 "Cork weighs 16lb per cubic foot, water 70lb; each cubit foot of cork can carry 54lb. A pontoon made of solid cork would weigh 1,600lb, would displace 100' and could carry 5,400lb; taking away 1,000lb for the weight of the deck, made of planks and beams, leaves 4,400lb, which is enough to carry campaign vehicles. If this cork pontoon were divided into four floats, each of 25', they would each weigh 400lb and could carry 1,350lb. What advantages would come from a bridge made in this way! It could never be sunk by the impact of foreign bodies, or bad weather, or cannon fire. It would have the proper characteristics of a mechanism of war; durability, strength, and simplicity. A bridge so constructed could have one, two, three, four, five or even six floats supporting each pier, according to the number available, the width of the river and the requirement of the task. The wagons carrying the floats would no longer need to come to the river bank; such floats could be easily carried by hand for 200 or 400 yards."

 "Twelve pounds of cork can form a belt which fits under the armpits, which will keep a man afloat such that he can use his firearm. Several such belts, with the equivalent number of cork shoes and waterproof trousers, should be supplied to each company of pontoon sappers, to assist them in placing pontoons and to increase their security when working in the water on bridge construction."

  So you not only get Napoleon's comments about Caesar's campaigns, and what his enemies did, you are also treated to the master's musings on some of his own achievements. 

 Napoleon starkly dismisses the idea that Caesar planned to make himself a king. He states rightly that "The dignity of kings was a thing to be scorned and despised: the curule chair was higher than the throne. On what throne could Caesar have sat? On that of the kings of Rome, whose authority did not extend beyond the city's outskirts? On that of the barbarian kings of Asia, who had been defeated by men with names like Fabricius, Aemilius Paulus, Scipio, Metellus, Claudius and so on? That would have been a strange course to adopt. What? would Caesar really have sought stability, greatness and respect in the crown which had been worn by Philip, Perseus, Attalus, Mithridates, Pharnaces or Ptolemy, men whom the citizens had seen dragged along behind the triumphal chariot of their conquerors?"

 While it is true that most of these kings were not in Roman triumphs, I understand exactly where Napoleon is heading with this diatribe. Napoleon comments many times that Caesar was very lucky at times to escape some of his battles without losing. He makes it clear that he believed Caesar to be rash, sometimes to the extreme at times.

 The book itself is only 119 pages long including notes. This book was last published fully in 1836. It is high time it has seen the light of day. Thank you Pen & Sword.

Robert

Book : Napoleon's Commentaries on the Wars of Julius Caesar
Author: The Master
Translator: R. A. Maguire
Publisher: Pen & Sword
Distributor: Casemate Publishers
hpssims.com