second chance games

Search This Website of delight

U-BOAT LEADER from DAN VERSSEN GAMES As hoped for, having soared to great heights gaining my pilot's wings over Vietnam in Phan...

U Boat Leader by DVG Games Review U Boat Leader by DVG Games Review

For your Wargamer, Toy soldier collector, MiniFig collector, military history nut. Reviews, interviews, Model Making, AARs and books!

from DAN VERSSEN GAMES


As hoped for, having soared to great heights gaining my pilot's wings over Vietnam in Phantom Leader, I have been allowed to sound the chilling depths of the North Sea and Mid-Atlantic with U-Boat Leader.  Having surprised myself with the amount of enjoyment I gained from an air war simulation, I had little doubt that a topic I have always liked, namely submarine warfare, would immediately appeal.  Being part of a series, I was not surprised to find that there are many similar features to both games.  But would that make for disappointment or would two totally different environments be capable of being successfully simulated by similar mechanics?  Before solving that key question, let's take the traditional peak inside the box at the physical components.


Once again quality stands high on the agenda ranging from the same deep strong box with its beautiful artwork, counters of even greater richness and thickness and visually first-class cards.  For me, the sombre brown, shading to sepia of the illustrations of ships seen through the periscope lens and the faded writing are perfect for conjuring up the period and ambiance of the game, but they may evoke different responses, especially if striking colour is more to your taste. 

What has definitely caused a degree of concern and complaint has been a number of significant production errors.  None of them prevent you from playing the game, but they do raise questions.  Above all, virtually all the cards depicting the surface ships [Merchants, Escorts and Naval] have been printed on the front as Merchants.  DVG has an excellent record on customer care  and they have been swift to reassure buyers that complete new decks will be supplied, but this will take at least a couple of months.

In the meantime, in practical terms of playing the game, this can swiftly be sorted out by comparing the ship counters with the cards and the correct three decks created.  But to save you time, the Escort cards are those numbered from 86 -100 and the Naval cards are those numbered 101-112.  The simple process of using sleeves with different coloured backs is a further quick way to make sure that you don't have to go through the process of sorting at the beginning of each game.  Having been a gamer since 1976, it's no big deal for me, but I can quite understand and sympathise with those for whom this is a very off-putting factor.

The problem seems to stem from the printers, but even more disconcerting is that the main play aid [labelled Help Sheet], which contains important rule sequences, wrongly contains the old Combat routine instead of the new 2nd edition ones.  Again the mistake can be easily overcome by referring to the rule book, but as one of the main criticisms of the 1st edition was the simplistic and unsatisfying Combat rules, there must have been considerable focus on this element.  So, this mistake really should not have been allowed to get through.  I'm hoping that like the cards this will be corrected for those who have already received the game, though so far I am unaware of any pronouncement from the company on this.


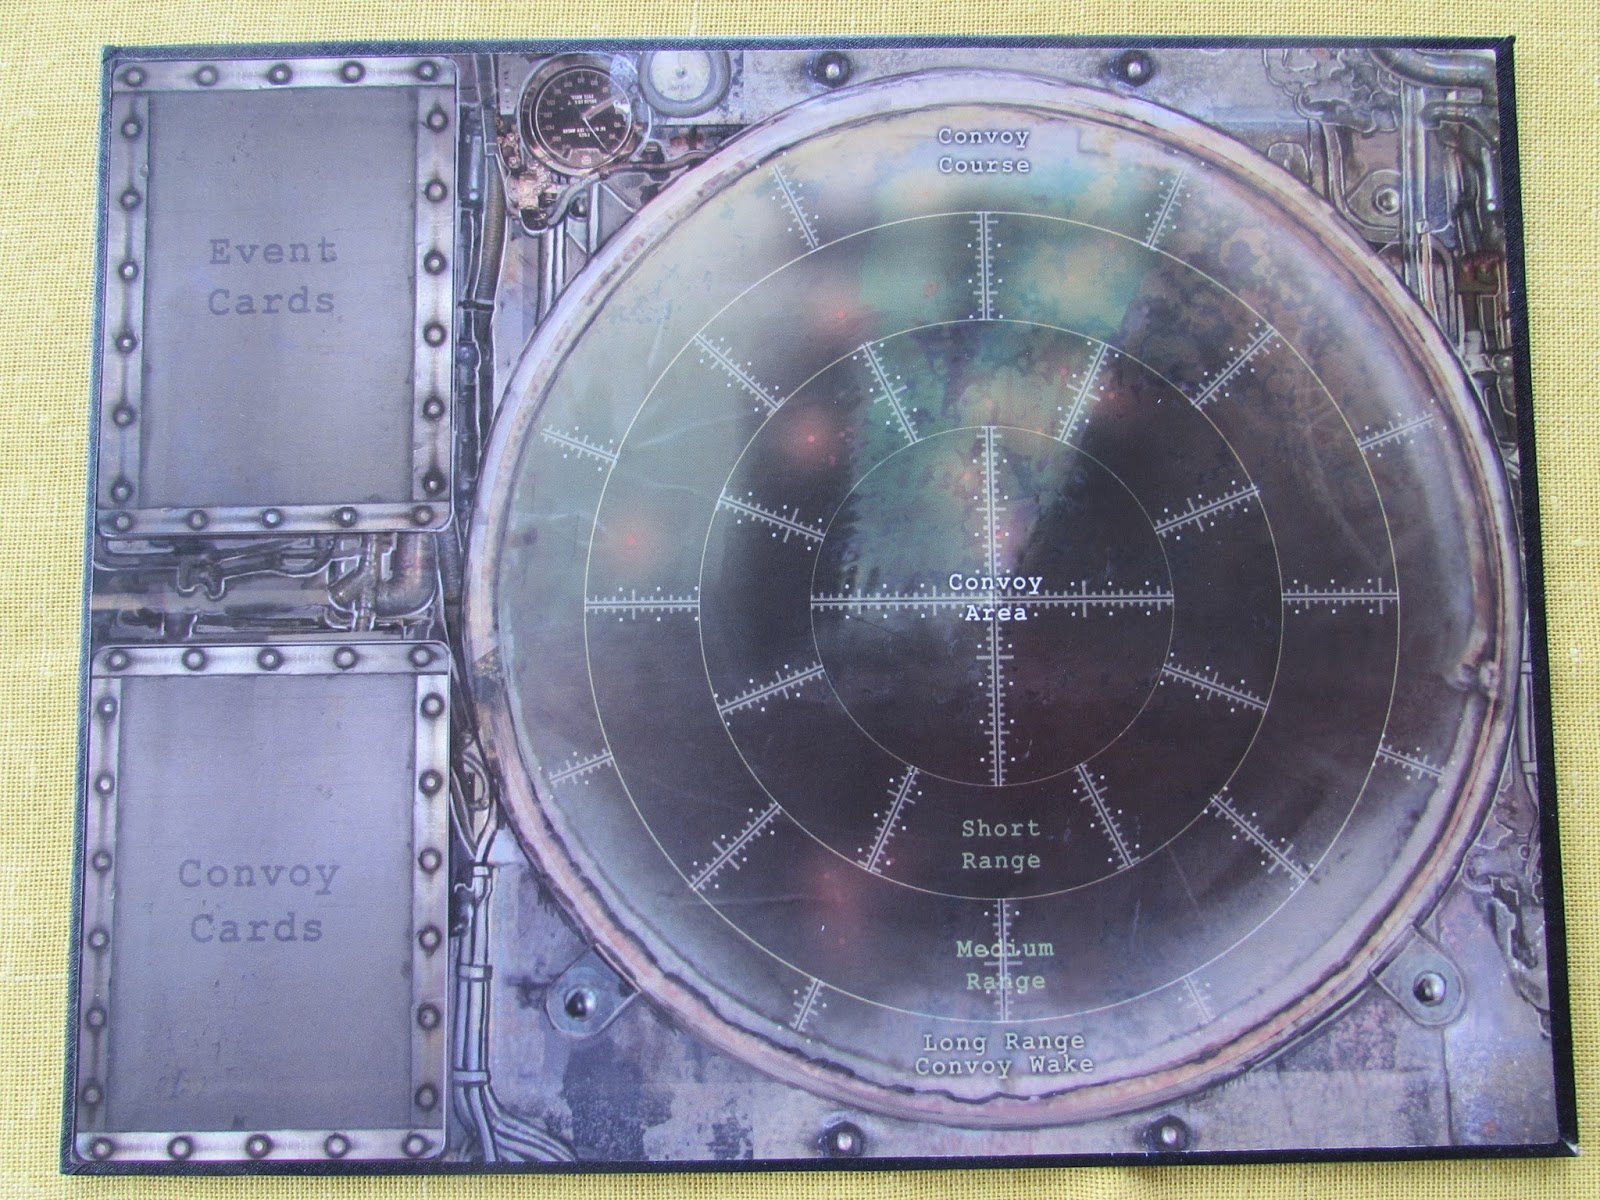
[This is the mounted board Help Sheet.  The incorrect Combat Sequence is in the bottom left corner and as you can see the central pile contains all the Escort cards wrongly printed as Merchant cards and to their right are the Naval cards, again, apart from the two I've put on top of the pile, wrongly printed as Merchant cards.]


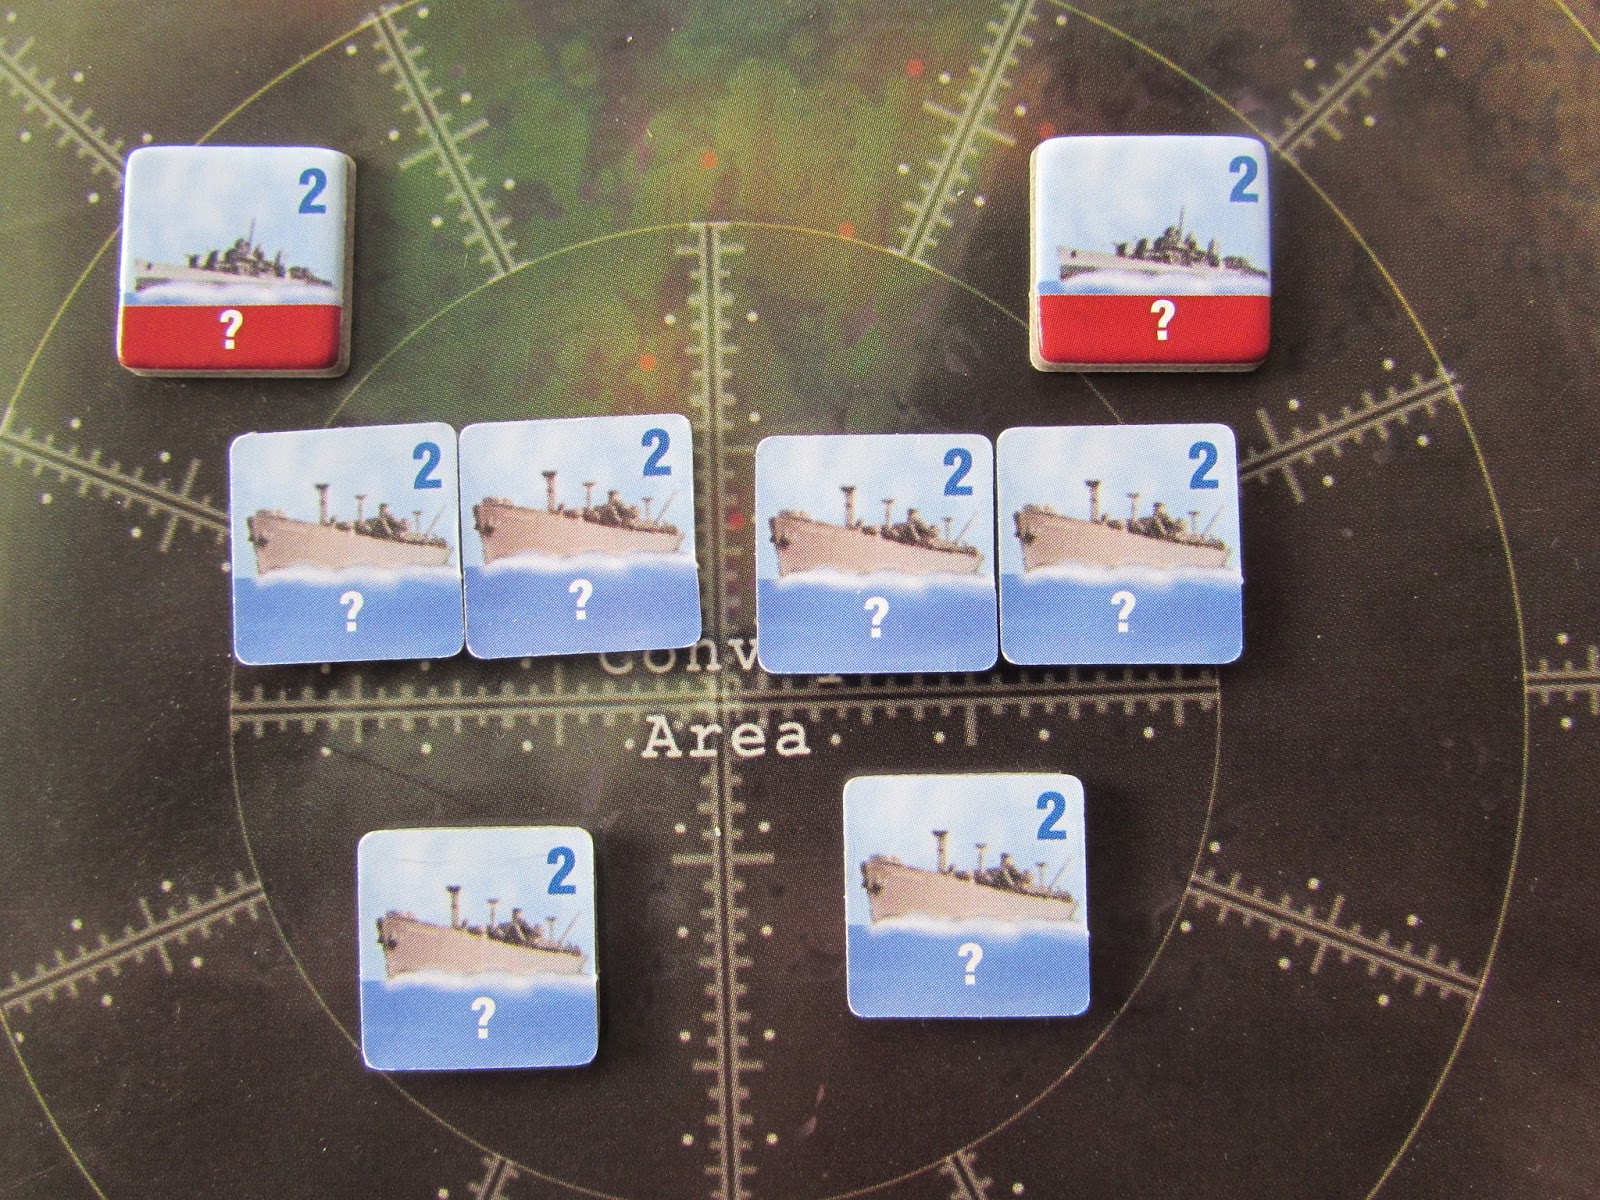
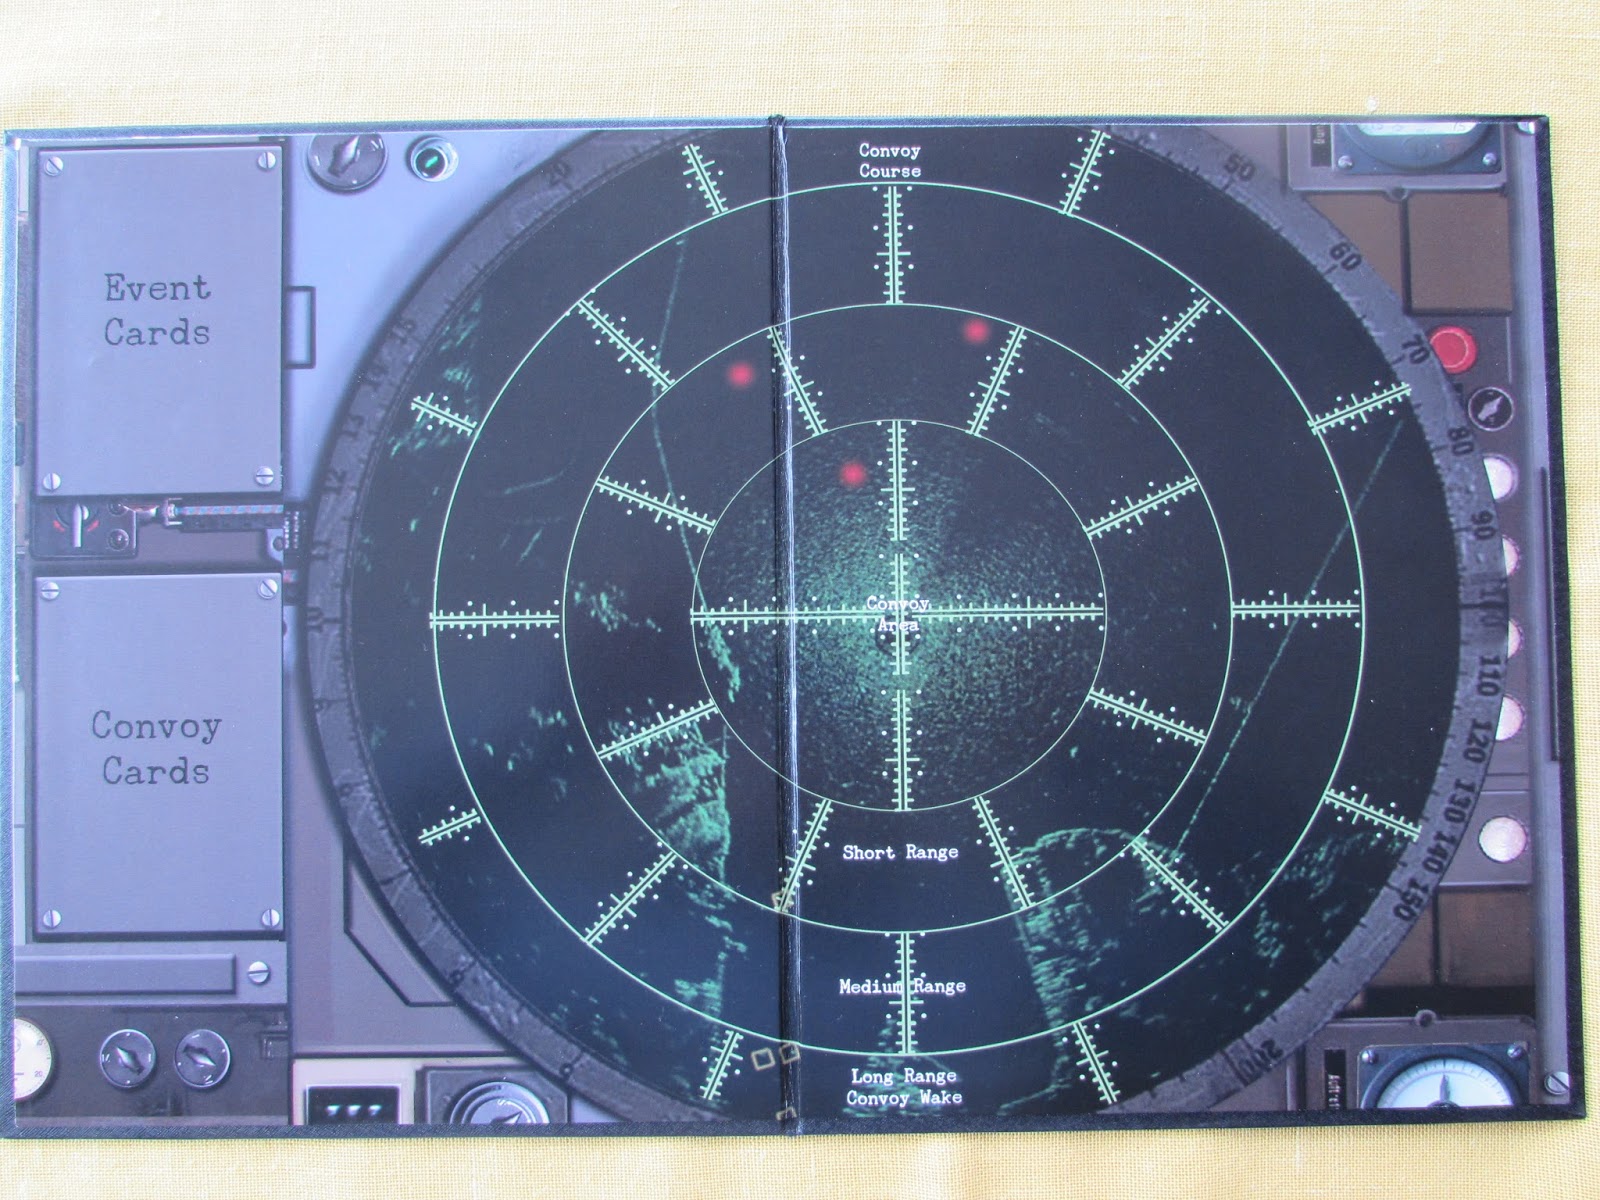
These drawbacks will sadly deter some from ever buying the game and will cause many to justifiably wait until they are sure all has been put right.  However, my personal major disappointment is the Tactical Display Board on which all the direct action between submarines and the vessels that they encounter is performed.  As it stands, it looks the part, but small is definitely not to be considered good here.  This central focus of the game takes the form of a sonar display and the quadrants are barely large enough to hold more than two ship/submarine counters, as the picture below shows. 


the Tactical Display Board contained in the 2nd edition

Considering that in Phantom Leader [PH from now on] the equivalent board is twice the size and excellent in every respect, I was puzzled about this reduction.  Fortunately, I received, along with my review copy of the game, the U-Boat Leader and Gato Leader Ship Miniatures and Battle Board package.  As the Tactical Display Board in this expansion is exactly the size of the board referred to above in PH, I strongly feel that this should have been a basic part of the 2nd edition production.  It certainly transforms the whole experience - as the identical set up on the larger board [shown below] reveals.


the Tactical Display Board contained in 
the U-Boat Leader and Gato Leader
Ship Miniatures and Battle Board package


All that now follows establishes that both PH and U-Boat Leader follow similar effective paths in all other respects.  4 Campaign cards take us from the early years in The Battle Begins [Sept 1939 - May 1940] on into the Axis domination of The Happy Times [June 1940 - May 1941] and up to the period of parity and then the gradual British upturn in The Hunted [June 1942 - June 1943]. The fourth Campaign is, for me, something of an unknown sideshow taking us to the Caribbean and the American coast in Operation Drumbeat [Feb 1942 - June 1942].  I'm not sure whether this was an eye to the American market, though Gato Leader which takes us to the Pacific war with American submarines will certainly satisfy that desire.


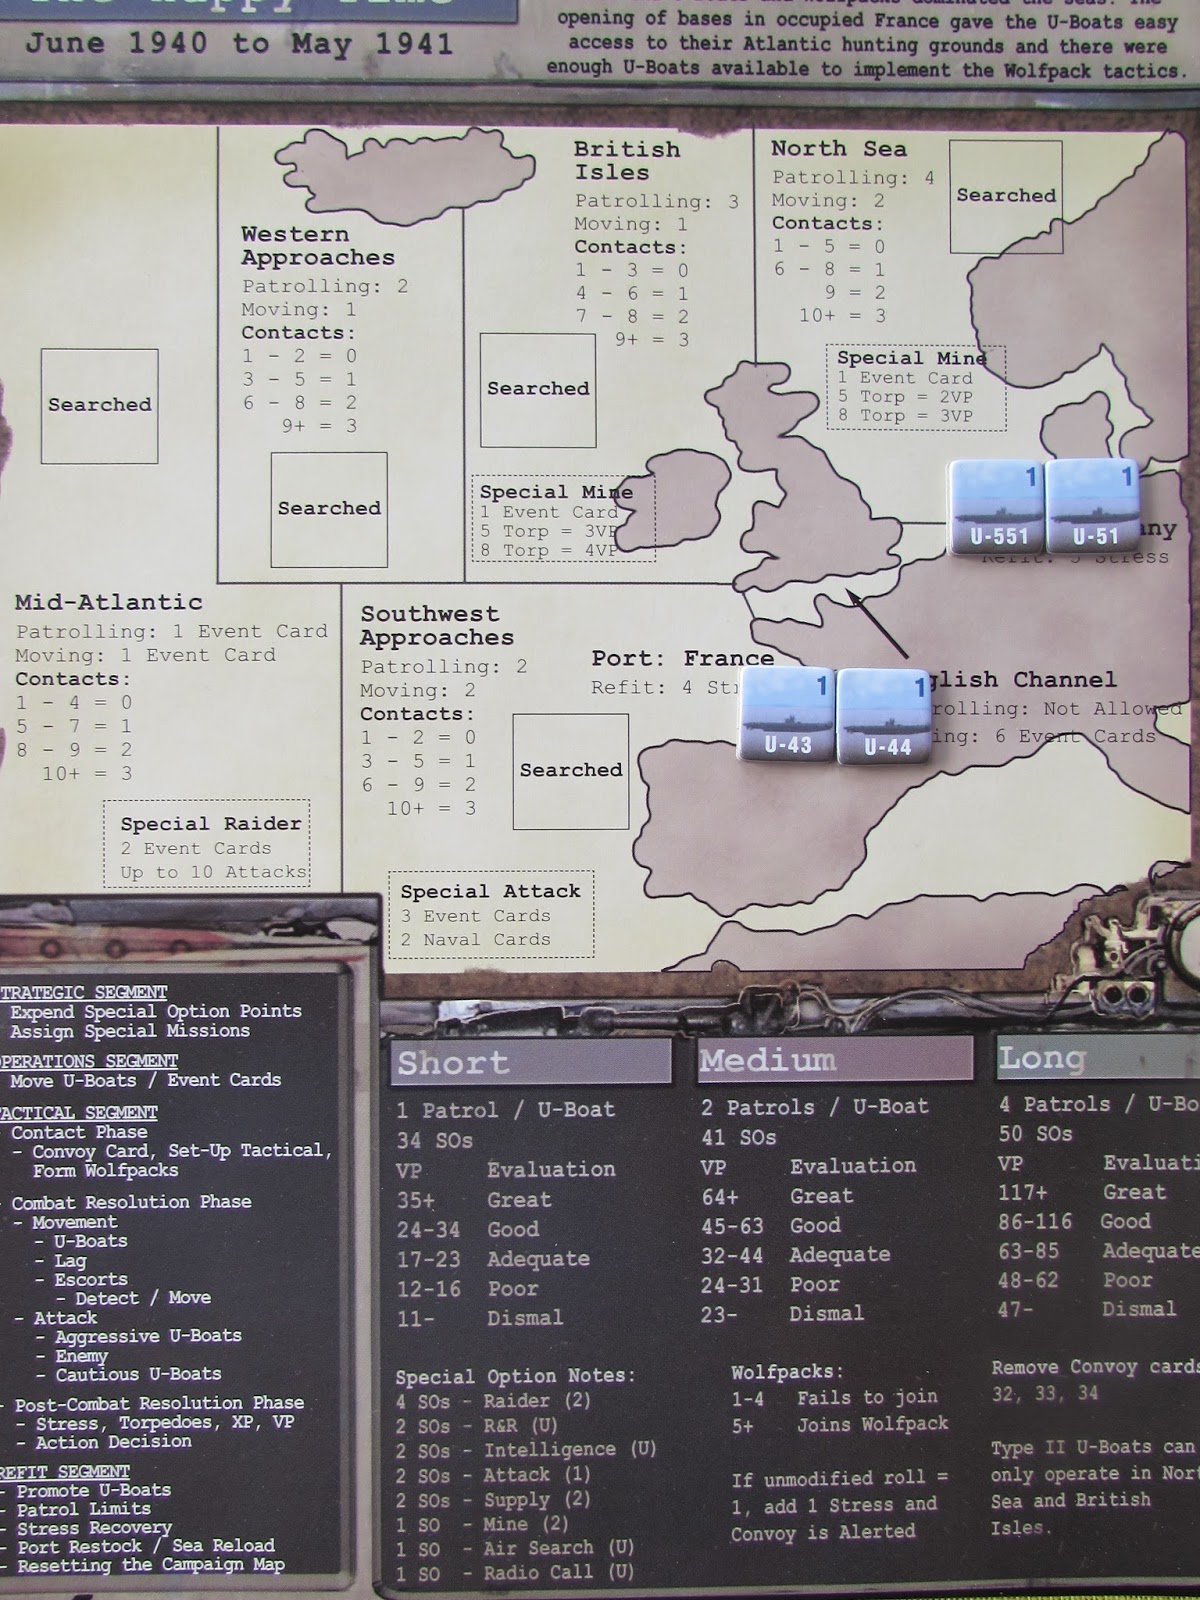
My first four submarines set up ready to start
 a Short version of The Happy Times Campaign

Each Campaign contains the ability to play at Short, Medium and Long length.  The length of campaign determines the number of SOs [Special Operation] points that you receive and the number of patrols each submarine must make.  SOs are mainly used to buy your submarines.  In PH your aircraft was designated by its call sign [e.g. Digger]: in U-Boat Leader, each submarine has an historical U-boat commander's name on the card.  I liked the call signs and feel that being able to sally out with such characters as Gunther Prien makes play even more immersive.  You can buy each submarine card at one of four levels, Green to Ace, as against the six levels of pilot in PH.


Above are the cards for those first four submarines.

If you have your own copy of PH or have read my review of that game, you will quickly see that U-Boat Leader is marginally simpler and easier to play at each stage that I'm now going to take you through.

The Strategic Segment especially is much quicker than the equivalent procedures in PH.  Choose your submarines and spend the few SOs you may have kept back after putting your submarine group together on such things as Special Missions such as Raider or Air Searches and Supply ships.  That's more or less it.  There is none of the lengthy deliberation on what types of ammunition and missiles you need, as each sub card tells you how many torpedoes you have in store and ready loaded and whether it has a gun capacity for surface firing.  Torpedo capacity may vary, but all subs with guns get 6 potential shots!  Place your subs in whatever ports are available and you're ready to sail on to the Operational Segment.


Close up of the submarines in port ready to sail
in the Operational Segment on the Campaign map.

To my surprise I rather missed the more complex decision making of PH.  On the other hand, I did like being able to get down to the action quicker and here there is a major difference, as your U-boats have an Operations Segment where each moves individually on the Campaign map from sea area to sea area drawing and resolving Event cards as they do so.  Though a simple process, I like the extra dimension of deciding how far you're going to move and finding out what happens as you keep pressing on.

When you have moved all your subs, you then change to the Tactical Segment and once more sub by sub roll to see if you make contact with the enemy.  The possibility is from zero to three contacts, with each contact giving you the opportunity to draw a Convoy card.   When you have drawn a Convoy card reduce the Contact marker by one.  The size and composition of the convoy may vary and, if you don't like what you see you can always decide to abort that encounter.


A close up of the Tactical Display with two Merchants identified.

One has taken damage, the other so far is unscathed.


If you do decide to tackle the convoy, then in some cases you may be able to form a wolfpack, if you have chosen to move more than one sub to the same sea area and the pickings look particularly rich.
With the Convoy card accepted, you set out the enemy ship markers according to their positions on the Convoy card.   Often there will be a number of merchant ships with one or two escorts, on the Tactical Display.  As yet your targets are unidentified and so their markers are those with question marks on.  Then you  place your sub/s on the outer most ring of the display.

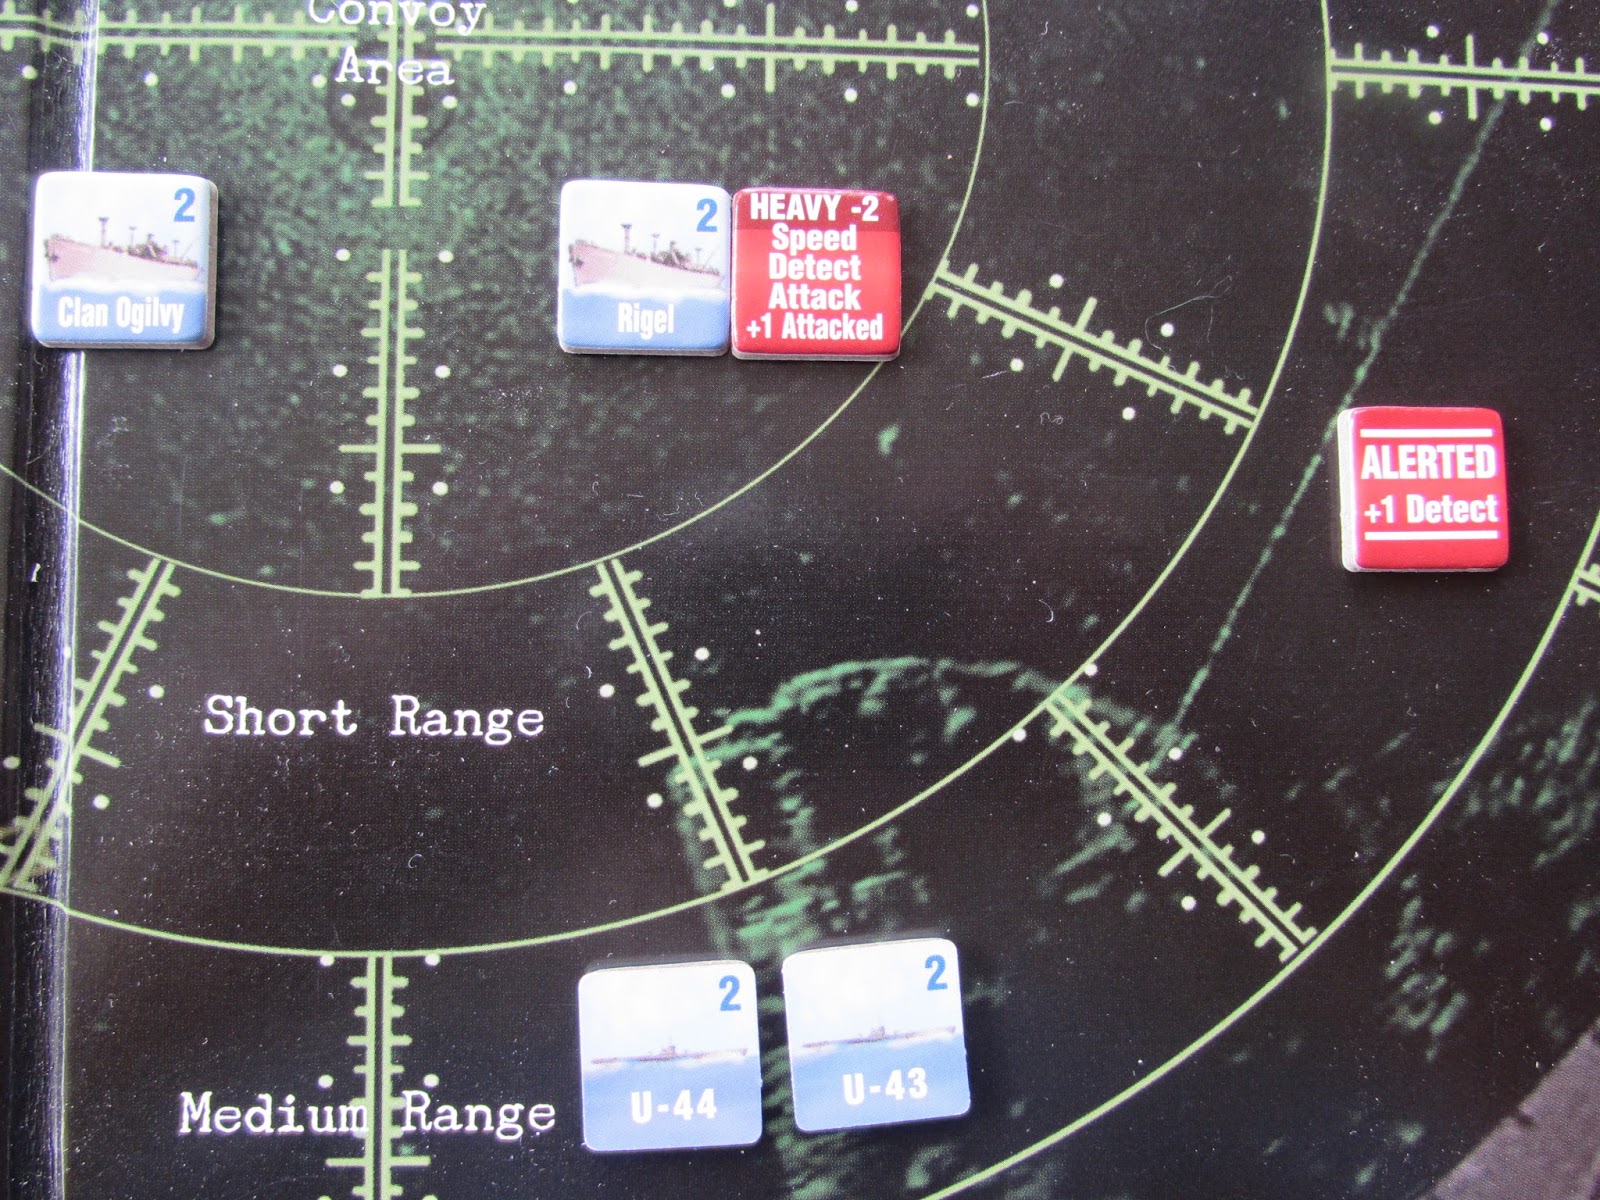
You move your subs one space if submerged and two on the surface, while very simple and easy mechanics govern the movement of enemy ships.  As these come within range, you'll draw an appropriate card which will identify the ship and you will place its named marker on the display.  This whole part of the game is engrossing with all relevant features taken into account through very accessible rules.

And so the heart of the game is under way.  Decisions, decisions!  The element I always appreciate in a game.  Attack on the surface, so that you can use your gunnery as well as torpedoes and become a more easily identified target by any Escorts.  How many torpedoes to launch at one target to improve your chance of hitting?  How do you react to being attacked?  Always loved Silent Running and Crash Dives in warfare?  They're both simple options that you can go for.

At this point the following familiar and in most cases identical elements from PH kick in.  Your subs indicated on their card as aggressive fire first, then the enemy and then cautious subs. OK and Shaken status play their part as does Stress.  The different hit numbers on the enemy ships determine the amount of damage your die roll inflicts on them, up to and including sinking them outright.

What has greatly improved the game is the introduction of damage chits to be drawn randomly for the enemy attacks on your subs.  Overall, this works very, very well, with only one slight concern on my part and that is the almost nil chance of Merchant ships inflicting damage and the seeming lethality of Escorts. 

It does mean, of course, that you try to keep the Merchant ships between you and the Escorts, but as the Escorts can both sail through and fire through the Merchant ships, this isn't too easy.  I must admit that here I feel that a house rule might come into being for me, limiting the ability of Escorts simply ploughing straight through the Merchant ships.  As things stand at the moment, once the Escorts start firing, it's time for my subs to cut and run to fight another day.

Once your subs are off the display, that particular encounter is finished and there is the opportunity to reload torpedoes and attend to other housekeeping elements.  However, it does not necessarily mean that your current sub is finished with.  If you still have a Contact level remaining you may draw another Convoy card and the Tactical cycle begins again or if you have an enemy ship on the verge of sinking you can spend a Contact point, fire off a torpedo or gun if on the surface to guarantee that it does settle beneath the waves and add to your VP and Experience point tally.  These ideas get another thumbs up from me. 


Just some of the high quality counters contained in the game.

This continues until all your subs have been activated or you do not want to activate any more.  However, all is still not quite done, as you still have to return to a port passing through the sea areas necessary to do so and drawing Event cards as you do so.  This constitutes one Patrol.  Finally, you reach the Refit Segment with such items as promotion of U-boats if gained, Stress recovery and torpedo reloads.   If playing a Short Campaign, you'll now determine the success level, as your subs only undertake one Patrol; if a Medium or Long Campaign, you will prepare for another Patrol and off you go again. 

All these elements are handled in the rule book with excellent clarity and in the appropriate logical progression familiar from DVG's solitaire games.   Components are clearly explained, as are all the different cards, followed by the Set Up instructions.  Next come the rules for the various Segments I've talked you through, a short historical section on different types of U-boats and a very helpful three page example of play.  This latter part is standard in all the DVG games I've played and is thankfully becoming a feature of other companies' rulebooks.

In terms of game play, I can thoroughly recommend the experience of playing U-Boat Leader and would suggest that it is an easier starting point than the many solitaire air warfare games produced by DVG.  For those of you who are hesitant because of the production problems needing to be rectified, you could always move straight to Gato Leader, which covers the Pacific war from the periscope lens of the American subs.  Hence the title. 

Obviously, the appeal is solidly aimed at the US market, but everything in the box is spot one with none of the slip-ups to be corrected in U-Boat Leader.

As the only difference in the rules are very, very minor, a separate review would be a pointless repetition and so, I hope, in a few weeks' time to take you instead through a detailed AAR of a Short length Campaign from play of Gato Leader.  Until then, beware the enemy above!


Rule   The   Waves By Naval Warfare Simulations  Editor Comment: No idea why but this review isn't showing when you browse the ...

Rule The Waves by Naval Wafare Simulations Review Rule The Waves by Naval Wafare Simulations Review

For your Wargamer, Toy soldier collector, MiniFig collector, military history nut. Reviews, interviews, Model Making, AARs and books!


By


Editor Comment: No idea why but this review isn't showing when you browse the review section. So added it to the Intel section aswell


 Okay, I played Steam and Iron with the campaign expansion, and I thought that anything a warship enthusiast could want was in it. Boy, was I wrong. I think I just saw a kitchen sink float by. Rule The Waves is not a game, it is a lifestyle. If you want it to be, that is. You can go as deep into this game as you want to. It is almost intimidating when opening up the game. Where to start and what to do? Thankfully NWS has thrown in a lot of help for the budding Tirpitz in you. The start of the game is still a few years before the advent of the Dreadnaught changed the entire naval race. The ships you start with resemble those in the Russo-Japanese War, not WWI. 

 You can start the game as one of eight countries. These are:

England, Germany, France, Italy, Russia, Austria-Hungary, Japan and the US. You can also click on 'Custom nation'; this allows you to also pick CSA, CSA2, Spain, Spain2.

  Each country has its own research advantages, and it also has some disadvantages listed. One of the disadvantages is the size of the naval guns your country can build compared to others. 


  You can choose to use the historical fleets of each nation and its resources, or make it more of a sandbox game and manually build your existing fleet. This doesn't mean you will be able to start churning out Yamatos immediately, though. All of your ship's designs will have to be researched, including tonnage and gun size etc. You will also have to make sure that your docks are capable of holding the behemoths you plan to build.


  The next screen will show you the fleet you built or the historic legacy fleet you own.


  For the warfare part of the game, it plays out in the same way as their earlier games: Steam and Iron, and the Russo-Japanese War. One thing about the warfare aspect, it does not play out historically. You are leading your country and its naval forces to an all new alternative history. So don't think that you have X numbers of years until World War I starts. You will be dealing with all sorts of provocations and problems that show up on the international political scene. You might have planned to have your navy ready for a war in 1908, and it breaks out in 1906. Just as in your home finances, there is always a price to pay. You have a naval budget to work with. That leads to all sorts of quandaries. Do you spend your money on your fleet facilities to finally build that battleship you always wanted, or just build more of the ships that you already have the research for?


This is the ship design screen where all of us budding Tirpitzes and Fishers will run rampant.  


  Building your ships is also a game of one or the other. Do you build an armored giant with pea shooters or do you build a gun platform made of paper? It's all up to you what ships your navy has to use in its wars. You will also have to build your fleets of submarines and forts.

  A massive fleet is only as good as the sailors that man it. Training is another piece that fits under the wide brim of your admiral's hat. It's also expensive and needs to be budgeted for.


   This screen shot shows that I am getting really close to ending up in a war with the US. The 'tension' bars are in yellow, green, and possibly a color you would see in a diaper.


  Naval actions can take place all over the world. You can end up at war with a nation on the other side of the globe. As naval chief of staff you will also have to direct your countries intelligence efforts against the other powers.  You do not want to find out about Britain's game changing battlecruiser as it slides down the slip. This game has made the naval world of 1900 yours to conquer. How far into the future do plan for your navy? Is it only until the next war breaks out or are you actively searching out the newest torpedoes, and what about the crazy Wright brothers? Do they actually have something that a navy could use at some point in time? The game has endless possibilities for replay. You can try every build or size, and shape navy and ships that you have ever imagined. Some of the ships you start out with will be equipped with rams, and by the time your game is nearing its end, planes will be flying over your forces.

  For the actual game mechanics of the warfare you will wage, please see my review of Steam and Iron. I wanted to focus on all of the new elements that Rule the Waves brings to the table. Just as a quick rundown: big gun battles, mines, torpedoes, submarine, and antisubmarine warfare etc. are included.

  So the game is everything that Steam and Iron was and so much more. For me, whose knees buckle at the site of a triple turret, it is heaven brought to earth in zeroes and ones. We can only hope that NWS can bring WWII naval warfare to life, and to make it as manageable a game as this one.
 
  For all of you budding naval enthusiasts out there, here is a question. As a child you saw the 'Sound of Music', and watched a family escape the Nazis. What does that family have to do with this game?


  Robert


Game: Rule The Waves
Developer: Naval Warfare Simulations 
Review Date: 8/27/2016
 

Wargame Design Studio       A new wargame studio has been set up by the folks behind the recent Panzer Battles games.   We wi...

Wargame Design Studio Wargame Design Studio

For your Wargamer, Toy soldier collector, MiniFig collector, military history nut. Reviews, interviews, Model Making, AARs and books!


A new wargame studio has been set up by the folks behind the recent Panzer Battles games.
 
We wish them good luck and hope they continue to make new wargames to keep us entertained long into the future. I also hope we get to see some unique designs and features in some of their future games.


Mike Norris Sopwith Triplane build has just been updated!   Click title to go to article!

Sopwith Triplane Build Update Sopwith Triplane Build Update

For your Wargamer, Toy soldier collector, MiniFig collector, military history nut. Reviews, interviews, Model Making, AARs and books!


Click title to go to article!

Brickmania: German Panzer III Review     Military Custom LEGO has really taken off and is getting more and more popular by the da...

Brickmania: Panzer III Review Brickmania: Panzer III Review

For your Wargamer, Toy soldier collector, MiniFig collector, military history nut. Reviews, interviews, Model Making, AARs and books!


Brickmania: German Panzer III Review


 Military Custom LEGO has really taken off and is getting more and more popular by the day it seems. If I'm typical of the person who has fallen for this, then it's the mix of nostalgia coupled with an obsessive interest in WWI and WWII that makes it such a potent mix. Brickmania are at the forefront of this hobby, making the top range connoisseur kits. They cover WWI right up to the present day.

Brickmania was started all the way back in 1999 by designer Daniel Siskind. In 2000, when he released his first design (one of the first to do so), he came into contact with a small but well connected adult LEGO community. The kit was a medieval blacksmith shop and was an instant success. He followed it up with a whole line of medieval village kits. As word got out and his fans grew he started getting inundated with requests for military and train themed kits. Then with more than a dozen successful kits released including one that was taken on by LEGO officially in 2002 Dan announced he was leaving the custom LEGO scene to follow other interests. As a goodbye present he released a magazine with all the instructions for his released kits. That seemed to be it....

Until in 2008 when a publisher contacted Dan to see if he wanted to author a book about military modelling and LEGO. That is when he found out his previous kits had gained a massive following, alongside a booming market for military custom LEGO! So, by 2009 Brickmania was again alive and well. A year and a thousand kits later Brickmania was booming and has continued at a meteoric pace ever since. They have even opened two shops, one just recently opened. I wonder if we will see Brickmania shops across the globe at some point. I'd love to see them open over here in the UK!


First I shall come clean. I was offered the new Apache Longbow for review. However, I so wanted a WWII tank as the first kit to review that I asked for the Panzer III instead, to which they agreed. To those who would have preferred me to have reviewed the Apache, I apologise whole heartedly. It does look an awesome kit, and pretty darn big one aswell! If I get the chance to review more Brickmania kits I will not interfere and take what is offered.


So now the introduction is over lets move on to the kit, a WWII German Panzer III, that has blitzkrieged across the Atlantic (yes I know, seems abit unrealistic, just go with it) and then invaded my flat, pushing on deep into living room territory, until finally I have it locked in my scissor scopes! OK, OK..Brickmania Panzer III kit is here to be reviewed, just trying to add abit of flair to the review, I shall get on with it. Anyway, it couldn't have done all that as it needs to be built first, plus it would have sunk, most likely. Sorry, OK, alright,  yes I shall get on with it..


The Panzer III medium tank started the War as Germany's main medium tank. This tank was supposed to take on all tanks from all nations. It was the tank Germany relied on in an anti tank role supporting the short barrel Panzer IV designed for an anti infantry role. During the War against Poland and then France it held its own, though training, plus all tanks having radio comms, helped them along the way. However, not far into the invasion of Russia, it came up against the formidable KV-1 heavy tank and the T34 (many say the best tank of the war). The Germans soon realised the Panzer III gun couldn't match either of those tanks and it took superior tactics and skill to be able to manoeuvre and then take these Russian tanks from the side or rear. Soon the Panzer IV was given a long barrel gun and became the main medium tank but the Panzer III carried on, constantly being upgraded, with each new version given a letter at the end. The last Panzer III version [the Panzer III N] was made in 1942 and was given a short barrel and moved into an anti infantry role, though Panzer III's continued to fight across the battlefields of Europe right until the end of the War. Around five thousand seven hundred were built from '39-'43.


The kit comes in the now standard Brickmania white box with the kit name and picture on the front and side. There is also a five star system for skill level needed to build the kit. The Panzer III is classed as Intermediate and has three stars. This is also shown on the front of the box. Nothing too fancy here. Does the job. When opened, you are presented with three zip lock bags filled with LEGO bricks, one large zip lock and two medium sized ones. The kit has 501 bricks in total. You also have a 30 page gloss finished instruction book which is well illustrated, I found it easy to follow, a major plus obviously. The one thing that did disappoint was the lack of any detail sheet, esp. considering the price I'd have thought a decal sheet wouldn't be to much to expect. Again though, this was the only minus point I came across, and something I think should be considered by Brickmania for possible future kits. I will go buy some though:)
 
Though I was a touch nervous with regards to building the Panzer III, I actually really enjoyed the process. I felt far more invested in the end product than if I'd just gone and bought a pre built one or say a die cast model of a tank. There are some fiddly aspects but nothing that caused any major headaches. Plus as the tank slowly came together I could see how much thought must have gone into its design. Having to use LEGO pieces already made and not actually making the pieces from scratch for the specific purpose of building a Panzer III it started to dawn on me why the kits don't come cheap. By the end of the build, as I marvelled at its details and how historically correct it looked, I fully understood the reasons behind the price tags. To be able to design these kits and be restricted to LEGO bricks that have already been made for most likely totally different type of builds must take an awful amount of time and I assume frustrations. Add on then having to try and find the bricks and source enough of each type to be able to create a line and we can say the Panzer III must take many man-hours to produce. So, as I said you can see why these kits cost as much as they do. Also it seems it's not just me that can justify the price as the sets seem to sell out fast, and with many kits now passed into the archives people aren't afraid to spend on them, and why not? They look fantastic! I do have to warn you though. Each kit is limited in how many are made. The Panzer III was limited to just 100. Some kits are limited to just 50. So you can't hang about if you want one. It also means they become collector pieces. As for the price I can't remember how much this Panzer III cost as it is sold out and no longer has a webpage, however I remember it being roughly around $290.

The finished model stands proudly on the shelf  where I put all my favourite miniatures. It has a rotatable turret and you can elevate the gun. The Panzer III comes with a German Panzer commander all kitted out in the black Panzer uniform and proudly sporting an Iron Cross. The print work on the MiniFig is excellent. The commander stands in the commanders hatch. As he stares  across the endless, flat  Russian Steppe, an overwhelming feeling of melancholy falls upon him. It's difficult for him to see where the steppe ends and the sky begins.  "There is no end to this forsaken country" he mutters to himself. Pointing forwards he yells "Move out". "When will this end...." he mumbles.. 

I believe Brickmania are using new tracks, I can't comment on what came before but the ones here look superb, time consuming to link together, but well worth it! The Tank uses all grey bricks on the whole which is perfect for the German Panzers especially in the first half of the War, when they were all grey before they started using that yellow colour. I believe the Allied tanks do suffer in the colour respect though as LEGO haven't made any green LEGO pieces that could be used to build them. So those too are grey in colour. Nevertheless, the WWII desert kits do come in yellow (see Panzer II kit below), LEGO as we know have made lots of yellow bricks, which is perfect for Brickmania!


Sadly, I have to end the review with bad news. It seems the Panzer III has now sold out (see I told you they sell like hot cakes). There is currently a DAK Panzer II for sale though. I expect to see a Panzer III return at some point in the future along with all the Axis and Allied tanks of WWII.


I do hope we can continue to review Brickmanias excellent kits. They are a flagship company in the world of military custom LEGO. If we do get to review more kits in the future, then I can't wait:) So, fingers crossed I get to chat to you again about another Brickmania release! Until then, Happy Building!

Retail Price of Panzer MkIII $170

Just heard it will be re released sometime this year!


 GUNN WINGS OF WAR AUGUST 2016 RELEASE         Dear All This month we have two all new iconic 1/30 scale wooden aircraft...

Thomas Gunn Newsletter Thomas Gunn Newsletter

For your Wargamer, Toy soldier collector, MiniFig collector, military history nut. Reviews, interviews, Model Making, AARs and books!


GUNN WINGS OF WAR AUGUST 2016 RELEASE


Dear All

This month we have two all new iconic 1/30 scale wooden aircraft models from
WW2 that were considered the backbone of the Luftwaffe bomber force and saw
action throughout the war in every theatre. With production normally taking
60 hours to make each model, these really are one off master pieces with
full interior detail and authentic markings as standard.


The Heinkel 111 was designed by Siegfried and Walter Gunter in 1934
ostensibly as a civilian passenger liner, but in reality the aircraft was
intended to provide the Luftwaffe with a fast medium bomber.  The mainly
glazed Plexiglas nose of the HE 111 gave it a very distinctive and easily
recognised look, almost akin to a giant wasp or bee.  During the early
stages of the war the HE111 performed well but like many German aircraft its
weak defensive armament was exploited by the RAF during the battle of
Britain. Casualties amongst bomber crews were particularly high but with no
suitable replacement the HE 111 soldiered on until the end of the war as a
strategic bomber, transport aircraft, glider tug and was even used as an
experimental variant to launch the V1 flying bomb whilst airborne. Various
airforces operated the HE 111 including the Spanish, Romania, Turkey and
China amongst others. The last ones were retired by the Spanish in the
1970's who made a licence built variant, with some of these featuring in the
1969 film 'The Battle of Britain' directed by Guy Hamilton. 
The HE 111 was over 59ft in length with a wingspan of 74ft, this makes for a
very impressive looking model in 1/30 scale as the attached photos will
testify. 


Armament consisted of 7 x 7.92mm machine guns with a 2000 Kilo bomb load
carried internally, further ordnance could be carried externally. Our model
features markings of a Luftwaffe aircraft from Kg53 as it would have
appeared during the battle of Britain 1940 with an initial batch of 5
aircraft being available at a cost of $1200 each plus postage and packing.
Comes free with Luftwaffe pilot and lady with umbrella as per the photos.
We will make another batch of aircraft where payment can be made over 6
months if the demand is there, please contact us by email for details. 


WOW089 Dornier 17 also known as the flying pencil was a twin engined light
bomber designed to be able to outrun enemy fighters. Making its combat debut
in the Spanish Civil War, the Dornier was liked by its crews but was
considered inferior in performance to the HE 111. The DO 17 usually had a
crew of 4 all housed in the same compartment and comprised of a pilot,
bombardier and 2 gunners to help defend the aircraft. Production ended in
1940 with the DO 217 replacing the DO 17, however surviving examples carried
on serving until the end of the war in various guises.  Our model is one of
the most well known Dornier 17's that took part in the Battle of Britain. On
26 August 1940 5K+AR was taking part in a raid on RAF bases at Debden and
Hornchurch when it became separated from other unit members. A Boulton Paul
Defiant is thought to have intercepted it with one of the engines being
disabled, forcing the pilot Willi Effmert to make a crash landing on the
Goodwin Sands. Two of the crew survived and were imprisoned for the duration
of the war. 5K+AR lay underneath the waves for nearly 60 years before it was
discovered. In 2010 it was raised from the sea bed and is now being restored
by the RAF Museum and will be the only complete example in the world once
restoration is complete. The DO 17 was nearly 60ft in length and with a
wingspan of 59ft and once again makes this a very distinctive  looking model
in 1/30 scale. We have an initial batch of 5 aircraft being available now at
a cost of $899 plus postage and packing, a further batch will be made
available with payment over 6 months if the demand warrants.  Please note
FJ029 policeman or LUFT021 pilot with fox will be supplied free depending on
availability and preference. 


That's all for this month folks, we may have some British WW1 aircraft at
the end of the month and will advertise these as and when we can. If you no
longer wish to subscribe to our newsletter please reply typing 'UNSUBSCRIBE'
in the header title and we will remove you from our mailing list.

Best wishes
The Gunn Team

Tradition of London: French Grenadiers of the Guard, Head of Column Napoleonic Wars Review       This is the first set sent to...

Tradition of London: French Grenadier Napoleonic Review Tradition of London: French Grenadier Napoleonic Review

For your Wargamer, Toy soldier collector, MiniFig collector, military history nut. Reviews, interviews, Model Making, AARs and books!


Tradition of London: French Grenadiers of the Guard, Head of Column Napoleonic Wars Review


This is the first set sent to me for review by Tradition of London. Tradition of London have been trading for over 50 years and though there have been ups and downs including in 2012 the closing of the London shop they are still going strong. Their soldiers are still made in Nottingham, England but they have a base in Stockholm, Sweden where all the soldiers are dispatched from.
 
Over the years Tradition have supplied many museums as well as special editions including Carlton Television for the Sharpe Series. Other notable customers have been The Tower of London, Mary Rose and the National Army Museum.  
 
Tradition of London sell a wide range of Toy Soldiers in various scales. They also sell white metal kits for those brave enough to build and paint their own. The Kits come at a very reasonable price, for those with the skills (or those wanted to gain the skills) they excellent value for money. They also sell Del Prado, King and Country, Steadfast, W Britain, Bravo Delta and CBG mignot figures plus miniatures for wargames and other items like paint and books\magazines. They also have the envious claim to the largest stock of Toy Soldiers you'll find. So pretty much something for everyone.
 

The set I received for review I couldn't have chosen better myself. They show off the different styles of Toy Soldier on the market when you compare them to my previous Thomas Gunn reviews. Thomas Gunn soldiers are your perfect example of the modern toy soldier, where as the set I received from Tradition of London show of the high gloss traditional toy soldier, little changed since Victorian times. Which considering they are Napoleonic suits them perfectly. The set is 54mm French Grenadiers of the Guard, Head of Column.

 
Example of presentation box. Not this actual set though.

 
The set comes in a lovely red presentation box with Tradition of London's motif in gold on the front. Straight away it struck me as the perfect present for anyone into Toy Soldier or the Napoleonic Wars. On the side of the box is a label saying "Hand Made Traditional Style Toy Soldiers Made in England. French Grenadiers of the Guard. Napoleonic Wars - Toy Set 768". Lifting the lid and then removing a layer of padding you then finally lay eyes on your collection. Quality hits you instantly. You know you have a special set here and something to show off as often as possible. Set into a layer of padding are eight soldiers, their gloss paint shining out. You instantly have a fantastic set to create a diorama of marching French grenadiers.  The set consists of one Officer with sword drawn, one Standard bearer, two Sapeurs, two Sergeants and finally two Drummers. Only the most physically powerful soldiers were chosen to become a Grenadier and would lead assaults on the field of battle, even leading the way through breaches during siege warfare. So you are looking at the best France can offer and all kitted out they do look like fine specimens!
 
This set in all it's finery


The Officer  is leading the troops with his Infantry Saber (Briquetes) drawn and held upright. The Grenadiers had be a formidable sight so they wore tall bearskin helmets with a red plume to give them a taller appearance. Though the Officer here is clean shaven many wore moustaches or beards, again to give them a more war like appearance. The Officer doesn't carry any back pack. He does appear to be wearing some sort of medal. He is wearing black boots, white breaches, white vest, white gloves, blue coat with dark blue collar, white lapels, red cuffs with white cuff flaps, red  turnbacks and pocket piping. He is also wearing white gloves. He is marching and stands on a green base. He is painted in Gloss and really does have an authentic Toy Soldier appearance, perfect for the era he represents.
 
The Standard bearer again is marching and stands on a green base. He is wearing a similar uniform to the Officer expect this time he isn't wearing black boots with tan tops. Wears bearksin cap with red plume. His coat is dark blue with dark blue collar, white lapels and red turnbacks and pocket piping. He is wearing black boots and white gaiters. He also has a red shoulder belt designed for the end of the standard pole to fit into so he can march with just one hand holding onto the Standard. The standard has a bronze eagle on the top and a blue pole. Cravet Red, white and blue with gold embroidery and fringe. Like the Officer he has gold epaulettes. Again he is clean shave, however you can see the end of some glorious side burns sticking out the bottom of his bearskin helmet. The actual standard has been hand painted it looks fantastic.  Again he really oozes the era he is from. The Gloss finish is perfect for this line.
 
Next come the two Sapeurs (Sappers). First thing you notice is that these two sport a fine beard. It was compulsory for all Sappers to grow a beard in the French Army (for a long time you had to have a moustache in the British Army). Plus Sappers wore the grenadier uniform. On both upper sleeves they have the crossed axe and grenade badge, the symbol of the Sapeur. These strong men with fine facial hair marched together and close to the band and Standard bearer. A corporal and four privates where chosen from a Grenadier battalion to become Sapeurs. Here they are marching with their Axe (issued to all Sapeurs) over their right shoulder and their Charleville Musket over their left shoulder. Wear bearskin cap with red plume.  The coat is dark blue with dark blue collar, white lapels and red turnbacks. They also wear white gauntlets that reach their elbows plus a long white apron that goes from their waist to half way down their shins. They wear red and gold epaulettes. On their backs they carry a calfskin knapsack with a rolled great coat on the top. They also carry an ammunition pouch as well as their infantry Saber and bayonet scabbard. A Bicorn is folded and tied to the Knapsack. They have white cross belts with brass grenades and buckles. They also wear black boots with white gaiters. Again the gloss finish is perfect and look very authentic.

The two Sergeants wear a very similar uniform as the Standard bearer. However they sport a fine moustache. They also carry their Charleville musket but this time they have their left arm folded across it and it is in an upright position with bayonet attached. They have their Sergeant stripes on their left upper sleeve. They wear red and gold epaulettes. Wear bearskin cap with red plume. They are wearing dark blue coat with dark blue collar, white lapels, red cuffs with white flaps, red turnbacks and pocket piping. White waist coat with brass buttons and white breaches. White crossbelts. On their backs is the standard issue calfskin Knapsack with a rolled up great coat on top. Below the Knapsack is an ammunition pouch\box. Their Bicorn het is also folded flat against the Knapsack. Again they have the Infantry Saber and bayonet scabbard attached to their belt. Black boots and white gaiters. Two fine French grenadier sergeants you'll be proud to own.

Finally we have the two drummers. These two wear the standard Bearskin cap with red plume. They also sport a well groomed moustache. The coat is dark blue with dark blue collar, white lapels, red cuffs with white cuff flaps, red turnbacks. Mixed red and gold epaulettes. White waistcoat with gilt buttons. They have black boots and white gaiters. On their backs is a calf skin Knapsack with rolled great coat on top, white straps. Bicorn folded and tied to knapsack. White crossbelt. Infantry Saber scabbard attached to belt. The drum is brass with blue hoops bearing white grenades. White cords and sling. White drum carriage with brass stick holder and grenade. White apron.  Black boots with white gaiters. Black drum sticks. Two fine drummers and round of this set beautifully.

More examples of superb sets.
 

I'll admit that I'd probably never have bought this set as old style gloss finish soldiers didn't appeal to me. However I'm now a convert. They appeal in a different way to the modern looking matt finish soldiers out there. They arouse a nostalgic feeling the others don't and in away when in their presentation box give them an authentic look, like you're looking at a set of toy soldiers from a hundred years ago or more. This makes them special and as I said appeal in a different way to the highly detailed, perfectly sculptured modern figures. That's not to say these don't look great and they are very well sculpted. Never thought I'd feel this way to be honest. So this set has added a whole new area for me to get excited about! I said at the start I couldn't have picked a better set to review after the two Thomas Gunn reviews. A set that shows off the brilliance of the gloss finish toy soldiers, in all their old fashioned glory. I can't think of any Toy Soldier collector or anyone interested in the Napoleonic Wars that wouldn't beam from ear to ear if they received this set as a birthday or Christmas present! The set retails at £129.76. Worth every penny!

I hope we can continue to review Tradition of London excellent range in the future. If so I can't wait for the next parcel to arrive from Tradition of London!


                                                                                   Sulla                                                  ...

Sulla: A Dictator Reconsidered by Lynda Telford Sulla: A Dictator Reconsidered  by Lynda Telford

For your Wargamer, Toy soldier collector, MiniFig collector, military history nut. Reviews, interviews, Model Making, AARs and books!

                                                                                   Sulla
                
                                      A Dictator Reconsidered

                                          By Lynda Telford 


 Lucius Cornelius Sulla Felix; his self written epitaph reads "no friend ever served me, and no enemy ever wronged me, whom I have not repaid in full".

  The truth about Sulla's life and exploits has always been there to be seen. It took a brave person like Lynda Telford to put it all down in writing. Swimming against the stream is hard enough. Fighting your way through two thousand years of history is quite another adventure, although the author's membership in the Richard III society may have helped her prepare for this struggle.

 Sulla: the name exudes anathema to most historians. All stories have to have a villain, and to most he fits the bill admirably. But does he? A soldier and general of the highest caliber, he was a dictator of Rome, the first dictator in Rome's long history not to have a time limit on his authority. He killed, outlawed, and even murdered. So he must be the demon we have read about. As I said, every story needs a villain and a hero. History has chosen the hero in our play, Julius Caesar, a man who refused to bow down to Sulla's will and divorce his wife. Technically true, but there is more to the story. Only two men bearded the old lion that was Sulla. Gnaeus Pompeius Magnus and Caesar. Of the two, Pompey stayed in Rome, whilst Caesar ran to the edge of the Roman world after his slight tug on Sulla's mane.

  He was one of only eight Romans to win the coveted Grass Crown before it was sullied with Octavian's honorary one.

 To me, Lynda Telford's book is a milestone. It brings to life a principled man who should have had the acclaim of the Roman world in which he lived. Instead he was, and is, vilified for his choice of friends and lovers. He was principled, and he did have a reason for what he planned and carried out. He was a patriot who saw Rome falling from a republic to chaos in front of him. He was born just before the upheaval of the Gracchus brothers. The Gracchus brothers also had a plan, a good and true one. Their problem was that they were willing to flaunt all of Rome's laws to see it through. From their lives and deaths you see the fall of the Roman republic. Demagogues, money, and violence became the way of  politics in Rome. Sulla was trying to put an end to this, and to strengthen the senate, and return Rome to a land of its laws.

 The author has picked an incredible man for her work. She has also picked a huge fight with history. If Caesar is a hero, then Sulla must be a villain.

  Sulla is not only vilified for his actions, but also for his way of life. He is the only openly bisexual person in all of the famous men of Rome's historical record before the empire. I say openly because he himself stated that the male actor Metrobius was the love of his life. I think it is high time (as does the author) we look at his life without the blinders of previous centuries prejudices. 

 That I agree with the author's premise is very much a given. To me, Gaius Marius and Caesar were both heading Rome so that it might be ruled as a personal empire, naturally with them or their family as emperors. Sulla tried to put a stop to the violence and chaos of the last forty years. He wanted the republic back in all of its glory, and strong within its laws. The author shows Sulla warts and all. She does not make excuses for him, but tries to explain his actions. There are many people who disagree with her portrait. Caesar finally conquered in the end. His own plaudits of his career have been used to teach Latin for two thousand years. While Sulla, who became a dictator and then voluntarily gave up that power, is reviled instead of being praised as another Cincinnatus. Readers, please try and keep an open mind about the author's portrait of the life of the colossus that was Lucius Cornelius Sulla Felix.

 The author brings his life and times to us in it's full panoply. I heartily recommend this book to anyone who has even the slightest interest in the history of the later Roman republic. Hopefully, she is hard at work on a biography of Pompey. In the meantime join me on every Ides of March, and raise a toast to Sulla and Pompey.

 Robert


Book: Sulla: a Dictator Reconsidered
Publisher: Pen and Sword
Distributor: Casemate Publishing
Author: Lynda Telford
Review Date: 8/21/16

Old School Tactical by Flying Pig Games Review     While I own a fair number of board games, I have never done an unboxing, let a...

Old School Tactical by Flying Pig Games Review Old School Tactical by Flying Pig Games Review

For your Wargamer, Toy soldier collector, MiniFig collector, military history nut. Reviews, interviews, Model Making, AARs and books!

Old School Tactical by Flying Pig Games Review 


 While I own a fair number of board games, I have never done an unboxing, let alone a review of one. My reviews up until now have been of digital wargames. So in a sense this is like coming home. My purchases of boxed wargames have mostly been of older games with a few newer ones here and there.

 I have not really been that much of a fan of tactical games, since in my youth we played a lot of what I call 'squad argument'. I don't remember that much playing, but I do remember a lot of arguing. Give a man with a pocket protector a set of wargame rules, and he turns into an armored warrior on the side of right. I am, however, an equal opportunity gamer. I'll give pretty much any game a try. I will do the unboxing etc. with the game components and also use a very well done vassal port of the game.

  Flying Pig Games is the board game company that has brought us Old School tactical. They also publish, among others, 'Night of Man' a tactical futuristic game, and '65' a game about the early battles in Vietnam. Yaah! magazine that is up to issue six now, is also published by them. It contains a game in every issue. They are also doing a kickstarter right now for Old School Tactical: volume II West Front.

 The game is (guess what) a tactical one about the eastern front battles in 1941 and 1942. It is important to remember that this is before Tigers and Panthers were around. In most scenarios with tanks playing as the German you will be undergunned, and under armored. The German antitank guns are woefully under powered and undersized. The PAK 36 that you will use in some scenarios was nicknamed the door knocker by German troops.


 First let's start with the box itself. The box measures roughly 11"x16". I do not have my postage scale handy, but I believe the weight is roughly 7-8 pounds plus or minus. It is certainly hefty enough for someone to start weight training with. It is also a piece of art all by itself. Just looking at, and feeling it you would believe that you have something special in your hands, and you wouldn't be wrong. The first thing you notice when opening the box is the size of the maps. It comes with two mounted maps. One depicts spring, summer, fall and the other winter. They are 30"x41" with one inch hexes. There was also a Stalingrad map for some of the tiers of the kick starter campaign, and it can be purchased as an expansion. It also comes with four six sided die. There are four counter sheets some 3/4" and others 7/8". The tanks, and artillery are shown top down with the infantry etc. being shown from the side. There are 18 'luck' cards, and 54 unit data cards. The tank and gun cards have a table that is used in deciding combat. The other unit cards are a great addition in having all of the info which is on the counters also in your hand, and easier to squint at. The rule book is well done and in full color, as is the scenario booklet. Two player aid cards are also included. All of the components are top notch. I have never seen a board game with this detail and craftsmanship.  


 Okay, so the game components are first rate. The next part up is the game play and the rules. I cannot stress enough on the actual game pieces, but if it sits on the shelf because the game play is terrible and the rules are unintelligible, what is it worth? Does the game play like a tactical east front game? Is there any immersion factor? 

  The manual is only twenty one pages long and is well written and easily understandable. It has color shots of the units and some illustration of game play inside.

 In the scenario briefing you will be given map coordinates. These are used for you to setup the four map edge markers that cordon off the field of battle that you will play in. The next listing is control  hexes; these are given a victory point amount to asses at the end of the game. Then comes the scenario turn length, special rules, and off board assets, air strikes and artillery. Next will be the victory conditions for the scenario and the setup for your and the enemy's forces on the map. Mostly that is listed as map edge or near this unit etc. There is a lot of leeway in most scenarios for the players setup. You aren't handcuffed into putting X unit into hex 41Y for the most part. The victory conditions are mostly in controlling certain hexes on the map. It is a large scenario book with 27 scenarios. The scenario booklet is well displayed with clear and concise info for the player to use. There is no ambiguity here. 


  The infantry counters have their stats displayed across the top of the counter. From left to right they are firepower, range, defense, and movement. The range is in white with all the others in black, with movement being the larger of the three in black. Crewed weapons counters show, starting in the left lower corner, that they are not allowed to move and fire. Next, in a clockwise manner, is the Maximum AP firepower. Across the top next comes HE firepower. Next in white is the maximum range, followed by defense and last is foot movement. Both crewed weapons and vehicles have a red triangle in the upper left corner to denote facing. Vehicles have more info than either of the other counters, and you also need the corresponding unit data card to decide combat. At the lower left corner in black is their secondary firepower followed in white by its range. Next in a clockwise manner is the maximum AP firepower. In line across the top is HE firepower followed in white with its range. In the upper right hand corner is the unit's movement allowance, and whether it is tracked or not. Right underneath movement is the unit's front defense, and its flank defense. Leader counters have no firepower (except in melee combat), and have their command range in a white circle.  The counters also show the attention to detail in this game's construction. The counters simply pop out easily, and I have not had to deal with chunks of cardboard stuck to them or use a razor knife at all. 


 The Player aid cards have the usual board game info. There is the terrain chart, turn sequence, artillery, air strike, bogged down, and rally info on one side of them. The other side has the infantry combat, and vehicle combat tables. 


  The turn sequence follows this format. The way your turns are counted is different from most games. If the scenario is for seven turns you start with the marker on seven, and count down. When you get to the number one for the turn marker and all of the impulse points are expended, then both players roll one die and add them up. If you get seven or greater, you both will get an extra turn. I like this, especially for the side that almost had a victory or captured that victory point hex. It gives you one more chance to complete your mission. Reinforcements are then added to the game map. You than can attach leaders and weapons. Then you get to roll for the various scenario rolls. These would be the chance for off board artillery etc. Then you have your rally and vehicle bog rolls. The players then both roll two dice for the initiative. High roll, as usual, wins. Then next part of the sequence is to roll for each side's impulse points. The number of die to roll is set by the rules of each scenario. Every action taken by your units costs impulse points. The game mechanic is to let one side use an impulse point and then to switch to the other player, unless there is a pass. The impulse point system in one way forces a player's hand. If you have less impulse points that your adversary you can choose to pass, and the other player continues with his turn. If you have the same or greater amount of impulse points, and don't want to use any on your units, you must expend one to pass. When both sides' impulse points are exhausted then that turn ends. A unit is allowed to move once and fire twice during a turn. The melee phase comes next. For melee to occur, a unit has to assault a hex containing an enemy counter. This costs one impulse point. You can choose to group move. This costs two impulse points, and you can also group assault for two impulse points. Unlike other games, you then just mark the hex and wait until all other movement and firing has taken place before deciding the effect of the assault. No terrain or fortification modifiers are used to resolve the melee. The melee results are usually bloody and quickly resolved. At times though, the melee can be unresolved and lock the combatants in the hex for the subsequent turns. During the following turns you are allowed to add other units to the melee. You are allowed to use opportunity fire against a unit the other player is moving. The opportunity fire rules add a tenseness to the game. Do you wait until the unit has completed its move, and possibly have a better chance at fire combat or miss your chance completely, due to line of sight? You announce it and then spend an impulse point for it. If there is no effect the enemy unit may continue its move. Then you add up the victory points from both sides. In some scenarios the victory points will not be tallied until the end of the game. You keep track of casualties for both sides on the casualty track. This is important, because for every five points a side loses to casualties, one impulse point will be deducted from the player's impulse point rolls.

  The game has an interesting 'gut check' rule. The  'gut check' number is listed in each scenario briefing. The player has to roll two die to check against any shaken/broken results on the combat tables. If the number rolled is the same or greater than the 'gut check' number then the shaken/broken result is ignored.


  Each scenario can also have hidden units added into the mix. These will not be found until an enemy unit tries to enter the hidden unit's hex. If a unit is in a structure hex, and it is attacked by heavy weapons ie. off board artillery or air strike etc., there is a check to see if there was a structure collapse. A light structure will collapse on a roll of a five or six, and a heavy structure will collapse on a roll of six. Line of sight is pretty straight forward, and can cause points to be deducted from the firing die roll.


  One luck card is drawn randomly at the start of the game. Unless the scenario rules state differently, the luck cards can be used during a players impulse, and do not cost any impulse points to play. Some cards can only be used for vehicles. If agreed to by the players, the manual states that in an infantry only scenario the vehicle cards can be kept out of the deck when choosing them. 


  The game is quick, easy, and relatively simple to play. It has a lot of nuances, but two players should be able to hash out the rules in no time and start playing. The play is relatively bloody, and resolved in a timely manner. You are going to be playing this game and thinking, not decoding the rule book.

  There is a free download available of the rules:

 https://www.dropbox.com/s/xn13k359aqrw2qt/OST-rules%20ver5.25%20.pdf?dl=0

  A print and play version is available also for download. It retails for $25.00, but the game itself is a steal right now for $75.00. You would also be missing out on the extremely well made components of the game.

  The game is certainly not a simple one, yet it is also not a game where you get bogged down in the rules, and stultifies game play. This game, while not really being 'old school' in a technical sense,  is a very good thing. It allows the players to play and have a good time destroying their cardboard enemies. This game will not sit on the shelf with all of the other 'might have beens'.

 Looking at all the different comments around the web most people, like me, are very happy if not ecstatic about the game. There are a few posts about rule questions etc., but what game doesn't have them. Sometimes it is the reader's and not the writer's fault (see above). I would like to see some more scenarios that use a larger part of the map. With small maps it can get stale because the defender and attacker both know where they are going to set up and move toward. Larger map usage would allow both sides to try out numerous combinations of play. One could make house rules and make some scenarios larger on the map, and just add more to the scenario length. It doesn't have the postage stamp size maps that some games have, so that is definitely a plus.

  Robert

 Game: Old School Tactical
 Publisher: Flying Pig Games
 Designer: Shayne Logan
 Date of Review:
hpssims.com