second chance games

Search This Website of delight

First things first, this article is much belated. I took a bit of a hiatus from posting here last fall and this new add on for Afghani...

Afghanistan '11 Royal Marines DLC - AAR & Review Afghanistan '11 Royal Marines DLC - AAR & Review

For your Wargamer, Toy soldier collector, MiniFig collector, military history nut. Reviews, interviews, Model Making, AARs and books!


First things first, this article is much belated. I took a bit of a hiatus from posting here last fall and this new add on for Afghanistan '11 was next on my list to review, but when I came back it slipped through the cracks and was missed. So, I thought I would make up for being tardy by writing up a combo AAR and review. 

From developer Every Single Soldier, and publisher Slitherine, Royal Marines is an expansion for Afghanistan '11, a game just as much about the logistics of war as it was about the fighting. Royal Marines doesn't change up the formula too much, but does give you some new toys to play with, and some additional options for conducting your counter-insurgency (COIN) ops. 

Like in the base game, Royal Marines includes a 10 mission campaign with historically based scenarios that give you unique situations and restraints to deal with. The other way to play the game is by jumping into a randomly generated map, where you will always have the same overall objective, but be completely free in how you want to pursue it. I have not played through the entire Royal Marines campaign, but I sampled several of the missions and saw that there is some good variety here if you are looking for a fresh challenge. This early mission, however, is not very complex, but I thought it would give a good sampling of what the game is like.

Today I'll be playing the second mission of the campaign, Operation Condor. This mission is loosely based on a real event. On May 16th, 2002, an SAS patrol was attacked for several hours by militants. The SAS patrol was extricated from its predicament by the arrival of AC-130's and Apache helicopters. The next day, a 1000 man strong force led by Royal Marines was deployed to the area with the goal of eliminating any enemy presence. 


For the purposes of this scenario, that real life operation is abstracted as seen below. I have a base already established in the central, somewhat eastern area of the map. I need to send out forces to hunt down and destroy all Taliban units on the western half of the map. In A'11, the east edge of the map always represents Pakistan, and that is where new Taliban units will come from. Cutting off any reinforcements will be an important part of my strategy. Local militant units can also pop up from hidden caves all over the map. These are difficult to eliminate entirely, but doing so isn't my concern in this scenario. I'll also need to get the Hearts and Minds score above 55, which shouldn't be too difficult. In A'11, winning over the local villages scores you more political points (your currency for new forces) and can yield intelligence, like the location of poppy fields which supply funds to the Taliban until they are destroyed. 


It doesn't take a tactical genius to look at the map above to see that geography will not be on my side in this scenario. Much of the map is mountainous terrain, with only one lonely winding road linking the two groups of villages. I'll need to get SAS units up in those mountains to spot for the enemy, and a convoy organized to travel through the valley and set up a FOB (forward operating base) on the far side. Every unit can only carry a limited amount of fuel/rations into the field. This means that any forays by friendly units must either be short ranged, or directed towards a FOB where they can resupply and take shelter from insurgent ambushes. For the insurgents, the mountains represent their safe haven, where only a few of my units can reach them. My special forces units (the SAS boys) are able to stay in the field longer than regular infantry, and can set up observation posts from which they can spot insurgents scurrying about in the mountains. They will be the key to locating the enemy. Once spotted, helicopters, artillery, and air strikes will be brought to bear to wipe them out. A FOB on the western half of the map will allow me to keep my helicopters and SAS units supplied. A conventional ground force will be needed to establish and secure said FOB.


Before going on the offensive, I first want to send a small convoy out to visit the nearest village to the east, and then set up a FOB a little further down the road. Spreading FOB's all over the map is generally a good idea, as it gives you more places to park units and to extend your reach. You can also use SAS units to train Afghanistan National Army (ANA) units in each FOB. In a normal game of A'11, as the turns go by you are forced to gradually hand over security to the ANA, so the more troops you can train, the better. You can also train ANA helicopters, artillery, and APC's at your main base, which I will also be doing. We will need a lot of helicopters in order to overcome the difficult terrain here and sustain the SAS posts in the field without interruption.


The visit with the village elders goes well, and we are given the location of a poppy field on the far side of the map. Taking this out will net us some political points, and weaken the Taliban. The only problem is that the field is much too far away to reach on the ground until we have a FOB over there. Luckily, we have helicopters on tap. Unfortunately, a couple of Taliban units pop up and damage our mine-detecting unit at the head of the convoy on the next turn. Without its ability to detect and destroy IED's, any road trip into uncontrolled territory will almost certainly meet disaster. The convoy is recalled back to HQ to repair.


While my first mine detector is in the shop, the second is sent down the road to the west, in an attempt to clear the first section of the road for follow-on forces in the next turn. The unit is also ambushed by insurgents and damaged. It seems the enemy is not hiding, but is aggressively operating right outside my main base. A drone is called in (you can have one on the map at a time) to recon the area. Three militant units are spotted and our available firepower is directed at them. Artillery and infantry from HQ, and an airstrike (an ability that can hit anywhere on the map, but has a long cool down) are used to knock out one of the enemy detachments and send the others fleeing. It seems we will need to clear out the immediate area before making a run to the west. To this end, I deploy a couple of SAS units into the nearby mountains.


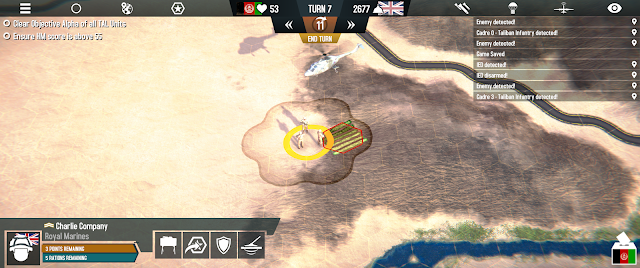
Helicopters are not completely immune to insurgent forces, but they don't have to worry about IED's or terrain, making them critically important in A'11. Despite the rocky start to the ground campaign, the Royal Marines of Charlie Company are airlifted across the map to that poppy field that the villagers told us about. Destroying it should slow the flow of new Taliban units, and rewards us with 1000 political points, which is quite helpful as I've overextended a bit and almost run out. Without a nearby FOB established, the Marines hop aboard their helicopter for a ride back to HQ. 

(Apologies for some of these images being far too bright. From what I gather, there is some kind of shader issue right now which causes this to happen The developers are working on it.)


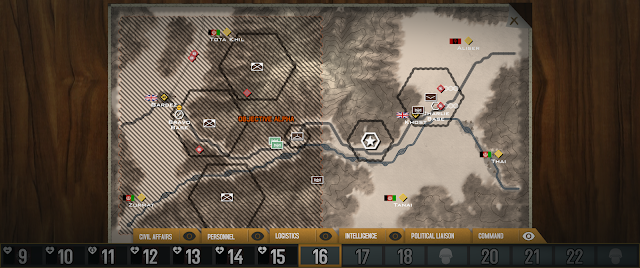
A couple of turns later, my second attempt at a western bound convoy is more successful. As you can see above, the vehicles have almost reached the key crossroads on the western half of the map. However, they are still a couple of turns away from safety, and end this turn in a highly vulnerable position sandwiched between two mountain ridges. From the message log, you can see how important sweeping for IED's is in this game. Three were eliminated on this turn alone. The insurgents will come back by and try to place more IED's all the time. Areas under direct observation are safe, but even a recently traveled road cannot be trusted if it was out of your sight for just a turn or two.


Back to the east, the Taliban presence is still strong. I was able to establish a waterworks at the nearby village (which makes them happy and nets you political points each turn) but my convoy was once again forced to retreat to safety before establishing a FOB. Pushing out in this direction will require some firepower. Luckily for me, a special event fired which gave me TWO Apache gunships for free. These are some of your most potent offensive weapons in the game, but come with a hefty price tag. Getting two for free is a real boost, and I set them to work immediately. The Apaches can engage the enemy from long range, don't have to worry about terrain, and have a decent chance of destroying an insurgent unit in one hit. These enemy units are also in range of my artillery, and it gives them a good reason to run back to Pakistan.


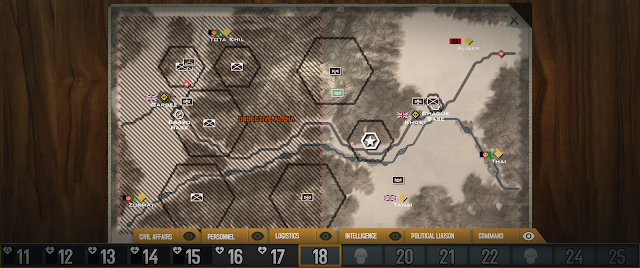
Ten turns in, let's take stock of the overall strategic picture. So far, I haven't accomplished much, but the framework is there. I have SAS units monitoring the mountains to the north, my convoy safely arrived in the west, and the local area around HQ is now secure. I've also won over the neighboring village and made visits to a couple of others. All that said, there are still a lot of insurgent units on the board, plus more that I can't see.

Visiting villages is an important part of the game, as it helps increase your H&M score, and occasionally gives you the location of an enemy unit, IED, or poppy field. This intelligence isn't always available however. Villages with little campfires burning are more likely to give you info, and so you want to visit them ASAP. In the original game these fires would stay lit until you came by, but in the Royal Marines DLC, they will go out soon if you do not make a visit. I like this change, as it adds some urgency to this aspect of the game, and forces you to be more flexible. 


On the next turn, a sandstorm blows in. This limits movement for all of my units and I have recall some helicopters back to HQ before they can complete their assignments. Fortunately for my western convoy, they are able to get the FOB built, and take shelter within it. Nature can at times be a greater obstacle than the enemy.


As the sandstorm clears, my western FOB gets to work. The minesweeper heads out to clear IED's from the nearby roads, and the Marines visit the village. My construction vehicle is also dispatched to build a water works there. All of these actions draw the local villages to the coalition side, making things easier for me, and satisfying the second victory condition for this scenario. My next step here will be to try and win over the village to the north. It isn't very far away, and is along the road. The village to the south is irrelevant at this point, as it is too remote to commit my limited resources towards. Sorry, folks! 


Zooming back out, you can see that I now have a FOB in the east and west. The HQ area looks clear, but out west we have a swarm of insurgents and IED's to deal with. I've also lost the village in the NE corner of the map to the militants. Winning them back may be difficult due to their location far away from my primary objective. For now I'll focus on eliminated the enemy from that area. Additional units are dispatched west now that they can operate out of the FOB.


At the western FOB, the fighting gets intense as several more Taliban units pop up. My SAS men are there to spot them, and once again heavy firepower is brought to bear. One Apache arrives to help the outpost, and an artillery unit will be airlifted over soon. Artillery units in FOB's require a lot more attention than they do at the HQ. A dedicated artillery expansion must be built for the FOB, and ammunition must be brought in by supply trucks or helicopters on a regular basis. For this mission, supply trucks are simply not an option. My helicopters continue to do logistics work, bringing rations to the SAS units in the field, and supplies to the critical western outpost.


On turn 16, things are looking good, but we still have our work cut out for us. The eastern FOB is busy fighting off Taliban reinforcements coming over from Pakistan. This is exactly what I want, but continues to tie down one of my Apaches. In the west, the enemy has been beaten back from the FOB, but still has a presence scattered around the objective area. Fortunately for me, I now have a nearly complete net of SAS observers gradually moving west and sweeping the area. Each time an enemy is spotted, artillery and helicopters operating out of the FOB are called up to eliminate them.


A couple of turns later, and the strategic picture is looking excellent. The enemy has been eliminated from most of the map, I have eyes in the field able to stop any new units from entering the objective zone, and a convoy headed out of the western FOB on its way to make nice with that northern village. A couple more poppy fields were found and eliminated, giving me a massive advantage in resources. Things are looking good!


Things are going even better than I thought, as on the next turn my Apache gunship takes out this final Taliban unit in the objective zone, fulfilling that part of the mission. As you can see, my Hearts and Minds score is now at 66, well above the required 55 for the scenario, and my political points are maxed out. All and all, a very good operation for the coalition despite some early stumbles. I call the mission a win, even though it doesn't actually end on the next turn. One thing I don't like about the campaigns in A'11 and this expansion, is that sometimes you are forced to play the scenarios out to the full 60 turns of a standard random map, despite completing the assigned objectives of the scenario. In this case, I've completely taken over the map and won over the villagers. Continuing to play would simply involve clicking end turn and smoking any insurgent unit silly enough to wander into range. Not too exciting, so I call it win and pack things up. In a full standard match, part of the challenge is that you must hand over control to the ANA gradually over time. At the end, the ANA must stand alone against the insurgents. In that case, it makes sense to play out to 60 turns, since that is part of the experience. Here though, it doesn't really gel with the idea of specific set of goals based on a relatively short real world operation.

That ends the AAR, but I have a couple more points to make for the review. Several other changes come with the DLC that I haven't mentioned so far. One significant addition, which didn't make an appearance in this scenario, is the inclusion of civilian traffic along the roads. And yes, as you might guess, this traffic can be used by the Taliban to send suicide car bombs right up to your units. In order to screen this traffic, you can now build roadblocks wherever you see fit. In order to help balance things out, and add some immersion to the game, you can now also get Afghan police units. You earn these by winning over villages to the coalition. This all adds yet another layer to the intricate dance of logistics and planning that is Afghanistan '11. Much like in the real conflict, engaging with and destroying the enemy is the easy part. Building up the infrastructure that will allow you to lock down an area and keep the insurgents out is the difficult part.


If you enjoyed the base game, it's safe to say that you will enjoy the Royal Marines add on. With new missions, new strategies, and new units to play with, there's plenty here to explore. Especially for the very reasonable price of $10, you really can't go wrong.


Afghanistan '11 and the Royal Marines DLC are available directly from Matrix/Slitherine or on Steam.

- Joe Beard


P.S. - I hope you enjoyed the AAR. I plan to do some full fledged ones soon, so this was a bit of trial run.

Night Fighter Ace Air Defense Over Germany 1943-44 by Compass Games    This is an unboxing and review of Nigh...

Nightfighter Ace: Air Defense Over Germany 1943-44 by Compass Games Nightfighter Ace: Air Defense Over Germany 1943-44 by Compass Games

For your Wargamer, Toy soldier collector, MiniFig collector, military history nut. Reviews, interviews, Model Making, AARs and books!

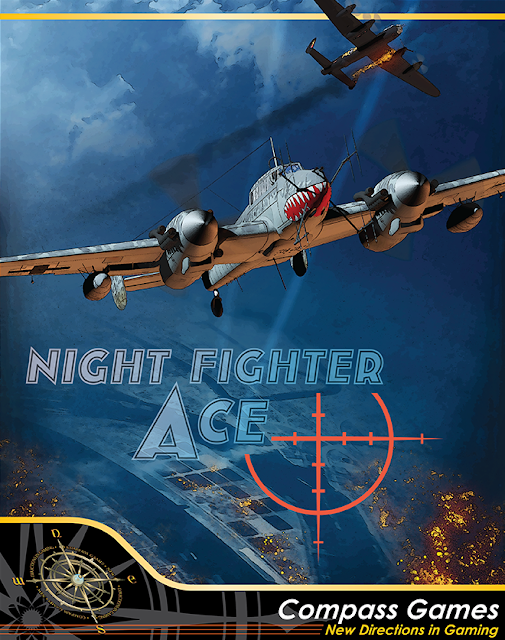
Night Fighter Ace

Air Defense Over Germany 1943-44

by

Compass Games


 This is an unboxing and review of Nightfighter Ace from Compass games.  From the moment you open the box you will be astounded by both the amount and quality of the components that come with the game. BGG has a rating of 8.38 for the game right now, and I believe that is right on the money. This is a solitaire game with you playing the German aviator side.This is the product information:


  • Complexity: 6 out of 10
  • Solitaire Suitability: 10 out of 10
  • Time Scale: 3-4 days per Turn
  • Map Scale: Abstract
  • Unit Scale: individual aircraft, individual weapon systems, individual electronic systems, specific crew members, and ammo rounds
  • Players: one (with option for two or more)
  • Playing Time: two to three hours


This is what you get with the game:

  • One Countersheet of 9/16" unit-counters
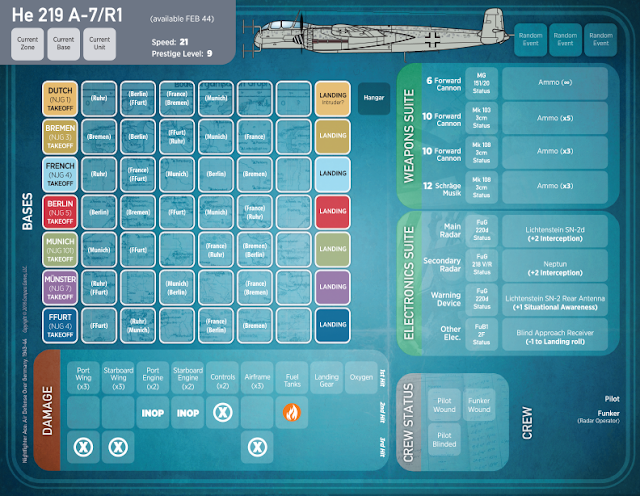
  • Sixteen Aircraft Display Mats 8.5" x 11" (double-sided, 32 total)
  • Four Player Aid Cards 8.5" x 11"
  • One Combat Display Mat 8.5" x 11"
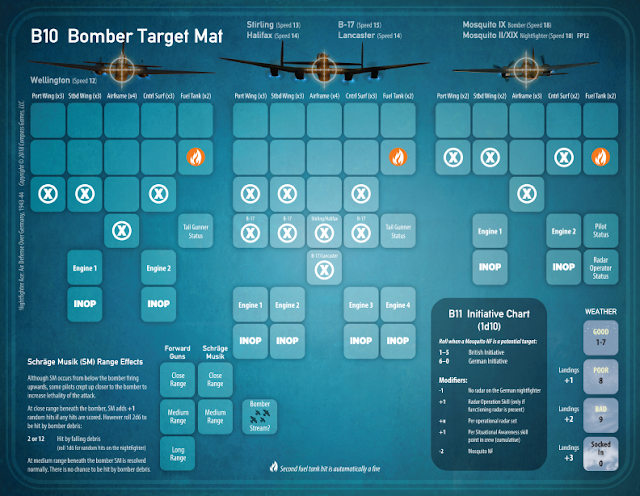
  • One Bomber Target Mat 8.5" x 11"
  • One Pilot Awards Display Mat 8.5" x 11"
  • One Air Operations Display Mat 11” x 17”
  • Forty Ace Pilot Cards
  • Sixty Combat Cards
  • Rules Booklet featuring extensive Historical Background
  • One Logsheet 8.5” x 11”
  • Two 6-sided and one 10-sided die

  The addition of a real logbook instead of just one page to copy is a great one.


 One of the game's greatest assets is the amount of different airplanes and variants of them that the player can use.
This is a list of them done by their availability:

Bf 110 F-4 - Start of Game
Bf 110 F-4a
Bf 110 F-4/U1
Bf 110 G-4/U1
Bf 110 G-4/U5
Bf 110 G-4/U6
Do-215 B-5
Do-217 J-2
Do-217 N-1/U1
Do-217 N-2/R22
He 219 A-0
Ju-88 C-6b
Ju-88 R-1
He 219 A-2
Bf 110 G-4a/R3
Bf 110 G-4b/R3
Bf 110 G-4c/R3
Bf 110 G-4d/R3
Ju-88 C-6c
He 219 A-5/R1
He 219 A-5/R2
He 219 A-5/R3
He 219 A-5/R4
He 219 A-7/R1
He 219 A-7/R2
He 219 A-7/R3
He 219 A-7/R4
Ta 154A-1
Ju-88 G-1
Ju-88 G-6b
Do335A-6
Do 335B-2 - July 1944

  That is one long list.


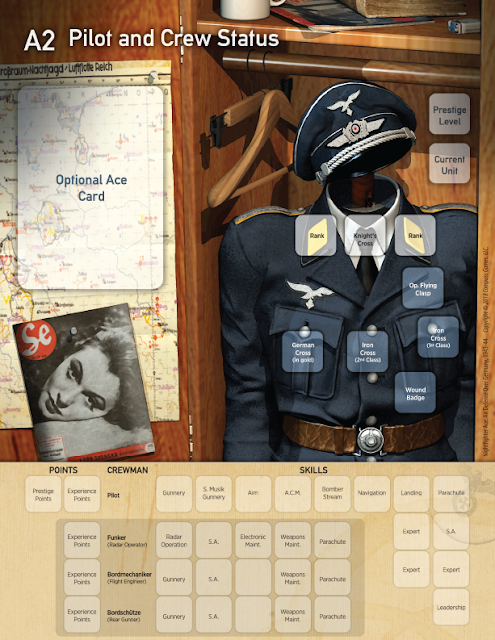
 The game is really a very good simulation of this part of World War II, or at least it feels it. To me that is one of the biggest challenges to a game designer, to try and make the player feel that he is in that moment of time. The game is one of those that really draws the player in. You develop a interest in your made up or cardboard aviator. It helps that you can actually win medals etc. The component sheet below actually comes with a uniform where you can put the various medals your ace accumulates. This is a very nice touch. 


  The rulebook is up to the high standards of the other components. It is full color and is easy to read with many examples of how to play. Strangely for such an immersive game, the rules themselves are only sixteen pages long with another page for optional rules. A nice touch is that the back of the rulebook has an index of all the rules for finding them quickly if needed. The last part of the rulebook is an entire eight pages of:
Designer Notes
Historical Notes
Aircraft
The Top Five German Nightfighter Aces


 The optional rules allow you to play the game cooperatively or in competition. You can also play with 'Ace Pilot Cards' albeit starting earlier in their careers. One optional rule adds pilot fatigue to the game. There is also an 'Extremely Optional Rule'. I think this is the first game I have ever seen this in. You get the chance to kill Adolf Hitler when receiving one of the higher Knights Cross medals. 


 Theses are some of the skills your pilot and crew can increase during the game:

Aim
Gunnery
Landing
Navigation 
Radar Operation
Situational Awareness
Schräge Musik Gunnery
Situational Awareness

 Your pilot can win medals all the way through to the Knights Cross with Diamonds. 


Schräge Musik installed in a Bf110


 This next part I call: what the **** is Schräge Musik? Well, it's literal translation is 'Slanted Music'. This was the German phrase for Jazz Music. What does this have to do with the game? Well, Schräge Musik was the name of the cannons that we're usually slanted 70 degrees out of the top of the cockpit behind the pilot. You would fly below and slightly behind a bomber above you and aim for the wigs of the the Allied bomber. You did not aim at the fuselage due to the chance of setting off the bomb load.  Most if not all of the planes have at least one other crew member. He is especially useful once radar becomes a large part of the game. 


 Are you interested in the night fighting over Germany in World War II? If so, then buy the game. If you are interested in the aerial war, pick it up. If you just want to have an enjoyable solitaire experience, then the game is also for you. Compass games has become a powerhouse gaming company that has begun turning out excellent games at a fast rate. They also sponsor a gaming convention in Ct. in the fall. I went to it last year and was able to get some great deals on their games. Here is the link:

https://www.compassgames.com/expo2019-overview

Compass Games Link:
https://www.compassgames.com/

Nightfighter Aces Link:
https://www.compassgames.com/nightfighter-ace.html 

I also did an unboxing of another excellent game from the Compass Games Red Poppies Campaigns: The Battle For Ypres:
https://www.awargamersneedfulthings.co.uk/2018/01/red-poppies-campaigns-volume-i-battles.html
 

 Robert

Island of Fire The Battle for the Barrikady Gun Factory in Stalingrad by Jason D. Mark    Death in a small pla...

Island of Fire: The Battle for the Barrikady Gun Factory in Stalingrad by Jason D. Mark Island of Fire: The Battle for the Barrikady Gun Factory in Stalingrad by Jason D. Mark

For your Wargamer, Toy soldier collector, MiniFig collector, military history nut. Reviews, interviews, Model Making, AARs and books!

Island of Fire

The Battle for the Barrikady Gun Factory in Stalingrad

by

Jason D. Mark


 Death in a small place would be a better title for this book. This is a reference book of the fighting around the Barrikady factory in Stalingrad. It is also much more than that. Reading the book also gives an overview of the entire battle from November 1942 until the bitter end. The author, Jason D. Mark, has become a specialist on the Battle of Stalingrad, and it definitely shows in this work.

 The book itself is a large, almost coffee table sized book. It is also long, as it is almost 600 pages in length. Almost every page has a photo of the men, machines, or aerial views of the battlefield. The author has also jammed it full of what is needed in every military history book- maps, and has them by the ton. This is especially needed to help the reader follow along with the actions that are described. The maps zoom down to house by house level, so you are never at a loss in following the attack and defense descriptions.

 For those of you who like personal accounts of the fighting, this book is a goldmine. For me, who for the most part eschews individual stories of battles, the book has enough overview and dry history to keep me interested. I have never been interested in where private Daniels slept the night before Waterloo. So for this book to have so many recollections and diary blurbs and still keep my attention on every page is quite an accomplishment. The book does almost too good a job in describing the hell on earth the combatants had to face, sometimes separated by floors or just a few feet. This book is so good I have gone out and purchased one of the author's other books, 'The Death of the Leaping Horsemen'.

 Even though I am very acquainted with the battle I was still rapt on every page by the story at this level. For anyone with even a slight interest in Stalingrad, this is a must buy. The book is a steal at its present price of $49.95. Thank you, Rowman & Littlefield for the chance to review this excellent book. I am looking forward to anything Mr. Mark will write next.

Island of Fire link:
https://rowman.com/ISBN/9780811719919/Island-of-Fire-The-Battle-for-the-Barrikady-Gun-Factory-in-Stalingrad

Rowman & Littlefield link:
https://rowman.com/


Robert
 

The Sniper Encyclopedia An A-Z Guide to World Sniping by John Walter      Once again a book I am reviewing ...

The Sniper Encyclopedia: An A-Z Guide to World Sniping by John Walter The Sniper Encyclopedia: An A-Z Guide to World Sniping by John Walter

For your Wargamer, Toy soldier collector, MiniFig collector, military history nut. Reviews, interviews, Model Making, AARs and books!


by


 Once again a book I am reviewing has been misnamed. The Sniper Encyclopedia should be called 'a history of snipers and their weapons'. Almost half of the book is dedicated to just the weaponry of snipers going back a few hundred years.

 The book itself is over 300 pages long. The description reads:

750 Standard Entries
100 Extended Features And 'Top 20' Lists
Over 400 Biographies
200 Illustrations

 This is a one stop reference for almost anything to do with the sniper and his weapons. It is a pretty amazing piece of work. I am certain the author has done a ton of research, judging by the incredible volume of information listed in the book. The only problem some people may have is with his 'Top 20' lists. For male snipers he has Simo Häyhä listed fourth behind three renowned Russian snipers of World War II. Everything else I have read puts the Finn in first place by a wide margin. In my research of the list some people believe that some of the Russian 'kills' were exaggerated for propaganda purposes. I am in no way able to confirm or deny this. I am just adding this to inform the reader.

 A listing of some of the companies and rifles include:

German manufacturers' codes
Natalia Kovshova
Mannlicher sniper rifles
Minute of Angle
Österreichische Waffenfabriks-Gesellschaft  (Steyr)
Remington sniper rifles
Serdyukov & Kraskov sniper rifles
Trench rifles
Top twenty Vietnam snipers

 Ignoring the above possible argument point, the book is still the best one I have ever read in regards to snipers and sniper rifles. From Kentucky Long Rifles to today's 50 caliber extreme long range rifles, all of them are here. If you are interested in the history of sniping this is your book. If you are looking for Biographies of the top snipers then look no further. If the reader is looking for a detailed description of just their weapons, then again this is your book. Thank you Casemate Publishers for letting me review this great book.

Robert

Book: The Sniper Encyclopedia: An A-Z Guide to World Sniping
Author: John Walter
Publisher: Casemate Publishers

Campaign Eylau-Friedland by John Tiller Software     I have been waiting for this with bated breath for so ...

Campaign Eylau-Friedland by John Tiller Software Campaign Eylau-Friedland by John Tiller Software

For your Wargamer, Toy soldier collector, MiniFig collector, military history nut. Reviews, interviews, Model Making, AARs and books!


by


 I have been waiting for this with bated breath for so long that I should be a cadaver. All other battles, including my least favorite Waterloo, pale in comparision to Eylau, in my mind. The desperate battle in a snow storm is the stuff of legends. Augereau, who should have been on sick leave, is ordered by Napoleon to attack the Russians. In the swirling snow storm his corps is led astray into the belching mouth of numerous Russian artillery. His corps devastated, Napoleon then orders Murat to attack with all 10,000 of the available cavalry. The greatest cavalry charge in Napoleonic times then takes place. The Russian center is then sliced through. Numerous Russian units are ridden down or dispersed. Then the cavalry regroups in the middle of the Russian Army, and cuts its way back out. Now that would be something to see in CGI in a film. Then of course we have Friedland. The Russian general Count von Bennigsen loses all caution, and apparently his mind. He crosses a river into a bottleneck that not only has his army trapped by the river behind, but his two flanks are pretty much cut off from each other by the topography. He does this with Napoleon somewhere on the other side of the river. His attempt to sneak into the tiger cage works all too well. A rejuvenated Grande Armee proceeds to utterly destroy his army. Eylau is the first real time that Napoleon is held at bay by another army. It sent shock waves through Europe, until his completely lopsided victory at Friedland. The Russian troops who had earned a reputation in the Seven Years War as incredibly tough only add to their glory.


 So what comes in the game:

Scenarios

  • Twenty-two battles and over two-hundred and twenty scenarios, to include the battles of Eylau, Friedland, Heilsberg, Guttstadt, 1st and 2nd Ostroleka and Mohrungen
  • Tutorial scenario that helps the player learn the game system.
  • A wide range of scenarios which allow the players to command an entire army or just a few brigades.
  • A select group of campaign scenarios available for play as stand alone battles.
  • Bonus battles that add in forces that were not used in the campaign or standard scenarios.

Campaigns

  • The 1806 Winter Campaign - Includes the Battles of Pultusk and Golymin.
  • The 1807 Winter Campaign - Includes the Battle of Eylau.
  • The 1807 Spring Campaign - Includes the Battles of Heilsberg and Friedland.
  • The full 1806-07 Campaign - Covers the entire campaign in Poland.

Features

  • Turn scale is either 10 or 15 minutes.
  • A Design folder includes files and information that will aid the customer in learning how to build their own scenarios.
  • A Terrain Effects Chart is included that helps the players determine the effects of terrain and the movement allowance of their units.
  • A Weapons Chart is included that allows the players to determine the range and effects of all weapons in the game.
  • Over sixty-two maps (to include submaps) are included covering the famous battles such as Eylau, Heilsberg and Friedland
  • Scenario and Campaign Editors.

Changes

  • New 2D Magnified view
  • Night turn length extended to 4 hours (240 minutes)
  • Maxium visibility range can be extended up to 180 hexes


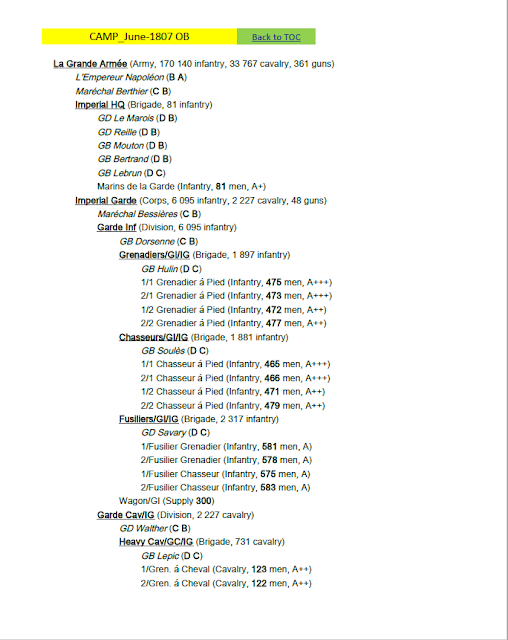
I have had my say about the changes in the games since they came out. The graphics are totally updated and while not state of the art are still fully functional on 2D, and eye pleasing on 3D. I usually play on the 2D magnified view now, unless I need the big picture for a moment. As far as the AI, again I have pontificated enough about it. There are now many scenarios that were built from the ground up as single player ones. They are tough to win, and not because the computer cheats or has extra troops by the ton (this is the usual practice in computer games to try and make single player worthwhile). Napoleonic tactical warfare was a sophisticated game of rock, paper, and scissors. For those of us who are sticklers for historical battles down to the last musket and grenadier, this game delivers. The campaign games adds a little of what if for players who enjoy that aspect of a game. In a day and age when the amount of scenarios that come in a game can be counted on two hands, this game comes with over 220! To put that in layman's terms, that is enough to be stranded on a desert isle for a very loooong time.


 For those of us who suffer from enjoying reading an encyclopedia or a PDR (Physicians Desk Reference, yes I liked to read through it as a child), the game comes with all these extras:


Preview Documents

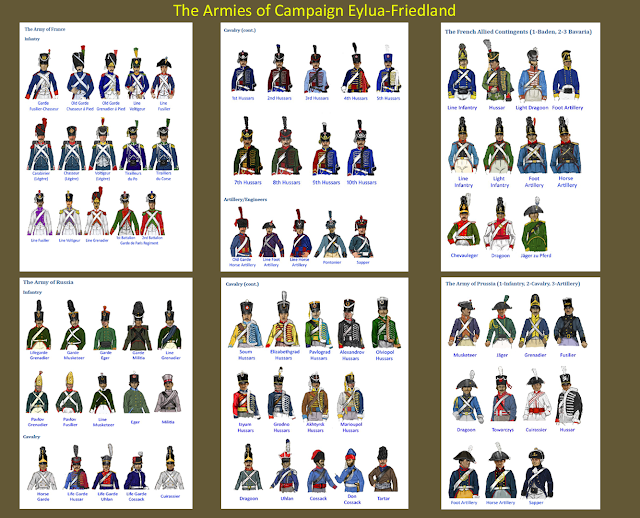
  • The Armies of Campaign Eylau-Friedland - pictoral display of the uniforms and soldiers of the various nations and minor allies which fought during the 1806-07 Polish Campaign.
  • The Battles of Campaign Eylau-Friedland - a listing of each historical battle in the game to include a jump map image, strength comparison and historical briefing.
  • Terrain Effects Chart - lists each terrain type and the movement costs for each troop type.
  • Weapons Effect Chart - lists all of the weapons in the game and their firepower value by range.
  • Parameter Data File Guide - breaks down each line in the PDT files and is for the customer in designing their own battles.
  • Situation Maps - helps the players understand the history of the campaigns in CEF and acquaints them with the locations where the battles were fought.
  • Order of Battle Guide - gives a detailed explanation of the units in the order of battle files.
  • Order of Battle Compendium - a PDF of all of the order of battle listings for the battles in CEF.
  • Campaign Eylau-Friedland Artwork - lists all of the units in the game and their location in the graphics files.
  • Leaderlist for Campaign Eylau-Friedland - lists all of the leaders in the game and their location in the leaders graphics file.
  • Turn Tracks - useful for the long battle and campaign scenarios.
  • Special Rules - used in the certain scenarios where certain restrictions need to be applied for more historically accurate game play.
  • NEW: Unit Listings for Campaign Eylau-Friedland - lists every unit's order of battle line entry for review by the players or in building new OB files for custom scenarios.


  So for those of us who are only happy when steeped in minutiae this is a game for us. For the casual gamer of Napoleonics, it has many shorter scenarios for your gaming pleasure. You can play by Direct-Play, Email, or Hot-Seat among others. I have been a fan of John Tiller games since they were first brought out by HPS (HPS Simulations). As I mentioned, the bar of the games keeps rising. Not only that, but all of the updates on the newer games are always implemented for the consumer on the older games. Imagine other companies updating almost twenty-year old software. Thank you, John Tiller Software for the chance to review my new favorite game of theirs.


This is a link to the game page:
http://www.johntillersoftware.com/NapoleonicBattles/CampaignEylau.html

A link to John Tiller Software:
http://www.johntillersoftware.com/index.html

A review of Petersburg from John Tiller Software:
https://www.awargamersneedfulthings.co.uk/2019/03/petersburg-by-wargame-design-studio-and.html

A review of Panzer battles North Africa 1941 by Wargame Design Studio and John Tiller Software:
https://www.awargamersneedfulthings.co.uk/2018/12/panzer-battles-of-north-africa-1941-by.html


Review of Panzer Battles of Normandy by Wargame Design Studio and John Tiller Software:
https://www.awargamersneedfulthings.co.uk/2016/07/john-tillers-panzer-battles-of-normandy.html#

Review of Panzer Battles Kursk Southern Flank by Wargame Design Studio and John Tiller Software:
https://www.awargamersneedfulthings.co.uk/2016/12/panzer-battles-kursk-southern-flank-by.html

Robert


Mark H. Walkers Platoon Commander Deluxe The Battle of Kursk Tracks in the Mud The Battle of Kursk Strategy Guide by Fl...

Mark H. Walker's Platoon Commander Deluxe the Battle of Kursk With the Kickstarter Extras by Flying Pigs Games Mark H. Walker's Platoon Commander Deluxe the Battle of Kursk With the Kickstarter Extras by Flying Pigs Games

For your Wargamer, Toy soldier collector, MiniFig collector, military history nut. Reviews, interviews, Model Making, AARs and books!


by


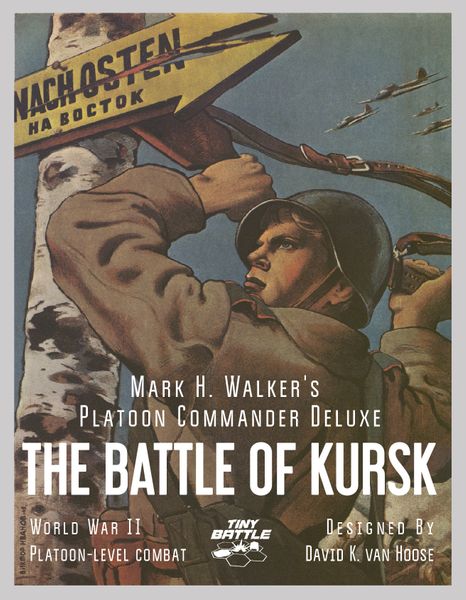
 It's big, bad, and beautiful. It is also very easy to start playing. Flying Pigs hits another one out of the park with this one. I was sent the entire Kickstarter kit and caboodle by Flying Pigs to inspect, thank you very much, you self-propelled porcines. I will go through the three pieces separately in this review. What I received was:

Platoon Commander Deluxe: The Battle Of Kursk
Tracks In The Mud
Platoon Commander Deluxe: The Battle Of Kursk Strategy Guide


 The first thing I noticed when  opening the box is how extremely well done all the components are. The next thing I did was to pick up what I thought would be a heavy sturdy many paged rulebook. Imagine my surprise when it turned out to be only nineteen pages long. Included in those pages are the twelve scenarios and the credits. The rules are only nine and a half pages long!!! How can a tactical game have only that many pages. Most tactical games have that many pages of errata. There are however many nuances in the rules that you have to carefully read. Take, for instance, one rule about stacking and movement. Rule 1.3 Stacking:
 "Up to two units may stack in a hex. Stacking limitations apply at all times". 
 This means that unlike many other games, stacking is not checked at the end of the turn. Only two units may be in any hex at one time during the full turn. So you cannot park two units in that hex, and then continue to move other units through that hex. So as the Strategy Guide says, "be careful about causing traffic jams". 


 You can see the sequence of play on the following sheet.


 This is what comes in the box:

252 colorful, one inch square die-cut counters
Two mounted 17" x 22" geomorphic game maps
18 playing cards
3 x player's aid cards
Full-color rules and scenario booklet


 The game plays like you would expect. The rules are easy to pick up, and you will be deciding the fate of your troops in Operation Citadel in  no time. Now, don't think that the brevity of the rules leaves you with a simple game. The rules and game give you the full panoply of a tactical World War II game. The cards can be used for barrages and for aerial strikes among other options. Here is a list of the card options.


 The game allows you to play with Tigers, Ferdinands, and Panthers along with the "animal killer" Su-152. So now we go onto the expansion Tracks in the Mud. Ah, the smell of cardboard representing heavy metal! This comes with this list of bad boys to play with:

Jagdtiger
King Tiger
Jagdpanther
T34/85
IS-3
IS-2
Pershing
Easy-Eight Sherman's
Two what if American versus Russian scenarios
Six scenarios in all


 This is just the icing on the cake. The addition of the ability to play with these monsters is a tactical dream come true. 


  With this already great pack you also get the The Battle of Kursk Strategy Guide. This guide is even longer than the rules and scenario booklet. Stacking, close assault, and fire combat etc. are gone through so that the player is spoon fed what he needs to know. Although to be honest, anyone who has played a tactical game or two should get the hang of the game in no time flat.


 The game play is abstracted so that it gives you a great tactical feel without getting all bogged down in the rules. The close combat rules seem to make a lot of sense. First, the attackers are not in the same hex like most games, so you can use units from multiple hexes to attack. The rules also give you a flanking bonus due to the multiple venues of attack. This would seem in line with real world tactical doctrine. The AFV combat also has some nuances that not only make gameplay faster, but just seem right.  What would you rather do on game night? Stare at the rules and fight over the rulebook or get to it? Those who love tactical minutiae should stay clear of this game. However, those of you looking for a good game that is tense, quick, and challenging, come on down. Simple, but deep tactics, and loads of new shiny AFVs to play with, what more do you want? You are free to argue to your heart's content about the various factors on the AFVs assigned by the designer. That is, once you have played it at least once. 

This is a link to game and expansion:

https://flyingpiggames.com/t/platoon-commander-deluxe

 Robert


 This is a blurb from the designer:


So, What's Different?
I hear that a lot. With all the tactical games on the market, what makes Platoon Commander Deluxe: Kursk different?
Clutterless counters. PCD:K uses color to determine a weapon's range. For example, an Armor Piercing factor printed on gold indicates that the weapon can fire normally at a target up to four hexes away.
Unique phasing. Players alternate attacking in the Fire Phase, but move all their units at once during the Movement Phase.
Flanking Friendly Close Assault Phase. Units do not enter the hex of the Close Assault target, but rather attack from adjacent hexes. This allows the attacker to not only amass the overwhelming odds needed to take that key position, but also attack from multiple directions, which provide a flanking bonus. Additionally, alternating attacks in the Close Assault phase allow defenders to conduct true spoiling attacks.
Ranged combat results are based not only an the target's armor factor and terrain, which determine the column on which the attack is executed, but also the target unit's morale which determines how many hits affected the target.
Artillery is card driven. Neither player knows the other's artillery capability by glancing at a scenario card. Artillery barrages are determined by Action Cards.
Action Cards. PCD:K is not card driven, but rather card assisted. The Action Cards provide artillery, rally units, provide combat bonuses, and even unexpected Opportunity Fire shots.
Focus and Aid Markers. These markers allow players to influence the battle much as their real life counterparts would. Players may choose to focus on a specific area, providing combat bonuses, or provide additional aid to those disrupted by fire.


Command: Desert Storm is the latest DLC pack for WarfareSim's Command: Modern Air Naval Operations (CMANO) which originally came ou...

Command: Desert Storm Command: Desert Storm

For your Wargamer, Toy soldier collector, MiniFig collector, military history nut. Reviews, interviews, Model Making, AARs and books!


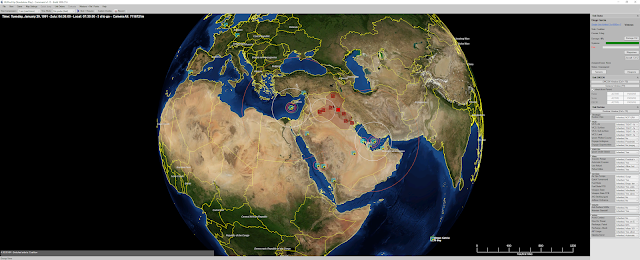
Command: Desert Storm is the latest DLC pack for WarfareSim's Command: Modern Air Naval Operations (CMANO) which originally came out back in 2013.(How the time flies!). Like other such mission packs for CMANO, Desert Storm can either be purchased as an addition to your CMANO library, or can stand on its own if you have not yet purchased the core game. I'll go ahead and say right now, this is not the best way to dip your toe in the CMANO waters if you have not yet tried the system. Desert Storm is going to appeal far more to the seasoned player by offering an interesting set of 15 large scenarios. If you aren't familiar at all with CMANO, you might want to start with my review of Shifting Sands, one of the previous DLC mission packs, where I wrote about the core game quite a bit. Or just hop on over to YouTube and find some gameplay videos. You'll quickly see the kind of gameplay you're getting here.


What makes the Persian Gulf War interesting enough to justify an entire DLC pack? The original CMANO release even includes a pretty substantial Gulf War scenario, why add on a whole pack of them? I wasn't so sure myself until read through the scenario mission briefings, which provide some great insight into all the different aspects of the campaign. While we can all look back and remember the end of the story, how Western air power absolutely crushed the Iraqi military, at the time no one was quite so sure how it would turn out. The United States had not conducted a military operation anywhere near this scale since Vietnam. The Iraqi's had Soviet aircraft and tanks that were aging but still dangerous, and an army full of veterans from the Iran-Iraq War. Would all the advanced technology of the United States prove itself useful or a waste of money? Well, we know the answer to that. The Gulf War brought conventional warfare into a new age. One in which control of the skies meant complete control of the battlefield. Laser guided bombs dropped from stealth bombers and fighter jets could easily knock out one Iraqi tank after another. Bunker busting bombs could crack open hardened aircraft hangers thought to be impregnable. Iraq's vast network of SAM sites and aircraft radars could be picked apart by highly coordinated coalition aircraft. The entire paradigm of conventional warfare has been changed ever since. Command: Desert Storm gives you a chance to take on the role of mission planner and recreate (well, try your best anyway) the massive success that was achieved.


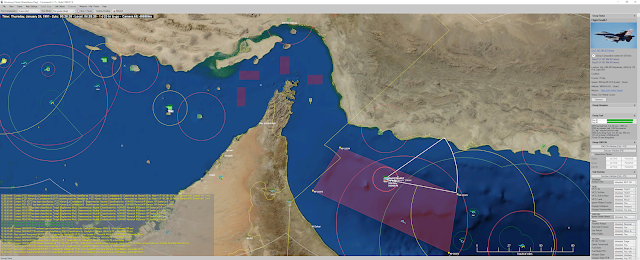
There are 14 Gulf War scenarios here, most historical, with a few hypotheticals thrown in. There is also a hypothetical 2019 Israel vs Iran scenario thrown in there to offer buyers a little of something different to round out the package. Players may be disappointed to learn that there is not a monster scenario of the entire conflict, nor is this a dynamic campaign or a chronological series of scenarios telling a narrative. These scenarios instead offer a smaller chunks of the conflict, highlighting one interesting aspect of the war in each case. There is a mission for hunting down the SCUD launchers, another for targeting the suspected chemical weapons. There is a mission recreating the "Highway of Death" stage of the battle in which you have control over at least 200 aircraft, I couldn't even count them all. While most of the missions are almost exclusively air campaigns (with a carrier group or two around as a base of operations), there is one mission where you are maneuvering some naval assets around the Strait of Hormuz, highlighting just how strategic that bit of geography can be for all involved and another that features the naval battle of Bubiyan. There's are no ground battles, as you might have hoped from the theater depicted. A few divisions make an appearance, but if you're doing your job right they'll never get a chance to shoot anything.


I found the very first scenario especially interesting in its choice of topic. That is the initial shifting of assets from other places to the Gulf. You might be thinking, how hard could it be to move some units around? Well, it ends up being quite the logistical dance when you are trying to rapidly move dozens of aircraft from all over the globe, even from the US itself, to the Middle East, while the situation on the ground continues to develop. Tankers need to be stationed along the routes, and vulnerable aircraft still need escorts since you don't know when hostilities might break out. The whole time while playing I was imagining how this played out in real life. 

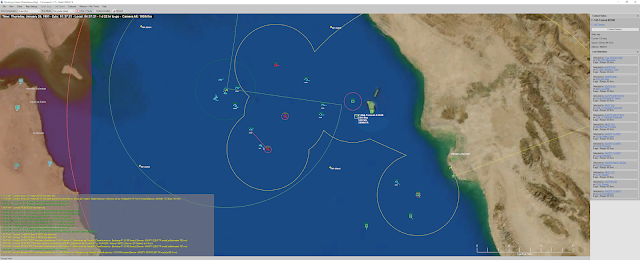
I was also a fan of how some of the hypothetical scenarios can bring Iran into the war. You don't know exactly when or if they will strike, and due to the geography of the gulf you can't avoid getting uncomfortably close to their shores. There are also civilian and Soviet units out there, so you can't just lash out at every sensor contact. It makes for some tense moments, as this uncertainty creates a fog of war even in the age of long range radar. 

Taken all together, the scenarios available here give you a picture of each stage of the war roughly in sequence. The rapid logistical buildup, the first night of bombings, the scramble to take out SCUD launchers and chemical weapons, and the large scale air campaigns which decisively won the war for the coalition. The hypothetical scenarios let you take a stab at many of the what-ifs and offer a greater challenge than the strictly historical pieces.

The Marines are on the way, but will there be anything for them to fight when they get there?

There's not much more to say that wouldn't involve simply describing each of the scenarios. This is a DLC pack that gives you exactly what it says on the box. 15 new scenarios, of high quality, with a mix of hypothetical and historical events.  If you are looking to take a deep dive into the Persian Gulf War, this is the pack for you. $20 will get you many hours of gameplay, as all of the missions are on the bigger, more complex end of the spectrum, some especially so. As I mentioned before, newbies are probably better off grabbing the Northern Inferno pack if they are looking for a taste of what CMANO can offer. For veteran CMANO players just itching for some new scenarios to test their skills on, this is an easy recommendation.

- Joe Beard

Command: Desert Storm is available either directly from Matrix Games/Slitherine or on Steam.


hpssims.com