second chance games

Search This Website of delight

INVASIONS: volume I I was delighted to learn of this new board game in the offing.  I was even more amazed and delighted when I disco...

INVASIONS: volume I INVASIONS: volume I

For your Wargamer, Toy soldier collector, MiniFig collector, military history nut. Reviews, interviews, Model Making, AARs and books!

INVASIONS: volume I

I was delighted to learn of this new board game in the offing.  I was even more amazed and delighted when I discovered that its designer was no less a figure than Philippe Thibaut, renowned for Europa Universalis.

This awesome game first so light as a board game produced by Azure Wish and then in a computer adaptation that has now reached its IV incarnation.

Invasions: Volume I should prove to be an equally engrossing design and one that promises more to come.
To learn more about the game connect to the kick starter link here and to learn about AvalonDigital the company behind the game click here.

AUSTERLITZ 1805 from Trafalgar Editions Just a brief word Having seen the quality of Waterloo, great news is that Austerlitz is...

AUSTERLITZ 1805 in the pipeline AUSTERLITZ 1805 in the pipeline

For your Wargamer, Toy soldier collector, MiniFig collector, military history nut. Reviews, interviews, Model Making, AARs and books!

AUSTERLITZ 1805
from Trafalgar Editions


Just a brief word

Having seen the quality of Waterloo, great news is that Austerlitz is next on the list for this game's system.  With the scope for wider-ranging  movement and hidden units, this is the perfect choice.

As a taste of what's come look no further than their Kickstarter video: Austerlitz 1805


WARFIGHTER PACIFIC from DVG It began with modern conflicts against drug cartels and insurgents across the globe and then moved...

WARFIGHTER PACIFIC WARFIGHTER PACIFIC

For your Wargamer, Toy soldier collector, MiniFig collector, military history nut. Reviews, interviews, Model Making, AARs and books!

WARFIGHTER PACIFIC
from DVG


It began with modern conflicts against drug cartels and insurgents across the globe and then moved back to WWII, initially with the Americans coming up against the Germans.  Soon, single deck expansions reversed the roles allowing the player/s to field German units against the A.I. of American Hostiles.  In came Britain, Russia and Poland with different add-ons giving us more and morevaried equipment, units, actions events etc.

Still, the rules and principles of play remained very similar.  Then, there was talk of Warfighter taking to the future with a sci-fi variant, but for my part I'm glad to say that the latest incarnation has filled the glaring WWII gap and has given us Warfighter Pacific.

Inevitably, the rule book for the most part presents very little that we haven't seen before.  In fact the first 38 pages are well nigh identical, though I was very pleased to see that great care had been taken to consistently substitute different cards and examples in keeping with the Pacific theatre once again to copiously illustrate the rules.


Attention to details like that are what make DVG's products so appealing, as is the quality of all the components.  First class counters - five sheets worth - with rounded corners that press out with ease, combine with the series of decks of cards that both provide the combatants and drive the game functions so smoothly and finally there's the mounted playing board.


This latest one represents for me the best in the series.  Admittedly, still very similar to its predecessors, but once again the various card locations have been given a new set of images, just as the illustrations had been renewed in the rule book.  But best of all is the background scene.


The detail above on the right hand side of the board is very atmospheric, as can be seen in this closer view.


The few charts and deck locations have been streamlined to maximise the crucial space for where the terrain cards and hostiles will be placed, giving a very clean appearance to the whole. Yet again, an ensemble presentation.

For those unfamiliar with the system, I suggest a look at the link here to my original exploration of its processes, before returning to consider some of the specific points in the current Pacific theatre.


As always shed loads of lovely thick counters

As mentioned the bulk of the rule book covers the unchanged base rules; what I didn't expect would be the omission of the excellent final section which provided a play through of a complete 5 turn Mission.  For those new to the system I'm sorry that has not been included.  However, the main reason for that is a new section that covers the very different handling of Campaigns.

Up to now you, the player, have created your own Campaigns by choosing a selection of Mission cards and Objective cards to play out in sequence.  Now Warfighter: Pacific gives you a series of historical Campaigns, covering Wake Island, Makin Island, Guadalcanal, Tarawa, Buna Station and Iwo Jima and two that take us back to the European Theatre, namely: Dunkirk and Market-Garden.

It also introduces the concept of Offensive and Defensive campaigns. Only one of the Pacific Campaigns is "Defensive" and only one Campaign features the Japanese as the Soldier Player.  Both of the European Theatre Campaigns, however, are Defensive.  Especially, with my personal interest- I've recently read Antony Beevor's "Arnhem" - Market-Garden is likely to be an early experience.

The following are the major new elements.  Each Campaign Display sheet has a map with Start Points indicated.  Offensive Campaigns list a series of Starting Location and Objective Cards to be used, while Defensive Campaigns list Starting Location and Mission Cards.    With Offensive Campaigns, a random Location card is drawn which is placed on the main game board in the first spot where a Mission card would normally have been placed and then a D10 roll on a chart gives you both the number of turns and the Location spot where you place the Objective card.

Defensive Campaigns work almost in reverse to the normal expectations.  A random Mission card is drawn and placed in its normal first spot on the game board, but the Starting Location card is placed where the Objective card used to be placed.  Your units are then placed on the Starting Location card and the objective is always to fight your way back to the Mission card! 

As with the first Warfighter WWII game, where you could play only as the American Soldiers versus German Hostiles, in Warfighter Pacific, you can only play as the American Soldiers versus Japanese Hostiles.  These Americans destined for the Pacific theatre of operations differ very little from their European comrades, except that many have the Hardy Hot ability.  For those of you unfamiliar with the overall games, this was a feature introduced through cards in some of the earlier expansion packs - except that then the ability was Hardy Cold to suit Campaigns fought on the Eastern Front.

As before, not all your soldiers will have this ability and so will struggle even more than their fellows to cope.  Incorporating fewer soldiers with the Hardy Hot ability is one way of making your game a tougher prospect!!  To match this many of the new Location cards feature … what else, but JUNGLE.  In fact, Hot/Moist/Light/ Heavy and Warm Jungle - oh and just Jungle too.

Lovely jubbly JUNGLE
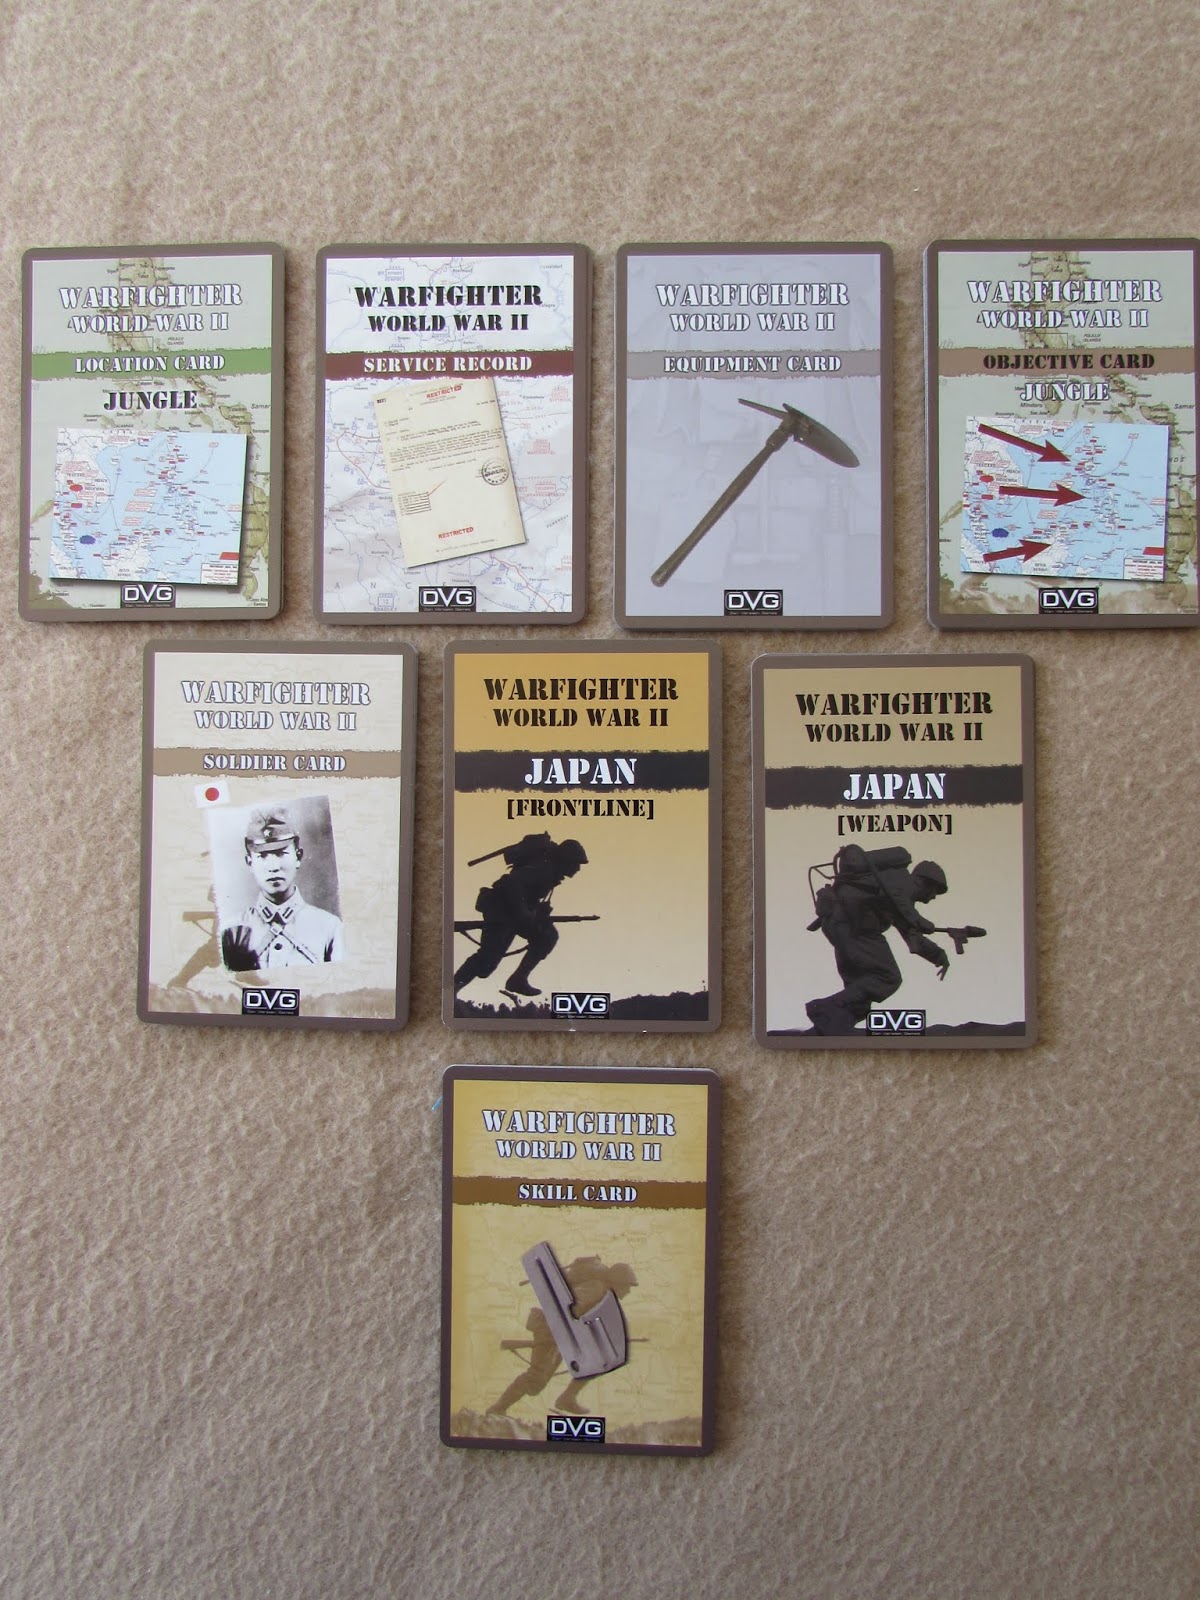
Pitted against them are decks of Elite and Frontline Hostiles - for the toughest experience just use the Elite deck, for a moderately tough experience combine the decks.  Personally, I find Frontline units quite tough enough!  Once again as the initial Warfighter WWII did, even the single Campaign where you can play as the Japanese soldiers will only be possible by buying Expansion Deck 15 which contains the necessary cards for playing as the Japanese.

Fortunately with my review copy of the core game came a stack of many more expansions and so, if nothing else, I would recommend adding at the very least Expansion 15 to your collection, the contents of which can be seen below.  
However, among the other Expansions there are some that I feel I cannot conclude without a mention.  They are my personal favourites, plus ONE that isn't -  but which I suspect will be a favourite for many!!

For me Expansion #24 US Airborne, Expansion #36 Vehicle Pack and Expansion #43 Shore Invasions are a must have, especially the latter with cards appropriate both to the European and Pacific theatre of operations.  So, what's the one I really can live without, but many of you will immediately want?  Any guesses?

Expansion #42 UNDEAD

As they say "chacun a son gout" and I'm dead [sorry!] sure that it will definitely be to the taste of the majority.  So, kit yourself up and set off on your mission to take on even worse foes.

As always many, many thanks to DVG for supplying the review copies 


Armored Brigade, the real-time tactical sandbox which covers a vast swath of Cold War gone hot possibilities, has received its first add on...

Armored Brigade - Italy-Yugoslavia Pack + Campaign Generator Armored Brigade - Italy-Yugoslavia Pack + Campaign Generator

For your Wargamer, Toy soldier collector, MiniFig collector, military history nut. Reviews, interviews, Model Making, AARs and books!


Armored Brigade, the real-time tactical sandbox which covers a vast swath of Cold War gone hot possibilities, has received its first add on content. It's called Nation Pack: Italy-Yugoslavia, and as the name suggests, it adds two unique new nations to the game. I won't go too far into describing the base game, since Robert did a good job of that here. Suffice to say, this a 2D RTS that will feel familiar to anyone who has played Close Combat or Combat Mission. 


What really sets the game apart is its vast scope. The game covers theoretical war in Europe between the years of 1965 and 1991. Accurate army rosters are available for 7 different nations in the base game, with this add-on increasing the count to 9. The other significant feature of the game is how it generates battlefields. Rather than having hand crafted maps or randomly generated ones, the game ships with several gigantic, accurate maps of various interesting locales in Europe. Individual maps are then generated from this by simply drawing a box of your desired size on that big map, and there you go, a new place to fight over. Combat can scale from company sized skirmishes to brigade sized brawls. This is the beauty of the game, it can be stretched and squeezed to give you exactly the sort of battle you want. 


Infantry squad knocks out a T-55 after losing their ride into town.
This new nation pack extends that sandbox even further by giving you two new nations to play with and a new map that covers 61 square kilometers of the Italian-Yugoslavian border. The two nations combined add over 250 new units to the game. That's a lot of new toys to play with! Now, I'm no aficionado of the Italian and Yugoslavian military makeup in this era (or any, really), so I'll link to the official description here which has a nice summary of the strategic thinking in those nations during the Cold War. The short version is, these nations were not the titans of the world, fielding first rate tanks and elite infantry. These are the oddballs, nations that had no desire to fight WW3 to begin with, nor did they have the resources to match the big boys if they wanted to. I've loved playing these sorts of secondary powers in every wargame since I got Combat Mission: Barbarossa to Berlin as a kid. It's always fascinating to dig around in the OOB and see what kinds of units are available, and then figuring out how to fight a battle with what you've got. Here I was especially interested in some of the earliest formations, which include plenty of WW2 leftovers. I know lots of people are clamoring for the game to be expanded into a full on WW2 game, but here you can at least get a taste. 


Now, let's look at the new map a bit, as it offers a great variety of terrain to fight over. There are constricting mountain valleys, wide open plains, urban zones, coastal areas, and lots of rivers to cross. I have not fully explored the map yet, of course, but every battle so far has been on a tactically interesting battlefield. Where the map really shines is when you combine it with the new campaign generator.

The one great shortcoming of Armored Brigade (besides the lack of multiplayer) is that the game does not come with any campaigns and only a handful of scenarios. Those scenarios are mostly tutorials, and after playing around with them you are left with only one-off battles that you generate. While the battles you can generate are excellent, and created exactly the way you want, they are still just one off battles with no narrative or larger stakes to consider. That has all be changed with the free update launching alongside this nation pack, which adds a dynamic campaign generator to Armored Brigade, even if you don't have the DLC. 


Each green box represents a potential battlefield for the campaign. It can be much shorter, of course, or feature much larger battlefields.
This campaign generator is analogous to the single battle generator in that it is very flexible and easy to use. You just click on the map to indicate the general track you want the campaign to take, tweak the settings and scope as you please, and away you go. Each campaign starts off with a meeting engagement, and then the winner will advance and the loser retreat. As the battle moves towards one end of the campaign track or the other, the defender will be able to get more supply points and be able to build fixed defenses like pillboxes and such. If the momentum of the battle shifts and the fighting passes back over old ground, the destruction of the previous fights will be evident. This can change the landscape of a battlefield that is fought over several times, creating an immersive narrative for the player. Losses also carry over from one battle to the next. The player will receive a certain amount of supply points after each battle, and these can be used to repair and refit units lost in the fighting. 


This is a feature that the game desperately needed, and I'm happy to see it added as a free update. Really the only thing that I didn't like about the base game was that the battles never felt like they carried much weight, since they were just randomly generated one-off affairs. Now you can have a narrative arc, with real consequences for your losses and poor (or brilliant) decisions in battle. I haven't had enough time with the game to play out any epic campaigns just yet, but I imagine many players will be firing up a titanic US vs USSR campaign that spans the length of the Germany map. The especially cool thing is that everyone's campaign will be unique!

So, if you have been enjoying Armored Brigade so far, this is an easy recommendation. The two new nations add some extra variety to what is available in the base game, and the new map is excellent. If you were on the fence about Armored Brigade, the free update including the campaign generator has given it a lot more value, and I suggest that you take another look. I imagine we will be seeing several nation packs similar to this one over the next couple of years, and I look forward to trying them out. In a sandbox of a game like this, you can never have too many toys or too much sand.

Armored Brigade and the Italy-Yugoslavia Nation Pack are available directly from Matrix/Slitherine.

- Joe Beard


Dunkirk by Worthington Publishing  Operation Dynamo was an outstanding success, carried out under the Ge...

Dunkirk by Worthington Publishing Dunkirk by Worthington Publishing

For your Wargamer, Toy soldier collector, MiniFig collector, military history nut. Reviews, interviews, Model Making, AARs and books!

Dunkirk

by

Worthington Publishing


 Operation Dynamo was an outstanding success, carried out under the German noses. Was it helped by Hitler's private thoughts about England, or his memories of Flanders, we will never know. The game itself is not just about the Battle of Dunkirk, but about the entire German invasion of France in 1940. Let us see what comes with the game:


  • Hard mounted game board
  • Wooden blocks with labels for German and Allied armies
  • Deck of 55 game cards
  • 6 German strategy cards (larger than standard game cards)
  • Rules
  • Dice


 When you open the game it seems a little sparse, but many times good things come in small packages so I kept an open mind. The map is on the smaller side, but adequately shows the area of Northeast France that is needed for gameplay. The hexes are large, which really helps with block games, especially when you can have more than one block per hex. The other components are likewise, more workman like than artsy. I wouldn't say they were Spartan, but they show the player everything he needs to know without extra glitter. The game also comes with cards for both the German and Allied player. 


 Even though there are cards for both players, they are not the process that runs the the game. To quote the designer, "The game is not card driven, but card enhanced. The game is chit driven". The most interesting part of the design is the 'German strategy cards'. These give the game a lot of longevity and replayability. Sure, the German player could try the 'sickle cut' maneuver, but he could lose nine out of ten times depending on what strategy card he chose at the start of the game. The Allied player is put on the horns of a dilemma, which strategy card did the German player pick. So one of the the things the designer notes suggests is for the German player to make moves to head toward different cities etc. to keep the Allied player guessing. The rulebook is only twelve pages long, and three of them are taken up by designer notes, etc. However, unlike the other Worthington games I have played, the rules are a lot more  in depth. The other games were simpler, but still good games. The rules are deeper than you would assume for the game. This is the sequence of play:

1) Add or Remove Command Chits per the Turn Record Chart.
2) Deal each player a card(s) as indicated on the Turn Record Chart.
3) Seed the opaque container with the Command Chits indicated on the Turn Record Chart.
4) One player (does not matter which) draws a Command Chit from the container. That Formation is now the Active Formation.
5) FHQ (Formation Headquarters) ACTIVATION: The owner of the Active Formation reveals to the opponent the location of the FHQ (in order to prove the FHQ's Command Range).
6A) FORMATION MOVEMENT PHASE: In-Command blocks of the Active Formation may move to their full Movement Rating, limited only by terrain and enemy blocks.
6A) POSSIBLE SHQ (Strategic Headquarters) STRATEGIC MOVEMENT: The owner of the Active Formation may, if desired, spend a SHQ step(s) to perform a Strategic Move with a block(s) of the Active Formation. This may be done concurrent with the Movement described in 6a above, BUT NO BLOCK MAY USE BOTH Formation Movement and SHQ Movement during the same Activation.
7) POSSIBLE SHQ OUT OF COMMAND MOVEMENT: The owner of the Active Formation may, if desired, spend a SHQ step(s) to perform Out of Command movement with a block(s) of the Active Formation.
8) combat phase: Battles exist in any hex containing enemy blocks and at least one block of the Active Formation. Owner of the Active Formation selects the sequence in which battles will be resolved. 
8A) BATTLE CARD PLAY: Each player may place ONE (1) Cattle Card per battle, if desired. Players simultaneously declare (show) a Battle Card if they wish to play one.
8B) BATTLE ROUNDS: Each battle lasts for one round of combat. A second round may be purchased BY THE ATTACKER ONLY using SHQ steps or possibly) a card play. No battle may have more than two Rounds per Activation. A side may NOT play a Battle Card in the second round of battle, if that side played a Battle Card in the first round.
9) Repeat steps 4 through 8b until no Command Chits remain in the opaque container.
10) REINFORCEMENTS & RESERVES PHASE: Players may play ONE Reinforcement card, adding steps per the Reinforcement rules. Players may ALSO spend SHQ steps to conduct a SHQ Reserves action, returning an Eliminated block(s) to play, per the Reserve rules. Players also add one free SHQ step to their SHQ block (Note: there is no Reinforcements/Reserves phase at the end on Turn 6.
11) Start the next turn with step 1 above. At the end of Turn 6, calculate Victory Points to determine the winner of the game based on the German Strategy Card selected.


 As you can see, any game (no matter what German Strategy Card is used) lasts only six turns. Airstrikes/Artillery strikes take place when a player uses the correct Battle Card for them. Airstrikes/Artillery strikes cannot eliminate an enemy block. 


 I think it's a good game with a little bit more added  to the rules than most block games. The rules are spelled out plainly for the players. There are also some optional rules that can be added to balance out the play between two players. You can "dial down" certain blocks to make it easier for the opponent. You could also remove certain powerful cards from one player's deck, among a few other things, to make the game more balanced. I have reviewed quite a few block wargames now, and have had a complete change of heart. I used to look down my nose at them as some kind of 'Stratego' game made into a wargame. The block wargames are just as good, and play just as well as hex and counter games. This is another good and relatively quick game that Worthington Publishing has added to their stable of growing games. You will be playing as either von Bock or von Rundstedt, or the Allies in no time flat. Thank you, Worthington Publishing, for letting me review this game.

Link to Worthington Games:
https://www.worthingtonpublishing.com/

Link to Dunkirk:
https://www.worthingtonpublishing.com/collection/dunkirk-france-1940

Worthington Publishing's newest kickstarter 'Napoleon Returns 1815':
https://www.kickstarter.com/projects/1456271622/napoleon-returns-1815?ref=dkeeld

Grant's Gamble review:
https://www.awargamersneedfulthings.co.uk/2017/11/grants-gamble-game-by-worthington-games.html


Robert

The already impressive roster for Field of Glory II expands into the Dark Ages with the Wolves at the Gate DLC recently announced by Slit...

Wolves at the Gate DLC Announced for Field of Glory II Wolves at the Gate DLC Announced for Field of Glory II

For your Wargamer, Toy soldier collector, MiniFig collector, military history nut. Reviews, interviews, Model Making, AARs and books!


The already impressive roster for Field of Glory II expands into the Dark Ages with the Wolves at the Gate DLC recently announced by Slitherine. From the press release:

Summary of features:
- 19 new factions
- 55 new units
- 76 new army lists
- 6 new Epic Battles
- 74 new Quick Battles
- Expanded Custom Battles module.
- Expanded Sandbox Campaign module.
- 6 new historically-based campaigns.
- New Allies feature added in accompanying game update.


This expansion extends Field of Glory II forward to 1040 AD, exploring the rich military history of the so-called “Dark Ages”, from the whirlwind Arab Conquest to the depredations of the Vikings and Magyars, the birth of England, France, Germany and Spain, and the long struggle of the Byzantine Empire to keep Roman civilisation alive in the east.

From 600 to 628 AD the Byzantines were locked in a titanic struggle for survival against the aggressive Sassanid Persian Empire, from which they eventually emerged victorious. Both empires, however, were severely weakened. Six years later, in 634, the newly Islamized Arabs erupted forth from Arabia, quickly defeating the Byzantines and Persians. By 750, under the Umayyad Caliphate, the Muslim Arab Empire stretched from Spain to the borders of India.


The Byzantine Empire, after losing its Levantine and North African provinces, survived the initial Islamic advance. Constantinople endured a year long siege (717-718), and this proved to be the beginning of the end for the Umayyad Caliphate. Eventually, weakened by defeats on the frontiers of their vast empire and internal unrest, the Umayyads were overthrown by the Abbasid dynasty. The great Islamic Empire was now split into many separate, and often competing states. The Byzantines grew stronger under the Macedonian Dynasty (867-1056), and ended the period more powerful than they had been for many centuries. In Northern Europe, Viking raids started in the late 8 th  century. Superb sailors, they used their longboats to strike across the Baltic and North Seas against towns, farms and monasteries, and raid as far as Seville and Constantinople. Eventually they settled down, and created important states in Normandy and the Kievan Rus. Their invasions of the British Isles resulted in centuries of intermittent warfare with the English, Irish and Scottish kingdoms.

Charlemagne ruled as King of the Franks from 768-814 AD. The kingdom he inherited already included most of modern France and parts of Germany. By his death in 814, his empire encompassed modern France, Belgium, the Netherlands, Germany, northern Italy and a strip of northern Spain. In 800 he was crowned “Emperor of the Romans” by Pope Leo III. After his death the Carolingian Empire split into two main states, West Francia (modern France) and East Francia (modern Germany).


In the 9th  century the nomadic Magyars erupted into European history. Their western raids reached as far as Spain. Their defeat by the Germans at Lechfeld in 955 ended their threat to Western Europe and in 1000 their High Prince accepted Christianity and was recognized as King of Hungary by Pope Sylvester II, ruling under his Christian name of István (Stephen) I.

You can read the full description on the Slithirine store page here.

Post men at the walls, and watch for our review in the near future!

- Joe Beard


Battle Brothers newest DLC invites you to visit the frozen frontiers and battle barbarians. From Overhype Studios, Battle Brothers was ...

Battle Brothers - Warriors of the North DLC Battle Brothers - Warriors of the North DLC

For your Wargamer, Toy soldier collector, MiniFig collector, military history nut. Reviews, interviews, Model Making, AARs and books!


Battle Brothers newest DLC invites you to visit the frozen frontiers and battle barbarians. From Overhype Studios, Battle Brothers was one of my favorite games of 2017, and you can read my original review here. In this excellent mash up of Mount and Blade and XCOM, you build up a plucky band of mercenaries as you travel the land taking on jobs to earn money. More money means you can hire more men, buy them more expensive gear, and keep them fed. If, like me, you enjoy sticking new gear onto an RPG paper doll, this is the game for you. Each man in your company has his own little equipment screen, where you can equip him with armor, headgear, weapons, and trinkets. Each mercenary also has an extensive set of stats like morale and max fatigue that can be improved over time. The game has two layers, the over world, which is very much like Mount and Blade, and turn based battles. If you want to read more of the details of the general gameplay, check my review linked above. If you are familiar with the game, you probably want to know what this new DLC is all about.

Warriors of the North, as you might guess from the title and artwork, adds in an entire new faction of enemies to face: Barbarians. These guys have a primitive Viking/Rus feel to them, coming at you with fur covered armor and horned helmets. Like the other enemy factions in the game, they have some unique mechanics that you will want to consider when you go into battle against them. The barbarians like to come in hard and take big swings, but this tires them out quickly. They'll often be accompanied by a tribal drummer, who restores their fatigue at quicker rate. They also might have a beastmaster with them, who brings along a big scary pet or two. Taking down these special enemy types will play a key part in your strategy. 


To go along with these new northern enemies, the north end of the map has been fleshed out a bit, and the game has received some new music tracks. I usually don't pay too much attention to music in games, but I found these to be noticeably good. All the barbarian gear can of course also be looted and equipped by your soldiers, giving them a more "northern" look if you so choose. This is a game that shines all the more brighter with more variety, and this DLC adds to that quite a bit. Previously you mostly had standard medieval style cloths and armor, but now your guys can be decked out with furs and helmets with antlers and the like.

While the barbarians make up probably the single biggest feature of the DLC, there's a lot of other good stuff here too. Previously, each time you started the game, the beginning was always the same. You were part of a mercenary company that is ambushed and the leader killed. You then take control of the company and get three mediocre members to get you started. Now, when you fire up a new company, you'll have a choice of ten different origin stories. These aren't just slightly different variations that ultimately don't matter, no, these starts all have long term advantages and disadvantages. 


I'll highlight the two I was most drawn to for this review. The first I tried was, naturally, the one rated most difficult: the lone wolf start. In this scenario you begin with exactly one merc, a veteran hedge knight equipped with upper end gear and a decent amount of money. This guy can take on two or three early game bandits without breaking a sweat. Where's the challenge? Oh, this hedge knight is actually you, so if he dies then the game ends. In a normal campaign, "you" are never represented in the field. Any given mercenary can die and it doesn't matter. Not so with this scenario.  Pair it up with Ironman mode and you've got yourself a whole new level of tension. Also, you can't hire more than a dozen men at a time, so that means your avatar will have to continue fighting, even as the enemies you face get nastier.


The other scenario I tried is pretty much the opposite. In the peasant militia start you begin the game with 12 peasants looking to take their local militia show on the road and win themselves some glory and coin. While you start out with 12 men, they all have bottom-tier equipment, if they have anything at all! It takes a lot of money to keep all of these men fed and paid, and buy them all some decent stuff. Once you have the funds to supply and pay them all, you can even take 16 men into battle instead of the usual dozen. The downside to all of this is that your group is prejudiced against anyone of higher birth, and so you can only recruit fellow peasants and lower class individuals. This means that any mid and late game losses will have to be replaced with level one nobodies that will need a lot of experience to catch up. 

The other start I'm interested in trying is the Davkul cultists. Yes, you can play the game as a roving group of cultists, recruiting those of like mind and maybe sacrificing them to Davkul at some point...

Another new addition to the game are the Champions. These are especially strong enemies among each faction who carry unique named items for you to take for yourself. While a straight forward addition, it's a welcome one that gives you some emergent gameplay as you follow tavern rumors to track down these mini-bosses. Along that line, there are two new legendary locations and bosses to take on, and a smattering of new quests and events to discover, and of course new weapons and armor to equip. In Battle Brothers, weapons define the abilities of your men in combat, and so adding new ones isn't just a visual effect, it opens up entirely new options in strategy. 


Since I never did a review on it, I'll briefly mention here the other major DLC for Battle Brothers called Beasts and Exploration. This one came out last year and really fleshed out the game beyond the solid, but limited main game content. It adds lots of monsters, bosses, and legendary locations to the game. It also allowed you to loot trophies from all of those new monsters and craft them into new stuff. In addition, it added the ability to customize your gear, upgrade your armor, and even repaint shields. Before that, they put out the Lindwurm add-on for free. This was likely a test run for the bosses and such that came later. It only adds one special enemy and some related items to the game, but hey, it was free! Since release, they've also patched and balanced the game several times, turning what was already a great game into an even better one.


With a reasonable price tag of just $8.99, I find it very easy to recommend Warriors of the North to anyone who enjoyed Battle Brothers. The new faction, items, and bosses add ever more variety to the game world, and the new origins will ensure that you can play several campaigns with quite a different experience than the default start. As I said in my original review, this is a game that has tons of room for quality DLC. The two so far have been exactly what I was looking for, and I hope there are more to come. This game is a wonderful sandbox, and the more toys the better.

- Joe Beard

Battle Brothers is available directly from the developers and can also be found on Steam and GoG.


Close Combat: The Bloody First - Join the Beta! Close Combat: The Bloody First - Join the Beta!

For your Wargamer, Toy soldier collector, MiniFig collector, military history nut. Reviews, interviews, Model Making, AARs and books!

First things first, this article is much belated. I took a bit of a hiatus from posting here last fall and this new add on for Afghani...

Afghanistan '11 Royal Marines DLC - AAR & Review Afghanistan '11 Royal Marines DLC - AAR & Review

For your Wargamer, Toy soldier collector, MiniFig collector, military history nut. Reviews, interviews, Model Making, AARs and books!


First things first, this article is much belated. I took a bit of a hiatus from posting here last fall and this new add on for Afghanistan '11 was next on my list to review, but when I came back it slipped through the cracks and was missed. So, I thought I would make up for being tardy by writing up a combo AAR and review. 

From developer Every Single Soldier, and publisher Slitherine, Royal Marines is an expansion for Afghanistan '11, a game just as much about the logistics of war as it was about the fighting. Royal Marines doesn't change up the formula too much, but does give you some new toys to play with, and some additional options for conducting your counter-insurgency (COIN) ops. 

Like in the base game, Royal Marines includes a 10 mission campaign with historically based scenarios that give you unique situations and restraints to deal with. The other way to play the game is by jumping into a randomly generated map, where you will always have the same overall objective, but be completely free in how you want to pursue it. I have not played through the entire Royal Marines campaign, but I sampled several of the missions and saw that there is some good variety here if you are looking for a fresh challenge. This early mission, however, is not very complex, but I thought it would give a good sampling of what the game is like.

Today I'll be playing the second mission of the campaign, Operation Condor. This mission is loosely based on a real event. On May 16th, 2002, an SAS patrol was attacked for several hours by militants. The SAS patrol was extricated from its predicament by the arrival of AC-130's and Apache helicopters. The next day, a 1000 man strong force led by Royal Marines was deployed to the area with the goal of eliminating any enemy presence. 


For the purposes of this scenario, that real life operation is abstracted as seen below. I have a base already established in the central, somewhat eastern area of the map. I need to send out forces to hunt down and destroy all Taliban units on the western half of the map. In A'11, the east edge of the map always represents Pakistan, and that is where new Taliban units will come from. Cutting off any reinforcements will be an important part of my strategy. Local militant units can also pop up from hidden caves all over the map. These are difficult to eliminate entirely, but doing so isn't my concern in this scenario. I'll also need to get the Hearts and Minds score above 55, which shouldn't be too difficult. In A'11, winning over the local villages scores you more political points (your currency for new forces) and can yield intelligence, like the location of poppy fields which supply funds to the Taliban until they are destroyed. 


It doesn't take a tactical genius to look at the map above to see that geography will not be on my side in this scenario. Much of the map is mountainous terrain, with only one lonely winding road linking the two groups of villages. I'll need to get SAS units up in those mountains to spot for the enemy, and a convoy organized to travel through the valley and set up a FOB (forward operating base) on the far side. Every unit can only carry a limited amount of fuel/rations into the field. This means that any forays by friendly units must either be short ranged, or directed towards a FOB where they can resupply and take shelter from insurgent ambushes. For the insurgents, the mountains represent their safe haven, where only a few of my units can reach them. My special forces units (the SAS boys) are able to stay in the field longer than regular infantry, and can set up observation posts from which they can spot insurgents scurrying about in the mountains. They will be the key to locating the enemy. Once spotted, helicopters, artillery, and air strikes will be brought to bear to wipe them out. A FOB on the western half of the map will allow me to keep my helicopters and SAS units supplied. A conventional ground force will be needed to establish and secure said FOB.


Before going on the offensive, I first want to send a small convoy out to visit the nearest village to the east, and then set up a FOB a little further down the road. Spreading FOB's all over the map is generally a good idea, as it gives you more places to park units and to extend your reach. You can also use SAS units to train Afghanistan National Army (ANA) units in each FOB. In a normal game of A'11, as the turns go by you are forced to gradually hand over security to the ANA, so the more troops you can train, the better. You can also train ANA helicopters, artillery, and APC's at your main base, which I will also be doing. We will need a lot of helicopters in order to overcome the difficult terrain here and sustain the SAS posts in the field without interruption.


The visit with the village elders goes well, and we are given the location of a poppy field on the far side of the map. Taking this out will net us some political points, and weaken the Taliban. The only problem is that the field is much too far away to reach on the ground until we have a FOB over there. Luckily, we have helicopters on tap. Unfortunately, a couple of Taliban units pop up and damage our mine-detecting unit at the head of the convoy on the next turn. Without its ability to detect and destroy IED's, any road trip into uncontrolled territory will almost certainly meet disaster. The convoy is recalled back to HQ to repair.


While my first mine detector is in the shop, the second is sent down the road to the west, in an attempt to clear the first section of the road for follow-on forces in the next turn. The unit is also ambushed by insurgents and damaged. It seems the enemy is not hiding, but is aggressively operating right outside my main base. A drone is called in (you can have one on the map at a time) to recon the area. Three militant units are spotted and our available firepower is directed at them. Artillery and infantry from HQ, and an airstrike (an ability that can hit anywhere on the map, but has a long cool down) are used to knock out one of the enemy detachments and send the others fleeing. It seems we will need to clear out the immediate area before making a run to the west. To this end, I deploy a couple of SAS units into the nearby mountains.


Helicopters are not completely immune to insurgent forces, but they don't have to worry about IED's or terrain, making them critically important in A'11. Despite the rocky start to the ground campaign, the Royal Marines of Charlie Company are airlifted across the map to that poppy field that the villagers told us about. Destroying it should slow the flow of new Taliban units, and rewards us with 1000 political points, which is quite helpful as I've overextended a bit and almost run out. Without a nearby FOB established, the Marines hop aboard their helicopter for a ride back to HQ. 

(Apologies for some of these images being far too bright. From what I gather, there is some kind of shader issue right now which causes this to happen The developers are working on it.)


A couple of turns later, my second attempt at a western bound convoy is more successful. As you can see above, the vehicles have almost reached the key crossroads on the western half of the map. However, they are still a couple of turns away from safety, and end this turn in a highly vulnerable position sandwiched between two mountain ridges. From the message log, you can see how important sweeping for IED's is in this game. Three were eliminated on this turn alone. The insurgents will come back by and try to place more IED's all the time. Areas under direct observation are safe, but even a recently traveled road cannot be trusted if it was out of your sight for just a turn or two.


Back to the east, the Taliban presence is still strong. I was able to establish a waterworks at the nearby village (which makes them happy and nets you political points each turn) but my convoy was once again forced to retreat to safety before establishing a FOB. Pushing out in this direction will require some firepower. Luckily for me, a special event fired which gave me TWO Apache gunships for free. These are some of your most potent offensive weapons in the game, but come with a hefty price tag. Getting two for free is a real boost, and I set them to work immediately. The Apaches can engage the enemy from long range, don't have to worry about terrain, and have a decent chance of destroying an insurgent unit in one hit. These enemy units are also in range of my artillery, and it gives them a good reason to run back to Pakistan.


Ten turns in, let's take stock of the overall strategic picture. So far, I haven't accomplished much, but the framework is there. I have SAS units monitoring the mountains to the north, my convoy safely arrived in the west, and the local area around HQ is now secure. I've also won over the neighboring village and made visits to a couple of others. All that said, there are still a lot of insurgent units on the board, plus more that I can't see.

Visiting villages is an important part of the game, as it helps increase your H&M score, and occasionally gives you the location of an enemy unit, IED, or poppy field. This intelligence isn't always available however. Villages with little campfires burning are more likely to give you info, and so you want to visit them ASAP. In the original game these fires would stay lit until you came by, but in the Royal Marines DLC, they will go out soon if you do not make a visit. I like this change, as it adds some urgency to this aspect of the game, and forces you to be more flexible. 


On the next turn, a sandstorm blows in. This limits movement for all of my units and I have recall some helicopters back to HQ before they can complete their assignments. Fortunately for my western convoy, they are able to get the FOB built, and take shelter within it. Nature can at times be a greater obstacle than the enemy.


As the sandstorm clears, my western FOB gets to work. The minesweeper heads out to clear IED's from the nearby roads, and the Marines visit the village. My construction vehicle is also dispatched to build a water works there. All of these actions draw the local villages to the coalition side, making things easier for me, and satisfying the second victory condition for this scenario. My next step here will be to try and win over the village to the north. It isn't very far away, and is along the road. The village to the south is irrelevant at this point, as it is too remote to commit my limited resources towards. Sorry, folks! 


Zooming back out, you can see that I now have a FOB in the east and west. The HQ area looks clear, but out west we have a swarm of insurgents and IED's to deal with. I've also lost the village in the NE corner of the map to the militants. Winning them back may be difficult due to their location far away from my primary objective. For now I'll focus on eliminated the enemy from that area. Additional units are dispatched west now that they can operate out of the FOB.


At the western FOB, the fighting gets intense as several more Taliban units pop up. My SAS men are there to spot them, and once again heavy firepower is brought to bear. One Apache arrives to help the outpost, and an artillery unit will be airlifted over soon. Artillery units in FOB's require a lot more attention than they do at the HQ. A dedicated artillery expansion must be built for the FOB, and ammunition must be brought in by supply trucks or helicopters on a regular basis. For this mission, supply trucks are simply not an option. My helicopters continue to do logistics work, bringing rations to the SAS units in the field, and supplies to the critical western outpost.


On turn 16, things are looking good, but we still have our work cut out for us. The eastern FOB is busy fighting off Taliban reinforcements coming over from Pakistan. This is exactly what I want, but continues to tie down one of my Apaches. In the west, the enemy has been beaten back from the FOB, but still has a presence scattered around the objective area. Fortunately for me, I now have a nearly complete net of SAS observers gradually moving west and sweeping the area. Each time an enemy is spotted, artillery and helicopters operating out of the FOB are called up to eliminate them.


A couple of turns later, and the strategic picture is looking excellent. The enemy has been eliminated from most of the map, I have eyes in the field able to stop any new units from entering the objective zone, and a convoy headed out of the western FOB on its way to make nice with that northern village. A couple more poppy fields were found and eliminated, giving me a massive advantage in resources. Things are looking good!


Things are going even better than I thought, as on the next turn my Apache gunship takes out this final Taliban unit in the objective zone, fulfilling that part of the mission. As you can see, my Hearts and Minds score is now at 66, well above the required 55 for the scenario, and my political points are maxed out. All and all, a very good operation for the coalition despite some early stumbles. I call the mission a win, even though it doesn't actually end on the next turn. One thing I don't like about the campaigns in A'11 and this expansion, is that sometimes you are forced to play the scenarios out to the full 60 turns of a standard random map, despite completing the assigned objectives of the scenario. In this case, I've completely taken over the map and won over the villagers. Continuing to play would simply involve clicking end turn and smoking any insurgent unit silly enough to wander into range. Not too exciting, so I call it win and pack things up. In a full standard match, part of the challenge is that you must hand over control to the ANA gradually over time. At the end, the ANA must stand alone against the insurgents. In that case, it makes sense to play out to 60 turns, since that is part of the experience. Here though, it doesn't really gel with the idea of specific set of goals based on a relatively short real world operation.

That ends the AAR, but I have a couple more points to make for the review. Several other changes come with the DLC that I haven't mentioned so far. One significant addition, which didn't make an appearance in this scenario, is the inclusion of civilian traffic along the roads. And yes, as you might guess, this traffic can be used by the Taliban to send suicide car bombs right up to your units. In order to screen this traffic, you can now build roadblocks wherever you see fit. In order to help balance things out, and add some immersion to the game, you can now also get Afghan police units. You earn these by winning over villages to the coalition. This all adds yet another layer to the intricate dance of logistics and planning that is Afghanistan '11. Much like in the real conflict, engaging with and destroying the enemy is the easy part. Building up the infrastructure that will allow you to lock down an area and keep the insurgents out is the difficult part.


If you enjoyed the base game, it's safe to say that you will enjoy the Royal Marines add on. With new missions, new strategies, and new units to play with, there's plenty here to explore. Especially for the very reasonable price of $10, you really can't go wrong.


Afghanistan '11 and the Royal Marines DLC are available directly from Matrix/Slitherine or on Steam.

- Joe Beard


P.S. - I hope you enjoyed the AAR. I plan to do some full fledged ones soon, so this was a bit of trial run.

Night Fighter Ace Air Defense Over Germany 1943-44 by Compass Games    This is an unboxing and review of Nigh...

Nightfighter Ace: Air Defense Over Germany 1943-44 by Compass Games Nightfighter Ace: Air Defense Over Germany 1943-44 by Compass Games

For your Wargamer, Toy soldier collector, MiniFig collector, military history nut. Reviews, interviews, Model Making, AARs and books!

Night Fighter Ace

Air Defense Over Germany 1943-44

by

Compass Games


 This is an unboxing and review of Nightfighter Ace from Compass games.  From the moment you open the box you will be astounded by both the amount and quality of the components that come with the game. BGG has a rating of 8.38 for the game right now, and I believe that is right on the money. This is a solitaire game with you playing the German aviator side.This is the product information:


  • Complexity: 6 out of 10
  • Solitaire Suitability: 10 out of 10
  • Time Scale: 3-4 days per Turn
  • Map Scale: Abstract
  • Unit Scale: individual aircraft, individual weapon systems, individual electronic systems, specific crew members, and ammo rounds
  • Players: one (with option for two or more)
  • Playing Time: two to three hours


This is what you get with the game:

  • One Countersheet of 9/16" unit-counters
  • Sixteen Aircraft Display Mats 8.5" x 11" (double-sided, 32 total)
  • Four Player Aid Cards 8.5" x 11"
  • One Combat Display Mat 8.5" x 11"
  • One Bomber Target Mat 8.5" x 11"
  • One Pilot Awards Display Mat 8.5" x 11"
  • One Air Operations Display Mat 11” x 17”
  • Forty Ace Pilot Cards
  • Sixty Combat Cards
  • Rules Booklet featuring extensive Historical Background
  • One Logsheet 8.5” x 11”
  • Two 6-sided and one 10-sided die

  The addition of a real logbook instead of just one page to copy is a great one.


 One of the game's greatest assets is the amount of different airplanes and variants of them that the player can use.
This is a list of them done by their availability:

Bf 110 F-4 - Start of Game
Bf 110 F-4a
Bf 110 F-4/U1
Bf 110 G-4/U1
Bf 110 G-4/U5
Bf 110 G-4/U6
Do-215 B-5
Do-217 J-2
Do-217 N-1/U1
Do-217 N-2/R22
He 219 A-0
Ju-88 C-6b
Ju-88 R-1
He 219 A-2
Bf 110 G-4a/R3
Bf 110 G-4b/R3
Bf 110 G-4c/R3
Bf 110 G-4d/R3
Ju-88 C-6c
He 219 A-5/R1
He 219 A-5/R2
He 219 A-5/R3
He 219 A-5/R4
He 219 A-7/R1
He 219 A-7/R2
He 219 A-7/R3
He 219 A-7/R4
Ta 154A-1
Ju-88 G-1
Ju-88 G-6b
Do335A-6
Do 335B-2 - July 1944

  That is one long list.


 The game is really a very good simulation of this part of World War II, or at least it feels it. To me that is one of the biggest challenges to a game designer, to try and make the player feel that he is in that moment of time. The game is one of those that really draws the player in. You develop a interest in your made up or cardboard aviator. It helps that you can actually win medals etc. The component sheet below actually comes with a uniform where you can put the various medals your ace accumulates. This is a very nice touch. 


  The rulebook is up to the high standards of the other components. It is full color and is easy to read with many examples of how to play. Strangely for such an immersive game, the rules themselves are only sixteen pages long with another page for optional rules. A nice touch is that the back of the rulebook has an index of all the rules for finding them quickly if needed. The last part of the rulebook is an entire eight pages of:
Designer Notes
Historical Notes
Aircraft
The Top Five German Nightfighter Aces


 The optional rules allow you to play the game cooperatively or in competition. You can also play with 'Ace Pilot Cards' albeit starting earlier in their careers. One optional rule adds pilot fatigue to the game. There is also an 'Extremely Optional Rule'. I think this is the first game I have ever seen this in. You get the chance to kill Adolf Hitler when receiving one of the higher Knights Cross medals. 


 Theses are some of the skills your pilot and crew can increase during the game:

Aim
Gunnery
Landing
Navigation 
Radar Operation
Situational Awareness
Schräge Musik Gunnery
Situational Awareness

 Your pilot can win medals all the way through to the Knights Cross with Diamonds. 


Schräge Musik installed in a Bf110


 This next part I call: what the **** is Schräge Musik? Well, it's literal translation is 'Slanted Music'. This was the German phrase for Jazz Music. What does this have to do with the game? Well, Schräge Musik was the name of the cannons that we're usually slanted 70 degrees out of the top of the cockpit behind the pilot. You would fly below and slightly behind a bomber above you and aim for the wigs of the the Allied bomber. You did not aim at the fuselage due to the chance of setting off the bomb load.  Most if not all of the planes have at least one other crew member. He is especially useful once radar becomes a large part of the game. 


 Are you interested in the night fighting over Germany in World War II? If so, then buy the game. If you are interested in the aerial war, pick it up. If you just want to have an enjoyable solitaire experience, then the game is also for you. Compass games has become a powerhouse gaming company that has begun turning out excellent games at a fast rate. They also sponsor a gaming convention in Ct. in the fall. I went to it last year and was able to get some great deals on their games. Here is the link:

https://www.compassgames.com/expo2019-overview

Compass Games Link:
https://www.compassgames.com/

Nightfighter Aces Link:
https://www.compassgames.com/nightfighter-ace.html 

I also did an unboxing of another excellent game from the Compass Games Red Poppies Campaigns: The Battle For Ypres:
https://www.awargamersneedfulthings.co.uk/2018/01/red-poppies-campaigns-volume-i-battles.html
 

 Robert

hpssims.com