second chance games

Search This Website of delight

Japan '46 by Wargame Design Studio & John Tiller Software  The invasion of the Japanese Home Islands st...

Japan '46 by Wargame Design Studio and John Tiller Software Japan '46 by Wargame Design Studio and John Tiller Software

For your Wargamer, Toy soldier collector, MiniFig collector, military history nut. Reviews, interviews, Model Making, AARs and books!


Japan '46

by

Wargame Design Studio & John Tiller Software


 The invasion of the Japanese Home Islands started with Operation Olympic. The Allies now have bases on the southern part of Kyushu. Unfortunately, the Japanese show no more signs of surrendering than before the invasion. This, contrary to Saddam, is the 'Mother of all Battles'. The Japanese are fighting tooth and nail, as was expected, for every inch of the Home Islands. The Operation named Coronet is now about to begin.


 Wargame Design Studio has really taken off in the last two years. In the beginning, they released three games in a new series called 'Panzer Battles'. This would be 'Battles of Kursk Southern Front', and 'Battles of Normandy', followed shortly after by 'Battles of North Africa'. Then they took on the role of Hercules and started a long list of labors in updating, and nearly revamping, the 'Panzer Campaigns' series of games from John Tiller Software. Once they were done turning all of those games into a 'Gold Version', complete with many new scenarios and tons of updates and fixes (especially visually), they have now turned their sights into doing the same for the 'Civil War Battles' series.


 So just like any other John Tiller Panzer Campaign game, Japan '46 is massive. These series of games do have smaller scenarios for the gamer to play, but the campaign games are really the stuff of legends. If they were board games you would have your entire table filled and then some. You would also be suffering from carpal tunnel syndrome from cutting apart all of the counters. The newer games, and the updates, are very solo playing friendly with the AI tweaked as much as possible. It is almost unbelievable the amount of game and information that you get when you buy one of these games. The historical write-ups and the designer notes are enough reading for long winter nights. If you are interested in tinkering, the games all come with an editor that pretty much can change anything but the name of the game. The series all go down to single guns and tanks when deciding on the variables for combat. The information on each army is exhaustive in its depth.


 Japan '46 is a continuation of the battles for Japan that starts right after the game Japan '45 (which if you haven't picked up, why not?). Except now you will be fighting in the Kanto plain, fighting for Tokyo and other major cities. On the Allied side you now have the French and Commonwealth forces to augment the US ones. The Japanese have four full Armies along with other forces and all the Naval and Air Forces that they have been husbanding until now. The game comes with 59 scenarios. These include:


The Invasion – March 1-5
The Breakout – March 6-10
The Linkup – March 12-17
The Battle of Tokyo – April 3-15
The Battle of the Kanto Plain – April 20-26

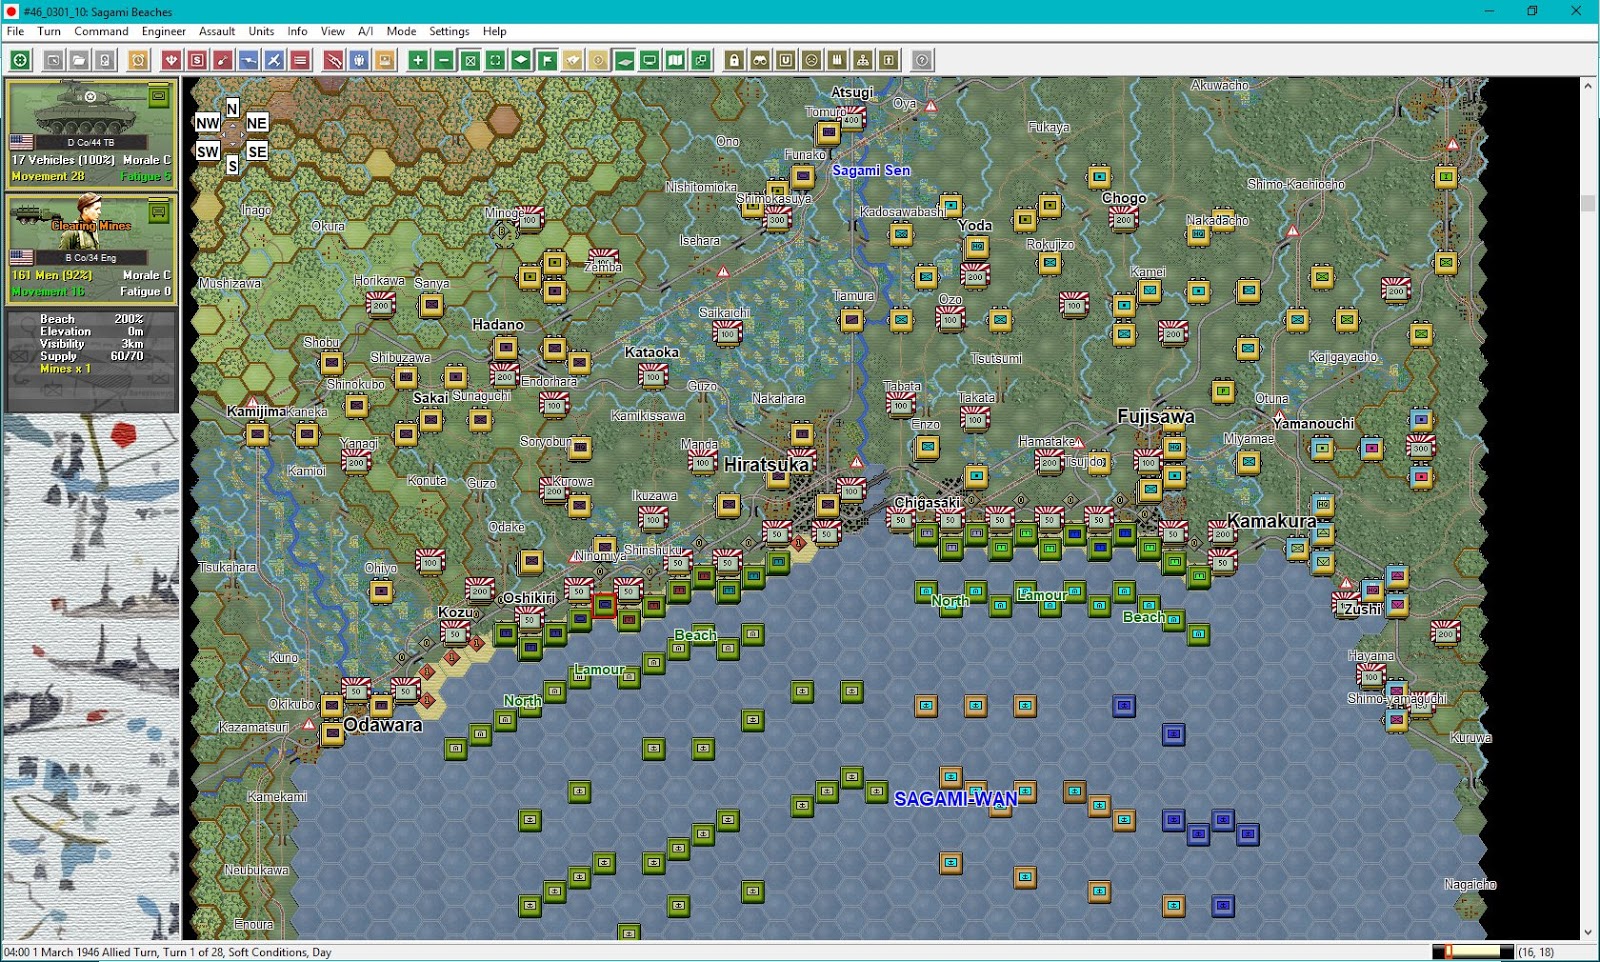
"The 59 scenarios range from small actions such as the “Counterattack at Choshi” (19 turns) to the huge “Operation Coronet” (608 turns) covering the entire campaign. The wide variety of scenario length and size will give the players a sense of the scope of the campaign. Weather conditions range from normal to mud. The game map accurately depicts the mix of terrain types that the Allies would have encountered during the operation."


 This is a list of some of the game features:
"Game scale is 1 hex = 1 km, 1 turn = 2 hours, with battalion and company size units.
59 Scenarios – covering all sizes and situations, including specialized versions for both head to head play and vs. the computer AI.
The master map covers the cities of Tokyo, Yokohama, Kagashima and the outlying areas to include minor islands (90,678 hexes) where Operation Coronet would have taken place.
The order of battle file covers the Allied and Japanese forces that could have taken part in the campaign with other formations added in for hypothetical situations.
Order-of-Battle and Scenario Editors which allow players to customize the game.
Sub-map feature allows the main map to be subdivided into smaller segments for custom scenario creation.
All new images for unit art on both sides, including guns and vehicles covering all of the forces of the Allied and Japanese armies involved in the operation.
Design notes which cover or include the production of the game, campaign notes, sources and a scenario list to include descriptions.
Japan ’46 provides multiple play options including play against the computer AI, Play by E-mail (PBEM), LAN & Internet “live” play, and two player hot seat.Some sample screenshots follows;"


 One kilometer hexes with two hour turns for the invasion of the center of Japan. I am not kidding when I say that you have bought yourself a game to get lost in. Wargame Design Studio has tried to give the player many more options of scenarios than the games had before (this includes all of the games they have updated from earlier in the series). As you can see above, you can play a nineteen turn scenario all the way to the 608 turn campaign game. These games are what you think of when you are making a list to be lost on a desert isle with. Hopefully along with your computer you have the use of a solar panel array for electricity. The visuals in the game are all up to the 21st century as far as wargames, and zooming in and out is mouse wheel based. The game play is essentially the same as it was, meaning that if you played a Panzer Campaign game a few years ago you would not be lost. You will be however, surrounded by new parts of the game and hopefully notice how they have become streamlined.  


 The fighting is the same that you would have encountered in Japan '45 (and I will include a link to my review of that game). As the Allies you are fighting a desperate foe who has dug in and is awaiting you. The irresistible force has met the immovable object. Think the battles of Tarawa and Iwo Jima etc. on a grand scale. Playing as the Japanese you must plan your strategy very carefully. You do not have the material might of the Allies. If you are going to try and strike back at the Allies, make sure that your timing is perfect. You cannot afford to waste your troops in Banzai charges. The city warfare of this new game brings home battles like Stalingrad to your computer. I hope you have as much fun playing this game as I have. To be honest I have never had a John Tiller Software game that I did not like. They did seem to be getting long in the tooth, but with Wargame Design Studios help they have been given a new lease on life. Thank you both Wargame Design Studio and John Tiller Software for letting me review another excellent game. 


Marlborough's Other Army The British Army and the Campaigns of the First Peninsular War 1702-1712 by Nicholas Dorrel...

Marlborough's Other Army The British Army and the Campaigns of the First Peninsular War, 1702-1712 by Nicholas Dorrell Marlborough's Other Army The British Army and the Campaigns of the First Peninsular War, 1702-1712 by Nicholas Dorrell

For your Wargamer, Toy soldier collector, MiniFig collector, military history nut. Reviews, interviews, Model Making, AARs and books!


Marlborough's Other Army

The British Army and the Campaigns of the First Peninsular War

1702-1712

by

Nicholas Dorrell


 This is the story of the campaigns in Spain during the War of the Spanish Succession. The last Hapsburg king of Spain, Charles II, had been dying for the last ten years. Europe had been trying to figure out a suitable treaty for when Charles II actually gave up the ghost. The two strongest candidates were Philip of Anjou, Louis XIVs grandson, or the Archduke Charles, brother of the Holy Roman Emperor Charles III. Louis XIVs wife had given up her claim to the Spanish throne, but Louis felt that because her dowry was not fulfilled her claim was still intact. The Archduke Charles was part of the Austrian branch of the Hapsburg family. The European powers had reached a pseudo agreement on the Spanish inheritance, only they had not bargained on Charles II. His will had named Philip of Anjou his successor, but if he did not agree, the crown would be offered to the Archduke Charles. Louis XIV realized he would be fighting almost all of Europe, but decided to accept the throne for his grandson. The campaigns in Northern Europe of Marlborough and the various French Marshals have been written about at length. Along with the above, this book shows the reader the almost unknown fighting that took place in the Iberian Peninsula.


 The book uses the term 'Confederate' to represent the British, Portuguese, Austrian etc. troops that fought to conquer Spain for the Archduke Charles. The Tory war cry of 'No Peace Without Spain' was the British rallying cry throughout the long war. The author shows that this was almost a complete flip flop from the Peninsula War that Wellington fought. Most of the Spanish nation fought with the French for their new king, and against the English and their Allies. It is very possible that what the English learned in this war was put to good use in the Napoleonic Wars.


 The book is filled with reproductions of paintings of the various commanders and some troops. For the miniature wargamer there are also eight full color pages on the troops and their flags. The book is also supplied with a fair amount of maps to help the reader envision the war. 

 The author shows us the seesaw campaigns which several times saw the Confederates conquer Madrid, only to lose it soon after. The French Army at times was commanded by James Fitz-James the Duke of Berwick (James II of England's illegitimate child and Marlborough's nephew). Some military historians compare his generalship to Marlborough very favorably. The book itself is filled with the actual formation rundown of what regiments etc. fought in each campaign. This is a very good book especially for someone who does not have that much of a grasp of the War of the Spanish Succession outside of the Low Countries. As was mentioned, it is also very useful for the miniature gamer. Thank you Casemate Publishers for letting me review this wonderfully informative book from Helion & Company.

LCVP - Higgins Boat by Cobi  The LCVP (landing craft, vehicle, personnel) or simply ...

LCVP - Higgins Boat by Cobi LCVP - Higgins Boat by Cobi

For your Wargamer, Toy soldier collector, MiniFig collector, military history nut. Reviews, interviews, Model Making, AARs and books!


LCVP - Higgins Boat

by

Cobi


 The LCVP (landing craft, vehicle, personnel) or simply the Higgins Boat, was the backbone of all of the invasions by the Allies in World War II. It was 11 meters long and 3.4 meters wide, and had a speed of 12 knots. The Higgins Boat was originally built with no ramp in the front of the boat. The US Marine Corps and Navy had seen the Japanese use their Daihatsu class of landing craft in the Sino-Japanese War. The Daihatsu class had a ramp in the front that dropped down. Andrew Higgins was shown pictures of the Japanese craft and with his own money built three craft for the Marines and Navy to use in trials. The boat was capable of carrying 36 soldiers or a Jeep and 12 soldiers, or 8,000lbs of cargo. Its design and light weight allowed it to drive right up onto the shore and deliver its lethal cargo. The Cobi Higgins Boat is built in 1:35 scale and was designed to be released with the 75th anniversary of D-Day.


 I had mixed feelings when getting ready to build the Higgins Boat that Cobi had sent me to review. True, it is a military vehicle, but not a plane or a tank. The fact that it has two machine guns on it and was used in many great battles finally made me come around. I am now very happy that Cobi chose this vehicle to send me. 


 The build itself is extremely well done. It has a very smooth appearance to it and does not have holes or a missing piece here or there (I am sure you know what I mean). Actually, the Cobi sets are just getting better with each iteration. The build is comprised of 510 pieces to build it.


 It was not a hard build and was done in a few hours. I took my time and did not rush through it. I wanted to enjoy the building as much as the finished project. As you can see, the attention to detail on this build is pretty amazing. It even has the track material in the bottom of the boat to facilitate driving a vehicle off it. The ramp actually works and can be shown either up or down.


 The three figures that come with it are also very well done. They come equipped with a Thompson machine Gun, and a Springfield Rifle. One of them is a sailor, and he even has a life jacket. The attention to detail on the figures is also getting to be really amazing. The set also comes with two German landing Barrages. Thank you Cobi for allowing me to review another excellent block set. As I mentioned, they just keep getting better and better. I am extremely happy with the build and it now takes its place right next to the Maus in my collection.


Link to the LCVP - Higgins Boat:
https://cobi.pl/en/small-army-ww2/ships-and-boats/lcvp---higgins-boat,art,11390.html

Robert

CASTLE ITTER FROM DVG A little more than a year after the appearance of Pavlov's House ,  David Thompson has put his excellent ...

CASTLE ITTER CASTLE ITTER

For your Wargamer, Toy soldier collector, MiniFig collector, military history nut. Reviews, interviews, Model Making, AARs and books!

CASTLE ITTER
FROM
DVG
A little more than a year after the appearance of Pavlov's House,  David Thompson has put his excellent solitaire system to equally good use in this second game, Castle Itter.  Before I say anything else about its implementation, something definitely needs to be said about the historical facts that give rise to the game's sub-title; The Strangest Battle of WWII.  For me and I'm sure for many others, there may be other strange battles of WWII, but I think this certainly ranks as one of the strangest and one of the least known!

It's May 1945 near the small Austrian Tyrol village of Itter and, in almost classic Hollywood movie terms, a small group of assorted German and American soldiers, a handful of French political prisoners and an SS officer seek to hold out against an SS force until an American relief force arrives.  Nor were these any old political prisoners - of them two were former prime ministers of France and one was Charles de Gaulle's sister according to the research that I've done.  I say this because the named French counters that the game gives us differ to some extent from those in online documentation, particularly in the omission of de Gaulle's sister.  Also the fact that only one defender died in the battle, though that was the commanding Wermacht officer, may indicate a less than last ditch defence.  However, don't let that deter you from enjoying this thoroughly taught and engrossing game.  

If you're new to this site, I'd strongly recommend a read of my review of Pavlov's House, as I shall be making a number of comparisons between the two games.  The first is in the scale of each game as represented by the marked difference in the playing boards.


Here we have the three panelled board for Pavlov's House, which moving left to right takes us from the tactical to the operational scope of the game. In contrast, Castle Itter remains purely on a tactical scale and it's very much as if we simply took and expanded the left hand panel and added the German movement tracks from the central panel.  


Consequently, we have a much more intimate game concentrating on the various areas of the castle and its approach on the right via the Gate House and its lone defending tank, the most curiously named Besotten Jenny!

This change of scale brings in many differences.  Most obvious is that there are fewer rules and fewer options for you the player to choose from.  Instead of drawing a hand of cards each turn containing a variety of actions and having to juggle where you consider the main threats currently to be coming from across three locations, you can take five actions from among four choices: fire to eliminate an enemy counter, fire to place suppression markers, move from one area to another or turn a unit counter back to fresh from exhausted.

The result is a much quicker game to learn and a much quicker game to play.  It took several plays of Pavlov's House and constant referral to the Play Aid to get to know what the choices written on each card offered you.  Here you will have memorised your actions and the enemies after a single play.  But, DO NOT think that this makes the current game inferior.  Both are intense struggles.  Both demand that you prevent an enemy unit from reaching and breaching its objective building, though there are other ways to lose in Pavlov's House!

Though the terrain is obviously abstracted to a certain degree, there is far more sense of place here, as a glance at the board reveals.  Initially at set up, there are only German attackers, one rifleman in each of the twelve starting locations, and the five French prisoners lodged in the cellar, which in real life would be below the castle, but here is placed in the bottom left corner.
In the picture above, the rest of the game's physical components can be seen.  Above the board are the various markers: Action Tokens, Command Tokens, Disrupted Tokens, 1 Load Token [for loading the tank's main gun!] and Suppression Tokens.  Below it on the left are the range of SS counters [lots more riflemen, scouts, sturm troopers, machine gunners and mortars].  In the centre are three reinforcements for the defenders, to their right the German wermacht defenders and then on the far right the American defenders.
A closer look at the main part of the castle

Every single item is substantial from the glossy mounted board to the large, thick individual counters.  As with Pavlov's House, many of the defenders are named and, in a touch that contributes to the atmosphere of the situation, have special attributes identified by a capital letter.   Some of the rank and file German defenders have low morale which is offset by the presence of an officer in the same location.  Four of the five French prisoner defenders can inspire others in the same location by adding a die to their attack value.  Those Americans marked with a T for tank can make use of several special locations [mainly on the tank itself] that significantly boost attack and suppression dice, while the senior Wermacht officer has the sacrifice ability to die in the place of one French defender who becomes a casualty. 
Most of the Defenders
Once again these unit counters are of a very satisfying size and robustness which makes both for ease of handling and ease of reading the information on them.

The rule book is a model of clarity and personally I'm pleased with the decision to move to an A4 format which makes for ease of handling.  It's a glossy well laid out product with numerous full colour examples to support every detail of the game from set up, explanation of counters and cards and every action that can be performed.

It is a very straightforward game to get into.  A turn involves the five actions taken by you, followed by drawing three cards from the German deck and carrying out the instructions on them. The first four turns are swift and particularly easy for you the defender as each turn you must use each of your five actions to place one of your defenders on the board and perform an action with them.  At this early stage of the game, this will mainly be placing suppression markers.  
The curiously named tank, Besotten Jenny, fully crewed

From then on the fun and thrill of the game is deciding on what five actions to take and then awaiting the resolution of each of the three German cards which must be drawn and executed one by one.  Your two aggressive actions are firing at a single enemy unit or placing suppression markers that can be used to fire at an enemy unit only when it is first placed on the board.  

Once one of your units has taken an action, it is flipped to its exhausted side and it then takes an action simply to turn it back to its active side again.  Moving a unit within a location is a free action thus allowing the chosen unit to do something else, but moving from one location to another is a complete action.  Soon some of your men are going to become disrupted and, yes, it takes an action just to remove a Disrupted marker.

You have a few units that have the special Command ability to perform three actions on other units that occupy the same location.  Mainly these will be used to remove a Disruption marker or refresh an exhausted unit.  But such affected units are marked with Command markers to show that you can't then use them in the same turn.

Always there are more actions needing to be taken than the five you are allotted and as the various SS units begin to encroach nearer and nearer on their allotted paths to the castle, the tension is ratcheted up.
Here are some of your worst enemies.  The machine gunners and mortar teams cannot advance to take the castle, but remain on starting points for the opportunity to lay down fire when the appropriate cards are drawn, while the Sturm units are the most difficult to kill of your opponents that will be advancing down the avenues of attack!

All the SS actions are governed by the turn of three cards each turn.  These cards are a range that mingle the introduction of units that can advance and those that are stationary, but can fire along with a variety of actions directed to suppress units, damage the fabric of the castle or seek to destroy your one and only tank.
All these involve dice rolls that often seem to have a mind and will of their own!   As these rolls are based on two D6, with the expected range of 2-12, laying down suppressive fire on areas 6-8 is advisable particularly early in the game.  But typically always expect the unexpected.  Having built up just such a defensive shield against those areas, I was subjected to a series of low rolls of 4s and 5s that had the enemy units streaming in on the opposite side of the board.

I've had the tank survive all rolls against it and at other times seen it brew up along with a full complement of soldiers destroyed with it.  My leading German officer has been sniped at and killed as my first casualty, while a terrace full of soldiers has come through unscathed.
Here is one of my more ignominious defeats, as the SS breach the castle. Technically you lose immediately 1 unit makes it into the castle, but I couldn't resist seeing how bad the effects of the killing card play was and, as you can see, three units have breached my defences, with two more lined up behind them.

All in all, I've found Castle Itter a fast playing, nail-biting experience, very easy to learn and highly rewarding to play.  What's more, should you find it easier to survive than I do, there is an excellent Tactical deck of cards that can be introduced that turns the screw from merely difficult to insanely impossible!  Don't say you haven't been warned.

I've no hesitation in recommending this as an addition to anyone's collection and count Pavlov's House with Castle Itter as a perfect pairing. 


Heart of Leviathan by imageStudios  These are the ultimate heavy metal for us aficionados: Battleships in World W...

Heart of Leviathan by imageStudios Heart of Leviathan by imageStudios

For your Wargamer, Toy soldier collector, MiniFig collector, military history nut. Reviews, interviews, Model Making, AARs and books!


Heart of Leviathan

by

imageStudios


 These are the ultimate heavy metal for us aficionados: Battleships in World War I. The setting was mostly the frigid North Sea, although action took place across the globe. This is one of my favorite wargame/simulation topics. Who wouldn't be in love with their majestic beauty? These ships were the ultimate weapon of war on the high seas until submarines and then finally aircraft came along. In the age depicted, they are like the dinosaurs with no other enemies except other leviathans to worry about. Massively armed and armored, they strode across the seas from 1905 until the beginning of world War II as each nation flexed their biceps. With the building of the British Dreadnought all other warships became obsolete overnight. Oddly enough, Dreadnought was so radically better than any other warship it actually somewhat levelled the playing field between Germany and Britain. So we know what the game is about; how is it to play?


 First things first, I have to tell you what HOL is not. It is not a naval simulation where you need the floor of your den or dining room to play. You also do not need a calculator or have to keep maximizing and reprinting the game's spreadsheets in order to read them. This game is a thing of beauty. It is a mixture of miniatures and wargame/simulation that is wonderful to look at and to play. The game's components are top shelf all the way. The piece de resistance is the miniature ships that come with the game. Even the rulebook is a small piece of art. This is what you get with the game:


4 Battleships - 2 König Class, 2 Iron Duke Class (this game set)
4 Hardstock Ship Counters
4 Ship Command Placards
5 Movement Templates
15 Dice - 5 Red, 5 Blue, 5 Black
Critical Damage Card Deck
Equipment Refit/Upgrade Card Deck
Shallow Water Obstacle
Numerous Minefield Obstacles
Smoke Markers
Ship Captain Card Deck
Numerous Markers


 I just cannot say enough about the level of the components. The only games that are comparable are very high level space simulators. The rulebook is only ten pages long including the Advanced Rules. The actual rules probably only take up five pages because of the excellent, and large, illustrations of setup and play. This is not a tome that cannot be memorized and you do not need a medieval monk, complete with scrolls, sitting next to the players as a reference. This is an exceedingly playable game that actually gives the player historic outcomes. It is one of those things where everyone is scratching their heads, going why didn't I think of this? Another great part of the game is that you can use the miniatures unpainted, but why would you, or you can use them after they are spruced up in all their glory. Not only that, you do not need them at all. If you are too wary of damaging your small masterpieces, the game comes with thick stock overhead portraits of the ships. The miniatures actually have a small rectangular keel that fits right into the cardboard. So it is up to you, admiral, on how you want to play. This also means that when leaving home to play somewhere else you do not have to worry about damage to your miniscule beauties. They actually are not that miniscule. The ships are almost 4 1/2" long (at least these Battleships are). You can play the game in as little space as 36" x 36" or larger if you prefer. The key to the game is the 'Ship Command Placard'. Everything about the ship from speed, hull strength, and the dice to use at what range, along with other things are on the placard. Everything about the rules has been streamlined and pretty much thought of. It has turned naval gunnery warfare from an hour for the player to find out if he has hit to what he actually hit on his opponent, to a simple system. I am not saying the other types of games are not enjoyable at times. It is just before this game we never had the choice of what type to play. That is one thing I have to state strongly. This game was never intended to be a simulation of incredible depth. You cannot target a specific part of the enemy's ship. It is a simple die roll that shows whether or not you have drawn blood. If you roll a 'Critical Hit', then the captain of the hit ship pulls a card from the Critical Damage Deck and implements those effects. Some of these are:

Damaged Rudder - Can only move straight
Power Generator Damage - You can only fire at range 1 or 2
Shattered Primary Gun Barrel - Remove one red and one blue die
Command Station Destroyed - Discard all Admiral and Captain   upgrade cards
Powder Magazine Explosion - Something wrong with your bloody ship today


 Both Captain Cards and Equipment Refit/Upgrade Cards are bought at the start of the game. They suggest a 200 point engagement value for each player. You, of course, are free to decide among the players the amount. Some of the Equipment Refit/Upgrade Cards are specific to the type of ship (Battleship. Battlecruiser), and some are specific to either Germany or England.
These are some of the cards:

Elbow Grease - Can freely rotate turrets to the other side
Mast range Clock  - Another Friendly ship within range 1-3 may change one blank result to a hit
Repair Damage - Recover up to two Hull Value of your ship

 Each Ship Captain Card has its own set of allowable Upgrade/Refit Cards it can use.


 The sequence of play is:

1. Plot Phase - Planning phase for the turn. Players secretly set their ship's Movement Value on the Ship Command Placard. Players may also select an Order that is available to them to be used during the turn.
2. Movement/Orders Phase - During the Movement/Orders Phase, players follow through with the movement and orders previously designated for their ships during the Plot Phase. The Player in possession of the First Player Token moves and/or executes orders for any one of his/her ships first followed by player 2 (repeat alternately until all ships have been activated)
3. Combat (Guns) Phase - Ships fire at opposing targets while targeted ships attempt to avoid or minimize damage. Players alternate firing back and forth (just as in movement). Battle damage is resolved immediately/consecutively - not simultaneously - Ships can be sunk before they have a chance to return fire.


 The advanced rules add the ability for a captain to make smoke. The advanced rules also include Close Quarter Melee rules. These ships were still armed for this even at this late age. The age of the ram armed Battleship was not that many years before. Image Studios has also released a set with cruisers that has torpedoes in the game. These are the English and German ships released and planned so far:

English

Iron Duke Class - Battleship
Iron Duke -  This was in my set
Benbow - This was in my set
Emperor of India
Marlborough

Queen Elizabeth Class - Battleship
Queen Elizabeth
Warspite
Barham
Malaya
Valiant


Weymouth sub-class of the Town class - Light Cruiser
Weymouth
Yarmouth
Falmouth
Dartmouth

M Class Destroyer

German

König Class - Battleship
König - This was in my set
Markgraf - This was in my set
KronPrinz
Grosser Kurfürst

Helgoland Class - Battleship
Helgoland
Thüringen
Ostfriesland
Oldenburg

Dresden Class - Light Cruiser
Dresden
Emden

U-boats
U-19
U-51


  This game is for anyone who has any interest in World War I naval battles. I think this is a great crossover game for someone who wants to try miniature gaming, or a miniature gamer who wants to head toward board games. This game is the perfect segue for either. Thank you imageStudios for letting me review this game. I cannot for the life of me understand why this game has so little written about it on the web. Its BGG page is almost entirely empty. For a game that is this good it is a shame. 

i
mageStudios Hearts of Leviathan:
https://www.imagestudios.us/heart-of-leviathan.html

Robert
 

With Musket & Tomahawk  Volume I The Saratoga Campaign and the Wilderness War of 1777 by Michael O. Logusz ...

With Musket & Tomahawk Volume I by Michael O. Logusz With Musket & Tomahawk Volume I by Michael O. Logusz

For your Wargamer, Toy soldier collector, MiniFig collector, military history nut. Reviews, interviews, Model Making, AARs and books!


With Musket & Tomahawk  Volume I

The Saratoga Campaign and the Wilderness War of 1777

by

Michael O. Logusz


  Some campaigns just grab the military history reader. Whether it be because of content, or perhaps it is a geographical pull, meaning the area of the campaign is close to home. The Saratoga Campaign of the American Revolution hits both cylinders on my military history scale. Not only that, but it is really the turning point of the Revolution. After Saratoga, there was no way that the British were going to win. Before Saratoga, all of the large battles of the war were won by the British (Trenton actually had very few troops involved). The British had been able to cuff the American forces about the head and defeat them, albeit sometimes at great cost, at every turn. This was the first battle/campaign where an entire British army was defeated and almost all of it captured by the Americans. The shockwave of this victory cannot be underplayed. This is the reason that France entered the war, and without France there would be no Yorktown. So, needless to say, there are many books on the subject. Is this book just a rehash of everything that has been written or a great example of written military history? Let us see.

 One of the best parts of the book is that it explains in detail the British planning for 1777. Starting as a much smaller envisioned attack from Canada, it was turned into a war winning strike designed to separate New England from the rest of the rebelling colonies. The book goes into the fact that this idea did not spring out of 'Gentleman Johnny's' brain by any means. Many officers had been discussing the need of an attack from Canada. The biggest historical question about the campaign is answered unequivocally by the author, complete with written facts and not conjecture. Was General Howe ordered or even pushed to attack Albany to meet up and help Burgoyne with his attacks through New York? The author shows us that the answer is no. Even before Burgoyne had started his campaign, Howe had written to the British Crown and gotten approval for his campaign in Pennsylvania. Was this the best strategy? Absolutely not. There is more than a chance that had Howe struck toward Albany, the Colonials would have been unable to deal with both forces and Burgoyne would have been successful. Howe has been vilified for leaving Burgoyne in the lurch for many years. The book shows us that the British authorities made no attempt to try and concentrate both armies in central New York. This one point is enough to raise the book above the rest of the crowd.

 This book is what military history should be. It is factual without being too dry, and the pace goes along almost like a novel. The author has chosen to add a number of maps. The difference compared to some other books is also plain. Other than having maps that look like they came off a mimeograph machine that needed ink forty years ago, they are clear and concise, and allow the reader an excellent bird's eye view of the campaign and battles. The book also comes with the obligatory several pages of pictures. Some are sketches and the others are photos of re-enactors. Strangely there are no pictures of the main combatants such as Burgoyne, etc. These are not really needed, so no real loss there. 

 One of the biggest reasons to read about the campaign is to see in actuality what Benedict Arnold really was to the Revolution. Most Americans only associate him with treason and have no idea that if not for him, it is possible that 'Granny' Gates might have lost at Saratoga. So strange to say, our most vilified traitor is one of the main reasons we have our freedom now. It is a story that more Americans need to know.

 Thank you Casemate for allowing me to read this excellent first volume on the War in the North during the Revolution. I cannot wait to read the next volumes in the series.

Robert

Book: With Musket & Tomahawk: Volume I The Saratoga and the Wilderness War of 1777
Author: Michael O. Lugosz
Publisher: Casemate Publishers

Puerto Rico should need no introduction; it stood atop the bgg rankings for many years (I believe it is the longest-running #1 game in t...

Puerto Rico Puerto Rico

For your Wargamer, Toy soldier collector, MiniFig collector, military history nut. Reviews, interviews, Model Making, AARs and books!


Puerto Rico should need no introduction; it stood atop the bgg rankings for many years (I believe it is the longest-running #1 game in the history of bgg).  However, If you’re not familiar, players assume the roles of colonial governors on their eponymous island.  The game makes no attempt to nationalise or politicise the theme, other than alluding to European governors attempting to instil their values of order and industry to their respective islands and incoming colonists.  I too will ignore the politics and real history of the period.  Games are meant to be enjoyed after all and not provide a social commentary on human rights/abuses.

I recently received the Puerto Rico deluxe edition and have been excited to revisit this gem. However, if you’ve never heard of it (!!!) then the TL;DR is, if you like ‘Euro’ games with tight mechanics, don’t read this, just go and buy it.

Gameplay

The primary mechanic in this game is one of Action Drafting, in which the starting player will choose one of the six available actions.  Every other player will then get to do the same action albeit without the bonus ability that the first player gets.  After each player has taken their action, the starting player moves round to the next player on the left and then play repeats.  Although this game may look quite intimidating to a new gamer the repetition of actions 2 or 3 times every round allows the rules to sink in surprisingly quickly. In my experience, there are very few questions from new players after the first 30 minutes or so.
Ready...Steady...Colonise
The game takes place on individual player boards which comprise island spaces and city spaces.  These must be filled by plantations (square chits), or buildings (rectangular chits) respectively.  There are loads of little seemingly insignificant design choices like this (chit shape) which make the game easy to teach and enjoyable to play every single time.  Even if you haven’t played in years, I promise that the rules will come flooding back.

The chosen actions are all part of the Role cards, which are: Captain, Mayor, Builder, Settler, Trader and Craftsman.  There is also a Prospector Role which has no associated action and will only be used in 4 or 5 player games.  These roles all perform a thematically linked action that will help to develop your ‘island’.  After players are familiar with the mechanics it is often quickly apparent which role should be chosen to most benefit you, however where I find the most fun in this game is looking for those roles which most hurt your opponents.
The available roles
The available plantations (corn, indigo, sugar, tobacco and coffee) only produce goods if there is the matching production building (indigo mill, sugar ill, tobacco storage etc) in the city space. The exception here is corn which requires no production building but is worth zero when sold…  It is a multiple-step process to produce any good (except corn); you’ll need to do the Settler action (placing a plantation), the Builder action (building the necessary production building), do the Mayor action which allows you to move your colonists onto the matching plantations and buildings.  All of which will allow you to produce during the Craftsmen action.

It is obvious from this description that some level of strategic thought is necessary to optimise your chosen plantations and buildings.  It is pointless planting sugar cane if you never build a sugar mill… there are many different building and goods options that provide viable paths to victory no one method will guarantee the win. The adage ‘do what your opponents aren’t’ springs to mind, you really do have to play tactically as well and consider the board state and available resources to do well.  New-comers won’t necessarily appreciate these nuances until their second or third play, but they’ll still have a good time whilst they're learning.
What you're playing on
Aside from the money, which allows you to enhance your city by buying buildings, the main VP scoring comes from choosing the Captain role which allows players to ship their produced goods (dependent on their island plantations and city buildings) back to Europe.  Each shipped good produces 1VP, however, there are only 3 ships that only accept one type of good and a finite amount of the first ‘shipped’ good.  However, 5 different types of goods can be produced so some goods may be lost…

Like many Euro games, the economy is very tight, money is often hard to come by.  But the true grease of your VP engine is your produced goods.  Each good can be sold to the Trader for some money but often you may be forced to ship your high-value coffee stock or risk having to just lose it without any gain.  New players don't often realise the ramifications around the table of their role choices but I revel in causing other players to lose their produced goods. 
The player board (near the beginning of the game)
There is a relatively high amount of player interaction even though you’re all playing on completely separate boards.  This is due to the common pool of resources, (plantations, buildings, colonists, goods, ship spaces and trading house spaces) that are finite and low.  During the Craftsmen action, the pool of resources will often be depleted allowing a big producer to deny other players the resources they should be entitled to.  This will not be a happy accident amongst experienced players.

Each Mayor phase will cause more colonists to be brought to the player's island and when the colonist supply runs out the game is over.  VPs come from buildings and shipped goods and any of the expensive large buildings which will be built towards the end of the game. Amongst equally experienced players the score appears to be fairly tight and a skilled player against newer players should win every time.  As with any mechanically sound game, aside from your opponents’ choices, luck does not feature in this game.
Some of the expansion content
This deluxe edition comes with the New Buildings and The Nobles expansions.  In total, they add 2 additional large buildings and 18 types of small buildings.  When you consider that the base game only has 23 types of buildings it’s easy to see that the expansions, with the additional building permutations, massively add to the re-playability of this game.  Alongside the buildings, players also get red Noble discs, which act just like colonists apart from they’re limited to certain buildings.  Both expansions serve to increase the playtime of 90 minutes to about 2 hours – which is a good thing in my opinion.  However, I would recommend that you don’t draft buildings at the beginning as read in the expansion rules – just draw them randomly.

Components

I was quite disappointed in the quality of the components in what is considered a deluxe version.  The deluxe version, as far as I cant tell, only adds the two expansions (New Buildings and Nobles) into the base game.  Unfortunately, this edition has very thin card stock and I don’t think it will stand up to much normal wear-and-tear.


What you've got to work with
The punchboard used for the components is also thinner than I was expecting from a deluxe edition.  It was quite easy to not only bend the components when taking them out but also to rip them.  I had to go agonizingly slowly pressing out the coins and VP markers to prevent them from ripping (Unfortunately not completely successfully). 

I like the new art-work and I appreciate the insert that comes in the box.  The cubes and goods barrels work perfectly well and I wouldn’t want them to change anything about the colonist discs or any of the wooden components.  The only very minor functional gripe with the functionality of the components is that there are no spaces for two of the expansions’ large buildings on the game board.
Old
vs
New

Criticisms

It’s not easy to find criticisms in a game that is arguably the best game ever! (cult of the new notwithstanding).  However, some could argue that the opening is scripted based on player order.  This certainly may happen with experienced (5+ plays) players I feel like there is enough variability in the plantations and the role choices that after the 2nd or 3rd Actions have been taken this can be ignored.  If you want to analyse the game in-depth I’m sure the optimum play can be found, but you won’t find anyone willing to play with you.  If you add in all the expansion content then this criticism can be completely ignored.

The only real gripe I have is just of component quality which I have already mentioned.  

Conclusion

Some would say there is a lack of direct player interaction but if so, they’re playing the game wrong. Puerto Rico provides a less confrontational experience than something like Tigris & Euphrates but still gives all players the ability to negatively and (unfortunately) positively affect their opponents.  You’re often left with a decision between something good for you or something bad for your opponents and just okay for you.  I like these types of decisions – although I struggle not to (try at least) hurt my opponents as much as possible.
The end
I think Puerto Rico is a true masterpiece of a game that can be enjoyed by any level of gamer.  It scales well from 3-to 5 players and is a relatively quick teach.  This deluxe edition also comes with rules for 2 players but I confess I have not tried at that player count.  This edition is slightly let down by the quality of the card-stock but I am willing to overlook that minor flaw in what is a brilliant game. 

I’d like to thank Asmodee for sending out this review copy.  Many local game stores will have this in stock and you can use this link http://www.findyourgamestore.co.uk/ to support your FLGS or use their online web store. 

Designer: Andrea Seyfarth
Publisher: Alea
BGG Page: https://boardgamegeek.com/boardgame/3076/puerto-rico
Players: 3-5
Playtime: 2 hours

hpssims.com