second chance games

Search This Website of delight

Hitler's Paratroopers in Normandy The German II Parachute Corps in The Battle For France,1944 by Gilberto Villahermos...

Hitler's Paratroopers in Normandy: The German II Parachute Corps in The Battle for France,1944 by Gilberto Villahermosa Hitler's Paratroopers in Normandy: The German II Parachute Corps in The Battle for France,1944 by Gilberto Villahermosa

For your Wargamer, Toy soldier collector, MiniFig collector, military history nut. Reviews, interviews, Model Making, AARs and books!


Hitler's Paratroopers in Normandy

The German II Parachute Corps in The Battle For France,1944

by

Gilberto Villahermosa


 To Hitler, the day of the Fallschirmjäger ended with the invasion of Crete. They had suffered so many casualties during their successful attack that it was almost a Pyrrhic victory. At the siege of Stalingrad the Luftwaffe's airlift capacity was bled dry of pilots and planes. So even had Hitler changed his mind about the Fallschirmjäger, it wouldn't have mattered. Their wings were clipped. However, the Fallschirmjäger's usefulness was not over. They were some of the most highly trained soldiers in the Third Reich. They would continue to win laurels all over Europe as Fire Brigade soldiers, closing holes in the lines and stopping various Allied offensives in their tracks. When you think of the Fallschirmjäger in the infantry role, you usually think of their defense of Monte Cassino. This book shows how they were deeply involved with the defense of Normandy.

 The story of the Fallschirmjäger in Normandy is a story of dedicated soldiers who belonged to very different units as far as their training and abilities are concerned. The 3rd Parachute Division was the cream of the crop as far as both Fallschirmjäger and Infantry Divisions. It was one of the very few infantry Divisions that the German General Staff listed as well equipped and strong enough for offensive operations; let that sink in. According to Allied interrogation they believed their commander Generalleutnant Schimpf 'a god'. The division had its complete complement of soldiers and was the fourth strongest division in Normandy, behind three SS Panzer Divisions. The 5th Parachute Division was another story. It was made up of recruits, most who didn't have jump training, and not anywhere near its established amount of weaponry. The 6th Parachute Regiment of the 2nd Paratroop Division also was well thought of and fought in Normandy. Elements of the 6th Parachute Division also fought in Normandy.

 All of these units were part of the II Parachute Corps. The book tells the story of the II Parachute Corps, and its battles in Normandy to stem the Allied tide. The author goes through the Corps conception and birth. Not only is this a book about the Normandy battles, but it is also a reference book on the training and composition of not only the II Parachute Corps, but also the disparate units under its command.

 The 2nd Parachute Division, or some of it, was tasked with defending Brest under Generalleutnant Hermann Bernhard Ramcke. Ramcke was one of only twenty-seven men in the armed forces who were awarded The Knights Cross, with Oak Leaves, Swords, and Diamonds. The defense of Brest was considered of the highest importance, because the Allies desperately needed a port to use in Northern France. The only problem for the 2nd Parachute Division was after its mauling in Russia, the division was badly in need of men and supplies. An American assessment of its strength put it at 35% of its full complement. Ironically, for the Allies, the fight to conquer Brest so totally destroyed the city that it was unusable as a port. In fact, after the war, French authorities were even considering not bothering to rebuild the city where it was. The author shows us all of this desperate fighting.

 For the author's ability to help you visualize the Normandy battles the book is worth its weight. When you add in the incredible amount of detail that you will learn about the Fallschirmjäger the book is a steal. I cannot recommend it highly enough. Thank you Casemate Publishers and Pen andSword for allowing me to review this wonderful book.

Robert

Publisher: Pen & Sword
Distributor: Casemate Publishers

Gorizia 1916 La Sesta Battaglia dell'Isonzo  The Sixth Battle of the Isonzo by Europa Simulazioni  Wor...

Gorizia 1916 La Sesta Battaglia dell'Isonzo (The Sixth Battle of the Isonzo) by Europa Simulazioni Gorizia 1916 La Sesta Battaglia dell'Isonzo (The Sixth Battle of the Isonzo) by Europa Simulazioni

For your Wargamer, Toy soldier collector, MiniFig collector, military history nut. Reviews, interviews, Model Making, AARs and books!


Gorizia 1916

La Sesta Battaglia dell'Isonzo 

The Sixth Battle of the Isonzo

by

Europa Simulazioni


 World War I in Italy and Austria-Hungary is the story of two men. The first is Luigi Cadorna, who was the Chief of Staff of the Italian Army in World War I. The second is Franz Conrad von Hotzendorf, the Chief of Staff in the Austro-Hungarian Army. They had both risen to the highest places in their respective armies by hard work and seemingly excellent minds, with which to fight the largest war yet on the planet. The only problem was in both cases it was entirely a facade. They were stuck and hidebound, as many other generals in World War I, by outmoded thinking. Again, they both were  like everyone else at the start of the war, in love with the idea that with offensive spirit and with a good dose of 'we can conquer all' thinking the war could be won. Unfortunately for the troops under their command, most generals in the other armies learned the lessons of World War I. Not these two though, no sirree. They could not think of much beyond using their troops in headlong assaults against 20th century weaponry. von Hotzendorf was also obsessed with the idea of taking revenge on Italy (at the start of the war Italy was aligned with Germany and Austria-Hungary, but refused to enter the war). When Italy did enter the war, it was as a member of the Entente against their former allies. Both of these generals seemed unable to learn the new form of warfare that was happening and both were replaced after numerous failures on their armies' part. Strangely, their legacies are also similar. These generals have military historians as both their detractors and defenders. As far as planning, they both seemed to be able to come up with great plans on paper that did not take into account the realities of the war.

 The Sixth Battle of the Isonzo took place in 1916. There were twelve Battles of the Isonzo in all. Five of these are considered Italian victories, four are listed as Austro-Hungarian victories, and three are draws. The Austro-Hungarian Army had just finished attacking the Italians in the Battle of the Asiago or the Strafexpedition (Punitive Expedition). The Austro-Hungarians were stopped just after they had punched a hole in the Italian lines. The Russians also attacked in Galicia, causing them to remove large amounts of troops. The Austro-Hungarians did not believe that the Italians could strike back so soon after the Battle of the Asiago. The Italians were able to move large amounts of troops and artillery in a short amount of time to launch the Sixth battle of the Isonzo. Just as in most of the battles on the frontier between the countries, the assault started well and the Italians seemed to have victory within their grasp. Unfortunately, as was the norm, the attack sputterted out once real movement returned to the to the front. The inability of all of the combatants to keep up pressure once the lines had been broken was seen throughout the first three years of World War I.


 So, there is the background of the game. Sorry if it seems too long, but to me it is one of the most interesting fronts of World War I. This is the second game from Europa Simulazioni that I have had the pleasure of reviewing. Being a bit of an aficionado about this part of the war, I was very interested to see how ES's game compared to history. The game comes in English and Italian for the Charts and Tables. This is what you get with the game:


One 22"x34" map of  the battlefield
1120 die-cut counters
Standard rules and Scenario Instructions (three small and one large Campaign Scenario) 
Charts, tables
Dice
Box 


 The game is played in daily turns.
It comes with a campaign game of twelve days (August 6th to August 17th).


 The map comes with large hexes to help with the stacking that comes with a World War I game. It is a very nicely done map of the area of the battle. The colors for the different terrain work nicely together. Only two infantry units can be stacked in one hex, but there can also be artillery and some other units. With a 22"x34" map and four counter sheets, the larger hexes help with the congestion. The scale of the map is 1000 meters per hex. The four sheets of counters are all the same size, and the counters are 1/2" in size, and use NATO identifiers for the troop types etc. They are also color coded as to what division or brigade they belong to. There are four types of counters in the game: Combat Units, Artillery Units, Brigade Headquarters, and Informational Markers. The size of the counters means that there is a lot of information in a small place. The Rulebook is in black and white, but is set up in an easy to follow manner. The components are exactly what I was expecting from a Europa Simulazioni game.


 Just so we understand each other, this is an old school wargame. There are no plastic soldiers, it is not card driven, or do wooden blocks come with it. It is a dyed in the wool wargame whose antecedents are SPI and Avalon Hill. This game, except for the deeper rules and better done components, would be right at home on a table forty years ago. This is a deep simulation of World War I trench warfare on The Italian Front. This is the Sequence of Play:

1. Reinforcement Phase
2. Command Phase
3. Initiative Phase
4. Weather Phase
5. Supply Phase
6. Artillery Phase
7. Event Phase
8. Initiative Player Action Phase
 A. Tactical Movement and Assault Declaration
 B. Offensive bombardment
 C. Defensive Fire (by the Non-Initiative Player)
 D. Assault Resolution
 E. Counter-Assault Declaration (by the Non-Initiative Player)
 F. Counter-Assault Defensive Fire
 G. Counter-Assault Resolution (by the Non-Initiative Player)
 H. Action Completed
 I. Opponent Reaction

 At the end of step I, the Initiative Player can perform another Action Phase, repeating Phase 8 with another Brigade he has planned to activate, or he can 'pass', leaving the decision to the Non-Initiative Player to go to Phase 9 or pass in turn.

9. Non-Initiative Player Action Phase
  A. Tactical Movement and Assault Declaration
 B. Offensive bombardment
 C. Defensive Fire (by the Initiative Player)
 D. Assault Resolution
 E. Counter-Assault Declaration (by the Initiative Player)
 F. Counter-Assault Defensive Fire
 G. Counter-Assault Resolution (by the Initiative Player)
 H. Action Completed
 I. Opponent Reaction
10. Non-Activated Unit Movement Phase
11. Replacement and rally Phase
12.Victory Condition Check Phase


 There are rules about the following:

Logistics and initiative
Command
Supply
Bombardment
Interdiction
Force march
Disorganization
Fog of War


Austro-Hungarian


 The game also comes with special rules for these Units:

Engineer Units
Cavalry Units
MG Companies
Flamethrowers
Armored Cars
Austro-Hungarian Night Counterattacks


Italian


 The victory conditions are more in tune with the realities of World War I than many I have seen. This quote from the Rulebook sums it all up "The Objectives of both sides were territorial, their own or enemy losses were immaterial". The game can also abruptly end not only because of the Italian Player taking Victory Hexes, but also if he fails to do so. The rule 'Italian Offensive Halt', comes into play and the game is over if the Italian Player does not conquer a Victory Hex for three consecutive turns.


Is that Albert Einstein as the Game Turn Marker?

 The game is an incredibly immersive one about the Italian front during world War I. Everything you would want, or expect, in a World war I game is here. The writing of the rules are very well done for a non-English European game. There may be some usage errors. I am certainly not the one to find them, but the rules are easy to follow and clear cut. For a game about an obscure battle, at least outside of Europe, this is a full blown simulation of the battle. Many times not well known battles get the short shrift when it comes to games; not here. That the Victory Conditions do not include losses at all is a neat touch for a World War I game. Playing as the Italian Player you must, because of the sudden death rule, keep attacking each turn. The game forces you to disregard your losses, and this is as it should be. The Italian Player cannot take the time to get the odds just right, like you can in some games. The clock is ticking for the Italian Player also. Playing as the Austro-Hungarian you cannot trade space for time. You must defend everything as best you can. Hang on by the skin of your teeth if need be, but defend those victory hexes. The Austro-Hungarian night attack can be used once per game. If you pass the die rolls it gives you a Brigade to attack for practically free. As in the real world both sides must also balance Logistics and Supplies. Artillery fire used in 'Interdiction' is a powerful tool at your disposal. If you can use interdiction do so as much as possible. If you can you have made that enemy Brigade useless for the next turn.

 In summation, this is a great game on an obscure subject that more people should be playing. When you go the the Europa Simulazioni site, take the time to browse through their other games. I own several and they are just as well done. Thank you Europa Simulazioni for the chance to review this game. 

Europa Simulazioni:
http://italianwars.net/

Gorizia:
italianwars.net/games/gorizia_1916

My review of Europa Simulazioni's La Guerra Di Gradisca 1615-1617:
https://www.awargamersneedfulthings.co.uk/2019/12/la-guerra-di-gradisca-1615-1617-by.html

Robert


Here's a link to Part 1 in case you missed it. The Kingdom of Graykeep has already plunged head first into a new age of progr...

Shadow Empire Preview: The Graykeep AAR Part 2 Shadow Empire Preview: The Graykeep AAR Part 2

For your Wargamer, Toy soldier collector, MiniFig collector, military history nut. Reviews, interviews, Model Making, AARs and books!


The Kingdom of Graykeep has already plunged head first into a new age of progress, rapidly expanding its borders out from admittedly modest beginnings. As king, I have many decisions to make that will shape our future, but I am assisted by numerous advisors and staff. I plan to continue recruiting additional bureaucrats and using them to head new councils like one focused on foreign affairs, and another in charge of military research. The more funding we can provide to these councils, the more able they will be to provide me with stratagems, cards which I can play, at the cost of political points, to do things like improve diplomatic ties with a hostile neighbor, or change the tactics of individual military HQ's. Below you can see the world as we know it right now. There is much that is unknown to us, but we know that there is opportunity out in that darkness that exceeds the dangers.


Militarily, our situation is stable but still requiring my full attention. We face two points of contact with non-aligned rebel forces, and are being pressed by a minor power that has no respect for our expansion. Previously, I was able to secure basic diplomatic contact with my neighbors to the north, west, and south, and we all agreed to fix the borders in their current state. While future conflict is almost certainly still on the table, I feel comfortable enough to concentrate my forces to the east, where we have numerous active enemies, and several small towns up for grabs.


Amania (dark blue) makes a fatal error. Going beyond occupying the nominally unclaimed territory between us, they send their soldiers behind my lines, cutting off the bulk of my forces from supply just as we finish off the last of the rebels in the area. This will not stand! I have no choice but declare my first war. I had hoped to avoid this inevitability for as long as possible, at least until we had established a more robust economy, capable of replacing the losses we were sure to take. Fortunately, most of my forces still consist of militia, units which are able to replenish themselves without input from my government. On the downside, these forces are weak in terms of firepower. Our enemy appears to have two units of mechanized walkers to our single walker, but overall we have much greater numbers. 

First things first, I have my troopers breakthrough and take back control of the road leading back to Hawking, our capital. This will ensure my forces aren't soon starved for supplies. Then we begin working on turning the tables against the Amanians by cutting off a couple of their units and eliminating pockets one by one. Alas, the major power to the north, Zelaria, chooses this as an opportune time to shake us down for money. Their leader threatens war if we do not pay tribute. With their forces stationed on the border, immediately ready to attack my army from the rear if they so choose, I decide to pay the tribute that is demanded, and avoid a two front war. I've read that those never go well. 


Although it stings to lose a large portion of our hard earned cash, it will hopefully buy us time to deal with one enemy before facing another. My forces pounce on Amania forces and press them back. Unfortunately, their walkers are just as formidable as our lone steel beast, able to turn back entire companies of militia riflemen on their own. Our greater numbers soon tell, however, and we are able to isolate and defeat them piecemeal. The next turn, I notice that our borders in that area show only non-aligned rebel forces. Whether we have defeated them entirely, or if their rear was overrun by rebels, is unclear. The only thing that matters is that our front is secure and our forces can continue to advance and liberate more towns in the area. I order the expansion of our road network so that our supplies can flow to the front. With the foreign affairs situation relatively stable for the moment, more attention can be paid to internal matters. 

One matter , for example, is whether or not we should interact with an ancient AI computer found in some deep ruins back in Hawking. The machine predates all of our known histories and could give us some interesting revelations. It could cause us problems as well. In the spirit of boldness, I direct our scientists to turn it on and see what happens. The AI gives us a lengthy lecture on ethics, and then supplies the knowledge needed for us to produce more effective firearms. The ethics we take into consideration, the firearms we prepare for production.


Production, however, requires resources, and my advisors point out to me that we won't be able to build any of the nice new things they have been researching until we secure our own supplies of them. Namely, metal. Our militia army is fine for now, but if we want to build anything better, we need metal. Our dirt roads are fine for now, but if we want to build railroads, we need metal. If we want to expand our industrial base, again, metal. To that end I stop by the economic council meeting and direct them devote the vast majority of their funding to prospecting for resource deposits. The more passive approach I've taken so far has not yielded any results. I have the military continue to explore and bring more territory into our kingdom, hopefully increases the chances we will strike metal.

In the meantime I've begun buying metal on the limited open market. We have an excess of funds at the moment, since we aren't building much of anything (need metal!) and so buying it outright will get things moving for now.  I quickly learn that buying too much of one resource causes the price to sky rocket for a time, and vice versa, selling a large amount of food, something we have quite a lot of, causes its price to plummet. As a result, the amount of metal we can acquire at any one time is limited, but useful for finishing some construction projects we started long ago but never had the resources to complete.

There is one nice economic development, the first private construction pops up near the agricultural domes we built early on. A town to support the workers pops up on its own accord, and begins paying taxes. An excellent development indeed! 


Another internal matter comes across my desk. This one is a bit of a touchy subject. The Church of Syndic, by far the most popular cult within my kingdom, requests a hefty donation from the state to fund their ultimate project. They want to create some sort of super computer to solve all of our problems. Such cults are fairly common on our world, though each has its own objectives. Quite a few of my own staff are Syndic sympathizers, and they would be quite upset with me if I refuse, not to mention the church itself being cross with me. They point out that they have donated multiple priests to augment my forces by strengthening their resolve, at no cost at all to the state. In the back of my mind, I am wary of using such priests in our forces, I can't help but think that seeding too many of them among the companies might lead to some sort of insurrection. That said, they do greatly benefit the troops they accompany. 

I decide it is in the best interest of keeping everyone happy to make the hefty donation. That's money we could have used to buy more metal and other resources, but a kingdom is more than just buildings and roads, it must have a happy populace as well. Zelaria, our most powerful neighbor, is at it again with the demands for tribute. I can see their forces build up along our border at times, making everyone nervous. I tell them to shove off this time and the next. Not only because our forces now stand ready to repel any invasion, but also because I don't have that kind of money to spare at the moment.


Our investment in prospecting efforts finally pays off! A metal deposit is found in the southern region of the kingdom. Now I just need to order the construction of a metal mine and we will be in business! No more shortages, no more buying at exorbitant prices on the open market! We can really make some progress with a steady flow of materials. Oh, what's this? My construction chief is telling me that the site is too far away and outside of our logistics network. Apparently building such a facility in the middle of nowhere with no way to transport workers and construction equipment to the site is a problem. Ah, well, that makes sense. I consult the writings of my father (the game manual) and realize that I have indeed been neglecting the logistical side of things. Simply building dirt roads is not enough it seems. I order the construction of some transportation centers to get trucks on the road and supplies moving. Once again I'm forced to buy metal on the market to speed up the process. 

In the meantime, I look out across my kingdom. We have expanded further than I ever expected by this point. So far out in fact that our units can't be supplied and we begin losing contact with a few of them completely. Logistics really are important it seems! Being a king in this world is far more involved than simply ordering armies around. It requires management of trade, diplomacy, logistics, personal relationships, and more, in far greater detail than one might ever suspect. It looks like I've still got a lot to learn, but things are going quite well in the Kingdom of Graykeep. For now...


Shadow Empire is coming out soon from Slitherine Games. Stay tuned for more coverage of this fascinating title!

- Joe Beard

HOW THE WEST WAS SAVED: THE RUSSO-POLISH WAR FROM STRATEGEMATA Another fairly obscure war for many of us in the Western hemisphe...

HOW THE WEST WAS SAVED HOW THE WEST WAS SAVED

For your Wargamer, Toy soldier collector, MiniFig collector, military history nut. Reviews, interviews, Model Making, AARs and books!

HOW THE WEST WAS SAVED:
THE RUSSO-POLISH WAR
FROM
STRATEGEMATA

Another fairly obscure war for many of us in the Western hemisphere of Europe.  However, it is a topic I already had familiarity with through two prior gaming treatments. The first was the original GDW game Red Star/White Eagle [note the just released remake by Compass Games] and later The Eagle and The Star from the small Polish company Leonardo Games , which also underwent a superlative physical revamp some years ago by Academy Games under the title, Strike of the Eagle.  

As I have both the latest from Compass Games and Academy Games' very different system, I was delighted to be sent a review copy from the Polish company, Strategemata, of their game on the topic with its exceedingly long title, How the West was Saved: the Russo-Polish War!  

I admit that I had strong expectations that I would enjoy the game.  since the designer was Stephen Pole and the system used here is a modification of the one used in his three games covering WWII.  The latter are all in my collection and provide a highly playable and enjoyable system.  Also, they were all produced by White Dog Games and so I was equally interested in how the change to the Polish company Strategemata would affect the look of the components.

I'm pleased to say that the evolving and improving quality noted in my recent review of The Last Vikings continues.  First to be noted is a very clear and simple mounted map.  

On the left edge there is an equally clear and eminently readable terrain chart and on the right edge is the Turn display with the crucial number of Resource Points for each player, the list of victory point cities, the turn sequence and a large bold graphic explaining a unit's various factors. Though not usually over-keen on terrain displays on the playing board, perhaps because so many are not user friendly, this is so easy to read and commit to memory that I was more than satisfied.

The counters, though of fairly standard quality, are crisp and clean and hark back to the style of earlier days with three simple numbers for unit strength and movement.  Rather strangely, there is a single larger number at the top of the counter which is a unit's strength when acted from its top, facing edge, while the smaller number in the lower left hand corner number is for attacks across the over five sides of the hex.  This seems a strange differentiation both for the period in history and for the operational/strategic scale of the game.  The third number on the bottom right is the familiar standard movement allowance.


The red counters are the Russian forces and the white ones the Polish, while a small number in yellow with a blue band at the top are the Ukrainians, while the two red units with a green stripe are Russian-supporting Lithuanians.


One of the key points looking at the small number of units involved, especially compared with the numbers in Steve Pole's other three games using this system, is the much greater fluidity of play.  This is even more strongly seen from the set-up and reinforcement chart and the picture given, when the game is set up!
This really is low counter density and a very open situation at the beginning of the game.
The game turn sequence is very simple and straightforward.  Each turn begins with both players playing an Event card and these really are a lovely production from the picture on the front of each card to the wide range of historical images and illustrations from posters on the reverse.
Card Front
Reproduction of propaganda poster
Historical photograph
Here is the full sequence:

Random Events
Determine Resource Points
Depot Actions
Check Supply Status
Combat Unit Movement
Combat
Restoration of Units
Reinforcements

Much of this is quick and easy both to learn and to play.  So, Random Events as we've seen is simply each player playing and revealing a single card which will be executed at the appropriate stage that it applies to.

The number of each player's Resource Points is printed on the Turn Track and supplemented by the roll of two dice: one white D6 - a positive die and one red D6 - a negative die.  So each player may gain or lose from -5 to +5.  On the whole, there aren't major swings, but the possibility is always there.  A nice simple effective rule.

It is these Resource Points that are the heart of this system engine. First of all they are the "currency" to pay for virtually everything that happens in the game, starting with the next Phase: Depot Actions.  Here each player places alternately one new Supply Depot and, like nearly every single action in the game, the moment you decline to take the appropriate action for a Phase then you cannot take any more of that type of action.  Once both players have finished laying new depots you've got to pay for all that are now on the board out of your Resource Points. This chain of Supply Depots is absolutely vital, for in the next Phase [Check Supply Status] every full strength unit that is now out of supply is flipped to its weaker side and if already flipped is now eliminated!  Easy, effective and DEADLY!

Next comes Combat Unit Movement which again is done alternately.  Each stack of units that is moved costs one Resource Point and all the units chosen in a single stack must end in the same hex.  With resource points in short supply, there won't be too many movements made, which is another factor that makes this game run smoothly and swiftly.  Next comes Combat, again executed by each player alternately choosing to carry out one combat at a time and once again if a player declines to carry out a combat then they cannot carry any more later in the Phase. This cat and mouse, back and forth interaction is one of the elements that I relish strongly.
A close up of a small part of the battlefield
Finally, after Combat there is the opportunity to restore weakened units i.e. those that have been reduced to their weaker side can be flipped back to full strength.  Just one problem of course, to do so needs some of those precious Resource Points and, if by now you have some of these left, then you're probably managing better than I usually do!

The only things you don't pay for are your reinforcements and the limited number of four redeployments per player.  Finally, the rules conclude with a rare few Special Rules.  Overall, though the rules have relatively few illustrations and everything is in simple black and white, the clarity of the rules means that these are all that's needed.

Combat, though straightforward, is the section that needs most attention, because there are some interesting and fairly novel elements.  Attacks must be made through the top facing edge of the unit which shows a unit's stronger value and an attack is a single stack against a single stack.  Both players add up the total strength of their units in the single stack and add 1 strength point per additional stack adjacent to the defender. Only the attacker may attempt to bring in the full strength of one additional adjacent stack, but this is at the risk of a D6 die roll.  Roll 5/6 and the additional stack is added in; 3/4 the stack isn't added: BUT  roll 1/2 and the whole attack is cancelled!   To the final total strengths of each side is added the roll of a single D6.

Losses are dependent on the differences between scores.  For the loser it's half that number rounded down, for the attacker it 's half the number of the defender's losses,  This is with the added restriction that neither player can suffer more hits than the number of units inflicting the damage.  To give a simple example: if the difference were 6, then the loser of the combat would provisionally suffer 3 hits, but if the winner had only two units in his stack, then the most the loser would suffer would be 2 hits.

The other rule that needs care, and I say this as someone who has considerable familiarity with this system and the rules, is the use of depots and supply.  However, the care is not in understanding the rules [they are very clear], but in carrying them out.  Too often in the past, when playing Steve Pole's games set in WWII have I discovered that I've miscalculated the distance. As the distance restrictions are even more stringent in How The West Was Saved to reflect the earlier historical period,  you need to be even more careful.

For me, this is an excellent addition to those games already using this system.  It has the lowest counter density of them all; as a result it plays even faster.  The situation is more fluid and open and provides a good balance of attacking and defending for both players.  What's more in these unusual and constrained times where solo play is the enforced norm [unless you're playing online], it plays very well solitaire with only the play of Event cards being slightly problematic.

So many thanks once more to Strategemata for supplying my review copy.

Approx.  $65

Available in the UK : £59.95 from Second Chance Games


These are interesting times we’re living in. As a gamer you may think that our options to play games are limited but in my experience no...

Caylus 1303 Caylus 1303

For your Wargamer, Toy soldier collector, MiniFig collector, military history nut. Reviews, interviews, Model Making, AARs and books!

These are interesting times we’re living in. As a gamer you may think that our options to play games are limited but in my experience nothing has been further from the truth. Not only are there fantastic online resources to help us connect virtually to one another, there is also a growing demand from non-gamers to connect, for contact, conversation and to alleviate the monotony of whatever situation they find themselves locked down in.  We’re perfectly placed as a community to help many people in our own small way.

Prior to the lockdown in the UK I was sent a copy of Caylus 1303 to review. I am writing this as part review and part-a list of resources (at the end of the review) I’ve used to play games online.

Caylus 1303 is a revamp of the eponymous and genre-defining worker placement classic Caylus.  If you’re not familiar with the original, it has spawned a sub-culture within the gaming community of bland-euro art, mean-looking dudes on boxes and arguably the most infamous character in gaming – the Provost! I’ve only played the original a handful of times but it still sparks memories of being screwed over, or inflicting the same screwage onto my friends… I’m pleased to say all this is still present in the new streamlined version of the game.

Gameplay


Caylus 1303 is played over 9 rounds, in which players are trying to get the most prestige points (i.e. victory points) by contributing to building the town of Caylus and constructing the castle.  Thematically this makes perfect sense as the town of the same name in France is famous for its castle.  However, in the game, this theme feels loosely tacked on as a mechanism to place workers and screw with your opponents.
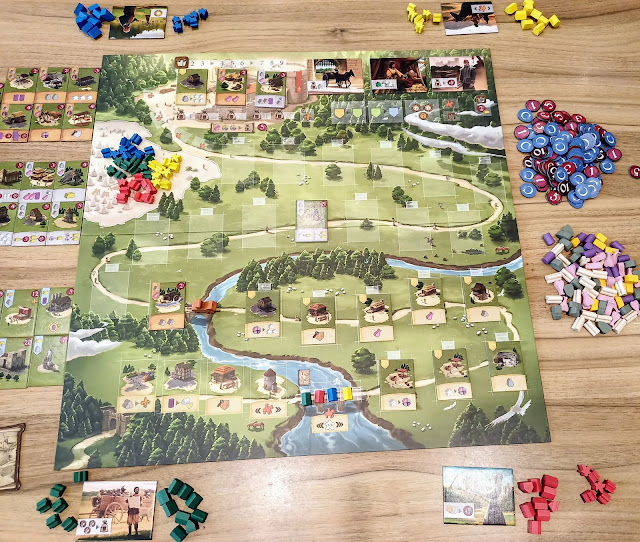
Initial setup for 4 player game.
The game has a randomised setup and a variable turn order, two features that are a must for me when it comes to theme-light euros.  The setup is relatively quick and aided by excellent graphic design throughout the game.  After your first game, you’ll be able to setup the board in a matter of minutes.

One huge benefit of virtual gaming is that the chore of setting up any game is largely removed from the players. I am very experienced in using both Vassal and Table Top simulator both of which have free modules for nearly every board game you can imagine (at least ones you’d want to play!). TTS is much newer than vassal and has a much larger user-base and I’m constantly amazed at how quickly game modules are available in the workshop. Vassal caters more to the typical GMT-crowd
Table Top Simulator - opening splash
Caylus 1303 (a relatively new game has an unofficial port on TTS but only with lower resolution scans. I still managed to convince a few gaming buddies to give it a try and I found it perfectly playable through the TTS module. The easiest (and best) solution I have found to talk to my opponents is through Discord. This enables multi-player comms and text chat if you’re so inclined.  If you’re just playing 2 player games then Zoom is free to use and has a useful screen-sharing option.

During the lockdown I have played online with gaming opponents, Caylus 1303, Mage Knight, War of the Ring, Pendragon, Undaunted Normandy, Combat Commander Europe.  However, what has surprised me most is how up for games ‘non-gamers’ are during these times. I have had countless family and social group quizzes, I have had success playing Scattegories, played a Fake Artist Goes to New York, hosting a murder mystery evening, pub quizzes and even a scavenger hunt for kids.  I have used Zoom for a lot of these but also Kahoot and Quizziz to run the quiz nights.
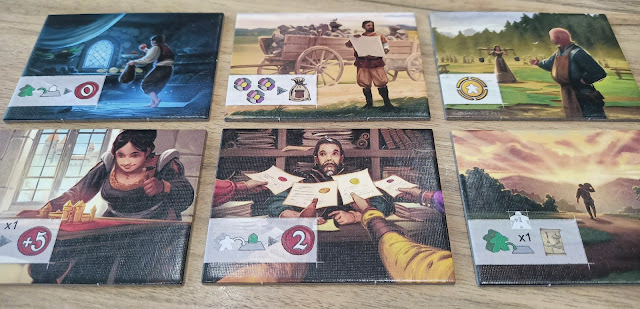
Some of the Characters
Each player in Caylus 1303 will also have a character with bonus abilities on certain actions. This, however, is not guaranteed to stay with you long.  There is no text anywhere on the board or components so I couldn’t tell what the characters are (without referring to the rule book) but once again the icons are brilliantly designed and intuitive.  I know it’s cheaper to translate a game with no text (just the rulebook) but I would have liked a characters name on their cards at least…

Each round of the game consists of 4 phases.  Planning, Activation, Delivery and Stewardship.
Each player places out their workers on free spaces containing a building during the Planning Phase. Trying to plan out your actions based on resources you get later in the round shouldn’t be difficult…but I have not played any game where I didn’t mess this up at least once. The number of workers you have each round will also change allowing you to do more actions or saving them to move the Provost even more...
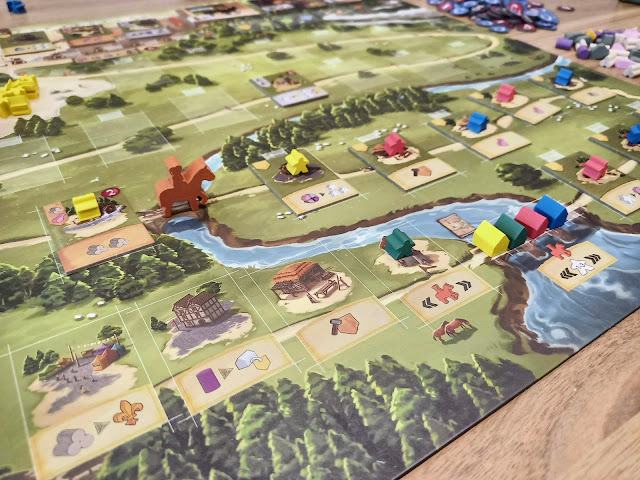
First Round Planning Completed
Activation resolves each worker’s action space (building) from the beginning of the road to the space just before the Provost.  The first four buildings are fixed in each game and provide their specific effect.  An additional 10 buildings are placed on the road at the beginning of the game.  These comprise 8 starter buildings, 1 wood building and 1 stone building. The road will have 13 empty spaces in which players can build. All buildings provide also provide prestige points as well as their effect.

The best thing about Activation, and really what makes this game Caylus is moving the Provost.  Any workers on buildings after the Provost will not get their effect.  Each player will get the opportunity to move the Provost in player order up to 3 spaces, forward or back. There is also a building that can move the Provost and also one of the Character’s abilities moves the Provost as well. Buildings later on the road, will generally have more powerful effects but their use is not guaranteed. Placing your workers on them is a risky but rewarding business.
A small selection of the Starting, Wood and Stone Buildings and Monuments
Moving the Provost in front of your opponents is a delicious feeling, unfortunately it’s going to happen to you too. But this is where the fun is, if you don’t like confrontation in your games then this is not for you.

The Delivery Phase allows players to sacrifice their resources to build the castle gaining 5 prestige points and a favour.  In order to go here, each worker will generally need three different resources so it won’t be used too much in the early game, but it is a powerful way to gain lots of prestige points later on.

During the Stewardship Phase owned buildings can be changed to residences, thereby removing the effect, and residences can be changed into Monuments (lots of Prestige points).  However, one side-effect of this is that there are fewer spaces on the road for workers to go.  This combines with generally more workers being available to players later in the game.  This surplus is tailor-made to spend on moving the Provost.  However, in order to gain the most points you will need to pivot away from Residences (gaining more workers) and into Monuments (gaining more points).
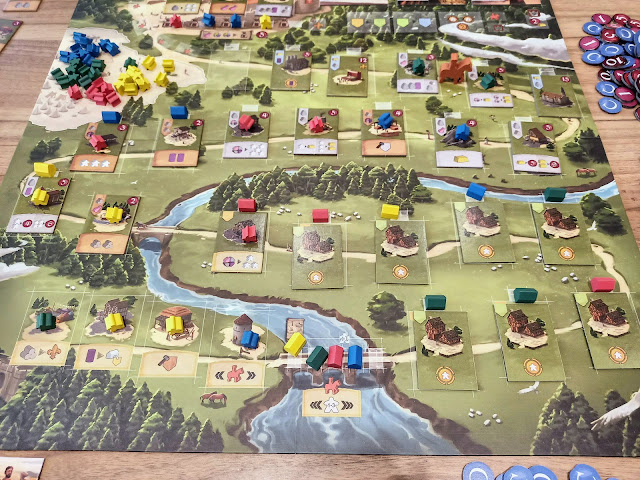
4 Players in the 8th (penultimate) round
The winner of the game is the player with the most Prestige points at the end of the ninth round.

Components


Once again I have nothing but praise for the physical components.  The card is lovely and thick and punched out cleaner than almost any other punchboard I can remember.  The wooden components are nice and chunky and their shape represents the resources.  The art and graphic design is clean, consistent and nice to look, but the stand out feature for me is the iconography. They are largely intuitive and once a player is familiar with the rules, sufficiently describe the actions.
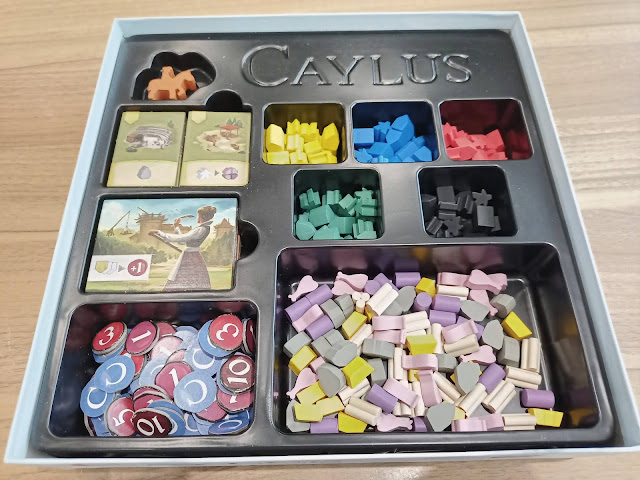
Fantastic insert
The insert is a rare example of a publisher actually providing something that I’m not going to chuck out straight away.  It even handles vertical storage without plastic bags which I’m particularly grateful for.

Criticisms


I don’t think I can recommend the two-player game.  At two players, the take-that decision and screwage gets a bit samey.  The designer has compensated the more empty board by starting with more workers but this doesn’t really compensate and it feels quite a different game.  At three players the board isn’t quite as busy but still quite fun.  At five it runs a little long but is still fun – I wouldn’t recommend a 5 player game for your first time out.
A clean and short rulebook

Conclusion


This is a beautiful game and one I’m glad to play and introduce to anybody. I would even recommend this as a gateway game to a non-gamer if they’re not going to be too precious about being attacked (albeit indirectly by the Provost) at every opportunity.  After the first round, the rules are easily remembered and the only repeated questions were around the construction site and favours, neither of which I’ve detailed here but they’re not hard to grasp.

Waiting to play IRL
I like the randomised setup and variable turn order in this game.  These elements are only possible with finely tuned mechanics, else the game will break more often than it’s fun.  That is definitely not the case here, with over 30 years of playtesting (the original Caylus) this revamp has streamlined the original and maintained the essence of what made Caylus, Caylus.  The mechanics and gameplay are rock solid and it will be a welcome addition to my next game night.  Fingers crossed it comes soon.

Stay safe and see you on the other side

I’d like to thank Asmodee for sending this review copy.  Many local game stores will still have this in stock although they may not be open currently, their online shopping portals may still be open. You can use this link http://www.findyourgamestore.co.uk/ to find and support them during this difficult time.


Designer: William Attia
Play time: 60-90 minutes.
Players: 2 – 5 players

Online gaming resources

BGGs distance gaming guide https://boardgamegeek.com/wiki/page/Distance_Gaming_Guide (a comprehensive how- to)
Vassal Engine http://www.vassalengine.org/ (program to run board game modules)
Vassal Mods http://www.vassalengine.org/wiki/Category:Modules (repository of many board games)
Table Top Simulator https://store.steampowered.com/app/286160/Tabletop_Simulator/ (cross platform application that has many users) and it’s workshop where all the games are: https://steamcommunity.com/app/286160/workshop/
Tabletopia https://tabletopia.com/ (browser based alternative to TTS)

Chat and Comms

Discord https://discordapp.com/ (gaming focused communication platform)
Viber https://www.viber.com/en/ (Open source secure comms and video calling)
Zoom (Easy to use software with unlimited calls for 1 to 1 video-conferencing i.e. wargaming)

hpssims.com