second chance games

Search This Website of delight

 THIS WAR WITHOUT AN ENEMY FROM NUTS PUBLISHING Are the titles of games getting more obscure? Whatever the answer, the war cloaked behind th...

THIS WAR WITHOUT AN ENEMY THIS WAR WITHOUT AN ENEMY

For your Wargamer, Toy soldier collector, MiniFig collector, military history nut. Reviews, interviews, Model Making, AARs and books!

 THIS WAR WITHOUT AN ENEMY

FROM

NUTS PUBLISHING


Are the titles of games getting more obscure? Whatever the answer, the war cloaked behind this title is one that has received very few treatments by the board wargame world.  Its subject - the English Civil War.  

I came to hear of it early in its inception when it was first mooted as a new addition to Columbia Games' extensive and excellent series of light block games.  As most of these are numbered in my collection of games and have had extensive play, I was delighted at the prospect of one on the English Civil War.  I had one reservation though: would it just be a re-tread of their Richard III with different blocks?

This too was the problem for the game's designer, Scott Moore, as was revealed in his interview for AWNT, when he described his eventual move to develop the game.

 "... my move to Nuts Publishing gave me the freedom to change my game beyond the confines of the Columbia system.  So, in the end I had full control over the design of the game and did not have to make any compromises."

At the time, I thought this was a brave decision and it's one that has paid huge dividends not just in terms of the content, but also in the quality.  Nuts Publishing, though a small company, has set the highest standards in all the varied components.  This is clear from a first glimpse of the daring box art;  the stark, dominating red cross set against the swirling, murky white clouds of battle smoke conjures up both the cross of St George, the symbolic flag of England, and the bloody funereal cross of death reminding us of the vicious slaughter of civil war. 

Here praise must go to the artist, Nicolas Roblin, and Scott's own words couldn't sum this praise up better.

"...the success of the final design was mainly due to his extensive research, passion and dedication - and, of course, natural talent ... the box cover illustration and the gorgeous map have attracted the most praise."

I couldn't agree more.  The strength of the map art can be seen, even from my photograph, in the rich forested areas and the mountainous terrain of Wales and the North. What my shot barely brings out is the 3D quality of the coastline and the superb depiction of the few, but crucial cities.


A closer look at the coast of Wales will give you a better idea both of the careful delineation of the coast, with the dark black lines showing where two areas are not adjacent. A similar level of detail is shown in the image of Bristol: the orange fortified border and numbers convey that this is a major city, sympathetic to Parliament with a VP value of 1 and a Siege factor of 4  [i.e. that you can assign a maximum of 4 blocks to Storming it.]

Inevitably areas can get crowded when occupied by the maximum number of blocks, a perennial issue with most block games.  For example Columbia's excellent Julius Caesar having a point-to-point map rather than areas frequently involves stacking your blocks. Presenting much more of a difficulty is the almost illegible print of the geographical names of the areas.  This is one of the rare moments when I'd swop the lovely design work for a touch of plain clarity.  A problem I haven't encountered, but I know others have commented on is some difficulty reading the localities on the blocks because of the font size. 

That said, what can be seen is that the continuing depth of research and appropriate art are equally notable in the images used for the unit stickers on the wooden blocks and the individuality of the illustrations on the cards. 


Each separate type of Event has its specific picture in keeping with the period.  These add greatly to the atmosphere of the game, as  the two I've singled out show.

All the other necessary contents maintain this high standard of work.  Two Play Aids, one for each player, a Battle Display and set up cards for 1642 and 1644.  Finally, two extensive glossy booklets, one for the Rules, the other a Playbook also signal that this game has developed a familiar system to a significantly greater depth.

The core is recognisably one of yearly Rounds with 6 player turns in each.  A hand of six cards is played one at a time by each player, with the higher value card determining who is the 1st Player in a turn.  Cards may also have Events on them.  This is an excellent and important development on previous games, which had very few Event cards and these allowed nothing but the Event to happen.  Scott Moore has introduced far more Event cards all of which include a reduced number of Action Points.  This is significant both in adding greatly to the historical atmosphere of the game and in introducing a whole series of varying effects.  Though I would say it is obvious which Phase of a turn an Event should affect, Scott has even added a helpful letter on the card to instruct you as to the exact Phase.

Parliament Set-up Card with blocks positioned
 Each Action point of value on the card [4 is the maximum] allows such familiar Actions as a Group Move, Sea Move, Muster or Recruitment.  The map is divided into Areas and movement has limits on how many units may enter an Enemy occupied area, depending on the type of border [Open/Mountain/River].  After the 1st Player has spent all their Action Points, the 2nd Player does likewise. 

After Actions comes the Tactical Phase when Battles - and possibly Sieges - occur.  Order of resolving Battles is determined by the 1st Player and Withdrawal From Battle may be attempted by the Defender to avoid battle.  If a Battle does occur then a very nice, though rather thin, Battle Display Card comes into play as this point and up to 3 rounds of combat may occur in each separate battle.

Finally Supply is checked, again  a very familiar process in these type of games, where the type of terrain in an Area determines how many units are in Supply, while those above the limit lose a point of strength.  Again this is a departure from the more commonly punitive removal of any surplus blocks to the recruitment pool.

As seen in the earlier photo, units are the standard blocks with Strength denoted by the number of "pips" [i.e. small circles] around the edge and rotated as a block takes hits.  Strength determines how many dice you roll in Battle, while the top right number on the block is its effectiveness which indicates what you must roll equal or less than to score a hit.  What is noticeably not part of the conventional figures on the blocks is an alphabetic letter that determines the order in which blocks fire.

This is just one of many factors that leads to examining just how much this game has developed and built upon a tried and trusted system.  For the moment we'll stay with how Battle is conducted.  Most block games have used the basic format, Defender's "A" blocks fire before Attacker's "A" blocks and so on through the alphabet, with usually the lowest rank being "D" blocks. Not in this game.  Instead, the new sequence makes use of a new variation of a Battle Display Board.

Though the use of Battle Displays has appeared in a few block games already, virtually all have been very simplistic affairs of opposing Left Wing, Centre and Right Wing, with victory depending on variants of which player manages to clear one or more sector of the enemy and occupy them. In This War Without An Enemy, the Battle Display is very different.  First of all, it is much more visually appealing with its aerial landscape view of woods, roads and defensive positions.

An example of how a Battle might initially line up
Each side has named areas for Firing Infantry, Engaging Infantry, Cavalry, Artillery and Reserves, while two special areas are reserved for Routing Cavalry and Pursuing Cavalry.  Already the key rationale and intent can be seen emerging: to give a more realistic feel and experience appropriate to this specific period of musket and pike warfare.  Artillery fires first and can only fire in the first Round of a battle.  Then, in turn, the Defender then the Attacker has to choose whether their infantry remains in the Firing Infantry area where they will now fire with a -1 penalty or move to the Engaging Infantry area where they will attack later after the cavalry phase, but without penalty.

This little touch of decision making gets a resounding cheer from me as does the whole process of Battle in this game.  Cavalry must attack cavalry, if both are present, and may possibly lead to routing and consequently the possibility of pursuit- the next excellent touch.  After the first round of a battle, first the Defender has the choice to declare a General Retreat and, if they don't, then the Attacker has the same choice.

The whole process, though giving a significantly more authentic feel, takes hardly any more time to carry out.  The final change is one more that I greatly appreciate.  Normally if the defender has not been eliminated or retreated by the end of three rounds of combat, the Attacker must retreat.  At last we've got a rule that makes much more realistic sense: the player who has most blocks remaining on the battlefield is judged to be the victor.  This makes the cavalry pursuit rule all the more important and realistic.  If your victorious cavalry have gone charging off after the defeated cavalry, then you may find your army has fewer blocks on the field than the enemy and you've lost the battle!  This is what has happened to me in my most recent game and in the battle I've just been reading about in an excellent military account of the English Civil War that I recommend at the end of my review. 

After Battle, if the area contains a Fortified City, there may come the chance of a Siege taking place.  Again despite Sieges having featured occasionally in previous block games, particularly Columbia Games' Crusader Rex, Scott Moore has introduced  substantially more options, including a genuine opportunity for the Defender to undertake a sally without the need to have a relief force involved.  Siege markers, Storming, including Bombardment, Fortified Defence and possibly the use of Events are all there.  You can choose to sit there with the odd spot of bombardment and watch your enemy wither through Siege Attrition, but typically that's a slow process.  So, trying to secure a breach and then storming offers the much quicker, but much riskier choice.  

This is one section of the rules that will take some careful initial reading to get clear, but the outcome is another rewarding part of the game.  This is especially true, since the road to victory points is almost exclusively the capture of cities.  Battles do not directly gain you VPs, though defeating and eliminating your enemy in the field will certainly be an important factor in your success.  Just don't lose too many troops yourself in the process!

So far, the changes I've described, significant though they are, have mainly been developments and a deepening of existing rules and concepts of block games, though these by themselves are substantial and greatly enrich  virtually every feature of the system.  The final addition is one that pertains specifically to historical elements of the English Civil War. 

This is the strongly Regional nature of the conflict.  I say that as a native of the predominantly Royalist favouring county of Lancashire, who lives only a few miles from the site of the siege of Lathom House in 1644.  The latter was notable for the Countess of Derby holding the castle for her husband, the Earl of Derby, and successfully organising its defence with 300 men to withstand a three month siege against 2,000 Parliamentarians.

The opening of the war viewed from the Royalist side
This aspect of the war was first strongly explored by that doyen of English Civil war games, Charles Vasey, in his celebrated CDG version, Unhappy King Charles. In This War Without An Enemy, the same ideas have been covered to achieve the same effects, but in considerably easier and simpler rules.  

Each Regional block has an identifying letter on a coloured background that matches its Region's distinctive coloured boundary.  Such units may move freely within those boundaries, but not outside unless led by or moving to a matching Regional Leader or a major Leader, such as King Charles or Prince Rupert for the Royalists.  Here, the Parliamentarians have a distinct advantage with four major Leaders.  Apart from the dire consequences if such troops lose their Leader when outside their Region, they cannot recruit new strength unless within their home Region.  

Moreover, sufficient control of Areas within a Region by either side brings in additional forces at the end of a year.  Finally, further extending the importance of locality is that some Areas have Loyalty icons, while Cities are outlined in either blue [Royalist] or orange [Parliamentarian] to indicate their Sympathy for the given side. Consequently, a few simple rules and this easy use of colour coding accomplish a pleasing level of historical feel to the game.

Altogether with this consistent developing and enriching of the rules, along with wholly new elements, the Rulebook is a much more detailed affair of 24 pages, as against the slender 8 pages of comparable block games.  The layout too in double columns incorporates much more text with relatively few illustrations.  At times, careful reading is needed not to overlook a telling detail or significant word.  On occasion a rule that was in an earlier draft has lingered on and a few points have needed clarifying.  However, support from the designer, Scott Moore and Nuts Publishing couldn't be better, with the fastest of responses to any questions posed.

With this significantly expanded depth to the game - and I wholeheartedly praise what has been achieved - there is one major omission that did surprise me.  There is NO index, not even of the simplest and most basic type!   A really good cross-referenced index would seem an obvious inclusion. [Still, the great wider world of enthusiasts  has already supplied that lack and so a very good index can be downloaded from the files on BoardGameGeek.] 

One of the few, but clear illustrations
Understanding the rules is also reinforced by what is becoming a more frequent addition to many games - namely, a Playbook. The first section plays through the opening two turns in detail.  The text is fairly densely presented in long paragraphs, but is supplemented with two large illustrations, one of which is full page.  The rest of the booklet provides a rewarding background consisting of four pages of historical material, five pages of biographical detail of the leaders in the game and finally six more pages explaining the historical detail of the Events on the cards.  All of this is a very good addition to both the game and the background knowledge that is so supportive of a period that is comparatively unfamiliar to the gaming world.

A good example of both the extensive text and a full page illustration in the Playbook

This is a much meatier addition to the block gaming circle of games and definitely more than the intro-level that many belong to.  It is certainly not a quick 2 hrs or less that some are.  However, there are two short introductory scenarios and a medium length one.  Besides that, Scott has provided a simplified version online at BGG.  However, all that has been added is so rewarding that I for one wouldn't want to lose any element of them.  Play is intense, gives a realistic feel for the English Civil War and has already provided many of those individual moments of narrative excitement.

I had very high hopes and great anticipation for the eventual release of this game.   I'm glad to say that This War Without An Enemy has lived up to those expectations and in so many ways has surpassed them.  The quality of presentation from Nuts Publishing and the rewarding detail without sacrificing playability from the designer Scott Moore have brought together a great combination of talents.  
 

As always many thanks to Nuts Publishing for providing the review copy.

Recommendations

Scott Moore's interview at Belloto Con in Spain - link here - much of the questioning is in Spanish, but all Scott's replies are in English!  Great insight, including detailed explanation of the Battle system.

All The King's Armies by Stuart Reid - an excellent narrative of the military aspects of the English Civil War.

  Men of Iron Tri-Pack by GMT Games Including the Games: Men of Iron, Infidel, Blood & Roses  This set of games is pretty amazing. It go...

Men of Iron Tri-Pack by GMT Games Men of Iron Tri-Pack by GMT Games

For your Wargamer, Toy soldier collector, MiniFig collector, military history nut. Reviews, interviews, Model Making, AARs and books!


 Men of Iron Tri-Pack


by GMT Games


Including the Games:

Men of Iron, Infidel, Blood & Roses


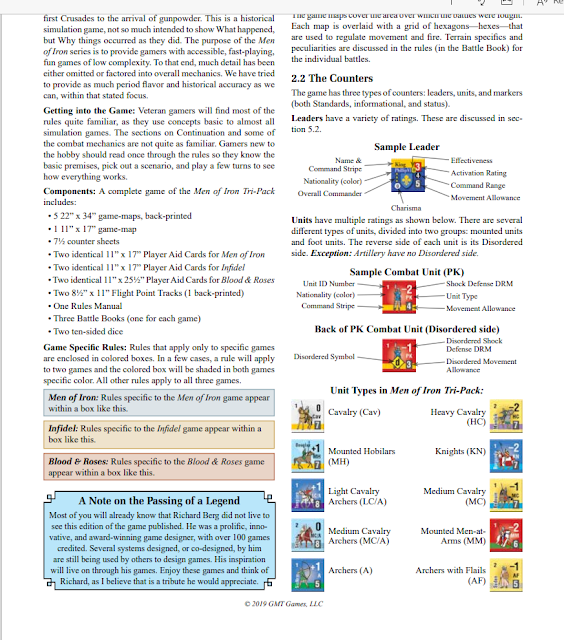
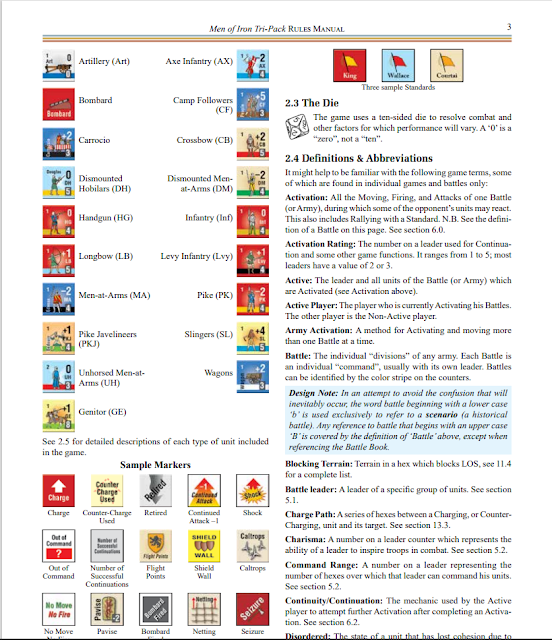
 This set of games is pretty amazing. It goes from the rebirth of infantry, to the acendency of the English longbow, and finishes with the armored knight having to deal with gunpowder weapons. The list of battles is very long and a delight to Middle Ages boardgame fans. This is what comes with the game:


Five double-sided 22x34” maps and one 11x17" map

Seven and one half counter sheets

One series rulebook

Three battle books

Eight player aid cards

Two ten-sided dice


 This is the list of battles:


"Dorylaeum – Northwest Anatolia, 1 July 1097 - The Crusader line of march, including the people’s Crusade and Peter the hermit, as well as all the great 1st Crusade Leaders, are “ambushed” by Kilij Arslan and his crack Seljuk cavalry.   

Antioch – Northern Syrian, 28 June 1098 - The exhausted, starving and depleted Crusaders – they had few horses left – have just taken Antioch and are now faced with a large Turkish army, under Kerbogha, sent to retake the city.   

Ascalon – Southern Palestine, 12 August 1099 - The Crusaders, having seized Jerusalem, turn south to fend off the suddenly active large army of the Fatimids, with their crack Mamluk heavy cavalry.   

Harran – Crusader Kingdom of Antioch/Edessa, 7 May 1104 - Baldwin II of Edessa seeks to maintain control of his little kingdom in northern Syria, something Soqman, Atabeg of Damascus, is not happy to allow. One of the first major Crusader defeats.   

Montgisard – Frankish Kingdom of Jerusalem, 25 November 1177 - Saladin attempts to destroy a small army from the Kingdom of Jerusalem with an army more than five times its size. Though there are only 400 knights, the Crusaders are led by the remarkable Baldwin IV, The Leper King. The outcome - one of the greatest Crusader victories. See if you can carry off this stunning upset!   

Arsuf - Ayyubid Kingdom of Jerusalem, 7 September 1191 - The classic battle between Richard I Lionheart and the Ayyubid Army of Saladin highlighting the major facets of each army in an unusual moving battle.

Falkirk - Scotland, 22 July 1298 - Wallace's great disaster, despite his massive schiltron. Good infantry is fine, but it needs support. The ultimate solitaire scenario. 

Courtrai - Flanders, 11 July 1302 - The Battle of the Golden Spurs. The Flemish shook the elite French army with one of the earliest displays of the power of solid infantry using defensive positions. 

Bannockburn - Scotland, 23-24 June 1314 - Robert the Bruce's famous triumph over a numerically superior, but literally bogged down English army. 

Crecy - France, 26 August 1346 - The first great battle of the Hundred Years War. It showed that infantry, supported by archers, could defeat the best knights in Europe. 

Poitiers - France, 19 September 1356 - The French fight dismounted this time and almost win. But the longbow, and solid English infantry prevail again. 

Najera - Castile, 3 April 1367 - The Black Prince goes to Spain with a marvelous combined arms force to further English plans of "expansion". 

Agincourt – Artois, 25 October 1415 – Henry V wins a mighty victory against the flower of French chivalry. 

1st St. Albans – Herefordshire, 22 May 1455 - Marks the first major engagement in the Wars of the Roses. Richard, Duke of York and his ally, Richard Neville, Earl of Warwick, defeated the Lancastrians under Edmund, Duke of Somerset, who was killed during the battle. York also captured Henry VI and forced Henry to appoint him Constable of England  

Blore Heath – Staffordshire, 23 September 1459 - Greatly outnumbered Yorkist infantry used the longbow and a defensive position to drive off the Lancastrian Men-at-Arms. 

2nd St. Albans – Herefordshire, 17 February 1461 - The Lancastrians drove the Yorkists out of the town and then destroyed Warwick’s strangely deployed army, even when sturdily defended by hedges, caltrops and spiked netting. 

Towton – Yorkshire, 29 March 1461 - Easily biggest battle in the box and the biggest in the entire series. It uses over 200 combat units and, much like the actual battle, will probably take a long time to play. It is mostly crash and bash, with little room for maneuver, all fought in a blinding snowstorm!!  

Barnet – Greater London Area, 14 April 1471 - A classic battle of planned deployments, but overlapping wings, cries of treason in the lines, fog of war (actual fog), and the excellent use of reserves. 

Tewksbury – Gloucestershire, 4 May 1471 - A battle that shows one of the key terrain features of the battles in this era, extensive hedges and thick underbrush in otherwise clear fields. 

Bosworth – Leicestershire, 22 August 1485 - The best-known battle of the wars and the tragic (I think) death of King Richard III in a battle he should have won. Using the latest information as to where the battle took place, let’s see if you can cancel out the Tudor dynasty."


Falkirk Setup and Map

 This is a list of some of the historical commanders in the game:


"The great English King, Edward III and his son, The Black Prince, William Wallace and The Bruce, Captal de Buch.  Crusaders Stephen of Blois, Bohemond of Taranto, Raymond of Toulouse, Bishop Adhemar of Le Puy, the leper King Baldwin IV, Raynald of Chatillon, and King Richard I. Saracen leaders Kilij Arslan, Kerbogha, Atabeg of Mosul,  Fatimid Vizier al-Afdal Shahanshah, Soqman the Artukid of Diyar-Bakr and Aleppo, and Saladin. King Henry VI, Richard, Duke of York, King Edward IV, Richard Neville, Earl of Warwick, King Richard III, and Henry Tudor, Earl of Richmond (and founder of the Tudor dynasty)."


 The Men of Iron series was originally produced as four separate games:

Men of Iron
Infidel
Blood & Roses
Arquebus

 This is another in a long line of GMT Games giving the gamer a big package of previously released separate games and/or add-ons that were produced after the original game was put out. In this case the Battle of Agincourt was only released in the C3I magazine. So, you get all the battles of the three games with the bonus one Agincourt, and for an excellent price. Please understand that this is not just a rehash of the older separate games. The tri-pack has all of the errata added in along with updated counters and maps.

 The maps are very well done, even if they are mostly empty or devoid of different types of terrain. Almost all Middle Age Battles, and Ancient ones, took place of flat featureless areas. The counters are smaller at 1/2" (except for the Agincourt ones that are 9/16"), but even my old eyes can read the names and data. The European leaders have their heraldic sign on their counters, while the Islamic leaders have a crescent moon on their counters. There are two of each of the player's aids for Blood & Roses, Infidel, and Men of Iron. Men of Iron and Infidel are both four pages, while Blood & Roses is six pages in total. Each game has its own full page Flight Turn Track and General Track on one full page. The Rules Manual is in full color, and is twenty-eight pages long. Each of the three games has its own Battle Book (in full color). These contain all of the setups for the different battles, along with some historical information, and any special rules for each scenario. All of the components are up to the GMT standard of excellence.


 I already own, and have played, the original release of Blood & Roses, and Arquebus the fourth title in the series. I really like the system and both games, so I was excited to see what this release was going to add. This is the sequence of play:

"A. Activation Phase
• If this is a Free Activation, choose a Battle, Army Activation
(6.1), Standard (15.2), or Pass (6.1). If Pass is chosen, the
non-Active player gets a Free Activation; the Time marker
may be moved (16.1).
• If a Standard is Activated skip to Phase D or move the
Standard and skip to Phase E (15.2).
B. Move/Fire Phase
During Army Activation, Activated units may only Move (7.0).
During a Battle Activation any or all units of the Activated
Battle may Move (7.0) and/or Fire (11.0).
• Place any replacement leaders (5.5).
• Before any unit is moved or fires, first the Non-Active
player plays any Battle Cry or Unsteady Troops Seizure
counters, then the Active player plays any Battle Cry or
Unsteady Troops Seizure counters (6.3).
• Before any unit is moved or fires check Command status
for all Activated units (5.2 & 5.3).
• A foot unit armed with missile weapons may fire only at the
end of its move. Light Cavalry Archers, Medium Cavalry
Archers, and Genitors units may fire before, during, or at
the end of their move. A unit may fire without moving.
• Each unit must finish its movement/firing before another
unit may begin to move/fire.
• The Non-Active player’s units may qualify for Reaction/
Return fire (11.2) or Counter-Charge (13.9) depending on
the Active player’s actions.
• After movement in an Army Activation skip to Phase E.
C. Shock Phase
During a Battle Activation, after all movement/firing for the
activated Battle is complete, Shock combat (12.0) and Charges
(13.0) may be initiated.
1. The Active player designates which of his units are
attacking which defending units, including Charges (13.0).
2. Pre-Shock activities:
a) One at a time, the Active player places each Charging
unit adjacent to its target. Any Reaction Fire caused by
this is resolved (11.2).
b) Roll for terrain-induced Disorder checks for attackers;
apply automatic terrain-induced Disorders.
c) Roll for Shock/Charge Reluctance (13.5).
d) Any Retreat Before Combat (12.2) by the defender is
resolved.
e) The defender attempts any Counter-Charges (13.6) of
which he is capable.
3. The Active player resolves all his Shock and Charge
attacks, in any order he wishes. The Charge Table is used
as long as at least half of the units in an individual attack
succeeded in Charging (not Disordered by Reaction Fire
or Counter-Charged); otherwise the Shock Table is used.
Continued Attack (14.7) markers are placed and Advances
(12.4) are taken.
Exception: Attacks by a single attacker against multiple
defending hexes are resolved at the same time, and they are
considered to be going on simultaneously, with results (which
can be cumulative for the attacker) applied after both attacks
are resolved.
4. All Continued Attacks (14.7) are now resolved. Begin again
at Step 1, except that only units marked with Continued
Attack markers Shock and they must declare a Shock attack;
Charging and Counter-Charging are not allowed.
D. Rally Phase
During Battle Activation, Rally (15.0) any Disordered units that
did nothing for the entire Activation and that are currently not
adjacent to an enemy unit. If a Standard was Activated, Rally
(15.0) any Retired unit belonging to that army in or within one
hex of the Standard, and not adjacent to an enemy unit.
E. Continuation Phase
Make any Battle Flight rolls, and then any needed Pursuit rolls
(14.8 and 14.9). If the completed Activation was a Free Activation, both players make a Loss Check (3.0). If the game does
not end due to Loss Check, Pass or choose to Continue with a
Battle or Army Activation (6.2).
• This cannot be the Battle that just Activated, unless the
Active player has only one Battle.
• Army Activation can only follow an Army Activation. A
Battle Activation can follow Activation of a Battle, Army,
or Standard.
• The Non-Active player may attempt to Seize Continuity
(6.3). If so, he plays a Seizure Opportunity counter
and chooses one of his Battles to Activate. The Active
player may play a Seizure Negation (6.3) counter and the
Continuation attempt is then resolved, otherwise the NonActive player makes a Seizure DR attempt. If successful,
he Activates that Battle and proceeds from Phase B with
that Battle. If not, the Active player gets a Free Activation,
proceed to Phase A; this Free Activation may even be used
to Activate the Battle that just completed Activation.
• If no Seizure attempt occurs, make a Continuation DR attempt
(6.2). If successful, Activate that Battle or Army and proceed
from Phase B. If not, or the Active player Passes, the NonActive player gets a Free Activation and proceeds to Phase A"

 As you can see, there are no real 'turns' for each player. The first player can continue to activate his troops if he is lucky enough with his die rolls. The second player can attempt to stop him using a 'seizure counter' to begin activating his own units. However, the first player can also use a 'seizure negation counter' to stop the second player from taking initiative control. Victory in each battle is achieved by eliminating named leaders and enemy units. One very interesting Special Rule is that of 'Timed Engagement'. This is meant to make one side act historically and force them to attack within a certain time period, rather than maneuver about the battlefield. During many of these battles knights became 'fire and forget' weapons that just launched themselves at the first enemy they saw. This would include complete loss of brain function and force the knights to attack at the worst possible time and place. Roughly this equates to when a male elephant goes into 'musth' from a huge testosterone boost. The knights would only think of striking an enemy and being the first to do so. Hence, the wall of dead seen in front of the English archers in many of the Hundred Years War battles. 


Do you like Long Odds?


The individual Battle Books are amazing in the historical detail and all of the information needed for setup and play for each battle. There are also some funny quips added to the mix, "Say goodnight Gracie" being one of them. To say that I really like the series is a complete understatement. I think that this is one of the finest designs that Richard Berg ever came up with. I would love to have an ancients game using this system. I normally do not mention prices, but this game is a true steal at under $100. All three games were probably in the $70 range when released, so you really get some bang for your buck. Even if you do not know a York from a Lancaster these games will be an excellent addition to your collection. Easy rules, relatively short game times, and a small map footprint mean that you will have them on your table in no time. The choice of battles in Europe and Outremer is incredible in its scope. Thank you so much GMT Games for letting me review this new edition of this Berg masterpiece.

Robert

GMT Games:

GMT Games Men of Iron Tri-Pack:

Men of Iron Tri-Pack Rules:

  Battlestar Galactica Deadlock recently ended its second and final season of DLC with a bang, and after playing through the campaign I'...

Battlestar Galactica Deadlock: Season 2 Finale DLC Battlestar Galactica Deadlock: Season 2 Finale DLC

For your Wargamer, Toy soldier collector, MiniFig collector, military history nut. Reviews, interviews, Model Making, AARs and books!


Battlestar Galactica Deadlock recently ended its second and final season of DLC with a bang, and after playing through the campaign I'm here to offer my thoughts. As the name of pack implies, "Armistice" is a series of missions leading up to the end of the First Cylon War. There are eight missions in the pack, and the campaign plays out in a mostly linear fashion. There are side missions for gathering extra resources and keeping the Cylon threat level down, but really you can plow ahead with the story missions, only pausing if you really need to.

Each mission comes with plenty of story dialogue before, during, and after the operation. Characters you've come to know throughout the lengthy campaign reach the end of their arcs along with the war itself. If you're a fan of BSG and have read up on the lore, you'll be happy to know that many tidbits from the mini-series prequel "Razor" are tied into the final missions here. The story ends on a rather somber note, as is appropriate given what happens later in the BSG world. As the player, you know that you have come up a bit short, and some of the characters seem to sense this as well. The Cylon "super weapon" hinted at throughout the story gets away, dooming mankind to the events seen in the opening hours of BSG the show. 


While many of the missions in the campaign boil down to wiping out the enemy fleet, many of them have some kind of objective to accomplish as well, and one towards the end even has a fun gimmick that forces you to manage your fleet much differently than normal. Given that this is the home stretch of the game, it's no surprise that every battle here is a massive slugfest between the best ships you can muster and hordes of Cylons. With just about every option in the game unlocked at this point, and plenty of resources to go around, you have free reign to organize your tactics as you see fit. I enjoyed trying out some of the various munitions I had ignored previously, and of course seeing how things would go if I equipped a nuke in every available slot (hint: things get messy).  


The turn-based space combat still holds strong after years of playing it off and on again. It always feels good to pull together a clean attack the knocks out one enemy ship after another while minimizing your own losses. You have to remain vigilant, as getting lax and allowing a ship to cruise head on into the enemy's guns or torpedoes can get it killed in a single turn. 


In addition to the Armistice story DLC, the finale also features the "Modern Ships" pack. These ships don't appear in the story campaign, but instead are available for skirmish and multiplayer modes. These ships fully tie the game into the era of BSG the show, featuring the sleek Cylon basestars of that era and the Mercury class Battlestars (like the Pegasus seen in the show). 


The game also received a free update for all users, the Daybreak Update which you can see all the details of here. Besides a number of quality of life and visual/performance improvements, the update adds a Photography mode for getting those nifty sci-fi screenshots, and new modes for multiplayer and bigger fleet caps.


I've been a fan of this game for years now, and it was great to play out the conclusion of the story. Fans of the show and fans of tactical combat games should certainly check it out if they haven't yet, as it really is so much better than one might ever expect from a TV show based game that came out many years after hype for the show died down. The developers, Black Lab Games, can be proud of what they've done here, and I look forward to seeing what they do next.


Battlestar Galactica Deadlock and all of its content can be found at the usual storefronts, as well as directly from Slitherine Games.


- Joe Beard

  God's Viking Harold Hardrada by Nic Fields  For an author to write about Haraldr Sigurðarson, normally called Harald Hardrada which me...

God's Viking Harald Hardrada the Last Great Viking by Nic Fields God's Viking Harald Hardrada the Last Great Viking by Nic Fields

For your Wargamer, Toy soldier collector, MiniFig collector, military history nut. Reviews, interviews, Model Making, AARs and books!


 God's Viking


Harold Hardrada


by


Nic Fields


 For an author to write about Haraldr Sigurðarson, normally called Harald Hardrada which means hard-counsel or hard-ruler, is a difficult task. Mostly what we know about him comes from Norse sagas. Therefore, it is hard to tell the truth from hyperbole. Dr. Nic Fields has given himself a very hard task to present us with the historical Harold. From the battle of Stiklestad in 1030, where Harald was only fifteen, to the battle of Stamford Bridge in 1066, Harald blazed like a comet across the early Middle Ages sky. The chronicler Adam of Bremen called him the "Thunderbolt of the North". Let us take a look at what the author has given us.


 First, it is a large book, coming in at 366 pages. It is, however, not just a straight biography of Harald. His life is shown us throughout the pages, but the book brings a trove of many other things. The book is filled with the history of the Viking Age from the half-mythical Ragnar, to the death of the last real Viking Harald. The book also is packed with with facts about other parts of the age. It starts with a chapter named 'War', which shows exactly how Vikings fought, etc. The last chapter of the book, called 'He, her, hero, heroine' goes into the details of how Viking women shaped the age. The book is filled with various Norse kings and chieftains. It mentions Eiríkr Blóðøx (Eric Bloodaxe, a happy little sobriquet). The author describes him thus: "Norsemen were all warlike, but Eric Bloodaxe was a special case; he enjoyed homicide as a family activity". 


 The author also dispels some fallacies that we now take as gospel about events and people in the Viking Age. He shows that the 'Blood-Eagle' was just a literary license from the later writers of the sagas. Ivar the Boneless is also a victim of what the author calls "English literalism". In actual fact, the epithet 'boneless' is still used in Norway to describe a crafty, sly character, as in 'No bones, you can't hear him coming'. The Norse were well known for their tongue in cheek nicknames. They would use names like 'fatso' to describe a skinny person, and vice versa. 


 The book does not neglect Harald's life though. We see him as a fifteen year old warrior fighting beside his half-brother. Then we see his long journey through 'Rus' (modern Russia), all the way to the court of the Byzantine Emperor. He becomes a general and head of the Emperor's Varangian Guard. Varangian was the Byzantine word for the Northmen. We follow his return to Norway and the throne, to his twenty-year war to conquer Denmark. He finally falls at the Battle of Stamford Bridge, the first and sometimes overlooked  invasion of England in 1066.


 The book goes into incredible depth about Harald and the age before and during his life. I can easily recommend it to anyone who wants to really find out about the history of the Viking Age. Thank you Casemate Publishers for letting me review this needed and timely book.


Robert

Book: God's Viking:  Harald Hardrada the Life and Times of the Last Great Viking

Author: Nic Fields

Publisher: Pen & Sword

Distributor: Casemate Publishers


  FOR WHAT REMAINS : STREETS OF RUIN FROM DVG I  have to declare a special interest in this game as will become clear shortly.  ...

FOR WHAT REMAINS : STREETS OF RUIN FOR WHAT REMAINS : STREETS OF RUIN

For your Wargamer, Toy soldier collector, MiniFig collector, military history nut. Reviews, interviews, Model Making, AARs and books!

 FOR WHAT REMAINS : STREETS OF RUIN
FROM
DVG

I have to declare a special interest in this game as will become clear shortly.  Its designer, David Thompson, first came to my attention when Pavlov's House was still in the early stages of being produced.  What I saw of that design made me search out any information that I could find about this relatively unknown designer.  Amongst what I did discover was a long-standing design project nominally called Skirmish Tactics Apocalypse [STA] that immediately intrigued me and fired my imagination.  This was something I wanted to see happen!

Subsequently, in 2018, I was able to review Pavlov's House for AWNT.  This led on to the pleasure of an interview with David Thompson in which I raised the hope of one day seeing STA professionally published.  Back then the prospects of that seemed remote and highly unlikely and that I would now be writing a review of that very game design, with its new title For What Remains, a mere dream.

Reviewing Pavlov's House was followed in due course by reviewing Castle Itter and then to my immense delight news of the dream came true.  DVG had plans to produce For What Remains and so it's many, many thanks to DVG for their willingness to provide review copies of all three "core" boxes, plus the bonus pack of faction dice and the transparent templates for the various "big guns" in the game.

What came as an even greater surprise and a personal thrill was when I came to read in David Thompson's Final Thoughts in the game's Rule Book that my comments and wishes in that interview article had led to DVG asking to be shown the details of this long-planned design!  The rest, as they say, is history.

In this review , I'm going to focus on the system and the typical contents of all three boxes and in a subsequent review I'll look more closely at the other Factions and the continuing story that each game unfolds.  Altogether there are six Factions, with two factions presented per game. In Streets of Ruin, the Factions are the Freemen and the Combine.  

CONTENTS

12 Double-sided map tiles 
Rule Book
Campaign Guide
2 Faction Guides [one for each Faction]
An AI Reference Sheet for each Faction
An Ability Reference Sheet for each faction
10 Character Reference Cards 
10 AI Activation Cards
60 Character Counters
60 Action Tokens
2 Faction Action Tokens
2 Ability Tokens
4 Scavenge Tokens
1 EMP Artifact Token
2 Ability Templates
5 Dice
1 Action Bag

The quality of all the contents is excellent, with the Character Counters and their associated Action Tokens continuing the style and appearance of those seen in both of David Thompson's previous designs published by DVG.  They are substantial, strong, chunky pieces.


They are also remarkably clear and uncluttered, carrying solely the name of the unit, its abbreviated quality letter[Recruit, Veteran or Elite] and as there are two of each type of unit, a skull or radiation symbol to distinguish them.

Next come the 12 detailed, double-sided terrain tiles that you'll use to build up your battleground.  These are very thin card that have an almost plastic feel and flexibility to them and all the scenarios provided in the Campaign Guide are based on a 3 x 3 layout, though there is nothing to stop you creating your own scenarios with substantially different layouts.
There's been some discussion about this thinness and the fact that the tiles will slide about unless you either place them on a surface that gives sufficient drag or you cover them with plexiglass.  Personally, I like them as they are, as I would always overlay any game with plexiglass where the terrain is constructed from tiles.  One thing's for sure that the art work for this post-apocalyptic world  is superb creating totally the right atmosphere.  What I like even more is the way in which types of terrain have been depicted for both movement and levels. At the moment there is only ground level and higher terrain, but future tiles could easily cover several levels.

Like so much in this game the solution is remarkably simple and easy to understand.  A combination of different coloured edging surrounds either terrain that is impassable or at a higher level or difficult terrain, with 2 movement points being the cost to enter both of the latter two types.  For those with any colour vision problems, apart from the colours avoiding those that cause the most familiar problems, there is an identifying symbol also placed in one square of the terrain type.

This basic simplicity signals other features that place the game strongly at the entry level with the emphasis on ease of understanding, ease of recall and ease of play and a fairly swift action-packed encounter ensues.  This is reflected in each Rule Book that follows an identical pattern, but is not just an identical reprint!


The sequence is as follows - a pictorial guide to all the components and the game layout on your table: a 2 page narrative extract; brief statements about each of the six factions: the range of elements that characters can possess with explanations of how to read the counters and the Character Reference cards: how to set up and read the terrain: details for a simple learning scenario: a gameplay sequence and description of the four key actions [Ranged Combat, Area Combat, Close Combat and Movement] and a special section on what are termed Huge Characters.

What is most significant about all that I've just outlined is that, though virtually all the text is identical, the substantial number and size of illustrative examples are totally different in each Rule Book.  I admire this decision, as I'd expected what most series games do which is to include the same Rule book, examples and all.  Instead every single illustrated example draws purely from the Factions presented in that specific game.
So above, this is Ranged Combat in Streets of Ruin and you can see just how substantial the illustrated example is and this is typical of every example.  While below, you can see the same rule, but the tailor-made example from Blood on The Rails.
The information supplied up to this point in the rules allows you to play the five Scenarios, in each game's Campaign Booklet, as individual Skirmish Scenarios crafting each one to your own chosen number of Character points to make them as large or small as you want.  Obviously, it also gives you all you need to know to create your own Scenarios.

Each Rule Book next explains how to play the five Scenarios as a Campaign using the photocopiable Force Rosters to build your initial troops and personalise them by giving them names, if you wish.  As the Campaign progresses, you will gain points to spend on upgrading the quality of individual characters. This is followed by a Section detailing how to play the game solo - something essential in the current situation.

The penultimate part is a five page time-line for this post-apocalyptic world which I can best describe as alt-history.  I say this because the substantial back-story begins in 1957 and ends in 2035.  In its course, historical events and equally factual geographical locations are melded into a disturbing vision of what might have been.  It begins with the only too real series of U.S. nuclear tests at the Nevada Test Site called Operation Plumbbob and especially one test called Rainier that was the first totally underground nuclear test.  This test opens a gateway to an alternate dimension called the Netherscape, more frequently referred to as the Basement.  From this point on we are firmly into the alt-history of planet Earth.

Personally, the details of this type of sci-fi/dystopia has very little influence on my enjoyment of a game, though I have travelled in the past through Warhammer 40k with my son and have quite a partiality for Deadzone 2 which bears some similarities to For What Remains.  But for those who value and appreciate the creation of narrative, this is sustained consistently through the counters, the tiles and the artwork of all the booklets and in particular in the Campaign booklet for each game.


In these, a finely detailed and crafted part of the story is played out, once again located in a genuine historical time and region - the massive Russian test site at Semipalatinsk.  David Thompson has certainly done his research, incorporating photographs and aerial reconnaissance pictures linked to the location of each Scenario in the three Campaigns to achieve a very realistic setting for these dramatic engagements.

Turning from the background and story, I want to consider the elements that make this game work so well.  Obviously, the simple and easy rules are the starting point, but more significant for me in valuing this game is the Activation system.  Each turn you will be able to place as many Activation tokens in the draw bag as you have units in the skirmish.  So with five units, five tokens will go into the bag, along with your opponent's tokens.  As a token is drawn, the unit can take one action.  This in itself produces the continuous thrill of anticipation, especially as the game progresses and which side and which unit is drawn to activate becomes more and more important! 

In addition each unit possesses 3 Activation tokens, so you can activate a unit up to 3 times in a turn, but only at the expense of other units not being able to be activated at all. The next consideration is that those Activation tokens used this turn are set aside and cannot be used on the next turn.  Right from the start you're faced with this simple, but vital decision: which units will you choose for potential activation and how often in a turn?

 Above you can see the square counters which are the units you place on the map, while below them are the corresponding Activation tokens for each unit.

Though the choice of Actions may seem very limited: just Movement or Combat, more variety comes from each character having one or more predesignated Special Abilities.  This aspect of the game relates to the quality of unit that I mentioned earlier.  As you'd expect, the better the quality the more Abilities a unit possesses.  

Typically, the Freemen Medic has the capacity to heal one hit for herself or heal one hit on an adjacent character.  The opposing Combine unit, the Harpi, has the same ability, but also improved movement through difficult terrain.  As you move to the increasingly stranger units in the other "core" games, those Abilities become equally stranger!! 

Instead of trying to crowd these distinctive differences into the Rule Book, they are handled through the individual Faction Guides. Each unit has a brief description that adds to the narrative element of the game, an explanation of any special ranged weapon [these usually involve area style effects with blast templates] with accompanying full page illustrated example and details of the Special Abilities and variations according to unit quality.

Also relating to the units, each type has its separate Character Reference Card which covers in chart form the different stats for Movement, Range, Ranged Combat, Close Combat and Defense and Abilities cross referenced with Unit Quality.  These I've found very easy to use, even when having to handle up to ten separate cards when playing solo.

Two Combine Faction Character Reference Cards
Which word "Solo" neatly takes us to the final rules section: Solitaire Play.  This too is handled initially in two very quickly assimilated pages and then in game play by a Reference Card for each type of unit.


These are very simple to use and provides a system that must rank as one of the easiest to understand and put into operation of any I've come across.  A simple die roll on the Reference Chart gives an A.I. unit its order which will be carried on from turn to turn until accomplished or some intervening event causes a change and the need to roll for a new action.  

Above all, it seems to generate just the same type of authentic game narrative as ftf place, as may be instanced by a typical example from one of my games.  An A.I. unit tasked to move and pick up the nearest scavenge unit was just about to reach its objective when it was hit by my fire.  Forced to roll on a different table for being hit, it rolled to move toward the nearest Harpi [which possesses the ability to try to heal it!].  Good thinking soldier! But, of course, the roll might have made it continue on to its objective.  In which case - brave soldier grits its teeth and forces itself to risk trying to carry out  its order

Obviously trying to remember exactly what each unit has to do may seem perhaps a little confusing.  Here I'd suggest a coloured cube as a marker on the Reference Chart is all you need to cover most situations.  Just occasionally, you may need to make the odd written note.  However, if you've laboured over the intricacies of the time-consuming flow charts of many bot supported games, this is a breeze.  So too is the mechanism for ramping up the difficulty of your A.I. opponent: for an easy game just allow the A.I. to add 1 extra Action token to the drawbag, for moderate add 2 extra tokens and for really difficult add 3 extra tokens.  May I suggest that you can adapt even this by varying the number of additional tokens from turn to turn.

Inevitably the question of price and the decision to produce three "core" boxes, rather one "core" and two expansions needs to be raised. Typical prices in rounded figures are $40 and £50 per game. Considering many board wargames weigh in at £60+, you'll spend far more [and I have] for games of less quality and far less "bang for the buck."  So, I have no hesitation in saying that buying one game is value for money.  For those who've expressed the concern that they might like the game enough that they'll want the other two games, all I can say is take the risk. 
Scenario 1 ready for some solo action!

To sum up, For What Remains is a major qualifier for introductory level skirmish gaming, while giving a life-time gamer like myself a great dose of action that can be off the shelf and on the table in minutes.  Face to face play is a wonderfully cat and mouse experience, where the more you play with the same opponent the more what happened last time is going to feed into how you play the next time.  Solitaire play is equally rewarding, easy to run and adaptable.   
A final close-up of the action

On top of that, this is a major sand-box design that has scope for considerable personal input.   It's already provoking, as I expected, enthusiasm to produce home-grown scenarios and couldn't be a better supported game, as David Thompson and team are some of the fastest responders to questions and suggestions from gamers that you'll come cross.   

  Brotherhood & Unity War in Bosnia and Herzegovina 1992-1995 by Compass Games  I believe Compass Games is four out of four, for sending...

Brotherhood & Unity: War in Bosnia and Herzegovina 1992-1995 by Compass Games Brotherhood & Unity: War in Bosnia and Herzegovina 1992-1995 by Compass Games

For your Wargamer, Toy soldier collector, MiniFig collector, military history nut. Reviews, interviews, Model Making, AARs and books!


 Brotherhood & Unity


War in Bosnia and Herzegovina 1992-1995


by


Compass Games


 I believe Compass Games is four out of four, for sending me games about pieces of history I know very little. I had small children and had started a new job just when this war broke out. Although I know the bare minimum about the fighting, I do know the history or the area. So, that gives me at least a leg up in my research about the war.

 The Balkans have been a hotbed of European history since the Roman Empire was still intact. Many of us are aware that the annexation of Bosnia and Herzegovina (BiH) into the Austrian-Hungarian Empire was the match that lit the fuse that started World War I. Thirty years before the war Otto von Bismarck had exclaimed "It will be some damn fool thing in the Balkans that sets it off.", referring to the start of the next European war. Winston Churchill made the statement "The Balkans produce more history than they can consume.".  The problems in the Balkans are numerous, but the two main ones are ethnic and religious. The three ethnic groups that live in Bosnia and Herzegovina are Bosniaks, Serbians, and Croatians. Bosniaks tend to be Muslim, Serbians tend to be Orthodox Christians, and Croatians are usually Catholic. The Ottoman empire ruled the area for hundreds of years, which is why Islam has a foothold there. We have seen throughout history how religious and ethnic diversity in a small area can cause bloodshed. The creation of Yugoslavia after World War I did not alleviate any of the long standing issues. World War II saw the different ethnic groups on different sides of the partisan war in Yugoslavia. With the breakup of Yugoslavia in 1990-1992 the fuse was once again lit. This is from the Designer's Short History of BiH:


"The war was characterized by bitter fighting, indiscriminate
shelling of cities and towns, ethnic cleansing and systematic
mass rape – mainly perpetrated by Serbian, and to a lesser
extent by Croat and Bosniak forces. Events such as the Siege
of Sarajevo and the Srebrenica massacre later became tragic
reminders of a conflict that should not have been fought in
the first place.
The Serbs were initially militarily superior due to the
weapons and resources provided by the ex-Yugoslav Army
(JNA), but they eventually lost momentum as the Bosniaks
and Croats created an alliance. As a result of the Serbian
atrocities committed at Srebrenica and Markale, NATO air
forces intervened in 1995 with Operation Deliberate Force
targeting the positions of the Army of the Republika Srpska.
The war was brought to an end after the peace negotiations
held in Dayton, Ohio and signing of the General Framework
Agreement for Peace in Bosnia and Herzegovina in Paris on
14 December 1995.
It is presumed that more than 100.000 people died, and more
than 2 million people were displaced."


 This is the write up from Compass Games:

  • Complexity: 5 out of 10
  • Solitaire suitability: 5 out of 10
  • Time Scale: 1 year per turn, 2 months per action round
  • Map Scale: Point-to-point strategic level
  • Unit Scale: Brigades
  • Number of Players: 2 to 3
  • Suitability for Solitaire: Medium
  • Average Time to Play: 2 to 3 hours


 This is what comes with the game:

  • 1 22"x34" Mounted Map
  • 260 9/16" Counters
  • 96 Strategy cards (in 3 decks: Serbian, Croatian and Bosniak)
  • 3 Player aid cards
  • 1 Rulebook
  • 1 Ten-sided die
  • 1 Box and lid set


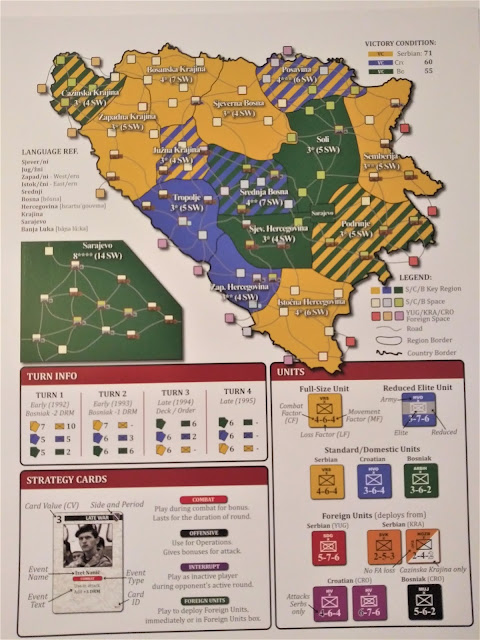
  I have been buying and reviewing Compass Games for about three years now. I have seen some older remarks about the components of their games. If at one time they left something to be desired, that ship has long sailed. The games I have from them all have wonderfully manufactured components. This game is no exception. The map is especially thick and well done. The colors are vibrant and it is easy to read, with every table etc. that you need to play on it. It is a point to point movement game. The map also has an inset to deal with the fighting for Sarajevo. Does that city's name ring a bell? If not for a driver's wrong turn in that city, what might the 20th century history have been? But I digress. The counters are large at a size of 9/16". They are mostly plain, and use NATO symbols for the units. There are both standard and elite units in the mix. For control counters, there are either the separate areas' flags or heraldic symbols. These lend a nice change from the otherwise plain unit counters. The three decks, one each for Serbian, Bosniak, and Croatian player, each have the heraldic sign on the back. Each of the cards are very easy to read, and are also easy to understand how to use them. There is only one double-sided Player Aid, three of them, one for each player. The Player Aid is in full color and easy to read. The rulebook is setup a little different than most. It goes through the different game concepts in the beginning pages, along with the breakdown of what's what on the cards and counters. This takes up pages one through nine. The Game Setup and Sequence of Play start on page ten and run until page nineteen. Then you have two pages on how to play with only two players. The rule book continues with two variants and then goes into the Designer's Short History of BiH. Pages twenty-three to twenty-eight have notes on the cards of all three decks. Next is a large bibliography; thank you, I needed it. It also comes with an index, and a two page spread of both counter sheets back and front, just in case. As I said, the components are all what you would expect from a Compass Games effort.


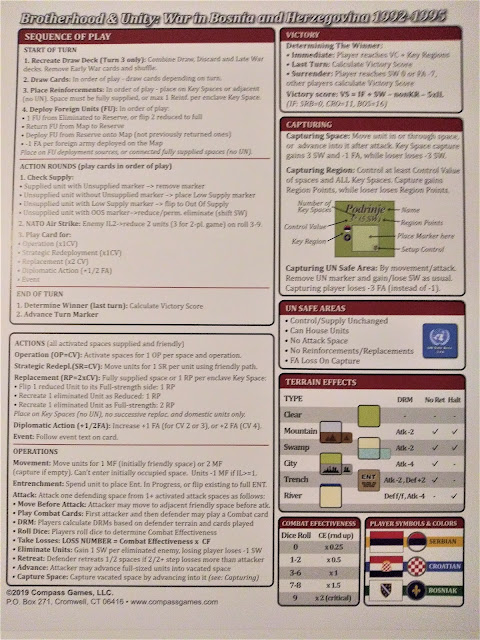
 The game can be played as either a two-player or a three-player one. As a two-player, one player plays the Serbian forces, with the other player having control of both the Bosniaks and Croatians. In the three player game each player gets one of the sides of the conflict to play. This is the Sequence of Play:


Game Sequence: The game is played in turns, each
of which is subdivided into phases. Game Phases are played
in the following order:
1. Start of Turn Phase
Players draw cards, place reinforcements, and deploy
Foreign Units.
2. Action Phase
Players successively play cards to perform actions. This
phase ends when all cards have been played.
3. End of Turn Phase
Players check if Victory Conditions have been met, and
advance the Game Turn marker.
 Order of Play: Each Game Phase is played in the
following order:
• Turns 1-2: Serbian -> Croat -> Bosniak
• Turns 3-4: Bosniak -> Croat -> Serbian


 The normal game only has four turns to it. You can play a variant that extends the game by adding cards to everyone's deck, or you can play the variant 'Fight to the End' in which you just keep playing turns until someone surrenders or is defeated. Which player goes when each turn is set up in the rules. I did not try it yet, but I wonder if a die roll for who goes when will unbalance the game. It might give it a longer life on your table with not knowing where you are in the turn sequence, or it is possible that it was looked at in testing and was found not to work. The game itself, although dealing with anything but a straight up war, has many of the rules we are used to such as: stacking, movement, and reinforcement. The Serbian player starts out in a very strong position and can try to roll over his opponents in the first turns. However, this is where Foreign Attitude and NATO come in. If you are doing too well, you might just have to deal with some Thunderbolts and other air assets of NATO on your tail. This goes for all the players. So, like any good wargame, Brotherhood & Unity is a juggling game. If I am on a streak of good luck, do I keep pushing it, or sit back and dig in? The Foreign Attitude part of the game makes it that much harder to keep all the balls in the air. With a play time of two to three hours, it is perfect for game night and also doesn't need to take up the table except for those hours. As long as the cat or dog doesn't get involved, everyone should have space and time for the game. Thank you Compass Games for allowing me to review another winner from your stable. The game is extremely well produced and judging by other peoples comments they find the game just as enjoyable as I do.


 My apologies to the designer. I tried numerous times to find out how to put a caron above a C.

  Across the Pacific by Pacific Rim Publishing   The above is the artwork for the US release, although I am kind of partial to the Japanese ...

Across the Pacific by Pacific Rim Publishing Across the Pacific by Pacific Rim Publishing

For your Wargamer, Toy soldier collector, MiniFig collector, military history nut. Reviews, interviews, Model Making, AARs and books!


 Across the Pacific


by


Pacific Rim Publishing


 The above is the artwork for the US release, although I am kind of partial to the Japanese edition cover below.


 Games that portray the entire war in the Pacific seem to be rather easy to find. They are probably right after Waterloo, The Bulge, and the Russian Front games as far as the amount of them. Unfortunately, when there is a crowded field of games, some will be left behind. Not because there is something wrong with them, but just because the public's fancy was caught by other games. This game has some unique points to it, but before we go there, let us describe what comes with the game. Here is the lucre in the box:

36 by 48 inch map of the Pacific Basin from Pearl Harbor to Imphal, Dutch Harbor to Brisbane
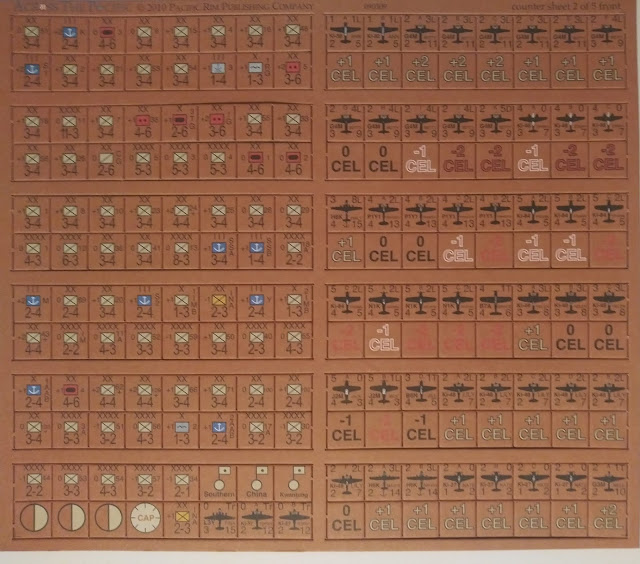
960 die-cut back printed 5/8 inch counters
24-page rules booklet
24-page Designer's Notes, Historical Commentary, and Examples of Play booklet
Two 11 by 17 inch color back printed Order of Battle charts — one Japanese, one Allied
Two 8-1/2 by 11 inch Unit and Carrier Air Groups Display charts — one Japanese, one Allied
Two 8-1/2 by 11 inch Task Force Display charts
Two 8-1/2 by 11 inch Charts and Tables card


 The listed size of the map is somewhat misleading. When you start to open it up, it seems like you are opening up one of the Russian dolls. Each flap seems to lead to another folded piece. I actually measured it, because it really seemed larger than the stated size. The colors are plain, and there is no glitz whatsoever. However, it is fully functional, and there are no ambiguities about the hex terrain. The counters are large and very easy to read. Again, they are more functional looking than arty. The Player's Aids are fully in color and well done. The Rulebook and Player's Handbook are in black and white. The Rulebook is twenty-four pages long. The rules are naturally a bit more involved than some other games. You are playing out the entire Pacific War. The Player's Handbook is split into three sections Designer's Notes, Historical Commentary, and Examples of Play. To give you an example of the Historical Summary:

"Tokkotai is a shortened form of TOKubetsu KOgokiTAI, meaning "special attack corps" or "special attack unit". Tokko is a shortened form of TOKubetsu KOgo, "special attack". The Japanese usually referred to these special attacks as Tokko and to the units that performed the attacks as Tokkotai." 
This is how informative the Historical Summary is. The Naval counters are a combination of different ships, and do not represent just one ship. Here are some examples:

Japanese
BB-1 - Fuso, Yamashiro
CV-3 - Zuikaku, Shokaku
United States
BB-10 Missouri, Wisconsin
CV-3 - Wasp, Hornet


 The designer Michaels Myers also wrote a book on the Pacific War. The name of it is 'The Pacific War and Contingent Victory: Why Japanese Defeat was not Inevitable'. After reading his Designer Comments I had to read a copy of the book for myself. It stands to reason that his ideas for the game came from his own ideas on the Pacific War. This comes from the Game Notes, and sums up the games premises:

"Across the Pacific questions the usual assumptions and allows players to test alternative strategies. For example, it is often assumed that Japan had no chance to win the Pacific War. The problems with this assumption is that (1) it assumes a kind of unproved historical determinism, (2) it undermines the problem-solving accomplishments of the Allies in the Pacific war, and (3) it neglects to take into account Japanese potential advantages. Such an assumption leads to wargames where the only interesting action takes place at the beginning or the end of the war. It is thought that the Allies could have done better in Malaya or the Philippines, but the main course of the war is assumed to be an ineluctable progress of the allies toward victory, whether that be occasioned by an invasion of Japan or atomic bombs."


 To use the designer notes again:

"The heart of the operational combat system in Across the Pacific is the creation and use of Naval Task Forces and Task Groups."

 The developer, Mark A. Kramer,  goes onto show all of the different strategies that Japan can use instead of the historical ones. 

Using the SSA regiment and an SNLF regiment to ensure the capture of Wake island on turn one. With the intention of capturing Guam on turn two.
Not splitting the IJN by trying to maintain two major bases at both Tokyo and Truk. 
Creating a Type-B Task Force in Tokyo to augment the carrier raid against Pearl Harbor, and using the guns to obliterate the initial USN deployment.
Invading and isolating New Guinea on turn one before the US and Australian troops can get there.
Go for an all out attack in China on turn one. It will make your conquest of southern Asia much more difficult, but will cut the need for keeping large forces pinned in China. It will also negate the Allied bombing campaign from China.


 So the designer has given you, as the Japanese and Allied player, a whole host of different strategies to try out. You are not even forced to attack Pearl Harbor. This is something that is usually a given in any Pacific war game.


 Each turn represents five months of the war. There are nine turns in total. These are the different scenarios you can play:

Across the Pacific - The Grand Campaign
Remember Pearl Harbor - This starts in May 1942 and assumes the Japanese acted historically. It ends in August 1945.
Midway - This lasts only one turn.
Guadalcanal - This lasts two turns.
The Rising Sun  - This lasts for one turn. It is a solitaire scenario with the player as the Japanese for the first five months of the war.

  As with any game that differs from the norm you have to put more effort into learning the rules. Two of the big rules or ideas in the game are 'Air Umbrellas' and CEL (Combat Effectiveness Level) for units. The Air Umbrella is a way for the player to keep a large area under his own air control. Historically, after 1942 the Japanese pilots were badly trained. The CEL rules in the game make it possible for the Japanese player to husband his good pilots, and get them into the good second part of the war airframes. POLs (Petroleum, Oil, and Lubricants) are the supply markers of the game. Almost any player action will use up a POL marker. 


 I really like the game and it is a shame that it seems to have been lost in the shuffle in 2010 when it was released. The variable strategies for both sides is one of its main points. While the Kamikaze attacks are open to the Japanese player, there is also the possibility that you will not need them.  The limited postings I have seen on the game find that players do enjoy the game and its concepts. Thank you Pacific Rim Publishing for letting me review this sleeper of a game. They seem to have a wide range of products to take a look at.

Robert

Pacific Rim Publishing:

Across the Pacific:


hpssims.com