second chance games

Search This Website of delight

  Custoza Fields of Doom by Europa Simulazioni  Custoza and its fields were a crossroad in Italy for a long time. It was also essential to a...

Custoza Fields of Doom by Europa Simulazioni Custoza Fields of Doom by Europa Simulazioni

For your Wargamer, Toy soldier collector, MiniFig collector, military history nut. Reviews, interviews, Model Making, AARs and books!


 Custoza Fields of Doom


by


Europa Simulazioni


 Custoza and its fields were a crossroad in Italy for a long time. It was also essential to attack or defend the fortress system called the 'Quadrilateral' (composed of the four fortresses Peschiera, Mantua, Legnago, and Verona). The first battle in 1848 was decisive in the First War of Independence of Italy. The third battle took place during the Third war for Independence in 1866. Both battles were fought because Austria-Hungary was trying to keep control of its possessions in Northern Italy. Like many areas in Europe, because of Custoza's geography many other armies have traversed its fields also. The year 1848 saw the Hapsburg monarchy of Austria-Hungary fight for its life against the tide of revolution flowing across Europe. The Hapsburgs were barely treading water, let alone able to deal with insurrections and invasions into the outer parts of the Empire. Finally with some semblance of calm in the inner empire Franz Joseph I, the new emperor, was able to send Field Marshal Radetzky to secure its Northern Italian provinces. Unbeknownst to many, the Austro-Prussian War in 1866 also saw Austria-Hungary fighting in Italy. Custoza was the scene of another battle in this war. Why do I mention two battles? Because the game allows the players to fight both of them. So, let us see what you get with this two for one deal. These are the contents:


Two 23"x34" maps

A rules booklet (the Italian version also contains a rule booklet in Italian)

3 sheets of large (5/8") counters

Charts and tables (both in Italian and English)

Two Dice

Boxed


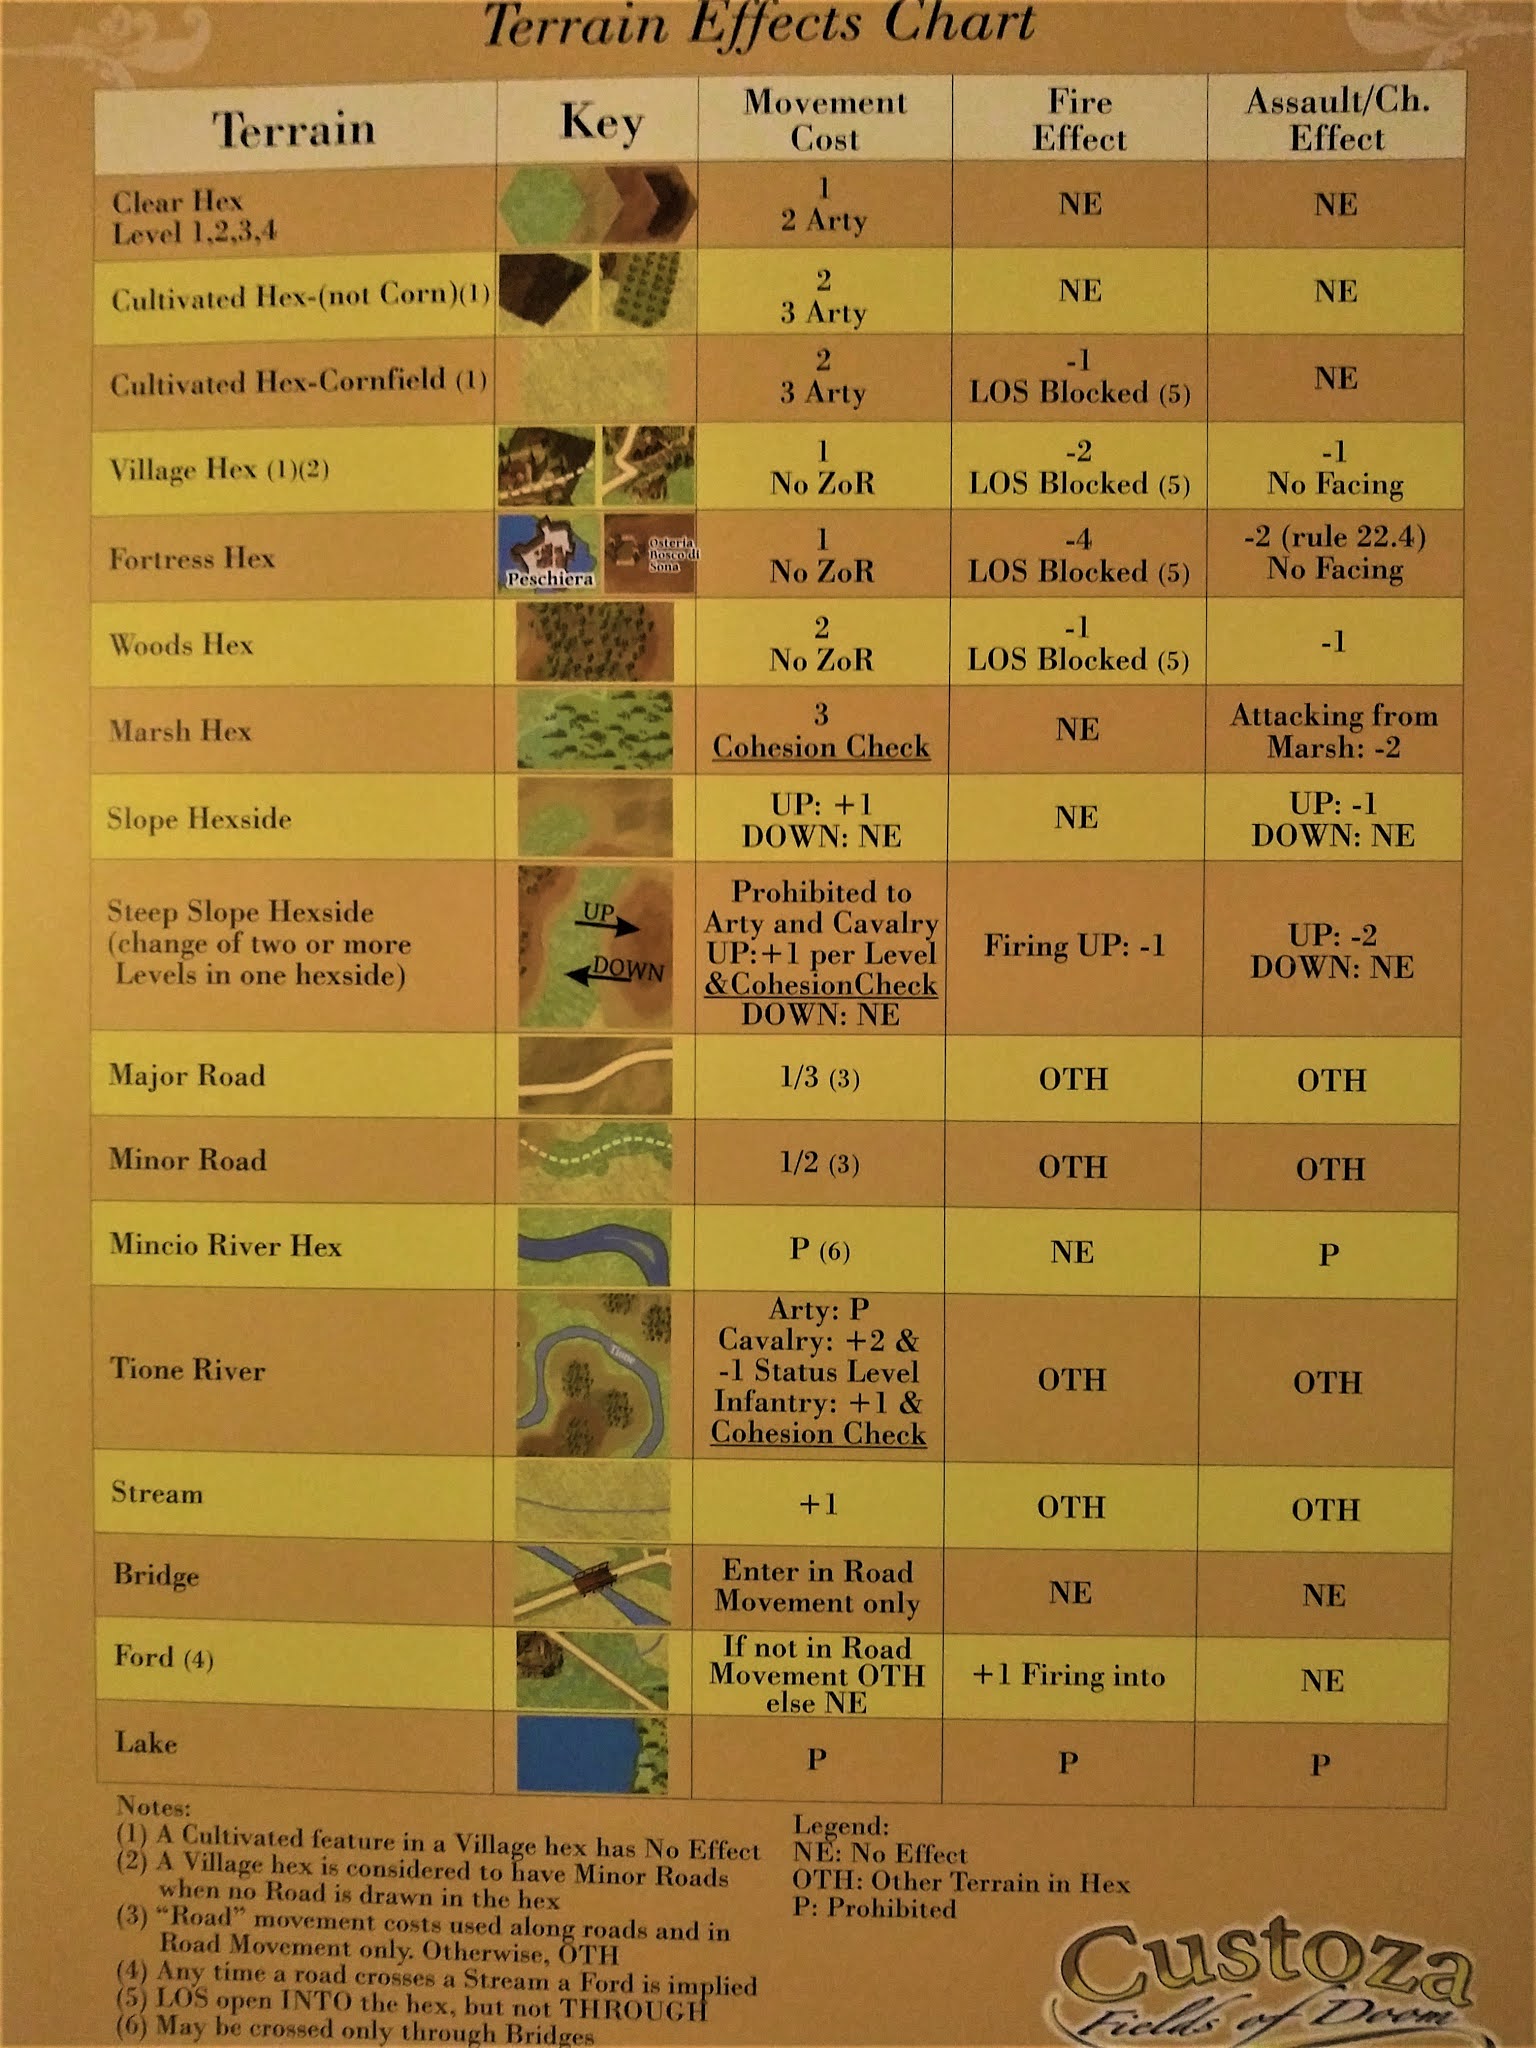
  This will be my third review of a Europa Simulazioni wargame. I must tell you upfront that the game impresses me as visually as the first two did. Even the artwork on their game boxes are wonderfully done. The maps that come with the game are large and have big hexes to accommodate the large 5/8"counters. The maps are extremely well done. Another thing I like about Europa Simulazioni maps are that you do not have to guess what the terrain is in each hex. They make it very easy for the player that way. There is no need for quibbling if this hex is more forest or swamp etc. The counters are very colorful without being 'busy'. You get very nice looking counters, with small black and white portraits of the different generals. The two Player Aid cards are of thick paper and are done in large print. On one side of the first one is the terrain chart. The other side has the Assault Table and the Fire Table, along with the modifiers and the Cohesion Check Modifiers Table. The other Player Aid is 'The Objective Map'. This is used in the advanced game; more on this later. The Rules Booklet is thirty-two pages long and is in black and white. The rules only take up sixteen pages, and the rest is the different scenario setups, background history, and designer notes.


  The game actually comes with these scenarios:


Three smaller ones to learn the game (two from 1866, and one from 1848).

1848 Historical

1848 Free Set-Up

1848 Late Start

1866 Historical

1866 Free Set-up

So, you get eight scenarios from two different wars in one box. Not a bad package at all.


 The game allows a player to deal with almost every problem or tactical conundrum that faced all 19th century generals. The terrain helps with that, but the various scenarios really help to put you in their shoes. The Basic Game rules only take up twelve pages. There is enough in the rules for anyone who wants to play out a 19th century battle. Where the game really shines is with the addition of the Advanced Rules. These include:


Formation Status

On March Formations

In Reserve Formations

Fatigue

Command Collapse

Line of Communication 

Reinforcements

 There are also a few Special Rules that deal with Fortresses and Night turns etc.


 This is the Objective Map below.


 This is the Basic game Sequence of Play:

"1. Initiative Determination. Each Player rolls two dice,
 adding the Command Rating of the Overall
 Commander, if in play. The player with the highest
 total is the Initiative player. Re-roll on ties.
2. Engaged Formations Action Phase.
2.1 Command Step. Check the Command Status
 of all of the units, and mark the Out of Command
 ones (4.1).
2.2 Activation Step. Starting with the Initiative
 player, both sides alternate trying to activate one
 of their Formations (5.1). A failed attempt is
 considered an attempt. Both players can choose to
 pass, and to not try to activate a Formation, but if
 players pass three times in sequence (i.e. Player 1,
 Player 2, then again Player 1), the Phase ends and
 Formations which have not been activated cannot
 activate any more on the current GT.
 NOTE: Out of Command units can still move in
 their Phase (see Step 4.)
 Once activated, the Formation’s units that are In
 Command can act, Force by Force.
 NOTE: Remember, consider a single unit as a Force.
 For each Formation to activate, conduct the following
 steps:
2.2.a) Assault and Charge declarations
 Assaults and Charges must be declared at the
 beginning of the Activation, before any action,
 using the appropriate markers (see 6.1).
2.2.b) Forces perform Actions
 Each Force belonging to the Activated Formation
 can perform one Action, potentially causing
 Reactions (see 11) by enemy Forces. A Force can
 choose one action among:
- Movement (7.0) (including any Action implying
 expenditure of Movement Points)
- Fire (8.0) (Artillery or Light Infantry), including
 movement before firing, if Light Infantry (6.4)
- Charge/Assault, including the movement to
 perform it (9.0 and 10.0)
2.2.c) End of Activation
 Eligible Forces can Recover Status Levels and/or
 Exhaustion (see 13.6).
 Remove Assault/Charge markers.
3. Non Activated Formations Phase. In Command
 units of Non Activated Formations can Recover
 Status Levels and/or from Exhaustion (see 13.6).
 They must execute Withdrawal (see 12.0) if they are
 in a ZoR.
 The Initiative Player’s units move second.
4. Out of Command Units Phase. Out of Command
 units can move now, and Recover Status Levels
 and/or from Exhaustion (see 13.6).
 They must execute Withdrawal (see 12.0) if they are
 in a ZoR. If they are not in a ZoR and move, they
 must move closer to their Commander (4.1.1).
 Initiative Player units move second.
5. End of the the Game Turn Phase.
 Remove “Low Ammo/Out of Ammo” markers.
 Advance the GT marker one box on the Turn record
 Track."


  When using the above Objective Map in the Advanced Game, only the commander and his scout unit is shown on the large map face down. Every 'On March Formation' has it's marker placed on the above Objective map. One interesting rule is that at least half of his movement allowance must be on any type of road hex. The commander also has to be at least one hex closer to his destination after movement. The designer states that both "fair play and good sense" are to be used in conjunction with the above. They must grow grognards differently in Italy. 

 So, the game comes with eight scenarios and the inclusion of the Objective Map, and the free set-up scenarios mean that the gameplay in this box is almost limitless. 

 The designer states that at first the project was boring and predictable. Their answer: "Hence the radical decision: we reset everything and started gain with a completely new system. Without using predefined schemes,  and with the basic concepts of a) non-absolute control of formations and b) continuous action/reaction, the system that you find was born". Historically, in 1866 the cavalry of both sides were not used to their fullest advantage. Both sides groped about the battlefield trying to find each other. In these essentially Napoleonic battles I am sure that most grognards will do better. The games revolve around a unit's cohesion, and its ability to withstand the enemy fires and then use shock. In my eyes Europa Simulazioni has hit the mark with this game. As long as you are a fan of 19th century warfare, you should be a fan of this game. Thank you Europa Simulazioni for allowing me to review this unknown, but very welcome addition to battles of the 19th century.


This is the link to the English Rules:

Custoza-Rules-P1-2-Eng.pdf (italianwars.net)

This is the link to Europa Simulazioni:

Europa Simulazioni - Home (italianwars.net)

This is the Link to Custoza: Fields of Doom:

Europa Simulazioni - Custoza, fields of doom (italianwars.net)


Robert

  The Last Stand The Battle for Moscow 1941-42 by Multi-Man Publishing  This game allows the players to simulate the last part of Operation ...

The Last Stand : The Battle for Moscow 1941-42 by Multi-Man Publishing The Last Stand : The Battle for Moscow 1941-42 by Multi-Man Publishing

For your Wargamer, Toy soldier collector, MiniFig collector, military history nut. Reviews, interviews, Model Making, AARs and books!


 The Last Stand


The Battle for Moscow 1941-42


by


Multi-Man Publishing


 This game allows the players to simulate the last part of Operation Barbarossa in 1941, or the Russian counterattack at the end of the year into the beginning of 1942. Moscow was not seen as an important goal for Operation Barbarossa by Hitler. It was, however, always seen as an integral part of the invasion of the Soviet Union by the OKH (Oberkommando des Heeres) the German Army's High Command. Indeed, Army Group Center under field Marshal von Bock was poised to strike at the city much earlier. However, Hitler had forced Army Group Center to release Guiderian's Second Panzer Group (later upgraded to the Second Panzer Army) to aid in the vast encirclement of 600,000 + Soviet troops around Kiev. But now at the end of September, the OKH had finally dragged Hitler into the idea of an attack on Moscow. This was to be called Operation Typhoon. Three Panzer Armies (Hoth's Third, Hoepner's Fourth, and Guiderian's Second), along with the rest of Army Group Center are to be unleashed toward the city of Moscow. Multi-Man Publishing is putting you in command of either the German or Soviet Armies in this last do or die struggle of 1941. The Germans were able to see the spires of Moscow before being pushed back. Can you do better than von Bock or Zhukov?


 The game was designed by Masahiro Yamazaki, who has also designed 'Stalingrad Pocket', and 'Red Star Rising', among many others. This is what comes with the game:

One 34" x 22" map
560 ½" counters
32 page full color rulebook
2 player aids


 This is the blurb from Multi-Man Publishing about the game:

Solitaire Rating: very good to excellent
Complexity: Medium
Playing Time: 3-10 hours
Scenarios: 3
Game scale: Units are divisions, turns are ten days, and hexes are 17.2 kilometers across.

 This is a straight up old school hex-and-counter wargame that someone in 1978 would be able to sit down and play. It is not card driven, or has blocks for the units. The map is very well done, and has many of the charts and tables needed for play on it. There are no ambiguous hexes, as far as terrain, and rivers are all on their appropriate hex sides. All of the different Soviet defense positions around Moscow are on the map and easy to see. The Rulebook is twenty-seven pages long, with an abbreviated sequence of play on the back cover. The Rulebook is in full color. It is also printed in very large print. This makes it very easy on us old grognard eyes. The rules are setup very well, and are easy to follow. There are three Player's Aid cards. Two are the same and have the CRT and the weather die roll (this is optional) etc. on them. The other Player's Aid card has the setup for Scenario Two on one side (The First Scenario Setup is on the map), and the reinforcements for all three scenarios on the other. The counters are well done and not too 'busy'. You can easily read the information on them. The Soviet counters come with both historical and unknown strength sides. This allows the players to start with the historical Soviet strengths or unknown. While not a work of art, the game is up to the usual standards I have seen in my other MMP products. The cover of the game and Rules Booklet is another story. This is a picture right off a Soviet propaganda picture from the Second World War. 

 The three scenarios are:

The German Attack - This is ten turns long.
The Winter Counteroffensive - This is six turns long.
The extended Game - This is twelve turns long.


 This is an abbreviated sequence of play:

A.) German Player Turn
 1.) Supply Phase
  a.) Weather
  b.) Reinforcement/Supply Placement
  c.) Receive Air Points
  d.) Combat Unit Supply Check
  e.) Isolated Attrition Check
  f.) Supply Unit Removal (Snow Turns)
  g.) Soviet Morale Chit Pull (if applicable)
 2.) Movement Phase
  a.) Unit Movement/Overrun
  b.) Supply Unit Consumption
 3.) Combat Phase
  a.) Resolve Combat
  b.) Remove Supply Units in Expend Mode
 4.) Soviet Reaction Phase (The Soviet Player is allowed to move  and overrun with eligible Mechanized units)
 5.) Exploitation Movement (all German units may move again with one half of their movement allowance)
B.) Soviet Player Turn
 1.) Supply Phase
  a.) Reinforcement HQ and Combat Unit Placement
  b.) Receive Air Points
  c.) Combat Unit Supply Check
  d.) Isolated Attrition Check
  e.) Red Army Morale Check
 2.) Katyusha Gun Phase
  a.) Katyusha movement
  b.) Katyusha Fire
 3.) Movement Phase
 4.) German Reaction Phase (Like the Soviets in his reaction phase, but with different parameters, the German player may conduct reaction move with his eligible Mechanized units).
 5.) Combat Phase
  a.) Ski Unit placement
  b.) Resolve Attacks
 6.) Exploitation Movement (identical to the German Phase)


 You can see by the above picture that both sides receive air points, and there are special rules for the Soviet Katyusha rocket weapons (Stalin's organs). As the German player, you have to strike hard and fast to have any chance of gaining victory. The German player is not going to be able to make up lost time and space in the latter part of the game. The Soviet player has to be ready to have his lines torn open again and again by the German Player. He then must throw everything available to try and stem the German tide, and pray for winter. The game can be played with the historical weather for each turn, or optionally by deciding the weather by a die roll before each turn. This makes a big difference in the game. If the German player is lucky on his die rolls the game is much easier because some of the various modifiers for Rain, Snow, or Frozen weather conditions will not hamper him. Supply for both sides is dealt with entirely differently. A German unit is in supply if it is eight hexes from a friendly map edge. Farther than that, it depends totally on its parent unit's German Supply Unit. For example, a Fourth Panzer Army unit cannot use a Supply Unit from the Second Panzer Army. This is an easy elegant way to show how tenuous the German supply lines became during the battle. The Soviet Units have to be five hexes from a friendly map edge, or within five, (or four for mechanized), hexes of a Headquarters Unit that has an unbroken line to a friendly edge. The German player can also use the Supply Unit to help with odds shifts in two combat situations. However, once he has done that he loses the Supply Unit and must build it up again. 


The Defenses Around Moscow


 The game does a great job at giving the German player the idea that it is now or never. He must bust through the line and get going to get to Moscow before his tank's oil freezes. He also must face what seems like a zombie apocalypse of Soviet Units. Time and time again, he must break through Soviets' defensive lines. The Soviet player is also faced with deja vu. He must carefully construct defensive lines one turn to see them torn to ribbons by the German Units the next. As the Soviet player you must get ahold of the idea of sacrificing units. You must play to save the units that you can to fight again, whilst also knowing which ones to use as speed bumps against the German advance. I believe the game puts both players in their historic commanders seats. As the German you get to see how easy with clear weather and just a month earlier it could have gone. Playing as the Soviet the player can visualize just how close the Soviets came to losing this battle. When the Soviet counterattacks kick in, both players get to change their respective strategic roles. The German player has to try and hang on by the skin of his teeth while the Soviet gets to try and wipe him out. The only thing you can ask for in a wargame is that it replicates history for the players, without being ugly as hell. Judging by those criteria the game definitely passes muster. Thank you Multi-man Publishing for allowing me to review this very good game. 

Robert

Multi-man Publishing:

Last Stand: The Battle for Moscow 1941-42:


Cooper Island pits one to four players against each other to reclaim and settle their own peninsula in the Island of Cooper…  It is a heavy-...

Cooper Island by Frosted Games and Capstone Games Cooper Island by Frosted Games and Capstone Games

For your Wargamer, Toy soldier collector, MiniFig collector, military history nut. Reviews, interviews, Model Making, AARs and books!


Cooper Island pits one to four players against each other to reclaim and settle their own peninsula in the Island of Cooper…  It is a heavy-weight Euro-smorgasbord of mechanisms: worker placement,  tile placement, engine builder and rondel with intricate interplay between how you score points and how the $*&# do you score points? (At least for your first few plays.)

Gameplay

The game plays out in punishingly-few-five turns.  Each turn consists of 3 phases, the Income Phase, the Worker Phase and the Clean-Up Phase.  Two of which are simultaneous and which give the game a surprisingly low downtime per player when you consider how much stuff you’ve got to think about on your turn.

The Harbour Master in the Second Round

There are only 8 action spaces for your workers to be placed onto, but you can also perform an almost unlimited number of five Anytime actions.  As your peninsula develops new spaces will be revealed on your player board giving additional bonuses and sometimes extra stuff for you to do.  I don’t think I’ve ever been as bewildered by a game on the first play as I have this one.  Working out how to score points was not even on my radar on my first playthroughs of this.


I came away from my first game (with a terrible score) with a numb brain and I had only just realised that my anytime actions were pivotal for any type of success in this game.  On my second play through my brain was hurting even more because I was trying to optimise my choice of actions spaces with the anytime actions that I had at my disposal.  However, I was still trying to do a little bit of everything and consequently didn’t receive too many points. 

A really close game - not my first

It wasn’t until the third play-through that I even considered trying to score points (instead of them just happening as a result of my actions) and actually have a strategy; which currently looks like - optimise to get more workers as soon as possible (by fulfilling Milestone Tokens) and then Settle and Build at the highest level possible… This could be utterly wrong, maybe exploring your peninsula or building statues is better… I still don’t really know how to do well.


The earlier you can get more workers the more benefit they will provide over the course of the game is an age-old, (well at least Agricola-old) strategy of building your engine.  However, you need to fuel that engine and your workers will need feeding, however, there isn’t the same level of jeopardy that you feel when you can’t feed you Agricola-family.  In this, you just receive an anchor token which prevents your ships moving around the peninsula.

2 Normal and 1 Special worker need feeding

So with 5 Anytime Actions, 8 worker Actions (each with their own bonus actions), 4 terrain types, 6 resource types, 18 unexplored hexes to fill, 8 sandbanks to visit, 5 ruins to explore/statues to build, 3 different types of buildings to construct and two different types of workers, 6 boats to build and a player-dependent number of Bay Water and Harbour spaces to visit; you’ll hopefully begin to understand how wide the decision tree you are faced with is at the start of the game.  However, finding good combos and synergies between your anytime actions and your workers’ actions is what makes this game tick.


The pace of this game is perfectly balanced. The first one or two rounds are much simpler, (you’ve unlocked fewer bonus actions) which helps new players to become familiar with the core actions and flow of the game and during the fourth and fifth round, your combos can be magnificent and convoluted.  Keeping track of a resource as it moves from a fourth level hex to pay for an action which gets additional bonuses and more market stock to pay for further bonus actions can almost feel like you’re doing the work, but it’s damn rewarding.

The end of a solo game - not too shabby  

The Income Phase is a simultaneous affair where you quickly take the income (shown by Terra Mystica hands) revealed on your player board.  Additional hands can be in play by building one of your Income Boats.  The standard income actions allow you to draw a double hex tile from the bag into your personal reserve and place a double hex tile onto your peninsula from your personal reserve.  The important thing to understand that any time you have actions to do (including your anytime actions) is that you choose the order of them, which adds another wrinkle to your brow when you’re trying to optimise actions.


Double hex landscape tiles and islet tiles form the core of your peninsula and they build up to an attractive looking board with nice, chunky card being placed on top of each other.  You can shim a mismatched terrain height by using one of your Anytime Cartographer actions (assuming you’ve got the necessary amount of Cartographer points).  Each time you place a landscape tile you’ll place matching resource cubes onto that tile. The height at which the resource cubes are placed determines their value.  However, once a hex is a Meadow hex, for example, it is always a Meadow hex you can’t change its hex type (unless you decide to place a settlement tile onto it). Building your landscape in this fashion (following all the tile placement rules) is like a 3d puzzle and could be a challenging game in its own right.

This looks great on the table

The Worker Phase is the core of the game and you only start with two workers to place onto the board.  Those two workers have a choice of 8 spots in the central island board to occupy.  Four of the actions will let you place additional landscape tiles into your peninsula (following the placement rules) and which gives resources.  The other four actions require you to pay resources you’ve just gained to build buildings, statues, boats, or supply some cargo which all have their own specific benefit and most importantly answer the first question of ‘how the $*&# do you score points?’.


Traditionally in worker placement games, a worker on a spot will prevent other players from taking that action.  Here, you just have to pay the player 1 resource to go on top of their worker.  This adds an unexpected boost often at opportune times.  I suppose it would be possible to determine the board state of another player to work out where they are going to place their workers, to maxims this boost to you, but my gameplay is so far from this level – I’m just gripping on to my ships pennants keeping up with my own game.  I just consider it a nice and often welcome surprise if it does happen to me.

The worker actions spaces / central island board

You can unlock special workers (the ‘square’ discs…) which provide a more powerful version of their action space.  However, to get these new workers, you’ll need to remove a normal worker but also unlocking additional victory points.  Deciding the optimum strategy of whether the new worker should be normal or special is well beyond the processing power of my brain.

The Clean-Up Phase is a blessed relief on the grey-matter, even though you have to start by feeding your workers.  It is another simultaneous affair in which you may get points and you reset your workers and market and move the round tracker.  There is a decision to be made to pay or not to reactivate an asset, however, in my experience, you only have one maybe two assets that even need reactivating and it’s nearly always worth it.  This is the easiest decision in the game.

A clear and easy to follow rulebook

This game plays in about 90 minutes to two hours.  If you all know the game 4 players can complete the game in under 2 hours which is a huge achievement for such a dense, crunchy (in a good sense) game.  Few games can provide the same level of challenge for four players in the same length of time as this does.

Components

Some of the components deserve special praise. The landscape hex tiles are deliciously thick and create a good-looking peninsula after the game.  The player colours are standard red, green, blue and black pieces and the resources are contrasting shades of brown – wood, purple – cloth, grey – stone, pink – food, and yellow – gold.  These pieces, resources, workers and buildings are all made of wood – which I prefer.

All good here

The rulebook does a tremendous job of conveying how the game plays.  Each section is colour coded to relate to the actions. This colour coding exists throughout the game i.e. on the player board so after reading the rules, you’ve got a good idea of how the game will play.  This is an amazing achievement for such a dense game.  The rules are contained in 27 pages of very well written text and copious examples littered throughout.  Although I did find one non-game affecting typo relating to page number references.


The player boards and central island board, at first glance, contain a dizzying array of icons, but as is the case with most heavy Euros, once you’re familiar with the actions themselves, the icons provide a non-textual and intuitive prompt for what is going on, and what you should be doing.  I thought the player board with its colour-coded sections, and icon design allows a returning player to pick the game flow back up very quickly.

A bit of a table-hog.  2 Player game

I was disappointed that there is no insert of any type in the box and similarly the two-piece player boards are made from quite a thin card stock.  However, these are just minor quibbles for me as I’ll end up 3d printing an insert for this and I understand that another 3 or sheets of board stock with different die cuts would have been much more expensive.

Criticisms

The only criticism I have is not really fair to level at Cooper Island, as it was designed to be a complex worker placement, is that it's a complex worker placement game.  You’re not going to have a good time introducing this to gamers more comfortable with Splendor and Ticket to Ride.  However, there is a place in the market and my collection for complex Euros like this.  If you buy this I am confident that you’ve already done your research and you’ll know exactly if this game is for you or not.

Conclusion

I really like this game, the huge amount of actions you have over five short rounds is impressive.  I appreciate the design and all its complexities coming in under 2 hours.  However, I don’t think it will see the light of day (or game night) at the moment – I don’t think I can face continually teaching it to lots of new players.  Maybe when life is a bit more settled and less crazy I’ll feel a need to train my brain after another relaxing day in the office (/s) and I’ll pull this out for some stimulation.  However, 2020 is not that year, my work has been manic of late and I just don’t feel up to Cooper Island but I look forward to the time when life is a bit more peaceful and normal and this will become a regular on my table.


P.S. The solo mode is fun and challenging (I’ve only beat the first difficulty level) but I feel less pressure when playing this solo and not teaching the game.


I’d like to thank Asmodee UK for sending this review copy. This is in stock in many stores and you can use this link https://www.asmodee.co.uk/contentpage/find-your-game-store to find your Friendly Local Game Store who need all the help they can get at the moment.

Designer:  Andreas "ode." Odendahl

Bgg page:  https://boardgamegeek.com/boardgame/269511/cooper-island

Play time:  90 minutes

Players:  1-4

  Leningrad The Advance of Panzer Group 4, 1941 W. Chales De Beaulieu Translated by Linden Lyons  W. Chales de Beaulieu was the Chief of Sta...

Leningrad: The Advance of Panzer Group 4, 1941 by W. Chales De Beaulieu translated by Linden Lyons Leningrad: The Advance of Panzer Group 4, 1941 by W. Chales De Beaulieu translated by Linden Lyons

For your Wargamer, Toy soldier collector, MiniFig collector, military history nut. Reviews, interviews, Model Making, AARs and books!


 Leningrad


The Advance of Panzer Group 4, 1941


W. Chales De Beaulieu


Translated by


Linden Lyons


 W. Chales de Beaulieu was the Chief of Staff for Panzer Group 4 when it and its commanding unit Army Group North invaded Russia. Army Group North's main job was to take Leningrad, and hook up with the Finnish troops. The book was first published in German in 1961. This was part of the series "Die Wehrmacht in Kampf" Battles and Problems of the Second World War. These are being published in English for the first time. The series is edited by Matthias Strohn, Head of Historical Anlysis at the CHACR, the British Army's strategic think tank, and Reader in Modern war Studies at Buckingham University, and an expert on the German Army.  


The book is short at 133 pages, but does come with eighteen appendices. It was written by an army officer, not a writer, so that is how it reads. The author explains in great detail about all of the Panzer Group's actions, and more importantly why those actions were taken. 


 Incredible as it seems, on the 10th of July 1941 two-thirds of the way to Leningrad had already been covered by the Panzer Group. That means on that date only 300 kilometers were between it and the city. The author believes that the OKH is to blame for most of Army Group North's stops and starts in the coming weeks and months before it arrived before Leningrad. He believes that the Panzer Group could have been at the city on August 18th. 


 One surprising thing about the author's tale is his views on Field Marshal Manstein (Manstein was in command of Panzer Korps LVI that was part of Panzer Group 4). It is clear from the text that he is not a fan at all of his. He also takes him to task for some of his writings. He believes either Manstein's memory had failed or he simply made up some of his remarks about the charge of the Panzer Group to Leningrad. 


 Thank you very much Casemate Publishers for allowing me to read this refreshing look at one large part of Army Group North's history in 1941.


Robert


Book: Leningrad: The Advance of Panzer group 4, 1941

Author: W. Chales De Beaulieu

Publisher: Casemate Publishers

Something is Stirring, down in the Abyss. A submarine, the USS Salem, has a mysterious incident which leaves the crew scattered across the s...

Stirring Abyss Stirring Abyss

For your Wargamer, Toy soldier collector, MiniFig collector, military history nut. Reviews, interviews, Model Making, AARs and books!


Something is Stirring, down in the Abyss. A submarine, the USS Salem, has a mysterious incident which leaves the crew scattered across the sea floor in diving suits. You awaken as one of the officers, and set to work finding other survivors from the crew and figuring out what happened. As you explore, it becomes apparent that this was no simple naval incident. Aggressive, monstrous creatures stand in your way, and nature seems to be corrupting in disturbing ways all around you. Something...fishy...is going on.


Just in time for Halloween comes a spooky strategy adventure from Sleepy Sentry and Slitherine Games. Stirring Abyss combines elements of XCOM and the Lovecraft mythos to create something quite different than anything I've seen before. As the leader of the surviving crew from the USS Salem, you'll go on a series of missions, defeating monsters and gathering resources as you unravel the plot. While you might glance at the screenshots and think that this game seems simple enough, there is actually quite a lot going on...beneath the surface. 


After coming to his senses on the sea floor, your starting character makes his way back to the USS Salem, which has suffered heavy damage. Fans of XCOM will immediately see the influence of the base building in that series reimagined here. Instead of building a base, you'll instead be pumping water out of the various compartments in the sub, and then spending resources to get things operational again. Some rooms have a pre-determined use, while quite a few can provide a benefit of your choosing. Stirring Abyss is very stingy with resources, forcing you to make hard choices about what rooms to bring online first. 


Stirring Abyss is actually stingy in a lot of good ways, constantly putting your team under a ton of...pressure. Crew members don't automatically heal between missions. Resources that you need for repairing the sub are also needed for crafting items and equipment. Power generated by the sub can be used for special abilities during the tactical phase, but needs to be conserved if you're going to keep pumping water out of the sub. During the tactical phase your team is closer to running out of air with each turn that passes. On top of all of that, the tactical combat itself is unforgiving, often pitting your team against overwhelming odds and demanding that you use all of their special abilities to good effect, or else. 


The tactical combat is relatively simple in terms of mechanics, but still very satisfying. There are three classes of characters: officers, scientists, and crewmen, each with a different set of options for unlocking new abilities as they level up. Additionally, each character you bring on board is unique, with a few custom traits of their own. Most combat early on consists of stabbing enemies with your handy diving knives, but eventually each character will have a variety of options for dishing out extra damage, hitting enemies with status effects, and supporting each other. Making this far juicier is that this is a game set in a Lovecraftian world, drawing much of its inspiration from The Temple, a short story about a German sub in WWI that meets a troubled end. After just a couple of missions you gain party wide supernatural abilities that you can fire off several times per mission. These include things like teleporting short distances and massively boosting your accuracy. A little further into the campaign you'll unlock a room in the sub where you can mutate your crew members and give them straight up crazy new "perks" like tentacle arms and giant claws. 


You'll need every advantage you can get, as Stirring Abyss pulls no punches with difficulty. Besides dealing with scant resources, you'll also need to keep a close eye on the hit points of your crew members. While there are a lot of ways to restore hit points (abilities, items, submarine features, and occasionally by killing enemies) almost none of them are free, and absolutely none of them will fill that health meter up in one go. This strategic concern translates to careful maneuvering during the tactical phase. Recklessly wading into a fight can put you at a disadvantage later on. Instead, you'll want to make full use of the options you have. You'll also need to learn how each of the many different enemy types operates. Most have at least a couple of special abilities that you'll need to work around. Besides health points, your crewmen also have a sanity meter which can be depleted by various events, like say, seeing a teammate get ripped apart by a giant shark-man monster. Suffering too much sanity damage can eventually render someone completely insane, which could cost you a veteran of many battles.  As units level up they can choose from new perks and abilities, depending on their class, as well as stat bonuses that increase things like damage resistance and critical hit chances. These upgrades are pretty straight forward, but to add some complexity there are also a large selection of party-wide bonuses to be unlocked over time. 


While the combat and XCOM elements are quite good, if relatively simple, what really makes this game sing is how it dives into its theme. The impressive music tracks are dark and foreboding, playing up the dread of a deep sea mystery and something unimaginable lurking in the darkness. The graphics, which still screenshots don't fully convey, charmingly draw from the well of 1950's era sci-fi and adventure art. Each mission carries the narrative forward, with lengthy discussions among the crew, detailed descriptions of the various horrors you come across, and the occasional choose-your-own-adventure style minigame. I don't want to spoil too much here, as the mystery of just what is happening is a big part of the draw to go from one mission to the next. 


As a fan of Lovecraft stories and someone who can't get enough XCOM style strategy games, this one was a very pleasant surprise when it popped onto my radar and eventually ended up in my hands. I haven't gotten too far into the campaign yet, as there was a bug (since ironed out in the release version) which tripped me up several times. Even so, there's no doubt in my mind that this game will hold your interest if you give it a shot. The story is fun right out of the gate, and the tactical combat is comfortable but challenging. I look forward to pursuing the mystery further and seeing just what sort of eldritch horrors are causing so much chaos in the briny deep.


Stirring Abyss is available on GoG, Steam and directly from Slitherine.


- Joe Beard


  FOR WHAT REMAINS: BLOOD ON THE RAILS   OUT OF THE BASEMENT from DVG In looking at the first of the three "core" boxes of For Wha...

FOR WHAT REMAINS: BLOOD ON THE RAILS & OUT OF THE BASEMENT FOR WHAT REMAINS: BLOOD ON THE RAILS & OUT OF THE BASEMENT

For your Wargamer, Toy soldier collector, MiniFig collector, military history nut. Reviews, interviews, Model Making, AARs and books!

 FOR WHAT REMAINS:

BLOOD ON THE RAILS  

OUT OF THE BASEMENT

from

DVG


In looking at the first of the three "core" boxes of For What Remains, I was most concerned to give you a strong idea of the quality, systems and mechanics of this game.  In this continuing exploration, the focus will be on the background and player Factions covered in the course of all three games.

As I explained, the timeline behind the game begins in our known world in 1957 and culminates in the not too distant future of 2035.  Apart from providing a narrative arc solidly derived from historical events and places, this timeline is important in introducing us to the alt-history beings that emerged over the course of time to challenge our world and led to the post-apocalyptic landscape and future/present in which For What Remains plays out.

The history of 1957 did not just witness the first wholly underground nuclear test at the Nevada Test Site in the USA, but also opened a gateway to the Netherscape, an alternate dimension commonly called the Basement.  This provides us with some of the more eldritch creatures that you may find yourself controlling or battling against, especially in the third game, Out of the Basement.  A nice touch in the narrative is the explanation that infrequent chance alignments between the two dimensions had occurred throughout earth's history leading to many of the foul things temporarily emerging that led to our beliefs in demons, ghosts and monsters!  However, the most important and deadly beings encountered were the humanoid Nethermancers, possessed of telepathic powers.

It's no surprise to learn that while we were focused on the nuclear escalation above ground and the space race, the real race was taking place beneath our feet to unravel and take advantage of the creatures, minerals and powers of the Basement!  With echoes of the intentions of the Corporation in the Alien films, proposals to gene-splice human and Nethermancer DNA were proposed, but initially rejected.  

However, later events shifted attitudes.  In particular the growing influence of North Korea as a nuclear power linked with Algeria, Pakistan and Iran [make of that what you will!] and their alliance with the Nethermancers led to the formation of an opposing and counterbalancing World Alliance.  The bedfellows here are very familiar - the US, Canada, Australia and most of Europe, plus one very unexpected member, China.  

So, this polarisation of the world into two major antagonistic power blocks [I wonder why?] is postulated.  So far, so familiar, but in a very distorted image. By the way, it's not without some amusement/horror that the date reached in the timeline at this point is 2022!

Meanwhile within the World Alliance, a semi-clandestine group of the USA's Homeland Security, Department B [not the nicest bunch!],  grows ever more influential, culminating in the development of a humanoid race built out of a fusion of human, organic and mineral matters, named the Earthen.  These along with highly developed robotic systems piloted by humans and featuring cyborgs too [who will ultimately provide the game's Combine faction] become the frontline World Alliance forces in the growing confrontations with the denizens of the Netherscape and their human allies in this polarised world. 

At much the same time, Department B had established a Tactical Response Unit Echo whose members were being worked on to develop psychic powers in them. To further add to this lethal mix, a universal religious movement rises to condemn and blame both this dependence on technology and the world's abandonment of God.  Inevitably, a militant element develops out of this religious ground-swell and so are born the Soldiers of Light.  It is these two groups - the smaller off-shoots of the larger human alliances - that oppose each other in the second game. Blood on the Rails.  Though technically all are of human stock, the Echo faction members are signally unusual in their range of psychic abilities and also include a number of the strange hybrid human/Netherscape beings called chimeras.  While the Soldiers of Light, though themselves human too, have established domination over some of the beasts that have been mutated by the effects of the Basement.  


Soldiers of Light units from Blood On The Rails

The fifth faction is the Order of The New Dawn.  These creatures you will meet in the third game Out of The Basement and they will be battling in their scenarios against the Earthen faction, whose origins I outlined earlier.  The Order are almost entirely creatures of the other-world dimension, the Netherscape, though they too have an element of humans degraded and transformed by the effects of extended exposure to the Basement.

In the final period of the game's narrative history from 2022 to 2035, the clash between the two conglomerations of global rivals comes to a head with initially a major victory won by the Earthen against the creatures of the Basement.  However, the pyrric decimation of these winning forces leads them to turn against their human masters of the World Alliance.  Eventually, as time moves on, by 2030 a resurgence of the Nethermancers allied with North Korea looks to be on the point of total victory, causing the unleashing of all out nuclear weaponry leading to a world in post-apocalyptic ruin.

... and thus, we arrive at the "present" day -  an exhausted and depleted  world of splintered factions locked in a subtle and murderous interplay.  The Combine nominally rules with a repressive martial law over the varied remnants of mankind, fighting as often against humans as against Netherscape creatures, in particular the specific rebel faction, the Freemen. who make up the sixth faction. These confrontations provide the Campaign scenarios in the first game Streets of Ruin.

Having established the narrative setting for the games, this next section will explore the geographical landscape over which the various scenarios and their linking Campaigns are fought.  All three Campaigns are located in an area of Russia [physically about the size of Wales] called Semipalatinsk.  This is a real location in which between 1949 - 1989, hundreds of nuclear tests were conducted. 


Diagram of Semipalatinsk Region

A factor I drew attention to and praised in my initial review was how each Rule book, though inevitably containing parts that were identical, tailored the presentation and additional details and all illustrations to reflect the specific and original elements in each game.  These Campaign booklets show the same attention to the individuality of each game.  They all start with the same diagram of the area, but accompanied by totally different photos of the landscape, as well as individual aerial photos!  This adds greatly to the convincing feel of each game.


  Aerial shot from Streets of Ruin Campaign Booklet

This is matched in the text by starting with the same one page overall description, but then each booklet branches off into the very particular geography of this game.  Streets of Ruin takes us to the town of Kurchatov, while the second game, Blood On The Rails pinpoints the railyards on the outskirts of Kurchatov.  Finally, Out of The Basement moves south-west to area "G"  and the Degelen Mountain, where true to its game title, all the scenarios play out underground in the tunnels and dwelling areas established by the Earthen and infested with creatures of the Netherscape!


Location shot from Out of The Basement Campaign Booklet

After these open pages establish the background geography, each Campaign booklet then progresses through five linked scenarios  Because each game is meant to be able to stand alone, the first scenario in each game is identical in victory conditions, relying on a combination of your opponent's units and pick up scavenge tokens.  A gamer intending to buy all three games might feel this repetition a little unrewarding in novelty, as well as the fact that other scenarios spread across the three games have marked similarities.

However, when you consider the hundreds and hundreds of scenarios developed for the myriad boxed sets of ASL [Advanced Squad Leader], the number of scenario types probably boil down to about five  or six: [1]eliminate your opponent, [2]occupy more locations than your opponent, [3]attack/ defend a location, [4]get your troops from one side of the map to exit the other edge/prevent your opponent form doing so, [4]an ambush situation, [5]hold out until reinforcements arrive - which in itself is a variation of number 3 and [6] a rescue mission - which often mixes elements of several of these preceding stereotypical actions!  This in essence is what all wargames can be reduced down to.

What we have in For What Remains reflects just the same generic situations.  Like all wargames, what brings the differences are the particularities of varying units and varying locations, how to get the best out of the units at your disposal and their skills.  The final variety comes from the structure that the five scenarios in each Campaign build up in a sequence with two or three being linked so that the outcomes of one influence some factor in the next scenario.  

As with most skirmish style games, units divide into two over-riding basic characteristics - units that are best operating at range and those that flourish in close combat or at least close range.  The typical example of the first type is probably the sniper, of the latter perhaps a type of flamethrower operative.

Because of the scope that the other world/sci-fi element brings, we have several distinctly unusual skills and their combinations to enrich the game play and, of course, art work to match whether in the booklets or on the counters.


Death Vine from the Earthen Faction

Above is a typical illustration from one of the six Faction booklets.  Each booklet starts with a specific introduction to the Faction, followed by at least a single page dedicated to each type of unit with details of their particular skills and how each affects the rules.  With the much larger units [called "huge"], whose counters occupy 4 squares, there is a also a full page illustration to exemplify the rules for their weapon/ability.


Here's a typical example of a "huge" unit - in this case a dragooner from the Sons of Light Faction.

All together, each faction embraces 5 or 6 types of unit, usually with at least one in the "huge" category.  Typically these units cover such generic roles as Leader, Medic/Healer, Basic Combatants and Specialists.

Obviously the appeal of each game lies not just in the specific campaign. Even with just one of the "core" boxes, you have abundant map tiles and counters for you to create many skirmish encounters of your own and the ability to develop multi-player scenarios.  Investing in more than one set multiplies the potential enormously - especially for the multi-player involvement.  

Should the decision be taken to provide future material what I would personally love to see are encounters occurring at critical points in the timeline and finally, as I know others have suggested, the whole design is ripe for RPG treatment!

Anyone fancy being a Wraith as seen here on the box art for the final game, Out of The Basement?


 THIS WAR WITHOUT AN ENEMY FROM NUTS PUBLISHING Are the titles of games getting more obscure? Whatever the answer, the war cloaked behind th...

THIS WAR WITHOUT AN ENEMY THIS WAR WITHOUT AN ENEMY

For your Wargamer, Toy soldier collector, MiniFig collector, military history nut. Reviews, interviews, Model Making, AARs and books!

 THIS WAR WITHOUT AN ENEMY

FROM

NUTS PUBLISHING


Are the titles of games getting more obscure? Whatever the answer, the war cloaked behind this title is one that has received very few treatments by the board wargame world.  Its subject - the English Civil War.  

I came to hear of it early in its inception when it was first mooted as a new addition to Columbia Games' extensive and excellent series of light block games.  As most of these are numbered in my collection of games and have had extensive play, I was delighted at the prospect of one on the English Civil War.  I had one reservation though: would it just be a re-tread of their Richard III with different blocks?

This too was the problem for the game's designer, Scott Moore, as was revealed in his interview for AWNT, when he described his eventual move to develop the game.

 "... my move to Nuts Publishing gave me the freedom to change my game beyond the confines of the Columbia system.  So, in the end I had full control over the design of the game and did not have to make any compromises."

At the time, I thought this was a brave decision and it's one that has paid huge dividends not just in terms of the content, but also in the quality.  Nuts Publishing, though a small company, has set the highest standards in all the varied components.  This is clear from a first glimpse of the daring box art;  the stark, dominating red cross set against the swirling, murky white clouds of battle smoke conjures up both the cross of St George, the symbolic flag of England, and the bloody funereal cross of death reminding us of the vicious slaughter of civil war. 

Here praise must go to the artist, Nicolas Roblin, and Scott's own words couldn't sum this praise up better.

"...the success of the final design was mainly due to his extensive research, passion and dedication - and, of course, natural talent ... the box cover illustration and the gorgeous map have attracted the most praise."

I couldn't agree more.  The strength of the map art can be seen, even from my photograph, in the rich forested areas and the mountainous terrain of Wales and the North. What my shot barely brings out is the 3D quality of the coastline and the superb depiction of the few, but crucial cities.


A closer look at the coast of Wales will give you a better idea both of the careful delineation of the coast, with the dark black lines showing where two areas are not adjacent. A similar level of detail is shown in the image of Bristol: the orange fortified border and numbers convey that this is a major city, sympathetic to Parliament with a VP value of 1 and a Siege factor of 4  [i.e. that you can assign a maximum of 4 blocks to Storming it.]

Inevitably areas can get crowded when occupied by the maximum number of blocks, a perennial issue with most block games.  For example Columbia's excellent Julius Caesar having a point-to-point map rather than areas frequently involves stacking your blocks. Presenting much more of a difficulty is the almost illegible print of the geographical names of the areas.  This is one of the rare moments when I'd swop the lovely design work for a touch of plain clarity.  A problem I haven't encountered, but I know others have commented on is some difficulty reading the localities on the blocks because of the font size. 

That said, what can be seen is that the continuing depth of research and appropriate art are equally notable in the images used for the unit stickers on the wooden blocks and the individuality of the illustrations on the cards. 


Each separate type of Event has its specific picture in keeping with the period.  These add greatly to the atmosphere of the game, as  the two I've singled out show.

All the other necessary contents maintain this high standard of work.  Two Play Aids, one for each player, a Battle Display and set up cards for 1642 and 1644.  Finally, two extensive glossy booklets, one for the Rules, the other a Playbook also signal that this game has developed a familiar system to a significantly greater depth.

The core is recognisably one of yearly Rounds with 6 player turns in each.  A hand of six cards is played one at a time by each player, with the higher value card determining who is the 1st Player in a turn.  Cards may also have Events on them.  This is an excellent and important development on previous games, which had very few Event cards and these allowed nothing but the Event to happen.  Scott Moore has introduced far more Event cards all of which include a reduced number of Action Points.  This is significant both in adding greatly to the historical atmosphere of the game and in introducing a whole series of varying effects.  Though I would say it is obvious which Phase of a turn an Event should affect, Scott has even added a helpful letter on the card to instruct you as to the exact Phase.

Parliament Set-up Card with blocks positioned
 Each Action point of value on the card [4 is the maximum] allows such familiar Actions as a Group Move, Sea Move, Muster or Recruitment.  The map is divided into Areas and movement has limits on how many units may enter an Enemy occupied area, depending on the type of border [Open/Mountain/River].  After the 1st Player has spent all their Action Points, the 2nd Player does likewise. 

After Actions comes the Tactical Phase when Battles - and possibly Sieges - occur.  Order of resolving Battles is determined by the 1st Player and Withdrawal From Battle may be attempted by the Defender to avoid battle.  If a Battle does occur then a very nice, though rather thin, Battle Display Card comes into play as this point and up to 3 rounds of combat may occur in each separate battle.

Finally Supply is checked, again  a very familiar process in these type of games, where the type of terrain in an Area determines how many units are in Supply, while those above the limit lose a point of strength.  Again this is a departure from the more commonly punitive removal of any surplus blocks to the recruitment pool.

As seen in the earlier photo, units are the standard blocks with Strength denoted by the number of "pips" [i.e. small circles] around the edge and rotated as a block takes hits.  Strength determines how many dice you roll in Battle, while the top right number on the block is its effectiveness which indicates what you must roll equal or less than to score a hit.  What is noticeably not part of the conventional figures on the blocks is an alphabetic letter that determines the order in which blocks fire.

This is just one of many factors that leads to examining just how much this game has developed and built upon a tried and trusted system.  For the moment we'll stay with how Battle is conducted.  Most block games have used the basic format, Defender's "A" blocks fire before Attacker's "A" blocks and so on through the alphabet, with usually the lowest rank being "D" blocks. Not in this game.  Instead, the new sequence makes use of a new variation of a Battle Display Board.

Though the use of Battle Displays has appeared in a few block games already, virtually all have been very simplistic affairs of opposing Left Wing, Centre and Right Wing, with victory depending on variants of which player manages to clear one or more sector of the enemy and occupy them. In This War Without An Enemy, the Battle Display is very different.  First of all, it is much more visually appealing with its aerial landscape view of woods, roads and defensive positions.

An example of how a Battle might initially line up
Each side has named areas for Firing Infantry, Engaging Infantry, Cavalry, Artillery and Reserves, while two special areas are reserved for Routing Cavalry and Pursuing Cavalry.  Already the key rationale and intent can be seen emerging: to give a more realistic feel and experience appropriate to this specific period of musket and pike warfare.  Artillery fires first and can only fire in the first Round of a battle.  Then, in turn, the Defender then the Attacker has to choose whether their infantry remains in the Firing Infantry area where they will now fire with a -1 penalty or move to the Engaging Infantry area where they will attack later after the cavalry phase, but without penalty.

This little touch of decision making gets a resounding cheer from me as does the whole process of Battle in this game.  Cavalry must attack cavalry, if both are present, and may possibly lead to routing and consequently the possibility of pursuit- the next excellent touch.  After the first round of a battle, first the Defender has the choice to declare a General Retreat and, if they don't, then the Attacker has the same choice.

The whole process, though giving a significantly more authentic feel, takes hardly any more time to carry out.  The final change is one more that I greatly appreciate.  Normally if the defender has not been eliminated or retreated by the end of three rounds of combat, the Attacker must retreat.  At last we've got a rule that makes much more realistic sense: the player who has most blocks remaining on the battlefield is judged to be the victor.  This makes the cavalry pursuit rule all the more important and realistic.  If your victorious cavalry have gone charging off after the defeated cavalry, then you may find your army has fewer blocks on the field than the enemy and you've lost the battle!  This is what has happened to me in my most recent game and in the battle I've just been reading about in an excellent military account of the English Civil War that I recommend at the end of my review. 

After Battle, if the area contains a Fortified City, there may come the chance of a Siege taking place.  Again despite Sieges having featured occasionally in previous block games, particularly Columbia Games' Crusader Rex, Scott Moore has introduced  substantially more options, including a genuine opportunity for the Defender to undertake a sally without the need to have a relief force involved.  Siege markers, Storming, including Bombardment, Fortified Defence and possibly the use of Events are all there.  You can choose to sit there with the odd spot of bombardment and watch your enemy wither through Siege Attrition, but typically that's a slow process.  So, trying to secure a breach and then storming offers the much quicker, but much riskier choice.  

This is one section of the rules that will take some careful initial reading to get clear, but the outcome is another rewarding part of the game.  This is especially true, since the road to victory points is almost exclusively the capture of cities.  Battles do not directly gain you VPs, though defeating and eliminating your enemy in the field will certainly be an important factor in your success.  Just don't lose too many troops yourself in the process!

So far, the changes I've described, significant though they are, have mainly been developments and a deepening of existing rules and concepts of block games, though these by themselves are substantial and greatly enrich  virtually every feature of the system.  The final addition is one that pertains specifically to historical elements of the English Civil War. 

This is the strongly Regional nature of the conflict.  I say that as a native of the predominantly Royalist favouring county of Lancashire, who lives only a few miles from the site of the siege of Lathom House in 1644.  The latter was notable for the Countess of Derby holding the castle for her husband, the Earl of Derby, and successfully organising its defence with 300 men to withstand a three month siege against 2,000 Parliamentarians.

The opening of the war viewed from the Royalist side
This aspect of the war was first strongly explored by that doyen of English Civil war games, Charles Vasey, in his celebrated CDG version, Unhappy King Charles. In This War Without An Enemy, the same ideas have been covered to achieve the same effects, but in considerably easier and simpler rules.  

Each Regional block has an identifying letter on a coloured background that matches its Region's distinctive coloured boundary.  Such units may move freely within those boundaries, but not outside unless led by or moving to a matching Regional Leader or a major Leader, such as King Charles or Prince Rupert for the Royalists.  Here, the Parliamentarians have a distinct advantage with four major Leaders.  Apart from the dire consequences if such troops lose their Leader when outside their Region, they cannot recruit new strength unless within their home Region.  

Moreover, sufficient control of Areas within a Region by either side brings in additional forces at the end of a year.  Finally, further extending the importance of locality is that some Areas have Loyalty icons, while Cities are outlined in either blue [Royalist] or orange [Parliamentarian] to indicate their Sympathy for the given side. Consequently, a few simple rules and this easy use of colour coding accomplish a pleasing level of historical feel to the game.

Altogether with this consistent developing and enriching of the rules, along with wholly new elements, the Rulebook is a much more detailed affair of 24 pages, as against the slender 8 pages of comparable block games.  The layout too in double columns incorporates much more text with relatively few illustrations.  At times, careful reading is needed not to overlook a telling detail or significant word.  On occasion a rule that was in an earlier draft has lingered on and a few points have needed clarifying.  However, support from the designer, Scott Moore and Nuts Publishing couldn't be better, with the fastest of responses to any questions posed.

With this significantly expanded depth to the game - and I wholeheartedly praise what has been achieved - there is one major omission that did surprise me.  There is NO index, not even of the simplest and most basic type!   A really good cross-referenced index would seem an obvious inclusion. [Still, the great wider world of enthusiasts  has already supplied that lack and so a very good index can be downloaded from the files on BoardGameGeek.] 

One of the few, but clear illustrations
Understanding the rules is also reinforced by what is becoming a more frequent addition to many games - namely, a Playbook. The first section plays through the opening two turns in detail.  The text is fairly densely presented in long paragraphs, but is supplemented with two large illustrations, one of which is full page.  The rest of the booklet provides a rewarding background consisting of four pages of historical material, five pages of biographical detail of the leaders in the game and finally six more pages explaining the historical detail of the Events on the cards.  All of this is a very good addition to both the game and the background knowledge that is so supportive of a period that is comparatively unfamiliar to the gaming world.

A good example of both the extensive text and a full page illustration in the Playbook

This is a much meatier addition to the block gaming circle of games and definitely more than the intro-level that many belong to.  It is certainly not a quick 2 hrs or less that some are.  However, there are two short introductory scenarios and a medium length one.  Besides that, Scott has provided a simplified version online at BGG.  However, all that has been added is so rewarding that I for one wouldn't want to lose any element of them.  Play is intense, gives a realistic feel for the English Civil War and has already provided many of those individual moments of narrative excitement.

I had very high hopes and great anticipation for the eventual release of this game.   I'm glad to say that This War Without An Enemy has lived up to those expectations and in so many ways has surpassed them.  The quality of presentation from Nuts Publishing and the rewarding detail without sacrificing playability from the designer Scott Moore have brought together a great combination of talents.  
 

As always many thanks to Nuts Publishing for providing the review copy.

Recommendations

Scott Moore's interview at Belloto Con in Spain - link here - much of the questioning is in Spanish, but all Scott's replies are in English!  Great insight, including detailed explanation of the Battle system.

All The King's Armies by Stuart Reid - an excellent narrative of the military aspects of the English Civil War.

hpssims.com