second chance games

Search This Website of delight

  BY STEALTH AND SEA FROM DVG Not so long ago when I reviewed Pavlov's House , the designer David Thompson was a comparative unknown and...

BY STEALTH AND SEA BY STEALTH AND SEA

For your Wargamer, Toy soldier collector, MiniFig collector, military history nut. Reviews, interviews, Model Making, AARs and books!

 BY STEALTH AND SEA

FROM

DVG


Not so long ago when I reviewed Pavlov's House, the designer David Thompson was a comparative unknown and it was the topic and game company publishing it that drew my interest and many others'.  Fast forward to today and the question now is what's David Thompson designing next.  That has been accomplished through a number of very different successful designs and the makings of a "must-have" series that began with Pavlov's House.

If you, like me, want that third series game then you'll have to be patient for the arrival of Soldiers in Postmen's Uniforms.  Instead once again it's "... and now for something completely different."  Well that's not quite true.  It is a purely solitaire game. We are still in the period of WWII and, like Castle Itter, we're still with a topic barely known, never mind gamed!

By Stealth and Sea takes as its subject the exploits of Italian two-man torpedo actions in the Mediterranean.  If you're asking what on earth they are,  I was slightly ahead of you.  My encyclopaedic knowledge of the topic comes from a strip cartoon story in the hardback Christmas annual of one of my favourite childhood comics!  Perhaps, however, it's no surprise that the heroes of my comic were British and highly successful against insurmountable odds.  

In fact, the British "Chariot", as it was named, was directly inspired by the exploits of the Italians, but, as you'll discover, the Italian actions are a far cry from those depicted in my comic.

The presentation of the game, being a DVG product, is unquestionably immaculate and with some additional surprises.  This was most evident in the game board or, I should say, boards!  I had expected a generic map with terrain tiles in the style of Sherman Leader or, considering the nautical topic, that it would be even more likely to have an abstracted board as in U-Boat.

Far from it, there are three boards.  Each depicts a specific geographical location; the harbour areas of Gibraltar, Alexandria and Algiers.  In their monochrome grey-blue tones, they exude the feel of an aerial blue-print that I find adds to the impression of historical authenticity.


The boards also boast the traditional standard hexes for manoeuvring your equally traditional square cardboard units.  These mainly depict the various ships that will be both the targets for your Italian attackers and, in some cases, the ships that will be seeking to attack and thwart your plans.  You, yourself, have but three counters to manoeuvre - these are your three SLCs.  These letters SLC stand for "siluri a lenta corsa" or, as we called them, slow-running manned torpedoes.


Though much smaller than the counters familiar from other David Thompson designs, they have a similar appearance with a coloured edging identifying whether they are Navy, Cargo or Patrol vessels.  However, if you were hoping for the familiar head and shoulder profiles of historical individuals, they are still here.  In this case, they are not on counters, but on a set of small Operator Cards that depict each two-man team and there's a substantial range to choose from 


The ones you choose or those designated by the Scenario are placed on separate display sheets, one for each SLC.  The only slight criticism I have of the components is with the thin card for these displays.  A much more substantial quality would have added little to the cost.


By contrast, the several wooden discs that mark various items of equipment on these cards are much solider, as are the various A4 sized player aids that cover the Turn Sequence, potential SLC Actions, Roster Sheet for the Operators  of the manned torpedoes and both an Historic and a Custom Campaign After Action Report Sheet.

Finally, there are the two booklets: one of Rules, the other of Missions.  They are identical in being printed on quality glossy paper and laid out in large, clear text with an abundance of illustrations.  Though the basic rules occupy 20 pages, this is misleading as the generosity of diagrams and textual layout probably double the amount of space a less luxurious  production would fill.  In addition the rules are sequenced to take you step by careful step in chronological order through a turn.  The Mission set up uses the first scenario from the Mission Guide, the attack on Gibraltar harbour.

Nothing could be simpler or more straightforward - for those weened on the typically extensive choices and deliberations made in planning that begin most of DVG's solo games, this may be a welcome relief or a disappointing departure.  Even when you add in the extra elements introduced when playing a Campaign, the preparatory choices remain fairly few.

In fact, this is the main limitation of the game and it is a limitation based on the historical abilities of what is being simulated.  You are dealing with actions in which the participants could only manoeuvre their craft either on the surface or submerged. Their prime actions are avoiding detection until they can reach a target, detach the warhead that is part of the craft they are manning and attach it to the target ship.  Along the way you will mainly be coping with the vagaries and inadequacies of the equipment and as often as not these will determine the success or failure of even reaching your target. 

There are only four Phases to each turn.

The Fault Check Phase: its title is fairly self-explanatory.  The top card of the Fault deck is turned and a die roll check made.  Failure affects a range of six possibilities including individual items such as breathing gear or a wetsuit to the ballast tank of your manned torpedo or its warhead.

SLC Phase is where you choose two from the possible action list for each of your manned torpedoes.  Many of these choices are related to movement, either on the surface or submerged.  As a full move is two hexes and ordinary movement only one, while even changing facing takes up one Action, progress is very slow!  The other Action choices include diving and surfacing, repair [a highly likely essential choice], evading anti-torpedo nets, detaching the warhead, attaching the warhead to a target and attack from an SLC; these latter two are variations of the only type of attack you can make and lead to the compulsory Actions of Scuttling the SLC and Escape.  Nearly all of these involve some sort of die-roll check, though a few can be automatically achieved by spending both Action Points.

Harbour Defense Phase
Here the Alert Deck comes into play.  Some elements of the harbour defence are not immediately introduced, while others may be strengthened, particularly if playing a campaign of three scenarios.  Though typical elements such as Searchlights and Shore based Mortars feature, along with detection by ships,  All comes down to card turning, even the slightly more mobile element of Patrol Craft Response & Patrol Craft Attack follows the same lines. 

Clean-Up Phase
This simply covers the removal of Patrol Craft or their flipping from Exhausted to Ready and moving the Time marker on.

All in all, a very straightforward and easily assimilated system: even  playing a Campaign, which takes up the rest of the rule book, adds only a few more options, such as choosing the skills that can be increased and the Harbour defences developed.  Finally, there is an equally beautifully produced Mission Guide with 9 Scenarios of which six are devoted to Gibraltar, one to Algiers and two to Alexandria. 


The key decks that cover virtually all that you do.


All the contents bar the wooden markers.


The SLC  displays with appropriate markers


 The many targets at anchor in Gibraltar harbour

The history has been thoroughly and lovingly researched and crafted with the expected quality of production, but the nature of the situation leads to what I would call a very passive experience.  As a player you are very much in the hands of the turn of the various cards and the accompanying dice rolls.  I felt very much that I was in a narrative with too little control of its outcome and, more than anything, I was disappointed that all the many lovely counters depicting historical ships simply sit there as interchangeable targets for a last lucky or unlucky die roll!  Unlike both Pavlov's House and Castle Itter which are tense, pulse-raising every time, By Stealth and Sea didn't get my heart racing.


I first learned many of the details of the First Barbary War  from Ian Toll's excellent book Six Frigates , which was one of the best hi...

The Shores of Tripoli The Shores of Tripoli

For your Wargamer, Toy soldier collector, MiniFig collector, military history nut. Reviews, interviews, Model Making, AARs and books!


I first learned many of the details of the First Barbary War from Ian Toll's excellent book Six Frigates, which was one of the best historical works I've ever had the pleasure of reading. It was quite the tale of a scrappy young nation deciding it was better to fight the local bully than to pay him tribute. Now Fort Circle Games has released their first board game, which captures this moment in history with a very elegant and simple design. The Shores of Tripoli is a strategy game for two players that can easily be played in under an hour. 


One player takes the side of the Americans, the other takes on the role of the Pasha of Tripoli. Each gets a hand of cards, but the actions that each player can take after that are almost entirely different. The American player has powerful frigates that they can freely move around the map, but these are very limited in number in the early phase of the game. America seeks to build up forces in the region, blockade the Barbary corsairs in their harbor(s), and potentially build an army on land. The Tripolitan player is racing against time to send their corsairs out on raids and gather all 12 gold coins before being overwhelmed. They can also win by managing to destroy 4 American frigates over the course of the game. Both players will feel stretched thin, and wishing they could take just one more action throughout the entire game. 


Sometimes things come down to a climactic battle!

The game is split up into 6 rounds each representing a year of time, and 4 turns within each year, with each player getting one action per turn. At the end of each year, the players draw more cards to refresh their hands, and potentially receive reinforcements. That means that, at most, there are only 24 actions to be had in a game of Shores. Therefore, every single action you take carries weight, and there is precious little margin for poor moves. At the same time, the game is so brief that if you do screw up, you won't have to wait long to get it over with and try again!


The cards each player has come in three flavors. Cards which let the player take a moderately powerful action, and then can be put in the discard pile to come back around later. Cards which trigger a unique event that can only fire once per game, and finally cards which can add on an extra twist to other specific events or battles. All cards can also be discarded to take a minor action (building a new small ship for both players, moving two frigates around for the US player, or going raiding for the Tripolitan player). On each turn, a player must either play one of their cards for an event, or discard one to take an action. There is also a hard hand limit, and so one must think carefully about cards they may want to hang onto for plans down the road.


While I haven't fully explained the rules, there isn't much more than that to the rulebook. Players move satisfyingly chunky ship pieces around on a relatively simple map, where there are really only a handful of spaces that are used throughout the game. Combat is resolved via very simple rules and rolling big handfuls of dice. The game can even feel very luck based at first. However, after just a few plays, another level to the strategy emerges. There are not that many cards in each deck, and every single one will filter through the game at some point. With many of the most powerful cards being one use only and very specific in their function, strategies begin to build around guessing which cards your opponent has in their hand at any given time, and noting which cards they have already played. It's definitely a game that benefits from familiarity and repeated plays.


The game includes a solo mode in which you play as the Americans against a Tripoli bot who will mostly play sensible moves, but is predictable. That said, you will still need to play very smartly if you want to find a path to victory. I lost twice to the bot before finally winning on the very last turn of my third game. While I would not recommend buying this game to only play solo, it's nice that there is a satisfying opponent in the box. 


It shouldn't be very difficult to find a live opponent for The Shores of Tripoli, as the rules are extremely simple to teach, and the game can be played in a casual manner as one learns, while still having fun. Neither player can roll over the other without extreme luck, and the quick turns keep the game moving at a good pace. My wife, an occasional board gamer at best, and certainly no wargamer, was able to defeat me on her first attempt! 


If you are looking to learn more about the conflict, this game is a great place to start. Each of the unique event cards is based on either events which actually happened or very much could have happened. Besides the rule book, the game comes with a historical supplement which offers a great deal of context for the design of the game and the cards. One nice bit of fluff in the box is a copy of the letter sent by Thomas Jefferson to Yusuf Karamanli just before the war broke out.


The Shores of Tripoli is a charming game that could fit right in on any gamer's shelf. The mechanics are simple, the game plays fast, and each side offers a unique approach. The American player will need to be active, moving ships around, attacking when the time seems right, and trying to find the balance between covering ground and spreading themselves too thinly. The Tripolitan player is racing the clock, weighing risk and benefit with each raid, all while looking for openings to exploit. If you are at all interested in the historical conflict depicted, I heartily recommend The Shores of Tripoli. 


The game can be ordered directly from Fort Circle Games or from other vendors on the web. 


- Joe Beard


 Romans at War The Roman Military in the Republic and the Empire by Simon Elliott  This book is oversized, at right around 300 pages long. I...

Romans at War: The Roman Military in the Republic and Empire by Simon Elliott Romans at War: The Roman Military in the Republic and Empire by Simon Elliott

For your Wargamer, Toy soldier collector, MiniFig collector, military history nut. Reviews, interviews, Model Making, AARs and books!


 Romans at War


The Roman Military in the Republic and the Empire


by


Simon Elliott


 This book is oversized, at right around 300 pages long. It is also filled with pictures of reenactors, and art and ruins that the Romans left to us. The author gives himself a hard task to show the whole history of Roman warfare in one volume. Normally, books are written about Roman warfare with the history of it split between the Republic and Empire eras. Even if you are writing about just the actual Roman era, without adding in the Byzantine, you are talking about 1000 years of history. In this book the author has taken up the challenge to show us all 1000 years in one book.

 These are the chapters of the book:

1. The Roman Republic

2. The Republican Military

3. The Roman Empire

4. The Principate Military

5. The Dominate Military

6. On Campaign and in Battle

7. Non-Conflict Role of the Roman Military

8. Allies and Enemies of Rome

Conclusion

 From the earliest times of Rome, to the destruction of the Empire after more than 400 years, the author shows us this panoply of history. In the book are a number of maps and a very nice timeline of the entire period. We are presented with these personalities: Scipio Africanus, Marius, Sulla, Caesar, Trajan, Septimius Severus, Stilicho,  and the entire cast of those 1000 years.

 Naturally, given a book of 300 pages, this book can only do an overview of most of the historical information. However, I am quite surprised about how much the author managed to stuff into this book. This book is an excellent starting point for someone who wants to learn about the Roman system of war. It is also a handy reference guide for those of us who have already delved deeply into the field. Mr. Elliott has been able to do much more with these 300 pages than I thought possible. It is a pretty amazing feat. Thank you Casemate Publishers for allowing me to review this great book. Do yourself a favor and check out some of the other books by the author.

Robert

Book: Romans at war: The Roman Military in the Republic and Empire

Author: Simon Elliott

Publisher: Casemate Publishers


Tiger Leader The World War II Ground Combat Solitaire Strategy Game 2nd Edition by Dan Verssen Games (DVG)   "Tyger, Tyger burning brig...

Tiger Leader: The World War II Ground Combat Solitaire Strategy Game 2nd Edition by Dan Verssen Games (DVG) Tiger Leader: The World War II Ground Combat Solitaire Strategy Game 2nd Edition by Dan Verssen Games (DVG)

For your Wargamer, Toy soldier collector, MiniFig collector, military history nut. Reviews, interviews, Model Making, AARs and books!


Tiger Leader

The World War II Ground Combat Solitaire Strategy Game

2nd Edition

by

Dan Verssen Games (DVG)


 "Tyger, Tyger burning bright,
 in the forests of the night:
What immortal hand or eye, 
Could frame thy fearful symmetry?
(William Blake)

 Yes, it is a different Tiger, but the response of its enemies is pretty much the same: sheer terror. The amount of Tigers that Germany built compared to the totals of other tanks on each side was quite small. However the Allied soldiers would see them behind every house or large bush. Reading the Allied and Soviet reports, they destroyed 10,000 German Tigers. Germany actually constructed only 1,347 Tiger I's and 489 Tiger II's. Yes it is actually a Panzerkampfwagen Tiger Ausf. B., not a Tiger II. However, not all wargamers have as much OCD about things as others do. Before we get pigeonholed, we have to remember that you will be in charge of a German Panzerkampfgruppe (Battle Group). You will not only have tanks under your command, but almost every other German land combat unit. It will also be a long time before you see or even dream about Tigers if you play the early campaigns. You may even start the game with Panzer I's. these were no better than any other machine gun equipped tanks from the mid 1930's. So, what does DVG actually give you in the box:

Enemy Units include units from the Polish Army, French Army, British Army, Russian Army, and the American Army.
240 Full Color Cards
440 Full Color Counters
12 2.5" Terrain Tiles
1 22"x 17" Mounted Display
1 11"x17" HQ Sheet
1 Player Log Sheet
1 Full Color Player Aid Sheet
1 10-sided die


 All of the DVG games I have played have four things in common:
1. Everything in them is large and easy to read.
2. When possible they fit everything including the kitchen sink in the box for the player to use.
3. They are all excellent solitaire games
4. Mounted map boards


 I could simply end the review here and say why are you bothering to read this, then tell you to go out and go buy it, case closed. However we have to conform to the standards, so here goes. The map board is well mounted; not a surprise there. The 'hexes' on it are almost as big as the bases for miniature wargame units. In reality they are actually 2.5" wide. The counters are 5/8" in size, and very easy to read. Your counters only have numbers at the bottom, to use in conjunction with the unit cards. The enemy counters have their designation, for example infantry, etc. They also have their Armor Piercing and High Explosive ratings on them. The cards are separated into six decks: Event, Unit, Special Condition, Objective, Battalion, and Leaders. The rulebook is only twenty-two pages long. It is also in full color, and is in large type. Examples of play are scattered throughout it. The one Player Log Sheet needs to be copied. I am not a big fan of manual record keeping. However, in this game it makes sense. DVG has given us so much in the box already that some of it would have to be removed to replace the manual record keeping. The twelve Terrain Tiles are double sided. Their use gives the game extra depth and replayability. 

 These are some of the German units you will be playing with:

Tiger Leader includes the following units:
Panzer I
Panzer II
Panzer III
Panzer IV
Tiger Tank
Panther Tank
King Tiger Tank
Stug
Marder
Infantry
Armored cars
Halftracks

 Naturally you will be fighting some of the above and more in your solitaire quest to survive the war. This is a list of the campaigns you are able to fight in:

The Invasion of Poland 1939
The Battle for France 1940
The Battle for North Africa 1941
The Invasion of Russia 1941
The Battle for North Africa 1942
The Fight for Italy 1943
The Fight for Russia 1943
The Days of D-Day 1944
The Final Days in Berlin 1945


 The game has been revised a good bit in this Version 2 release. Let me clarify that. If you own only the original Tiger Leader, there have been changes to the game to make it closer to Sherman Leader in the rules. If you already own Tiger Leader and the upgrade kit, the changes are mostly in the artwork. The upgrade kit fixed the issues that people found with some non-historical rules.

 The game is both Card and Die driven. The main driving force behind the game is Special Option (SO) points. These are given to you to use from the Objective Cards. You will purchase your units with SO points. The Leader games from DVG are not supposed to be a highly detailed simulation of whatever they represent. They are a commander lite simulation of the historical conflict that takes place in their area of focus. They are also eminently fun and great games. Just like any other wargame, people can argue about the different numbers given to each unit in the game. It is really a pointless exercise because each person has his own view of what they should be. When you purchase a wargame you are seeing the designer's thoughts on the effectiveness of each unit. I do have an idea, though. If you do not agree with the designer, then try your own. It is a boardgame that you have purchased. Feel free to fiddle with them as you see fit. However, realize that your own numbers might make the game totally unbalanced. There is a reason the designer used his numbers, and it is because play testing showed which ones represented reality in the designer's mind. 

 The game also comes with Optional Rules to enhance gameplay. There are three of them:

Tenacity
Battlefield Heroics
Flank Attacks

 For Tenacity you can decide to extend a battle by one turn, at the cost of each participating Commander gaining one extra stress point. For Battlefield Heroics, if a Commander's unit is destroyed, he can take over from a KIA, Unfit or wounded Commander from the same type of unit. Flank Attacks take place with a die roll at ranges of 0 or 1. Tenacity and Battlefield Heroics also cost one SO point for each week of the campaign that the rule is used.


 The game tries to be as user friendly as possible. The Sequence of Play is shown right on the top of the mounted map. This is the sequence:

Campaign Set-Up
Select Campaign Card
Select Objective Card
Draw Battalion Cards
Buy Units
Select Commanders

Start of Week
Special Condition Card
Assign Units

Pre-Combat
Event Card
Place Turn Counter
Place Terrain Tiles
Place Friendly Units
Place Enemy Units

Combat
Fast Move and Attack
Roll for Enemy Movement
Enemy Actions
Slow Move and Attack
Advance Turn Counter

Post-Combat
Event Card
Battalion Status
Record Commander Stress
Record Commander Experience Points
End of Week

Move Battalions
On Leave
Adjust Special Option Points
Repair/Replace
Priority R&R

End of Campaign
Campaign Outcome


 The game's rules are easy to understand and the fact that almost all of what needs to be done each turn is right on the map makes it that much easier to remember. The big difference in DVG solitaire games is the fact that you are playing campaigns and not separate scenarios. Many players win games by totally exhausting their troops to win one scenario. If they were forced into a battle again with the same troops, they would quickly lose the second battle. Tiger Leader and its brothers are commander games. The player is forced to deal with fatigue, loss, and all the other problems that a real commander is faced with. If you go into the first scenario with guns blazing you will quickly lose the campaign. The player has to deal with the battle at hand, but also keep looking at the long haul. You must win every battle, and also have a strong force left to fight all of the rest. This game has been tweaked to be even better than its first iteration. Tiger Leader has excellent gameplay and components, not much more can be asked of a wargame. If you are interested in WWII European Theater land combat acting as a commander, then this game is for you.


 DVG was nice enough to send me three expansions with the base game. These are:

Tiger Leader Expansion #1 Blitzkrieg
Tiger Leader Expansion #2 Panzers
Tiger Leader Terrain Tile Pack #2


 This comes with new:

Campaign Cards
Situation Cards
Special Condition Cards
Event Cards
Enemy Battalion Cards
Commander Cards
Enemy Battalion Counters


 This comes with these new items:

Vehicle Cards
Infantry cards
Vehicle Counters
Infantry Counters

 Among the new Vehicle Cards are one for a late war E-50 and E-100


 This set comes with these new tiles:

River
Bogging
Urban
Riverfront
Industrial

 You can also purchase a Neoprene mat to play on, and Tiger leader Terrain Tile Pack #1.

 These serve to make this excellent game even more so. Thank you very much Dan Verssen Games for allowing me to review Tiger leader 2nd Edition. I have reviewed about six of their games, and they just keep upping the bar with each new release.

Robert

Dan Verssen Games:

Tiger leader 2nd Edition:


  Nights of Fire: Battle for Budapest by Mighty Boards  Once again, wargaming is increasing my knowledge. I knew that the Hungarian Uprising...

Nights of Fire: Battle for Budapest by Mighty Boards Nights of Fire: Battle for Budapest by Mighty Boards

For your Wargamer, Toy soldier collector, MiniFig collector, military history nut. Reviews, interviews, Model Making, AARs and books!


 Nights of Fire: Battle for Budapest


by


Mighty Boards


 Once again, wargaming is increasing my knowledge. I knew that the Hungarian Uprising took place, but I did not know any of the actual history of it. On October 23rd a student protest against the government started the Hungarian Uprising. Originally the Soviets started to remove their troops. However, Imre Nagy, the head of the new government, in a speech declared that Hungary was going to leave the Warsaw Pact and become neutral. This is seen by many as the turning point that made the Soviets decide to invade Hungary and remove the new government. On November 4th the Soviets invaded Budapest. The uprising was crushed, and 2,500 Hungarians and 700 Soviets were dead. This number does not include any Hungarians that were murdered during the crackdown after the uprising. Imre Nagy was grabbed by the Soviets and later was brought back to Hungary for a closed trial that ended with his execution. The Western powers were involved with the Suez Crisis at exactly the same time. Egypt's Nasser had nationalized the Suez Canal. In retaliation Britain, France, and Israel invaded Egypt. Most historians believe that there was not a chance that the Western Powers would intervene on Hungary's behalf. Mighty Boards has a game that is about the beginning of the Hungarian Uprising; it is called Days of Ire. This game is about the Soviet invasion and crushing of the uprising in Budapest. Let us see what comes in the game box:


Mounted Game Board

Rulebook

83 Cards (57mm x 89mm)

30 Wooden Blocks

Stickers

59 Cardboard Tokens (counters etc.)

4 Glass Bead Markers

1 Six-Sided die


 The game is one of the new breed of a cross between a Euro game and a Wargame. In its design you can see the influence of both. The board is separated into areas and not hexes. As you can see, the turn record track is done in a novel way in the lower right corner. There are both blocks and cardboard counters used in the game; this is another testament to its DNA. The blocks are done well, along with the stickers. The cardboard counters are very large and all of these pieces are easy to read. The card decks are extremely well produced. There are two double-sided Player Aids. Two are the 'Soviet Rules Reference', one is the 'Konev Revolutionary Rules Reference', and the last is the 'Revolutionary Rules Reference'. The Rulebook is done in vibrant colors and is easy to read with tons of illustrations. The rules are twenty pages long. This is followed by both a Historical Essay, and Designer's Notes. The Historical Essay gives the player all he needs for background on the Soviet invasion. The Designer Notes are very interesting and go through how this hybrid Euro/Wargame came about. 


 One thing about the game that you should know up front is that there is no way for the Hungarians to actually 'win'. You can win the game playing as the Hungarian by victory points (helping civilians flee etc.), but you will not defeat the Soviets. Your job, as the Hungarian player, is to slow the Soviets down and make the invasion as costly as possible for them. The game is set up for one, two, or three players. In solitaire or two player mode, the player faces Konev, the Soviet Marshal in charge of the operation, Mighty Boards name for their bot. In two player there can also be a Soviet and a Hungarian player. In three player there are two Hungarian players and one Soviet. The Rulebook states that you can pick who will play each side, or a player can demand to be the Soviets by banging his shoe on the table. The Rulebook is set up different than most. The rules for the multiplayer and solitaire are listed one after the other in each separate phase. The game comes with both Basic and Advanced rules. These are also listed in each phase, and not as usual in its own listing after the basic game. Both the Basic rules and the Advanced are shown on the Player Aid cards.


  The game is a card driven one. There are four decks: Soviet Tactic Cards, Konev Cards, Revolutionary Cards, and Headline Cards. When one player is playing against the Soviet, either a Soviet player or the Konev bot, the player draws 12 cards as long as the Revolutionaries morale is over 19. The Konev, Soviet bot, deals out 5 cards from the deck and shows 1,3, and 5. The other two cards are turned over. All the directions on the cards are easy to follow and pretty self-explanatory. As the Revolutionary, your job is to stall the Soviets and to help civilians flee. The more you stall the Soviets the lower their prestige falls. As the Soviet, you must capture Budapest with as much speed as possible. The Soviet player must attempt to capture as many civilians as possible. 


 This is the sequence of play:

1. Draw Phase

2. Tactics Phase

3. Reinforcement Phase

4. Operations Phase

5. Adjustment Phase

6. Clean-up Phase


 What is the Red Army Pack?

Days & Nights: Red Army Pack is an add-on pack that contains 28 miniatures compatible with both Days of Ire and Nights of Fire. It also contains a small deck expansion to Nights of Fire, and an additional deck allowing campaign play. 


In Campaign mode you can play a game of Days of Ire followed by a game of Nights of Fire (solo, cooperative, or conflict mode up to 1v2 supported), and have the winner decided only at the end!


 The game, as mentioned, has a Basic and Advanced rule set. Once you become used to the basic game, you can turn it up a notch. The game is easy to learn. The actual mechanics of the game are fairly simple. One or two playthroughs and you should not need the Rulebook again. The Player Aids should walk you through the game. The rules are simple, but like many games with easy rules there is still a lot to learn and do. The fact that setup is random means that the game is always fresh and you cannot work out a strategy that will work every time. Games are here for us to have fun. Wargames and historical ones have an extra onus. They should be fun and teach the player something. Nights of Fire is both fun and a learning experience, and that is all you can ask from a game like this. Thank you Mighty Boards for allowing me to review this great game.

Robert

Mighty Boards:

https://www.mighty-boards.com/

Nights of Fire:

https://www.mighty-boards.com/nightsoffire


Thermonuclear war is the game about which it's been said that the only winning move is not to play at all. What would it look like if yo...

ICBM ICBM

For your Wargamer, Toy soldier collector, MiniFig collector, military history nut. Reviews, interviews, Model Making, AARs and books!


Thermonuclear war is the game about which it's been said that the only winning move is not to play at all. What would it look like if you had to play it out anyway? ICBM is a game which answers that question. Millions will die as eight global regions duke it out with every weapon of mass destruction in their inventory. 

ICBM is a real time strategy game from Slitherine with sparse graphics but a deep well of strategy to explore. At the beginning of the game you will be presented with a mostly empty map of the world. Eight regions, such as North America, East Asia, and Europe, are each outlined in their own color and dotted with targets, ahem, cities filled with millions of innocent civilians. In terms of military power, things start off completely even, with everyone building from the same relatively blank slate. Once the clock starts ticking, the player is given a wide open decision space in terms of what to research, what to build, and where to deploy it. Additionally, at some point alliances will form, which the player is free to enter into, or not, though isolationists will likely find themselves very, very alone once the nukes start flying. That's because alliances allow not just the sharing of vision, but also the sharing of technology, both of these things being absolutely crucial to gaining an edge over the enemy. 


At the start of the game it would be foolhardy to rush into conflict. ICBM is all about the slow burn as you build up forces and technology, shaping your strategy as you go. Radars must be built so that you can find targets to begin with, as well as defend against the enemy. Then you'll need to decide on what your offense and defense will look like. Do you want wings of bombers or fleets of subs? Maybe you'll attack from space, or a good old fashioned carrier strike force?  As you're building up, you'll likely find yourself skirmishing with neighbors. Maybe you catch their sub lurking off the cost and sink it, or maybe they notice your isolated radar site and take it out with an airstrike. Since everything you build costs you time that could have been spent building something else, you'll feel these losses. On top of that, this fighting adds tension to the game, since you never know if this is IT, or just another quick strike before things quiet down again. 


Once things do kick off, you'll quickly find out just how well or poorly you have planned, and also how well your enemies have done. Didn't bother patrolling your coastlines at all this game? Maybe there's a couple subs hanging out there ready to waste your infrastructure in a matter of seconds. Underestimate the enemy air defenses, and now your bomber wings got wiped out before reaching their targets? That's the ballgame folks. Just the same, the enemy will be running up against your defenses and maybe you've got some surprises for them too. This quick release of destructive energy is what all of the tension of the early game build up has been leading towards. ICBM even has specific mechanics to ratchet this moment up. 

One is the option to turn off a feature which pauses the game for every little semi-significant update (like spotting a new enemy unit) because once the full scale war kicks off, it's going to get hectic and there's no fun in stopping it every few seconds. Second, there is a tool for setting up large scale coordinated strike plans that can be set in motion with one click. Given enough buildup time you can find yourself in command of dozens or hundreds of weapons of mass destruction. The tool makes it easy to divvy up appropriate targets for them and even time the attacks to hit all at once. 


For long time strategy fans, you'll likely remember DEFCON from 2006, a game which certainly paved the way for this title. Where DEFCON was streamlined and colorful, ICBM is grayer and more complex. One could certainly enjoy both games, but I could also see someone greatly preferring one over the other. I appreciate the more complex and involved systems in ICBM, where you have a great deal of freedom in shaping your force composition, but while playing I was constantly reminded of how DEFCON managed to provoke a stronger emotional response despite it's more colorful and simpler presentation. Almost 15 years later, I can still vividly recall the ambient sounds in DEFCON which included distant alarms, doors closing, and someone crying in the background as the war played out on screen. ICBM feels much more sterile in terms of presentation. It's functional, but not much else.


ICBM offers a fun take on strategy gaming, especially if you can get online and play with a group. I could see friends taking multiple runs at each other using different strategies and styles. There is also an online ELO ranking if you want to get into serious competitive play. The AI does a good enough job, but of course will never be as creative or unpredictable as another human. 

ICBM is available from the usual online stores, as well as directly from Slitherine.

- Joe Beard


  Napoleon 1807 La Campagne de Pologne by Shakos Games  In 1806 Napoleon crushed Prussia in a campaign that looked pretty much like a 19th c...

Napoleon 1807 La Campagne de Pologne by Shakos Games Napoleon 1807 La Campagne de Pologne by Shakos Games

For your Wargamer, Toy soldier collector, MiniFig collector, military history nut. Reviews, interviews, Model Making, AARs and books!


 Napoleon 1807 La Campagne de Pologne


by


Shakos Games


 In 1806 Napoleon crushed Prussia in a campaign that looked pretty much like a 19th century blitzkrieg. He had beaten an Austro-Russian Army in 1805 at Austerlitz, but just as Frederick the Great learned, the Russian Army was a lot like the Energizer Bunny. The Russians had pulled back into Poland to reorganize. This led to the Grande Armee's first taste of campaigning in eastern Europe. The French Army did not like it at all. The roads were dirt tracks, and the poor villages were nothing like what they had found in what would become the Germany we know. Instead of glory and march on, Napoleon often heard his grognards (grumblers) yell 'peace' at him as he rode by. The campaign in Poland was two phased. First, at the beginning of 1807, Marshal Ney had disturbed a hornet's nest by disturbing the Russians, when the French Army was in winter quarters. This led to the brutal, and inconclusive Battle of Eylau on February 7th and 8th. This was the first real check Napoleon had ever received on the battlefield, and had not come out with a clear cut victory. It was also one of the bloodiest. Marshal Ney observed "What a massacre! And without result". Napoleon told Marshal Soult "The Russians have done us great harm," to which Soult replied "And we them, our bullets were not made of cotton". Later that year in June, General Benningsen (commander of the Russian Army) seems to have had a momentary attack of lunacy at Friedland. He had thought to defeat Marshal Lannes, before the rest of the Grande Armee came to the rescue. Benningsen decided to cross a river and trap himself right in front of Napoleon. It would have been wiser to jump into a lion's den. The Battle of Friedland led directly to the Peace of Tilsit. So let us see what Shakos Games has given us:


1 mounted game board 90 x 60 cm

1 rulebook

1 scenarios booklet

1 quickstart booklet

3 player aids (orders of battle)

2 player screens

2 sets of 48 cards

6 additional cards for Napoléon 1806

2 sticker sheets (100)

More than 250 wooden pieces

10 combat dice

2 cloth bags


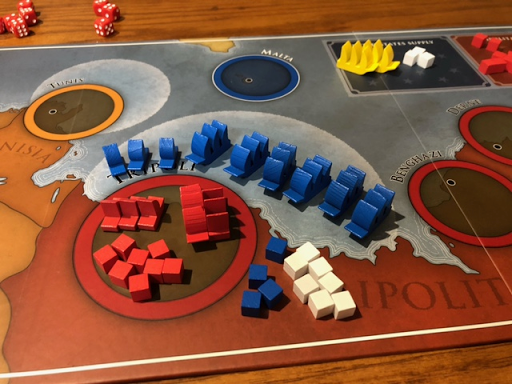
 This list is very much akin to someone saying they bought you a diamond and they hand you the Star of Africa. Opening the box, you are presented with something new in the wargaming world. This is a wargame that is the offspring of a Euro game and a normal wargame. So, it has the beauty of a Euro game, and it is also an in depth wargame. This is about the third game I have seen with this kind of pedigree, but this game by far has the best looking components. The mounted game board is a beauty to behold. From the picture of a flintlock pistol along one side, to the Victory Point Tables, it is wonderfully done. The wooden pieces are among some of the best I have ever seen. They were cut precisely, and there are no extra flanges, etc. The stickers are either pictures of the actual Marshal/General or a Cossack and a French light cavalry. These represent vedettes, and are used in the optional rules. In a change from most block games the side that faces your opponent actually has a sticker to denote which side it belongs to. So many little things like this are added to the game. There are two screens to hide your opponent and your Order of Battle Aids showing your forces strength and amount of fatigue. The French one has a golden eagle and the Russian shows a golden double-headed eagle. On the inside of both screens are various aids, done in wonderful color, to help with the play sequence and other rules. There are three double-sided Orders of Battle Player Aids. These show the setups for the Pultusk, Eylau, and Friedland battles. There is one very large Player Aid that is four pages long. The middle two pages are a fold out showing exactly how to set up the map and the various Player Aids. There are two cloth bags that also have the French and Russian eagles on them. These epitomize the care and sheer artistry of the game's components. There are two sets of cards (Russian, French) that are on par with the rest of the components as far as looks. They are also easy to read and understand. I cannot say enough about how wonderful the game looks. The Rulebook is in large print and full beautiful color. The actual rules, with examples of play, are fourteen pages long. There are 'Rules of the Grognard' that can be used to enhance the game. The last four pages explain each Playing Card in detail. The Scenario Booklet is just as sumptuous as the rest of the game's components. There are thirteen scenarios in all. These are the scenarios:


1-7 are Campaign Scenarios

1 - Pultusk Scenario Historical Placement

2 - Pultusk Scenario Free Placement

3 - In the Mud of Poland Free Placement

4 - Eylau Campaign Historical placement

5 - Eylau Campaign Open Placement

6 - Friedland Campaign Historical Placement

7 - Friedland Campaign Open Placement

8-10 are Battle scenarios

8 - The Russian Offensive Historical Placement

9 - Battle of Eylau Historical Placement

10 - Battle of Friedland Historical Placement

Scenario 11 is the Grand Campaign

11 - From Pultusk to Friedland

Scenarios 12 and 13 are for use with the 1806 game from Shakos

12 - The Russians Come to the aid of the Prussians in Saxony

13 - From Napoleon 1806 to Napoleon 1807


 This is the sequence of play:


"Operations

 Pass: If a player passes, they can no longer

perform operations, but can still play 1 card

with its name on a green background in order to

apply events to the operations of their opponent.

The opponent continues operations until they also

pass. If both players have passed, the operations

phase is over. A player who has activated all their

corps is forced to pass.

• Perform an operation: During an

operation the active player selects a stack where

each corps has to be Activated status – i.e., face

up. The player is not required to select all the corps

present in an area. Activated corps will be able to:

 move

 initiate combat

 or both by performing a moving attack

At the end of an operation, flip the activated corps

flag up on its has been Activated side, even if the

corps did not actually move. Also, activate all

other corps that have participated in a combat,

attacking or defending.

During an operation, each player may play a single

card from their hand with the name of the event on

a green background. The card is placed in the

player’s discard pile once the effect is resolved.


Recovery

During the recovery phase, players perform the

following actions in order:

1) Each corps that is still on its to be Activated side

removes all its fatigue points.

2) For each of their other corps, the player can

play 1 card from their hand, and only 1, and

remove the number of fatigue points indicated in

the recovery box located bottom right.

3) All corps that still have between 5 and 8 fatigue

points then lose 1 strength point immediately.

4) Flip all corps face up to indicate that they are to

be Activated for the next turn.

5) Advance the Turn marker and repeat the game

sequence.


Very important: at any point in the game when a

corps has no strength points or more than 8 fatigue

points, it is immediately and permanently removed

from the game.

Remember that strength points lost due to fatigue

award victory points to your opponent."


 As you can see, the game is relatively simple in its actual rules. However, do not be fooled by the dearth of the rules. This is a medium complexity wargame from the ground up. You will find no 'Beer & Pretzels' in this box. The main rules that makes this game so very good is the rules on fatigue. Some Napoleonic games allow the player to march, attack etc. with no penalties whatsoever. In this game EVERY action causes fatigue. This is as it should be, and is historically accurate. You can only ask so much of real troops before their cohesion breaks. From the beginning, the designers were predicated on making a historically accurate game that is also easy to get into, and to easily remember the rules. In this they have succeeded, probably far beyond their expectations. After one play through you should have no reason the look up anything in the rulebook. The amount of excellent Player's Aids also help in this regard. The game has been set up so that you can use either the cards or the dice included to decide combat. You can either look at three cards or roll three die. The Rulebook is written as if you are using the cards.


 The game has another interesting rule up its sleeve. This is the 'Axis of Retreat' rule. When a stack moves into an area occupied by an enemy force, the force moving into the occupied area places an Axis of Retreat symbol toward the area it just moved from. If a new enemy force is able to move through the connection that has the Axis of Retreat on it, then the force that had the Axis of Retreat loses 2 fatigue points. This is just another example of the ingenuity of the rules and the designers' ideas to make the game as historically accurate as possible.


 To achieve victory, you must:

Eliminate opponent's strength points

Control fortified towns

Protect your citadels

Besiege you opponent's citadels


The Fatigue markers are the Round Red Ones


 Bottom line? It is a game that is on another level of beauty of its components. From the moment you see the box to when you start opening it up you will be amazed. The whole ensemble is a sight to behold. Do not think that Shakos Games have shirked on the game play. This is not the case of something beautiful but shallow. The way fatigue is handled really makes the game seem historically accurate. If you march and fight willy-nilly about the board like some games allow, you will pay for it. Thank you so much, Shakos Games, for letting me review this wonderful beauty. From what I can tell their Napoleon 1806 is just as beautiful.

Robert

Shakos Games:

Shakos | Historical board games 

Napoleon 1807:

Napoléon 1807 | Shakos


  From the Realm of a Dying Sun Volume II: The IV SS-Panzerkorps in the Budapest Relief Efforts, December 1944-February 1945 by Douglas E. N...

From the Realm of a Dying Sun Volume II: The IV SS-Panzerkorps in the Budapest Relief Efforts, December 1944-February 1945 by Douglas E. Nash Sr. From the Realm of a Dying Sun Volume II: The IV SS-Panzerkorps in the Budapest Relief Efforts, December 1944-February 1945 by Douglas E. Nash Sr.

For your Wargamer, Toy soldier collector, MiniFig collector, military history nut. Reviews, interviews, Model Making, AARs and books!


 From the Realm of a Dying Sun Volume II:


The IV SS-Panzerkorps in the Budapest Relief Efforts, December 1944-February 1945


by


Douglas E. Nash Sr.


 The first volume took us from the creation of the IV SS- Panzerkorps, and all that entailed, to the battles around Warsaw on the Eastern Front in WWII. This second volume takes us to Hungary and the desperate battle to relieve Budapest. The action takes place on the Eastern Front which by that time is getting uncomfortably close to Germany itself. Hitler demanded that the besieged in Budapest be relieved. Guiderian (Chief of the General Staff) wanted as many troops as possible to keep the Red Army off German soil. He described the Eastern Front as "A house of cards. If the front is broken through at one point all the rest will collapse".


 There were three relief attempts to fight through to the beleaguered in Budapest. Each operation was named Konrad. So, we have operation Konrad I,II, and III. The IV SS-Panzerkorps was in the thick of the fighting in all three operations. The backbone of IV SS- Panzerkorps were the two SS Panzer Divisions Wiking and Totenkopf. At different times during the IV SS-Panzerkorps existence, many other divisions and kampfgruppe's (battle groups) were added to its Order of Battle. 


 Long before the IV SS-Panzerkorps was created, both of the SS Panzer Divisions had been in the thick of the fighting in Russia. While one can be disgusted by their actions, one also has to reluctantly give them their just do. Both of the divisions were nearly destroyed several times over in the fighting on the Eastern Front. However, their cadres were able to install an esprit des corps in even their most reluctant, almost press ganged, soldiers. 


 The first volume was by far one of the best military history books I have ever read. This volume continues in that vein without even the slightest hiccup. In this book, like its sibling, the author seamlessly takes the reader from the highest councils of war to the individual battles for each plot of ground.


 There are two groups of photographs that are in the book. The first is a portrait gallery of most of the German persona listed in the book. The second is sixteen pages of photos taken of the troops during the actual operations described in the book.


 Some of the book is pretty eye-opening as far as the actual relations between the German Army and this SS-Panzerkorps. General der Panzertruppe Hermann Balck was the commander of the newly reconstituted 6th Armee. The IV SS-Panzerkorps, under Herbert Otto Gille, was subordinated to the 6th Armee for these operations. That there was no love lost between Gille and Balck is shown in several areas of the book along with Balck's actual disdain for the SS. On page 311, Gille is quoted as saying that his new deployment "smelled like a briefcase". This is in reference to the July 20th 1944 attempted assassination of Hitler. The book states that Gille believed Balck was actually trying to destroy his command in an act of treachery. This amazing piece of history is just one of the many that are found in the volume.


 This book, and the preceding volume, are exactly the kind of history that history buffs want to read. From the who, what, and when to the actual descriptions of the battles, these books are almost unparalleled. Thank you Casemate Publishers for letting me review this second volume of a planned trilogy on the IV SS-Panzerkorps. I cannot wait for volume III.

Robert


Book: From the Realm of a Dying Sun Volume II: The IV SS Panzerkorps in the Budapest Relief Efforts, December 1944-February 1945

Author: Douglas E. Nash Sr.

Publisher: Casemate Publishers

hpssims.com