second chance games

Search This Website of delight

Florenza X Anniversary edition is a reprint of a game I knew nothing about. I love games with unique themes and this one is the first game ...

Florenza X Anniversary Edition by Stefano Groppi Florenza X Anniversary Edition by Stefano Groppi

For your Wargamer, Toy soldier collector, MiniFig collector, military history nut. Reviews, interviews, Model Making, AARs and books!


Florenza X Anniversary edition is a reprint of a game I knew nothing about. I love games with unique themes and this one is the first game I’ve played about Italian renaissance art. What’s slightly ironic in a game that worships at the feet of the most iconic names in art is that its own artwork is a little on the bland and beige side. But you shouldn’t let this minor gripe put you off, there is a good game in here with a ridiculously tight economy.

Gameplay


The game pits you, as a patron of the arts in Florence commissioning paintings, sculptures and architecture. Prestige Points are earned for supporting and funding artworks and they ultimately decide who wins the game, most Prestige Points wins. All of that sounds, quite simple but I had a bear of a time trying to learn the game, I think partly due to the fact the rules never explicitly state that the squares across the boards are the artworks. It’s bloomin’ obvious now I’ve played it a handful of times, but I found the initial learning curve pretty steep and opaque. Not least because everything is written in quite arcane Italian - more on that later.


This is a competitive worker placement game for 1 to 5 players. Every piece of art (its name at least) and character card are part of true history and that is fantastic. I feel slightly cleverer...each time I finish a game of this. There are a bunch of different mechanisms and abilities that change each round that you’ll constantly be taxed trying to work out how to afford Bernino to sculpt the Cupola of the Duomo…(confused? Shame on you for not having any archaic Italian language skills...)

The unique selling point of this ‘medieval euro worker placement’ (do we not have enough of those yet?) is that you place your workers out to action spaces, sometimes to collect resources and sometimes to spend them but you don’t actually resolve the action spaces until a later phase Trying to keep a handle on the cost of what you’re planning on building, in an even later phase, and placing your workers in order to meet those requirements, in an earlier phase, sounds simple when written down but is actually a memory game like no other.


Your best-laid plans can quickly and purposefully be derailed by other players as well. If I plan on building a particular piece of art I should make damn certain that I’ll have the necessary resources to build it otherwise I’ll lose prestige points. However, if you place your workers out to get the resources first another player could usurp you on that artwork and you’re left either with an inferior piece or not being able to build at all. There are some deliciously brutal moves you can inflict on your opponents and I love that in any game.

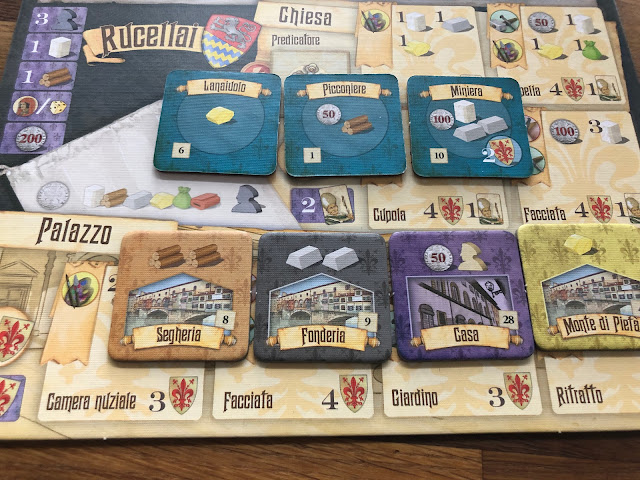
In order to build a piece of art, you’ll have to hire an artist and give them the necessary resources to complete it. There are 5 main resources in this game Marble, Wood, Cloth, Stone, Gold and ‘the green one’. It supposedly Spice but I can’t figure out what that was used for in renaissance art and it looks more like a paint pot to me. There are 7 rounds in which you’ll be building workshops (to get your ‘engine’ going, collecting resources from income or workshops you’ve built (which ultimately let you either build more workshops and complete pieces of art), hiring artists (which provide bonus Prestige), paying alms to the church, working with merchants of Florence (called Captains of Fortune), becoming a captain of the people or a Bishop yourself or even a Cardinal or simply trading at the market or running your business. ‘Phew’...


As you can see there’s a lot going on. For a newcomer to the game (i.e. me), the amount of archaic Italian on the board and cards was a bit of a stumbling block to understanding and learning the game. I’ve got no idea what a ‘Rione’ is or what a Boscaludolo does, and you’ll not find any English guides to help you. What I didn’t realise until my second game is that the text really doesn’t matter, initially it was a stumbling block but by my third play I was appreciating the Italian flare and I’m glad that the designer purposefully retained the language throughout the game to ‘enhance the atmosphere and immersiveness of the playing experience’.

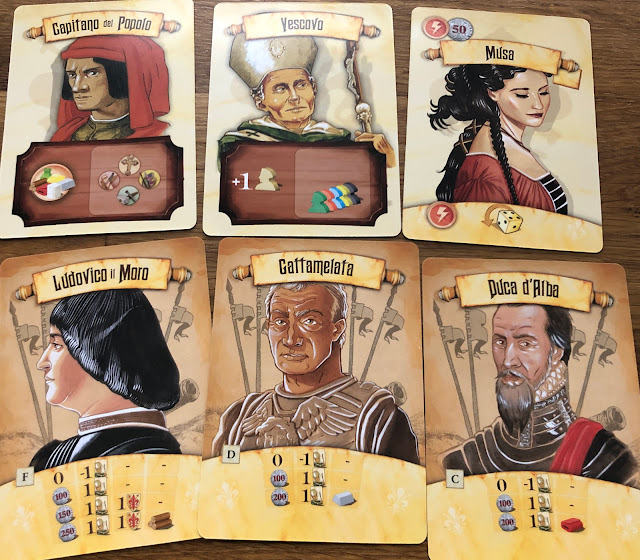
There are 8 phases each round and the player order is variable based on who was farthest on the Prestige Points track. However, this is definitely not a case of a runaway leader as each time you become the first player (i.e. take the Captain of the People card) you’ll reset your Prestige marker back to 0 and collect that many Prestige points as tokens instead. This was a clever mechanism to move the first player marker around the table not just randomly but also based on skill. It is certainly possible to manufacture a couple of game turns where you stay as 1st player.


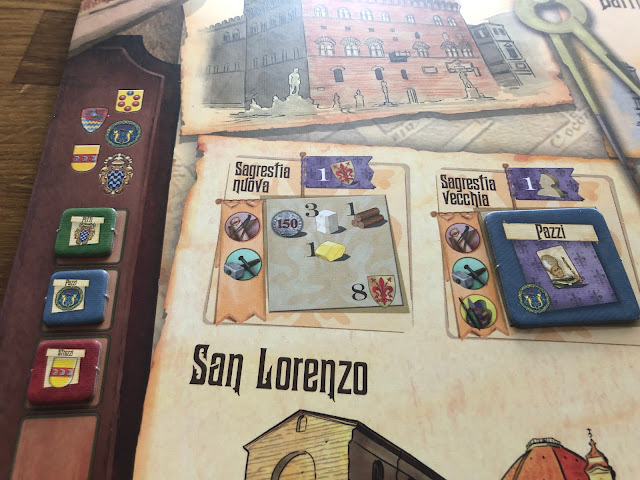
The second player is determined by the Church Influence track - which works very similarly to Prestige and awards the leading player with becoming a bishop for the next round. If you’re ever elected Bishop twice in a row you’ll become a cardinal and although the rule book says that that has lots of bonus points I’ve never seen that happen. The third, fourth and fifth player orders is based solely on their position on the Prestige track. I like variable player orders and this feels a bit more tactical (i.e. I prefer it) to the typical action space that takes the first player marker - here it’s all based on your accumulated Prestige / Influence.

The ordering of the phases in the round, at first glance, seemed a little disjointed to me. It took a few games to really sink in and I was constantly looking in the rule book and flicking back and forth to find the correct interpretation. Unfortunately, the rulebook wasn’t as comprehensive as I would have liked. For example, the income phase is clearly marked on the game components with a purple colour. Nowhere in the rulebook (that I could) find is that explained. I spent the first 30 minutes of my learning game, wondering what the bizarre colouring on the workshops was. But I did feel a bit cleverer...when I worked it out.


Once the round order clicked, I appreciated the ordering of it, and the ordering is actually what makes this game so brain-burnery…(real word). Your workers are placed in Phase 4 and there can only ever be one worker per space. This is sequentially in player order. In Phase 5 you’ll resolve the actions in a specified order and/or trade in the market. Bearing in mind that you’ll have commissioned artists with their own inherent costs and art with their own resource requirements in Phase 4 and it isn’t until Phase 6 where you’ll actually complete that art...If you’re anything like me trying to mentally keep track of what my workers were going to do and how I was planning on funding that artwork should stave off, or induce a good level of dementia. I found it surprisingly difficult (in a good way) to plan and execute the plan without any mistakes.

Not being able to complete an artwork you’ve commissioned can lead to significant penalties. There are three main areas that you can build in, the Cathedral on the mainboard (or Duomo). Failing to build an artwork there will cost you 3 prestige points. The town of Florenza shows five other buildings on the mainboard. Miscalculations here will cost you 2 Prestige Points. Or you could build on your own player board where the penalty is only 1 Prestige Point for failing to build.


‘But surely that won’t happen', I hear you cry; it does and it will to you too. The economy is so tight that it is often the lack of just one resource ‘spice’ (!?) that prevents you from completing an artwork. You can’t just turn around and build one you can afford as your worker has to have chosen that artwork two phases earlier in order to build it. That, in essence, is the game of Florenza - a hybrid memory game with worker placement and a bit of tearing your remaining hair out because your opponents have just knee-capped you. And I loved it.

I certainly haven’t explored every nuance of this game and I’m not particularly good at it. For example, if you complete the four pieces in your own ‘Chiesa’ (anyone?) or the four in your ‘Palazzo’ (anyone?) you’ll get some bonus Prestige points each turn. However, by just completing one big artwork on the mainboard you can claim smaller but more easily achieved bonus points. I’ve never finished my board in 5 games. I like the fact that there are always some difficult decisions to be made, which are made harder by your opponents thinking exactly like you and nicking the spot you were eyeing up. This is particularly prevalent in the end game where many spots (i.e. art) on the mainboard have already been built, and you’re competing with lots more resources for far fewer spaces. Exactly how I like it.

Components


The components are all made from nice thick cardboard stock or wood and are all perfectly functional and easy to use. I particularly liked the likenesses of the artists and buildings on the cards and mainboard. I even recognised some of them…


There are also dedicated areas on the mainboard and your personal board to store resources which is quite a nice touch and necessary as this game will certainly eat up a lot of table space.

Criticisms


This game is crying out for a more comprehensive player aid. They include a workshop costs/benefit chart which I didn’t find overly helpful. But I did have to refer to the round order or a few common areas in the rulebook more times than I care to remember (and still do). My rule book is certainly looking a bit tired. A better player aid showing the round order and card powers would be far more useful, arguably it will probably take up a whole sheet of A4. For example, nowhere on the board does it mention the penalty cost for not completing a piece of art.


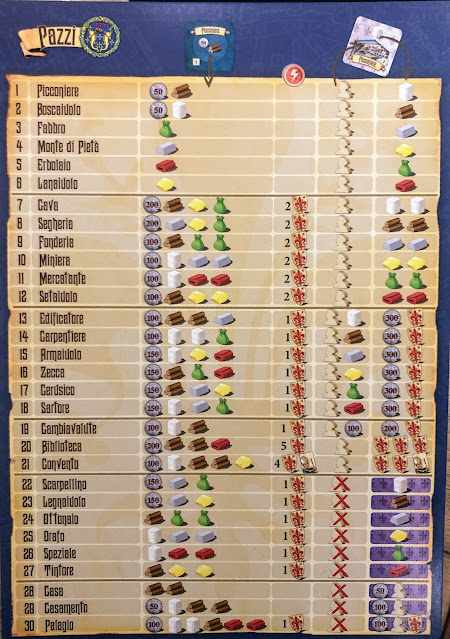
The biggest criticism I have is the set-up and pack-up time. It’s quite fiddly to do so and I’ve not been able to do it in under 15 minutes. You have to set out all of the available workshops (44 of them in approximately 20 stacks) and then draw 9 different artists from a deck matching the randomly drawn tiles; as well as all the other resources and cards to lay out. Thankfully the cards are all uniquely numbered and easy to identify, assuming you’ve packed the 40 cards away in numerical order.

I’ve played this solo and with three players and I don’t think I’d want to try a five-player game. Towards the end or even the middle of the game, you’ll have 8 kinsmen which will need careful consideration to place and resolve. This was an okay length of time in a 3 player teaching game but I wouldn’t want to teach this at any higher player count. I would only endorse this at 5 players if everyone had played before otherwise, it’s at risk of outstaying its welcome.


Conclusion


I had zero expectations or knowledge of this and it’s turned into a bit of a sleeper hit for me. It’s got a fairly unique theme and looks quite distinctive and not many people have heard of it, I find myself drawn to it more and more. I feel it certainly deserves more attention and is easily the equal of some of the most revered games in the hobby. I would recommend this to any seasoned gamer as a competitive and rewarding experience.

I’d like to thank Asmodee UK for sending this review copy. You can use this link https://www.asmodee.co.uk/contentpage/find-your-game-store to find your Friendly Local Game Store, which need all the help they can get at the moment.

Designers: Steffano Groppi
Bgg page: https://boardgamegeek.com/boardgame/311464/florenza-x-anniversary-edition
Playtime: 90 - 180 mins
Players: 1-5

  Bloody Hell Operation Goodwood: July 18-20, 1944 Operation Spring: July 25-26, 1944 by High Flying Dice Games     Depending upon what book...

Bloody Hell by High Flying Dice Games Bloody Hell by High Flying Dice Games

For your Wargamer, Toy soldier collector, MiniFig collector, military history nut. Reviews, interviews, Model Making, AARs and books!


 Bloody Hell


Operation Goodwood: July 18-20, 1944

Operation Spring: July 25-26, 1944


by


High Flying Dice Games


  Depending upon what book you read, and if it was written by an Englishman or not, the battle to take Caen is represented very differently. Field Marshal Montgomery always stated that his part of Operation Overlord (D-Day) went exactly to his plan. He states that it was the plan all along to draw the SS and other strong German units against his troops and that he would be the anvil and the Americans the hammer. Some books follow this lead. However, most state that Caen was to be taken the first day or shortly thereafter. That Monty's 'slows' stuck the Allies in Normandy for almost two months of desperate fighting. Regardless of the plan, Monty's English and Commonwealth Army was forced to try again and again to crack the tough nut of Caen. High Flying Dice Games gives us a chance to fight two of these battles on our tables. I have always been fascinated by Operation Goodwood, so hopefully this is an extra treat for me. Bloody Hell is one game in HFG's Professional Editions line of games. 


 These are the Designer Notes for the Operation Goodwood Scenario:

"Operation Goodwood

At first we seemed to advance quite rapidly, then suddenly, my tank ground to a halt as did all the others I could see...other tanks I could see were all stationary and several were beginning to brew. There were no targets. Nothing intelligible was coming over the radio. I watched through the periscope, fascinated as though it was a film I was seeing.

--Corporal Ronald Cox of the 2nd Fife and Forfar Yeomanry, July 18th.

This game on Operation Goodwood grew out of the interest and enjoyment I had in developing the companion game about Operation Spring, the Canadian offensive on Verrieres Ridge on July 25th, 1944. Montgomery’s massive onslaught against what was thought to be a severely beaten and depleted enemy was meant to be an unstoppable, irresistible offensive that would finally break the Allies out of the Normandy beachhead. That it instead ran into an un-moveable defense, planned earlier by Field Marshal Rommel, made for a ruinous fight that seriously damaged subsequent British offensives in the war. Nearly 2/3rds of the British tanks committed were destroyed in the two-day fight.

The Germans also suffered heavy losses in keeping control of their defensive positions. While many of Montgomery’s supporters pointed out that Goodwood seriously eroded the Germans’ capabilities to resist the Americans’ Operation Cobra offensive a week later, the cost to Great Britain was severe. That the Allied soldiers came close to winning a dramatic victory ahead of the Americans is a testament to the ferocity and courage both sides brought to this battlefield.

Allied Player

You have a massive armored host, but will have to move quickly and aggressively to win this battle. How you fight your infantry, air and few artillery assets will be crucial, as the tanks, despite their numbers, may not have the capability to punch through on their own. Be careful of how many reinforcements you call upon, as the cost in VP to bring them in early may create a deficit you can’t undo. Make the most of the opportunities you get and you may just end up on the road to Paris.

German Player

At the start of the game you may very well understand how Colonel Luck felt. However, time is on your side, and you have a range of weapons with which to fight, if your opponent, and the fates, grants you the time to bring them to the front. You will have many tough calls, and may not have the luxury of redeploying units once engaged if the dreaded jabos (fighter bombers) show up repeatedly. As Colonel Luck pointed out to the commander of the flak batteries defending Bourguebus, by the end of day you may be dead or a hero. Your actions will, for the most part, determine which applies."


 When the designer has done so well, and succinctly written up about the history and each player's role in the game it makes no sense for me to try and outdo it.


Let us see what comes with the game:

Game Design: Paul Rohrbaugh

Graphics Design: Bruce Yearian


Two,  17" x 22" maps

280 die cut, double sided unit counters and markers

One, Player Aid Card: Terrain Chart & Combat Results Table

Random Events Chart

Designer Notes & Bibliography

One Page of Addenda

Game Record Track 

8 page rule book


 We will look at the components now. The maps are your typical wargame maps with not too much flair about them. The terrain is easily distinguishable, and the hex numbers are easy to read. I guess maps are very much in the eye of the beholder, but I have no issue with them. The counters are normal size at 1/2". This makes them somewhat hard to read for those of us of advanced years. However, you always have to keep in mind the map footprint when talking about larger counters. Even if you are playing the two map campaign the game's footprint is small. This really helps with grognards who only have a limited amount of space. So, the counters are no smaller than many others that we play with. The tank and and jagdpanzer units have a silhouette of each kind on their counters. There are also counters for minefields, entrenchments, and smoke. As stated, the Rulebook has only eight pages of rules, followed by four pages of setup information. The Rulebook is in black and white, and does not come with any examples of play. These should really not be needed for a grognard, and this is not really a game that I would use to introduce a newbie to the hobby. The Player's Aid and all of the charts are pretty much self-explanatory. These are all in black and white, except for the terrain chart (naturally). The game components all pass muster. This is not a game where you will look at it and go Ooh and Ah, but it is all completely serviceable.


 This is the Sequence of Play:

Weather and Random Event Determination Phase

Air Phase - Allied Only

Initiative Determination Phase - Starts on Game Turn Two

Operations Phase - Chit Pull of Formations Activation Marker

End Phase


 The game is really not your typical folio game. It comes with two different operations that you can play (Goodwood, Spring), and it also has a campaign game of playing through both operations. There are not too many games at all on this level about Operation Goodwood, and none that I know of about Operation Spring. The life and death struggle for Caen, by the British and Commonwealth soldiers on one side and the Germans on the other, has had many excellent books and articles written about it. With this game it is much easier to understand the history of the battles, and why things happened the way they did. I find the game to be very enjoyable, and spot on as far as following history. Playing as the British you are going to find exactly how large of a can opener you are going to need to pry the Germans out of their defenses. As the German player, you will realize exactly what it was like to try and stem the tide with always diminishing resources.


Close up of some German Units


 As mentioned, the game has a small footprint, which is great when you do not want to play a monster, or do not have the room. The game comes with lots of chrome also. These are the Random Events:


Wittman Strikes - If the 1/101st Panzer is in play, you can get a second die roll

Allied Snafu - Remove one Allied Formation Activation Marker, and -1 to the Allied Initiative Die Roll

German Snafu - Same for Germans

Auftragstaktik - One German Formations Undisrupted Units can Activate for a Second Time

Oh Canada! or, For King and Counter - Same as Auftragstaktik for the Allied Player


 On the Addenda sheet there is also a variant that you can try out. According to the designer it is a bit  of a "what if" in his mind. The Allied player, to simulate more planning and cohesion on the Allied side, is allowed to activate the 2nd Canadian Armored Brigade with either the 2nd or 3rd Canadian infantry Divisions. This would be instead of activating on its own.


Allied Units


  I am very impressed with my first High Flying Dice Games. Thank you very much High Flying Dice Games for letting me review this. I am also going to be reviewing two more of their games, which look very interesting. These are the two:


A Test of Mettle - Three Battles From the Allied Campaign in the Lorraine: Tough Hombres - Battle of Mairy, Revanche! - Battle of Dompaire, Patton's Finest  - Battle of Arracourt.


September's Eagles - The Thompson Trophy Air Races 1929-1939

Name me another game where you can fly as Howard Hughes, or fly Gee Bee Racers!


You can also get boxed editions of all of their games.


Robert 

High Flying Dice Games:

High Flying Dice Games, LLC: From the Filing Cabinet to the Game Table (hfdgames.com)

Bloody Hell:

Bloody Hell Information (hfdgames.com)

 300: EARTH & WATER from NUTS PUBLISHING Cliche warning - good things come in small packages! This latest release from Nuts Publishing c...

300 EARTH & WATER 300 EARTH & WATER

For your Wargamer, Toy soldier collector, MiniFig collector, military history nut. Reviews, interviews, Model Making, AARs and books!

 300:EARTH & WATER

from

NUTS PUBLISHING


Cliche warning - good things come in small packages!

This latest release from Nuts Publishing covers the Graeco-Persian wars.  Think Darius and Xerxes, Marathon and Thermopylae - and for many the latter battle probably instantly brings up the number 300 and the gore splattered slo-mo film of that name and, of course, the title of this game.

Striking as the film was for its visuals, so equally striking is the all out effort to package this small game in splendour - thankfully without additional blood!  At first sight, it looks identical to the size of so many of the former VPG boxes - but no plain cardboard box with a coloured sleeve here.  Instead it is a very solid box with a fold-over lid, with a magnetic flap that automatically closes into place.  When opened up, two artistic evocative scenes are printed on the inside.  


The map, though small, is a mounted four panel fold out.


The design is elegant in its simplicity, while given a strong touch of colour from the opposing images of leading figures from this mighty conflict.  Nor are they just a matter of attractive decoration.  Each corresponds to a significant moment from the wars on one of the Event cards [usually a death!], play of which will lead to an army unit being permanently removed from the game  to be placed on the historical personage's picture.

A close up of the three Greek figures
This quality is matched in the rule book.  Again small in size, but crammed with a wealth of colourful vivid illustrative examples of play.  Indeed the only spartan [pun intended] items are the Event cards which provide only text with no pictures!

Similar to many CDG games, most have dual texts applicable to whether it is the Greek or Persian player using it.  

As mentioned, the rule  book is a slim item printed on smooth glossy paper edged at the top and bottom with a golden border.  The text is set out in two clear columns and every step is clearly illustrated and reinforced with pictorial examples.

Even the boxes of text within the examples are colour-coded to which side, Greek or Persian, that they refer.  These rules in a mere 12 pages are a model of clarity, taking you through the stages of the game in the exact order of play. It even manages to include at the end brief explanations of the historical events and personages on each Event card and finally rounds off with a potted history of the Graeco-Persian wars!! 

So, looks good, reads well -  but how does it play?  Well, I can happily say that the crucial core has all the elegance of its exterior qualities.  It is a highly abstracted treatment, executed with a small number of cubes for military units and an even smaller number of discs for naval units.

All the wooden components and a neat set of dice

The game in its box takes up minimum space and can be set up in about a minute and here is everything set up ready to play, easily accommodated on my portable playing area.   

The game plays out over 5 Campaigns [the maximum 5 turns of the game], but if the Event card, Sudden Death of the Great King, is drawn by the Persian player then the Campaign is over!  Consequently, I have had several games where only three Campaign turns were played which does produce a very, very short game.  

If you want, this can easily be house-ruled to make sure you get more game play.  However I'd strongly discourage you from rushing off to follow this increasing tendency to tamper with games, especially as this seems to happen after barely one play!!  This is all part of the design and presents the Persian player with an immediate pause for thought.  Each Campaign begins with a Preparation Phase when new units and new cards can be purchased.   The maximum a player can buy is 6 cards and each card can be used only for either its Event or a single activation of units.  

For me, when playing as the Persian, the pressure of time is at the heart of the game.  Do I go for maximum card buy and maximum risk of ending the Campaign?  Do I take fewer, but then have fewer opportunities for Activation or Event Play?  

This is also part of the highly asymmetrical styles of the two sides that starts with the fact that the Persian player has 12 purchase points to the Greeks 6 points.  The Persian has far more land units and one more naval as potential purchases, but they have the burden of attack and that pressure of time I've highlighted.  Their supply problems I've generally found to be greater too.  

It is a game of cat and mouse.  The Persian player can build, and I would say must build, the famous bridge of boats across the Hellespont - represented by a nice brown, thin, wooden oblong.  Rules cover ports, naval transport and land and sea combat.  It is the overwhelming force  against the resolute little defender, metaphorically David against Goliath... and that little Greek defender surely can win, as the end of one of my games shows below!


If either side controls both of their opponent's Major Cities at the end of a Campaign, then it's an automatic victory.  Otherwise the player who has accumulated the most control points over the five campaigns wins. 

So, it's immediately eye-catching, elegant, easy to grasp and quick to play and immensely tense and playable.  Face to face play is absolutely what it is designed for, though I intend using one of the enthusiast- produced systems for soloing CDG games for added plays.

So many thanks to Nuts Publishing for providing me with this review copy of a pocket gem!

25 euros
£17.95
$22.99

FOR GLORY FROM SPIELCRAFT GAMES FOR GLORY TO RETURN Just an announcement to keep alert for a new launch later this year of a great deck bui...

FOR GLORY FOR GLORY

For your Wargamer, Toy soldier collector, MiniFig collector, military history nut. Reviews, interviews, Model Making, AARs and books!

FOR GLORY


FROM

SPIELCRAFT GAMES


FOR GLORY TO RETURN

Just an announcement to keep alert for a new launch later this year of a great deck builder that appeared in the States last year.  Here's your chance to run a gladiatorial school all in preparation for that final showdown in the arena.  Be a colossus in the colosseum!

Here's a sneak peak at the game set up


LOOK FORWARD TO AN IN-DEPTH REVIEW HERE WITH THE KICKSTARTER LAUNCH

  Rostov '41 Race to the Don by Multi-Man Publishing, The Gamers  Field Marshal von Rundstedt, in command of Army Group South, had the t...

Rostov '41 Race to the Don by Multi-Man Publishing, The Gamers Rostov '41 Race to the Don by Multi-Man Publishing, The Gamers

For your Wargamer, Toy soldier collector, MiniFig collector, military history nut. Reviews, interviews, Model Making, AARs and books!


 Rostov '41


Race to the Don


by


Multi-Man Publishing, The Gamers


 Field Marshal von Rundstedt, in command of Army Group South, had the toughest assignment of the three Army groups in Operation Barbarossa. To Hitler he also had the most important assignment. Army Group South was supposed to capture the Ukraine and especially the Donbass. Then it was to capture the Soviet oilfields in the Caucasus. It didn't help that the Soviets that were fighting Army Group South were the most numerous and best equipped German opponents at the time of the attack: June 22nd,1941. The actual 'largest tank battle in WWII' had taken place at Dubno early in the campaign for Southern Russia. 

 The game comes with:

Standard Combat Series (SCS) rulebook (version 1.8)

Rostov ‘41 game-specific rulebook

One full color 22" x 34" map

280 counters

4 Scenarios

Box and dice


 This is the first part of the SCS Rulebook. It not only explains the games, but informs you on how to treat your opponent if need be:

"This series was designed for two reasons. First, it was meant to offset our other series which, by an order of magnitude, are much more complicated than the SCS. Second, it was designed to be a basic—read FUN—game which can be played at times when the others seem like too much of a good thing. These games are made for the “break out the beer and pretzels, and here we go” type of evening. While none of our games are designed with the beginner as their raison d’être, the SCS was designed as something the beginner would be able to was designed as something the beginner would be able to handle—as opposed to being devoured by. 

 I want to make the reasons behind a few things in this series known. First of all is our standard rounding rule. I have been forever pained by the “11 to 6? Oh, I’m so sorry, that’s only a 1 to 1 attack.” More importantly, watching players scrounge the map looking for a strength point or two to “make the odds break” is downright embarrassing. By making the “table break” happen at the 1/2 value, I hope to make players spend less time pre-calculating and more time just shooting from the hip. Its the shoot from the hip gun fight that is fun in wargaming, not the ravings of the accountant gone mad looking for each individual strength point. If your opponent starts to pre-calculate combats in this system (even after making it tougher on him), feel free to slap him silly! Sure, he can start scrounging for enough points to make that last 0.5, but only if you let him dodge around the Fog of War rule!"


 The map is fully functional and utilitarian in look. This is keeping with the whole SCS series. The games were meant to be easy to play and simple to figure out. It also helps that the terrain in the area is mostly steppe. The counters complement the map. They are 1/2" in size, and use the standard NATO symbols. The symbols are a bit small, but the numbers are easy to read.  The counters are the regulation Soviet brown and German gray and black (SS). Both of the Rulebooks are in black & white. The Series Rulebook is only eight pages long, while the Rostov '41Rulebook is also eight pages long. However, only three pages are for the actual Rostov '41 rules and the next four are the setup instructions for the four scenarios/campaign. The last page has the Terrain Effects Chart and the Combat Table Chart. All of the components match the style and price of the games in the SCS series.  


 You can play these four scenarios:

Fritz on the Don (Campaign), 14 Turns

Fritz on the Mius, 4 turns

Fritz Grabs Rostov, 7 turns

Soviet Counterpunch, 4 turns


 This is the Sequence of Play:

Initiative Player Turn

Reinforcement Phase
German Barrage Phase
Movement Phase
Barrage Phase
Combat Phase
Exploitation Phase
Supply Phase
Clean Up Phase

Non-Initiative Player Turn
The non-Initiative Player now repeats
the steps in order above.

Turn End
Advance to the next turn or end the game
if last turn of scenario.


There are also rules for:

Zones of Control
Stacking
Reinforcements
Retreats
Terrain Effects
Unit Reconstruction
Disorganized Units (DG)

 The game plays as a free-wheeling affair. It is a standard size map, but the counter density is extremely low. The Series Rule that does not allow for your opponent to inspect your stack is a nice touch for some Fog-of-war. The Standard Combat Series was the brain-child of Dean Essig, and there are now over twenty games in the series. Rostov '41 was designed by Ray Weiss. The rules have no ambiguity in them at all. They are a model of rules for wargames, in both their being easy to understand, and their terseness. The Barrage rules (both Artillery and Air Strikes), are some of the most interesting ones in the game. The Soviet player can only use a barrage during the Barrage Phase. The German player can use his artillery in the German Barrage phase and the Barrage Phase. The German Air Strikes can be carries out in either Barrage Phase, but also in the Movement or Exploitation Phase. The German players' Air Strikes take precedent over anything else. This means that if the Soviet player is going to conduct a Barrage or Movement, the German player can interrupt him and use an Air Strike before the Soviet player makes his move or Barrage. The roll for Initiative decides how many Air Strikes each player has each turn. Each player rolls a six sided die (+1 to the Germans in a clear weather turn), and this decides who has the Initiative, The difference between each side's die roll is the number of Air Strikes the player with initiative receives.

 The game plays just like in any other Eastern Front game in 1941-42. The Soviet player must decide when to hold 'em, and when to fold 'em. He must try and stop the German motorized troops from shredding and then encircling his front. Some cardboard sacrifices will have to be made. The German player does not have time on his side. First the Rasputitsa (mud season), and then the winter will throw a monkey wrench into his plans. The campaign game has only fourteen turns for the German player to take as many Victory Hexes as possible. He needs at least twenty-two+ to get a Decisive Victory. In this game the five hexes of Rostov are worth fifteen points, so the German player does not have to occupy too many others. However, leaving supplied Soviet forces behind him will cost him dearly in taken away Victory Points. 

 In summary, this is a great game with excellent rules. Thank you multi-Man Publishing for letting me review this game. I have a few other games in the Standard Combat Series that I have not given the time they deserve judging by Rostov '41.

 Robert


Rostov '41 Race to the Don:


Other Multi-Man Publishing reviews.

Monty's Gamble: Market Garden review:

Monty's Gamble: Market Garden by Multi-Man Publishing - A Wargamers Needful Things

Last Stand: The battle for Moscow 1941-42 review:

The Last Stand : The Battle for Moscow 1941-42 by Multi-Man Publishing - A Wargamers Needful Things

Baptism by Fire review:

Baptism by Fire by Multi-Man Publishing - A Wargamers Needful Things


  St-Lo: Normandy 1944 The Breakout Begins by War Drum Games & Quarterdeck International  Once again with a wargame, I find my history s...

St-Lo: Normandy 1944 The Breakout Begins by War Drum Games & Quarterdeck International St-Lo: Normandy 1944 The Breakout Begins by War Drum Games & Quarterdeck International

For your Wargamer, Toy soldier collector, MiniFig collector, military history nut. Reviews, interviews, Model Making, AARs and books!


 St-Lo: Normandy 1944 The Breakout Begins


by


War Drum Games & Quarterdeck International


 Once again with a wargame, I find my history synapses at a loss. I was always more interested in the fighting for Caen during the Normandy Campaign. Oh, I have played many tactical battles about the American Hedgerow Campaign, but I have to admit I only know the history of the actual American breakout and and end run at a cursory level. This is, however, a very good thing. I would be very surprised if many grognards are not like me in this aspect. We acquire or get ready to play a game about a period or campaign that our knowledge is not up to snuff on. Then we grab every resource we can get our hands on to read up on it. This does not mean that we watch certain TV channels about it. One of them is a fanciful landing spot for aliens. The other should change its name to the Nazi memorabilia channel, but I digress. This is one of the salient points about wargames, even if we do not play them. They give us a chance to see exactly what the forces of both sides were faced with at the moment. In truth though, a wargame is a game/simulation and was meant to be played. So let us see how St. Lo measures up on both the game and historical levels. This is what comes with the game:

One 22" x 34" Mounted Map
400 die-cut playing pieces
One US Division Display Sheet
One US Artillery Display Sheet
One German Division Display Sheet
One German Artillery Display Sheet
Rules Book
Charts and Tables
One six-sided die


 The first thing we have to describe is the map. It is mounted, but that just tells half the story. It seems to be twice the thickness of other mounted maps. It will be able to deal with years of gaming. The terrain on the map is mostly the same. This is not the map's fault. This is hedgerow hell. There are a few villages throughout the map, but the most important features are the higher terrain. The higher terrain allows either side to use its artillery. The colors of the map fit the area nicely. The counters are large at 9/16" and come pre-rounded. So, you counter clippers can have a break with these. The Rule Book is twenty-eight pages long. All of the headings for the rules 1.0 or 5.0 etc. have excellent little historical reports and information at the start of them. For the history lover these little blurbs are worth the cost of the game alone. The Rule Book is in full color. It also comes with examples of play. The six Player Aid sheets are laminated. This is a great touch. I do not let food or anything near my games, but some people like to live life dangerously. The information on the sheets are pretty much self-explanatory. All of the Player Aid sheets are in English. The game pieces have been manufactured to the highest standard. 


The English version of the game is in full English


 The Sequence of Play is:

Weather Phase
Reinforcement Phase
Initiative Phase
Asset Phase (Does not take place on Turn 1)
Operations Phase
Recovery Phase
Artillery Rally Phase
Headquarters Phase


 The Player Notes and Historical notes are both well worth the read. The Player Notes start out as this for both sides:

German

 "You must except that the Americans assault will push you back. But remember, the American victory objectives are far behind your initial line., and the victory conditions require only that you hold those objectives for eight days. So you must plan to trade space for time. Back up and build strongholds. and cause the Americans as much frustration as you can. The game system offers you a number of subtle ways to do so."

American

"Tactically, try to drive deep and fragment the German Line. Your artillery, if it has good observation can be a shocking deadly weapon against retreating German units. Beware of letting small German units slip behind your lines. Usually, the best attack procedure is first to pin or disrupt the defender with barrage fire, and then to hit him with a deliberate or intensive attack. If you have achieved a high combat ratio, you can save time and also surprise the German player by omitting the barrage."

 The game is full of tactical flavor and rules representing:

Barrage Fire
Hasty attack
Engineers
Headquarters
Pin
Rally
Recon (US)
Entrenching
Zones of Control

 The game is different than most other wargames on this scale, especially in the way that it handles Assets.


 The game play for both sides is as historic as it comes. The high ground on the map (which there isn't much of), becomes the main area of fighting between the Germans and the Americans. The high ground in this game, like reality, means that you can see the enemy and use your artillery and other assets against the enemy. Historically the American artillery was its premier force in WWII. It was able to rain death and destruction upon the Axis forces whenever given the chance. The Germans in the game are as usual for 1944-45 goal is to hang on longer than they did in reality. Playing as the Germans, you will be ground down turn after turn. You will need to play the game like you are playing Poker and know when to cut and run. The American forces will grind you down. Playing as the Americans, do exactly as was done in 1944 in this battle. Use your artillery to smash the Germans into a pulp, instead of charging headlong and losing your infantry in a blood bath. Playing as the Americans, you only have eight turns to win the game. There are no German Victory Points. Victory is determined by how many Victory Points the American player can amass. The American player gets eight points for having a unit with a line of supply in one of the St-Lo hexes. He must also try to capture as many German Depot hexes on the East side of the map as he can. Three of the Depot hexes are on the map edge one or two hexes from St-Lo, and are worth two points apiece. The others are spread out over the map, and are worth one point  apiece. In the games that I have played, victory has come down to the wire. Twenty-one or higher points means a Decisive US victory. Eight to ten points gives you a marginal German victory. The German player has to fight like Jersey Joe Walcott. Always retreat, but make the other player pay for each hex, and hit back hard when the opportunity arises.


 In summary, this is an absolutely great game that plays very historically, and the components are first rate. Thank you very much Quarterdeck International for letting me review this game. Apparently, Compass Games is now selling St-Lo instead of Quarterdeck International. Please check out the other many fine products on QI's site. They carry a great assortment of hard to find European and Asian wargames. Also look at the great line of games that Compass Games is now selling.

Robert

Quarterdeck International:

Compass Games:

St-Lo: Normandy 1944 The Breakout Begins:


  The Black Prince and the Capture of a King Poitiers 1356 by Marilyn Livingstone & Morgen Witzel   This book continues the trend in Cas...

The Black Prince and the Capture of a King Poitiers 1356 by Marilyn Livingstone & Morgen Witzel The Black Prince and the Capture of a King Poitiers 1356 by Marilyn Livingstone & Morgen Witzel

For your Wargamer, Toy soldier collector, MiniFig collector, military history nut. Reviews, interviews, Model Making, AARs and books!


 The Black Prince and the Capture of a King Poitiers 1356


by


Marilyn Livingstone & Morgen Witzel


 This book continues the trend in Casemate Publications that I have mentioned before. To whit, never go by their titles. You would think that a book with a battle in its name would give you a little history before the battle and then end with the battle. This book actually gives the history of the entire Hundred Years War up to the Battle of Poitiers. It also gives a day by day journal of each day during the campaign. Then it finishes up with some of the events that happened after the battle. How the authors managed to get all of this in only 200 pages is pretty amazing. Because of the above, do not think that the history of the actual battle was given short shrift. The battle and the failed negotiations before it are gone into detail.


  I have never been much of a fan of the 'Black Prince'. I have always delved into the Hundred Years War before and after him. Because of this book I am now much more informed about his exploits and why he was considered a great general. Contrary to the usual history about the French, this book shows that they realized they had to come up with a plan to beat the English long bowmen. They didn't just haphazardly charge at the first Englishmen they saw. The book also shows how some Scots, fresh from fighting the English, were high up in the French war councils. The authors show that the Black Prince was brought to bay, much like Henry V, by the French maneuvering. 


 This is an amazing book that gives the reader everything he would want to know about the battle and the campaign. Thank you Casemate Publishers for allowing me to review this wonderful history narrative.


Robert

Book: The Black Prince and the Capture of a King Poitiers 1356

Authors: Marilyn Livingstone & Morgen Witzel

Publisher: Casemate Publishers


 CARENTAN Great Battles of Small Units from STRATEGEMATA This is the most recent game from Strategemata in this splendid series of small sca...

CARENTAN CARENTAN

For your Wargamer, Toy soldier collector, MiniFig collector, military history nut. Reviews, interviews, Model Making, AARs and books!

 CARENTAN

Great Battles of Small Units

from

STRATEGEMATA


This is the most recent game from Strategemata in this splendid series of small scale engagements from WWII.  Previous games in this series featured Polish units[a link to my review exploring the system can be found at the end of this review], but inevitably Carentan is exclusively an American affair.  Even more than the first two, the focus homes in on an even smaller geographical area, resulting in a map that I find particularly interesting. 

In physical terms, the components remain the same adequate, but modest quality that I have commented on in my previous review of this series.  They are functional, but lack the gloss and glamour of the major companies.  Only the move to full colour box art and an artistic depiction of action and drama adds a brighter touch.

The contents are identical in every way - an approximately folio size map of predominantly green background, a brief eight page, plain paper rule book, including a substantial number of simple, minimal-looking, illustrative examples and  small thin counters.  Once again unit I.D. is in very small print and the important colour coding unfortunately uses too many similar shades of blue.  

At set up, these start out reasonably clear because of physical grouping, but as units become intermingled in the course of play I found that a good degree of care was needed to make sure that I didn't inadvertently activate the odd misassigned unit.
Plain eight page rule book

One of two counter sheets

Perhaps the strongest of the components are the card-based player aids, in particular the double-sided set-up display for the two scenarios.
 

The set-up display and turn track for the main scenario

I'd strongly recommend a look at my previous review of this system with its innovative elements - a link to which can be found here Black Cavalry.   If you do, you may wish to pass over the next section where I'll briefly recap the key features of the system and their defining originality.  

Most notable is the lack of any dice.  Instead you'll need to supply for yourself a standard pack of cards which are either drawn from the deck or played from your hand to resolve the various game functions.

Each player starts the game with a set number of cards in their hand and there will be very limited opportunities to replenish or exchange these cards as the game progresses.  I like this slight ability to control the outcome of a limited number of your chosen actions and the awkward decisions of which choices and when to take them.  

However, possibly the most important of your choices will be how many formations you decide to try to activate when you have the initiative. A single formation can be automatically activated for free, but a single formation rarely provides many units.  More than one formation means you'll have to pay for all, including the first one.  Activation costs also cover Artillery and Air Strikes.  

So, add up all your costs and draw a card - here's where a nice powerful 10 pt card in your hand may well tempt prompt use!
Fail to get a draw high enough to cover all your costs and you get none of them.  Push your luck takes on a whole new meaning.

This is one of my favourite features of this novel game system and it closely interacts with the next novel element.  In fact, this combination is the single strongest reason that I enjoy and value the game. Only the player with the current Initiative actively undertakes the turn.  The other player can only react.  This may happen in two ways.  

Initially, the first time an active unit moves into line of sight and fire range of an inactive unit, the player without the initiative may draw a card [no playing a card from your hand] to determine Defensive Fire.  The result from 0 - 3 will allow you to place a marker that shows how many fire attacks the unit may make this turn. Alternatively you may forego Defensive Fire and choose to wait until an enemy unit moves adjacent so that you can retreat one hex. 

The third major feature is the handling of Initiative, using the four card-suits, Hearts, Clubs, Diamonds and Spades and a chit for each suit, with the German and American flag on opposite sides.  An initial pre-game card draw, usually of 3 cards at the beginning of the game establishes a starting set.  In Carentan, the Allied side of each Initiative marker will be uppermost depending on which cards are drawn. So if the 3 cards drawn showed a club and two hearts cards, the Club and Heart markers would be set with the Allied flag uppermost and the Spade and Diamond markers would be set with the German flag uppermost.  

As the game progresses, whatever card is drawn at the beginning of a turn to determine who has the Initiative, its marker is flipped to the reverse side.  Following our example from above, if a Heart was drawn, the Allied player would have the Initiative for the turn and the Heart marker would be turned over to show the German flag. As a result, on the next turn the four markers would now show only the  Club's marker for the American player and the other three suits' markers would all show the German flag and so the initiative draw would be much more likely to favour the German player.

For the rest of this review, I shall concentrate on the specifics of the situation in Carentan.  The major scenario is named Purple Heart Lane and covers 10th - 12th June 1944. Obviously the first consideration is the particular geography of the battle, which can be seen below.

 This is a very different situation from those covered in previous games in the series and a two page historical sketch gives an excellent summation.  It covers the importance for both the Allies and the Germans, the geography of the area and the course of the battle for the town. To the north extensive marshland and canals  made approach extremely difficult and slow.  From the east, the avenue of attack is still limited, though less so.  The map scale is much smaller and in the very centre lies the objective of Carentan, with a damaged railway embankment running from west to east.

Defending the town and area is the best German unit available in that area, the 6th Fallschirmjager Regiment commanded by Friedrich von der Heydte [a name immediately familiar to anyone who has played any of the many games that cover the Battle of the Bulge!].

The very restricted terrain means that there is little room for manoeuvre, so each play-through offers little opportunity for variety of options.  It is a good, old-fashioned slugfest.  The Allies have to batter their way into Carentan and artillery is likely to play a more significant role than in previous games.  

The scenario plays out over 24 turns and I should also add that the American units that you can see are only the at-start units and the reinforcements that enter over the middle turns will more than double their final number.  Whereas this is all the Germans have to defend with, unless you add in the optional variant that may bring in up to 6 additional German units late in the game on turn 20!  It comes as no surprise that the Allied victory condition is to control all hexes of Carentan.  

However, the German victory condition isn't simply to prevent the American player from achieving their goal.  Specifically, the German player must control the road from Auverville on the south edge of the map to either of the two hexes where it enters into Carentan at 1111 or 1112.  I understand the historical logic of this, as it would have served the Germans little to hang on to a small portion of Carentan and not have a supply line/retreat avenue south.  However, it does make the German player's task even harder and makes me feel that at best the German might achieve a draw, which is the result if neither side manages to achieve their victory condition. 

For those who want a shorter playing experience, there is a scenario of 12 turns that covers the German counter attack.  The title for this one is Battle of Bloody Gulch [must admit this conjured up images of a John Wayne or Clint Eastwood Western shoot-out rather than a WWII battle!].  Here the Germans are on the attack with slightly fewer units than the Americans who also gain another six units very early in the scenario.  The layout can be seen below.

The only advantage the German player initially enjoys is that all the American units at the start of the this scenario are single step counters or on their last step.

Overall, though I miss the additional two, very brief scenarios of Black Cavalry, I really enjoyed the intensity of this head-on collision.  Counter density is slightly higher, but by comparison with the majority of hex and counter games, this is still a small game and this is emphasised by the essential design feature of activation which means that only a limited number of units will come into play in a given turn.  Above all, I recommend this fresh and innovative approach that is easy to learn and apply.  I certainly hope that further great  battles of small units will continue to appear.

Once more my thanks to Strategemata for their providing this review copy and their friendly commitment and support. 


hpssims.com