second chance games

Search This Website of delight

  Parma 1734 The Battle of Crocetta by Aleph Game Studio  The Eighteenth Century was as full of warfare as the preceding centuries in Europe...

Parma 1734: The Battle of Crocetta by Aleph Game Studio Parma 1734: The Battle of Crocetta by Aleph Game Studio

For your Wargamer, Toy soldier collector, MiniFig collector, military history nut. Reviews, interviews, Model Making, AARs and books!


 Parma 1734 The Battle of Crocetta


by


Aleph Game Studio


 The Eighteenth Century was as full of warfare as the preceding centuries in Europe. We mostly think of these two wars: The War of the Austrian Succession, and The Seven Years War, up until the Wars of the French Revolution. There were, however, quite a few wars that erupted, two of them being The War of Jenkin's Ear, and The War of the Polish Succession. The Battle of Crocetta was part of the War of the Polish Succession. It was fought near Parma on June 29th 1734, between the Austrian Army, and the Franco-Piedmontese Army. France and Austria had been fighting over Italy for hundreds of years and would continue until 1859. The French were originally commanded by Marshal Claude Louis Hector de Villars (of The War of the Spanish Succession fame), but he gave up the ghost on June 17th 1734. The French were then commanded by Marshals de Broglie, and Coigny. The Piedmontese were commanded by King Carlo Emanuele III of Savoy. The Austrians were commanded by Marshal Claudio Florimondo di Mercy, and Prince Federico Luigi of Wurttemberg-Winnetal. The battle was very hard fought, and both sides suffered higher than normal casualties given the amount of troops on the battlefield. The Austrians withdrew after the battle, giving the French a dubious victory. So, let us see what is in the box:


1 game map

3 countersheets

6 scenario cards

2 player aids

1 10-sided die

1 rulebook

Players: 2

Time: 2-5 hours


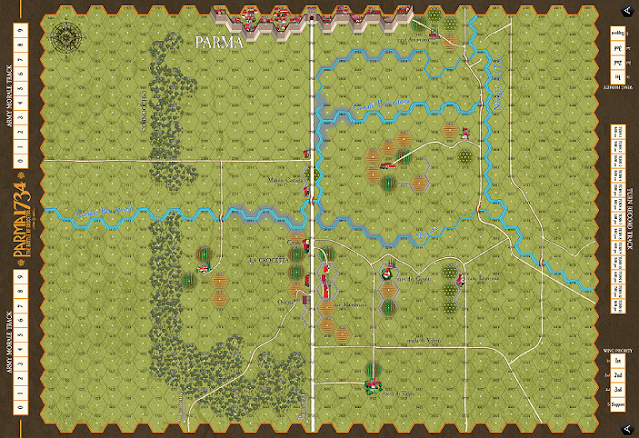
  The map is done very well with some really nice touches added for the buildings on it. There are no ambiguities about what a hex consists of etc. The counters are large at just under 3/4", and they also come pre-rounded. Each one has what is really a small artwork done it to differentiate between infantry, cavalry, artillery, and leaders. The Movement Allowance and all of the numbers on them are nice and big for old grognard eyes. There is one Player Aid for each player, so no need to share one. It has the Terrain Chart, Infantry Fire Table, Artillery Fire Table, Shock Combat Table, and the Sequence of Play on each. Their are six Players' Aid sheets for the setup of both scenarios. These are in full color, and instead of just a list of what counters go where it shows the actual counter full sized on the sheets. This is a really nice touch. All of the Players' Aids' are made of hard stock. The Rulebook is twenty-eight pages long. It is in full color, and uses large print throughout its pages. An altogether very well manufactured game.


 This is the Sequence of Play:


"1. Command Phase

During this phase the players organize their army.

Both players:

• simultaneously assign their Priorities of Order to

the Army for the current turn;

• check the status of the Troop Command;

• place reinforcements as indicated in the

Scenario Cards.

2. Opening Artillery Fire Phase

In this phase the players use their artillery

batteries. Players take turns firing one battery at

a time. The rules of the Scenario usually indicate

who is the first player of the phase, otherwise

each side rolls a die and whoever gets the

highest result will be the first. In the event of a tie,

both players roll the die until one of the two gets

a higher result than the other. The winner will

become the Active player and will activate his

first artillery battery.

3. Initiative Phase

In this phase is the players determine who will be

the Initiative Player. The players each roll a dice,

the player with highest result die roll is the

Initiative Player for the current turn, while the

other will be the Reactive Player. In the event of

a tie, both players roll the die until one of the two

gets a higher result than the other.

4. Wing Impulse Phase

In this phase, players take turns activating their

Wings, based on how they distributed the Order

Priorities during Phase 1.

This is the sequence that is carried out within this

phase:

a) Impulse of the Initiative Player (1st action):

the Initiative Player reveals and activates his

own Priority Wing in this sequence:

1. Movement of units

2. Activated units Fire Combat

3. Activated units Shock Combat

4. Mandatory moves caused by Shock

Combat

5. Advance after Shock Combat

b) b) Reactive Player Impulse (1st action): the

Reactive Player reveals and activates their

Priority Wing in this sequence:

1. Movement of units

2. Activated units Fire Combat

3. Activated units Shock Combat

4. Mandatory moves caused by Shock

Combat

5. Advance after Shock Combat

c) Other impulses: repeat the same sequence

as the previous impulses for the other Wings,

in order of priority assigned:

1. Initiative Player's Impulse (2nd flanking

action)

2. Reactive Player Impulse (2nd flanking

action)

3. Initiative Player's Impulse (3rd flanking

action)

4. Reactive Player Impulse (3rd flanking

action)

5. Impulse of the Initiative Player (support)

6. Reactive Player Impulse (support)

5. End of Turn Phase

During this phase, end of turn checks are

performed. In particular, this sequence must be

respected, starting with the Initiative player:

1) Check the Army morale (see 12.0);

2) Rally of units (see 13.0);

3) Remove 1st Shoot/1st Volley/Fired markers.

Finally, the Game Turn Marker is advanced."


 I wanted to include the full Sequence of Play so that the gamer sees that this game does not use a simple cut and paste set of rules from other games series. It is a deep game that tries, and succeeds, in simulating eighteenth century warfare. 


 The scenarios that come with the game are:


1. Tutorial: Clash Of The Vanguards (8-10 AM)

2. The Battle Of Crocetta 


 The game has unusual Victory Conditions as well. The designer understands that eighteenth century warfare was not usually a battle to the death, or even a battle to one side being routed. So, the game's intent is for each side to force the other to fall to 10% of its Initial Morale Value. This then forces the side that hits that percentage to order a General Withdrawal Order. These are the values etc. of the two sides:


French/Piedmontese Army:

Initial Value - 88

Demoralization  - 44

Withdrawal - 8

Austrian Army:

Initial Value - 96

Demoralization - 48

Withdrawal - 9


 Demoralization causes an army to suffer its movement capacity halved, leaders to lose 1 point of Command Range, and all Discipline checks suffer a +2 modifier to the die roll.


 Each separate regiment also has its own Regimental Breaking Point Value. This is a rule that is not often seen in games.


 This a breakdown of some of the chrome added into the game:


Infantry can be in either:

  Line

  Column

There are four different types of Cavalry:

  Heavy Cavalry

  Cuiraissers

  Dragoons

  Hussars

Artillery can be either:

  Limbered

  Fire Capable

Leaders have a Command Range


The designer knows that divisions were not used at this time in warfare, and battles were fought by 'Wings'.


 The game is a very taut see saw battle between two pretty evenly matched armies. The rules were designed to put the player into the shoes of a Marshal of the period. This means each player needs to learn the limitations of warfare at this period. The only thing missing from the rules are ones about sending dispatch riders out to your formations. Thank you Aleph Game Studio for letting me review this great and very interesting game from your stable. If a player is looking for a detailed engrossing game about eighteenth century battlefields they need look no further.


Robert


Aleph Game Studio:

Aleph Game Studio – A new beginning in gaming

Parma 1734: The Battle of Crocetta:

Parma 1734 – Aleph Game Studio

  FOR GLORY FROM SPIELCRAFT If you don't know your ludus from your lanista, you soon will after playing a game of For Glory and there&#...

FOR GLORY FOR GLORY

For your Wargamer, Toy soldier collector, MiniFig collector, military history nut. Reviews, interviews, Model Making, AARs and books!

 FOR GLORY
FROM
SPIELCRAFT

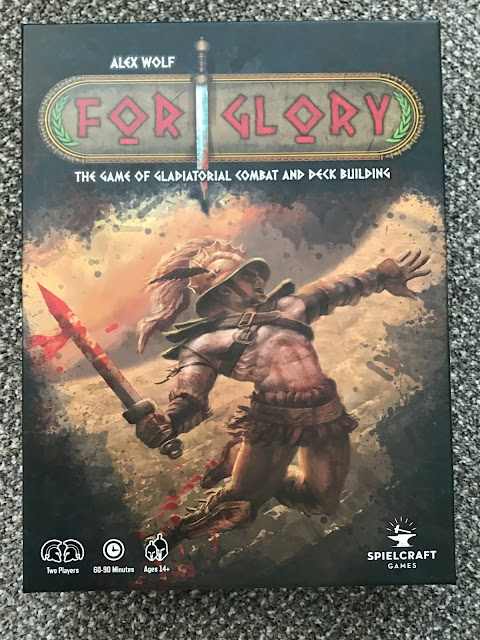
If you don't know your ludus from your lanista, you soon will after playing a game of For Glory and there's no doubt that the picture on the box is rather an obvious clue!

So, without further ado, here we are in Ancient Rome tasked with being an owner of a gladiatorial school and training up gladiators to fight in the arena.  The lanista - well that's your role in life - and ludus is your school, in this case a training establishment for gladiators.  It's a neat point that the other meaning for ludus is a game.

Now there have been quite a few games on the theme of gladiatorial combat from the super deluxe Hipplomachus to many, often minor publishings, some with figures included or just traditional cardboard counters, some with arena boards and some without.  All have taken us purely to the arena and the gladiators and the combat; many are quite simple encounters, a few have been relatively detailed affairs.  None, as far as I've been able to ascertain, have covered the ground that For Glory does.

For Glory presents us with a compact, deck-building treatment that can just about be squeezed onto my all-purpose gaming board.  In the picture you can see everything except the game box and rule book.

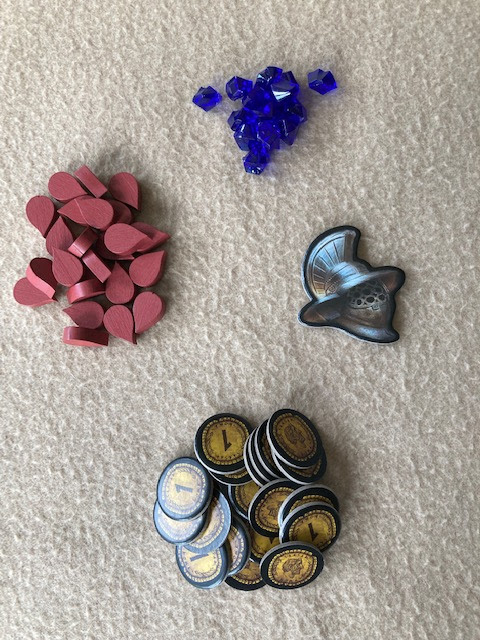
In essence, it is a quick-playing, two-player, deck-building game.  On the right, you can see the cardboard coins, blue glory tokens and the wooden, red wound markers.

In this close-up, you can also see the gladiator's helmet token which designates the 2nd player.  All the components are of very good quality and I particularly like the art work of the many different cards and its extensive use in the rule book itself.
The rules themselves are a player's delight.  They are thorough, exceptionally clear and very easy to follow.  This is both because they are well written as well as exhaustively illustrated and exemplified.  Each type of card has its own separate picture and explanation of how to read its symbols.  The fact that there is degree of repetition when a feature of one type of card mirrors that of another type should be a great asset to anyone new to deck-building.

For those familiar with this popular mechanic, it makes assimilating the information a swift and effortless process.  As a result after a couple of games, I found play rarely needed any reference to the rule book.  However, should you need to, there is a very handy alphabetical reference section at the back of the rule book, though there is no numbered index to the rules.

The  excellent, easily assimilated set of rules

In brief, a Round is divided into two Phases
     Machinations Phase
     Arena Phase
However, in many Rounds you will only play the Machinations Phase.  But to help understand the flow of the game, it's worth briefly explaining the table layout which is appropriately presented at the very start of the rule book.


On the left side are the three Supply Decks: Economy, Gladiator and Training.  These Decks are where you will buy the cards to develop your own personal playing deck.  On the right are all the necessary markers, while running down the centre is your playing area tableau, the three potential Arenas where your gladiators will fight and your opponent's playing area tableau.

Taking a closer look at the very heart of the game, we have the three Arenas.

The left and centre Arenas are called the Fleeting Glory Arenas and the one on the right is the Lasting Glory Arena.  The Lasting Glory Arena can always have gladiators placed there, but as soon as the first gladiator is placed at one of the Fleeting Glory Arenas, the other Fleeting Arena cannot have gladiators committed to it. Note carefully the blue Glory tokens on each Arena card as these are you vital reward for victory in the Arena.  They are also how you eventually win the game, as the first player to gain six of these tokens is the winner.
An important factor is that the Arena Phase does not take place every Round.  Instead there is a gradual build up.  Each gladiator card that is committed to an Arena has a Bloodlust value and an Arena Phase will only occur when the combined total of Bloodlust points reaches a set number.  The mechanics of this is an element I strongly enjoy in the game, especially as there are two important balancing constraints.  
One is that the check for whether an Arena Phase has been reached is only carried out after the 2nd player has taken their Machination Phase.  In other words, the first player can't suddenly pile in several gladiators to reach the required total without the second player being able to respond.  The other is that an Arena Phase begins with Late Registration - this allows each player to commit alternately one new gladiator at a time to an arena by paying three coins.
This produces a very satisfying uncertainty about when and which gladiators to commit  and adds a good potential for bluffing.  My advice is to watch carefully which gladiators your opponent acquires and which have been committed to the arenas.
However, before any combat can take place, you will have taken several Machination Phases and I can assure you that these Phases are just as absorbing and exciting as the fights!
Picture of combat in the arena taken from the rule book
For those who may just revel in the hack and slash of combat, perhaps this may not be the game for you.  But for those like me who want a more nuanced experience, the Machinations Phase is just the thing.  As with many deck-building mechanics both players begin with an identical deck of 14 cards containing 2 identical and rather limited gladiators and the rest are mainly coin cards.  Each Round, you will draw 7 cards and you will want to try to use all of them to maximum effect, as any unused cards are placed in your discard pile. 
Here is your starting deck of 14 cards

Initially, buying cards will predominate and what you can buy is handled very well, because there are the three decks already mentioned: Supply, Gladiators and Training and there will always be three cards from each deck to choose from.  Having this range of nine cards is a major plus, as you rarely find yourself in the position I've encountered in some deck building games where too often crucial cards keep appearing and being claimed by others just before your turn. Nor have I experienced the dreaded "killer" cards of some games that are so overpowering they totally skew game play.
There's a wide range of choice and effect that effectively bring in strong thematic historical elements to the game.  Particularly important are Patrons, who you will add to your player tableau.  Not only do they often add bonus effects, but their essence is the amount of Influence they bring with them.  This is crucial because Influence is what you need to allow gladiators to enter an Arena and for them to stay there.
Your Patrons will remain permanently in your tableau, but if you use their bonus effect/s, then as in most deck builders you have to exhaust them by turning them sideways.  If you do that, you lose their Influence until the next Round.  As a result you may not have enough Influence to maintain all your gladiators.  I love these sort of dilemmas in a game that force simple, but difficult choices and are also a realistic reflection of the theme.
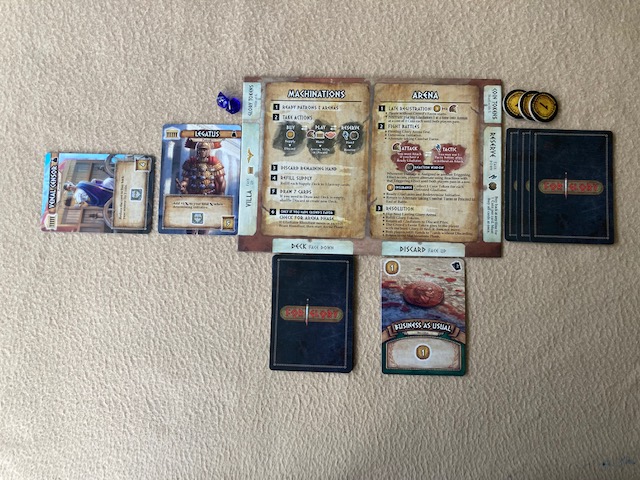
Here's the basic layout of your tableau part way through a Round.  In the centre is your player board which handily outlines both Phases and the steps you can take.  To the left are placed your Patrons and just above them any Glory tokens you've gained, while to the right are cards that you have Reserved and above them any coins that you've acquired.  Finally below, on the left, is your deck of cards from which you will deal your next Round of cards  and to the right any discards.  What you cannot see in the photo are the cards that you still have in your hand to play that Round.
So, over a number of Rounds of Machination Phases, you and your opponent have placed enough gladiators to reach the Bloodlust level for an Arena Phase to take place.  The photo below shows the excellent example of this in the rule book. 
Initially this will happen fairly quickly, as only 6 Bloodlust pts are needed to trigger the first Arena Phase, but after that the totals for triggering rise in the following sequence: 14,19,24, 24.  
Though this is hardly a difficult item to remember, the game [following its excellent provision of superb visual aids] has a small deck of Boast cards with the Bloodlust numbers on.  What's more they are illustrated with a suitably boastful gladiator raising a sword and axe aloft and an equivalently boastful text - one of which, at least, shows a fairly high level of articulate literacy for a gladiator.
This level of attention to reinforcing theme through constant visual art is one of the game's many strong qualities.
Finally, in the Machination Phase never forget the ability to place Tactic and Reaction cards into your Reserve Area.  The ability to suddenly bring them into your hand during the Arena Phase could just be the difference between victory and defeat, but don't forget that you'll need enough coins to bring all of them out at one go!
The Arena Phase
As mentioned earlier, this begins with both players having the opportunity for Late Registration - but remember, you will need to pay 3 coins for each gladiator you want to now put down and will have had to lay cards during previous Machination Phases that provide sufficient spare Influence for this to be allowed!
That done, at last it's down and dirty to the combat.  A Fleeting Glory Arena must be resolved first followed by the Lasting Glory Arena.  It is, of course, possible for only one Arena to have had gladiators assigned to it.  Initiative is determined and then the players take combat turns alternately until both pass consecutively.
In a player's combat turn, a gladiator that is Ready [i.e. hasn't already attacked and been Exhausted] must attack and one Tactic may be played.  The latter may be a Tactic card played from your hand or a Tactic ability on one of the cards already set out in your tableau.
Should you have no gladiators left able to attack, you may still keep taking Combat turns, if you have any remaining Tactics playable.
Once both players have passed consecutively, if both players still have gladiators in that Arena alive, then they are all made Ready and the Combat process begins again. Ultimately the player who has at least one gladiator left alive will win the combat and gain the blue Glory token.  It is possible that both players might simultaneously lose their last gladiator, but it's not something I've yet experienced!

Once again, the level of interaction works to draw you into the atmosphere of gladiatorial combat.  There are many different types of gladiator, each with a differing ability and not always when they attack.  For example, some gladiators' effects. only come into play after they have attacked and are Exhausted.  Combine these with the abilities on Tactic cards, the Tactic abilities of some of your Patrons and the effect of Reaction cards and some Patrons' Reaction abilities and you have an engrossing set of mechanics.  

Even the Arenas play their part and this explains the names of the two types of Arena: Fleeting Glory and Lasting Glory.  If you win the combat in a Fleeting Glory Arena, you gain one Glory token and gain the ability of that Arena the next time you fight in it.  Should you lose in that next combat, your opponent will gain its ability for the moment.  Hence the name Fleeting Glory.  Whereas, if you win in the Lasting Glory Arena, not only do you gain two Glory tokens, but you gain the Arena card and its ability for the rest of the game and a new Arena card is turned over from the extensive deck of Arena cards to become the new Lasting Glory Arena!

To sum up For Glory ... good things come in small packages.  It's a both well designed and well presented game.  All the components and especially the art work on the many cards support the theme perfectly, especially when laid out in front of you in play.  The rule book too uses its design to great effect to make it an exemplary model for organisation and clarity. But more than anything else, it's an engaging, fun game to play and an excellent addition to the lighter field of two-player games

Obviously there's only one thing left for me to say, after thanking Spielcraft for generously providing me with this review copy of For Glory ...
  
Ave Caesar, nos morituri te salutant


  Napoleon 1806 by Shakos Games  The Third Coalition was brought into existence by English money (subsidies) to defeat Napoleonic France. Pr...

Napoleon 1806 by Shakos Games Napoleon 1806 by Shakos Games

For your Wargamer, Toy soldier collector, MiniFig collector, military history nut. Reviews, interviews, Model Making, AARs and books!


 Napoleon 1806


by


Shakos Games


 The Third Coalition was brought into existence by English money (subsidies) to defeat Napoleonic France. Prussia, oddly enough, had not joined it. The consensus of historians that they were biding their time until either side had given them enough of a bribe. They hadn't counted on Napoleon, and the completely trained and incredibly formidable Grande Armee. Before anyone realized what was happening, the Austrian General Mack (and 50,000 soldiers) were swept up by Napoleon without really a fight. This sent the Austrians reeling back to meet their Russian Allies. However, a little battle called Austerlitz put the Third Coalition down for a dirt nap. Prussia was just starting to think it would be a good idea to join the Third Coalition before it was no more. So with the Grande Armee and its roughly 200,000 troops sitting in Germany or nearby on the border, the Prussians came up with one hell of an idea. The Prussian court had a war party headed by their lovely Queen. This war party finally talked the King and his ministers to go to war with France virtually on their own. What was wrong with the drinking water in Berlin I guess we will never know. Russia had not concluded peace with France, so the Russians could help in the long run. The Prussian Army was led by octogenarians who had been weaned on Frederick the Great's battles. One of their youngest generals was Blucher, who was in his sixties. The Prussian staff seemed to have no idea of what actually to do. They staggered slowly toward the French border with no real plan. They also decided to split their army in two without having any idea of where the French were. The lion that was Napoleon had no trouble dispatching the sheep that were the Prussians. As a matter of fact, the 1806 Campaign is usually listed as the first blitzkrieg. The French went through Prussia like poop through a goose, probably only stopping at times to procure more maps of each new area they were rampaging through. This is one of those games where it is almost impossible to do as bad as your historical counterpart. The history being done, let us see what is in the box:


1 mounted game board 60 x 60 cm

1 rulebook

1 quickstart booklet

2 player aids (orders of battle)

2 player screens

2 sets of 36 cards

1 sticker sheet (54)

More than 220 wooden pieces

10 combat dice

1 cloth bag


  Opening up the box leads a person to exclaim 'C'est Magnifique! This is another European wargame that mixes a real honest to God wargame with a Euro game's look. The map is a beauty, and has a real historical feeling to it. The stickers are little pieces of artwork. They have the countenances of the Prussian King Frederick III and his various generals. These are countered by portraits of Napoleon and some of his Marshals. The two Orders of Battle are made of hard stock and are also a pleasure to look at. The Quickstart Guide is a very large four page fold out. It has a simplified rundown of this information on the first and fourth page:


Setup

How To Win

How To Play

How To Move

Fatigue

How To Engage In Combat


The middle two pages have a complete picture of the map and the Orders Of Battle and a Sample Card. The information needed for using the Orders Of Battle and Cards are also printed there. There are two Player Screens, one in blue, and one in gray. On the inside of the Screens are The Game Sequence and information on combat etc. The two Decks of Cards are also well done, and the Cards themselves do not feel flimsy. The manufacture of the wooden block pieces was done with excellent quality control. I found no mismatched sizes in the different pieces. The Rulebook is a work of art in itself. It is filled on most pages with colorful illustrations of what is being written about on the page. It is twenty-three pages in length. The actual rules take up fourteen pages. There is also a Short Scenario added for those who can only fit in time for a short game. A section called 'Rules For The Grognard' is added to add some historical flavor, and fog of war to the mix. Next is a section called 'Rules Of The Marshal"; this is a setup to play a tournament of the game. For conventions etc. this is a nice addition. What follows is a three page rundown of every Card and their meanings. The end of the Rulebook is a four part History Of The Campaign, and Design Notes. You also get a nice bag for the different pieces. The picture on it is a gold Napoleonic Eagle done on a blue background. The actual game pieces are a carbon copy of what you would find in Shakos Games 'Napoleon 1807' game. I will have a link to my review of that game below.


 The Sequence of Play is easy to remember:


Draw -  Each Player Draws Three Cards

Initiative - The Player With The Highest Value Card Wins

Operations - Movement And Combat

Recovery - Each Player Can Remove Fatigue From Some Corps


  The game rules allow for games to be played quickly. However, there is so much that a player can choose to do each turn that it can be a longer game. This totally depends on what depth each player wants to put into each of their moves. The Grognard Rules really add a lot to the game. These are:

Hidden Setup

Fog Of War

Cavalry Vedettes


 The Map is a point to point movement type. With the Order Of Battle Cards being hidden from play, your opponent will have no idea of what is in front of him strengthwise. The Cards Decks add to the 'friction' of war. While the French Grand Armee is still near its peak the Prussian Army, if not led as it was historically, can still give the French a run for their money. This game is another example of a designer wanting to have a game based in history, as much as possible, but still make it an excellent 'game', and a relatively easy one for two players to enjoy.


 Thank you very much Shakos Games for letting me review this beautiful and great playing game. It deserves to be right up with its brother Napoleon 1807 on your shelf. They have also come out with Napoleon 1815, so it is now a trilogy of games. I also had a chance to review their Saladin game. I will have the review in the links also.


Robert

Shakos Games:

Shakos | Historical board games

Napoleon 1807 Review:

Napoleon 1807 La Campagne de Pologne by Shakos Games - A Wargamers Needful Things

Saladin Review:

Saladin by Shakos Games - A Wargamers Needful Things


  GKR: HEAVY HITTERS FROM CRYPTOZOIC ENTERTAINMENTS & WETA WORKSHOP It's bold! It's bright!  It's brash! Is it Ameritrash? W...

GKR: HEAVY HITTERS GKR: HEAVY HITTERS

For your Wargamer, Toy soldier collector, MiniFig collector, military history nut. Reviews, interviews, Model Making, AARs and books!

 GKR: HEAVY HITTERS

FROM

CRYPTOZOIC ENTERTAINMENTS

&

WETA WORKSHOP


It's bold! It's bright!  It's brash!
Is it Ameritrash?
Well, as no one will probably give you the same definition as to what Ameritrash is, that might be difficult to answer that question.  But here goes.

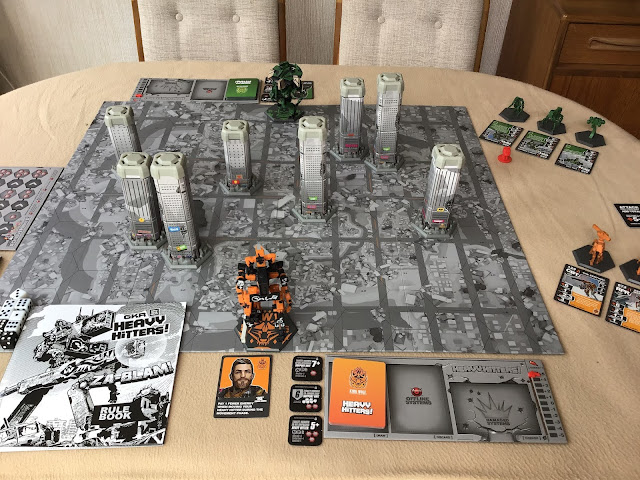
 Giant monster robots stomping over Earth's abandoned cities in a combative sport linked in to mega corporations vying for highly lucrative advertising power.  Bags of theme is ramped up with fantastic graphics, whether in the artwork on the many decks of cards or the super-size models of the titular Heavy Hitters!

Ready painted, they look even better on the mounted game board and each is supported by three smaller Support robots that have been shaded, though not gloriously finished like the four mega robot miniatures. The hand of Weta Workshop, the multi Academy Award winning design studio and physical effects manufacturing facility, can clearly be felt in all aspects of the components and their artwork. Everything hangs together brilliantly.  So, A* for sheer looks and once you set up it looks even more stunning.
The only criticism has been levelled at the buildings that are assembled from a plastic base, cardboard tower and plastic cap.  If you intend to try to store them back in the original box, then I'd suggest you really will have problems.  As the caps very easily come off in play never mind storage, my personal solution has been to glue the caps and towers together.  The base cannot be dealt with in this way, as it's possible as part of gameplay to destroy a building, leaving just the base.  Still, kept separate and partially assembled has proved very easy.

At first sight, the rule book looks underwhelming by comparison with all the other physical goodies. But this is mainly because it is small by the side of everything else in the game and has been given a deliberately retro look with a black and white cover.  The moment you turn the first page you know you've got quality here too, with glossy pages and  coloured illustrations and examples on nearly every single page.

The rules are clearly and methodically detailed and are very accessible.  They produce a fast and fun experience both for newbies and grognards alike.  Each of the four player factions has a separate deck of 38 cards from which you will select 25 to use in a given game.  These cards are not only the basic motor of the game, but your choice defines both your GKR and, to some extent, your intended game play. 

The cards include first and foremost the GKR's primary and secondary weapons.  You start by choosing those for operating one Primary Weapon and two Secondary Weapons, followed by Deployment cards for your Support units and finally the remaining cards to make up your play deck of 25 come from Manoeuvre, Reaction and Orbital Strikes [think very powerful artillery].


Above are a typical 6 of those selected for my first game.  All the data on the cards is well laid out, thoroughly explained in the rule book and rapidly becomes second nature.  Each player has a solid display for the cards with a numbered column running down the right edge with a vertical slot and plastic sliding marker to log the vital energy usage.

The latter -energy usage- is probably the single most important factor in the game.  Moving your GKR, using its weapons and deploying your Support units all cost energy and each round you have 5 free energy points.  Beyond that, you must sacrifice to the Damage pile one of your precious 25 cards for every extra energy point you use!  What's even worse is that for every hit your GKR suffers, you must also discard a card to the Damage pile.

The basic sequence of a turn is Deploy, Move, Combat, Tag Buildings and Reset. 

Deploy

This couldn't be simpler.  Play one of your Deploy cards and spend 2 of your precious 5 free Energy o points and place a Support Unit on the board or place a Support Unit without playing a Deploy card and pay a whopping 4 Energy points!

Move

Pretty obvious.  The main concept is the order of movement is Heavy Hitters, Support Combat unit, Support Repair unit and finally Support Recon unit with each player moving alternately.

Combat

Players simultaneously play face down Weapon cards and cards for Support unit attacks.  These are then revealed and Energy costs paid for and then sequence of fire is determined by the speed number on each card - the higher the number the earlier you fire.  

Additional card play may affect fire, including preventing an opponent's weapon from firing - nasty, because not only don't you get to fire, but you still lose the energy you spent to allow it to fire.

Typically various factors are covered such as full and partial cover from buildings, flank attacks, range, LOS [line of sight], spotting for Indirect Fire and, one I particularly like, Alley Shots in which a GKR can squeeze of a shot between two adjacent buildings.

2D6 are rolled with +5 needed for a GKR to hit and +7 for a Support unit.  The damage caused by a single hit is then checked and it can be massive and then the target gets to roll save dice for each point of damage.  To quote a famous film title - There Will Be Blood! And remember, each point of damage is the loss of one of your 25 cards that you started with.  In a simple 2 player game, that is the main victory condition, kill your opponent's GKR by causing him/her to have no cards left.

With 3 or 4 players, victory is different and will be discussed later. 

Tag Buildings

Following Combat. each unit adjacent to a building may place a tag on one building.  GKRs have the added advantage of being able to replace another player's tag with one of their own.  Each building has slots for 4 tags and the player who manages to place 4 tags on a building destroys it and gains permanent control of the ruin.  For a player to demolish and so control 4 buildings is the other victory condition.   

Tagging buildings isn't just useful as a game-winning goal.  Each turn, a player gains a Support card for each building tagged that turn and a player can hold up to 5 Support cards in their hand.

The photo above shows the Support Deck and just a few of the typical cards you make gain from tagging buildings.  Also, a player who destroys a building gains a Pilot upgrade that brings new benefits.  A single board records the progressing upgrades that each player's human pilot of their GKR achieves in the course of the game.
Pilot upgrade Achievements Board

Reset
Simplicity itself.  Reset your Energy back to +5 on your player board, as seen below and then replenish your hand back to 6 Faction Cards.

The final section of the rules provides a range of pre-generated maps for 2, 3 and 4 player games to get you quickly underway.  All that I've described so far applies to all number of players [sorry, no solo rules] and the only detail to add is that for three or four players the game end condition [other than being first to demolish 4 buildings]  is when one player's GKR is eliminated.  At that point, the current Turn is played to its end and players add together the number of undamaged Faction Cards plus the number of spaces their Pilot has moved along the Achievements Board.

This last detail has come in for some criticism with the claim that a player who has sat back and kept out of harm's way could win the game.  My reaction to that is not very sympathetic.  All I would say is that, if the rest of the players have let that happen, then make sure you play to avoid it happening ever again!

My final summing up is that here you have a fast playing, easy to learn, slam bang action skirmish game.  Great components, lots of colour and atmosphere, investing a post-apocalyptic setting with a gaudy, almost cartoonish style.  

So, for me this is Ameritrash at its best - but be warned it does come with a price tag that matches the HEAVY in its title, especially if you're having to buy it on the second-hand market where I've seen it at up to the $230.


Alley Shot


Tagging a Building

Many thanks to Asmodee Uk for providing this review copy.


Yellow Jack  The War of Jenkin's Ear 1739-1743 Part of The Sea Lords Series of Games By  Red Sash Games   The War of Jenkin's Ear, w...

Yellow Jack: The War of Jenkin's Ear 1739-1743, By Red Sash Games Yellow Jack: The War of Jenkin's Ear 1739-1743, By Red Sash Games

For your Wargamer, Toy soldier collector, MiniFig collector, military history nut. Reviews, interviews, Model Making, AARs and books!


Yellow Jack 


The War of Jenkin's Ear 1739-1743


Part of The Sea Lords Series of Games


By 


Red Sash Games


  The War of Jenkin's Ear, was mainly a conflict between Bourbon Spain and England. Robert Jenkins was a captain of an English merchant vessel who was mutilated by Spanish Coast Guards in 1731. In reality, the war was really about money, specifically the Asiento (a contract with England that allowed her to sell slaves in Spanish America). In Spain, the war is called The Guerra del Asiento. The war mostly took place in the Caribbean. The War of Jenkin's Ear then became part of the wider European conflict: The War of the Austrian Succession 1740-1748. There was also an earlier outbreak of hostilities between Spain and England over the same reasons named The Anglo-Spanish War 1727-1729. The wars were really about English merchants' access to the Spanish areas of North and South America. Red Sash Games mainly has naval and land warfare games centering around the time of the War of the Austrian Succession. They call their land warfare games of the time The Lace Wars Series. Their sea warfare games of the time are from their The Sea Lords Series. As obscure as this war seems I remember being taught about it in High School. Well, enough of that. Here is what actually comes with the game:


6 die cut counter sheets – 720 counters – including the naval forces of Britain, Spain, and France, plus Pirates (no Caribbean naval game is complete without Pirates). One of the counter sheets includes all the important naval leaders who participated in the War of the Austrian Succession; another consists of land units – all the regiments that fought in the Caribbean. There is also a sheet of generic markers.


37 wooden disks representing “task forces” (boxed game only; regular counters are also supplied to represent these items).


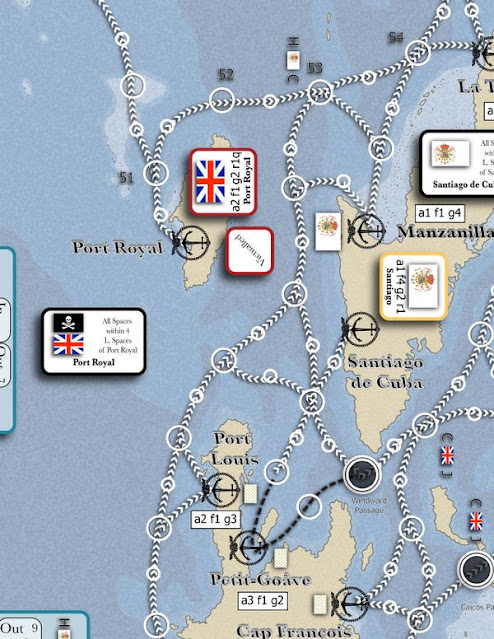
48” x 54” map depicting the Caribbean, Gulf of Mexico, and Carolinas coastline.


1 series rulebook, 1 exclusive rule book, 2 scenario/OOB books, 1 set of charts & tables, historical commentary. 1 set of display cards.


One piece of the Map


 This is their own write up about the game:


"Autumn, 1739. Fierce economic competition between Britain and Spain has broken into open war: the War of Jenkins' Ear. As His Britannic Majesty's naval commander-in-chief in the Caribbean, your duties have suddenly multiplied. Their Lordships at the Admiralty demand action. Parliament expects the speedy conquest of Spain's New World possessions - ALL of them - but is unwilling to supply men and ships. That would require the adoption of methods suitable only under a 'French Despotism'. Before you utter them let it be known that your objections are unpatriotic and un-British. Meanwhile, the powerful Planters' Lobby is insisting you make defending their islands your top priority, while the equally powerful Traders' Lobby is demanding convoy protection and simultaneously accusing you of 'pressing' merchant seamen into service aboard your ships. Or, can you honourably serve the great House of Bourbon, whose scions rule France and Spain? The English heretics have unjustly fabricated a war. They are jealous of Spain's greatness and desire her colonies for their own. For years they have paid lip service to the international laws of commerce while breaking those same laws at every opportunity. Of late, His Most Catholic Majesty had graciously agreed to accept arbitration for so-called 'wrongs' done to British traders, waiving compensation for similar wrongs done to Spain. But when she offered payment, the English dogs slapped Spain's hand aside, saying it was not enough! This insult will not go unavenged. The King has ordered you to secure our trade routes and has issued letters of marque for the harrying of British merchantmen - let their own methods be used against them! In the fulness of time, our brother France has promised his support.


Control the seas and you control the fate of the New World. Whichever side you choose, glory and honour - and prizes galore - are yours for the taking. Provided you avoid court martial and disgrace."


 I like the writing in the above piece, so I added it in. Sometimes a game company can come up with a more succinct and intriguing summary than a reviewer.  The game is operational in scope. By the way, Yellow Jack is actually jargon for the rampant Yellow Fever in the area. Although by this time they were waning, the game does contain pirates and privateers.


 The map pieces are well done, and to me at least have a period flavor to them. It could be because I played Pirates from Sid Meier for so many hours on the C-64. The counters are wonderful. They are pretty much the same as the ones in their game 'Cockpit of Europe'. I did a review of that excellent game, and the link will be below. The counters are large and easy to read. There are numerous Players' Aids in the box, from a hurricane sheet to a four page turn sequence fold out! It also comes with a twenty-three page 'Exclusive Rule Book' for this game. Yellow Jack comes with two Scenario & Orders Books, one for the Bourbons (France & Spain), and one for the English. To top it all off, there is a 111 page Historical Commentary which is well stocked with maps and pictures. The Historical Commentary moves easily between the big picture and the minutiae of the period, and it is easily worth its weight in gold doubloons. The game and Historical Commentary were both done by the designer Ian Weir. It is plain to see that these games are a labor of love by Mr. Weir. 


 This game was given a rating of 4.5 for complexity. Yes, it is a very complex game. This is not one that you are going to break out on game night and decide to play on a whim while trying to teach the rules. However, like almost all games that are complex, you get out of it what you put into it. If you have a Saturday to run through one of the smaller scenarios, and then try your hand at the campaign game, this would be your best bet.


 There are five Minor Scenarios from 1739-1743, each one lasts one year.


1739 - Rule Britannia

1740 - Old Grog & Peg Leg

1741 - Carlos Don't Surf

1742 - Spanish Fly

1743 - Hot Cocoa

The Price of and Ear - The Campaign Game

Hasta La Muerte - The Extended Campaign

1744 Scenario

1745 Scenario

1746 Scenario

1747 Scenario

1748 Scenario


 The scenarios of 1744-1748 saw no major operations historically, but they do add France as a Spanish Ally.


 The Turn Sequence has these and many other segments:


Wind Generation Step

Check for new Hurricanes

Check for Random Events

Resolve Hurricanes

Resolve Gales

Reinforcement & Reorganization 

Conduct Searches & Mark Spotted Formations

Detach Independent Squadrons Without Orders

Disembark Expeditions


One side of the Hurricane Map


 If you love sea warfare from an operational standpoint, this game is for you. The historical information of sea warfare at this time is alone the price of admission. The game is complex, but it has to be to plumb the depths of historical accuracy that the designer intended. The game was intended to be a two-player, but like almost all games it can also be played solo. The age of warfare that the game represents has very little boardgames to choose from. This game is not historically like the Campaign of Trafalgar. It is one of far flung outposts that are important to each crown, but not as much as they once were. There are no more Spanish Treasure fleets filled with Inca and Aztec gold plying these waters. Even Piracy has lost the glitter of its golden age. Both sided in the game must deal with pretty much the forces that they have been dealt with, especially in the one year scenarios. 


 I am definitely an aficionado of the era. For me to pull myself away from a game, or simulation, of land warfare when one of your counters represents Maurice de Saxe is a pretty hard task. However, Yellow Jack was up to it and more. Thank you very much Mr. Weir and Red Sash Games for letting me review this game. 


 Red Sash Games has numerous ways to buy their products, including the ever more popular print & play. I urge you to take a look at all of their games when you have a chance.


Robert


Red Sash Games:

Red Sash Games Home Page

Yellow Jack:

Yellow Jack (redsashgames.com)

My Review of 'Lace Wars, The Cockpit of Europe':

Cockpit of Europe by Red Sash Games - A Wargamers Needful Things

 Joe Balkoski's The Korean War: Designer Signature Edition June 1950 - May 1951 by Compass Games  The Korean War, often called the Forgo...

Joe BalKoski's The Korean War: Designer Signature Edition by Compass Games Joe BalKoski's The Korean War: Designer Signature Edition by Compass Games

For your Wargamer, Toy soldier collector, MiniFig collector, military history nut. Reviews, interviews, Model Making, AARs and books!


 Joe Balkoski's The Korean War: Designer Signature Edition


June 1950 - May 1951


by


Compass Games


 The Korean War, often called the Forgotten War, was really part of a forgotten decade of war. The 1950's saw a large part of Eastern Asia alight with the fires of war. The Western Allies were fighting together, and separately, against numerous Communist populist 'freedom fighters'. The French were fighting Ho Chi Minh's Communists in French Indo-China pretty much since the end of World War II. The British were fighting the Malayan Emergency from 1948-1960, again against Communist forces (interestingly, it had to be called an 'emergency' and not a civil war, because British insurance companies would not pay if it was a 'Civil War'). Almost all of the history of this decade was swept away by the intense struggle of the Vietnam War. 

 The Korean peninsula was divided in half in 1945 (almost exactly like Vietnam was in 1954), between a Communist North and 'Free' South. Again, much like Vietnam, the 'Free' government of South Korea was more of a strongman in power than an actually free society. The game focuses on the first part of the war where maneuvering was still possible. Afterwards it became a stalemate and fought much like World War I, with both sides hunkered down in defensive lines. The beginning of the Korean War saw the North's forces capture almost all of South Korea and push the Allies into the small Pusan Perimeter. General Douglas Macarthur saw his last hurrahs by his amphibious invasion of Inchon, and pushing the North Koreans almost across the Yalu River (their border with China). At that time, the Chinese Communists decided that they had to intervene, and really under the noses of the Allies, secretly moved a large force into North Korea. This force almost swept aside the Allies until they were finally stopped almost at exactly the 38th Parallel, this being the actual demarcation line between North and South Korea. The war dragged on for another two years before peace was achieved. So, now that we have seen the history let us now look at the game. This is what comes in the game box.


Components:

Four map sheets (42.5″ x 71″overall map dimension)

Three countersheets (9/16″ size)

Rules booklet with updated Historical Notes

Two charts and tables booklets

One ten-sided die

Box and Lid


 This is the information about the game from it's website:

Complexity: 7 out of 10

Solitaire Suitability: 6 out of 10 (landing options; no hidden units)

Time Scale: one month per turn

Map Scale: 7.5 miles per hex

Unit Scale: battalions, regiments, brigades and divisions

Players: one to two, best with two or more

Playing Time: 4-8 hours depending upon scenario, 20+ hours for campaign


 This is the difference between the 'Designer Signature Edition' and the original:

Larger and easier-to-read 9/16” counters and four game maps
Game map information is updated and includes all-new map artwork
Enhanced ergonomics are built into the set up and reinforcement charts
Restrictions on UN build-up and breakdown so UN player cannot perpetually continue Action Phase by reorganizing units
Modified amphibious assault system that allows UN player to more effectively recreate September 1950 Inchon invasion
Modified victory conditions that lessen impact of Global Tension
New random events to make the operation a bit more unpredictable
Updated rules treatment backed by many illustrations, an index, and clarifications and examples of play to reduce potential questions.
Updated historical notes


 As you can see by the pics, to steal from Monty Python "She's got huge tracts of land", or maps. With the entire Korean Peninsula done at 7.5 miles per hex, the maps have to be that large. The map itself is very well done. It has very large hexes and the color scheme is pleasing to the eye. The different terrains are easily identifiable in each hex. You do not have to try and figure out if a hex is this or that terrain. The counters are also large at 9/16". This makes it very easy to read all the information on them. They are also easy to maneuver for old grognard hands. A few people have complained about the counters being hard to 'punch' out of the cardboard sprues. With counters that do not fall out by themselves, I always use a trusty pair of Solingen scissors that are about 100 years old. I never have a problem with counters. Also, if anyone did have a problem they were sent another set out pronto by Compass Games. Did I mention they have great service? There are numerous Players' Aids that come with it. These are all hard pieces with some lamination on them. This is the list of them:

Three UN Air Support/Interdiction pages. One has the information      for Basic Game Scenario 3 on the back.


Game Turn Record for the Advanced Game which is two-sided. This is not really a Turn Record, but it has all of the information for each turn on it.


One Sheet with the UN Reinforcement Charts on it, and a Terrain Chart and UN Escalation Chart on the back.


One UN Combat Results Chart with a Terrain chart and other information on the back.


One North Korean/Chinese Combat Results Chart with a Terrain Chart and other information on the back.


One Sheet of the UN Depot Table, with a Summary of the Units on the back.


One Sheet of the NK Depot Table, with a summary of the Units on the back.


Then there are two for page fold outs, one for each side, with almost all of the information supplied on the separate sheets.


 So, you can see that you will not need to share any of the Players' Aids with each other. 

The Game also comes with a Rules of Play booklet, along with a Playbook. The Rules of Play Booklet is forty pages long. The Playbook is also forty pages long. Both are in full color and have a good amount of visual aids for gameplay. The Playbook starts with the Advanced Games Rules on page fifteen, and go to page twenty-seven. Next comes a short Historical Perspective written by the designer Joe Balkoski. Then there is a ten page 'The Game as History' with maps included for each turn. Lastly, there is a piece on Korean Culture and History. 

 Four of the Scenarios use only Maps A and B and a portion of Map C. One Scenario uses Maps C and D only. The Advanced Game Scenario uses all four Maps.


 As with all of Compass Games Designer Series Games, this is not just a new printing of an older game. The original designers have worked on their games and incorporated many errata and actually changed some of the mechanics. Yes Virginia, the map is slightly larger one way than the original. The original had two 22" x 34" Maps. Then again, almost everything is better than what came in the original box. There will always be some people that are not happy with change. The horsey set had a long fight with those new fangled automobiles. I don't know, I think it is easier to walk to the Post Office without having to watch out for land mines. Almost all games that are produced now are made because X amount of people want them published. Just because a Designer Signature Edition has been made does not mean that we are forced to throw out our originals. I have a few doubles of games that were reworked. I also have versions one, two, and three of Imperium Romanum, so I am descending from the soapbox now.


 Getting away from pure cosmetics, let us take a look at gameplay. Playing either side in the game presents the player with a completely different set of assets and liabilities. The NK Player has the advantage early on. The Western Allies had lowered their forces after World War II to save money. The US was not prepared for a large land war. This should not come as a surprise, because it happened in almost all of the wars we have fought. So the UN Player has to sacrifice space for time, and fight a delaying rearguard action, until the UN forces are brought up to strength. The rules do a good job of simulating what the commanders of both sides had to deal with. In a nutshell, win a war, but do not win it too much for fear of starting World War III. I am pretty sure that neither side was able to find a strategy for dealing with that threat. Kick some butt on a local scale without hearing the sirens wail to get to the bunkers asap. The UN Player does have a large advantage over the historic UN forces. The UN Player knows that China will become involved if pushed. The UN forces at the time were told that the chance of China interfering was slim to none. The Russians becoming involved is also something to give the UN Player to think about. The UN air superiority was taken for granted up until the Russian intervention. Some of the games rules have been changed because some players learned how to game the original system. My personal take on rules, is if the designer by mistake allows a player to game the system or allows a player to act non-historically, I just modify those rules. 


 The Air War, except for turn one, and its missions are just for the UN Player. The UN Player must choose between Close Air Support (CAS) missions, and Interdiction missions. Each scenario has rules that make some of the NK northern provinces off limits to UN air missions. These rules will be played out again in the Vietnam War.


 The Sequence of Play is very different than most games. It changes so much from turn to turn that a separate Player's Aid is given to you to check the changes from turn to turn.


 The Advanced Game is where the game really shines. The Advanced Game adds these and other rules to the game


UN Initial Intervention

UN Escalation

US Mobilization

Global Tension

Chinese Invasion of Formosa/Taiwan

Soviet Intervention


 Supply becomes a large part of the game also with the addition of Supply Depots (Supply Depots are in two of the scenarios, but their impact is more limited).


 As was mentioned, the game only represents the first year of the war. This was when the situation was fluid and the political consequences of some actions had not been thoroughly thought about. The UN, due to Macarthur's last amphibious invasion, were able to take the fight to NK, and almost overrun it completely to the Chinese border. Unfortunately, he blinded himself to the idea that Chinese forces would intervene. Then the UN forces were forced to fight a rearguard action under the constant threat of massed waves of Chinese forces. Both Players can be put in the position of attacker and defender during any of the scenarios. This is usually a hallmark of a great game design. 


 So, is the game worth it's price, even though you might own the original? The results are in and it is a resounding Yes! The game play has only been advanced and the components are better. Thank you, Compass Games for giving me the chance to review your newest redo of excellent older games. We grognards salute you. I urge you to take a gander at Compass Games large, and growing by the minute, stable of excellent games.


Robert

Compass Games:

Compass Games – New Directions In Gaming

Joe Balkoski's The Korean War:

The Korean War: June 1950 – May 1951, Designer Signature Edition – Compass Games


hpssims.com