second chance games

Search This Website of delight

Showing posts with label operational level. Show all posts

  AGAINST THE IRON RING FROM VUCA SIMULATIONS As with several previous Vuca Simulations games, Against the Iron Ring is a significant revam...

AGAINST THE IRON RING AGAINST THE IRON RING

For your Wargamer, Toy soldier collector, MiniFig collector, military history nut. Reviews, interviews, Model Making, AARs and books!

operational level

 AGAINST THE IRON RING

FROM

VUCA SIMULATIONS


As with several previous Vuca Simulations games, Against the Iron Ring is a significant revamp of an earlier boxed game or magazine game.  In this case, Six Angles magazine game, Paulus' 6th Army, designed by Masahiro Yamazaki.  Its system has basic features very close to that in the two excellent games in the Traces of War series that I have previously reviewed.  It presents an operational treatment of the Soviet campaign that begins with Operation Uranus and continues into Winter Storm - a campaign that covers the encirclement which led to the surrender of the German 6th Army under General Paulus and Von Manstein's attempted relief.  It also covers much the same ground as Stalingrad Pocket, the first game in the Standard Combat Series (published by The Gamers).

The production bears all the hallmark qualities that we've come to expect from Vuca Simulations.  Excellent, thick pre-rounded counters, 2 maps in a muted steely grey, various play aids in solid, rigid boards and a clear, comprehensive full-colour rulebook.

All contents displayed above and the double map shown below


There are a few minor niggles.  The first being a small number of inaccuracies with counters, such as the Soviet unit 4MK 51st Army. Being a particularly powerful unit it has several counters to show it from its strongest to weakest strength.  Unfortunately the strongest counter with an armour symbol is missing.  Fortunately however, its corresponding counter with a Nato symbol is there - so a slightly hybrid result existence transpires for this unit.  My copy also came accompanied by the corrected foldable player aids - both the originals and their replacements display that substantial solidity that has been a hallmark of Vuca Simulations games from their outset, as do the four excellent double-sided Set-Up sheets that cover the game's three scenarios.  


Scenario 1 presents Operation Uranus's drive for the Kalach Crossings and this is played out on a single map over the first three turns, while Scenario 2 takes us to the end of the campaign in Winter Storm, again needing only single map and covers turns 8 to 12.  Finally, Scenario 3 uses both maps for the complete 12 turns of the whole campaign. 
Both the shorter scenarios are excellent for learning the rules and provide a lively and punchy experience in their own right.  If you're familiar with the Traces of ... series you may be forgiven for plunging straight into the full campaign, as none of these games need either the time or table space that could bring them anywhere near the label "monster"!  However, Against the Iron Ring provides a slightly more detailed system than that in the Traces of ... series.

So, diving in, the Turn Sequence is a fairly familiar and fairly standard igo-ugo one; with the Soviet turn being followed and mirrored by the German one in an identical sequence of Phases.

Soviet Movement Phase
Soviet Combat Phase
German Reaction Phase
Soviet Exploitation Phase
Soviet Supply Phase

German Movement Phase
German Combat Phase
Soviet Reaction Phase
German Exploitation Phase
German Supply Phase

The basic rules are also a familiar and generally standard affair.  However, there are many significant modifications and additions that give each side a slightly different quality  and character.  Consequently, both players need to get well acquainted with them to make sure they play their side accurately while being familiar with what their opponent can do that is slightly different.
Such is true of one of the features of this system that I continue to be uncertain whether I like it or not.  That feature is the colour coding signalled by division and corps for the Germans and Army for the Soviets.  As in the Traces of… series, this is largely irrelevant as units are activated according to their being within range of any HQ. In this game that is something of a relief, as some of the colours (particularly for German units), at least to my eyes, are all too similar especially under artificial lighting. However, to my surprise divisional integrity as shown by these colours does play a part for the German player in combat whether as attacker or defender.  Though this will only occasionally come into effect, the need to be on the alert for it would have been helped by more distinctively different colouring.
On the other hand what is highly useful to ease of play is each Player's substantial, individualised Player Aid.  Typically each contains the essential Combat Results Table and a range of other tables, such as Surrender Check, Supply Capture, German Mobile Unit Supply and German Supply Airlift, as well as a comprehensive Terrain Chart.  


Beyond that, each contains a very detailed Sequence of Play specific to the individual player and an equally comprehensive display that highlights the key points for Movement, Exploitation Movement, Reserve Status and Reaction.

These I've found very, very useful, both in learning the game's rules and during play.  They provide such helpful reminders not just of basic elements, but the minor individualities for that player.
One of the most significant for the Soviet player is the function of Soviet Offensive Supply Markers.  


A limited and finite number of these mobile units begin play on the map and the Soviet player will gain no more in the course of the game.  At what point in the game you choose to use them makes for some careful consideration, especially as they have to be flipped to their Offensive Supply Side at the beginning of the Soviet Movement Phase. They affect the HQ that they're stacked with, bestowing a series of important benefits.  First of all the HQ can act as a supply source even if it cannot trace a valid supply line to a normal supply source.  Next it allows every eligible unit within its range to undertake overruns and finally in the Combat Phase it grants units within range a +2 column shift right when attacking.


A typical Soviet HQ - 
its range in hexes being the number on the left
By contrast the German player has none of these limiting restraints, but, on the other hand, nor does it gain the Combat Phase benefit of a 2 column shift.  By and large, all the rules that give each side its individuality present contrasting or limiting modifications.  
So, regarding Reserves, the Soviet player can place a single unit per HQ into Reserve.  As there are 10 HQs that allows a maximum of 10 units placed in Reserve, whereas the German player can place 4 stacks in Reserve.  As a stack may contain a maximum of 4 steps and units range in size from a single step to 4 steps, this gives both sides considerable flexibility and diversity.  If the Soviet managed to put ten 4-step units into Reserve this would be a significantly more powerful force than the German who can marshal at best four 4-step points of strength [i.e. 40 steps as opposed to 16 steps]!
What is even more startling is the distinction between how steps are signified for stacking purposes and what they mean in terms of a unit's durability.  Look at the example below.

The number of steps for stacking purposes is shown by the dots in the top left hand corner of the counter.  However, in conventional 
terms stacking points frequently equals the number of steps a unit possesses.  Not so here, as can be seen in the example above of one of the strongest units in the game.   The Soviet 1st Tank unit is represented by 4 separate counters, each of which has the same stacking value on its front and back.  Consequently, though it has only 4 stacking points at its strongest, it takes 8 losses to eliminate  the unit!
Another striking feature of the system is the developed Supply rules.  In particular, there are 3 levels of being out of supply that affect Attack strength, Defence strength and Movement in increasingly punishing ways  and with a specially debilitating Level 3 marker for Soviet Corps units!  The final additional rule that I like here is that Levels of being Out of Supply don't just increase by continuing to be OOS when Supply is next checked, they also get worse if you take part in Movement or Combat while being OOS.

The markers for 3 Levels of OOS
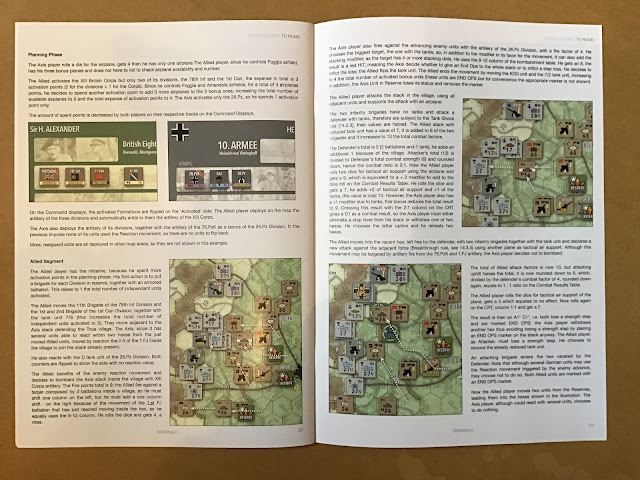
The final aspect to consider is the overall quality of the Rule Book.  This is well organised and structured, supported by plentiful examples that combine both pictorial illustration accompanied by substantial written explanation.  A typical example is the one below which starts with a picture of a series of potential overrun situations.

This is then followed by a full and very substantial unpacking of the diagram.  


As I've already indicated the rules are of medium density and the rule book takes you systematically and carefully through them.

The last aspect I want to explore are the Scenarios.  The following image shows the set up for Scenario 1: Operation Uranus.  This is a 3 turn scenario played out solely on the right hand map.  As such it's an excellent introduction to the system having a fairly low counter density and short playing time.  It's also useful for honing your skills for launching the full two map campaign scenario.
Set up for Scenario 1
(with Stalingrad inset overlaid at the bottom)

One minor draw back is that an excellent expanded display of the four hexes that constitute the area of Stalingrad is printed on the other map.  If you don't want to have your units piled up high, then  creating a copy of the display (like the image below) solves the problem.


Finally in the image below, I've left the four hexes that constitute Stalingrad empty for you to see.  Normally, I leave one counter in each hex with the remainder set up, as indicated above.  Though you can overstack in these hexes, it's important to note that you can still only attack from Stalingrad with four stacking points of units and only four stacking points can be used in defending Stalingrad hexes.


Scenario 2: Winter Storm is wrongly shown in the Rule Book as being played on the left hand map.  In fact it is played out on the same map as Scenario 1 and the Soviet Deployment  Lines insert on the Soviet counter Set Up  play aid is extremely helpful in getting everything right.


My final photo is simply one of my storage for all the units by Formation. This I've found ultimately to be the best way to sort them in order to swiftly find the correct units for a Scenario and transfer them on to the player Set Up play aids.


All in all, another excellent addition to my collection which I would highly recommend.  Thanks again to Vuca Simulations for providing the review copy and a special thanks for their patience in the four to five month delay in my being able to review Against The Iron Ring because of  family health problems.


 FOURTEEN DAYS IN JUNE FROM STRATEGEMATA It may sound like the title of a spy novel, but as you can see we're back in familiar war gamin...

FOURTEEN DAYS IN JUNE FOURTEEN DAYS IN JUNE

For your Wargamer, Toy soldier collector, MiniFig collector, military history nut. Reviews, interviews, Model Making, AARs and books!

operational level

 FOURTEEN DAYS IN JUNE

FROM

STRATEGEMATA


It may sound like the title of a spy novel, but as you can see we're back in familiar war gaming territory... or, perhaps, not so familiar.  Especially, there's no need for the immediate exclamation - not another Waterloo game.  Why? Well, because this isn't the typical focus of the three days, but as the title and subscript spells out, it's a treatment of the whole two weeks leading up to and culminating in the battle of Waterloo.  This is a very refreshing change, especially as it's a game coming from a designer that I already rate highly.  Several of his games I've already reviewed for A Wargamers Needful Things and nearly all his other games are in my collection.  So, it was no surprise to see "A game by Stephen Pole" featured on the front of the game box.  It's a detail that would immediately make me pick up a game and have me well on the way to buying it.
However, once again I've got Strategemata to thank for their kindness in sending me Fourteen Days In June to review.  Opening up the box revealed typical features of both a Stephen Pole design and Strategemata production.  Much as I've liked the sequence of their smaller mounted maps in recent games, I was more than happy to see a full sized paper map for this game which gives justice to the necessary scale for this campaign.

The counters remain of very average quality by current standards and remind me very much of the simplicity of when I first encountered board games through SPI magazine games back in the 1970s!  Everything is functional and serviceable and so is the rule book, which remains a simple twelve page, stapled, black and white production.  
Front page of Rules Booklet

As has become almost standard, it is supported by a similar eight page booklet of rules examples, with plenty of helpful coloured illustrations, but with text in even smaller print than the rules themselves.  
Eight page Examples Booklet

Though these production qualities are a far cry from the gloss of many nascent games companies, the design itself is very much a quality one, blending as it does elements familiar from a number of Stephen Pole's previous games with some very interesting developments.
To start with, what is familiar from 2021's How The Union Was Saved are the wooden stands and oblong leader counters that are all that appear on the map itself.  Each stand and Leader represents a Formation.  They are very few in number, with only eight in total for the joint Allied British and Prussian forces and seven for the French when set up at the start,  growing to a maximum of fourteen for the Allied and twelve for the French.  This is followed by the identical layout down one side of the map for the units that make up each leader's command.  

On the display, you place unit markers, one for each of the three combat arms: infantry, cavalry and artillery.  These markers are numbered so that you can register the current number of divisions of each type that the force contains.  Those placed on each top row will be numbered in black to show full strength and those on each bottom row will be numbered in white to show half strength.
Just as your display was hidden from your opponent's by screens in How the Union Was Saved, so too here.

Each player gets to see a suitably dramatic scene of their enemy in firing line, while on the reverse they face a helpful set of informative tables.  All these elements are identical to those in the previous game, along with the combat system that I'll discuss later.  Virtually everything else is different.
The initial and very obvious difference is the larger size of map which promises that manoeuvre will be even more important than it was for the ACW game.  However, it is within the system itself that the major changes and developments appear and all of them I've found highly rewarding.  
The major one in this game is the issuing of orders.   What is rather strange is that in the Sequence of Play, it doesn't even get named!  There are, in fact, only three Phases listed:
[1] Attrition and Supply
[2] Movement and Combat
[3] Commander Movement
The first, Attrition and Supply, is fairly conventional.  Attrition is affected by two factors - the size of the Force and whether it is in supply or not.  Supply is handled by the tried and trusted method of  tracing to a supply source along a road, but thankfully doesn't allow the often ridiculous ability to allow your road to wander all over the map back to a supply source!  Instead the road you are using to trace supply may only progress three hexes ahead of the compass direction fixed for your nationality - south for the British, north for the French and west for the Prussians.  An extra restriction is that you must be on or adjacent to the road or be separated by a single clear hex.  It may seem a small point, but having despaired of many games with easy, but ridiculously liberal supply rules or some games with immensely complex ones!  Here, it is simple, but realistic.
Virtually all the rest of the game's rules are contained in Phase 2 Movement and Combat.  Personally, I would have labelled this Phase Orders and Movement, as it has five sections. Parts I to IV deal with Orders, while Part V deals specifically with the details of Movement.  However, the type of Order will affect movement and whether you can engage in combat too.  All these combinations depart significantly from the simplicity and ease of understanding that I associate with Steve Pole's designs.  Don't be deterred.  It is well worth getting to grips with and I would strongly recommend following through each part of the rules, using both the examples in the supporting booklet along with physical counters on the map too.  A single play of the game was then sufficient for me to play subsequent games with barely a reference to the rule book about orders.  I'd also suggest that, when first learning and playing the game, you stick to the Historical Set-Up rules and only move on to the Quasi-Historical Set-Up or Free Set-Up when you've bedded in the rules!

Historical Set-Up
 
So, at the start only the French issue Initial Orders, one for each Force on the map and this involves writing a destination village, town or city on a record sheet.   This is a very similar method to Hexasim's Rising/Falling Eagles games that also cover Napoleonic battles.  While under Initial Orders, formations can only move on the road network.  For the first three turns, only the French can move using these Initial Orders, though on turn 2 the Allied forces do write down their Initial Orders and on turn 3 place the Order markers on the map.
Without going into too much detail, what follows on from Turn 4 is the issuing of Further Orders.    This is done one force at a time alternately from one side to the other.  Each time you attempt to issue an order, you test by rolling two dice with a decreasing bonus system to see if you are successful.  Fail and you cannot issue any more orders; also if you decide not to issue an order, you can't issue any more that turn.  There is quite a deal of subtlety here (especially as you can place +1 or +2 markers which act as a sort of delayed order process).  Once comfortable with applying them, it's a system I thoroughly enjoy and would single out as being a major factor.
Once all Order markers have been placed on the map, they are carried out,  again alternately.  One side chooses a Force with an Order marker, removes the Order marker and moves and conducts combat, if desired and possible, and then the other side activates a  Force and does the same.  Like the issuing of orders, if you decide not to activate a Force, then you won't be able to activate any more that turn and any Forces that still have orders on them have them removed!
Part IV (of the Movement and Combat Phase) is named Updating Orders and is the process by which a Force with a +1 marker is given an Order marker and a Force with a +2 marker has it substituted by a +1 marker.  
Included among these central processes of the game are a number of small details that contribute to the flavour and feel of this game.  Route blocked markers that hinder the progress of your own units; the ability to Force March resulting in placing a fatigue marker that affects combat; the use of markers to show that your Force has already been in combat and adds a negative affect to further combat; the role of Commanders for whom only the single highest ranking Commander's standee is ever located on the map and as Forces merge or split new Commanders come into play or are placed on the hidden displays where the unit strength markers are located; and one of my favourites, Inadvertent Moves  whereby every hex moved off-road has to be diced for and a failed roll ends the Force's movement in a randomly generated hex adjacent to the one you've just entered.  The latter is an excellent reminder of the difficulties of off-road movement along with the added difficulties brought on by bad weather. 

En Avant. Mes Amis
The blue markers indicate Route Blocked


Moving on to the Combat rules, they are the identical ones used in Stephen Pole's previous ACW game and they are highly effective and easy to implement.  Commanders once more play an important role, as the number of stars of rank a leader possesses determines the maximum number of dice you may choose to roll and the total rolled is the number of divisions you must commit to a battle.  So, a leader like Napoleon can roll up to five dice which, of course, means, depending on what he rolls, he may be able to commit anywhere between 5 to 30 divisions.  Obviously, if you don't have as many as the number rolled, you simply commit all that you have!  Factors like the quality of your Army Commander if leading the Force, combined arms and terrain add to your total with the final addition of a D6 roll for each player.
Whoever achieves the higher number wins the battle.  Then the difference between the scores is the maximum number of hits that the winner inflicts on the loser and the loser scores half that number of hits on the winner.  Each hit eliminates half a division point. The scale of a victory also involves who retreats and who controls that retreat. This is an excellent and very easy method which does away with unrealistic combat factor counting just to get that perfect combat odds and also does away with computing column shifts and die roll modifiers.  Moreover, losses from combat and attrition are crucial to winning the game.
Unless the French gain an automatic victory by capturing one of the two hexes of Brussels, victory is determined at the end of the fourteen turn game by the number of divisions lost by each side.  
The French win if either the British or the Prussians have lost at lest 10 divisions and the French have lost fewer than half the total number of divisions lost by the the British and Prussians combined.  Any other result is a win for the Allied side.  These conditions influence game play and player decisions from the very start - another excellent factor in the game.
This is a hugely enjoyable two-player game.  It is easy to play and one that will not have your head buried in the rule book, but concentrating on what's happening on the map.  Hidden strengths, the order system and combined movement & combat rules all lead to a fast moving, tension filled contest of cat and mouse game that can be played out in a single sitting.  It’s also the type of game where you will certainly make blunders, as you learn the potential for each side to deceive and pursue unexpected lines.  Learning how to counter these and devise and exploit twists of your own is part of the pleasure.  Even using the historical setup,  the course of the campaign may well not follow history, unless both players pursue identical decisions to their historical counterparts.  But if you want to put yourself in the place of those commanders with all the uncertainty that they faced and execute your plan to achieve victory, this game should just serve your needs.  Personally, I intend to try it out in the future with the added uncertainty of using my sleds so that I cannot initially see who is leading each Force. nor who may be in command when forces split up.


  FROM SALERNO TO ROME FROM DISSIMULA EDIZIONI This is only the second game to be published by Dissimula Edizioni   and I would like to than...

FROM SALERNO TO ROME FROM SALERNO TO ROME

For your Wargamer, Toy soldier collector, MiniFig collector, military history nut. Reviews, interviews, Model Making, AARs and books!

operational level

 FROM SALERNO TO ROME

FROM

DISSIMULA EDIZIONI


This is only the second game to be published by Dissimula Edizioni and I would like to thank this small Italian games company for providing me with a zip-lock edition of this second game.  The focus on the 10 month Italian Campaign of WWII was what first drew my attention.  Then the pictures that I saw of From Salerno to Rome grabbed my attention even more because of the apparent quality of production.  The real thing, when it arrived, fully lived up to those images.  I would single out the two maps that overlap perfectly to form the full campaign playing area.


It stretches from Rome on the north edge of map 2 to south of Salerno on the south edge of map 1.  Details are perfectly clear and the muted colours work well to portray the Italian landscape.  The units and markers are well rendered, in particular the Corps and Division counters that are used on the Army display charts are very attractive.  


Unfortunately my photo of the Allied units in their counter sheets don't do them justice and distorts the colour, but this close up of one sector gives a more accurate impression.
 

 I deliberately chose to show some of the counters as they are when just pressed out of the counter sheets and some after I had clipped the corners.  Though a lengthy process, I would strongly recommend it for the additional effect created on the map.

All the play aids are of a similar good quality, ranging over the unit displays for the Campaign game [including a very useful set up map] and the Operation Diadem Scenario, a full colour terrain and combat chart and each player's Operational Costs chart and Army Displays.
Setup Chart for the full Campaign Scenario
The final element is the Rule book which is printed on such good quality gloss paper that it feels almost like thin card - definitely a substantial production.

In all there are five Scenarios, each of which is played on a single map, providing substantially shorter sessions than the full 10-turn, 2 map Campaign.

Scenarios
Ortona :  1 Turn
Salerno : 2 Turns
Anzio:    2 Turns    
Operation Diadem: 2 Turns
The Kesselring Option [hypothetical] 2 Turns

The full Campaign: 10 Turns

You will certainly make use of those shorter Scenarios for a number of reasons.  The first is that they make good games in their own right, especially the Salerno and Anzio ones. The second is the length of time the whole Campaign will take to play, unless the typical Sudden Death victory condition is achieved and finally the third is their need to help in learning the rules.

This is not a simple game in terms of the rules themselves, nor in the sense of understanding them.  The translation from Italian into English has some familiar issues, such as lack of correspondence in subject and verb between singular and plural, inexact use of prepositions and slightly ungrammatical phrasing or a lack of idiomatic phrasing.  However, none of these hinder understanding.  Rather the difficulties veer between the innovative concepts and the broad explanation of some of them.

First of all, however, I'd like to take you through the overall course of a turn and look at some of the uncertainties and ambiguities, while pointing out the many strengths of the design.  Perhaps the major point to be aware of is the inaccurate picture given by the Sequence of Play Chart provided for each player.  

Each Turn begins with the recording of that Turn's Action Points on the player's Army Display Chart, one for the Allied Player and one for the Axis Player, as seen below.


The most important point to grasp is that a Turn is made up of a variable number of Impulses.  In the first Impulse of every turn [except the first turn] both players will have the opportunity to use limited Replacement Points to build up flipped units on the map or rebuild eliminated ones.  In designated Impulses, Reinforcements first become available, but may be delayed by a player's choice.  All other aspects of an Impulse are identical.  They involve a simultaneous Planning Phase and then an Igo-Ugo Operations Phase.  Though the Initiative Player performs all their Moves and Combat first and then the Non-Initiative Player does likewise, this does not convey the interactive nature of an Impulse, which is among the strong points of the system.   

This interaction stems primarily from the use of Reserves and the ability of many units to React.  What I found unusual was that most Axis units possess this latter factor, whereas hardly any Allied ones do.  This is one of several areas where I desperately wished for some Design Notes to explain the thinking behind the decision. 

However, let's look at Planning.  Each Player has a Chart of Operations that they can select from: the Allied Player has a wider range of choices, virtually all of which need to be paid for from that Turn's Action Point [AP] allocation, whereas the Axis Player has fewer options, but several cost no APs.

On each Player's Army Display, you have Corps and Division HQ markers that will be turned to their Activated side if they are chosen for Operations that Impulse.  Should the number of Operations be few, you may be able to remember exactly what you have chosen, but for a more extensive range of Operations, I'd strongly recommend a handy note pad to jot them down!

The full range of Allied Operations options takes in  a few that are optional rules, such as Intelligence which allows you to examine a number of enemy stacks and several very simple choices such as additional airplanes.  The core of your choices is the activation of Divisions or Corps, including the ability to reassign Divisions to other Corps and even to other Armies.  Again the Allied Player has to pay for these Operations with APs, while the Axis Player can do so for free.  This disparity is open to question, though I assume that it depends on the reputed German ability to cobble together their units as needed by defence and desperation.  [Oh Design Notes where are you?] 

Whether this gives the Axis an edge which may affect play balance, I don't yet have enough playing time to comment on.  However, if it should, an easy remedy will be to introduce some relevant AP cost
similar to the Allied one.  Also there is one Allied action choice that can be made only ONCE in the whole game and that is a Major Landing.  Considering that the historical Campaign had both Salerno and Anzio and these are individual scenarios in the game,  I was a bit surprised that the Allied Player can only launch one!  Still that can also be house ruled should you wish to or feel it necessary.

Overall the Planning Phase is one that, I strongly enjoy and welcome as a concept rarely met with in board wargames design. You really do feel like you are genuinely a senior commander, having to decide what operations you are going to undertake and when.  This is especially true as noted above for the Allied Player with their choice of when exactly to launch that one and only Major Landing Operation. 

The obvious drawback to the Planning Phase is that it does add considerably to the length of each Turn, as it is being undertaken not once a Turn, but once every Impulse!  That said, it is a feature I wouldn't miss for the world!  

The number of Action Points each player spends in an Impulse then determines who has the Initiative and moves and fights first in the Operations Phase of that particualr Impulse.  This too has a subtle influence on game play.  How much to allocate and when?  Commit too much too soon and your opponent may have too much of a free hand in a later Impulse that turn.  Or can you strike a strong early blow that may mitigate your opponent's ability to retaliate later.  This is another excellent conundrum created by this part of the game system  and another big plus to chalk up for the game.

So too is the choice between planning several single division operations and Corps Operations.  The first allows a succession of small move/fight actions one after the other that might punch a hole and then exploit it, while a Corps Operation allows several Divisions all to move and then all fight.  Obviously the perfect choice is several Corps Operations in hope of creating bigger holes and greater exploitation!  All of these are very positive main elements in the game's design. 
Always useful - a full colour Reinforcement Chart

Running alongside is a mixture of smaller details that combine to create the fluidity and "feel" of From Salerno to Rome.  In no particular order, I'd like to outline a few and comment on them.  First off is naval, artillery and air power.  All can be used either for bombardment or combat support - but none of the three elements can be combined together. [Another question as to why not for the Design Notes.] 

The handling of air power I really like - a basic two planes plus an additional one based on a die roll are free for the Allies every Impulse, while the Axis have only a guaranteed single plane plus an additional one to be rolled for.  On top of that the Allies can acquire more by capturing airfields - for every three factors captured, you gain an extra airplane!  Simple, but effective.  However, it did take a question or two to shake down just how combat support worked.  In effect the use of any one from planes/artillery/naval allows a roll on the Combat Support Table to gain a DRM [Die Roll Modifier] or column shift on the Combat Table for a given combat.

Another good aspect that also took a little sorting out was the use of Reserves.  First of all, you create them by placing Reserve markers on units or stacks of units belonging to a Division when you first activate it.  After the Division has moved and had combat you can activate individual Reserve units or stacks to move and have combat one hex at a time.  So no combining Reserves from different hexes to attack, though a meaty Allied single stack can pack a reasonable punch!

Should the non-Active opponent have Reserves, they can interrupt by activating a single unit/stack.  This can produce an exchange of small actions.  However, some aspects of these rules were only brought to light through posing questions on BGG.  In particular, the fact that if either player passes on this exchange of Reserve activations, they cannot activate any more Reserves that Impulse.

Both the Movement and Combat Rules are remarkably short and straightforward, while covering all the familiar, typical features.  So Movement includes Strategic Movement that quadruples or triples movement allowance, provided the unit remains at a specified hex distance from an enemy unit and as always there are the benefits of road movement, bridge blowing, bridge repair and construction.  The one major surprise was that all units can move from hex to hex when adjacent to the enemy at the cost of +1 Movement point.  Very unusual! 

Combat is covered in less than two pages.  It's a standard odds ratio table with DRMs and column shifts, embracing terrain, armour bonus and tank shock, combat support, encirclement, retreats and advances.  All very easy to understand and apply.

The final unusual feature is that there are no Artillery units, only markers for Army, Corps and Divisional artillery.  The latter can be redeployed at the beginning of every Impulse!  Thankfully there are not large numbers of artillery or this might have been a chore. This allows for a fluidity I find strange, though the fact that the markers always remains where placed until the next Impulse makes for very careful placement. It also means that attacking units will often move out of range of artillery support especially at the Divisional level.
Again a curious feature for which I'd love more design explanation.

I like the fact that there is a range of minor Optional rules that are integrated at the appropriate point rather than bundled together in a separate section later.  I also like that they are additions [some intended to add historical detail] rather than modifications that change, modify or amplify existing rules.  

Overall, the rule book itself is an attractive production, though very limited in illustration, until you reach the 4 page Example of Play which does encompass most major elements of the rules.  Below is a good illustration from the Example of Play.

I certainly found this a great help to understanding the interaction of some of the rules.  As I've pointed out interpreting accurately some of the rules isn't always easy.  Sometimes play helps to clarify, but equally some of the uncertainties arose during play.  The system is definitely not one for the beginner and, as I've indicated there were several times when the rationale behind some rules would help especially when they didn't seem to fit with what I know of the historical elements. 

However, this is both a system and a campaign of WWII that I feel is well worth the effort to master.  The flow of the game and the situations in the shorter scenarios that I've played have been both enjoyable and engrossing.  The visual appeal of map and counters when set up is excellent and the feel and involvement of both players at all times very rewarding.  I only wish that I had the room to be able to leave the full two map campaign set up for the very lengthy period of time necessary. But that will have to wait until the sort of three or four day gaming conventions that I used to enjoy return to normality.

Once again thanks to Dissimula Edizioni for providing a review copy and I certainly hope that they will take this system to other WWII theatres.  Until they do, I'm looking forward to their next project which takes us to the American Civil war - another of my favourite wargaming periods - and the Chancellorsville Campaign.


hpssims.com