second chance games

Search This Website of delight

Showing posts with label aar. Show all posts

This is the opening scenario of the recently published A Most Fearful Sacrifice , the latest development in Herman Luttmann's Blind Swor...

AAR THE SLAUGHTER PEN AAR THE SLAUGHTER PEN

For your Wargamer, Toy soldier collector, MiniFig collector, military history nut. Reviews, interviews, Model Making, AARs and books!

aar

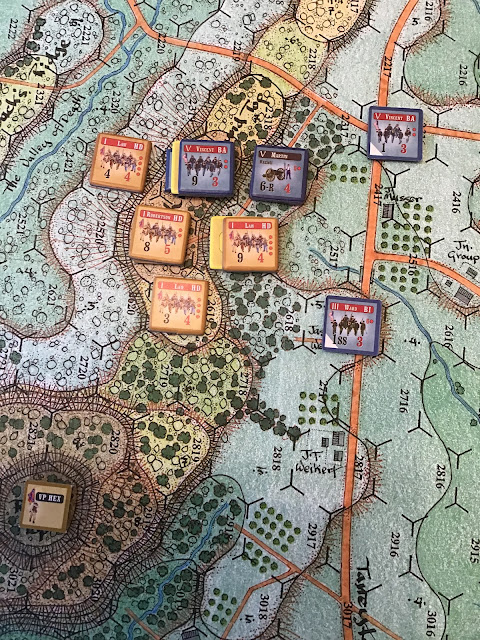
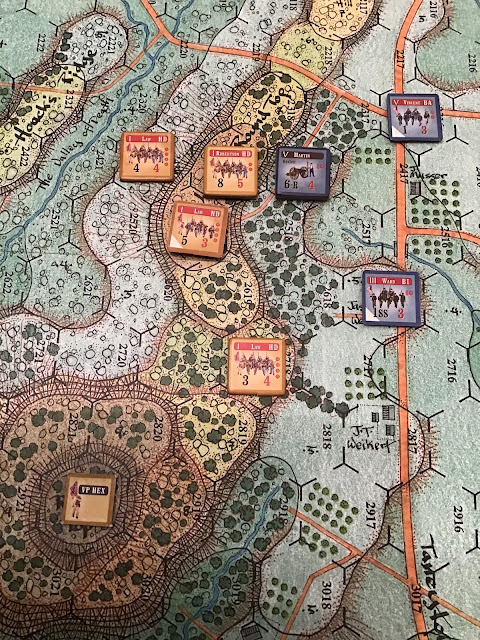
This is the opening scenario of the recently published A Most Fearful Sacrifice, the latest development in Herman Luttmann's Blind Sword system for fighting ACW battles.  Though billed as a learning scenario, it gave a dramatic first outing with this superlative game.


The Slaughter Pen : Scenario 1

Gettysburg July 2nd late afternoon around 5 p.m.  Confederate forces seem to have made ground in their desperate assault on the Round Tops.  If successful this could unhinge the whole Union defence.


Events were soon to unfold an even more dramatic scene, as both sides witness their strongest units shaken by the loss of a colonel.  The first to recover seem to be the Union troops, as an element of Weed’s brigade suddenly appears on the lower slopes of Little Round Top.  This is rapidly followed by sight of Martin’s small artillery unit struggling to join them, while the strong, but shaken unit of Vincent’s brigade first moves onto the crest of Little Round Top and then recovers good order.  Offsetting this is the failure of Ward’s units to do anything and they’re soon to pay the price for their dilatory lack of action, as one group are fired on and fall back from their position.


A blizzard of bullets looks like a leader must surely fall, but when the smoke clears amazingly no one has been hit!  Hard on the heels of this comes the arrival of a Confederate courier.  Goodness knows what news he has brought, but all of Hood’s valiant troops, as one after the other the men of Law’s brigade surge forward. A new unit attempts the first assault on Little Round Top, but is forced back.  This is followed by a stronger unit crashing into a weaker Union force on the lower slopes and putting it to flight.  Heartened by this success they press on to attack the strongest of the Union units defending one end of Little Round Top.  Surely this is courting disaster!


To all the Union troops’ horror, this powerful unit is shaken and forced to retreat.  With part of the hill taken and Big Round Top already in Confederate hands from the previous hour’s fighting, Union hopes are looking slim.  To add to their woes, Ward’s small detachment of Sharpshooters is roughly handled and sent packing too!


A final renewed Confederate assault adds to the bill of slaughter and leaves the Confederates in what looks like an unassailable position with an hour of battle still left.


Can the Union still  snatch a pyrrhic victory by regaining full control of Little Round Top?  As 6p.m. arrived, Union artillery fire at last came into play and the strongest Confederate unit of Law’s brigade becomes battleworn.  This seems small consolation as in swift succession the remaining Union unit defending the peak of Little Round Top is first depleted and then shaken and forced to retreat.  Little Round Top is totally in Confederate hands.  Meanwhile Law’s battered Confederate force that suffered at the start of the hour sees its colonel hit and down, but against all the odds stands firm. Subjected to more fire it still holds, but a final assault forces it to retreat, but it does so by retreating onto the very peak of Little Round Top adjacent to its fellow unit.


Exhausted men everywhere can do no more and the remaining drama stutters to a close.   The Union force is well nigh destroyed and the Confederates hold the crucial ground.


Apologies for the lack of more pictures, as it was only the enjoyment of the game that led me to write it up as an AAR from the notes that I took during play. In the first photo, the yellow markers peeking out from under two of the counters indicate Shaken status.


Here's a link to Part 1 in case you missed it. The Kingdom of Graykeep has already plunged head first into a new age of progr...

Shadow Empire Preview: The Graykeep AAR Part 2 Shadow Empire Preview: The Graykeep AAR Part 2

For your Wargamer, Toy soldier collector, MiniFig collector, military history nut. Reviews, interviews, Model Making, AARs and books!

aar


The Kingdom of Graykeep has already plunged head first into a new age of progress, rapidly expanding its borders out from admittedly modest beginnings. As king, I have many decisions to make that will shape our future, but I am assisted by numerous advisors and staff. I plan to continue recruiting additional bureaucrats and using them to head new councils like one focused on foreign affairs, and another in charge of military research. The more funding we can provide to these councils, the more able they will be to provide me with stratagems, cards which I can play, at the cost of political points, to do things like improve diplomatic ties with a hostile neighbor, or change the tactics of individual military HQ's. Below you can see the world as we know it right now. There is much that is unknown to us, but we know that there is opportunity out in that darkness that exceeds the dangers.


Militarily, our situation is stable but still requiring my full attention. We face two points of contact with non-aligned rebel forces, and are being pressed by a minor power that has no respect for our expansion. Previously, I was able to secure basic diplomatic contact with my neighbors to the north, west, and south, and we all agreed to fix the borders in their current state. While future conflict is almost certainly still on the table, I feel comfortable enough to concentrate my forces to the east, where we have numerous active enemies, and several small towns up for grabs.


Amania (dark blue) makes a fatal error. Going beyond occupying the nominally unclaimed territory between us, they send their soldiers behind my lines, cutting off the bulk of my forces from supply just as we finish off the last of the rebels in the area. This will not stand! I have no choice but declare my first war. I had hoped to avoid this inevitability for as long as possible, at least until we had established a more robust economy, capable of replacing the losses we were sure to take. Fortunately, most of my forces still consist of militia, units which are able to replenish themselves without input from my government. On the downside, these forces are weak in terms of firepower. Our enemy appears to have two units of mechanized walkers to our single walker, but overall we have much greater numbers. 

First things first, I have my troopers breakthrough and take back control of the road leading back to Hawking, our capital. This will ensure my forces aren't soon starved for supplies. Then we begin working on turning the tables against the Amanians by cutting off a couple of their units and eliminating pockets one by one. Alas, the major power to the north, Zelaria, chooses this as an opportune time to shake us down for money. Their leader threatens war if we do not pay tribute. With their forces stationed on the border, immediately ready to attack my army from the rear if they so choose, I decide to pay the tribute that is demanded, and avoid a two front war. I've read that those never go well. 


Although it stings to lose a large portion of our hard earned cash, it will hopefully buy us time to deal with one enemy before facing another. My forces pounce on Amania forces and press them back. Unfortunately, their walkers are just as formidable as our lone steel beast, able to turn back entire companies of militia riflemen on their own. Our greater numbers soon tell, however, and we are able to isolate and defeat them piecemeal. The next turn, I notice that our borders in that area show only non-aligned rebel forces. Whether we have defeated them entirely, or if their rear was overrun by rebels, is unclear. The only thing that matters is that our front is secure and our forces can continue to advance and liberate more towns in the area. I order the expansion of our road network so that our supplies can flow to the front. With the foreign affairs situation relatively stable for the moment, more attention can be paid to internal matters. 

One matter , for example, is whether or not we should interact with an ancient AI computer found in some deep ruins back in Hawking. The machine predates all of our known histories and could give us some interesting revelations. It could cause us problems as well. In the spirit of boldness, I direct our scientists to turn it on and see what happens. The AI gives us a lengthy lecture on ethics, and then supplies the knowledge needed for us to produce more effective firearms. The ethics we take into consideration, the firearms we prepare for production.


Production, however, requires resources, and my advisors point out to me that we won't be able to build any of the nice new things they have been researching until we secure our own supplies of them. Namely, metal. Our militia army is fine for now, but if we want to build anything better, we need metal. Our dirt roads are fine for now, but if we want to build railroads, we need metal. If we want to expand our industrial base, again, metal. To that end I stop by the economic council meeting and direct them devote the vast majority of their funding to prospecting for resource deposits. The more passive approach I've taken so far has not yielded any results. I have the military continue to explore and bring more territory into our kingdom, hopefully increases the chances we will strike metal.

In the meantime I've begun buying metal on the limited open market. We have an excess of funds at the moment, since we aren't building much of anything (need metal!) and so buying it outright will get things moving for now.  I quickly learn that buying too much of one resource causes the price to sky rocket for a time, and vice versa, selling a large amount of food, something we have quite a lot of, causes its price to plummet. As a result, the amount of metal we can acquire at any one time is limited, but useful for finishing some construction projects we started long ago but never had the resources to complete.

There is one nice economic development, the first private construction pops up near the agricultural domes we built early on. A town to support the workers pops up on its own accord, and begins paying taxes. An excellent development indeed! 


Another internal matter comes across my desk. This one is a bit of a touchy subject. The Church of Syndic, by far the most popular cult within my kingdom, requests a hefty donation from the state to fund their ultimate project. They want to create some sort of super computer to solve all of our problems. Such cults are fairly common on our world, though each has its own objectives. Quite a few of my own staff are Syndic sympathizers, and they would be quite upset with me if I refuse, not to mention the church itself being cross with me. They point out that they have donated multiple priests to augment my forces by strengthening their resolve, at no cost at all to the state. In the back of my mind, I am wary of using such priests in our forces, I can't help but think that seeding too many of them among the companies might lead to some sort of insurrection. That said, they do greatly benefit the troops they accompany. 

I decide it is in the best interest of keeping everyone happy to make the hefty donation. That's money we could have used to buy more metal and other resources, but a kingdom is more than just buildings and roads, it must have a happy populace as well. Zelaria, our most powerful neighbor, is at it again with the demands for tribute. I can see their forces build up along our border at times, making everyone nervous. I tell them to shove off this time and the next. Not only because our forces now stand ready to repel any invasion, but also because I don't have that kind of money to spare at the moment.


Our investment in prospecting efforts finally pays off! A metal deposit is found in the southern region of the kingdom. Now I just need to order the construction of a metal mine and we will be in business! No more shortages, no more buying at exorbitant prices on the open market! We can really make some progress with a steady flow of materials. Oh, what's this? My construction chief is telling me that the site is too far away and outside of our logistics network. Apparently building such a facility in the middle of nowhere with no way to transport workers and construction equipment to the site is a problem. Ah, well, that makes sense. I consult the writings of my father (the game manual) and realize that I have indeed been neglecting the logistical side of things. Simply building dirt roads is not enough it seems. I order the construction of some transportation centers to get trucks on the road and supplies moving. Once again I'm forced to buy metal on the market to speed up the process. 

In the meantime, I look out across my kingdom. We have expanded further than I ever expected by this point. So far out in fact that our units can't be supplied and we begin losing contact with a few of them completely. Logistics really are important it seems! Being a king in this world is far more involved than simply ordering armies around. It requires management of trade, diplomacy, logistics, personal relationships, and more, in far greater detail than one might ever suspect. It looks like I've still got a lot to learn, but things are going quite well in the Kingdom of Graykeep. For now...


Shadow Empire is coming out soon from Slitherine Games. Stay tuned for more coverage of this fascinating title!

- Joe Beard

Day breaks over the kingdom of Graykeep. Well, calling it a kingdom would be a generous statement. Once...long ago, before the Dissoluti...

Shadow Empire Preview: The Graykeep AAR Part 1 Shadow Empire Preview: The Graykeep AAR Part 1

For your Wargamer, Toy soldier collector, MiniFig collector, military history nut. Reviews, interviews, Model Making, AARs and books!

aar


Day breaks over the kingdom of Graykeep. Well, calling it a kingdom would be a generous statement. Once...long ago, before the Dissolution War, it truly was a magnificent place known around the system. Or so the records and traditions passed down to me by my father say. Truth be told, no one can say for sure what the kingdom was like, or even how long it has been since those glory days. The darkness of endless war and devastation ruined our world, and all of the others known to man during the Dissolution War. A complete loss in communication and trade with other worlds, a regression of technology, and a total breakdown in society has left little standing in the ashes. My family line and a few thousand loyal followers have clung to each other in the city of Hawking and its surrounding villages for centuries, holding out against famine and raiders alike. Now, on the day of my coronation, as I take my deceased father's place, we are poised on the edge of a new era.


Our resource situation, after years of progress and setbacks, has finally become stable enough to support a small standing army of militia, including vehicles for some units. These forces are divided up into several smaller battalions and one, relatively, powerful offensive brigade. We know little about the world around us, only that there are green prairies to our east, a desert to the west, and mountains in between. Ancient roads, now reduced to dirt paths and traveled only by the occasional merchant, still exist and will serve as our means to resupply the troops we send afield. We do not know how far these roads extend, and will likely need to invest in building new ones as we go. 

When it comes to neighbors, we do know the names of several similar city states like ourselves, but no one is certain where their capitals lay or what their exact dispositions are towards us. The little news we have received indicates that other places are in a similar situation as us, able to field small forces to defend their territory and perhaps expand. In the gaps are roving bands of militia, holding onto whatever they can, but without any proper government. Something is in the air, a feeling of tension as if a spring were coiled, we are not the only ones ready for action. 

Our goal is to take back what was once ours, and return civilization to this planet. We will do so by force if needed, by diplomacy when possible. This objective will require us to find new resources and invest them in new infrastructure. To that end I direct my secretary to form an economic council and appoint a promising young staffer to lead it. This council will focus on finding resources and developing new technologies to exploit them. There are many other councils that will need to be formed as we go, using some of our political resources, but each one added gives us many new avenues for improvements.


Our initial ventures afield go as expected. Troops are sent down the known roads and link up our capital with several nearby villages, adding to the kingdom right away. We also stumble across the wreckage of an advanced vessel from the Galactic Republic days. Somehow, despite the centuries of time that have passed, this wreck remained hidden in a ravine and was never picked over by scavengers. Studying it will greatly help our research efforts as we work to recreate the more advanced technology of old.

As we also expected, before too long our troops begin to push up against the forces of our neighbors, who also seem to be on the move. There are no official borders established between us, as they are as much in the dark as we are. Not looking to immediately get in a fight, I pull my forces back to hold onto the towns we have found, and secure the precious advanced wreckage. In the south, our troopers do not encounter any opposing forces and continue on, locating additional villages to bring into the fold. While adding all of this additional population is the goal of our mission, it also means that we have many more mouths to feed. I decide to invest in a domed farm right outside Hawking, where water is plentiful. I also direct our work crews to start their first infrastructure project by building a short new road out to a village that we have discovered. Hopefully this will be the first step towards a globe spanning network centered around our kingdom of Graykeep.


Over the next few months, we bide our time, investing in new government councils while getting a better view of the big picture. We now have a rough idea of the forces facing us from the west, as they continue to encroach on our territory but do not yet attack. Our scouts, initially skittish, reporting the potential foes to be overwhelming in numbers, but cooler heads have prevailed and now we see that their forces in similar to our own, and we have reinforcements we can bring to bear if needed. The troops we sent south find some working automated machine gun bunkers from the Republic days and bring them online. Unfortunately, these units cannot be moved easily, and we do not yet have to means to redeploy them.

As most of our forces are currently occupied with staring down the neighboring army, I decide to invest in an independent company of buggies that can serve as fast scouts to continue exploring the unknown territory around our kingdom.


Over recent months we have tried to sneak a spy into the lands of Limehead, which have learned is the name of the nation to our west. Their forces have not retreated from the border, and I would like to know what lies beyond their lines.The first two attempts to send over a spy fail, but on the third try they are successful, we expect reports to filter back soon. Our scout company of fast buggies is almost complete, and will move out shortly.

We did get some more good news from our soldiers to the south, after some more poking around in the ruins, they recovered a fully functioning mechanized walker from the Galactic Republic era. Our rudimentary militia, equipped with only basic weapons like rifles, machine guns, and RPG's, will be happy to have this war machine bringing its additional firepower to bear. Knowing that we have so many neighbors around, and hoping for better options to interact with them, I decide to form a foreign affairs council. This will generate more stratagems for us to use in diplomacy.


The Emperor of Limehead, apparently tiring of the ongoing situation between our forces, requests that we formally recognize the current lines as the legitimate border between our nations. With the information reported by our spy, I can now see that there is mostly only mountains and desert out there, and so I decide that peace would be prudent at this time. The lands to our east seem far more promising and hospitable. Recognizing the border improves relations between us and Limehead, so I feel safe to remove the bulk of my forces from that area and send them up the road to the northeast. Our first foray into that area encountered numerous groups of unaligned militia and it is likely we will need to fight to take the resources in that area.


Tragedy strikes the scout company we sent into the wilderness to our east where no roads existed. They find a couple of villages, but upon entering one they were ambushed by the local militia forces and nearly wiped out! Of course, this will not stand. I divert some of my troops to secure those villages and the nearby sea. We will need to begin a large road project here if we want to truly control this area. Sending my forces so far into the countryside with no road for logistics is a bad combination. Running low on supplies renders even the best troops vulnerable and useless.


To the northeast, things get hot but go our way as our better equipped army is able to crush several units of unaligned militia. I've begun to consider these forces rebels more than anything else. They should know by now that these lands belong to Graykeep and standing against us is futile. There is another minor kingdom here as well, and we are able to gets eyes on their capital. Like with Limehead, we choose to respect their borders for now so that they will not molest our advances east. After breaking through the rebel lines and driving away most of their forces, we send the battle walker forward to quickly capture a couple more villages. Nothing quite like seeing such powerful ancient technology bearing our banners to bring people into the fold. 


Some of the rebel forces refuse to retreat, and are pounded by our artillery, infantry, and the battle walker. With so much firepower on our side, coming from multiple angles, we are able to inflict heavy casualties while sustaining almost none ourselves. Our forces grow confident with each victory, and kingdom of Graykeep continues to expand under my watch. At home, some new technologies and ideas are discovered, giving us new options and improving the efficiency of my government. I decide to form multiple councils focused on research and development so that we may maintain an advantage over our rivals. I suspect that the going is about to get a lot tougher.


This article is the first in an AAR series I'm doing as a way to preview the upcoming Shadow Empire. This game has really grabbed my attention with its fascinating premise and deep gameplay. It is from creator of Advanced Tactics Gold and the Decisive Campaigns series. At a glance, Shadow Empire bears some resemblance to those games, and does use a similar combat system. But. This game has so much going on that really sets it apart. The manual includes a dozen pages of back story giving context to the setting and the goes on for another 160 pages detailing all of the various systems and mechanics driving this game. It's a lot to take in, and I'm learning as I go. That's why I choose to do this AAR, to chronicle a game so you can get an idea of what it is like, and to give me time to really sink my teeth into the gameplay and the fun setting. I think this game certainly bears a close look from all wargamers and strategy fans. More to come soon!


- Joe Beard


Derby Worlds 2017 was held 7th and 8th October, just South of Leicester at the Bruntingthorpe Proving Grounds. Demo game for The Battle...

Derby Worlds 2017 Derby Worlds 2017

For your Wargamer, Toy soldier collector, MiniFig collector, military history nut. Reviews, interviews, Model Making, AARs and books!

aar

Derby Worlds 2017 was held 7th and 8th October, just South of Leicester at the Bruntingthorpe Proving Grounds.
Demo game for The Battle of Cerignola
I had no idea what to expect having never attended a miniature wargaming convention. I was going along to play a game of Magic Realm with some fellow bgg-ers.
A very special Magic Realm
I was immediately struck by how well attended the show was and therefore how healthy the miniature wargaming hobby is in the UK. Personal experience also backs up my theory that it is a buoyant hobby in the UK as I can readily find a local weekly wargaming club, the same can't be said of local board game clubs.
The Battle of Jutland (on a massive table)
If I had to guess there were probably 2,000 people in attendance on Saturday and the show literature advertised over 70 different traders on the day. Just over half of the space was dedicated to traders and demo games, and the rest of the hall was handed over to the dozens of different tournaments on offer. At the busiest time, there could have been upwards of 40 different tournament games going on.
Towards the tournament side of the hall
Another view of Cerignola
All of the demo tables were gorgeous and lavish productions of what a wargaming table can look like. I expect the reality is probably a little different if you looked in the attics and sheds of most wargamers.
First World War African battle
My game of Magic Realm, aside from being played on a phenomenally beautiful set, was a fairly typical Magic Realm affair i.e. I died on day 3. I failed 2 hide rolls and moved into a clearing with 2 Flying Dragons, a Tremendous Flying Dragon and to top it off, an Octopus was summoned at the end of my turn. That fight was never going to end well for my Berserker. I ended the game with a grand score of -30, for the uninitiated a score of 0 or higher is considered a win.
My Berserker dying
All in all, I had a great time, and could definitely recommend it for any UK gamer and if like me, you're primarily a board gamer, it is a fantastic introduction to the vast array of different rule sets, eras, scales and modelling possibilities that are readily available in the miniature wargaming hobby. I will definitely be going back next year.

 CMBN AAR  -Siege- by Pericles  

CMBN Vid AAR - Siege- by Pericles CMBN Vid AAR - Siege- by Pericles

For your Wargamer, Toy soldier collector, MiniFig collector, military history nut. Reviews, interviews, Model Making, AARs and books!

aar


 CMBN AAR  -Siege- by Pericles


CMBN AAR -Iron Horse Vale- by Pericles  

CMBN Vid AAR -Iron Horse Vale- by Pericles CMBN Vid AAR -Iron Horse Vale- by Pericles

For your Wargamer, Toy soldier collector, MiniFig collector, military history nut. Reviews, interviews, Model Making, AARs and books!

aar


CMBN AAR -Iron Horse Vale- by Pericles


Warbirds: Blitzkrieg AAR: Stuka Attack!       Click for Game Review!

AAR Stuka Attack in Warbirds: Blitzkrieg AAR Stuka Attack in Warbirds: Blitzkrieg

For your Wargamer, Toy soldier collector, MiniFig collector, military history nut. Reviews, interviews, Model Making, AARs and books!

aar

Warbirds: Blitzkrieg AAR: Stuka Attack!


Click for Game Review!

ASL AAR by Ian Willey         Being without a computer set up for VASL has meant no ASL for the last few weeks so when James wa...

ASL AAR by Ian Willey ASL AAR by Ian Willey

For your Wargamer, Toy soldier collector, MiniFig collector, military history nut. Reviews, interviews, Model Making, AARs and books!

aar

ASL AAR by Ian Willey


Being without a computer set up for VASL has meant no ASL for the last few weeks so when James was available for a FTF game I was hardly going to turn it down was I? What to play was as easy really as both James and myself have copies of PiF and with so many to choose from I went towards the back of the pack picking out BFP-140 Iron Greeting.

Heroes in Blackpool is less than two weeks away so I wanted something that included AFV's so as to help clean off the rust as James has had less play than I of late. This scenario has the Russians defending against a Polish counter attack starting with seven squads and a 37L ATG. James by comparison had thirteen squads and six tanks (my six come on as reinforcements with a further four squads). The boards are both new, BFP R & Q with Q sporting the new stone and wood mixed material buildings we had playtested way back.

I took one look at James set up and knew I was in trouble. He was set to punch straight through my forward defence and I had little behind it to stop him. I would have to scramble the rest of my troops from the flank to try and slow him down. Turn three reinforcements seemed to be a long way off.

I was fortunate that James kept his prep relatively light, though I had a forward 447 squad broken. He then ran two half squads into real squads which he had expected to be dummies and this slowed him down a little. I defensive fired with quite good results and started to relax. Big mistake, James advance fire broke another squad on the main defence and another on my right flank.

My turn 1 was all about moving units to try and occupy the last of the victory building locations and keep out of Polish LOS. Where I did stand and fight though I did break a couple of stacked squads. 

James turn two saw him use a platoon of three tanks to cut off rout paths costing me a squad and DM'ing another. He was to do this on turn three as well! I expected him to move faster but he was content in cutting off another unit in the expectation of breaking it later. Again I started to relax when my defensive fire broke yet more Poles but again I paid the price. By the start of Polish turn 3 I had lost two squads, a third was ripe for the taking and another had suffered ELR and become conscript.

James to cover his broken stack on his left flank kept a pair of squads back, this was smart thinking as I would have happily sent a squad or leader off to keep them DM but it did even the odds a little in the front line. He made the mistake of leaving one three tank platoon in motion and the other was operating in effect behind my lines. He was now mopping up the first of the three VC buildings and had troops ready to take the second during close combat which they did with ease.

My turn three saw a key Polish unit break to prep which allowed me to get three of the four reinforcing squads into the edge of the village. My tanks having 22MP's meant I was able to come round behind his motion platoon and set up for a turkey shoot. The other three ran into the village and blocked the open route into the last VC building. At last I was starting to apply my will on the game.

James quickly took out a tank that I had allowed him a shot at. The only compensation was that it meant his platoon was staying in position. A move round the flank and freezing a squad or two was what I had feared. The three ambushed tanks scuttled off surviving all my fire much to my annoyance. But James had paused in his attack, I would get troops into the last victory building in force before he could attack it. 

The ambushed platoon had positioned itself such that one tank of his could still fire on mine but I was to fire first. My next shot was a CH burning his tank out and with the smoke generated reduced the effectiveness of his kill stack. I packed the building with troops and awaiting his next turn.

James attacked heavily in turn five but half his attacking troops were broken. The tanks mostly ignored each other going after infantry but just as it seemed the Poles would get into the building a lucky sniper broke the lead squad.

My fifth turn failed to break any of James units, here we go I thought as the defensive fire phase came round. I suffered the one broken squad which was replaced in the advance phase. I had the building loaded with troops adjacent for a last turn counter attack if required. With troops upstairs as well as down I was in an extremely strong position going into the Poles last turn.


James prep failed to break any of my troops, it was his turn to try and survive defensive fire but without the +3 cover. As you would expect he suffered a few breaks and enough pins that meant he could not advance into the two ground level hexes to try and break me in my last turn. It was now mathematically impossible to win and James conceded.

So how did it play? Well I thought I was on the losing side from the moment I came back in the room post James set up. Through the first two turns I went from your losing to just maybe you can do it. Turn three actually had me thinking I had a better chance of winning if James did not attack hard. In the end it kind of worked for me that he did try for the building rather than trying to isolate it. My tanks simply put him off. Turns 5 and 6 I finally felt in control as his infantry were slow at rallying.

As for Poland in Flames as a product? Well I have playtested a fair few so I already know it has some excellent scenarios in it and whilst I don't think this is a future classic it does allow both sides to mix up attack and defence so it should get some solid play and it's small enough to get played through in an evening. I would be happy to play it again and it's always good to have a scenario where the Poles are attacking.

Ians Blog

Editor: Hopefully the first of many ASL AARs from Ian:)
 Be sure to check his blog


Let's Play: Graviteam Tactics, Shilovo 1942 DLC, Part 001 POCKET SLAUGHT... Let's Play: Graviteam Tactics, Shilovo 1942 DLC, Part 001 POCKET SLAUGHT...

For your Wargamer, Toy soldier collector, MiniFig collector, military history nut. Reviews, interviews, Model Making, AARs and books!

aar


If you want to start at the beginning, here's  Part 1 A brief recap: I have succeeded in my first objective of supplying an existing F...

Early Access Preview: Afghanistan '11 - Part 2 Early Access Preview: Afghanistan '11 - Part 2

For your Wargamer, Toy soldier collector, MiniFig collector, military history nut. Reviews, interviews, Model Making, AARs and books!

aar

If you want to start at the beginning, here's Part 1

A brief recap: I have succeeded in my first objective of supplying an existing FOB with two truckloads of supplies. I now need to push up my Hearts and Minds score while defending the FOB.

The FOB is loaded with troops and supplies, but is still quite isolated from HQ.
After taking a few dings in recent turns, I'm in the negative on Political Points (PP) and can't do much. I figure I will slow things down for a few turns and try to consolidate my position.


Units can be sent back home to regain some PP.
I'm forced to send home an Apache attack helicopter to shed some of my PP debt. I need to get back in the positive quickly in case an emergency crops up, and I have need of the special abilities like airstrikes or supply drops.


Some good news!

The coalition supported candidate wins the Afghan national elections, this means we get a few bonuses like reducing the number of Taliban missions. As you will see, this reduction was hardly felt...

Sending vehicles ahead without mine sweeper support is dangerous.

I send a transport loaded with some ANA soldiers down south to visit the friendly village there. Since it is far from the mountains, I decide to risk sending it racing ahead without mine sweeping operations going first. My Husky minesweeper was already damaged by some roaming Taliban. Unfortunately, the ANA troops hit an IED, which ruins their whole day. Now I have two vehicles damaged and exposed.

Heavy enemy presence detected!
I can't risk sending the Husky back to base without scouting the area, so I launch my recon drone. It's not a pretty picture, a total of FIVE Taliban units are hanging around in the area. 

Taliban sent packing.
 I hit the Taliban with artillery, airstrikes, an Apache, and mechanized infantry. My ground forces take a couple of hits, but the Taliban are either destroyed or on the run. Now to get everyone back to base to recover.

Uh-oh, that was just the beginning.
Before my forces can get back inside the FOB, another swarm of Taliban units appear and surround the base. Artillery hits them again, and more coalition ground forces join the fight to hold the FOB.

Taliban defeated, but we have many wounded.
I'm able to push the Taliban back again, but I have a lot of wounded soldiers. I use the engineers on hand to add a field hospital to the FOB so that my infantry can be healed up to full strength.

Here we go again.
On the next turn I organize and dispatch a small convoy to head west across the river and build a new FOB. They leave just as another wave of Taliban fighters moves against the FOB. 

Oh, come on. Right now?
Congress, in its infinite wisdom, decides to cut off funds even as the fighting rages here on the front lines.


The area around the FOB is looking pretty scorched after constant battle.
Once again, my forces are able to beat back the Taliban. My convoy sent west encounters no resistance and manages to set up a new FOB. Things are looking good!

I spoke too soon...

The enemy gives me a few turns of relative peace, and I use the opening to deploy some troops to the nearby villages, knock out a couple of opium fields, and fly in additional artillery ammo to the FOB.  However, the relief does not last long, another large wave of Taliban insurgents appears around the FOB.

What a mess.

Although things had been going quite well at the western FOB, somehow an enemy group slipped in and planted an IED just outside the line-of-sight of my FOB. An already wounded infantry unit sent on a routine trip to the village was hit and destroyed.

When it rains, it pours.
My recon drones will now be more expensive to deploy. I did not have much luck with events during this scenario.

The western FOB is now threatened as well.

Attacks on the central FOB continue, I lose another helicopter to RPG's, and now my western FOB is surrounded and has no infantry available to defend it. I also ran into several annoying bugs that I did not encounter during the first portion of this AAR. 

As my score begins to slip further and further from reach, I decide to call it quits for now. I conceded defeat.

The final game state.

I look forward to playing a more updated version of this game, and will give it an in depth review on or right after the March 23rd release. There are a lot of good things going on here, but as you can see, the very first scenario out the gate is quite difficult to even survive, much less win. The balance currently feels a bit off. I was hesitant to ever send my regular US infantry into combat with Taliban fighters, since they had an almost even chance of losing. The ANA infantry had even worse odds. This meant I only had a few options for attacking the enemy, and there were a LOT of enemies around. I'm still very much a novice at the game, so maybe the balance is fine and I'm just not approaching things correctly.

There were also more than a couple of bugs, but that's to be expected at this point. I imagine most have already been ironed out and will be patched soon. My favorite was a Taliban unit that survived being shot at by an Apache, ran around the perimeter of my FOB, shot an RPG at the helicopter, then teleported a half-dozen hexes away, turned and fired back at the FOB, blowing up a supply truck, then disappeared into the fog of war. Those guys were just a little over-powered, I have to say! 

I anxiously await the final version of the game, and look forward to giving it a full review sometime next week. Although this match ended in a frustrating way, it still did a great job of capturing the frustrations of the real conflict. There is a constant struggle to achieve multiple goals at the same time with limited resources.

Afghanistan '11, developed by Every Single Soldier and published by Slitherine, is the sequel to Vietnam '65. This new title ta...

Early Access Preview: Afghanistan '11 - Part 1 Early Access Preview: Afghanistan '11 - Part 1

For your Wargamer, Toy soldier collector, MiniFig collector, military history nut. Reviews, interviews, Model Making, AARs and books!

aar


Afghanistan '11, developed by Every Single Soldier and published by Slitherine, is the sequel to Vietnam '65. This new title takes the established formula of fighting an insurgency, while winning over the hearts and minds of civilians, and adds several new layers to it. The game is scheduled for release later this month on March 23rd, so I thought I would do a preview consisting of an AAR (After Action Report) to give you an idea of how the game plays. 


Scenario Selection Screen

In Vietnam '65, there were no distinct scenarios, only a randomly generated map which always asked you to complete the same set of general victory conditions. Afghanistan '11 includes an 18 mission campaign in which you must complete specific objectives in addition to the normal gameplay loop.


Scenario Briefing
For this AAR, I will be attempting the first mission after the tutorial, loosely based on the Battle of Lashkagar. Although the game is titled Afghanistan '11, the campaign begins at the start of the conflict. These scenarios are not detailed recreations of the events described, but the map design and objectives take their inspiration from the same type of challenges faced in reality. 


The Strategic Map View
 Above you see the strategic map, which includes tabs for a lot of useful information, and icons showing everything of importance in the field.  My objective for the scenario is to resupply the FOB (Forward Operating Base) in the middle of the map, with my main base of operations located at the star in the lower right corner. I must then keep the FOB intact and keep the hearts and minds score at 50 or better. (This score can usually be seen in the top-middle of the screen, on the left.) The other icons are villages spread across the area which I must try to keep friendly. The initial obstacle here is that my HQ is really far away from everything else. My plan is to greatly reinforce FOB Bravo and use it as a jumping off point to control the villages around it. 


The road from HQ (bottom right) to FOB Bravo (upper left).
I expect that a lot of IEDs will have been placed along the lengthy stretch of highway between my starting point and FOB Bravo. Luckily, the US forces can call in a Husky mine clearing vehicle to lead the way. The only downside is that it is a bit slow compared to the other vehicles. However, the rest of the convoy would get blown up without it, so we must make do.


The convoy sets out.
 I have a ton of political points available, so I deploy a fairly substantial force right off the bat. A large convoy carrying supplies, infantry, special forces, and an engineering unit, the Buffalo. I also send a Chinook ahead with heavy artillery for the FOB and send some Blackhawk-borne troops to visit the nearest village.

Political points are used for pretty much everything you do. Requesting reinforcements, building new FOBs or roads, and even moving units around costs political points. You have to balance between using enough to get the job done (so you can generate more points) and overstretching yourself to the point that your forces become ineffective, as you cannot do as much once you run out of points. This number can even go negative, so you have to be careful. 

Trouble ahead.
Before going any further, I use one of my special abilities, the UAV, to scout ahead. It spots three militia units on or near our planned route.  Militia spawn in undetectable caves in the mountains and proceed to place IEDs along roads and around villages. Although you can't stop them from spawning, if you attack them they will flee and abandon their bomb planting mission. Taliban units are much nastier and more aggressive, they will flee when attacked, but then regroup and continue their mission. Initially Taliban will only appear along the east map edge, representing the Pakistan border, but if you let the allegiance of a village slip away the Taliban will start spawning deeper into the area of operations.


An Apache attack generates mixed results.
 I take out the militia along the road with a powerful airstrike, another of my abilities which has a three turn cooldown. It also costs political points to use, if you run out it is no longer an option.  I request an Apache to help me take out the other militia units. While engaging the first group the Apache suffers some damage. This costs political points as the folks back home don't like to see American forces damaged or defeated. Being a rookie commander, I didn't notice that the Apache can make a long range attack, which would have been far safer.


Heavy Artillery. Look at that range!
 The rest of the journey to FOB Bravo is uneventful. The Husky clears several more IEDs, but no enemy infantry are spotted. Back at HQ, a special forces unit has finished training a new artillery company for the Afghan National Army (ANA). Your Special Forces units are not good in direct combat, and can't make village visits, but they do have several special abilities, which includes training ANA units. This saves you from calling in more expensive American units. At the HQ you can train artillery and APC units, and at FOBs they can train ANA infantry companies. The ANA troops are better for visiting villages, but aren't quite as good in a fight compared to the American infantry.  In some scenarios you will need to build up a sizable ANA force before reaching a certain turn when the US forces will leave and the ANA will have to fend for itself.


The FOB artillery can now cover the central region of the AO.
 Once my Buffalo engineer unit reached the FOB I had it build an artillery pit and maintenance yard. These upgrades are fairly expensive, but will be needed to make the FOB a hub for my activities here.

An opium field spotted north of the right village.
 While the ground convoy moved to the FOB, I had my Blackhawk continue carrying an infantry unit to the villages furthest north. The one on the right, up in the mountains, proved uncooperative and is leaning towards the local militia. The people in the village on the left were more helpful, and told us about the location of an opium farm back near the first village. Helicopters are much more expensive to operate than ground transports, but can get your troops around the map in a hurry. I was able to visit both of these villages in a single turn.


The Taliban shows up.
 Back at FOB Bravo, things become a touch hotter as Taliban and Militia forces move in. Some rapid artillery strikes send them running. I also send an infantry company south to the contact the nearby village, sweeping for IED's along the way. Clearing these explosives always makes the closest village favor you more.


More Taliban!
 Up north, my troopers take care of the opium field, and also spot a Taliban technical on their way in. The Taliban unit fled, but my UAV spotted them again. Another airstrike and the world is a safer place. Removing the opium fields helps you by cutting off funds for the Taliban, but also makes the associated village dislike you, since your forces just took away their only cash crop.


An ideal sight!
 On the next turn I send my Buffalo engineer unit south from FOB Bravo to build waterworks in the village there. These people are very appreciative and now fully support us. After re-supplying the Buffalo I will send it back to connect the road to this village. Building up the infrastructure of local villages like this will help you win the hearts and minds campaign, but also costs political points to build, and creates new targets for your foes.


Cast your vote.
 Election time eventually comes, and I must choose who the Coalition will support for President. The candidates will have various positions that make your life easier or harder. You can spend some political points here to ensure a victory, or just try to maintain order on the battlefield. The Taliban will also step up its efforts right before an election.


My second convoy runs into trouble.
 Several turns later, things have gone against me to some degree. Although I have won over a couple of villages, others have swung against me. I decide to send a second, smaller convoy out to the FOB in preparation for an expedition into the western half of the map. Another FOB there will give me a strong point to work from in that region. Unfortunately, my Husky stumbles into a Taliban unit and suffers some damage. The Taliban forces flee and the infantry patrol I send out to find them has no luck. My UAV is already engaged elsewhere.


My Chinook bites the dust.
 On the next turn, disaster strikes. My Chinook had just completed a mission to supply a village with U.N. aid (which pushes favor in your direction, and of course is all warm and fuzzy). On the way home it flew right over a Taliban squad that damaged it. Then, just out of reach of the HQ, it ran into another Taliban squad, which was able to shoot it down. This gave me a pretty severe political point loss, and now my options become more limited for the time being. I hadn't realized that the helicopters were so vulnerable when moving. My movements must be much more careful in the future.


The situation as it stands on Turn 11.
At the end of 11 turns, my situation is a mixed bag. I have lost political support at home, but not everything is bad in the field. I have the full support of two villages, and have a very strong position in the middle of the map. Several enemy units have been destroyed, and numerous IED's cleared. My planned move into the west should net me one more village there. I must work to win over the village between my FOB and HQ, since it is now spawning Taliban units, and they are throwing serious wrenches in my plans.

The elections will conclude next turn. Hopefully the Coalition friendly candidate will win, and the momentum will shift back to us.

Look for Part 2 very soon!

- Joe Beard


hpssims.com