second chance games

Search This Website of delight

  Skies Above Britain by GMT Games  It is 1940 and Britain stands alone in Europe against Germany and Italy. So many books have been written...

Skies Above Britain by GMT Games Skies Above Britain by GMT Games

For your Wargamer, Toy soldier collector, MiniFig collector, military history nut. Reviews, interviews, Model Making, AARs and books!


 Skies Above Britain


by


GMT Games


 It is 1940 and Britain stands alone in Europe against Germany and Italy. So many books have been written about Churchill's 'Few' that I would be surprised if any grognard hasn't read at least a few of them. To either soften Britain up before Operation Sea Lion or to win the war all on its own, both have been put forward as German plans. The Luftwaffe is ready to take on the Royal Air Force. From Norway to the French coast Heinkel 111's, Dornier 17's, and Messerschmitt 109's are starting their engines to start flying over Britain. It starts with Aldertag (Eagle's Day) which was August 13th, 1940. The Battle of Britain actually started in July. Aldertag was the start of a massive German attempt to bring the RAF to its knees. Luckily for the free world the British won the battle. In actuality the Germans lost so many aircraft that they had to switch to night bombing at the end of the blitz. By the end of October 1940, the Germans had pretty much given up on anything more than nuisance raids. The British Spitfires and Hurricanes had won the day.  


 This is what GMT Games has to say about the game:

 "Skies Above Britain is a solitaire game depicting a Royal Air Force squadron of Hurricanes or Spitfires waging a desperate effort to disrupt and destroy German daylight bombing raids over southeast England in the summer of 1940. The player’s individual aircraft—each represented by a stickered block—must locate the incoming raid, intercept it, and evade or defeat swarms of escorting German fighters that usually outnumber you and whose pilots have superior experience and tactics. The game simulates the dogfighting and fighter-vs.-bomber action at an individual aircraft level using a card-assisted system that simulates key tactical decision-making without losing the feel of fast-paced aerial combat. A player can fly scenarios representing an individual patrol or use the patrol generator to create an endless variety of realistic individual patrols, multi-patrol campaigns, or larger campaigns covering the entire Battle of Britain. Each patrol will take a half hour or more to play, while a campaign can last anywhere between 6 and 28 patrols."


 So, the game follows in the footsteps of 'Skies Above the Reich' and 'Storm Above the Reich'. It is a solitaire game where the player tries to stop the German bombers at all costs. 


  This is what comes with the game:

1 Interception Game Board
1 Squadron Display Game Board
1 Me-110 Circle Display
4 Counter Sheets
1 Rules Booklet
1 Situation Manual
1 Optionals Booklet
3 Player Aid Cards
200 Playing Cards
1 Pad of Roster Sheets
2 Historical Log Sheets
1 Sheet of Stickers
38 Wooden Blocks
10 Wooden Cubes
1 Wooden Cylinder
2 Dice

 So, compared to the last two games in the series you now get to fly for the good guys. You also get to tackle bombers that are much less dangerous to your fighter than B-17s and B-24s were to the German fighters. Of course, your weaponry in 1940 is nowhere near the strength of the weapons on a 1944 German fighter. Your planes are mostly armed with eight .303 caliber machine guns, essentially the size of a rifle round. 


 The games in the series have two things in common. One, you are flying fighters against enemy bombers. Two, the boxes are heavy enough to start a curling routine with. Once opened, a cornucopia of items seem to come spilling out of the box. Looking quickly at the six decks, pilot logs, and all the other components might lead you to think "what have I gotten myself into", or "this is too much of a game for me". Then you get a glimpse of the three different rules/manuals that come with the game, and you are certain you have bitten off more than you can chew. Just relax and sit back and take a few slow breaths. It is nowhere as bad as it seems at first. 


 The first thing that you will look at upon opening the box are the above stated three rules/manuals. The Rulebook is sixty pages in length (remember to breathe). Even though it is the same size as most rulebooks it just seems larger to me. It is made with glossy paper, and it comes with wonderful extremely large printing. Everything about the Rulebook is big. On every page is a beautiful full color example of play or illustration to help you learn the rules. Next up, we have the Situation Manual. This has the different scenarios and is also chock full of example of play. It is fifty-one pages in length and is also made of glossy paper and has large print. The Optionals manual is produced the same as the other two and is nineteen pages in length. It comes with the optional rules and a historical pilot roster which can be copied and used. I think this is a very nice touch. Then comes a page and a half of Designer Notes followed by a nice sized bibliography. 

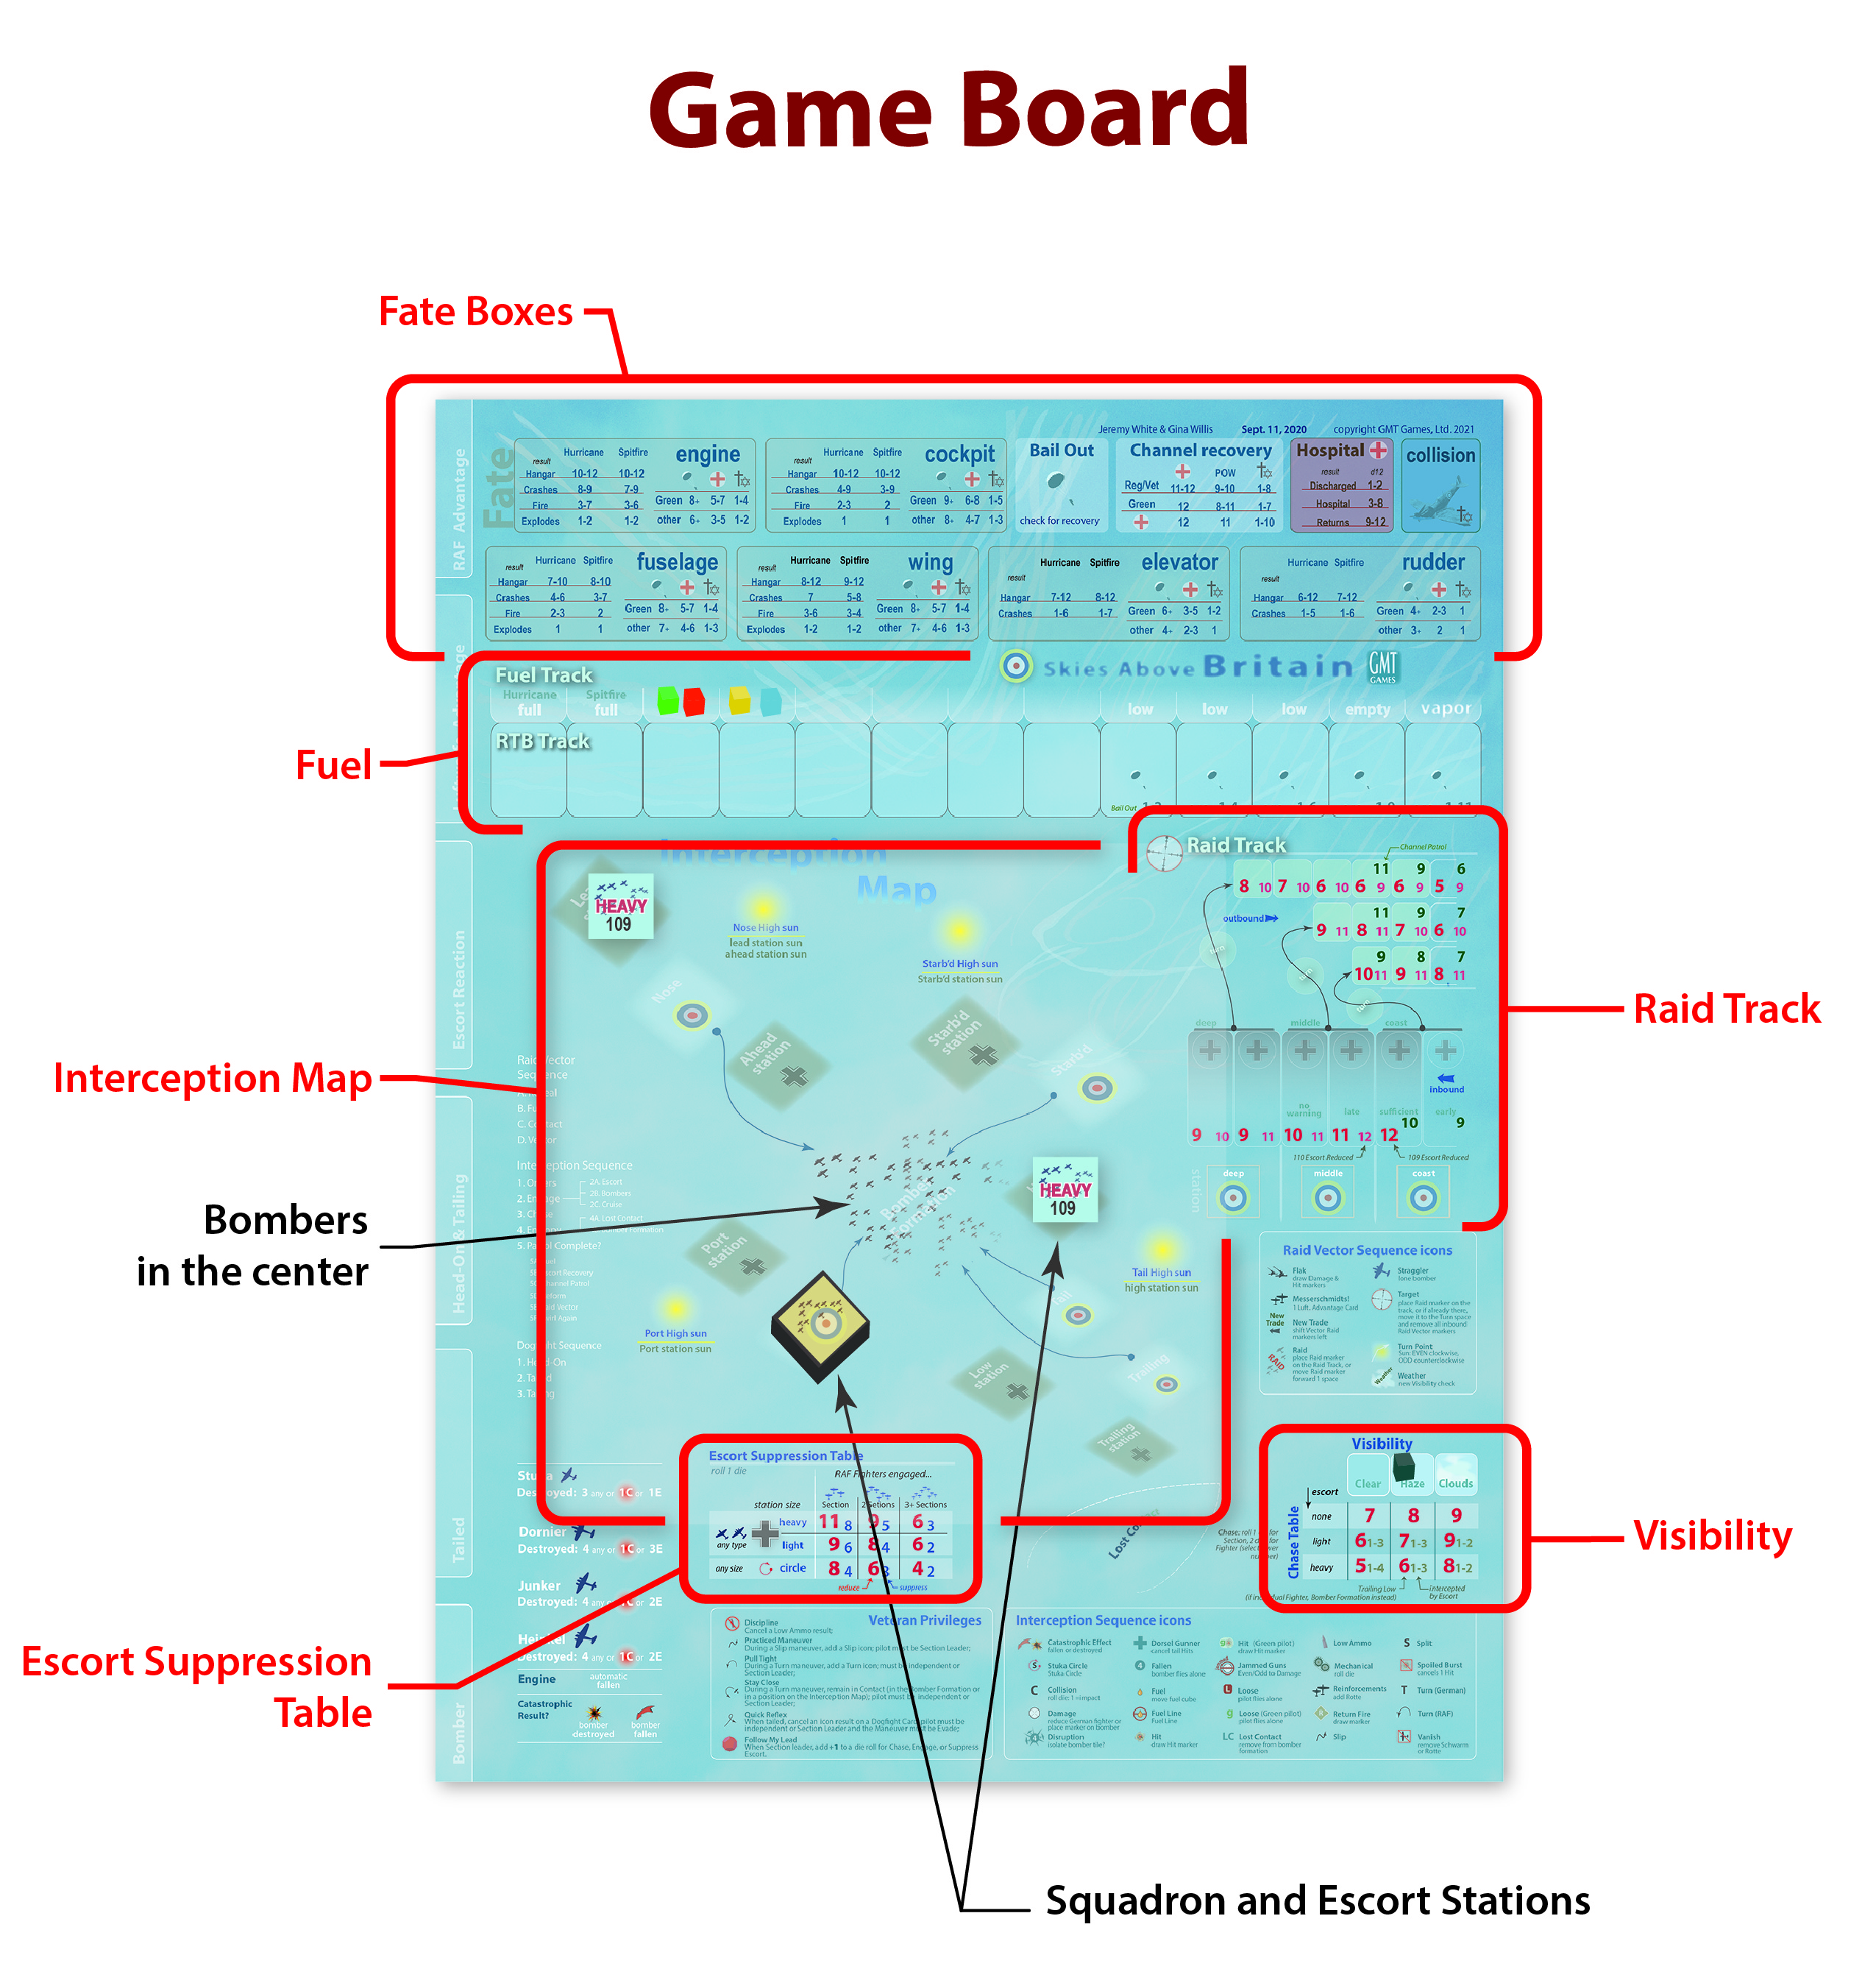
 One difference from the other games is that the German bombers come on large tiles, as counters, instead of them being on the game board. There are two full counter sheets of these large tiles. These represent the Heinkel 111, Junkers JU-88, Dornier Do-17, and Stukas that you will be trying to shoot down. Then come two more counter sheets. These are mostly 5/8" in size with some being as large as one inch. These come with either nicely done pictures of different fighter pilots, or the different control markers needed for the game. They are very artistic in their style and are some of the most pleasing to the eye counters I have seen. Next comes a small sticker sheet which are used on the wooden blocks that come with the game. These are just as artistic as the counters. The thirty-eight wooden blocks are mostly black squares that the stickers will be attached to. A small amount of dexterity is needed for this, unless you have some freeloaders (sorry, I meant children) around to do this for you. There are six decks of cards: Escort Reaction, RAF Advantage, Luftwaffe Advantage, Bomber, Tailed, and Head on & Tailing. These are heavier than usual cards that do not feel flimsy to the touch. The front of the card has one of the names above while the back shows you one or more example of how it is used. Then comes two card stock Pilot Rosters. On one side is a squadron with names and on the back are Squadron Logs. These Pilot Rosters are also historical for the 303 and 54th squadrons. You also get a pad of the same with no names of pilots or a squadron number on them. As I mentioned above, the addition of some historical names really helps with the immersion and is a great addition. There are three large folding Player Aids that are made of card stock. They are for the Interception Sequence, Pilots, Raid Vector Sequence, RTB Sequence, Intercept Bombers, Intercept Escort, Sequence of Play. So, everything is right at hand without having to peruse the Rulebook each turn, at least in the beginning. There is also a 'Circle Display' for the defensive maneuver that BF 110s used. Next is a small, mounted map with the Squadron Display on one side and the Advanced Squadron Display on the other. Last, but not least, is the mounted Game Board which is mostly taken up by the Interception Map. It also has some other charts and tables on it. These are exactly the type of manufactured components that we have come to expect in a GMT game. The heft of the combined components has already been mentioned for those of us who still give some credence to the weight of the box and its worth.

 
 Apparently, the idea of a Skies Above Britain for a game was not received by some as actually a game that could be designed. Here is a quote from Gina Willis, one of the designers:

"Call me stubborn, but the cold water that Mark and Jerry (Jeremy White and Mark Aasted designers of Skies Above the Reich and Storm Above the Reich) tossed on wishes for a "Skies Above Britain" only made me more curious to see if and how such a game really could be made to work."

 These two quotes from Gina Willis are about the design itself:

"Since German bombers depended more on escorting fighters for protection than their own armament, a Battle of Britain "Skies" would need to move the fighter-vs.-escort aspect of combat more to the foreground than it was in the earlier volumes."

"One new wrinkle was putting the bombers on moveable tiles instead of printing them in a formation on a board. Tiles on a tabletop could be removed or pushed apart to show disruption and attrition effects on bomber formations in a direct, spatial way."


 Some of the Optional Rules are:

Confirmed Kills - Bomber kills are recorded one for one. However, to show how many times claims were not accurate, four fighter kills equal one kill.

Weave - One section will fly above and behind as a lookout. This costs more fuel.

Random Events - Self-explanatory, and too numerous to list.

Cratered - Your aerodrome has been damaged and you must fly from a nearby one. Parts and replacements are not there, and no one can return from hospital.

Graduated replacements - This replaces the one pilot replacement after every patrol. It is done by die roll now.

 Some of these can only be played when using the Advanced Squadron Display. The Advanced Squadron Display adds more rules to the game. It is much like playing with basic and advanced rules.


 As far as my opinion of the game: do I like it? No, I love it. This next information will tell you exactly how the wargaming community in general viewed the game:

2022 Charles S. Roberts Awards Winners Announced
Best Solitaire or Cooperative Wargame:
WINNER: Skies Above Britain, GMT Games, designers Jerry White and Gina Willis

 That pretty much sums up my feelings as well. One of the best parts of the design is the fact that the Rulebook actually tells newbies "You don't have to read the whole Rulebook to start playing." Even with the number of things in the box and the three different rules/manuals, it is still an easy game to learn and to start playing. You can start the dogfighting pretty much right away. The way that the designers have added so much historical flavor to the game is also a wonderful bonus. Let us not forget the RPG part of the game. You actually feel for your small fighter pilot friends. To be able to, hopefully, follow them through a campaign let alone a single sortie is a sign of a great designed game. The tension in the game is palpable. Do you break off with your ammo getting low, or do you choose to go for that one lone bomber? Each of your decisions can be found to be the wrong one by the game's highly, (I cannot say intelligent), evolved matrix of choices the designers have given it. Just like in reality ditching your plane over Britain is usually followed by a safe parachute flight. However, woe to the poor pilot who has to eject over the Channel. This is one of those games where you look at the clock and see four hours have passed but you still sit and play a few more sorties. 

 Thank you so much GMT Games for allowing me to take Skies Above Britain out for a spin. I knew the history more from the German point of view rather than the British. This game has made me read some books that deal with the British side of the Battle of Britain. If that is all I got from the game, it is worth playing but there is so much more than that in this box.

Robert

GMT Games:

Skies Above Britain:

Link to the Rulebook:

My review of Storm Above the Reich:


They Came Only to Die: The Battle of Nashville, December 15–16 by Sean Michael Chick    I knew of the author long before I saw this book bec...

They Came Only to Die: The Battle of Nashville, December 15–16, 1864 by Sean Michael Chick They Came Only to Die: The Battle of Nashville, December 15–16, 1864 by Sean Michael Chick

For your Wargamer, Toy soldier collector, MiniFig collector, military history nut. Reviews, interviews, Model Making, AARs and books!


They Came Only to Die: The Battle of Nashville, December 15–16


by


Sean Michael Chick


 I knew of the author long before I saw this book because he is a prolific wargame designer, and a very good one at that. So, I was very curious to see how his writing compared to his game designing skills. Not that I really had a doubt in my mind. I just wanted to see how much of a crossover there actually was.


 The Battle of Nashville was certainly a battle that did not need to be fought. Lieutenant General John Bell Hood was in charge of the of the Confederate Army of Tennessee. Hood had started the Civil War in Virginia commanding a brigade of Texans. As a brigade, and later division, commander he was in the Army of Northern Virginia under General Robert E. Lee as one of its finest officers. He was wounded in the left arm at Gettysburg; the arm was left pretty much useless. Then his division was sent west with the rest of Lieutenant General James Longstreet's corps to fight under Lieutenant General Braxton Bragg. Hood fought in the Battle of Chickamauga where he was wounded in his right leg, and it had to be amputated. After his recuperation he was first made a corps commander under Lieutenant General Joseph E. Johnston in the Army of Tennessee. He then replaced him and became commander. So, he was a field commander of an army with only one leg and one arm and constantly in pain from his wounds. He fought the Union General William T. Sherman for the city of Atlanta and lost. At this time Hood came up with a plan for his Franklin-Nashville Campaign. In a nutshell, the plan was for Hood's army to go north and in doing so force Sherman to follow him. This did not happen because the size of Hood's army was no more than the Union troops defending Tennessee. This put into motion the terrible battles of Franklin and Nashville.


 The author shows us the background to the Battle of Nashville and also the history that led each of the commanders during it. He says that many times Hood has been excoriated in print and that he does not deserve it. He feels he was a commander who was put into a desperate situation and did the best he could under the circumstances. The situation that the Army of Tennessee was in, lacking almost everything that an army needs, even before their invasion of Tennessee, is shown to the reader. The actual battle and the terrible retreat that the Army of Tennessee faced in the middle of winter is explained in detail.


 The author also gives us little biographies of every commander that is mentioned in the text. The book is full of black and white pictures of the combatants and the different areas of the campaign. The one thing that I love are the maps. These are as clear and full of information as a reader could possibly want. 


 This is an excerpt from the book:

"Total Rebel losses in two days of battle were at
least 6,000 with 4,462 prisoners. Fifty-three cannon
were in Union hands. Federal losses were at least
3,000. With most casualties coming within a few hours
at the end of each day, Nashville had a fairly high loss
rate per hour. In addition, it was the most lopsided
victory achieved by an attacking army in the Civil War,
with the possible exception of Five Forks and Sailor’s
Creek, which involved fewer troops and casualties
than Nashville."

 
  The book ends with many descriptions and photos of what the intrepid amateur historian will find when going to the many historic sites mentioned in the book. I have read several of the great books that are in the Emerging Civil War Series from Savas Beatie. I am pleased to say that this volume follows in its older brothers' footsteps. This is a perfect introduction to someone who just wants an overview or a reader who plans to dig into the subject more deeply. Thank You Savas Beatie, for allowing me to review this very good volume on a little-known part of the war in the west.

Robert


Publisher: Savas Beatie


The Onin War 1467-77 by Stephen Turnbull   The author, Stephen Turnbull, has become synonymous with the history of Japan and especially of t...

The Onin War 1467-77 by Stephen Turnbull The Onin War 1467-77 by Stephen Turnbull

For your Wargamer, Toy soldier collector, MiniFig collector, military history nut. Reviews, interviews, Model Making, AARs and books!


The Onin War 1467-77

by

Stephen Turnbull


 The author, Stephen Turnbull, has become synonymous with the history of Japan and especially of the Samurai under the Shogunate. The list of his books is much too long to print here. Having read a good number of his books so far, I had high expectations for this book. I was not to be proven wrong by any means in this regard.

 The Onin War is really the start of the 'Sengoku Jidai' (warring states) period of Japanese history. This is when the power of the Shogun over the country started to wane. The Sengoku Jidai was a time when all of Japan became a battlefield for the various warlords around the nation.


 The Onin War was fought between 1467-77. The author starts the book by going back in time before the Onin War. His story starts with the Emperor G0-Daigo (1288-1339) and his attempts to take back the imperial power from the Shogun. The Shogun was originally a servant of the emperor, mostly as a general. This changed around 300 years earlier and the emperor then became just a cypher with the Shogun holding absolute power. The book continues with the trials and tribulations of Japan as different families, and strangely enough, the poor farmers rose in revolt. This boiling pot was brought to a frenzy by the of the ascension of the 'lottery Shogun' Ashikaga Yoshinori. His brutal reign as Shogun ended with a successful revolt and the loss of his head. 


 The intrigues continued until the new Shogun Ashikaga Yoshimasa was not really in control of the country at all. The various warlords did as they pleased. This ended up with two factions of the warlords attacking each other in the capital city of Kyoto. The Onin War was fought during the years 1467-77 and was fought mostly in the environs of Kyoto. The city became a burning shell of itself during the early part of the war with each warlord commanding fortified mansions in the city. All of this and more is shown to us by the author. He continues with the story of what happened after the actual fighting in Kyoto spread to the rest of the country. The book is filled to the brim with not only Japanese history but also shows exactly why the different revolts broke out. It also gives you a glimpse into the lives of the numerous characters mentioned and their biographies. You even get to see some of the trials and tribulations that the poorer folk of Japan had to go through during this period.


 The book is from Helion & Company and is part of its excellent 'From Retinue to Regiment 1453-1618' series. The book is only 120 pages but is filled with tons of information. It comes with several pages of full color pictures of places, people, and artwork about the events in the book. The rest of the book is rife with black and white pictures of the same.


 Thank you, Casemate Publishers for allowing me to review this great book on a pretty much unknown, outside of Japan, piece of Japanese history.


Robert


Publisher: Helion & Company

Distributor: Casemate Publishers


  TRACES OF WAR FROM VUCA SIMULATIONS Traces of War takes us back to the Eastern Front and its physical contents initially made me expect a...

TRACES OF WAR TRACES OF WAR

For your Wargamer, Toy soldier collector, MiniFig collector, military history nut. Reviews, interviews, Model Making, AARs and books!

 TRACES OF WAR

FROM

VUCA SIMULATIONS

Traces of War takes us back to the Eastern Front and its physical contents initially made me expect a welcome return to the system used in Crossing the Line and Across the Bug River.  The sheer quality of all its components certainly puts it in the same league.  However, a quick look at the designer's name, Tetsuya Nakamura, and the fact that this is a re-tread of the Japanese magazine issue, Manstein's Last Battle, made me realise that this was a very different and simpler system.  I had encountered his system in the MMP production of A Victory Lost and like many others had both enjoyed its simplicity and playability, but not the disappointing production values.  So it's with many thanks to Vuca Simulations for providing this review copy and opportunity to explore its qualities.

Vuca Simulations have established an excellent reputation for quality and the only feature in Traces of War that has raised some criticism is the two-part map.  There are those who, relishing the company's previous beautifully mounted maps, lamented that these are paper maps.  Others have complained of the slight imperfection in matching up the two maps, though some have qualified that their concern stems from their experience of Vuca Simulations' record for perfection!  What I do like about the maps is the almost linen-like feel to them.
 

Personally, I've not found the matching up of the two maps anything other than a minor imperfection, especially once the Soviets start advancing into that area of the map, though I would highly recommend plexi-glass sheets that are always useful, especially where you have two-map games.  
Other than that, all other components live up perfectly to the company's customary excellence.   The three sheets of familiar rounded-corner counters are some of the best you'll find.  


Smilarly, the four charts [two identical ones for each player - another highly commendable practice] are the very thick, rigid A4-sized cardstock that also has become an expected feature.  These double-sided cards will rapidly become all you need to play the game.  Player Aid A contains a detailed sequence of play and all the necessary charts, while Player Aid B outlines all the rules and critical information.


Frankly after a turn or two, all you will really need is the single side of charts, because the rules are very easy to remember.  This is partly because they are relatively short, a mere 13 pages, but mainly because of their absolute clarity and the rule book's admirable presentation.  The pages are glossy without being too shiny, with the text set out in double-columns with plentiful illustration and examples that couldn't be easier to read because of their size.

A typical page of the rulebook
Having looked carefully at the English rules translation for the original Japanese magazine edition, I can safely say that these in Traces of War have an organisation, flow and readability very much lacking in the original. 
Sequence of Play
Luftwaffe Reorganisation Phase
This is a simple random chit-pull of German aircraft tokens that give offensive or defensive column shifts in combat.  The increasing number drawn - and there are only a maximum of four - depends on how many crossing-points the Soviet has captured.  Therefore it will be several turns before any are available.
Command Chit Selection
Both players choose which activation chits they will include this turn.  Mainly these are HQs that can activate all units within a given radius, but there is a single supply chit that is always included and the German player potentially has 2 OKH chits from turn 2 onwards and the Soviets receive a single-use airborne chit and airborne unit and may have a Stavka chit available from turn 5 onwards.  I like chit-pull activation mechanics generally and the system in Traces of War is an admirable one that is crucial to creating both the differing abilities of both sides and a substantial amount of the tension this game generates.
Action Phase
As a chit is drawn, the player has the choice for all units within the drawn HQ's command radius of either a move-combat sequence or a combat-move sequence.  I like the flexibility of choice and the variation to pace this offers the players, though as the German I would have loved the option of a move-move choice!
Both Movement & Combat are swift and easy to carry out. It's a rare pleasure to be able to remember all the terrain modifiers and movement costs in my head and the Combat Table too is very user friendly.  Most results are either R or RR - i.e. one hex or two hex retreats.  If this sounds like a very bloodless chart, don't be fooled, because a lot of that retreating will be through an enemy ZOC, each of which causes a step loss.  Imagine what might be going to happen soon to those German units in the pocket forming around Kharkov.


In terms of Phases, that's it.  Unlike most games, Supply and Reinforcements are handled not as Phases each turn, but as part of the chit pull system.  In this eight turn game, the Soviet player has six batches of reinforcements.  When he/she chooses to include the Reinforcement chit in a turn, one of those batches in numerical order will be placed on the map.  I love this further element of choice, along with the uncertainty of when in the turn they will arrive.  The ability to position them just where you most want them may perhaps be rather too powerful.  However, it is balanced by the chance that they won't arrive until they are too late to be valuable this turn.
For the German player, the reinforcement element is even more unusual and more restricted.  Just as for the Soviet player, it does depend on the inclusion of a chit in the Activation Pool.  In this case, it is the inclusion of an OKH chit and the German player has two of these chits available to include from the beginning of turn 2.   This is not the powerful tool it sounds, because the OKH chit can fulfil three different functions [1] activate an HQ [2] activate a set number of units anywhere on the board [3] provide a number of Negotiation Points to be used either to buy reinforcements or remove a Supreme Command Order.  All of those choices are going to be vying for the German player's attention every turn.  It's one of the frustrations and delights of playing the German side and for me gives a very convincing feel of what a desperate situation being the supreme commander must have been like with his nightmare of conflicting demands.  
If you're wondering what a Supreme Command Order is, it is this game's way of incorporating a version of what, in other games, are called Hitler Directives.  The six major cities on the map each holds one of these markers representing Hitler's demand that they should be held at all cost.  Should the Soviet player succeed in controlling any one of these cities while the marker is still in place, he/she wins.
As some of these will eventually be captured, the German player must at some point use Negotiation Points to remove those markers from cities where the Soviet player looks likely to seize control.   It is another simple, but hugely successful rule to ratchet up the pressure on the German player and provide a neat series of quandaries.  The German player is constantly forced to think what's the key priority now.
Supply too is governed by a Supply Chit that goes in the draw bag/cup every turn and when it is pulled out both sides check supply.  Again, I like this, though the method of checking supply definitely shows its age.  All that's needed is a line of any length free of enemy ZOCs and a few other restrictions, such as not passing through an enemy city or an unbridged major river.  

[Couldn't resist showing my favourite chit-draw bag "borrowed" from the V-Commandos game]
An additional feature that characterises the carefully thought out double-edged nature of some of my favourite rules in the game is the rule about Crossing Points of which there are six on the map.  All are located on the Dniepr that bisects the centre of the map and along which the Germans will strive to form some sort of coherent defensive line.  Their capture by the Soviets greatly aids their advance, but the corollary is that all the German bonuses [such as Luftwaffe markers, Supreme Command Negotiation Points and the value of the OKH chits] increase depending on how many the Soviets control.  This is both a clever balancing help for the Germans and a dilemma for both sides.
Before I conclude, a word about the very high solitaire value [9] given on the back of the box.

The only solitaire element in the game is the Play Aid below, which reproduces the two player charts that are printed on the opposing map edges.  This is provided so that, when you play the game solitaire by playing both sides, everything is facing you and easy to use.  As those of you know who've read other of my reviews this is my preferred way of soloing a two-player game and so I'm very happy to have such a simple resource.  But for those who want/need solo rules/bots, this is not what this game provides.


My final question is that of play balance which is already being argued about on BoardGameGeek [Ok, what game's play balance doesn't get vehemently argued about on BGG?]  The Soviets are definitely going to be doing a large percentage of the attacking and the Germans the defending.  There are two scenarios in the game: a short play of the first 4 turns and I do think that for the Soviet to accrue the necessary VPs to win is a well-nigh impossible task. However, the full game of 8 turns is the important consideration.  It is a struggle for the German player first to survive losing to an automatic Soviet victory and secondly to prevent the Soviet player gaining enough VPs to win at the end of the full 8 turns.  However, the more I play this game the more that German victory seems achievable and the more rewarding the feeling when you do!

Not one of my best efforts, as Dnipropetrovsk falls early
 to give an automatic Soviet victory

To sum up this is above all a highly playable game with short, very accessible rules.  Its components are a pleasure just to see set out and play is a tense experience, fuelled by plenty of interesting decision making for both sides.  It's a game that I strongly recommend and one that will be staying in my collection.

 ALBUERA 1811 BERESFORD vs SOULT FROM STRATEGEMATA The latest game that Strategemata kindly sent me a review copy of covers the battle of Al...

ALBUERA 1811 ALBUERA 1811

For your Wargamer, Toy soldier collector, MiniFig collector, military history nut. Reviews, interviews, Model Making, AARs and books!

 ALBUERA 1811

BERESFORD vs SOULT

FROM

STRATEGEMATA


The latest game that Strategemata kindly sent me a review copy of covers the battle of Albuera in the Peninsular War.  The historical battle was large in numbers and especially large in casualties, but led to no significant outcome for either side.

My first introduction to this battle in game terms was back in 1979, with the enjoyable, but fairly basic Albuera & Vittoria from 3W [World Wide Wargamers].    The most recent was White Dog Games Albuera 1811 with is original approach combining ideas from both the world of miniatures wargaming and Rachel [Bowen] Simmons innovative board game system for Napoleonic and ACW battles.
This game, Albuera 1811 Beresford v Soult, is a substantial traditional hex and counter production.  Like most of their games, it may lack the publishing polish of many larger companies.  The map is rather larger than standard size being slightly over 27 x 38 inches and has a rather retro look in its limited colour range.  However, once the units were set up, I was pleased with the impression created.


When I first unboxed the contents I was surprised by the large number of counters and a little bit daunted by the number that had fallen out of the six counter sheets.  It took some time to re-assemble them in order to take the picture seen below.  There was also a small zip-lock bag of 25 rectangular infantry counters that represent the largest formations in line order.

Though moderately large in unit numbers the reason for the many counters is that most infantry units are represented by three separate counters to cover skirmish, line and column formation.  I've got to say that sorting these was a chore because of the many that had fallen out of the sheets.  On top of that, the counters are small and the important unit designation on each is very small.  As I soon found out, when I realised that most units had at least three counters to represent different states, the need for a display chart became obvious.  It also became obvious that I would have to create them for myself.  Below is just the one for the British units,

Without some organisation of this sort, the game becomes a nightmare of "hunt the unit".  With it, it becomes manageable, but there are quite a number of other problems, as I've found.  After considerable improvements in the quality of the counters (along with mounted boards) for the last three Strategemata games I've reviewed, it was a disappointment to return to the thinner average quality ones here, though I suspect the much larger number of counters is the reason, as was the return to a paper map.
Despite this, as I began the game, I was enthusiastic about the overall look of the battle and the individual groupings, such as the one below.


Unfortunately, I soon realised that difficulties lay ahead.  All I can say is that manipulating the counters is a strain for the following reasons.  The stacking of small counters, the need to change counters in and out of play, the addition of numbered markers to show losses and others for morale states and finally any new unit entering a stack has to be placed on the bottom.  It's time consuming and leads to stacks that are very awkward to manage without tweezers and frequent confusion as stacks topple and affect what is often already a crowded group of units. 
Turning from these practical physical constraints, I hoped that the rulebook would prove an easier undertaking, but here too I encountered a number of difficulties.  A total of 12 pages seemed a modest number and I was expecting the sort of simple clarity that I'd found with many of the smaller scale Strategemata games.  Parts lived up to this expectation. In particular the command structure and the chit-pull activation system works well and give a realistic feel. With brigade, division and army commanders, there is a good deal of variety as to how you may choose to activate units.  Especially successful is the prospect that the greater the number of brigades you try to coordinate for action, the greater the risk grows of failure.  This nicely mirrors the problems of the period.  Also, as many of the command formations often contain only about six units, a highly interactive game ensues.  The distinction between line and column and the detaching of skirmishes too all worked to create the appropriate historical feel.
However, as I moved on to fire combat [musket fire for infantry and artillery fire] and clash [think melee] a range of problems became clear.  One was understanding some rules starting with the the initial heading Alternative Sequence of Fire Combat - I assume the word should be Alternating.  Much to my surprise the rule stated that the units opposed to the activated commander fired first and that any unit on the board could fire.  I assumed this meant only against those units currently moving or firing.
The next uncertainty came with the rule that every infantry unit could fire 4 times within a single turn.  There was nothing to indicate whether there are any restrictions on how many times a unit can fire during its own activation and how many during your opponent's activation.  With no rule preventing you, I've simply followed the practical view that you can fire whenever you have the opportunity until you've done so four times.  Much more of a problem is that it's another essential marker to add to your stack and one that's likely to frequently need replacing and this too inevitably adds to the length of a turn. 
The musket fire system itself is a deceptive process.  The Musket Fire Table  has only four possible results, ranging from "no effect" to some form of morale check and these results are not dependent on a die roll. 


How easy that looks, but what a time-consuming exercise it turned out to be. First of all the unit with the highest firepower is your lead unit, but a unit's firepower is affected by whether it has lost strength and by what formation it's in.  The latter will determine whether it fires at 100% or 66%  or even 20% and if it's firing at range two it has to be halved Then each hex from which additional units are firing moves you one row down the table minus one and finally, the number of times the lead unit has previously fired gives positive or negative modifiers to the morale check die roll that the unit fired on has to make.   Suddenly what seemed such a good idea has turned into a much less appealing and much more time-consuming task.

After that we get to resolve the Clash Phase [i.e. Melee].   According to the rules, this occurs when a unit has entered an enemy occupied hex.  The first thing to realise is that physically doing this soon becomes impractical, except very early in the game.
In the picture below is the simplest occurrence of Clash.  A single French unit has engaged a single British unit and they are both in line formation.   Neither unit has any markers on them yet and most unusual there are no other units nearby to worry about jostling.


In other words this is an immaculate example rather than a realistic occurrence.  Much more likely is the scene in the next picture with the same two units.  It still looks workable, though I wouldn't really like to place the attacking unit in the defending hex.


Finally we see what might actually lie in each of those piles.  A defending British unit that has fired once and taken 2 losses is being attacked by a French unit that has fired twice and has taken one loss

Remember that a hex can stack up to four units, there might be a morale marker in the stack as well and there will usually be several other units adjacent.  I think you can see the problems.  I really like what the game is trying to convey, but I have found both the frequent need to compute numbers and lift up counters and markers to do so, while operating on a fairly crowded battle field has slowed the game significantly and felt more like I was fighting the system rather than the battle. The game also allows you to make Counterattacks and Charges during your opponent's Movement Phase which essentially means that Clashes will occur quite often and not just in the Clash Phase. 
Scenario Cards

So, what makes the game workable.  First and foremost it is the command system and activation restrictions.  The Allied player has twenty formations many numbering between a mere 4 to 6 units, whereas the French have only nine formations of about 10 units and there are 16 turns.  The battle begins with three turns when a very limited number of leaders may be activated.  Most of these turns will involve mainly movement, some changing from column to line and a little musket and artillery fire and just possibly a few clashes.  As a result, you build up experience of the various systems in small steps.  

From turn 4 onwards, the Allies place Marshal Beresford their Senior Commander's chit and six Leader Activation chits into the cup and the French put Marshal Soult their Senior Commander's chit and four Leader chits into the cup.  Which chits you choose and the random order in which they are drawn will not only drive your battle plan, but at times serve to frustrate it.  It will mean that not all of each army will be active each turn, though some Leader's allow you to activate more than one formation.  This will also cause you satisfyingly realistic problems of whether to guarantee activation in small and less efficient increments or attempt larger coordinated formation actions at the risk of their failing to occur at all.  Finally there are automatic victory conditions to be checked in the last Phase [the Administrative Phase] of each turn.  If the VP marker has reached 8 VPs for the Allies they have won, whereas if it has reached 6 VPs for the French they have won.

To sum up, the game has a number of interesting systems that produce a realistic and tactical feel to the battle, but can suffer from cumbersome execution and a lack of clarity in some rules .  It will need a degree of initial organisation of the formations and the several counters to represent most units and, above all, it has an excellent command structure and activation system that brings a lot of realism and uncertainty to the outcome of the battle.


Rome to the Po River by Heinz Greiner Translated by Linden Lyons  This is another book in the 'Die Wehrmacht Im Kampf' series. This ...

Rome to the Po River by Heinz Greiner translated by Linden Lyons Rome to the Po River by Heinz Greiner translated by Linden Lyons

For your Wargamer, Toy soldier collector, MiniFig collector, military history nut. Reviews, interviews, Model Making, AARs and books!


Rome to the Po River


by


Heinz Greiner


Translated by Linden Lyons


 This is another book in the 'Die Wehrmacht Im Kampf' series. This series was originally published in German during the 1950s and 1960s. These books were written by Generals and Chiefs of Staff etc. and not by the German soldiers themselves. Much like the books that were written soon after the war, they glorify the German Army and its resistance to the Allies. They show a very clean war. There is no mention of atrocities or any other items that might tarnish the German Army. They are filled with the meticulous history of the different divisions and higher formations. These versions that are being released by Casemate Publishers are the first appearance of these books in English.

 This book tells the story of the 362nd Infantry Division during the last two years of the war in the Italian Campaign. The division was formed from the wreck of the 268th Infantry Division. The 268th division had fought in most of the German Army's campaigns since 1940. During the summer and fall of 1943 it had fought against the Russians and had suffered large casualties during the Russian offensives. Even while it was being constituted the 362nd division was responsible for over 320 km of the Italian coast.

 Heinz Grenier, the author, was a Generalleutnant in charge of the 268th division. He was also awarded the Knight's Cross and Oak Leaves for his command of both the 268th division and the 362nd. He tells us that the 362nd had to be reformed with both 17- and 18-year-olds. This is in October 1943, two years before the end of the war. Long before the division was ready, it was thrown into the fighting around the Allied invasion at Anzio. 

 The book goes through the various actions and the defensive battles for the Italian peninsula from the Anzio landing until the capitulation of the German forces in Italy in May 1945. It shows us a very different picture of the German forces than we usually see. The 362nd suffered a lack of material and men for its entire life span. The author does not hesitate to find fault for several of the defeats that the Germans suffered during this time. He especially seems rankled by the German loss of Rome to the Allies. 

 If you like reading about the day-to-day management of a division during a campaign, then this book is for you. Just like the other books in the series, this book shines when it comes to understanding the campaigns on a lower level than has normally shown us by authors. The book has numerous maps and other illustrations of the division breakdown etc. The only unfortunate thing about the maps is that they were apparently hand drawn. So, some of them are not as legible as the others. Thank you, Casemate Publishers, for allowing me to review another book in this fine series. 

Robert

Book: Rome to the Po River:

Author: Heinz Greiner:

Casemate Publishers:


  Nuclear Submarine 61505 by JMBricklayer   I have about twenty sets now from different companies who make brick models. It takes a lot for ...

Nuclear Submarine 61505 by JMBricklayer Nuclear Submarine 61505 by JMBricklayer

For your Wargamer, Toy soldier collector, MiniFig collector, military history nut. Reviews, interviews, Model Making, AARs and books!


 Nuclear Submarine 61505


by


JMBricklayer


 I have about twenty sets now from different companies who make brick models. It takes a lot for me to get a WOW! reaction because they have come so far in the last few years. Up until then a tank made by bricks looked like a box with some tracks thrown on it. In actual fact, you can still see some of those for sale. JMBricklayer popped up onto the scene just a short time ago and yet they are producing some of the finest brick models you can find. I reviewed their White Swan ship and their RC Tiger Tank (those links will be below). This huge submarine just blew me away with its detail.


 You can see just a small amount of the detail that comes with this submarine build. It is truly great to see what extras JMBricklayer was able to put into this brick model.


 It actually has about 100 less bricks than the White Swan ship but it seems much bigger than it. The inclusion of all of the different parts of a nuclear submarine are here. Just look at this list:

Nuclear Generator
Missile Silos
Command Center
Sleeping Quarters
Torpedo Control Room
The Different Array of Antennas


This is the Submarine starting to take shape.


You can plainly see the detail that went into modeling the nuclear reactor. Plus, you have the bunk beds from the sleeping quarters.


Here is a close-up of the reactor.


 It just amazes me to see how much thought was put into this build.


In this shot you can see the torpedo room.


 In the above shot you can see the command center with a desk and chairs. You also get to see the computer screens. The screens are from decals that come with the set.


Here you see the reactor again with the missile bay to the left.


  The finished product is really just amazing. I was afraid that the center of the submarine would be loose and have trouble staying together. I shouldn't have worried - it went together and held just fine. I did have some trouble with the long pieces that make up the bottom of the submarine. I believe it was my own impatience that caused most of the problems with the bottom. To make it go easier and faster I used a product called 'Le Glue'. It is a non-toxic water-soluble glue that washes away when put into hot water. All of the rest of the build I had no problem with. The brick tool that comes with this kit is an even better design than the previous one that came with the other kits I had built from JMBricklayer.


 Thank you JMBricklayer for allowing me to review this amazingly detailed Nuclear Submarine brick kit. I actually completed the kit much faster than I imagined. The detail and what I was seeing while building it made me want to just keep building to see what came up next in the build. It really is a great display brick model. Now it is the pride of my collection, which is very amazing because the White Swan is an amazing kit also.

Robert

 JMBricklayer, has graciously given some codes to use for a discount on the Nuclear Submarine:

For US Amazon, the website link https://www.amazon.com/dp/B0BYRW1PPV, the coupon code VIPARDE15 for US Amazon applies only to the non-discounted Nuclear Submarine 61505 and is valid for one month, offering a 15% discount. 

For UK Amazon, the website link https://www.amazon.co.uk/dp/B0BYRW1PPV, the coupon code VIPARDE15 for UK Amazon applies only to the non-discounted Nuclear Submarine 61505 and is valid for one month, offering a 15% discount. 

For an online store, the website link https://www.jmbricklayer.com/product/nuclear-submarine-61505/, the coupon code VIPARDE15 applies to all non-discounted products and offers a 15% discount. The code is valid until December 31, 2023. (Both the US/UK Amazon and the online store are free shipping and tax).

 This is a link to an article about the 10 best Chinese Lego Alternatives:

JMBricklayer:

My White Swan review:

My RC Tiger Tank review:

hpssims.com