second chance games

Search This Website of delight

Showing posts with label Reviews. Show all posts

TIGER LEADER BY DAN VERSSEN GAMES What I'm going to say may have started to become a touch familiar, nay repetitive, if you ...

Tiger Leader Tiger Leader

For your Wargamer, Toy soldier collector, MiniFig collector, military history nut. Reviews, interviews, Model Making, AARs and books!

Reviews

TIGER LEADER

BY DAN VERSSEN GAMES


What I'm going to say may have started to become a touch familiar, nay repetitive, if you have read my previous reviews of DVG games, especially as they have all been from the Leader stable of games.  Is it my fault that their production quality is some of the finest and most reliable in the hobby ?  There's no getting away from the fact that they put out consistently top-notch physical components - unboxing is a sheer delight  - and this from a company much smaller than all the really big names.

My one and only slightly adverse criticism of the new edition of U-Boat Leader and its American counterpart Gato Leader was the small size of mounted main gaming board and the fact that DVG then published as an "expansion" a decent sized board for them along with some fairly irrelevant plastic ships.  Well, Tiger Leader, which came out a year before them in 2015, hasn't even got that minor blip!

I'd go so far as to say that it is one of my favourite game boards in their series.  It's a four-panel, mounted board and fractionally over the standard 22" x 17" folio size that many companies put out as paper maps.  In the central play area is a magnificent sepia map of the Ardennes where that last desperate throw of the Third Reich, namely the Battle of The Bulge, took place.  Even more amazing is that this map is ultimately purely eye-candy, as once the main "Battle" Phase of the game gets under way, it is overlaid by six generic terrain pieces [in the same fashion as the earlier Thunderbolt/Apache Leader game].  Equally odd is that out of the nine excellent campaigns the game offers, the Bulge isn't included.
How can you leave out the Bulge? [sob]


However, as a war gamer who cut his teeth on hexes, these large, four-hex tile overlays are very impressive.  They are made of substantially thick, durable, glossy card-stock: double-sided so that you can fight in three different terrain localities - Europe, Desert and Winter.  They get a big, loud "Len's 10" from me [apologies that that metaphor's probably only understandable in the UK, not sure how many countries we've sold it to - so other nationalities can google "Strictly Come Dancing"].  So too do the two counter sheets that include the substantial numbers of Polish, French, Russian and American troops to fight against.


Along with the units are a wide range of Damage markers, one side for Armour damage, the other for Infantry damage, the inevitable red Stress markers, enemy Battalion counters and, of course, your own German units.


Ultimately, you will be selecting some of those evocative Tiger tanks, but if you're like me that will be some time in the future, as there are nine Campaigns to choose from starting with Poland 1939, France 1940, Russia, North Africa and Europe 1944.  There's nothing to stop you dashing on to those legendary monsters and don't let me stop you.  Perhaps it's just my OCD tendency, but I like to work my way gradually through the historical time-line!

And, naturellement, in a DVG product, lots of lovely cards to drool over [didn't I tell you I always sleeve mine - now you know why!] : German unit cards, German Commander cards, Battalion cards [in three types - Assault, Supply and Command] Event cards, Special Condition cards and Objective cards.  Some of them will be placed on the main mounted board called the Tactical Display Sheet, that I've already waxed lyrical about, some on the large card-stock display called the Head Quarters [sic - yes, it really is divided into two words]Sheet.  Not sure where you quarter your arms, legs, etc!

Apart from the map section I've already detailed, the two separate Displays provide you with Holding boxes for all those lovely cards, a detailed Sequence of play and enough information to just about cover all aspects of the game without reference to the rule book.  This tends to be a good feature of this series, but is for me one of the strongest and most workable examples in those games I possess.

As always the Rule Book is very substantial in quality and detail, following what I've come to recognise as their signature design.  First comes the Campaign Set-Up taking you step by step through each process while enumerating all the relevant details about the counters and the cards with carefully labelled and itemised pictures, exactly when needed. Though, in one way, there is more detail here, each step is so easy and straightforward that I've found the process simpler than expected. 

Select one of the nine Campaigns and a specific Objective.  Each Campaign will tell you the difficulty level, any additional Special Ops points [SOs], the terrain type and the Commander Skill levels and any special features.  The Objective card next provides how many SOs you have available to spend on buying units and other resources, the number of weeks the Campaign lasts, Battalion points for randomly selecting the necessary enemy Battalion cards, specific rules  modifications to the Campaign and the Evaluation table to determine your level of success at the end. 


If you are totally new to the Leader series of games, this may already be making you wonder if this game is for you, all I can say is that it is a very smooth process and reads far more dauntingly than the actual execution of what I'm describing.  Though my developed familiarity with the overall systems may have influenced my next statement, I genuinely believe - and I am being as objective as possible - that this game is easier to learn, flows more smoothly overall and plays more quickly.  What I have also found is that it is just as easy to lose!

The next step is one that appeals to me.  In the previous DVG games I've reviewed your unit and its commander were one and the same.  Buy a submarine and you choose one of the cards that represent the vessel and named commander at different levels of ability usually from Recruit to Ace, the same with your planes that were governed by the level of the pilot's skill.  In Tiger Leader, the SOs you've been allocated are for buying purely the units that you will use to fight the Campaign - a few more SOs may come your way during the following weeks of fighting - but by and large most of what you buy now will be what you're stuck with as they suffer and get shot up or eliminated. 


[Here's a typical combination of a machine-gun team and some transport.  They don't have to go together, but the combo allows your vehicle to move your men forward and then both the transport and the infantry can fire.  If the infantry are by themselves they can either move or fire, not do both.]

Then you choose, for free, one Commanding officer for each unit.  Once again, each of these Commanders do come in six levels of ability.  What prevents you just grabbing an Ace for each unit is the Campaign card that designates how many of each level of ability you may choose for up to seven units.  For example, the Polish campaign allows you 3 Recruit, 2 Green*, 1 Average and 1 Skilled Commander.  You'll notice that one level of Skill is starred.  Any units that you buy above seven have to be allocated another of the starred levels.   So, if I bought nine units I'd end up with 4 Green Commanders in total.  


[Tank Commander Dietrich hopefully on his way to Ace status, with all the necessary stats.  Notice that, like the images used for units, these aren't photo shots but sketches.]


Another very good wrinkle is that the assignment of Commander to unit can be changed at the beginning of each week.  You have three categories of units: Infantry, Armour and Unarmoured - obviously each type of unit must have the relevant type of Commander.  No giving an Armour Commander to an Infantry unit.

The next step is to draw a Special Condition card that will affect all the Battles in a given week.


One of the beneficial Special Condition cards - overall these cards have a balance of positive and negative effects and many of the negative ones can be cancelled by paying SO points.


Then it is decision time.  How many Battalions am I going to choose to fight at the start of the week and which of my units am I going to allocate to take on each Battalion?   Just choose one and send in all your men and you'll probably gain an easy victory, probably reaping about 3 VPs.  Do that for any of the Campaigns that last three weeks and you'll end up with about enough VPs to earn yourself an Evaluation ranging from Dismal to the lowest level of Adequate.


[ Just one of your likely adversaries, a fairly meaty Infantry Support Battalion. ]


One advantage of this game is that you don't lose any VPs for your own units and Commanders that are eliminated.

So, it's off to our first Battle of the week and the draw of an Event card which normally will affect only this particular battle.


As with Special Condition cards, about half have good, half bad outcomes.  Notice here a very familiar image - one of its earliest manifestations being a stylised version on the 1st edition of the famous Squad Leader game. 


Six random tiles are drawn to form the battlefield; you place your units on the bottom row of map hexes and the enemy units' positions are randomly selected by dice rolls in the top two hex rows of the map.  Most Battles last five turns.  As with previous Leader games, your units that have a Fast Commander will activate first to move and/or shoot, then all the enemy ones  and finally all your units with Slow Commanders.  A very satisfying, simple chart and a single die roll provides the A.I. for enemy movement.


Here is the set-up of my forces in an early Campaign with a tank, machine-gun unit and transport in the light cover on the left flank and two more tanks on the right flank.


Combat too is very easy with a few, typical modifiers, such as terrain.  For you, hit the enemy and it is eliminated - couldn't be simpler.  For the hits scored by enemy units, it's draw one of the double-sided Damage markers and apply the appropriate side of the marker: either Infantry or Armour.  As a result your units tend to survive longer than the enemy ones, as they may take several different types without being eliminated, though two of the same type usually will kill.  There is the rare chance of an Explosion and bye-bye unit and Commander.  It is rare, but in the second week of my first campaign, I had three tanks and each turn the Explosion damage was drawn when a unit shot at a tank.  Don't say I didn't warn you!

At first sight this asymmetrical procedure for Combat may seem to hand it to the Germans on a plate.  Experience of playing the game disproves that notion.  The range of damage, the limited ability to remove some of it between each week of Battle, the choice of a Commander who might help in the process, all add greatly to the narrative produced by the game and this draws you in to the atmosphere of the game.

To defeat a Battalion you have to destroy a set number of unit points, but there is also a point at which the Battalion is reduced to half strength [gaining you half the VPs].  So, you may decide, if possible, to avoid further combat by manoeuvre - not always an easy thing to do - until the end of this Battle and return the next week to finish the Battalion off with a fresh force.

Standard to all the Leader series is the Post Combat phase at the end of each week, when Experience is logged and possibly spent to upgrade the ability of a Commander, if he has earned enough points, attempt repairs and replacements depending on whether you've gained SOs and acquire new Commanders if any have been killed in the previous week's fighting.

Personally, I've had a thoroughly good time with this game.  The different elements introduced have greatly appealed . Among these  are the Operational Display on which your enemy Battalions are placed according to information on their Unit card and the rule that means they may advance or retreat week by week, the Tactical Movement chart already mentioned, the difference of having a map and terrain to fight and manoeuvre over, the combination of unit and Commander discussed in more depth earlier, the flavour given by the Damage chits and learning the best combination of units to meet a particular type of Battalion.

Despite my strongly favourable reaction to Tiger Leader, I was aware before I started that there had been quite some criticism of this particular addition to the Leader stable of games.  Especially, intimations of it being "broken", poor rules and lack of difference between units had made me wonder what to expect.  From extensive reading, my view is that most of the adverse comments boil down to the old realism/historicity argument.   First and foremost, the rules as written I found clear, consistent and easy to follow.  To repeat an earlier point,  they were easier to assimilate than any of the three previous Leader games I've reviewed.   They provided a good flow to all my games; even when I made monumental mistakes, they weren't mistakes in the rules!

Admittedly there are only small differences between the stats for the tanks, but at the level being focused on I wouldn't expect anything else.  Certainly, there is at least and I would say more difference here than between the submarines in U-Boat and Gator Leader.  But added to that there is the difference between individual Commanders and between their different Skill levels.  So. I would feel safe in saying that the differentiation is not one that is in any way out of line with the other Leader games.

Mutters about the sameness of all the battles, I would strongly refute.  I soon learnt that fielding the wrong combination of units against specific Battalions was a quick way to a losing situation.  Only one oddity that struck me was that there were limitations on the ability of some of my units to fire/move, but not on similar enemy units - if that bothers you then it's dead easy to give your enemy the same restrictions.  However, I felt that the game intended to handle that distinction through the movement limitations produced by the Tactical Displays A.I/. system.

The campaigns are tough, even the Poland 1939 one.  As at least one commentator has pointed out, you certainly don't romp through 
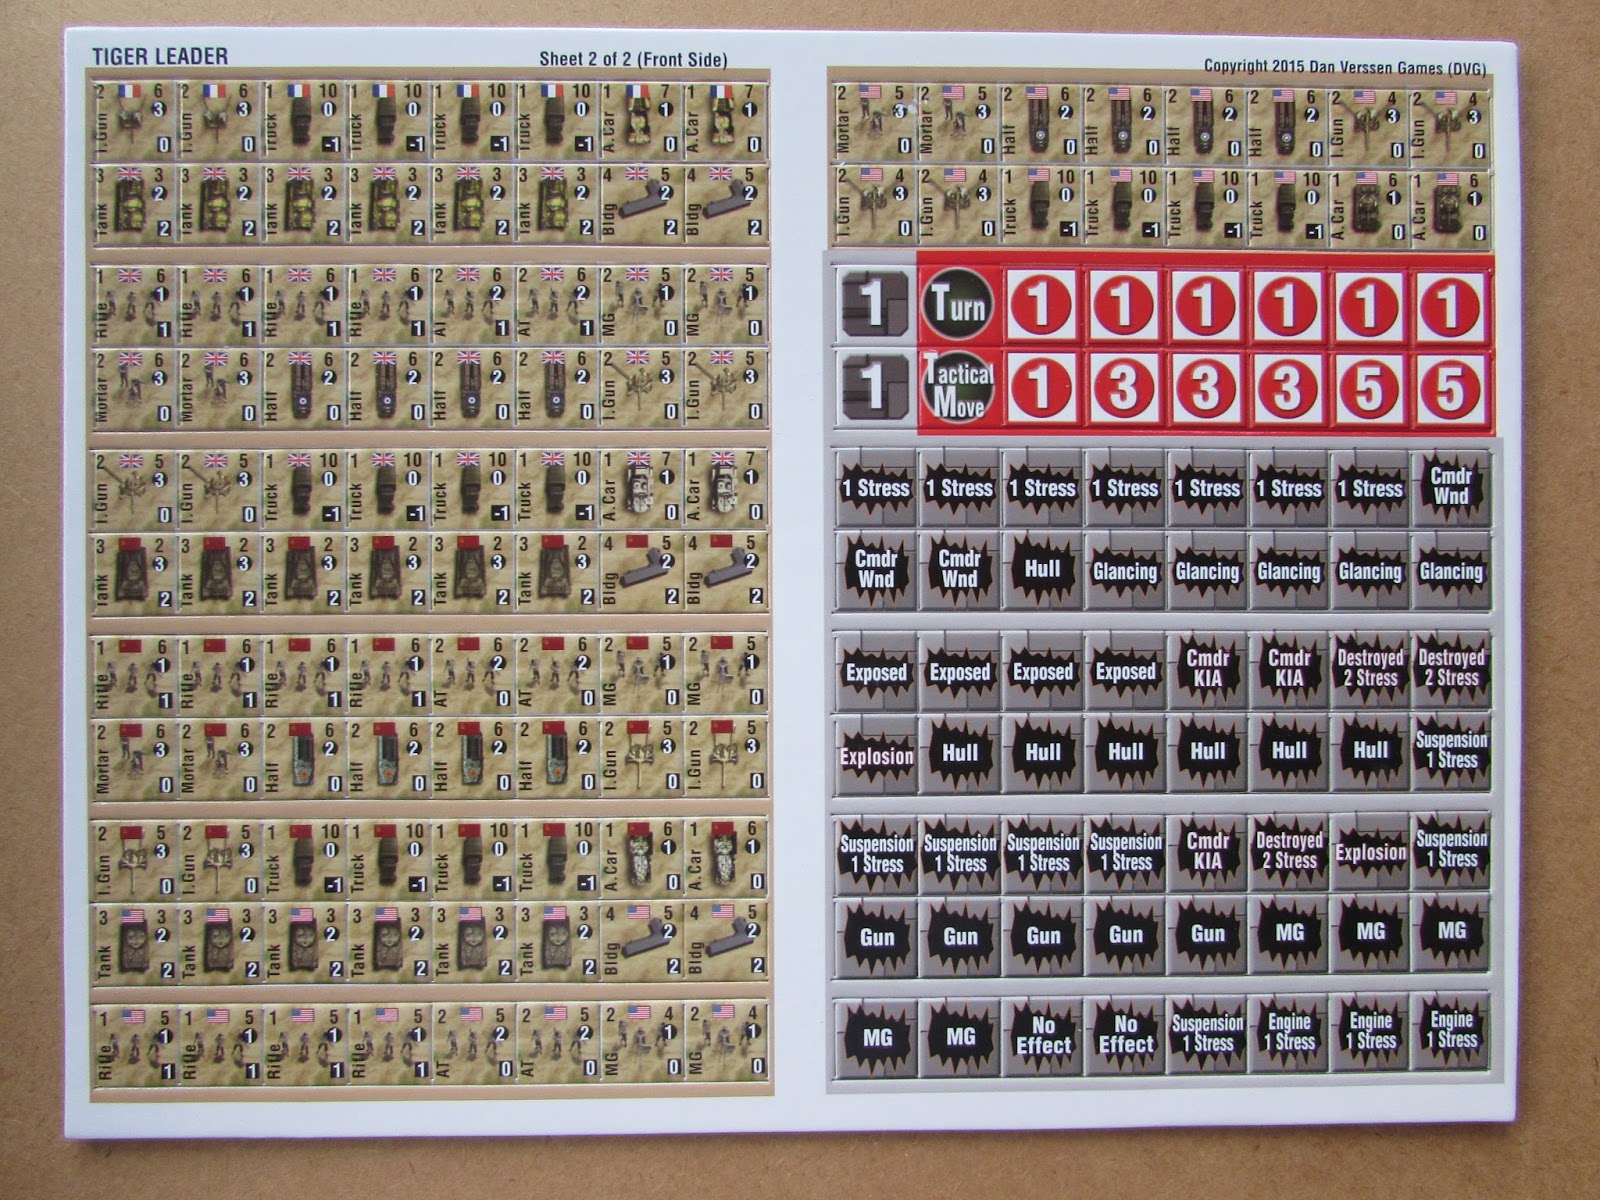
the Polish units.  If that's what you want to do, just give yourself some more SO points to field more units.  Perhaps, they are tougher than they ought to be, but then I don't find much fun in a situation where I really can't lose. 

Here are some of those Polish units


I'd rather have what I've got in this game than spend my time killing loads of enemy units with no trouble at all and then find that I've lost because the victory conditions say I should have killed even more.  Many other games I've played on the Polish campaign tend to do exactly that to achieve what they call balance!

So, bottom line for me - a fun experience, giving a very different feel from both air and submarine warfare [and so it should], broad brush approach that works, good clear rules, ace quality physical package in all departments [cards, counters, boards, rule book].  Nuff said, I hope.


Wings Over Flanders Fields Ultimate Edition Review  WOFF background Wings Over Flanders Field started off as a WWI modificat...

Wings Over Flanders Fields UE Review Wings Over Flanders Fields UE Review

For your Wargamer, Toy soldier collector, MiniFig collector, military history nut. Reviews, interviews, Model Making, AARs and books!

Reviews

Wings Over Flanders Fields Ultimate Edition Review 


WOFF background

Wings Over Flanders Field started off as a WWI modification called Over Flanders Field for Microsoft CFS3. Over the years, work hasn't stopped and at several stages a new, improved version was sold, which, until recently, took us to WOFF Version 3. Version 3 also had some expansions - DLC yet again adding new planes and features to an already superb sim. Now, what is to be considered  the ultimate version of WOFF has been released. WOFF 3 and its expansions have been brought all into one package, as well as the addition of  a host of new features and improvements. Wings Over Flanders Field Ultimate Edition is the climax of over ten years of development, and boy does it shine because of it. Come, take to the skies above the Western Front during the Great War. WOFF UE, not just the ultimate version of WOFF, but the ultimate single player flight sim, period!


WOFF UE


Please, stick with me

Those who know me, or if you've been a regular reader of the blog (I thank you) will know I'm a WWI obsessive. Though, for reasons I can't put my finger on, the Eastern Front in WWI doesn't appeal, yet in regards to WWII it's my main area of interest. However, as WOFF UE is only concerned with the Western Front then it's of no consequence. The War has really grabbed me to the point where I devour book after book, mainly memoirs, of those who experienced it from all sides, both on land as well as in the air. WW2 seems more real, tangible, a time that is more easy to relate too. A War that was horrific and actually killed more than WWI yet for some reason WWI is the go to war when you think about the horrors, misery and futility of warfare. Yet,  WWI only ended two decades before WWII started and it seems like a different world. Maybe it's the staccato black and white footage which makes it seem more unreal. Then add the horror of new and more deadly ways of killing, coupled with old tactics, then years of living a primitive, underground existence with death a constant companion. Even the wounds you were liable to get caused more brutal, horrific damage to your flesh and bone. A reason for this being the shells in WWI  broke up into large, jagged pieces of shrapnel which could cause horrific injuries, whereas in WWII, they fragmented into much smaller pieces, just as lethal, but they wouldn't cause the awful visual damage the larger shrapnel did. Even the ground itself became deadly, with even minor wounds killing the poor chap, with gas gangrene, another horrific way to die, and a cruel one.  You think you have what the British called a "Blighty", a minor wound that would get you home for awhile, yet ten or so days later you're dying a horrific, painful death, as gas gangrene takes its course.


Honestly, from here on in it's all relevant


 Then we have the aircraft flown during the War. The ones from WWII are not that dissimilar to prop powered planes of today. With WWI, however, the technical marvel of flying, and the flimsy, lethal looking wood, canvas and wire contraptions used to take man into the skies were all very new. So, at the start of WWI the aeroplanes looked frighteningly primitive, just like all the other aspects of the War, primitive. Yet again, this all adds to the War's otherworldliness.


 Over the War's four plus years, aircraft technology moved forward rapidly, unlike the actual fighting on the ground. Also, at different periods during the War, one side or the other would have the upper hand, either through technological advance like during the so-called Fokker scourge, when in 1915 the Central Powers invented a mechanism that synchronised the firing of the MG and the propeller. The pilots flying the Fokker aircraft equipped with this new bit of kit soon reaped a deadly harvest and the first Aces of the War were born. Or it was just a case of one side managing to bring faster and more manoeuvrable aircraft out before the other.  So, until the other side caught up or even overtook them in this tech race, the side not in the  ascendency would find their machines getting knocked out the sky at an alarming rate, obviously adding to the ever growing casualty lists. Over the Western front the British decided to always be on the offensive in the air, crossing over into enemy lines to take on the enemy. Since the War, many have questioned this, as it meant British casualties were a lot higher than the Germans'. The RFC policy of no parachutes (as it was deemed the pilot may jump when he could have got the plane home) also meant the RFC casualty rate was higher than need be. It condemned many pilots to a horrific death, being burnt alive as their plane fell out the sky, adding another barbaric and primitive aspect to the War. The Germans had taken on a defensive policy, waiting to swoop on the enemy as they crossed over into their air space. Flying in their brightly coloured planes, the Germans flew in large numbers called Jastas. If you were an Entente pilot during '17 up until April '18 and you spotted a bright red plane leading the enemy Jasta [signalling the presence of the Red Baron, Manfred Von Richthofen], fear would overwhelm you, praying you wont become the next victim of who would be the Wars overall leading ace. The Germans did carry out bombing campaigns through out the War, using aircraft like the huge Gotha bombers or Zeppelins, even regularly bombing the UK.


 By the War's end both sides had some very good, reliable, fast and deadly planes. The Germans with the Fokker DVIIF and the Allies the SE5a or Airco DH5. For a good part of the War though, you were more likely to die in training, from either an error you made or from mechanical failure or a combination of both, than you were in actual combat.


I expect your wondering why you've just read the above, when this is supposed to be a review for WOFF UE? 

Well it's because pretty much everything I mentioned above you'll experience in WOFF UE. From the first planes of the War scrapping it out in the Skies of '15 until the end of the War; it's all here. Choose to enlist for either the British (87 squadrons), German (205 squadrons), French (139 squadrons) or American (23 squadrons). Fly in a Recon or Bomber squadron, each flight praying you aren't about to be prey whilst doggedly sticking to your task. Or join a fighter squadron, to take the enemy on in a duel in the sky. Over 80, yes that's right 80 aircraft you can take to the skies in.

The AI is also another excellent feat the OBD team have managed to pull off. With each iteration it has got better and better, until we have what is easily the best flight sim AI out there. No fight to the death AI here, each pilot has his own skill level, plus moral and fatigue are monitored, which all effects how he flies and can result in him breaking for home when risk outweighs reward. The AI also sticks within the limits of his plane's flight model, and, talking about the flight models, each plane has been researched and tested and I haven't seen any complaints about any of WOFF UE's many flight models in the forums. This has to be a very good sign. WOFF UE, in my opinion, is by far the greatest single-player, combat flight sim that has been released on the PC, finally taking over that top spot for WWI flight sims from The Red Baron, and personally, it takes the top spot for any combat flight sim covering any era. 


Nothing can come close to the dramatic scenes this sim produces, as you fly across the tortured landscape of No Man's Land. It manages to convey the immensity of the sky, and creates clouds like no other sim. I can't find the words to explain it, but I honestly haven't played a flight sim that manages to make you and your plane feel so small and fragile, so insignificant, as you fly among such huge, dark, foreboding clouds. The atmosphere the sim creates is second to none. I've ready many pilot memoirs and when they wax lyrical about flying and the sorts of vista they see up in the heavens when playing WOFF UE you can understand what they mean.  Each season has its own high definition terrain set. No Man's Land will move in-line with how it did historically. Now, with the free skin pack, all Squadrons and Jastas have historically accurate paint jobs, as well as the planes of every Ace on all sides having their own, unique, historically accurate paint work. We are talking thousands of skins here.

This is another visual treat WOFF UE has to offer.  It also enhances the sort of realism OBD is trying to achieve, with great success in my opinion. Another massive improvement that WOFF has recently acquired is that the high definition planes' skins will now show bullet hole damage etc. which they didn't do. Previously, you had a choice between hi def skins or bullet holes, now you can have both.

As I'm talking about damage, the damage model and the visual effects have yet again been improved for the many aircraft, creating more varied looking and realistic plane damage. For the first time now pilots and observers will slump in their seats if killed. I always breathe a sigh of relief, if I shoot a plane down in flames and notice the pilot is already dead.  That's the kind of effect the game has on you, drawing you in to the point of worrying about an AI pilot's death! Previously, before the "slump", you never knew if the pilot was dead or not as he and his plane fell to earth like some sort of grisly comet.

Weather is also modelled.  So, as you take off, you could be flying through a snow storm, yet once above the cloud layer, bingo you're bathed in sunshine,  with blue sky all around. So as you can tell by now visually it's one hell of a treat. Day and night is modelled is also modelled. Fly as a pilot in a Gotha desperately trying to stay out of the search lights, as they sweep the night sky above London. Or, as the sun has just gone down towards the end of your patrol, you come into land at your airfield in France being guided by the flames lit along either side of the run way.


I can imagine some being worried about it using the old CFS 3 engine. Honestly, you really would never know they had
anything at all in common. It really is something you only have to consider when installing, or, if you don't own it, when tracking it down.


Now onto the dynamic campaign.  For a single player sim, this is the meat on the bones. This means WOFF UE has the body of a Greek God! So much work has gone into creating an experience that draws you in, and soon you find yourself fully immersed as a pilot during WWI flying high above the Western front.  You can, if you want to, choose exactly which squadron and what date you enlist and start your campaign. Or you can choose a date, and start in training, learning how to fly well behind the lines. Once you successfully complete your training then you could be assigned anywhere in any type of plane! Just like it was for those trainee pilots, but without the high possibility of death before your training was completed, saying that your in-game pilot can still die at this point, if you have a terrible crash.

OBD have done a tremendous amount of research on each squadron, including its aces and at which airfield they were at through out the war.  As you can imagine, with the number of squadrons I mentioned earlier, how much work that must have entailed! The squadrons are also rated as either on defence or offence aswell as how good it is, which can change during the War depending on the squadrons circumstances at that particular time. Also, the morale of the squadron as a whole is considered. You can if you wish request a transfer, as well as request leave.

Historically accurate Medals are awarded both to yourself and to your squadron members. Also, just like the War, you have to fill in a claim form when you think you've shot down one of the enemy. On the harder difficulty levels this can be denied, just like it was for the pilots back then. As for options regarding both difficulty and visually the game has plenty to choose from, so you can customise the experience to suit both how you want to play and what sort of rig you have. So the dynamic campaign is fantastic and surpasses all previous WWI flight sims. Play dead is dead difficulty and see how many hours you can do over the Western Front!


One final thing I want to mention about the game is that you can check on what aces are around at the particular time of the current campaign. You'll find that many even have their biography written, and when you see how many have a written biography it dawns on you just how much work has gone into this Sim. Along side any biography you'll find the Aces kills upto the particular date of your campaign, and as you continue forward the kills will be updated keeping inline with the pilots historical tally. The kill can even state who the unfortunate pilot and in a two seater observer were! The amount of research here, at your finger tips , could easily be published as a book in its own right. My hat goes of to you OBD. Stunning work!


Oh little tip when you get the game. Click "Credits". A little treat is waiting for you there.

Go check out the excellent WOFF forum at Sim HQ. Also like to thank the forum members if I've used one of their screenshots. 

WOFF webpage.


What you get with UE and New Feature List

 WOFF UE incorporates

Wings Over Flanders Fields 1
Wings Over Flanders Fields Expansion 2
Wings Over Flanders Fields Expansion 3
Add On Fokker Scourge
Add On Balance of Power
Add On Motley Crew

Plus all the updates, in an easy to install package.

Some of the new Features for UE

Two new two seater planes Bregeut 14 A.2 and the Caudon G.4
Enhanced Direct X Shaders
Huge performance increase
Revised Damage Models for all planes
Revised and improved lighting systems
Fully revised French Squadrons
New Winter Trees
Revised Flak

and many more features and improvements

Note: Also the Skin pack add on is now free for everybody:)

Nearly forgot to mention a major highlight!!

Last but not least is Matt Milne's outstanding musical score! What would WOFF be without it? Missing one of its vital elements for sure. The music could easily sell in the classical music section of a music store. In fact, I'm pretty certain it could get into the classical charts. Honestly, it's absolutely first class and adds so much to the atmosphere. So you can see, from its music to its campaigns and on to its visuals WOFF UE won't let you down. It's my favourite ever flight sim and all flight simmers should own it!

PLANET RUSH Designed by Reiner Knizia Published by Victory Point Games The basic premise is that you are one of five corpora...

PLANET RUSH PLANET RUSH

For your Wargamer, Toy soldier collector, MiniFig collector, military history nut. Reviews, interviews, Model Making, AARs and books!

Reviews

PLANET RUSH


Designed by Reiner Knizia

Published by Victory Point Games


The basic premise is that you are one of five corporations vying to build structures on the planet, Zenobia.  The one who contributes most will gain ownership of the planet.  If that brief description rings faint bells or stirs vague memories, don't be surprised.  Planet Rush is essentially a simpler remake of Reiner Knizia's Tower of Babel.  Indeed, Alan Emrich has already labeled it the Designer's Cut, as it seems that the briefer rule set that we get in Planet Rush was the original preferred design.

So, definitely a light Euro made even lighter, but, I have to say, not a Euro quality production.  The rules booklet is a bare 8 pages made out of two sheets of slightly smaller than A4 size paper, folded in half and stapled down the middle.  This really looks more like a DTP package.  It is full colour [though mainly blue] and semi-glossy, but the outer spine of the rulebook was already starting to look slightly cracked when I opened the package.  The "board" is made up by laying out the eight, very thin cards that represent the potential structures to be built and each player receives  a larger mat of equally thin card on which to record his/her score and a set of small wooden cubes in the player's designated colour.  Each player also gets an individual Faction Negotiation card.


The game set out for the maximum 5 players.


The cards that represent the four different types of material with which to build these planetary structures are clear, bold and of standard size, but they too will need the benefit of sleeving to make them durable for repeated play sessions.  Surprisingly the solidest pieces are the bonus markers and the rather nice launch pad and rocket that mark the Active player. 

Though the artwork is good and conveys the S/F theme appropriately, that is the only way in which the theme is represented in the game.  The rules and gameplay add nothing at all to the theme.   Seeing that the artwork on the player mats shows that the so-called corporations are owned by five different galactic races, I'd hoped that at least there might be some minor special rule for each ... but alas, no.


One of the 5 player mats - essentially a personal score board


That the game already exists in a slightly more complex form does tend to spell out that the background is fairly immaterial.  In its first incarnation, players were trying to construct the 7 Wonders of The World [with a potential eighth Wonder - the Tower of Babel - hence the original game title].  As stated in my opening paragraph, here we are trying to build planetary structures.  It could just as easily be five car manufactures aiming to contribute most to the design of eight cars or five railroad companies working to lay the tracks for eight new railroads in the Wild West.  Many Euros do tend to have bolt-on themes, but this does seem an extreme example. 

Game play is very straightforward.  In the Build Phase,  the current Active Player, receives the Launch pad and Rocket and has the choice of one of two actions.  Either the Active Player draws a Resource card or nominates one section of a building to be built by placing the Rocket on the corresponding section of the building card and announcing how many Resources are needed and what type they are.


Here are the four Resources:

Materials, Research, Power and Robotics.


This latter choice of Action is really the heart and key interest of the game and I'll shortly examine that in some depth.  Should all the sections of a structure be completed in the Build Phase, then that building is scored.

The second phase of each turn is the Resources Phase when each player draws one Resource card.

The game continues until all the sections of 7 out of the 8 possible structures have been completed and a final bonus scoring is then conducted.

So, back to a detailed look at the only [slightly]complex part of the game : THE BUILD PHASE and the choice to offer a section of building  for construction.

The Active Player chooses and places the Rocket on the section to be potentially completed.  He/she announces the number of Resources needed, depending on how many circles there are on that section and the type of Resource, which is also marked on the card.


And here is the dinky space Rocket sitting on its Launch Pad, ready to blast off

to mark the next section potentially to be built!


For example, the Power Station is made up of two sections: one needs 6 Green Research cards and the other section needs 4 blue Power cards to build.


The next step is that all the other players [but not the Active player] secretly choose how many cards of that Resource they want to bid.  A player can include Resource cards different from the one nominated, but I can see no point whatsoever in doing so, as such a bid has to be automatically rejected.  The only other card that can be usefully included in a bid is a player's Faction Negotiation card. 

The Active player then decides which of the bids to accept.  In choosing which bids, there are some restrictions.  Most important is that the number of cards must be exactly the number needed. So, if 7 are needed, a bid of 5 and a bid of 4 could not be accepted as there would be 2 cards more than was needed.  Whereas, a bid of 5 and a bid of 2 would work fine as a choice. 

However, the Active player can always include cards from his/her own hand. So, using the same example. If 7 cards were needed and the bids were 5 and 4, the Active player could accept the 5 bid and add two cards of the correct Resource type from their hand or accept the 4 bid and add three cards of the correct Resource type from their hand.  [Always assuming the Active player has the necessary number of appropriate Resource cards in their current hand.]

Of course, even if there were appropriate bids that add up to the right number of cards, the Active player can always choose to reject one or more bids and use their own cards instead.   

The other restriction is that if several of the players have included their Faction Negotiation card in their bid, the Active player can never accept more than one such bid.

Having decided which to accept, what happens next? 

Well, first of all, for a bid without a Faction Negotiation card included, the Bidding player puts one cube of his/her colour for each Resource bid on the building section. 

However, if a bid with a Faction Negotiation card included is accepted, then the Active player must put the corresponding number of his/her own cubes on the building section and the Bidding player is awarded the Bonus marker from the relevant building section. 


Finally, if the Active player didn't accept any bids that contain a Faction Negotiation card, then the Active player gets to claim the Bonus marker.

During the game, there are only two ways to score Victory Points:

[1] There are three types of Bonus marker that can be acquired in the way that I've described above and players score different numbers of Victory Points according to the type and number that they collect, as the game progresses.

[2] When all the sections of a building have been completed, that building is scored.  This is done by flipping the building card over to the back where there are five circles containing VP numbers.  The player with most cubes on the building places one of them in the highest scoring circle on the back of the card and so on down. 

A neat idea is that the fourth and fifth circles don't score you any VP points, but if there is a fourth or fifth player who has placed cubes on that building you still need to place one of their cubes in the circles that score zero points.  This is because they will count in the final scoring at the end of the game.  All other cubes on the structure are now returned to each player they belong to.


In total, to build all of the 7 structures, 22 cards of each colour will need to be played.  There is also an 8th structure called The Alien Ruins, which consists of a single section of eight circles.  This can only be built using a type of Resource that is no longer needed to build a section of any of the other seven structures. e.g. if all the sections that needed the red Robotics resource have been built, then the current Active player could nominate the Alien Ruins to be built with 8 red Robotics resources.

When seven of the eight structures have been built the game ends and the Final Scoring takes place.  If a player has a cube on all seven structures he/she scores 15 Victory pts, on six structures 10 Victory pts and on five structures 5 Victory pts.  If you've built on only four or fewer structures - tough - you score nothing!

So, folks that's it.  I have gone through the crucial bidding mechanic in depth, because virtually the whole game centres on that one major element.  It does work well.  There is interesting interplay between what cards you hold, what sections have so far been built, what players have scored so far, whose bids to accept or not [beware the payback from not accepting someone's bid, when they reject yours.], which building and which section to put up for construction.

But, it is very much a one mechanic game and very much a light filler.  It is quick to play and quick and easy to pick up the few rules.  For me, it's the type of game that gets played at the club while people wait to see how many turn up before moving on to heavier fare or else serves as a light family game - 'cept that I can see certain family members' personalities affecting which bids get accepted!!

My other concern is the very insubstantial nature of most of the components.  At the moment I haven't been able to find it sold outside the States, though I assume that will happen.  But for the moment, $32.99 plus the not inconsiderable postage/import costs is a high price for what you're getting.  VPG make many excellent games [see my review of Espana 20 vol 2], among them many solo games, but Planet Rush is not one I'd "move in a rapid fashion" to get. [There, I managed - sort of -  to avoid the awful pun!]


                                                 Sengoku Jidai DLC Gempei Kassen                                                          ...

Sengoko Jidai DLC Gempei Kassen by Slitherine Sengoko Jidai DLC Gempei Kassen by Slitherine

For your Wargamer, Toy soldier collector, MiniFig collector, military history nut. Reviews, interviews, Model Making, AARs and books!

Reviews

                                                 Sengoku Jidai DLC Gempei Kassen

                                                                          by

                                                                    Slitherine 


  The Gempei war in Japan was fought in the 12th century in Japan. It was a time of the 'cloistered emperors'. At this time the ruling emperor was usually a cypher and or a child. The adult emperors who had given up the throne carried the real power in their kimono. Sometimes you had up to three emperors at one time vying for control of the government. The Fujiwara family was also deep into the power struggle by being the emperors highest servants and also marrying into the royal family. The war starts because a cloistered emperor brought into the mix the two most powerful military families in Japan, the Taira and the Minamoto, thinking to use these families just as every other piece had been used in the power struggle. The plan backfires on the imperials, and ushers in the age of the Shogun. For the next 600-plus years, the emperor becomes a nonentity while the Shogun rules Japan.


 The DLC for this game, Sengoku Jidai, is an attempt to bring the battles of the two families out of the mist of history, and onto your computer screen. The DLC takes place roughly four hundred years earlier than the battles in Sengoku Jidai. This is a time when the Samurai was much more of an archer than a swordsman, and the tales of the warriors of these times represent that fact.


 Due to the mist that is present in Japanese history in the 12th century, we know of some battles and what warlord died and when. What we do not have is actual lists to be able to make out OOBs for the different battles of the Gempei War. So the decision was made by Byzantine Games to not falsify history and  make some OOBs up. Instead, the DLC is based solely on skirmish mode in the game without any historical battles. It is an unfortunate but correct decision based on the records.

 There has been some discussion on the web about the choice of the names of the two sides in the war. The Minamoto are listed as anti-imperials, while the Taira are listed as pro-imperials. I understand that while it is not technically correct; both were pro themselves and anti everyone else. You are still able to kick some 12th century Minamoto butt with your Taira troops, so it all works out in the end.

 Minamoto no Yoritomo is the strongman who set up the shogunate after the crushing defeat of the Taira at the sea battle of Dan-No-Ura. He then consolidated his position by the hounding and then murder of his half brother Minamoto no Yoshitsune. Yoshitsune was a greatly revered swordsman whose battle with the monk Benkei, and their companionship and travels after the fight, loom large in Japanese folklore.

 Sengoku Jidai is a game for anyone interested in the history of Japan. This DLC makes it more interesting with the new units and different strategies needed to win with your 12th century armies. Please see my review of Sengoku Jidai:  http://www.awargamersneedfulthings.co.uk/2016/05/sengoku-jidai-review.html


 Robert


Game : Sengoku Jidai DLC: Gempei Kassen
Developer: Byzantine Games
Publisher: Slitherine Games
Steam Release Date: 9/8/2016
Review Date: 10/1/2016

GATO LEADER As promised, my next undertaking is an AAR for Gato Leader .  I decided on this route, because a review would have simp...

GATO LEADER AAR GATO LEADER  AAR

For your Wargamer, Toy soldier collector, MiniFig collector, military history nut. Reviews, interviews, Model Making, AARs and books!

Reviews

GATO LEADER


As promised, my next undertaking is an AAR for Gato Leader.  I decided on this route, because a review would have simply been about 95+ % a replication of my review of U-Boat Leader As a prelude, these are the few differences, none critical, as they mainly reflect the historical backgrounds.

Gato Leader :

Includes some differing Special Missions, such as Mine and Recon/Rescue.

Wolfpacks are handled differently.  In fact, I would personally have called them something else, as I don't think that the Americans used this term.  Essentially, you chose whether or not a number of submarines begin as a group together in the same port.  So, no seeing whether a Convoy turns out to be a valuable target and then trying to call in other subs.

Takes us up to 1945, whereas U-Boat only goes as far as 1943, so there is more possibility of using radar.

Provides Forward Operating Bases [that can be purchased with Special Ops points]which allow for removing Stress points and reloading torpedoes.

Takes account of  the inferior quality of torpedoes by having a set of rules for dud torpedoes and a chart to roll on.  At its worst , none of your torpedoes may hit and in plenty of cases at least half will be duds! [Technically, this is not a totally new rule addition as U-Boat Leader 2nd edition has an optional rule for dud torpedoes.]

Allows for reloading torpedoes while on the Tactical Display.


These last two seem to me the most significant differences and one seems in part to balance the other.  However, I do not think that the ability to reload while on the Tactical Display is the big deal some comments on the game have made it out to be.


One other point worth mentioning is that the Event cards can be far more deadly than in U-Boat Leader and, overall, you will probably have to draw more too!


So, with that said, on to ...


Campaign Mission :
Turning The Tide
Short Scenario.


Stategic Segment


This gives me 40 SOs with which to purchase my submarines and any Special items.


I spend 36 SOs on submarines and the remaining 4 SOs on Special items.


Here's everything set up for the start of the Campaign, including my trusty dice tower!  On the left is the mounted play board which  has areas along the top for the Merchant Cards, the Escort Cards and the Naval cards and then beneath is nearly all the necessary information for conducting the Tactical Segment of a turn.  On the right is the Campaign Mission card with the map on which the subs operate in the Operational Segment of the turn.  The very blurred, vaguely bluish shapes are my four subs in groups of two.


Slap bang in the centre is the mounted Tactical Display board on which [surprise, surprise] the Tactical Segment takes place.   On the left side of this board are the holding boxes for the Event cards and Convoy cards and the rest is the lovely depiction of a sonar screen.  It's worth pointing out that this Tactical Display is part of the expansion pack.  It's brilliant, but the one that comes with Gato Leader itself is half the size and not as impressive because of the reduced area to play on.


My choices were:


Guardfish [Trained level + Torpedo Modifier]

Gudgeon  [Trained level + Radar] 

Both placed in Peal Harbour and formed as a wolfpack.  So, these two will operate together.

Silversides [Veteran + Torpedo Modifier]
Tautog       [Veteran + Radar]

Both placed in Freemantle and formed as a wolfpack.  So, these two will also operate together.

My decisions were based on the following reasons: the radar would gain a modifier in locating Convoys and the Torpedo Modifier would mean that the sub would roll one column better when checking for dud torpedoes.


A closer look at Guardfish, loaded up with 10 torpedoes Ready and another 14 Stored on board. 

It has markers showing its 6 gunnery factors and the Torp modifier.


Operations Segment


My first two subs left the port of Freemantle for the South China Sea, each drawing two Event cards.


Silversides


A Fatal Error                   + 3 Stress

Equipment Malfunction  + 2 Stress


[See what I mean about Event cards!  my sub is almost nearly up to its Shaken level and it hasn't even started to look for the enemy.]


Tautog

Lone Merchant - expend 1 torpedo and score 1 VP
Rough Seas         + 2 Stress


My other two subs left Pearl Harbour for the Marianas, each drawing two Event cards.

Guardfish

Nimitz Takes Notice  -  gain 2 SOs if you score equal or more than 10 VPs this turn.
Clear Weather            - no effect

[Well that draw went a bit better.]

Gudgeon

Rough Seas - + 2 Stress
Minefield [condition N/A, so gained default] + 1 Stress


The unfortunate Silversides which has picked up 5 Stress pts

just by sailing in to the South China Sea


 Tactical Segment


[N.B. all die rolls use a d10]


Tautog rolls for Contact


Contact die roll 6  mods +2 [number of subs in wolfpack],

+1[ radar], -3 [sub moved during the Operations segment].


Result 6 = 2 Contacts


Place Contact marker on the Campaign map board, draw a Convoy card and flip Contact marker from 2 to 1.

Contact card drawn is Card 043 [6 Merchants and 3 Escorts]  Unidentified markers are placed on the Tactical Display for all nine ships.


Convoy card 043 showing where the relevant unknown ship markers should be placed


The card only shows the 4 Centre Convoy Sectors and the 8 Short Range Sectors.  Beyond those are the 8 Medium Range Sectors and finally the 8 Long Range Sectors.  


Here are the six blue unidentified Merchant ship markers and the three unidentified escort ship markers, before I place my two subs in any of the outer Long Range Sectors.  


Once I do that, I choose for both submarines to submerge and move one sector nearer the revealed Escort Ikuna and the following enemy are revealed because of range : Merchants Santyo Maru, Katori Maru, Nanrei Maru and Hoten Maru.


As a result of Lag Movement, the two submarines move one sector towards the Convoy's wake.  [The top of the board is marked as the Convoy's course and the bottom is the Convoy's wake.]  The Escort Ikuna rolls for detection of the subs.  A 1 fails to detect the sub Silversides, but a roll of 8 detects Tautog and so, the other two unidentified Escorts converge along with Ikuna on Tautog.  The other Escorts are revealed as the Momi and Etorofu.  Ikuna and Etorofu are now directly in the same sector as my sub Tautog!


Also, the last two Merchants are revealed as the Harbin Maru and the Sakito Maru.


The image shows all the ships now identified and two Escorts in the same sector as the detected Tautog.  Tautog is just about to Deep Dive to try to avoid the Escorts attacks which are not rolled for, but Damage chits are automatically drawn.  In this case, it would have meant drawing 7 Heavy Damage chits in total - in all probability this would have been fatal for my sub!

*[At this point, with two Escorts at range zero, panic set in and I forgot that Tautog had the Aggressive quality and could have fired at the Escorts before they could fire at him.] 

Instead, not too surprisingly, the sub opts to Deep Dive to attempt to avoid the imminent attacks, first it takes 2 Stress points as a result of making the Deep Dive.  Though avoiding drawing damage tokens for attacks from the three Escorts, the sub still has to roll against its evasion rating and is successful for two of the three attacks, but fails against the other and so takes a temporary Flooding marker.  Not good, but could have been much, much worse if the Escorts' attacks had gone in.

[Crash Dive, which is what you do if you are attacked while on the surface, states quite clearly that an Evasion roll is made for each Escort attacking you.  With a Deep Dive, the rules are not 100% clear as to whether you make an Evasion roll for each separate Escort, as I did, or whether it's a single die roll.]

Because the Tautog has dived, it cannot attack. 

[Again, a point worth raising. In both Gato and U-Boat Leader, there are no restrictions on Escorts sailing into and through Convoy Sectors.  In my review of U-Boat Leader, I queried the historical validity of this total freedom.  Still not sure how appropriate this is.]

The other sub Silversides, however, now unleashes a spread of 5 torpedoes at the Katori Maru and another spread of 5 at the Hoten Maru.

Resolve those against the Katori Maru first.  The die roll for duds means that only half run true [i.e. 3 torpedoes out of the 5].  So, modifiers are +2 [3-1 for torpedo spread] +2 [sub's Torpedo Skill] -1 for range, giving a final mod of +3.

The torpedo rolls are 1,3, 9, becoming 4, 6 and 12.  Taking the highest result 12, this is compared with the target's stats and as 12 well passes the target's third number, the Katori Maru settles beneath the waves.  Silversides chalks up 4 VPs and 3 Experience Points.

So, the focus turns to the attack on the Hoten Maru.  All five torpedoes run true; no duds this time.  Modifiers: +4 [5-1 for torpedo spread, +2 [sub's Torpedo Skill] -2 [range] = +4.

Die rolls for the five torpedoes are 3, 7, 8, 9 becoming 7, 11, 12, 13.  like its sister ship, a final result of 13 is more than enough to sink the Hoten Maru and Silversides gains another 3 VPs and 2 Experience Points.

The Combat Resolution phase is over and so the Deep Dive marker is removed from the Tautog and a new round begins.

Silversides surfaces and moves 2 sectors away to the western most Long Range sector, while Tautog opts to attempt Silent Running and rolls a 1 [hurrah], so the detection marker is removed  and the sub's speed drops to zero.  As a result, in the Lag Movement phase, Tautog drifts two sectors south and out of detection range of the Escorts.


[In the image above, Tautog has just successfully rolled for Silent Running and its speed drops to zero.  Consequently, in the Lag Movement phase, the sub will move two Sectors due south, towards the Convoy's wake.]

* [I realised much later, I had made a mistake here.  The attack by Silversides would have placed an Alert counter on the Tactical Display which would have increased the Escorts' detection range by one and put Silversides in potential detection range of the Escorts.] 

Consequently, the Escorts roll for random movement.  End of Combat round.

For the next 3 rounds, the two subs lurk on the fringes, out of escort range, while Silversides reloads 2 torpedoes per round.

On the next round, both subs move into firing range of the Merchants.

Tautog fires 6 torpedoes at the Sakito Maru and half run true.  Modifiers +2 [3-1 for torpedo spread] +1 [sub's Torpedo Skill] -2 range = +1

Torpedo dice rolls are 10, 7, 1 becoming 11, 8 , 2

The Sakito Maru is sunk and Tautog gains VPs 4 : Experience Points 2.

Silversides launches 5 torpedoes at the Harbin Maru, but a pathetic die roll of 2 means that only one torpedo runs true and one of the torpedoes that miss errs dramatically off-course and hits its own sub!  This causes 3 Heavy Hits on the sub;  the first adds 2 Stress, the second is No Effect and the third causes lasting Hull damage.

To counter this appalling SNAFU, the 1 torpedo that strikes the Merchant rolls a 10 and with +1 total modifier the Harbin Maru is added to Silversides' growing total, gaining 3 VPs and 2 Experience Points.

On the next round, both subs surface in order to be able to move two sectors.  The Tautog is able to exit the Tactical Display, but Silversides can only reach the Western Long Range sector and so is easily detected by the Escorts who converge for the kill.  Silversides opts to Crash Dive and adds 1 Stress, so that the sub is now at 8 Stress, one away from the maximum it can take before becoming Unfit!  But all evasion rolls are successful.

On the next Combat round, the sub can exit the Tactical Display and the situation moves to the Post-Combat Resolution Phase.

Silversides records his 10 VPs and 7 Experience Points on the Campaign Log.

Tautog records 4 VPs and 2 Experience points.

Each sub gains 1 Stress at this stage.

Silversides moves to 9 Stress, and so I decide to place the sub back onto the Campaign Map in the Area's Searched Box.

Tautog, now at Stress 5, fully reloads and with 1 Convoy-sighted marker still on the Tactical Display, I decide to continue the Tactical Segment and draw a new Convoy card which reveals two Merchant ships and Escorts.  A second Convoy card is then drawn for its random Event.

Tautog decides to fire off 5 torpedoes at each Merchant ship [this causes them to be revealed as the Anyo Maru  and the Tatuwa Maru]. 

Firing at the Tatuwa Maru -  the roll on the dud table is low and only one torpedo hits the ship doing no damage, while one of the misses hits his own sub adding 1 Stress, Lasting Electrics damage and No Effect.

The other 5 torpedoes fired at the Anyo Maru all run true and with the best of his five dice being a 10, plus a small modifier, a final Merchant ship is sunk adding 4 VPs and 3 Experience Points to the tally.

In the next Combat round, Tautog immediately exits the Tactical Display to add one more Stress in the Post-Combat Phase, so the sub's Stress is now at 7.

Tautog also records 4 VPs and 3 Experience points.

With virtually no torpedoes left to reload and a high Stress level, I decide to call it quits and place Tautog in the Searched Box where Silversides has already been placed.

[... It was now the turn of my other two subs in the Marianas and I hope that you will allow me to draw breath at this point and pass over their exploits, until another day.  Otherwise this AAR is going to ... argh my two typing fingers have gone numb!

Some time later...

Once all your subs have been activated and gone through the processes that I've detailed, you move to the last Segment Refit.]

Re-fit Segment

Promote Submarines

Silversides  spends 5 of Experience points to promote the sub's commander to Ace level.

Tautog spends 3 Experience points to promote the sub's commander to Ace level.

As there is no Forward Operating Base in the area, neither sub can reduce their Stress level and neither sub has the Cool Special Ability which would allow 1 Stress point to be removed.

Any temporary damage received is removed, but lasting damage remains on the sub.

Finally the submarines are put back from the Searched Box into the South China Sea area and the process starts again.

With neither sub fit for much action, I simply return them to the Port of Freemantle from which they had started.  Of course, if subs travel further afield, you can head for the nearest Port or journey back drawing Event cards for moving into areas as you do so.  Thankfully for these two battered heroes, Freemantle borders the South China Sea and so they go straight into the Port Box.

Once in Port, each sub can remove the appropriate amount of damage, in this case 5 Stress points each for Freemantle Port.

This concludes 1 Patrol for each submarine which is the maximum they can do in a Short Mission.

Between them the Silversides & Tautog had notched up 18 Victory pts, enough to get me exactly half way to scoring the minimum total of VPs to earn the Adequate level in game terms!!


A FINAL FEW WORDS

First of all, this was a hugely enjoyable experience, though it took 10 A-4  pages of careful record keeping just to cover the details that covered half of the Campaign and several sessions that tallied about nine hours in total.  To play the game, without all the written record keeping to produce this AAR, is [I can assure you] a whole lot quicker!

I'd like to thank DVG, who very kindly sent with the game the Expansion Ship Miniatures and Battle Board which provides a mounted Tactical Display board twice the size of the smaller board in the game itself. But, as mentioned in my review of U-Boat Leader, the latter is rather small for the number of counters and markers likely to be placed on it. 

I love the expansion, but it does add another £22.99 to the cost of the overall package.

Both U-Boat Leader 2nd Edition and Gato Leader are for me excellent additions to my solitaire experience.  I imagine that the UK gamer may well settle for the former and the US gamer for the latter.  Both give equally satisfying and rewarding experiences.


hpssims.com