I deliberately chose to show some of the counters as they are when just pressed out of the counter sheets and some after I had clipped the corners. Though a lengthy process, I would strongly recommend it for the additional effect created on the map.
All the play aids are of a similar good quality, ranging over the unit displays for the Campaign game [including a very useful set up map] and the Operation Diadem Scenario, a full colour terrain and combat chart and each player's Operational Costs chart and Army Displays.
The final element is the Rule book which is printed on such good quality gloss paper that it feels almost like thin card - definitely a substantial production.
In all there are five Scenarios, each of which is played on a single map, providing substantially shorter sessions than the full 10-turn, 2 map Campaign.
Scenarios
Ortona : 1 Turn
Salerno : 2 Turns
Anzio: 2 Turns
Operation Diadem: 2 Turns
The Kesselring Option [hypothetical] 2 Turns
The full Campaign: 10 Turns
You will certainly make use of those shorter Scenarios for a number of reasons. The first is that they make good games in their own right, especially the Salerno and Anzio ones. The second is the length of time the whole Campaign will take to play, unless the typical Sudden Death victory condition is achieved and finally the third is their need to help in learning the rules.
This is not a simple game in terms of the rules themselves, nor in the sense of understanding them. The translation from Italian into English has some familiar issues, such as lack of correspondence in subject and verb between singular and plural, inexact use of prepositions and slightly ungrammatical phrasing or a lack of idiomatic phrasing. However, none of these hinder understanding. Rather the difficulties veer between the innovative concepts and the broad explanation of some of them.
First of all, however, I'd like to take you through the overall course of a turn and look at some of the uncertainties and ambiguities, while pointing out the many strengths of the design. Perhaps the major point to be aware of is the inaccurate picture given by the Sequence of Play Chart provided for each player.
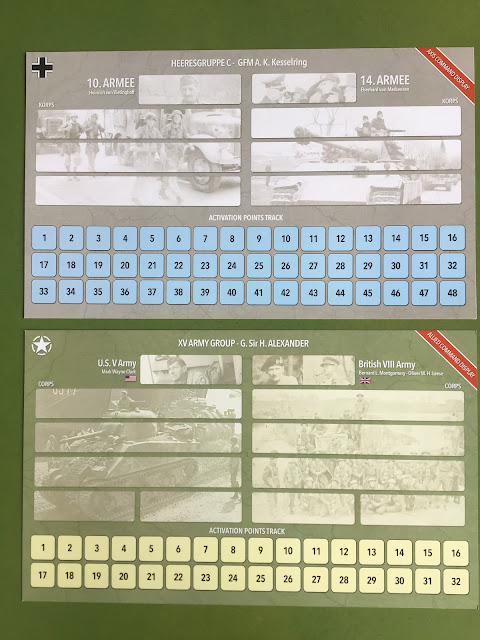
Each Turn begins with the recording of that Turn's Action Points on the player's Army Display Chart, one for the Allied Player and one for the Axis Player, as seen below.
The most important point to grasp is that a Turn is made up of a variable number of Impulses. In the first Impulse of every turn [except the first turn] both players will have the opportunity to use limited Replacement Points to build up flipped units on the map or rebuild eliminated ones. In designated Impulses, Reinforcements first become available, but may be delayed by a player's choice. All other aspects of an Impulse are identical. They involve a simultaneous Planning Phase and then an Igo-Ugo Operations Phase. Though the Initiative Player performs all their Moves and Combat first and then the Non-Initiative Player does likewise, this does not convey the interactive nature of an Impulse, which is among the strong points of the system.
This interaction stems primarily from the use of Reserves and the ability of many units to React. What I found unusual was that most Axis units possess this latter factor, whereas hardly any Allied ones do. This is one of several areas where I desperately wished for some Design Notes to explain the thinking behind the decision.
However, let's look at Planning. Each Player has a Chart of Operations that they can select from: the Allied Player has a wider range of choices, virtually all of which need to be paid for from that Turn's Action Point [AP] allocation, whereas the Axis Player has fewer options, but several cost no APs.
On each Player's Army Display, you have Corps and Division HQ markers that will be turned to their Activated side if they are chosen for Operations that Impulse. Should the number of Operations be few, you may be able to remember exactly what you have chosen, but for a more extensive range of Operations, I'd strongly recommend a handy note pad to jot them down!
The full range of Allied Operations options takes in a few that are optional rules, such as Intelligence which allows you to examine a number of enemy stacks and several very simple choices such as additional airplanes. The core of your choices is the activation of Divisions or Corps, including the ability to reassign Divisions to other Corps and even to other Armies. Again the Allied Player has to pay for these Operations with APs, while the Axis Player can do so for free. This disparity is open to question, though I assume that it depends on the reputed German ability to cobble together their units as needed by defence and desperation. [Oh Design Notes where are you?]
Whether this gives the Axis an edge which may affect play balance, I don't yet have enough playing time to comment on. However, if it should, an easy remedy will be to introduce some relevant AP cost
similar to the Allied one. Also there is one Allied action choice that can be made only ONCE in the whole game and that is a Major Landing. Considering that the historical Campaign had both Salerno and Anzio and these are individual scenarios in the game, I was a bit surprised that the Allied Player can only launch one! Still that can also be house ruled should you wish to or feel it necessary.
Overall the Planning Phase is one that, I strongly enjoy and welcome as a concept rarely met with in board wargames design. You really do feel like you are genuinely a senior commander, having to decide what operations you are going to undertake and when. This is especially true as noted above for the Allied Player with their choice of when exactly to launch that one and only Major Landing Operation.
The obvious drawback to the Planning Phase is that it does add considerably to the length of each Turn, as it is being undertaken not once a Turn, but once every Impulse! That said, it is a feature I wouldn't miss for the world!
The number of Action Points each player spends in an Impulse then determines who has the Initiative and moves and fights first in the Operations Phase of that particualr Impulse. This too has a subtle influence on game play. How much to allocate and when? Commit too much too soon and your opponent may have too much of a free hand in a later Impulse that turn. Or can you strike a strong early blow that may mitigate your opponent's ability to retaliate later. This is another excellent conundrum created by this part of the game system and another big plus to chalk up for the game.
So too is the choice between planning several single division operations and Corps Operations. The first allows a succession of small move/fight actions one after the other that might punch a hole and then exploit it, while a Corps Operation allows several Divisions all to move and then all fight. Obviously the perfect choice is several Corps Operations in hope of creating bigger holes and greater exploitation! All of these are very positive main elements in the game's design.
Always useful - a full colour Reinforcement Chart
Running alongside is a mixture of smaller details that combine to create the fluidity and "feel" of From Salerno to Rome. In no particular order, I'd like to outline a few and comment on them. First off is naval, artillery and air power. All can be used either for bombardment or combat support - but none of the three elements can be combined together. [Another question as to why not for the Design Notes.]
The handling of air power I really like - a basic two planes plus an additional one based on a die roll are free for the Allies every Impulse, while the Axis have only a guaranteed single plane plus an additional one to be rolled for. On top of that the Allies can acquire more by capturing airfields - for every three factors captured, you gain an extra airplane! Simple, but effective. However, it did take a question or two to shake down just how combat support worked. In effect the use of any one from planes/artillery/naval allows a roll on the Combat Support Table to gain a DRM [Die Roll Modifier] or column shift on the Combat Table for a given combat.
Another good aspect that also took a little sorting out was the use of Reserves. First of all, you create them by placing Reserve markers on units or stacks of units belonging to a Division when you first activate it. After the Division has moved and had combat you can activate individual Reserve units or stacks to move and have combat one hex at a time. So no combining Reserves from different hexes to attack, though a meaty Allied single stack can pack a reasonable punch!
Should the non-Active opponent have Reserves, they can interrupt by activating a single unit/stack. This can produce an exchange of small actions. However, some aspects of these rules were only brought to light through posing questions on BGG. In particular, the fact that if either player passes on this exchange of Reserve activations, they cannot activate any more Reserves that Impulse.
Both the Movement and Combat Rules are remarkably short and straightforward, while covering all the familiar, typical features. So Movement includes Strategic Movement that quadruples or triples movement allowance, provided the unit remains at a specified hex distance from an enemy unit and as always there are the benefits of road movement, bridge blowing, bridge repair and construction. The one major surprise was that all units can move from hex to hex when adjacent to the enemy at the cost of +1 Movement point. Very unusual!
Combat is covered in less than two pages. It's a standard odds ratio table with DRMs and column shifts, embracing terrain, armour bonus and tank shock, combat support, encirclement, retreats and advances. All very easy to understand and apply.
The final unusual feature is that there are no Artillery units, only markers for Army, Corps and Divisional artillery. The latter can be redeployed at the beginning of every Impulse! Thankfully there are not large numbers of artillery or this might have been a chore. This allows for a fluidity I find strange, though the fact that the markers always remains where placed until the next Impulse makes for very careful placement. It also means that attacking units will often move out of range of artillery support especially at the Divisional level.
Again a curious feature for which I'd love more design explanation.
I like the fact that there is a range of minor Optional rules that are integrated at the appropriate point rather than bundled together in a separate section later. I also like that they are additions [some intended to add historical detail] rather than modifications that change, modify or amplify existing rules.
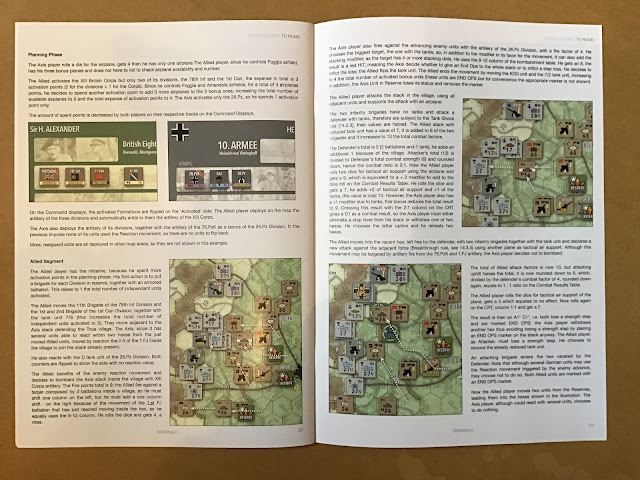
Overall, the rule book itself is an attractive production, though very limited in illustration, until you reach the 4 page Example of Play which does encompass most major elements of the rules. Below is a good illustration from the Example of Play.
I certainly found this a great help to understanding the interaction of some of the rules. As I've pointed out interpreting accurately some of the rules isn't always easy. Sometimes play helps to clarify, but equally some of the uncertainties arose during play. The system is definitely not one for the beginner and, as I've indicated there were several times when the rationale behind some rules would help especially when they didn't seem to fit with what I know of the historical elements.
However, this is both a system and a campaign of WWII that I feel is well worth the effort to master. The flow of the game and the situations in the shorter scenarios that I've played have been both enjoyable and engrossing. The visual appeal of map and counters when set up is excellent and the feel and involvement of both players at all times very rewarding. I only wish that I had the room to be able to leave the full two map campaign set up for the very lengthy period of time necessary. But that will have to wait until the sort of three or four day gaming conventions that I used to enjoy return to normality.
Once again thanks to Dissimula Edizioni for providing a review copy and I certainly hope that they will take this system to other WWII theatres. Until they do, I'm looking forward to their next project which takes us to the American Civil war - another of my favourite wargaming periods - and the Chancellorsville Campaign.


.jpg)


0 comments :