second chance games

Search This Website of delight

Showing posts with label Western Front. Show all posts

Preview of Nations At War Digital by Lock 'N Load Publishing  The Nations At War boardgames from Lock 'N Loa...

Preview of Nations at War Digital by Lock 'N Load Publishing Preview of Nations at War Digital by Lock 'N Load Publishing

For your Wargamer, Toy soldier collector, MiniFig collector, military history nut. Reviews, interviews, Model Making, AARs and books!

Western Front


Preview of Nations At War Digital

by

Lock 'N Load Publishing


 The Nations At War boardgames from Lock 'N Load comprise these games and add ons:

Nations At War Starter Kit
Stalin's Triumph
White Star Rising
Desert Heat
Solo Assistant for Nations At War

 These games portray platoon-level combat in the different theaters  of World War II. You will get to command armor, artillery, infantry and air support. From tanks fighting tanks to close infantry assault. If you are inclined to play both digital and boardgames (who isn't?), you should take a look at this series.


 So, I did reviews of two out of the three boardgames that comprise the L'NLs stable of Nations At War games. I found them to be great games that were quick to play, and gave historical results. The rules were meant to allow the player to play the game, and not to pore over page after page of the manual. In this, L'NL succeeded admirably. Now I have been allowed to do a preview of Nations At War Digital edition, and put it through the paces and see if it is as good as its cardboard cousin. So on to the game.


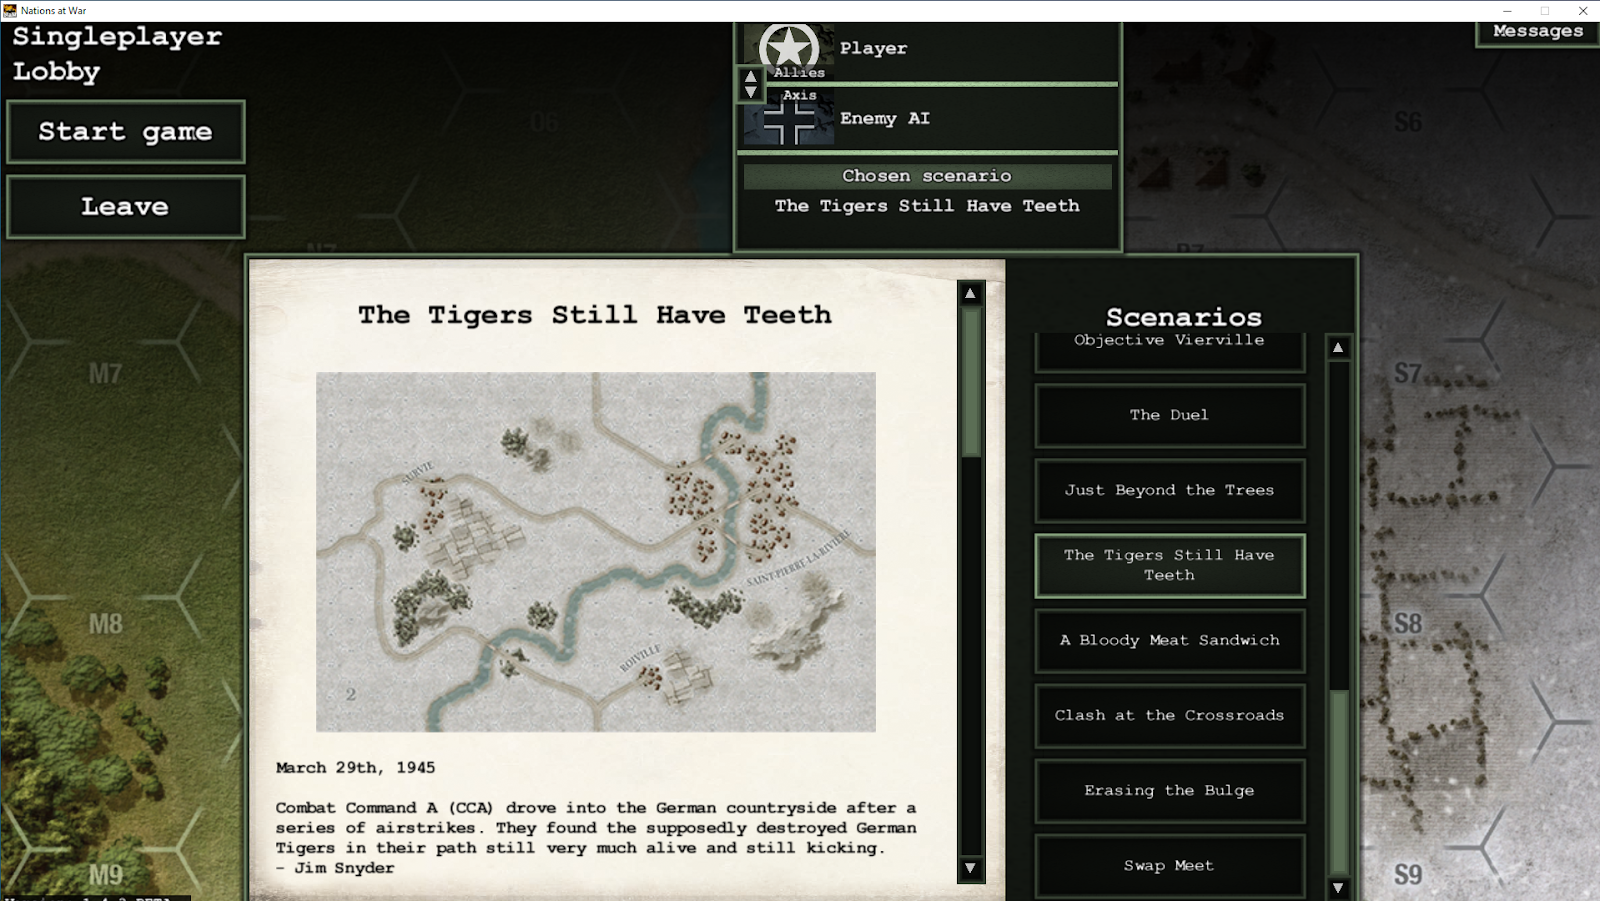
 First, the action is based entirely on the Western Front of WWII. The scenarios and equipment, etc. were taken from the 'White Star Rising' edition of the boardgames. Before we get too deep, please remember that this is a preview and things could and probably will change. I had played a much earlier version of the game, so I have seen it grow and become much more polished. 


 The player can play either the German or American side in the game. This means that you get to play with both Shermans and Panthers, along with most of the other equipment that each army used.

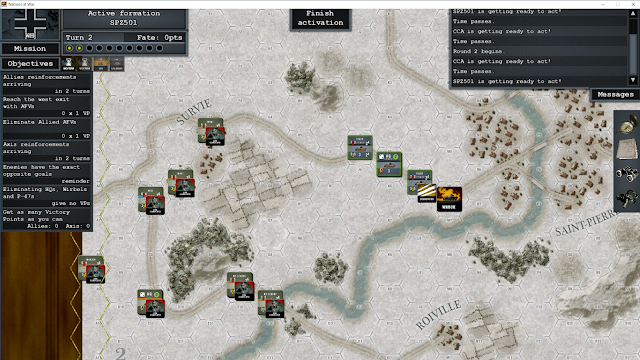
 The AI plays almost like a human opponent. To give you an example; I had four Tigers and the AI has a multitude of Shermans, M18s, M36s, and a few Stuarts. The victory conditions for the German side was that I destroy all of the enemy and exit the western edge of the map. The AI would use the Stuarts in Kamikaze like attacks towards the Tigers. At first glance, this seems a rather foolish move. However, for at least two turns I was forced to deal with the Stuarts and not do anything about the real threats that were enveloping my position. So, even though the tactics seem 'gamey', it is exactly what some players would actually do. The Allied airpower is not to be trifled with either. The ground attacking American planes took out two of my Tigers and a Wirbelwind in the above scenario. I have lost more than I have won playing against the AI.


 Another factor that is part of the boardgame, and is a real game changer at times, is Fate Points. Both sides are assigned so many of them at the start of each scenario. I will use L'NL's words to explain them:

"Despite generals, sergeants,riflemen, spreadsheets,tables, and game designer’s best efforts, battles are often won not by the side with the best weapons, most men, or better morale, but by the unforeseen actions of men and women and inexplicable twists
of fate. Fate Points (FPts) in the Nations at War system represent those twists.Fate Points are points that can be used to sway the turn of events and change an unfavorable situation into a favorable
one.
Fate Points are assigned within each scenario to a side and can be used anytime within the game. They cannot be carried over to other scenarios.Fate Points can be thought of as currency and can be used to purchase an event that can change the game. They can be used by the active player or their opponent at anytime.  The defending player ALWAYS has the last chance to use FPts to adjust a unit’s outcome. Fate points that are used to adjust die results may only be used on that players own die results."


 So instead of getting an almost faithful representation of the boardgames, L'NL was able to transpose the boardgames right into the silicon world. This in itself is a major kudo for the game. The AI knows what it has to do to win victories, and is able to follow through and do it. It uses its forces very aggressively, so don't assume it will be passive and better on the defense (as most AIs are). I am very impressed by the game, and really looking forward to L'NLs Tactical Digital series of games that is also coming out soon. Thank you L'NL for allowing me to do this test drive on Nations At War Digital. I almost forgot, this game will be available on Steam at release, as will L'NLs Tactical Digital series.

Lock 'N Load:
https://store.lnlpublishing.com/
Nations At War Digital:
https://store.lnlpublishing.com/series/nations-at-war-series/nations-at-war-digital-for-windows
Nations At War boardgames:
https://store.lnlpublishing.com/series/nations-at-war-series

Robert

Monty's Gamble: Market Garden by Multi-Man Publishing  The Wehrmacht had been rocked back on its heels sever...

Monty's Gamble: Market Garden by Multi-Man Publishing Monty's Gamble: Market Garden by Multi-Man Publishing

For your Wargamer, Toy soldier collector, MiniFig collector, military history nut. Reviews, interviews, Model Making, AARs and books!

Western Front


Monty's Gamble: Market Garden

by

Multi-Man Publishing


 The Wehrmacht had been rocked back on its heels several times during World War II. In late 1941 the Russian winter and Soviet counterattacks had caused it to stumble backwards. In late 1942 the Soviet surrounding of Stalingrad brought it again to the brink of disaster. Now it is 1944, and the Allied invasion of Normandy, followed by the breakout and then the Falaise Gap, had caused it to almost cease to be a fighting force on the Western front. The Allies had them on the run and it did not look like it would stop until Berlin was taken. Most Allied intelligence had the Wehrmacht in the West as a spent force and that the war would be over by Christmas. The only thing that stopped the Allies were supply problems. The Allied Armies had to stop and take a breather right then at the most inopportune moment. They were poised on the Netherlands border, waiting for their precious supplies to catch up. At this same moment the German Field Marshal von Rundstedt was put back in charge of the German forces on the Western front. He was given the Herculean task of trying to make the streaming refugees that were now the German forces into a fighting machine once again. That he succeeded was a testament mostly to the average German soldier during the war. At the same time, 1st Viscount Montgomery of Alamein, Field Marshal Bernard Law Montgomery was in command of the northern area of the Allied Armies poised in Belgium. Montgomery, who was a master of the set piece battle, decided to break free of his mold and devise an uncharacteristically bold plan. He would drop three Allied Airborne Divisions in a line, described as a 'carpet', to capture bridges in the Netherlands, with the British First Airborne tasked with taking a bridge over the Rhine at Arnhem. The Rhine was the last natural barrier between the Allied Armies and Germany itself. The British First Airborne would be landed more than sixty miles behind enemy lines! The topography of the Netherlands, with it being mostly land reclaimed from the North Sea, made the task for the British land forces to connect with all of the Airborne troops that much more difficult. The stage is set for you to fight for 'Hell's Highway'. You are put in the shoes of von Rundstedt or Montgomery to refight this epic battle. 


 Multi-Man Publishing was founded in 1994 by four Avalon Hill playtesters and a graphics art designer. They originally tried to get the rights to Advanced Squad Leader from Avalon Hill, but it did not go through. Curt Shilling (yes that one, sorry I am a Yankee fan), also tried to buy the rights to ASL. He was put in touch with MMP and joined as a 1/3 partner in 1995. Once Avalon Hill was sold to Hasbro, Hasbro did allow MMP to license the ASL name for their products in 1999. In 2002 MMP acquired The Gamers, and increased their game line greatly. ASL continues to be a huge part of MMP's stable with many new and revamped modules sold every year. The games from the 'Great Campaigns of The American Civil War' series have been or are in the process of being reissued, with even more added content to the games I have looked at. So, there we have the history behind the game and the company, so let us head to Monty's Gamble: Market Garden.

Let us first see what comes with the game:

1 Unmounted Mapsheet
3 Countersheets
1 Rulebook
4 Setup Cards
4 Six-Sided die


 The game is an area movement one and is played in impulses. The scale of the map is approximately 1" = 1.5 miles. The map is divided into sixty-five numbered areas. The game also comes with a new addition for this printing. This would be a new scenario that was originally published in Operations Special Magazine #2. The scenario/full game is 'Fortress Holland', and deals with the German invasion of the Netherlands in 1940; more on this later. The rulebook for Monty's Gamble is thirty-four pages long with an additional ten for Fortress Holland. The rulebook is in full color and a good number of pages are dedicated to examples of play. The printing of the rules is in large size and can easily be read and more importantly understood. The rulebook comes with an index on the first page; that is always a nice touch. The map is also very well done with a good number of the player aids built into it. The map is marked for all three of the Allied Airborne Divisions' different Operational Sectors. The three divisions are, The British 1st Airborne Division and Polish Brigade, The American 82nd and 101st Airborne Divisions ( respectfully the Red Devils, All American, and Screaming Eagles). As the game deals with an airborne assault to take and hold bridges, most of the rules have to deal with airborne landing and bridge seizure or demolition. There are also rules dealing with playing the Extended Game, and a few interesting Optional Rules. One of these deals with Optional D-Day Landings for the airborne troops. The historical landing area for the British 1st Airborne was particularly far from the bridge that they were entrusted with.


 This is the sequence of play:

The game has four turns (there is an Extended Game you can choose to play). Each turn has four Phases and a variable amount of Impulses. Each Turn is comprised of:

1 - Dawn phase (place Reinforcements, reset markers, and make a Weather Die Roll if it is September 19th or 20th)
2 - Daylight Phase (players choose Assault, Bombardment, infiltration, or Pass Impulses)
3 - Refit Phase (Refit and place Supply Depots)
4 - Regroup Phase (move any units into adjacent Free Area)

 The Turn sequence for the first Turn is changed from the above and replaced with four special D-Day Phases:
1 - Air Bombardment Phase
2 - Artillery Bombardment Phase
3 - Airborne Landing Phase 
4 - XXX Corps Ground Assault Phase

The Germans conduct their Refit Phase first. The Refit Phase is as follows:

1. Supply Depots are placed and moved to eligible Areas on the map.
2. Units use supply points to Refit. After All units have finished refitting Impulse advance/retractions may be purchased with reserve Supply.

3. Isolated Units may have to make a Surrender die roll.


The Germans have five Depots that they can use. Also German Units in Zone I may automatically Refit without using a Supply Depot, as long as it is German controlled.
The Allied Player has five Supply Depots for XXX Corps and three for the Airborne Units, and an air Supply Marker.

The Air Supply Marker is worth five Supply Points. The German Supply Depots are worth five Supply Points in clear weather and six in cloudy weather. The Allied Supply Depots are always worth five Supply Points regardless of the weather.


The above is a simple and elegant way to portray how units recover from movement or battle etc. The Player is not forced to keep a log of each Unit's supply throughout the game. The flipping of the Unit to its Spent side and the Disruption Markers also make it easy to keep track of the abilities of each Unit. Map Areas that are heavily contested, and are small on the map, do lead to a bit of congestion, but it never reaches a problem point.


Another interesting and seldom seen ‘historical reality’ is that if the Allied Player uses Air Bombardment in a contested area, there is a chance that his own troops will be hit by some of the bombing.
 

 The Allied Player must deal with German Interdiction from FLAK Towers, FLAK Units, and Air Interdiction Markers when trying to Invade, Supply, or reinforce his Airborne units. Bad die rolls on the Airborne Landing Phase can possibly turn the game into a first turn nightmare for the Allied Player. Airborne Units can be landed Fresh (available for use), Spent (cannot do anything else), to even being disrupted. For the Allied Player, speed is of the essence to get and keep those bridges. For the Allied XXX Corps it is just as imperative to keep moving as quickly as possible to the next bridge. The Allied Player will understand why the name Hell's Highway was put on the roads leading to Arnhem. For the German Player it is naturally the reverse. Delay the Allies at every turn, and if in danger of losing a bridge destroy it if possible. The historical recipe of the battle cannot help but make a tense and eventful game for a player of either side. To make it more nerve wracking the designer added the 'Advantage Chit'. This chit starts in the Allied Player's possession and when it is used goes to the German Player, and so forth during the game. The Advantage Chit has various uses, including rerolling a die roll etc. In speaking with the designer he had this to say " The fact is the game sets up and plays quickly and yields consistently historical results, better than most other Market-Garden games." 

 One part of the rules is a little perplexing: knowing the history of World War II airborne attacks. The only way that an Airborne Unit that is landing in a Drop Area becomes Disrupted or Spent is if a German FLAK Unit, FLAK Tower, or Air Interdiction Marker is in or adjacent to the Drop Area. Going by what really happened during the war in air drops I think that you should use a house rule and have every Airborne Unit have to pass a die roll to see if it is Disrupted or Spent on landing. This would represent the actual chaos that ensued during the different airdrops in WWII.


 The addition of the scenario of the attack on Fortress Holland is a great plus for the buyer. This is one of the few Western Front battles of WWII that has not had too many games done on it. The scenario uses many of the same rules from the main game. There are some additions like a German Armored Train and some other interesting twists to the rules, so that it does not seem like the scenario was just cookie-cuttered in.


 The designer is correct in that the game sets up rather quickly. The play, except for new players, goes along at a good clip. As far as being historical, the events that happen during games are well within the historic might-have-beens of the battle. Thank you Multi-Man Publishing for letting me review this very good and very different approach to 'A Bridge Too Far'. The 'almosts' that happen in a game really portray the nature of the battle, without the player getting bogged down in details.


MMP:
www.multimanpublishing.com/

Monty's Gamble:
www.multimanpublishing.com/Products/tabid/58/ProductID/276/Default.aspx

Link to my review of Baptism by Fire by MMP:
https://www.awargamersneedfulthings.co.uk/2018/10/baptism-by-fire-by-multi-man-publishing.html

 
Robert


Crossing The Line Aachen 1944 by Furor Teutonicus Games  I have been inundated lately with games coming from sm...

Crossing The Line: Aachen 1944 by Furor Teutonicus Games Crossing The Line: Aachen 1944 by Furor Teutonicus Games

For your Wargamer, Toy soldier collector, MiniFig collector, military history nut. Reviews, interviews, Model Making, AARs and books!

Western Front


Crossing The Line

Aachen 1944

by

Furor Teutonicus Games


 I have been inundated lately with games coming from small game companies, mostly new, in Europe. Mostly they have been from Italy, but this game comes from Germany. To those of us who long for the halcyon days of wargaming in the 1970s and early 1980s, I have news for you: this could very well be the 'Golden Age' of wargaming. Whilst it is true that the individual games do not have sales numbers like their predecessors, the sheer plethora of games and companies now is nothing short of amazing. The components in the games are also many times better than what we were used to. Well, enough of the speechifying, onto the game.


 This is the historical breakdown from Furor Teutonicus Games:

 "While Operation Market Garden was in the final stage of preparation, Lieutenant General Hodges led the leading elements of the First Army towards the Westwall fortified line south of Aachen. If successful, he might have the opportunity to drive through the fortified line crossing the Roer River and perhaps reaching the Rhine River.
 The Game Crossing the Line – Aachen 1944 is an operational level simulation of the Battle for Aachen, which took place from September 12th to October 21st, 1944. The game is intended for two players but is also suitable for solitaire and team play.
The goal for the US player is to hit the Germans hard and to seize specific victory locations. Of course, the German player the German player wants to prevent this from happening. The game is played in a semi-interactive way and makes both players sit on the fence at all times…"


 The Scale
• A hex represents 1.2km of terrain from side to side.
• Each turn represents a period of two to eight days.
• Combat units are mostly battalions.


 This is what comes with the game:

• One rulebook 
• One scenario booklet including four scenarios and extensive historical notes
• One 22”x34” map sheet
• 360 extra large counters of which 160 are combat units
• Four Player aid charts
• Setup charts
• Reinforcement & Withdrawals charts


 Right now 'Crossing The Line' is the sole game in Furor Teutonicus Game stable (although they do have some interesting ones in the queue). What is surprising to me is the polished look and quality of the games components. The Rule Book is in full color, and is very well done. It is very nicely laid out and also has a three page glossary at the end. This is very handy for looking up the game's rules and concepts. The map is beautifully done and its size is large for the battle. Everything on the map is easy to read and make out, including terrain. The counters have what the company calls a 'linen like' finish. Whatever it is, it works. The counters are extremely well done. They are also slightly rounded for the gamers who care. The Player Aid cards are also very well done and easy to read. The manufacturing is all done very well. There are four Player Aid Charts, each player getting two (labelled A and B). The Combat Sequence is even spelled out in one on a flow chart that even I could understand. 

For the German player the armored vehicles included are:

Panzer IV
Panther
StuG III
Jagdpanther
Jagdpanzer IV (although the silhouette looks more like a Jagdtiger)
StuG IV
Brummbar
Nashorn
Tiger II

The US player gets to maneuver:

M4 Sherman
M8 Greyhound
M10 Wolverine


 This is the sequence of Play:

Admin Phase: Consists of the following segments in that order:
1. Recovery Segment
2. Assignment Segment
3. Victory Plan Segment
4. Replacement Segment
5. Reinforcement Segment


"Ops Phase: Consists of various repetitions of the Ops Cycle, which itself consists of:
1. Initiative Determination 
2. Formation Activation:  Activating a formation allows the initiative player to activate all subordinate units, including Independent units currently assigned to it, to conduct one or more Actions (see 7. Actions).
Most game activities will take place in this phase. At the end of the Ops Cycle, the turn marker will be moved into the next box on the turn track."


 The game has stacking limit rules for each hex. One hex can have one HQ, two AFV (Armored Fighting Vehicle), and one Infantry unit in it. Overstacking causes automatic disruption to the units. The game's Zone Of Control rules are easy to understand and implement. Infantry has a ZOC over all six of the surrounding hexes, unless they are urban or Industrial hexes. AFVs only have a ZOC on clear or Pillbox in clear hexes. Disrupted units have no ZOC whatsoever. The game rules seem to be a mixture of  both solitaire and two-player together. The game purports to be solitaire friendly (it actually is), so it is possible that is the reason for the rules and mechanics being the way they are.


  The game is based upon the player's 'Formation Units', meaning their parent organization. You activate only formations, and not willy-nilly counters that are close enough to an HQ. Independent units are also used in the game, especially for the Germans. These can be attached to HQs if they are in the HQ's command range. They can be reassigned if they are in the command range of their current HQ and the new HQ. Initiative is rolled for at the beginning of each Operations Phase. The roll for initiative is modified by certain conditions, ie. interdiction level etc. The player with the initiative can choose to activate formations, or transfer the initiative to the other player. The next two features of the game mechanics is what elevates the game to a higher level than normal. First, a formation has to be activated before the player can use its units. This is pretty standard. However, in this game each time you activate a formation its activation level is reduced by one. Then you roll to see how many 'Action Points' you receive for the formation, but the lower the 'Activation Number' equals lower numbers for your 'Action Points'. So, this mechanic shows the gradual reduction of the units' abilities, even without combat. Second, the inactive player does not just sit there waiting for his turn. The inactive player can try for a 'Reaction Attempt' when an enemy unit triggers it by certain actions, ie. moving into a ZOC etc. Victory in the game is determined by control of Victory Hexes and German strength point losses. 


 There are four scenarios in the game:

First Blood
The Stolberg Corridor
Across the Wurm
Campaign Scenario

 The first scenario is a solo one played from the American side. The German units are static. The American player has from two to five activations of the 1st Infantry Division to clear three victory hexes. Victory is determined by how many activations the player needs to take the three hexes. Two activations is a Decisive Victory whilst five is a 'poor' performance. The other three scenarios play the game normally. The Stolberg Corridor scenario goes from turn one to turn three. Across the Wurm scenario is played from turn five to eight. The Campaign scenario plays all eight turns. The American player has to use finesse to take all of his objectives and not be a bull in a china shop. The German player has to remember that this is late 1944 and not early in the war. Furor Teutonicus has created a nail-biting operational level late war game. 


 This is one very well made and great to play game. This is all the more amazing, being that this is Furor Teutonicus's first game ever. I actually checked to see if the designers were old hands that moved on from other companies and that is not the case. For neophytes to come up with this design and know how to make sure what they have in mind gets placed in the map, counters, and rules is quite an accomplishment. They have created a tense and historical game that is a joy to play. The game mechanics and units make for a tough game for playing as either the US or the Germans. Thank you very much Furor Teutonicus Games for letting me sail on this maiden voyage with you.  Count me very impressed.

Furor Teutonicus Games Crossing The Line:
https://www.furor-teutonicus.com/produkt/crossing-the-line-aachen-1944/?lang=en

Robert

Hitler Strikes North The 1940 invasion of Norway by Quarterdeck International  I will start with a question -...

Hitler Strikes North The 1940 Invasion of Norway by Quarterdeck International Hitler Strikes North The 1940 Invasion of Norway by Quarterdeck International

For your Wargamer, Toy soldier collector, MiniFig collector, military history nut. Reviews, interviews, Model Making, AARs and books!

Western Front


Hitler Strikes North

The 1940 invasion of Norway

by

Quarterdeck International


 I will start with a question - why Norway? The answer lies in this quote: "If the mines of Lapland had ceased working, the blast furnaces of the Ruhr would have shut down too" (Rolf Karlbom). You could also add in the much larger threat to British sea lanes if the Uboats etc. could use Norway's ports. The hard part of the operation is that you are literally bearding the English Lion, or in this case, megalodon to come and take a bite. Scapa Flow, the British Royal Navy's main base, is a hop, skip, and a jump away from Norway. Germany's Navy was small and completely untried. Their ships were mostly newer than the British ones, but their worth in combat was an unknown factor. Without there being a naval part to the Invasion of Norway, the German plan was doomed to failure. 


 We will look at the components first. The maps are well done and easy to read. They are composed of most of Norway, the Northern tip of Scotland and some of Denmark. The counters are 5/8" and are also easy to read, but relatively plain. They come However, for the purist, they come with the corners already rounded. So, you can put your clippers away. The Player Aid Cards are in black and white on hardstock paper. There are supposed to be seven of them (1,2,3,3A,4,5, and one sheet that has Contact/Evasion tables). The only problem was that my copy did not come with #2. There is a copy of this sheet on the game's BGG page (I will post a link). So I just printed out that one card. This is actually a Chinese/English version. The Chinese Player Aid Cards are actually in color and laminated, and there are three of them. The problem with them is that the printing on them is very small, to fit all of the information on three double-sided PACs. The rulebook is in black and white, but the rules are succinct and easy to follow.


 This is what comes with the game:

2 x 22 x 17 inch maps
6 Player aids
216 Die-cut playing pieces
24 page rule book


 The game is interesting, because the German player rolls the dice to see what his goals are for the actual game. The player checks the die roll against the German Goal Determination Table (this is on the missing #2 card). The German Player's goal is either to exit Raiders into the Atlantic or to invade Norway. Strangely the German Player can choose to invade Norway if he rolls for Raiding. The Allied Player is only shown what his opponent's goal was at the end of the game. 


 This is the sequence of play:

5.1 Introduction of any Reinforcements takes place for both sides. Airfields adjacent to captured cities become German. Detach any destroyers at this time. Bardufoss and/or Weather roll if appropriate (See 9.51 & 15.0).
5.2 Movement.
Players may attempt to evade and/or divide up forces being shadowed (see 6.44).
Shadowed forces move and declare where they stop at and shadowing forces proceed with them.


5.3 German Air Reconnaissance Phase (see 6.22).
5.4 Mutual Search Phase. At night, only surface warships may call out a hex. Any sighted forces now proceed to evaluate the contact and if combat will occur (See 6.4).
5.5 Combat takes place. Combat occurs in the following order:
Submarine combat.
Surface ship combat at sea, followed by any combat with Coast Defense Batteries (EXCEPTION: see 9.21).
All ships on each side are revealed to each side (see 8.21).
All Gunnery is allocated before rolling dice.
SPECIAL SHADOWING/CONTACT (see 8.3).
Salvo Chasing is declared before gunnery combat (see 8.26).
Shielding is declared (see 8.27).
Gunnery Combat takes place.
Torpedo attacks are allocated and then executed.
Air combat.
Paratroop drops are now resolved (only in daylight). Check to see if any ports/airfields fall.
Norwegian and Danish warships are retreated if appropriate (See 9.31).
5.8 Complete the turn and move the turn marker forward one box.


 One of the game's greatest strengths is the amount of what ifs that can be played out in the game. There are Optional Rules including: The Bismarck and the Graf Zeppelin among many others. Luck plays a large part in the game, or actually die rolls. If the Royal Navy catches you with its big gun ships, it is usually lights out. The German Player must rely on his speed to get him out of trouble. One thing I was not aware of was the lackluster performance of German torpedoes in this campaign. The Luftwaffe, which became a large threat to the Royal Navy in the Mediterranean, is not anywhere near as potent here. This is as it was historically so it fits right in. As you can see below, there is even a chance for the French Navy to get involved in the melee.


 The is the games second release. It was originally released in the 1980s. The original release was thought of highly by wargamers. It seemed to make an even larger splash when it was released in Japan. The game has had some large changes from the first edition. Many of these were added by the developer Jack Greene from co-writing a book called "Hitler Strikes North". The price of the game is worth it if only for this one paragraph from the designer Jack Greene: "These game rules are not to be picked apart by a rules lawyer. They are an attempt to use logic and historical understanding of the period and players should adopt the same attitude. Otherwise, play somebody else's game". This should be made a standard and stamped on the face of all game rulebooks.


 I was given this game to review and did not pick it. The Norway Campaign or the surface raiding campaign in WWII does not really interest me that much. Much to my surprise, the game actually grew on me and is a very good representation of the campaigns. I now know this because the game made me do a lot of reading and investigating into the campaigns themselves. Any game that can do that has already paid for itself in opening up closed minds. This one not only did that, but as a game plays very well. Because of time constraints I was only able to play it solo (you can play any game solo). Its nuances would make it work as a very good two player game. Thank you very much Quarterdeck International for allowing me to review it.

 I somehow missed an email from QI about the missing Player's Aid Card. They had let me know that it was MIA and had sent a replacement for me to print off. I just found the email after the review was posted. 

Here are links to QI and some of their games:

https://www.quarterdeckinternational.com/

https://www.quarterdeckinternational.com/store/hitler-strikes-north-game

https://www.quarterdeckinternational.com/store/togo-game

https://www.quarterdeckinternational.com/store/moravian-game

https://boardgamegeek.com/filepage/181547/pac-4


Robert


1914 Glory's End/When Eagles Fight by GMT Games  This game box actually contains two separa...

1914 Glory's End/When Eagles Fight by GMT Games 1914 Glory's End/When Eagles Fight by GMT Games

For your Wargamer, Toy soldier collector, MiniFig collector, military history nut. Reviews, interviews, Model Making, AARs and books!

Western Front


1914 Glory's End/When Eagles Fight


by


GMT Games


 This game box actually contains two separate games. Ted Raicer originally designed both for (sob) Command magazine. I don't have many of the Command magazines, but the few I have I keep pristine and they are some of my prized possessions. Mr. Raicer was like a prophet in the wilderness when he started designing WWI games. No one was interested in WWI; it was all static trench warfare without any room to maneuver or use any finesse. Oh, how wrong we were. World War I is actually one of my favorite eras to wargame, especially the Eastern Front. There you have sweeping and swirling campaigns. The first game, '1914 Glory's End', is about the first campaign on the Western Front of WWI. So it is about the German army's swing through Belgium to outflank the French and take Paris. This culminates with the 'Race to the Sea' and the 'Kindermord Bei Ypern' (The Massacre of the Innocents at Ypres). While history has taught us that the German reservists were actually closer to middle age, they were still massacred in droves. The second game, 'When Eagles Fight', represents the entire war on the Eastern Front. The chaotic nature of the first and second years of the war come through loud and clear.

 This is what is in the box for Glory's End:

One 34"x22" Map
Two countersheets
Two Player Aid Cards
One Pad of Roster Sheets
One Rules Booklet
One Mini-map 

 This is what you get for When Eagles Fight :

One 34"x22" Map
Two Countersheets
Two Player Aid Cards
One Rules Booklet
Two dice 

 GMT has done a complete overhaul of the original games. Not that the original versions were bad, but usually everything can be improved upon.

 Per GMT the difference from the Command version of 1914 Glory's End:

"The game scale is 9.5 miles per hex and three days per turn. The campaign game runs a full 30 turns, but the new edition will include not only a previously published mini-scenario on the Battle of the Marne, but a short ten turn campaign scenario covering the decisive opening weeks of the war. In addition the campaign games can be played in historical or free set-up versions."

 This is from GMT about the differences in When Eagles Fight:

 "But the new edition of When Eagles Fight is more than just a reprint of the original version. The Random Events Table has been exchanged for a system of random events chits allowing for more events. The effects if the Germans do not launch a Verdun offensive in France-which sometimes threw off the balance of the original design- have been revised. Changes in the stacking rules after 1914 more accurately reflect the effect of trenches on the course of the campaigns. And the map now contains the rail lines removed by Command from the first edition. The game also includes a short alternative-history scenario in which the bulk of the German army goes east rather than west in August 1914."


 This is the Turn Sequence for 1914 Glory's End:

I. Allied Player Turn A. Reinforcement & Replacement Phase (Not on Turn 1)
 B.  Entrenching Phase (Turns 10-30 Only)
 C.  Command Control Phase (Not on Turn 1)
 D. Strategic Movement Phase (Not on Turn 1)
 E.  Operational Movement & March Combat Phase
 F.  Prepared Combat Phase
 G. Attrition Phase (7.12)
 H. Allied Victory Check Phase (Not on Turn 30*) *  On Game Turn 30 make one mutual victory check at the end of the turn, adding in all conditional VPs at that time.
II. German Player Turn
 A. Reinforcement, Replacement & Withdrawal Phase (Not on Turn 1)
 B.  Entrenching Phase (Turns 10-30 Only)
 C.  Command Control Phase (Not On Turn 1)
 D. Strategic Movement Phase
 E. Operational Movement & March Combat Phase
 F. Prepared Combat Phase
 G. Attrition Phase (7.12)
 H. German Victory Check Phase (Mutual Check on Turn 30*)

 This is the Turn Sequence for When Eagles Fight:

The Russian Player Turn is the first each Game Turn. Exception: When play begins, the Russian Player Turn of Game Turn 1 is considered to have already taken place, so play begins with the “Central Powers Regular Movement Phase.”
 I. Random Events Phase (From Game Turns 5 to 24)
 II. New Units & Withdrawals Phase A. Russian  • Reinforcements  • Replacements  • Withdrawals B. Central Powers • Reinforcements  • Conversions  • Replacements  • Withdrawals III. Strategic Movement Phase
 A. Russian
 B. Central Powers
 IV. The Russian Player Turn
 A. Russian Regular Movement Phase
 B. Russian Combat Phase
 C. Russian Attrition Phase
 V. The Central Powers Player Turn
 A. Central Powers Regular Movement Phase
 B. Central Powers Combat Phase
 C. German OberOst Combat Phase
 D. Central Powers Attrition Phase
 VI. Victory Check (Game Turns 2, 6, 11, 15, 20, 24) 


 Both games are listed as a '4' on GMT's complexity 'Meter'. So, they are both easy to get into for the player, and a good step up for new gamers from introductory games. Yet, both still have all the bells and whistles that Grognards love, such as Forts, Cavalry, Strategic Movement, Sea Movement, etc. 

 In 1914 Glory's End the German Player, just as in real life, has to smash through Belgium and its forts as quickly as possible. The German player has a timetable that has to be met if he is to take Paris. The German Player is given the historical choice of invading Belgium or not. If the German Player does not invade Belgium, Britain is kept out of the war for now. If the German Player reaches 20 Victory Points, then Britain does declare war. So you have to juggle the pros and cons of invading Belguim. I think most of us budding generals will choose to follow Schlieffen's thoughts on the matter. The Alied Player must delay the German Player as much as possible. The game shows how the original distribution of the French forces leaves the German Player a small window of opportunity in Northen France. The Allied Player has to play for time until his forces can be moved into Northern France to stave off defeat. The start of trench warfare on the Western Front is very effectively shown by the game's rules.

 When Eagles Fight gives the armchair general the chance to fight the entire war on the Eastern Front in World War I. This game is a strategic one instead of operational like it's brother. In 1914 the roles are reversed in Northeast Germany. The German Player must play for time and avoid being crushed by the 'Russian Steamroller'. In the South the 'Central Powers' Player must decide what to do with the Austro-Hungarian army (although I doubt anyone could do as badly as Franz Conrad von Hötzendorf it's commander for most of the war). Luckily for the Central Powers Player he does not have to worry about Serbia, other than not being able to move the 2nd Austro-Hungarian Army on turn one. The Central Powers Player does have to worry about the Italian Front after turn seven. The game's Random Events are full of opportunities or disasters that both players must work around. The Russian Player is hamstrung by ammunition shortages, just like in reality. The Russian Player has to decide if and when he will go on the defensive and what to do on the German and Austro-Hungarian part of the Eastern Front. Luckily for the Russian Player, the game's rules show the lack of cooperation between the Central Power's armies. The Russian Player is hamstrung by ammunition shortages, just like in reality. The Russian Player also has to worry about the threat of revolution depending upon how the war is going for them. 


 The games do unfortunately come with the maps printed on each side of one sheet. This means that unless you copy one of the maps you can only setup one game at a time. The maps are, however, done in typical GMT Games fashion, meaning that they are very well done with all the tables etc. at your fingertips without making the map look too 'busy'. The counters are your typical 5-6-4 type using NATO symbols. They are 5/8" and are very easy to read, even for old eyes. The Player Aid Cards are also very well done. The components are all up to GMT Games standards.

 These games were one of the few that we could play about World War I when they were released. We now have a multitude of games we can play on the war. Some are much more complex than these two games but I think both games have withstood the test of time, and are still two of the best in depicting their different fronts and scales. The Random Events for When Eagles Fight are only that, and do not dive into the realm of fiction or non-plausible as some games do. Do yourself a favor and pick up this great bargain of two great games for really the price of one. Thank you GMT Games for allowing me to review both of these games.


Robert

The title of this book gives the impression that it covers the escape attempts of captured military personnel during WWI. A more acc...

Voices in Flight Escaping Soldiers and Airmen of World War I by Martin W. Bowman Voices in Flight Escaping Soldiers and Airmen of World War I by Martin W. Bowman

For your Wargamer, Toy soldier collector, MiniFig collector, military history nut. Reviews, interviews, Model Making, AARs and books!

Western Front


The title of this book gives the impression that it covers the escape attempts of captured military personnel during WWI. A more accurate title would be "Airborne shenanigans during WWI", admittedly this is not as eye-catching a title; but what 'escaping' there is, is tucked up nicely in the last few chapters of the book. What you have to read to get to that point is however a fascinating insight into the personal exploits, predominantly of airmen - not soldiers, during the conflict. I enjoyed the entire book and was constantly struck by just how far we've come in 100 years of aviation [military] and in comparison what was considered acceptable then to today. For example during the first 5 days of the Battle of Arras, the author tells us that 75 aircraft were lost and 105 aircrew - a figure unthinkable today and sobering to consider.

When I opened this book my eyes felt assaulted by the walls of text on each page. This may sound like a silly criticism but the typesetting felt very cramped on the page. I'm sure the author is not to blame for this but it did look like someone had taken an un-formatted document file and bound it into a book. This did surprise me as no other book I have from Pen & Sword Publishing (P&S hereafter) has this style of typesetting. The publishing quality of my other P&S books is very high, maybe they had a page limit to fit this work into ...?

Each chapter opens with a short excerpt from a personal journal or what I assume to be official dispatches from the front or other such source. Then the author goes on to give the context and throughout each chapter reveals more of the personal account or event. I found this style of having two voices in a chapter engaging. The chapters finish with a note section, rather than at the end of the book which allows for much quicker lookup of the referenced material.

I am professionally aware of military aviation and have spent countless hours surrounded by pictures of old planes from the Royal Flying Corps and the Royal Naval Air Service. There were more than a few occasions throughout this book which jogged old memories of reading medal citations contained within squadron display cabinets. I was very grateful to the author in fleshing out each account and providing the sources and more of the back story as much as he did. There were still many stories of which I knew nothing and I was surprised at the seemingly, ubiquitous role the formative RAF had in WWI.

The focus of each chapter is a different individual and in its entirety this book comprises a who's who of aviation legends; Immelmann, Handley Page, Richtofen to name a few. One name that stood out to me for all the wrong reasons and which takes the best British military officer's name I've ever heard, was Sqn Cdr Joseph Ruscombe Wadham Smyth-Pigott. It feels slightly cheeky to say that the character of Blackadder's Lord Flashheart came to mind several times through reading this book...

One of the most poignant chapters involves the story of Reggie Marix, who after capturing a German cavalry captain and confiscating his sword, offered the POW his pistol in order to end the suffering of his stricken horse; an honour that Reggie thought the German should still have. The chapter goes on to relate how the confiscated sword found its way back to the German many years later and is quite touching. This example, and several others throughout the book, hark back to the days of chivalry and honour which arguably has disappeared from modern battlefields.

I think this book would be enjoyed by a relatively wide audience, although convincing the wider audience of that would be a challenge. If you're not interested in military history then nothing on the cover suggests that a person that only reads biographies would also enjoy it. The book's focus is on individuals and their personal stories in which they are, to me at least, doing amazing things. It's not a historic retelling of the tactics or strategies of WWI but focuses right down at the lowest, human level. In our time, these gentlemen would be celebrities in their own right and lauded for their courage, tenacity and skill. The reader is free to draw their own conclusions to how the majority of today's 'stars' stack up in comparison.

If you would like to pick up a copy of this title, P&S currently (Aug 2017) have a sale on it. However I will just link to their store page and the RRP of £25.00. I highly recommend this book.
hpssims.com