second chance games

Search This Website of delight

                                                              Operation Barbarossa 1941                                                   ...

Operation Barbarossa 1941 Hitler Against Stalin by Christer Bergstrom Operation Barbarossa 1941 Hitler Against Stalin by Christer Bergstrom

For your Wargamer, Toy soldier collector, MiniFig collector, military history nut. Reviews, interviews, Model Making, AARs and books!

                                                              Operation Barbarossa 1941

                                                      Hitler Against Stalin 

                                                               by

                                                      Christer Bergstrom 


 This will be approximately the thirtieth book I have read concerning the German invasion of the Soviet Union in 1941. Is there any reason to have another book on this subject? Haven't all of the different areas of the invasion been gone over with a fine toothed comb? Well, it turns out they haven't. This book is a tour de force on operation Barbarossa and all of its facets. It was released to coincide with the 75th anniversary of the invasion.

 Let us first look at the physical book itself. It is a large 'coffee table' like book. Its 300 pages are of high quality with over 250 photographs, many of which were never previously published. The author, Christer Bergstrom, has written twenty three other books on the history of world War II. His meticulous searching through the various countries' archives is apparent on every page.

  The book goes through the planning and different stages of the war up until the end of 1941. It does a fantastic job of telling the normal facts we are all well aware of that happened in operation  Barbarossa. This alone is worth the price of the book.

  Where this new rendition goes beyond all others in its field is where the author challenges, and proves, many of the items that we take as gospel in the earlier histories, and shows them to be false. Some of these myths are about the mass surrender of Soviet soldiers and the disparity between the casualties suffered on both sides. The book is a treasure trove of information about subjects that have never before been brought to print. It goes deeply into the partisan and anti-partisan part of the war. The author does not shy away from the many ugly facts about this time in history. He goes into detail about the Nazi 'cleansing' and the amount of cooperation that the Nazis received from some of the indigenous populations. There is even a part of the book that goes into the amount of rapes committed by the German soldiers. The author also shows in detail that the Axis armies actually outnumbered the Russian forces on June 22 1941.

 The appendices show a complete order of battle, and also both sides' armed forces structures. There is a listing of all the main armaments used by both sides in the war. There is also a comparison of the different lists of the axis losses during the campaign. 

 The book delves deeply into Finland's involvement with the war, and some not very flattering facts about their deportation to Germany of Russian prisoners of war, etc. 

 There are three haunting pictures included of young women brutalized before and after their murder for supposedly being partisans. Their beauty and innocence shine through in a very disturbing way. If anyone part of the book is its strongest, it is the tale and pictures of the horrible events that the Russian civilians had to suffer during the Nazi invasion. To those of us who are used to reading a more sanitized version of events, it brings to life that these could have been our daughters or other family members. The starkness of the text and photos show us the real human sufferings in this bitter war, and reminds us of what takes place in all wars. As Stalin said "one death is a tragedy, a million is a statistic". To those of us who are used to pushing cardboard or computer icons around the Russian front, it is really a must read to bring war and all its savagery and hatefulness to our eyes. To Russians, it is no wonder that the date 6/22/1941 is burned into their memories.

 While a few more maps for the separate encounters would have been a nice addition, the book in its scope tries and succeeds to bring to its pages the full story of the invasion. If you are going to have any book on your shelf about Barbarossa, this should be the one if you want to be informed about all of its different aspects. The photos themselves could have been a book about operation Barbarossa. The text with all of its tons of details of the day to day operations and human involvement is without a doubt the best covering of this campaign in print. Thank you Mr. Bergstrom for this effort, and thank you Casemate for realizing the book's potential. 


 Robert


Author: Christer Bergstrom
Publisher: Casemate
Review Date: 9/9/2016


                                                                                                                        The Dragon's Te...

The Dragon's Teeth by Benjamin Lai  The Dragon's Teeth by Benjamin Lai

For your Wargamer, Toy soldier collector, MiniFig collector, military history nut. Reviews, interviews, Model Making, AARs and books!

                                               
                                                                        The Dragon's Teeth
               
                                                                    by

                                                            Benjamin Lai  


 This book is about the the armed forces of the People's Republic of China. It couldn't have come at a better time. With the tense situations we are now seeing in Asia, it is a perfect time to look at the armed might of one of the largest players. The subtitle says it is about the Chinese People's Liberation army, but in its pages you will find information about China's land, sea, and air capabilities.The author was born in Hong Kong and went to school as a naval architect. Then he joined the British Army reserves and served in a number of roles therein. So he is well versed in the different areas he discusses.

 The first part of the book is a short history of the Chinese communist party and the creation of the People's Liberation Army. Then it goes into the different actions that happened between China and other countries during the cold war period. Some of these actions and spying mission counter-warfare are pretty much unknown to the west. The author elaborates on the Chinese actions to stop the US U2 spying missions. He also goes into the different small conflicts between China and Vietnam. The other two thirds of the book are devoted to the Chinese armed forces as they are today, with some history of the different weapons programs thrown in.

 The appendices list every weapon in use at this moment in time, from rifles to rockets. Also included are all of the planes and ships used by China's armed forces. 

 This book also brings to light all of the Soviet Union/Russia arms dealings that have occurred over the many decades between the two countries. I was surprised to read this, knowing about all of the extremely bloody border clashes that have occurred between them over the years.

 The book has numerous pages that are actually gray in color that write about different weapon systems, or where events are gone over in detail. It goes into the change in China from relying on weapon systems bought abroad, to a full-fledged in house research and development establishment. It goes into great depth of how the Chinese are working toward a main battle tank for the 21st century. The book shows comparisons between the spending of both China and the US. While the Chinese are increasing their defense spending, it is nowhere near the amount that the US spends. The author also goes into some depth talking about the Chinese strategic thought and its actions in recent years.

 All in all, the book is a well written clear and concise history and appreciation of the Chinese armed forces. The appendices alone are worth the price of the book. There are also thirty-four pages of photographs of old and new equipment and people. This book fills a void that has existed in much of the west of the true Chinese capabilities at this point in time. 
      

  Robert


Author: Benjamin Lai
Publisher: Casemate
Date of review: 9/3/2016


                                                           Team Yankee by Harold W. Coyle     The historical fiction genre is not...

Team Yankee by Harold W. Coyle Team Yankee by Harold W. Coyle

For your Wargamer, Toy soldier collector, MiniFig collector, military history nut. Reviews, interviews, Model Making, AARs and books!

                                                           Team Yankee by Harold W. Coyle


 The historical fiction genre is not one that I am well versed in. I usually like my history dry and full of actual facts, and not filled in with extras. However, there are a few historical fiction books that have really had a grip on me, and that I still reread from time to time. Allan Eckert's series of books on the colonial era are one example. Another was a book released in 1985 and is called 'Team Yankee'. It is a fictionalized account of World War III through the eyes of U.S. tankers in Germany trying to stop the Soviet onslaught. This is a review of the revised and updated version just released by Casemate Publishing. The book uses the strategic scenario from Gen. Sir John Hackett's book 'The Third World War'. 'The Third World War'  is another excellent historical fiction book.

 I will start with one caveat: this is a review of the physical book. There seems to be a lot of problems with the Kindle release of the book and its transcribing. Amazon has been working on trying to correct the issue.

  In this book you will see the war through the eyes of Captain Sean Bannon, and what he and his team experience through the first two weeks of WWIII. Bannon is in charge of Team Yankee, which is a tank company attached to the 3d battalion of the 78th Infantry. 

  The book starts with a Soviet attack in Europe. It really doesn't go into the background at all, but it doesn't need to. This book is really about low level combat, not sweeping strategic plans and options. It even goes into the effect the Soviet attack has on the wives and families of the American troops stationed in Germany. It was written by an actual VMI graduate who attended staff college and served with the tanks in Germany in the 1970s. 

  Captain Bannon is faced with the Soviet and Warsaw Pact invasion of Germany that loomed over the US forces in West Germany for forty-five years. It is a tale of military muscle versus finesse. The Soviets would have a much larger force to use in their invasion, while Nato's available forces were much smaller. It shows (as do non-fiction books) that the US equipment and training was very advanced compared to the Soviet of the time. The different real wars around the world have always shown this when Nato and Soviet tanks, etc. have been matched up by other countries. The book provides maps of the different engagements to help the reader get his bearings on what is happening in the story.

  It is not only about warfare, but also shows the human side of war. The book shows the casualties, and sometimes the human frailties, that may not show up until put under a mountain of stress. You actually care about the characters and are proud of their exploits and saddened by their losses. The book has a few moments of seeing the war from the other side. You will not see many, but the book is really about the lives, battles, and sacrifices that the US company goes through.

  This book has been updated and re-released, with attention given to the historical plans and strategies that are now available to the author after the fall of the Soviet Union.

  Join me in reading about Captain Bannon and his troops' exploits during this 'what if' moment in time. Thankfully, most of us were completely unaware of how many times during this era that the ball  did almost fall. 

 The book is a product of the 1980s and shows it. It was a time that the people in the US started to have pride in the nation and the armed forces again. Therefore, the book might be a little 'gung ho' for some peoples' tastes. It is not meant to be a blueprint for history, but a plausible outcome for what might have been. In this the author succeeds wonderfully, and actually makes you care about Team Yankee and its soldiers.

  
 Robert


Author: Harold W. Coyle
Publisher: Casemate
Date of Review: 9/1/2016


ONUS ! by DRACO IDEAS Like many others, I was struck and puzzled by the game's title, Onus .  I knew it as meaning a burden o...

Onus by Draco Ideas: Review Onus by Draco Ideas: Review

For your Wargamer, Toy soldier collector, MiniFig collector, military history nut. Reviews, interviews, Model Making, AARs and books!

by
DRACO IDEAS


Like many others, I was struck and puzzled by the game's title, Onus.  I knew it as meaning a burden or duty or obligation.  Not perhaps the most exciting title, though I had my image, whether of noble Roman or valiant Carthaginian, marching forth to do my duty or carry out the obligation that the burden of fate had laid on my shoulders.  Word from the designer has provided an even humbler perspective.  Onus in Latin conveys the idea of the weighty physical load carried by the ordinary marching legionary -  a heavy burden indeed.  So, here I am, metaphorical pack on back, ready to slog it down the road to death or glory at Cannae or Zama. 

[OK, secretly, I'm still the great Hannibal, braving blizzards and perilous Alpine passes with my elephants, on route for glorious victory at Lake Trasimene and Cannae]

The first thing to lift my weary soldier/reviewer's spirits is sight of the small, colourful box that the game comes in - that's not going to add much to the weight of the digging tool, spare kit, cooking utensils etc...  But, as they say, good things come in small packets. What a compact little war chest is to be found when you get inside the box! 

The war chest, opened, punched, bagged and repacked

[apologies for the quality of my camera work]


Hold on there, I'm getting a bit carried away.  Before I delve further into the components, just a few facts about what the game is about and why I'm so delighted to be reviewing it.

Giving its full title Onus! : Rome Vs Carthage helps.  What another game/simulation of the Punic war?  I still have the original Avalon Hill edition of Hannibal : Rome v Carthage and Punic Island Vol III in the Campaign Commander series, as well as several scenarios in my Command & Colours : Ancients, as well as Battleground : Second Punic War and am currently awaiting delivery in the next couple of weeks of my Kickstarter copy of Hands In The Sea.  So, why was I so pleased to receive such a small footprint game on this historical period and theme?

Well, the obvious answer is that I love all that comes under the umbrella title of Ancients and the Punic Wars, especially Hannibal, elephants and Alps! [Sorry, no Alps in a tactical game - compromises do have to be made.]  But, more than that, I had tried and failed [computer glitches!] to pledge to Onus! on Kickstarter and here I was being offered the chance of a copy to review the very game I had so wanted. 

The next reason was because the game offers the opportunity to fight a miniatures style game without all the problems of buying figures, painting them and storing them along with all the necessary terrain.  [Admittedly, terrain for Ancients battles does tend to be more minimal than for other historical periods.]  Even more important was the impression I had got from the Kickstarter advertising that here was a simulation using miniatures based rules that was accessible and easy to understand and was physically appealing too.

My final reason was that Onus was the first game produced by Draco Ideas and I had already greatly enjoyed playing and reviewing for A Wargamer's Needful Things a composite copy [original Spanish edition with basic English translation of the rules] of their yet to be published English edition of 2GM Tactics.  So, my expectations were high and especially my expectations of the rule book.  As this was going to be the key element for me, I'm going to break my usual pattern of starting with what I think of as a written unboxing  and instead head straight to the rule book.

I had read substantially about the original Spanish edition's rule book and, I confess, the impression given was not a flattering one. 


If you've read my review of 2GM Tactics, you'll know that Draco Ideas went for a cartoonish style of art work and, as you can see from the front of this game box, which is identical to the cover of the rule book, the same influence was there from the beginning.

However, just like 2GM Tactics, Onus's rule book is anything but cartoonish.  Small in size, but with a wealth of depth, it is a wholly serious product.  Print remains on the very small size with every page providing fairly dense text layout, but the main question would be how clear and comprehendible  they are.  The original Spanish rules had come in for some heavy flack regarding tone, which was seen as too chatty, with poor organisation and lack of clarity.  With no ability to read Spanish, I cannot comment on the validity of these complaints. 

What I can happily say is that these English rules bear no similarity whatsoever to that less than adequate picture.  Either those original comments were inaccurate or an excellent job has been done on improving them for the English edition.  First of all, the organisation of the rules is wholly logical, taking us through Set-Up and how to read the information on the unit cards, General cards and Order/Event cards.  A brief Game Sequence is followed by detailed sections on Movement, Charges, Ranged Attacks, Melee, Morale, Flight, the End of Turn and Victory Conditions. 

All is rounded out with brief sections on 3/4 player sessions, Solo play, five Scenarios and a simple Campaign linking the five together.  A very useful page of Golden Rules and a Modifiers Summary on the back cover are a great help, though I must admit that I did need to copy the Modifiers Summary page and enlarge it for easy reading!  There is even a two page Simplified Rules section that strips play down to very, very bare essentials, which could be highly useful for drawing younger gamers into the hobby.

Still, providing an organised rule book shouldn't be too hard a task.
Slightly more difficult can be making sure that they can be understood and then executed with relative ease.  I have to say that my past experience of miniatures rules, whether in the form of purely a rulebook intended for use with figures or in a professional games format like this one, has not been a happy one.  Even the simplest end such as the Strategos set by Philip Sabin or his ravishing Lost Battles boxed game ultimately left me too often confused and uncertain.  Certainly, I never achieved a level were I could largely just get on with the enjoying the game and not have multiple interruptions to check things, a situation that left me dispirited.

Thankfully, I can say that the rules for Onus! are clear, easy to understand and eminently workable.  In particular, Movement and Charges [consistently the most difficult aspect of figure games rules] are well explained with good, picture-illustrated examples.  Because you are moving over a table-top, not a nicely regulated, printed hex grid, and using the traditional measuring stick beloved of figure gamers, there will always be potential  for some uncertainty and argument, but that lies more with the gamer than the rules!  

However, this is the first time I've been able to  easily understand and achieve such things as how to extend either or both wings of a unit or envelop the flank or rear of a unit.  Charge rules in many, many games are the most complex and often awkward to explain and satisfactorily carry out.  Chalk up another successful detail in this game. 

Having once sat watching two miniatures gamers with a sheaf of rules spend a whole 10 minutes resolving one single melee with percentages calculated  endless modifiers added and subtracted and a final result of no losses to either side, I was glad to find melee too works smoothly with both Attacker and Defender throwing the same number of dice  according to the number of sections in contact. 

That's not to say that Onus! lacks the necessary refinements to cover details such as the benefits of the aforementioned movement against the flank or rear, as well as Attacker formation, cavalry v infantry, the presence of a general, broken status, previous wounds inflicted and more.  When you add the ability to throw in the effects of an Event too,  I was more than satisfied with this feature of the game.

I was very well pleased too with the moderate, but appropriate range of modifiers associated with the Melee section and the overall ease of application so that they were soon second nature and rarely needed any reference to the quick summary sheet that forms the back cover. 

I realise that the Battleground system has trodden a very similar path already, but having tried very hard to master Battleground : Second Punic War, here are the main reasons that Onus! has succeeded for me, where the other failed.

The simplest point was the much greater detail and clarity of the rules.  Battleground is sketchy, brief and too often hard to understand.  Next was the fact that the Battleground unit cards have to be marked with a dry-wipe marker pen to change stats as the game progresses.  Personally, I dislike having to write on any game components [even if designed for that purpose] and it is all too easy, when doing so, to get the ink on other elements.  Above all, lifting the cards out of melee contact and returning them successfully in position is a nightmare.

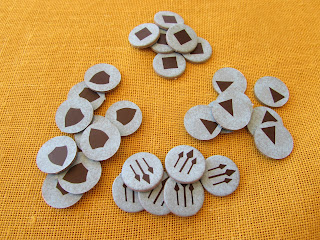
In Onus! these problems are avoided by the simple use of marker chits and I was amazed by the quantity and quality that could be packed into such a small box.


Just a small sample of the range included
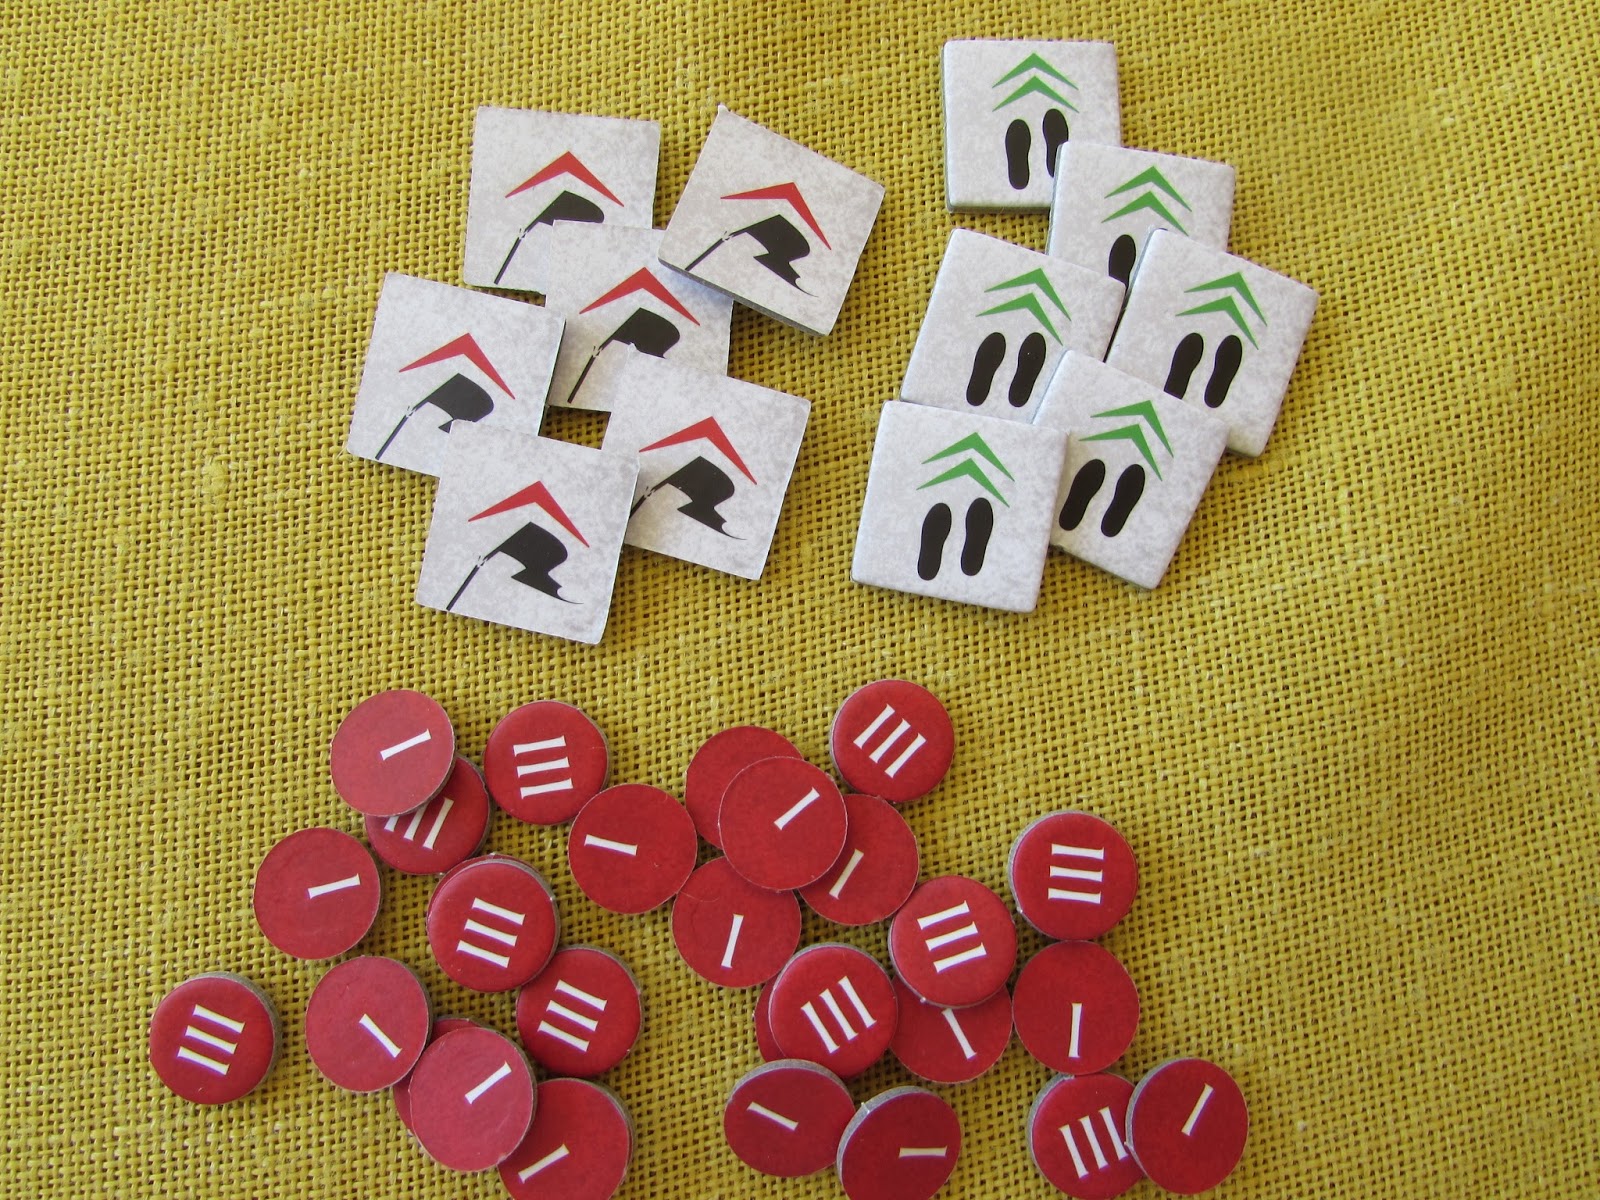


And more

And more


As you can see an impressive array and those are only a proportion of the total provided.  I'm still not sure how they've managed to include so much physical material and how it still fits in the box even when I've bagged it up.

On top of that you've got all the unit cards: 30 Roman, 30 Carthaginian and 30 mercenaries.


A typical Punic [Carthaginian] Phalanx

Here's an idea of the range of Punic [Carthaginian] units: Libyan Spearmen, Punic Archers and Cavalry, Lusitanian Infantry, Armed Civilians, Punic Infantry and, what else but ... Elephants!   These are opposed by all the familiar Roman troops: Hastati, Princeps,Velites, Triarii and two different types of Equites while the Mercenaries bring more exotic elements like Celtiberian Infantry, Balearic Slingers and Numidean cavalry, along with a range of missile throwing machines.

Though there are generals, they are sadly few, but famous.


Whereas the number of dual Order/Event cards is  a very satisfying 72 and apart from the variety this provides, their dual use adds in that dilemma of choice that you may becoming familiar with recognising as a game mechanic popular with me.


The typical instructions on the Order half [yellow heading] of the cards are strongly reminiscent of the Command and Tactic cards in the Command & Colours system.  As the battlefield is not divided into sectors, there are no worries about only possessing cards that relate to sectors where you have no units, though I have found occasionally that I have a hand of cards where most of my Orders aren't useful to activate units to move or fire!  As the rules suggest, it's well worth marking those units that you intend to activate and, for once, that is not a type of marker the game contains.  Personally, I tend to use a small die, simple, clear and easy to remove once the unit has been activated and most gamers have more than enough extra dice to hand!

The Events on the other half of the cards [blue heading] are nearly all applicable to Combat in some shape or form and I appreciate  what they often add to the narrative of the game.  Suddenly discovering that your vulnerable enemy suffering a ranged attack has benefited from a Take Shelter card and has become much harder to hit or that an attack against you is strengthened by an additional and unexpected ranged attack give a great deal of flavour to my gaming experience. 

Inevitably Onus! does not have the extreme rapidity of play found in a treatment such as the Command & Colours expansions that make up the Ancients line and, if you've read my review of The Great War, you'll know how much I do enjoy those games.  But I have been well rewarded with a more detailed system that gives the right feel and visual effect of fighting a miniatures battle at a fraction of the cost in money, time and effort that buying  and painting figures and then finding a rules set that didn't drive me to distraction would have been.

I now have to worry about my flanks, about manoeuvring and not being able to move through friendly units without the cost of breaking my own units.  I can take into account formation changes and the particular benefits of certain types of unit and all without disappearing under a mountain of rules.

I was even more fortunate that Draco Ideas generously included in their package to me the Desert Battle mat which greatly enhances play.  Here the Carthaginians advance beyond the village/city [depending on whichever battle you imagine you're playing].


This gives a close-up impression of said village/city. 


Apologies that my camera work doesn't do full justice to this.

I hope in the not to distant future to be able to report back on the first two Expansions:  Onus! Greeks Vs Persians and Onus! Scenery & Fortresses.

[Meantime, a trip to the Iberian peninsular with old long nose himself, Sir Arthur Wellesley, in Espana 20 : Bussaco & Talevera looks on the cards.]


ONUS! Rome Vs Carthage

Normal price £27 approx.


THE GREAT WAR Command & Colours After my successful venture into the clouds and, for me, the less familiar realm of aerial warf...

The Great War: Review The Great War: Review

For your Wargamer, Toy soldier collector, MiniFig collector, military history nut. Reviews, interviews, Model Making, AARs and books!

THE GREAT WAR

Command & Colours


After my successful venture into the clouds and, for me, the less familiar realm of aerial warfare with Phantom Leader, this next game brings me back to a period which I am much more versed in, namely WWI.  Not so many years ago in terms of board games, the period was still comparatively unrepresented and, though Ted Raicer's ground breaking Paths of Glory in 1999 stimulated the interest of designers and gamers alike, the period of The great War remains very much the poor relation in comparison with the Napoleonic Wars, the American Civil War and WWII.

When it has been gamed, the level has been predominantly strategic or operational, with only a rare few treating the tactical sphere.  Step in the doyen of tactical systems, Command & Colours, created by Richard Borg [and there's a system I am totally at home with].  First I marched with Lee & Grant on the ACW battlefields in the original BattleCry and its more recent excellent remake and upgrade.  Then came Memoir 44 and here I fought from the hell of Stalingrad and the burning sands of North Africa to Normandy and beyond with add-on after add-on, including the immense 9 maps of the Normandy beaches and the paratroop landing sites.  Most recently Samurai Battles took me to the exotic conflicts of Japan, perhaps best known from the films of Kurosawa.

While stepping out with the many plastic soldiers of these games, I was equally involved with marshalling the wooden blocks for the GMT treatment of the same system.  I began with Romans & Carthaginians and quickly acquired the first expansion Greece & Eastern Kingdoms, if only to follow in the footsteps of Alexander the Great.  I've fought the Barbarians and the Civil Wars of Caesar and Pompey.  This time I wasn't quite so all-embracing in my need to own everything - and so never acquired the Imperial Romans or Spartans.

Then the Napoleonic Wars beckoned and the drum and fife led me over the hills and far away to Spain in the first expansion and later to Russia and Austria, though not yet to the Prussian expansion and more recent additions.  Once again poor old WWI lagged behind, but eventually in 2015, there arrived The Great War.


Perhaps it's no surprise for the war that is so linked in our minds with WWII that the physical treatment has followed the path of Memoir 44 and given us plastic figures rather then wooden blocks - especially as the publisher is PSC [the Plastic Soldier Company].  Also considering the latter producers, it does mean that the figures come in six sprues and so need detaching. 

What a furore that stirred up!  There have been many complaints about this and the quality of the figures and I must admit that, despite care and the use of the appropriate clippers, a few of my figures did end up sporting what look more like shotguns than rifles with bayonets.  If you aren't familiar with using the right tools then the number of shortened guns may rise, but comments indicating the loss of all or part of a limb suggest to me that totally the wrong sort of cutting tool has been pressed into service!  In particular, I wouldn't recommend any sort of knife, however sharp.  Once set up, it has been hard for me to spot any of my slightly shortened rifles.


Here you should be able to notice, but later on the map I think you'll find it more difficult.

The other feature is that the machine gun figures do need assembling and gluing - again a very minor job that took little time and effort, though I'd suggest using tweezers to hold one part as you glue it to another [there are only three separate bits!]  Once put together they look very effective, though storing them separately is to be recommended both for ease of finding and to avoid any damage. 

Having said that, if you are at all familiar with Zvesda plastic figures which were used in Samurai Battles which really do need tricky assembly and have very fine and easily broken weapons, these PSG figures are sturdy and moulded as a single unit, except for the machine gunners.  A single storage box contains all my models, allowing the three sets of four figures that make up each machine gun unit and mortar unit to be kept separate from the bulk of the infantry and so very easy to identify for set up purposes.


A final point about these models is the variety of poses; unlike Memoir 44's identical infantry, there is a good range of different stances, as well as the special Bomber figure [an infantry man throwing a hand grenade] that acts like markers do in some of the other C&C games to identify a special unit.


A gloriously well-filled box!


From plastic we move to cardboard.  The double-sided board is excellent.  First of all the title The Great War is discreetly placed at each opposing edge and not splashed across the centre of the board in large letters, as the word ANCIENTS was!  Secondly, one side is a strong green and the other an all too appropriate brown that conveys those deadly muddy landscapes.  It is also deeper than the typical C&C board with 12 hexes by 11 hexes, making for an almost square board, but divided as is essential by the familiar dotted lines into the usual three sections: Left Flank, Centre and Right Flank.

Additional terrain pieces are more limited in variety than usual with a few building hexes, eight hill and nine forest hex overlays and then a plethora of trench hexes that you will certainly be placing a good number of in all scenarios.  Added to these are oblong pieces that have wire on one side and shell craters on the other.  Most scenarios begin with a preliminary round that will turn quite a number of hexes in the No-Man's-Land between the two armies into such shell holes.  All are of very thick, strong card and my single wish is that the wire/crater terrain had also been hex-shaped, as inevitably the four figures that make up each infantry unit tend to be slightly more difficult to move onto the oblong pieces and also tend to fall off the edges.


With all my C&C games, I prefer to lay a sheet of plexi-glass on top of the board once terrain tiles have been set up to avoid them shifting during the game play.  With The Great War, I'd very strongly recommend this practice or you will almost certainly find your trench lines regularly shifting and needing readjusting unless you have a very light and dexterous touch.  [Stop muttering that I must have ten thumbs!]  Added to that, the overlays for wire and the inevitable craters then sit comfortably on top of the plexi-glass, as seen below - hence the slightly blurred effect from the reflection.


Scenario 4 Loos

The British Advance on the Hohenzollern redoubt

Above you can see a small section of what is a typical lay-out.  As a brief aside, before I continue with the description of the contents of the game.  That image of  a solid line of British infantry advancing on a thinly held sector is very deceptive.  It is one you will repeatedly see in most of the scenarios, but what happened in this particular game in question is also one you will encounter frequently.  Some of those units will make it to the enemy trenches.  The ones that do will have taken losses and several won't get there at all.  Those two German units plus one of those hurrying from the back lines actually held on until the end of the game!


Rounding out these substantial terrain pieces are the circular Victory medals familiar to all the C&C games [Ok, I know that in some of them they are square shaped], two hexagonal artillery templates, lots of square HQ markers and several Reserve Artillery markers.  The need for these latter items and their use constitute some of the features that give The Great War its distinctive flavour, especially when compared with its big brother, Memoir 44.


Victory Medals - round not square!

As always there are packs of essential cards.  In this case, a Command deck and a Combat deck.  the former will be familiar to anyone who has played any other C&C game.  The Command deck is the engine that drives the whole game, containing the standard Section cards that designate how many units and in which section[s] they can be activated. and the Tactics cards that allow for special circumstances, such as a number of units in adjacent/linked hexes to be activated, imitating the card that your opponent has just played or the rare replacement card that allows you to gain back a soldier or two.


However, the Combat deck introduces a new element that I think is essential to the successful simulation of this war.  You are allowed a maximum of five Combat cards in your hand and each scenario will determine how many you start with and the basic rules explain how you gain more during the course of the game.  A single Combat card may be played in each Player turn, most often in conjunction with your Command card. 

Most of all, these Combat cards add so much to the feel of the game, as just a few titles will show:  Butt & Bayonet, Gas Attack and Trench Raid.  But none could be more evocative of those early jerky film footages we have once more become so familiar with this year or the last few moments of Blackadder Goes Forth than the card Advance Over The Top.


Even the rather sombre colouring of the cards both back and front with the slightly faded sepia images and small, thin lettering play their part in getting the atmosphere right.

The key twist to using these cards is that generally you have to pay for the cost of playing a card with HQ tokens and, like any good innovative rule, it presents tense decisions, as HQ tokens are also the essential element to calling in Reserve Artillery.  Which is the most pressing need at the moment?  Pay for a Combat card to hopefully tip the balance at a crucial moment or pay one HQ token per artillery die and it's rarely worth rolling less than 3 dice for artillery?  Such difficult choices are a prime element for me in most successful games.


The new and significant HQ counters


What else is new? 

To be expected is the machine gun unit, already mentioned in connection with assembling figures.  What was unexpected was that its range is only one hex more than that of an ordinary infantryman!  But, fire two machine guns at the same target and you add the dice together, a simple and effective way of achieving the benefit of cross-fire.

Perhaps, even more unexpected is the lack of on-board artillery units [though there are still a few mortar units]. Instead, the Reserve Artillery is an off-board token with a designated maximum fire power for the scenario and, as explained, each point of power equals one die and has to be paid for with an HQ token.  Another clever feature is the accompanying artillery template, a satisfyingly chunky piece, the size of a map board hex. 


Off-board Reserve Artillery Tokens

and Artillery templates


In a very simple mechanic, it achieves the effect of accuracy, scatter and intensity at one go.  Place the template [whose hex sides are numbered 1 to 6] on, or rather hold it above, your target hex and roll the dice.  Each die roll achieves a hit on the corresponding adjacent hex, but any doubles or more also add that number of hits on the target hex.  Achieve 3 hits on the target hex in this way by rolling the same number three times and any terrain defence modifier is negated and, after resolving fire, a crater marker is placed.

However, those hits do not mean automatic kills.  You still need to roll the ordinary Combat dice for each hit to see what the shelling has achieved.  Obviously some will have fallen into empty hexes and it's just possible that the Combat dice aren't smiling on you today either.  But, be warned: close your infantry units up for the Push and you can guarantee that those artillery shells will come raining down on their plastic heads!

On to those same Combat dice - something old, something new here:


Old : an infantry symbol kills an infantry figure [but also New, as you then deduct a number of infantry kills for the hex's terrain modifier], a flag symbol causes a push back [retreat a unit one hex, for any of you who are experiencing the Command & Colours system for the first time!].

New: a Burst symbol [looks like an explosion] immediately kills a figure, a Skull symbol only kills in certain circumstances and a Star symbol earns you one of those crucial HQ tokens.

Victory remains the same as in all C&C games: each Scenario tells you how many Victory medals win the game and the first to reach that number is the immediate winner.  Each unit killed earns you a Victory medal and many Scenarios award them for taking and holding geographical objectives as well. 

Inevitably, for a set of scenarios that focus entirely on trench warfare, one side is always going to have more units and be on the attack while the other has fewer and is on the defence.  What then stops the player on the attack from sitting back and pounding the enemy with his Reserve Artillery power, until a portion of the line is weak enough to be assaulted? 

The Great War has taken the decision to force the pace by allowing the Defender [in 13 Scenarios, the Germans and in only one Scenario, the British!] to play a Reconnaissance card and instead of the normal ability to take two cards and choose one, the player can simply take the normal single replacement card and a Victory medal as well.

This I accepted and adapted to fairly quickly, but my friend and opponent in all things wargaming was far less sanguine about the rule and felt it was an artificial solution.  So far, I haven't encountered any complaints on the main internet sites I frequent, such as Consimworld or Boardgamegeek.

Of more concern to me has been the similarity of the Scenarios, as indicated above.  As yet, I haven't tired of playing what are very similar situations, because they've all provided tense situations with a very effective feel of the WWI trenches and, of course, there is the expansion that provides TANKS!!!! 

But, in discussing the Scenarios, I'm rushing on rather to the last part of the rule book.  In total, cover to cover, it runs to 52 pages of A4 and is a handsome, glossy  production.  But, don't be worried by the length.  18 pages cover the 16 scenarios and another 10 explain terrain, Command cards, Tactic cards and Combat cards - all with a great deal of elegant white space!  4 pages describe the components and 2 the Set-Up.  In all, a mere 10 pages cover the rules themselves, with an additional 5 focusing on all the new elements.

Initially, I found it slightly more difficult to grasp everything and the first game did involve quite a lot of checking and referring back to the rules.  In part, I think that was as much due to the extensive knowledge I have of so many other C&C games getting in the way of mastering the new ideas.  After a few sessions, I soon found that The Great War is easier to play and remember than virtually any of my other many C&C games, with rarely any need  to turn to the rule book.

Having hesitated from buying the game, because I wondered whether I really did need another C&C game, I can safely say that I'm glad my craving for just one more got the better of me.  Add it to your collection too.  I don't think you'll be disappointed.


U-BOAT LEADER from DAN VERSSEN GAMES As hoped for, having soared to great heights gaining my pilot's wings over Vietnam in Phan...

U Boat Leader by DVG Games Review U Boat Leader by DVG Games Review

For your Wargamer, Toy soldier collector, MiniFig collector, military history nut. Reviews, interviews, Model Making, AARs and books!

from DAN VERSSEN GAMES


As hoped for, having soared to great heights gaining my pilot's wings over Vietnam in Phantom Leader, I have been allowed to sound the chilling depths of the North Sea and Mid-Atlantic with U-Boat Leader.  Having surprised myself with the amount of enjoyment I gained from an air war simulation, I had little doubt that a topic I have always liked, namely submarine warfare, would immediately appeal.  Being part of a series, I was not surprised to find that there are many similar features to both games.  But would that make for disappointment or would two totally different environments be capable of being successfully simulated by similar mechanics?  Before solving that key question, let's take the traditional peak inside the box at the physical components.


Once again quality stands high on the agenda ranging from the same deep strong box with its beautiful artwork, counters of even greater richness and thickness and visually first-class cards.  For me, the sombre brown, shading to sepia of the illustrations of ships seen through the periscope lens and the faded writing are perfect for conjuring up the period and ambiance of the game, but they may evoke different responses, especially if striking colour is more to your taste. 

What has definitely caused a degree of concern and complaint has been a number of significant production errors.  None of them prevent you from playing the game, but they do raise questions.  Above all, virtually all the cards depicting the surface ships [Merchants, Escorts and Naval] have been printed on the front as Merchants.  DVG has an excellent record on customer care  and they have been swift to reassure buyers that complete new decks will be supplied, but this will take at least a couple of months.

In the meantime, in practical terms of playing the game, this can swiftly be sorted out by comparing the ship counters with the cards and the correct three decks created.  But to save you time, the Escort cards are those numbered from 86 -100 and the Naval cards are those numbered 101-112.  The simple process of using sleeves with different coloured backs is a further quick way to make sure that you don't have to go through the process of sorting at the beginning of each game.  Having been a gamer since 1976, it's no big deal for me, but I can quite understand and sympathise with those for whom this is a very off-putting factor.

The problem seems to stem from the printers, but even more disconcerting is that the main play aid [labelled Help Sheet], which contains important rule sequences, wrongly contains the old Combat routine instead of the new 2nd edition ones.  Again the mistake can be easily overcome by referring to the rule book, but as one of the main criticisms of the 1st edition was the simplistic and unsatisfying Combat rules, there must have been considerable focus on this element.  So, this mistake really should not have been allowed to get through.  I'm hoping that like the cards this will be corrected for those who have already received the game, though so far I am unaware of any pronouncement from the company on this.


[This is the mounted board Help Sheet.  The incorrect Combat Sequence is in the bottom left corner and as you can see the central pile contains all the Escort cards wrongly printed as Merchant cards and to their right are the Naval cards, again, apart from the two I've put on top of the pile, wrongly printed as Merchant cards.]


These drawbacks will sadly deter some from ever buying the game and will cause many to justifiably wait until they are sure all has been put right.  However, my personal major disappointment is the Tactical Display Board on which all the direct action between submarines and the vessels that they encounter is performed.  As it stands, it looks the part, but small is definitely not to be considered good here.  This central focus of the game takes the form of a sonar display and the quadrants are barely large enough to hold more than two ship/submarine counters, as the picture below shows. 


the Tactical Display Board contained in the 2nd edition

Considering that in Phantom Leader [PH from now on] the equivalent board is twice the size and excellent in every respect, I was puzzled about this reduction.  Fortunately, I received, along with my review copy of the game, the U-Boat Leader and Gato Leader Ship Miniatures and Battle Board package.  As the Tactical Display Board in this expansion is exactly the size of the board referred to above in PH, I strongly feel that this should have been a basic part of the 2nd edition production.  It certainly transforms the whole experience - as the identical set up on the larger board [shown below] reveals.


the Tactical Display Board contained in 
the U-Boat Leader and Gato Leader
Ship Miniatures and Battle Board package


All that now follows establishes that both PH and U-Boat Leader follow similar effective paths in all other respects.  4 Campaign cards take us from the early years in The Battle Begins [Sept 1939 - May 1940] on into the Axis domination of The Happy Times [June 1940 - May 1941] and up to the period of parity and then the gradual British upturn in The Hunted [June 1942 - June 1943]. The fourth Campaign is, for me, something of an unknown sideshow taking us to the Caribbean and the American coast in Operation Drumbeat [Feb 1942 - June 1942].  I'm not sure whether this was an eye to the American market, though Gato Leader which takes us to the Pacific war with American submarines will certainly satisfy that desire.


My first four submarines set up ready to start
 a Short version of The Happy Times Campaign

Each Campaign contains the ability to play at Short, Medium and Long length.  The length of campaign determines the number of SOs [Special Operation] points that you receive and the number of patrols each submarine must make.  SOs are mainly used to buy your submarines.  In PH your aircraft was designated by its call sign [e.g. Digger]: in U-Boat Leader, each submarine has an historical U-boat commander's name on the card.  I liked the call signs and feel that being able to sally out with such characters as Gunther Prien makes play even more immersive.  You can buy each submarine card at one of four levels, Green to Ace, as against the six levels of pilot in PH.


Above are the cards for those first four submarines.

If you have your own copy of PH or have read my review of that game, you will quickly see that U-Boat Leader is marginally simpler and easier to play at each stage that I'm now going to take you through.

The Strategic Segment especially is much quicker than the equivalent procedures in PH.  Choose your submarines and spend the few SOs you may have kept back after putting your submarine group together on such things as Special Missions such as Raider or Air Searches and Supply ships.  That's more or less it.  There is none of the lengthy deliberation on what types of ammunition and missiles you need, as each sub card tells you how many torpedoes you have in store and ready loaded and whether it has a gun capacity for surface firing.  Torpedo capacity may vary, but all subs with guns get 6 potential shots!  Place your subs in whatever ports are available and you're ready to sail on to the Operational Segment.


Close up of the submarines in port ready to sail
in the Operational Segment on the Campaign map.

To my surprise I rather missed the more complex decision making of PH.  On the other hand, I did like being able to get down to the action quicker and here there is a major difference, as your U-boats have an Operations Segment where each moves individually on the Campaign map from sea area to sea area drawing and resolving Event cards as they do so.  Though a simple process, I like the extra dimension of deciding how far you're going to move and finding out what happens as you keep pressing on.

When you have moved all your subs, you then change to the Tactical Segment and once more sub by sub roll to see if you make contact with the enemy.  The possibility is from zero to three contacts, with each contact giving you the opportunity to draw a Convoy card.   When you have drawn a Convoy card reduce the Contact marker by one.  The size and composition of the convoy may vary and, if you don't like what you see you can always decide to abort that encounter.


A close up of the Tactical Display with two Merchants identified.

One has taken damage, the other so far is unscathed.


If you do decide to tackle the convoy, then in some cases you may be able to form a wolfpack, if you have chosen to move more than one sub to the same sea area and the pickings look particularly rich.
With the Convoy card accepted, you set out the enemy ship markers according to their positions on the Convoy card.   Often there will be a number of merchant ships with one or two escorts, on the Tactical Display.  As yet your targets are unidentified and so their markers are those with question marks on.  Then you  place your sub/s on the outer most ring of the display.

You move your subs one space if submerged and two on the surface, while very simple and easy mechanics govern the movement of enemy ships.  As these come within range, you'll draw an appropriate card which will identify the ship and you will place its named marker on the display.  This whole part of the game is engrossing with all relevant features taken into account through very accessible rules.

And so the heart of the game is under way.  Decisions, decisions!  The element I always appreciate in a game.  Attack on the surface, so that you can use your gunnery as well as torpedoes and become a more easily identified target by any Escorts.  How many torpedoes to launch at one target to improve your chance of hitting?  How do you react to being attacked?  Always loved Silent Running and Crash Dives in warfare?  They're both simple options that you can go for.

At this point the following familiar and in most cases identical elements from PH kick in.  Your subs indicated on their card as aggressive fire first, then the enemy and then cautious subs. OK and Shaken status play their part as does Stress.  The different hit numbers on the enemy ships determine the amount of damage your die roll inflicts on them, up to and including sinking them outright.

What has greatly improved the game is the introduction of damage chits to be drawn randomly for the enemy attacks on your subs.  Overall, this works very, very well, with only one slight concern on my part and that is the almost nil chance of Merchant ships inflicting damage and the seeming lethality of Escorts. 

It does mean, of course, that you try to keep the Merchant ships between you and the Escorts, but as the Escorts can both sail through and fire through the Merchant ships, this isn't too easy.  I must admit that here I feel that a house rule might come into being for me, limiting the ability of Escorts simply ploughing straight through the Merchant ships.  As things stand at the moment, once the Escorts start firing, it's time for my subs to cut and run to fight another day.

Once your subs are off the display, that particular encounter is finished and there is the opportunity to reload torpedoes and attend to other housekeeping elements.  However, it does not necessarily mean that your current sub is finished with.  If you still have a Contact level remaining you may draw another Convoy card and the Tactical cycle begins again or if you have an enemy ship on the verge of sinking you can spend a Contact point, fire off a torpedo or gun if on the surface to guarantee that it does settle beneath the waves and add to your VP and Experience point tally.  These ideas get another thumbs up from me. 


Just some of the high quality counters contained in the game.

This continues until all your subs have been activated or you do not want to activate any more.  However, all is still not quite done, as you still have to return to a port passing through the sea areas necessary to do so and drawing Event cards as you do so.  This constitutes one Patrol.  Finally, you reach the Refit Segment with such items as promotion of U-boats if gained, Stress recovery and torpedo reloads.   If playing a Short Campaign, you'll now determine the success level, as your subs only undertake one Patrol; if a Medium or Long Campaign, you will prepare for another Patrol and off you go again. 

All these elements are handled in the rule book with excellent clarity and in the appropriate logical progression familiar from DVG's solitaire games.   Components are clearly explained, as are all the different cards, followed by the Set Up instructions.  Next come the rules for the various Segments I've talked you through, a short historical section on different types of U-boats and a very helpful three page example of play.  This latter part is standard in all the DVG games I've played and is thankfully becoming a feature of other companies' rulebooks.

In terms of game play, I can thoroughly recommend the experience of playing U-Boat Leader and would suggest that it is an easier starting point than the many solitaire air warfare games produced by DVG.  For those of you who are hesitant because of the production problems needing to be rectified, you could always move straight to Gato Leader, which covers the Pacific war from the periscope lens of the American subs.  Hence the title. 

Obviously, the appeal is solidly aimed at the US market, but everything in the box is spot one with none of the slip-ups to be corrected in U-Boat Leader.

As the only difference in the rules are very, very minor, a separate review would be a pointless repetition and so, I hope, in a few weeks' time to take you instead through a detailed AAR of a Short length Campaign from play of Gato Leader.  Until then, beware the enemy above!


hpssims.com