second chance games

Search This Website of delight

Thomas Gunn Newsletter     Dear All  Welcome to October's release of our superb 1/30 scale WW2 wooden aircraft, all of ...

Thomas Gunn Newsletter Thomas Gunn Newsletter

For your Wargamer, Toy soldier collector, MiniFig collector, military history nut. Reviews, interviews, Model Making, AARs and books!


  Dear All

 Welcome to October's release of our superb 1/30 scale WW2 wooden aircraft, all of which take over 60 hours to complete. This month we have news of 3 aircraft which are available now and 2 aircraft which are coming soon, all our aircraft are produced in limited quantities and can be paid for upfront or over several months on a payment plan if this is your preferred option. 


 WOW 093 The North American Aviation P-51 Mustang  was a single seat fighter/fighter bomber utilised by the USAAF and RAF during WW2.  Initially the Mustang was designed as a response for a requirement by the RAF for additional fighter aircraft and first flew on 26th October 1940, 102 days after the contract was first signed by the British purchasing commission. The Mustang was initially powered by the Allinson V-1710 engine but this
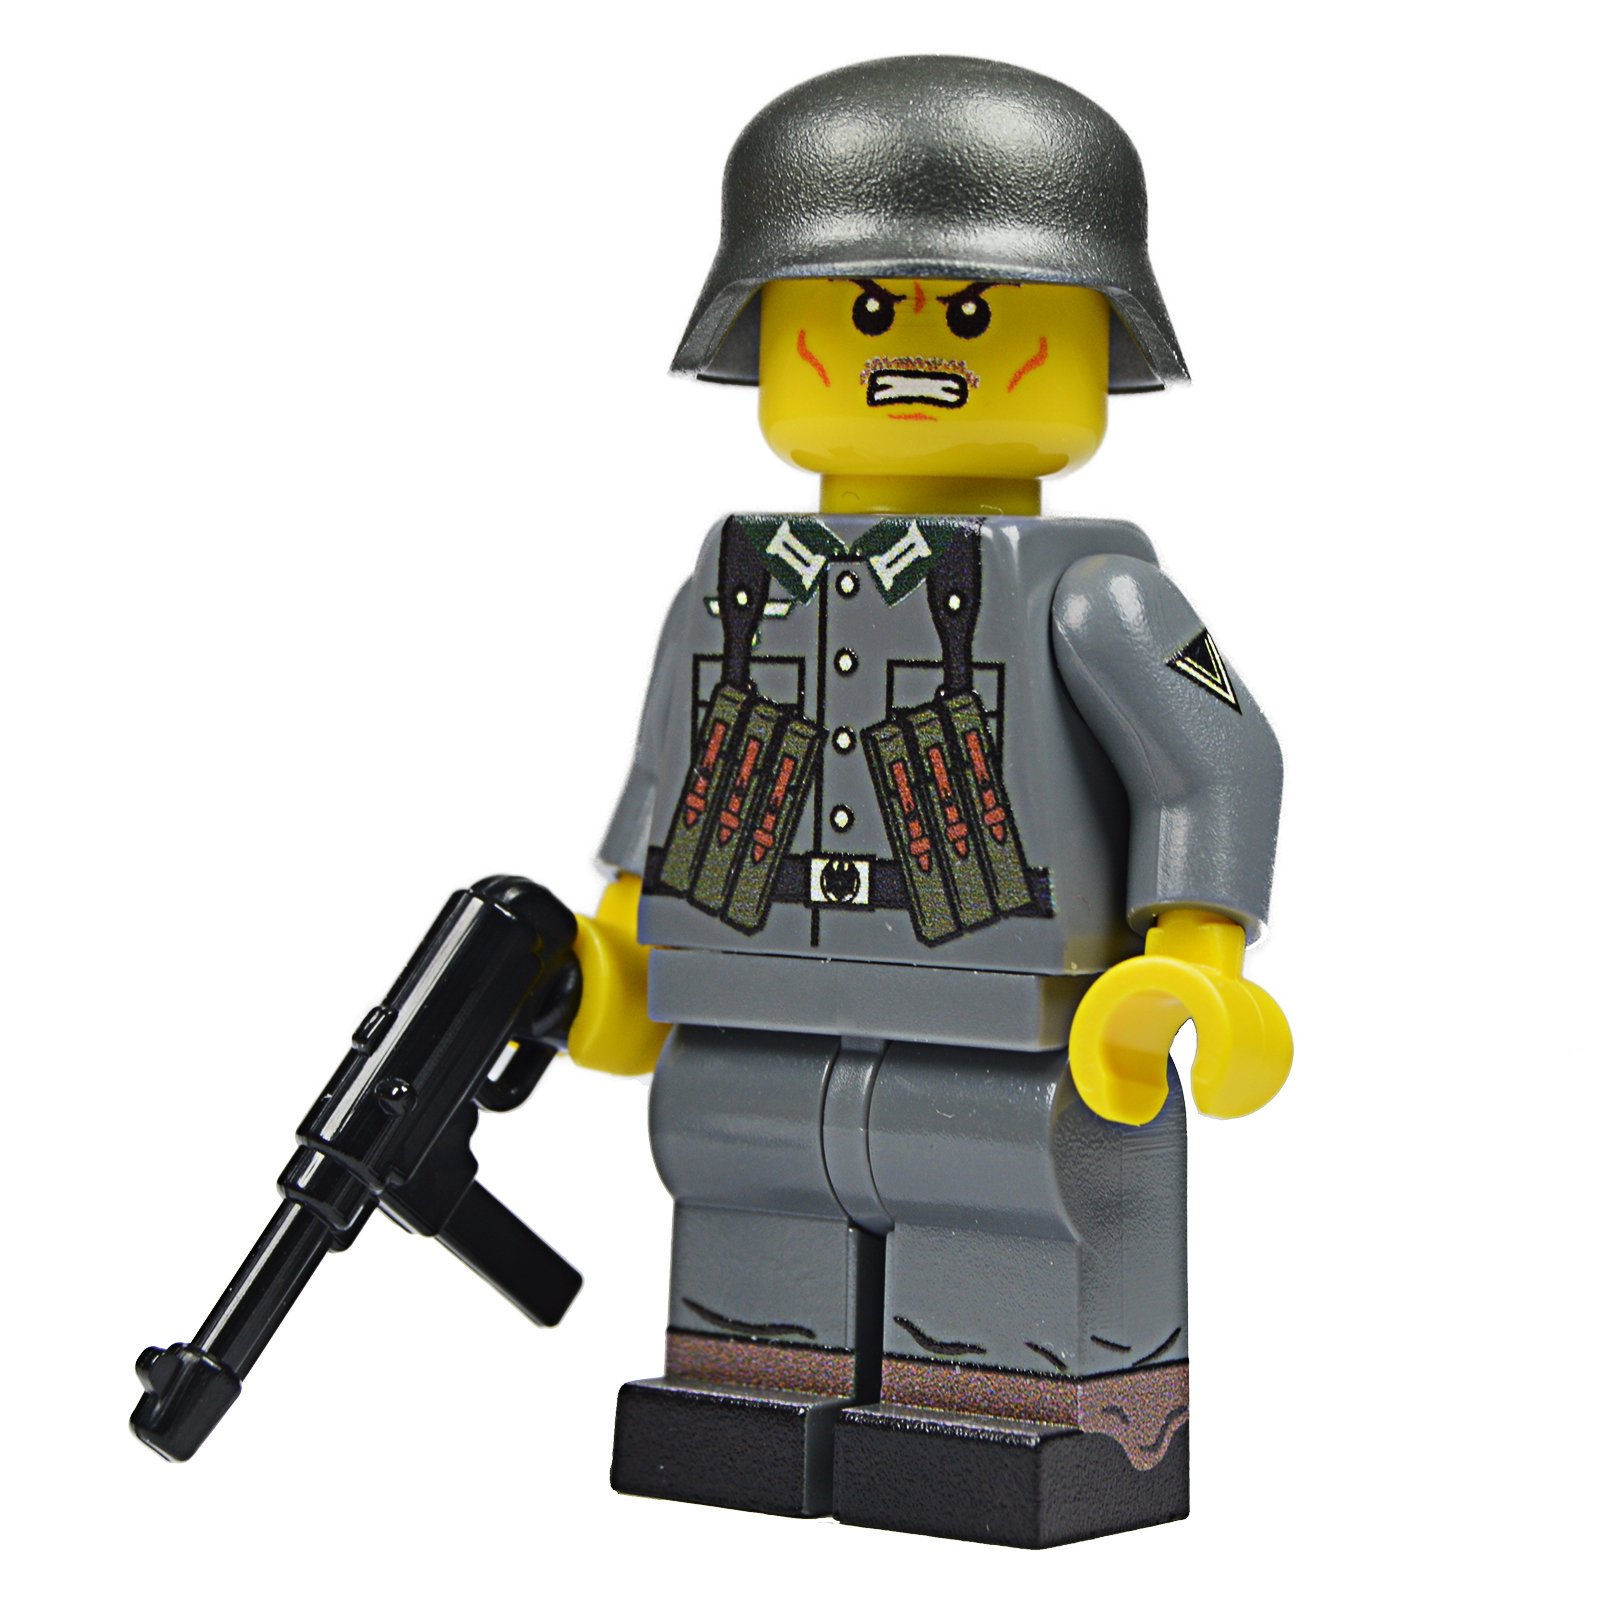
lacked the necessary high altitude  performance required by the RAF and the engine was substituted for the Rolls Royce Merlin. This modification transformed the Mustang into a first class aircraft capable of taking on any of the Luftwaffe's fighters. From 1943 the USAAF used Mustangs to escort the 8th Air Force in their bombing raids over Germany whilst the 9th Air Force used Mustangs as Fighter Bombers, in a combination that helped achieve air superiority in the European campaign by 1944. Mustangs were also used with great effect in North Africa, Italy the Mediterranean and the Pacific to help turn the tide of war in the Allies favour. Our version of the Mustang is one flown by  Captain Charles Weaver an American ace with several awards to his name including the Distinguished Flying Cross, The Air Medal and the French Croix de Guerre. Limited to 12 pieces worldwide, the US army sentry figure pictured in the attachments comes free with this model.


 The FW190 is known as one of the iconic aircraft of WW2, designed by Kurt Wolff in the 1930's it along with the Messerschmitt Bf 109 became the backbone of the Luftwaffe's fighter force during WW2.  Powered by a BMW 801twin row radial engine the FW 190 was capable of lifting heavier loads than the BF 109 allowing it to be utilised in several different roles including, fighter, fighter bomber and ground attack aircraft. The FW 190 made its first appearance over France in 1941 and proved superior to the RAF's MK V Spitfire in all aspects except turn radius. The FW 190 maintained this superiority until the introduction of the Spitfire MK 1X in November 1942. By 1944 Long Nosed variants of the F version of the FW 190 were entering service and this aircraft finally gave the Luftwaffe the parity it needed to address Allied superiority, unfortunately for the Luftwaffe it arrived too late in the war to have any real effect. WOW 099 'Black 3' was built in 1942 at the AGO factory in Ocherlesben and allocated to the fighter bomber wing of JG 5 Eismeer. Based at Herdla outside Bergen before being moved to Petsamo in Finland. It was then flown by Sgt Hans Gunther Kleemann on several missions. However in October '43 Kleemann bailed out of Black 3, after running out of fuel in a snowstorm west of Kongsfjord. Kleemann survived his landing and eventually made his way back to his base 2 days later, Black 3 was left for over 40 years where it had crashed In 1986 the wreck was recovered by the Norwegians and restored over a lengthy period in Norway and the USA, being the subject of 2 rebuilds! She now stands in the Norwegian Armed Forces Museum in Norway and is one of only 2 surviving FW 190 A 3's in the world.


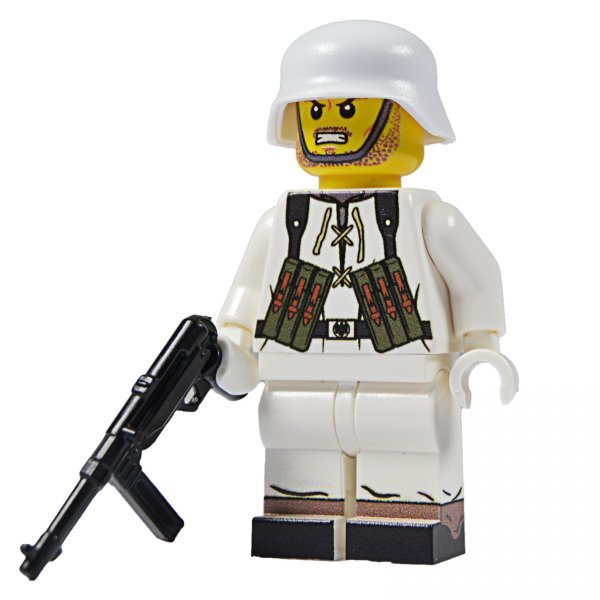
 Our second FW 190 WOW 100 is a Desert version 'Yellow 3' and was flown by Oblt. Erich Rudorffer whilst stationed with 6.JG 2. Rudorffer was the 7th most successful Luftwaffe ace of the war with 222 victories claimed in over 1000 missions, he was a gifted pilot who served on all combat fronts, he was lucky to survive the war despite being shot down 16 times and having to take to his parachute 9 times! He is credited with 10 heavy Allied bombers, 58
Sturmovik's and 60 Allied fighters on the Western Front during a career which netted him the Knights Cross with Oak Leaves and Swords plus a German Cross in Gold. After the war Rudorffer flew DC-3's in Australia before going to work for Pan Am and the German Civil Aviation Service, he died this year in April aged 98 years old. Both FW 190's come with LUFT 008 Footballer ground crew figure Fritz Walter as a freebie.


 All the above aircraft are priced at $650 which includes free shipping worldwide and are limited to 12 pieces each, they can be purchased via our website
www.tomgunn.co.uk or by dropping me an email. For those of you wishing to purchase more than one aircraft a discount on shipping will apply.


 I have pleasure in attaching pictures of our all new B 17 'My Devotion' and a Horsa glider from D-Day which will be making an appearance soon. If you are interested in reserving either of these pieces please send me an email as we only have 5 of each on offer at this moment in time. The guide price for the B17 will be $1500 and the Horsa (which is also an extremely large model) will be $1200 approx plus postage and packing as of yet to be determined.


Antigonus The One-Eyed By Jeff Champion    Mr. Champion adds to his obscure historical works with this biography of Antigonus...

Antigonus The One-Eyed by Jeff Champion Antigonus The One-Eyed by Jeff Champion

For your Wargamer, Toy soldier collector, MiniFig collector, military history nut. Reviews, interviews, Model Making, AARs and books!

Antigonus The One-Eyed

By


 Mr. Champion adds to his obscure historical works with this biography of Antigonus the greatest of the Diadochi or successors. His other works include 'The Tyrants of Syracuse' volumes I and II, and a biography of Pyrrhus. These two works have shed a large and new light on the history of the people and eras that they represent. It is far time that we have a biography of one of the greatest men of Hellenistic society.
Demetrius poliocretes son of Antigonus


 Antigonus was not one of the new men that grew to power underneath Alexander; indeed at his death he was already sixty years old. Antigonus was like Antipater, a general from Alexander's father, Phillip the second's time. When he was born, Macedon was a backwater and considered to be at the fringe of the Greek world, if the Greeks believed it belonged in their world at all. Between the various barbarian tribes surrounding Macedon, and the constant death and murder of her kings, Macedon was like a leaf in a whirlpool. No one would have believed in 380 B.C. that within sixty years this small country would have conquered almost the entire eastern portion of the known world and brought the mighty Persian empire to its knees. Antigonus himself was an imposing man for this era. A  large man over six feet tall and built solidly, he was able to overawe people by his presence. He was cruel at times, but also had a sense of humor. He had lost the sight in one eye and sometimes referred to himself as a cyclops. Once when getting a dispatch from a subordinate that was printed in large letters, he declared "that even a blind man could read this". Like many great generals, he had the common touch with his soldiers. He was one of the few ancient generals who were able to win battles after they were seemingly lost. Unfortunately, we have no statues or anything to show us what he looked like, so I added pictures of  his son and two of his inveterate enemies.


Lyssimachus


 Like many of the elder generation of Macedonians, we really know nothing about Antigonus' family or their place in his society. Some stories have him being a son of a simple farmer. As the author shows, that would have been highly unlikely. He would have had to be born into one of Macedon's leading aristocratic families. Exactly when and where is hidden in the depths of that era's history. 

 Antigonus was put into the position of satrap (governor) of Phrygia by Alexander. The satraps promoted by Alexander were sometimes given territories that the Macedonian army never went near. So the newly appointed satrap would have to conquer or at least subdue the indigenous populations. After Alexanders death in 323 B.C. Antigonus was just one of many satraps. In addition, his satrap of Phrygia was nowhere near any of the different sources of power at that time. His rise from this backwater to almost becoming the king of the entire Macedonian empire is detailed by the author. The author has had to piece together the life of Antigonus from the many scraps that we are left from the ancient historians. Unfortunately, the ancient authors jumped about like a cat being teased with a laser. Their accounts of different years hop around the ancient world from year to year without really following a clear path through any kingdom or person's life. Mr. Champion is to be congratulated for his detective work in bringing the lives he has to our attention, and hopefully prodded to bring more out of the dustbin.

Ptolemy I


  Antigonus' many battles and wars are shown to us, as is his ultimate failure and defeat in old age at Ipsus in 301 B.C. His son Demetrius poliocretes (the besieger) life is also a tale of rise and final ruin, however Demetrius' life was more of a roller coaster ride than his fathers. 

 The Antigonid kingdom at its greatest extent encompassed the entire Asian conquests of Alexander, and some additions that were conquered by the Macedonians after his death. The Antigonids went on to rule Macedon and some of Greece after the fall of Antigonus at Ipsus. Macedon saw many rulers in a few short decades. One of them was Demetrius, son of Antigonus. His grandson, also named Antigonus, became ruler after that; the Macedonian kingdom was ruled by the Antigonids until its fall in 168 B.C. The Antigonids as a family were very different from the Ptolemies and Seleucids. There was no patricide or filicide in the Antigonids for over a hundred years. The other Hellenistic kingdoms' families were lucky to go a generation without it happening.

 Antigonus' rise to power and eventual loss of his life and kingdom at Ipsus was used by the ancient writers as a prime example of hubris, which is unfortunate because all great conquerors have had the need to possess and reach for more than they have. I wonder if Mr. Champion is working on the biography of Demetrius next?


 Robert

 Book: Antigonus The One-Eyed
Author: Jeff Champion
Publisher: Pen and Sword
Distributor: Casemate Publishing
Date of Review: 10/14/2016

Warlords of Republican Rome Caesar Versus Pompey                                              By Dr. Nic Fields  Warlords of ...

Warlords of Republican Rome Caesar Versus Pompey Review Warlords of Republican Rome Caesar Versus Pompey Review

For your Wargamer, Toy soldier collector, MiniFig collector, military history nut. Reviews, interviews, Model Making, AARs and books!

                                            
By


 Warlords of Republican Rome Caesar versus Pompey is really a misnomer. It is really a political and military history of Rome from the rise of Marius to right before the battle of Phillipi.

 With this book you get a very well done political history of the Roman Republic. All of the Republics' elected offices and the qualifications needed for them, including the actual duties of the office holders, are explained in detail.

 The rise of Marius during the Jugurthine War, and his subsequent campaigns against the northern barbarian tribes, are gone over in depth. With the fear that engulfed Rome during these invasions of Italy, it is no wonder that Marius was proclaimed the third founder of Rome.

 
Marius


 The subsequent Social War with the Italian allies seeking Roman citizenship is touched upon. The virtual civil war between the optimates and the populares, more informally known as Sulla versus Marius, is explained.

 Then we head to the east for a description of the start of the twenty-four year long war with Mithridates of Pontus. Sulla's campaigns against Mithridates is explained to the reader, as is Sulla's return to Rome and his proscriptions (don't forget about Marius and Cinna's earlier proscriptions), and then his reforms to the Republic's laws are gone into. Sulla has himself made dictator with no period of time attached to his taking the office. Before, the dictatorship was only for at most six months and normally just until the crisis of the moment had passed. He does away with the overwhelming power of the tribunes, which has caused so much trouble over the last fifty years of the Republic. His other laws put the Senate squarely back in the saddle and holding the reins of government. Sulla then retires to private life, leading Caesar to comment " that Sulla knew nothing about politics", or perhaps he was very knowledgeable about politics and wanted the Republic restored to its glory. That is up to the reader to decide.

Mithridates


 From there the book goes into the rise of Pompey The Great, and all of his campaigns that made the Romans look at him as a new Alexander.

 The political history continues with the destruction of all of Sulla's reforms and the fall of the Republic into more chaos than even before his reforms. Crassus enters the field, as does a little known Julius Caesar. We read about the Catiline conspiracy and all of the other political upheavals until the first triumvirate of Crassus, Caesar, and Pompey takes place. Crassus' Parthian folly is shown to us also, and then we go to Caesar's bloody conquest of Gaul.

 The book then goes into the causes and military history of the civil war between Caesar and Pompey. Caesar's political agenda after his defeat of Pompey, and his overweening pride and attempt to make himself king and destroy the Republic is stripped bare for the reader to see.

 The events of the Ides of March are gone into, and the book finishes with the beginning of the second triumvirate of Octavian, Antony, and Lepidus. 

 Dr. Fields has really gone into a much larger area of Roman history than just a book about the military campaigns between Caesar, Pompey, and the other Republicans.

  As stated, the title is a misnomer, but that is not a bad point. By going into all of the different political and military history before the actual civil war between Caesar and Pompey, the reader becomes very well versed in the whys and not just a retelling of what happened. The book is written to not overwhelm a newcomer to Roman history, but it also will teach an old hand a thing or two.


Gnaeus Pompeius Magnus


 Robert


Book: Warlords of Republican Rome Caesar versus Pompey
Author: Dr. Nic Fields
Publisher: Casemate
Date of Review: 10/3/2016
                                    

Wind in the Wires and An Escapers Log by D Grinnell-Milne Review First off I have to admit I'm a WWI obsessive. This prob...

Wind in the Wires and The Escapers Log book review Wind in the Wires and The Escapers Log book review

For your Wargamer, Toy soldier collector, MiniFig collector, military history nut. Reviews, interviews, Model Making, AARs and books!

Wind in the Wires and An Escapers Log by D Grinnell-Milne Review


First off I have to admit I'm a WWI obsessive. This probably doesn't come as much of a surprise to those who know me. I've always had an interest in the Great War for as long as I can remember, more so even than WWII. Though at some point this interest crossed a line and I freely admit now borders on an obsession.  I think it was when I first watched the film Regeneration, which had quite an impact on me. From then on, I devoured memoir after memoir, which to this day is still the case. So you can imagine I've a pretty fair sized library of WWI books, which will probably continue to grow long into the future.


As just mentioned, I've read a lot of memoirs. Though most deal with the War on the land, I have read a few written by those who fought the War in the air. I think air warfare during WWI is fascinating. More so than in later wars, as we are dealing with the birth of war in the skies, in machines that had only recently managed to get man airborne.  So, you were more  likely to be killed just trying to fly the thing or due to some sort of failure than actual enemy action. Yet all nations never had any problems recruiting young men (boys to be honest) to go through the Russian roulette of training and then, with just a few hours solo under their belt, off into the skies above France or wherever it was they had been posted to. Life expectancy was low and could drop a lot lower depending on the role of the plane and plane type you had been assigned to. God help you if you had been assigned to a Be2C Recon plane during April '17 for instance. Even if assigned to a fighter squadron, your chances weren't great of getting past three weeks, though being assigned to a squadron like 56 Squadron which was full of great pilots would increase your life expectancy, a bit.


You'll find the pilots in the RFC would have come from a public school, though many had first served in the trenches and maybe came from a prestigious regiment like the Guards, though this was not always the case, as during the rush to enlist many public school boys joined whichever regiment would get to France first. One of the requisites the recruiters were looking for at the start of the RFC, apart from youth, was the ability to ride a horse, showing how little really was known about flying and what would make a good pilot! Yet you'll find it was a certain type of person that volunteered to be a pilot. You'll come across  extroverts, rebels, risk takers, adventure seekers, all extremely confident young men, when you start reading about the RFC. Though stress may eventually take its toll on those traits, for the most part the pilots are as interesting to read about as the machines they flew and died in. The author of this particular book is no exception to the rule. Well educated, proud, loyal, witty, determined, confident, aloof, eccentric and with a great turn of phrase (you can add fatalistic to that as the War went on, a trait most pilots gained at some point, if they lived long enough. Usually shown through, what today we call, a dark sense of humour). The book is so good because the author was not only a pilot but also a brilliant writer. A reason many Officer accounts are such great reads is due to the high standard of education they had been through.


Wind in the Wires is a great read. Easily up there with the other classics like Cecil Lewis' Sagittarius Rising. Though Grinnell-Milne wasn't in such a famous squadron as 56 squadron, which Cecil Lewis flew in, doesn't detract from the memoir at all. In fact, his training and first deployment early on in the War was being assigned to a recon squadron. I found this extremely interesting, as usually you'll find most memoirs come from fighter pilots and cover mid to late war. So it was a refreshing change to read about what was the beginning of the RFC, and what it was like to be in a Recon squadron around this time. As you'll find out, it wasn't exactly how you'd have imagined. The squadron was definitely not a stereotypical RFC squadron. His experience during the first phase of his War in the air wasn't ideal. It's fair to say the squadron wasn't too friendly or supportive; whether it was due to low moral being a recon squadron is hard to tell.  Halfway through the book he becomes a POW and there follows a brief description of his POW experience (the second book An Escaper's Log covers that period). Many failed attempts later, he finally escapes and once back, this time, he is assigned to a fighter squadron for the remainder of the War. Now you'll find that typical RFC squadron and you'll love being in their company for the rest of the book. This is the period Duncan got 5 out of his 6 confirmed victories. Anyone with any interest in WWI and the air war will love the book. Duncan is a brilliant writer and has an excellent eye when it comes to capturing all the little nuances, traits and mannerisms of someone's personality and then getting it onto the page. The book is a real page turner and for a while you'll be with him, through the highs and lows of being a pilot in the RFC during WWI. Highly recommended.

An Escaper's Log is his second book which covers the period of his incarceration as a POW and we follow him through the highs and lows of many failed escapes. The fact he never gives up shows the type of man that he was. I haven't previously read any accounts from prisoners of war in WW1, so it was very interesting and an area I'm keen to explore more. When he finally manages to escape and get back home, he has the chance to stay home and train new pilots, yet he turns it down, a testament to the man and his desire to get back up in the clouds again. Though it was the first book, Wind in the Wires, I was really interested in, I also really enjoyed An Escaper's Log. A book I probably wouldn't have read on its own but I'm glad I have. Well worth reading!

I also highly recommend a trilogy by Derek Robinson, Goshawk Squadron, War Story and Hornet's Sting. A fictional account of a RFC squadron and its pilots. Full of humour, as well as horror, the author does a brilliant job in bringing a squadron to life, from the fantastic banter between pilots to the vivid realistic descriptions of air combat and the author of Wind in the Wires, Duncan Grinnell-Milne, could easily have been a character in one of those books. So if you've read any of these books you'll have an idea what Duncan was like!

'We have no hesitation in ranking it with the very best of the war books.' Daily Telegraph

'Wind in the Wires is a war book in class by itself…. From beginning to end the book a lure to read…outstanding.' Flight

'An addition to the number of books about flying needs more excuse than the mere subject of air fighting. This book is excused by the charm of the author's style, by his judgement in pruning his story, and by the interest which his own personality arouses.' Manchester Guardian

'The most beautiful air book that has yet appeared.' Birmingham Post

'The most interesting and attractive quality of the book is the fact that it gives a graphic account of the fledgling days of wartime flying. When the time comes for the great writer of the future to compose a comprehensive narrative of the war, this is one of the books that will help him acquire a true perspective.' Nottingham Guardian

Iron Cross Brigade: Story of Werner Gosel and Sturmgeschutz-Abteilung 244    Before I get to the book let me first tell you abo...

Iron Cross Brigade by C Bauermeister and Jason Mark (eds.) Review Iron Cross Brigade by C Bauermeister and Jason Mark (eds.) Review

For your Wargamer, Toy soldier collector, MiniFig collector, military history nut. Reviews, interviews, Model Making, AARs and books!

Iron Cross Brigade: Story of Werner Gosel and Sturmgeschutz-Abteilung 244


 Before I get to the book let me first tell you about the publisher Leaping Horseman Books.  They are a small publisher based in Australia; the main man behind the company name is also an author called Jason Mark. They specialise in books about WWII East front, with Stalingrad being a major focus. If you've browsed their website you'll notice the books aren't cheap. However, hand on heart they are worth every single penny\cent. Not only is the actual content fantastic, all are extremely well researched and written, the materials used are top quality from the paper to the covers, and all have faultlessly clear photographs and maps. Out of the five books I own, one of them is probably my favourite book of all time and that includes fiction. The others easily get into my top twenty and a majority of them into my top ten! I certainly haven't regretted buying any of their books and I imagine that will continue on into the future, as I have total faith every book they release will be a page turner.

 Jason has several books published by Leaping Horseman, as the sole author, aswell as being involved in other books published by Leaping Horseman including this particular book. The first book I bought from Leaping Horseman was Island of Fire by Jason Mark. I'm finding it difficult to express how I felt reading that book. Suffice to say, with no hesitation at all, it's my favourite book, not just favourite military history book but my favourite book full stop. I've been fascinated by Stalingrad for a long time now, devouring as many books on the battle as possible. Island of Fire is the perfect book on Stalingrad, extremely well researched and takes you right into the savage, brutal combat for one of Stalingrad's Factories. I'd love to have the whole battle done in this detail , so Jason how about doing say a thirty volume Stalingrad set?:)


Iron Cross Brigade is a pretty unique book in how it's set out. First, you have Werner Gosel's autobiography of his War experience, then you have the unit history penned by Jason and Christian and finally a section that is the unit diary over a set period of time. The autobiography, coupled with the unit history, and the author's excellent narrative work fantastically well. They aren't totally separate sections of the book either. To give an example, when Werner is wounded, then the authors continue with the unit's history until Werner returns. The book is so much the richer than if it had been just a straightforward autobiography\memoir. The decision to write the book like this was a mark of genius. I hope, if the chance arises, Jason will work on similar lines for future memoirs.

The book follows Werner Gosel and the men of Stug.Abt.244. At the start of Barbarossa, Werner was a despatch rider on the staff of Stug.Abt.244. He was then trained as an Officer and sent back to this unit. Soon they were at the gates of Stalingrad where Werner was wounded in the early stages thereby avoiding the fate that was to befall the unit. The book, however, sticks with the unit, as it is thrust into the hell of Stalingrad. Eventually what was left of the unit went into captivity with only three Officers ever making it back home to Germany.

After Stalingrad, the unit is rebuilt and, when Werner returns to it, after a brief stint with Stug.Batterie 395, it is then involved at Kursk and  in the following retreat. Werner is made Adjutant in August '43 and is eventually captured by Russians, while trying to break out of the Brobuisk pocket. By this time, Werner had reached the rank of Battery Commander and was not released until five years later and the book looks at how ex-servicemen struggled and the difficulties they faced after the War in East Germany; something I hadn't read about before and is extremely interesting.

As for the unit, after Brobuisk it was rebuilt, yet again, and from October '44 until the end of the War fought on the West front. It fought around St Vith during December '44, and was finally destroyed for good in the Ruhr Pocket when on 14th April '45 the commander told what was left of the men to break up into small groups and  break out and head for home.

Just like the other books I've read from Leaping Horseman, I thoroughly enjoyed it. The book kept me gripped from start to finish and it now sits proudly with the other books I own from them. One aspect of their books I really like is that you come across familiar regiments\units that you've read about in another of Jason's excellent titles. So, a unit that is mentioned that may not have a major part in the book you're reading, isn't just a number, but you remember faces and experiences it has gone through, and so they have character of their own. Jack Sheldon, Ralph Whitehead and Jason Mark are by far three of the best researchers I've come across. I know any book by these authors is going to be superb and well worth reading and will take pride of place on my book shelves.

If you're only going to own one military history book you can't go far wrong choosing one of Leaping Horsemans. Iron Cross brigade doesn't let the side down in this respect. It's highly recommended.

492 Pages on high quality gloss paper
Hardcover
247 Photos
17 Maps
Includes units full War diary from 1943


Island of Fire, Into Oblivion and Besieged are three other books I own published by Leaping Horseman and all three are must haves.


                                                 Sengoku Jidai DLC Gempei Kassen                                                          ...

Sengoko Jidai DLC Gempei Kassen by Slitherine Sengoko Jidai DLC Gempei Kassen by Slitherine

For your Wargamer, Toy soldier collector, MiniFig collector, military history nut. Reviews, interviews, Model Making, AARs and books!

                                                 Sengoku Jidai DLC Gempei Kassen

                                                                          by

                                                                    Slitherine 


  The Gempei war in Japan was fought in the 12th century in Japan. It was a time of the 'cloistered emperors'. At this time the ruling emperor was usually a cypher and or a child. The adult emperors who had given up the throne carried the real power in their kimono. Sometimes you had up to three emperors at one time vying for control of the government. The Fujiwara family was also deep into the power struggle by being the emperors highest servants and also marrying into the royal family. The war starts because a cloistered emperor brought into the mix the two most powerful military families in Japan, the Taira and the Minamoto, thinking to use these families just as every other piece had been used in the power struggle. The plan backfires on the imperials, and ushers in the age of the Shogun. For the next 600-plus years, the emperor becomes a nonentity while the Shogun rules Japan.


 The DLC for this game, Sengoku Jidai, is an attempt to bring the battles of the two families out of the mist of history, and onto your computer screen. The DLC takes place roughly four hundred years earlier than the battles in Sengoku Jidai. This is a time when the Samurai was much more of an archer than a swordsman, and the tales of the warriors of these times represent that fact.


 Due to the mist that is present in Japanese history in the 12th century, we know of some battles and what warlord died and when. What we do not have is actual lists to be able to make out OOBs for the different battles of the Gempei War. So the decision was made by Byzantine Games to not falsify history and  make some OOBs up. Instead, the DLC is based solely on skirmish mode in the game without any historical battles. It is an unfortunate but correct decision based on the records.

 There has been some discussion on the web about the choice of the names of the two sides in the war. The Minamoto are listed as anti-imperials, while the Taira are listed as pro-imperials. I understand that while it is not technically correct; both were pro themselves and anti everyone else. You are still able to kick some 12th century Minamoto butt with your Taira troops, so it all works out in the end.

 Minamoto no Yoritomo is the strongman who set up the shogunate after the crushing defeat of the Taira at the sea battle of Dan-No-Ura. He then consolidated his position by the hounding and then murder of his half brother Minamoto no Yoshitsune. Yoshitsune was a greatly revered swordsman whose battle with the monk Benkei, and their companionship and travels after the fight, loom large in Japanese folklore.

 Sengoku Jidai is a game for anyone interested in the history of Japan. This DLC makes it more interesting with the new units and different strategies needed to win with your 12th century armies. Please see my review of Sengoku Jidai:  http://www.awargamersneedfulthings.co.uk/2016/05/sengoku-jidai-review.html


 Robert


Game : Sengoku Jidai DLC: Gempei Kassen
Developer: Byzantine Games
Publisher: Slitherine Games
Steam Release Date: 9/8/2016
Review Date: 10/1/2016

United Bricks: Three Soldats Reviewed On parade today we have three WWII Germans from United Bricks. Last time we reviewed United Brick...

United Bricks: Three MinFigs get the review treatment! United Bricks: Three MinFigs get the review treatment!

For your Wargamer, Toy soldier collector, MiniFig collector, military history nut. Reviews, interviews, Model Making, AARs and books!

United Bricks: Three Soldats Reviewed


On parade today we have three WWII Germans from United Bricks. Last time we reviewed United Bricks MinFigs they passed with flying colours. Will it be the same story this time, or have they been reprimanded and put on kitchen duty peeling spuds (potatoes for those not from the UK). Read on to find out!


First up we have German Soldier Corporal. In the last review, we also had a German corporal, but that time he was wearing a light grey uniform and didn't have the MP 40 ammo pouches on his webbing. This time he is wearing the standard feldgrau (field grey) uniform. He has his corporal's rank on his left shoulder. On his head is a metallic looking German M40 helmet. Unlike the grey uniformed corporal, this time he comes with a weapon, an MP40, hence the ammo pouches. One of my criticisms of the Cobi MiniFigs was their happy smiling faces; this is more like it, wearing his close combat face! He comes in either a yellow skin version as seen here or a more realistic light flesh version. You can also buy a winter version.


Print work is excellent and I have no complaints. He retails at £8.50.


Next up is a German Officer. He is wearing your standard early\mid war feldgrau uniform (The pockets give the date away, late war have no pleats on the pockets) and his hat is a Lego Kepi. On his belt is his Luger's holster. He is also wearing white gloves, so I presume he is on parade rather than in action. Obviously a brave soldier, he has the close combat badge and a Knights' Cross around his neck. Skin tone is flesh rather than the normal LEGO yellow, which is more realistic and my preference to be honest. Printing is excellent - they use a high quality UV method which produces excellent results.

This great little MiniFig retails at £8.50


I've saved my favourite for last. Here we have a German General. He is wearing a feldgrau German General's uniform. German Generals have red piping down the side of each leg. It also has red piping down the front of the jacket. He has a General's insignia on his lapels. He also has a collection of medals, including the Knights' Cross, Close Combat Badge and a War Merit Cross. On his head is a German officer's peaked cap, which I love - really well made. He wears white gloves and his skin tone is Flesh. I really do love this MiniFig. One other aspect to mention is his face, he looks extremely overworked and stressed out, with his red rimmed eyes and sunken cheeks, a great little detail. The print work is top quality.

The General retails at £8.50 and is well worth the price.

One final thing to mention is that the MiniFigs now come in a neat little black box with foam lining and gold printing on the lid. So much better than a zip lock bag:) This gets a huge thumbs up from me!

Well that's it for now. As you can see it looks like the spuds still need peeling! Keep checking back for more Mini Fig reviews and I'm sure we will be reviewing more excellent new releases from United Bricks!

GATO LEADER As promised, my next undertaking is an AAR for Gato Leader .  I decided on this route, because a review would have simp...

GATO LEADER AAR GATO LEADER  AAR

For your Wargamer, Toy soldier collector, MiniFig collector, military history nut. Reviews, interviews, Model Making, AARs and books!

GATO LEADER


As promised, my next undertaking is an AAR for Gato Leader.  I decided on this route, because a review would have simply been about 95+ % a replication of my review of U-Boat Leader As a prelude, these are the few differences, none critical, as they mainly reflect the historical backgrounds.

Gato Leader :

Includes some differing Special Missions, such as Mine and Recon/Rescue.

Wolfpacks are handled differently.  In fact, I would personally have called them something else, as I don't think that the Americans used this term.  Essentially, you chose whether or not a number of submarines begin as a group together in the same port.  So, no seeing whether a Convoy turns out to be a valuable target and then trying to call in other subs.

Takes us up to 1945, whereas U-Boat only goes as far as 1943, so there is more possibility of using radar.

Provides Forward Operating Bases [that can be purchased with Special Ops points]which allow for removing Stress points and reloading torpedoes.

Takes account of  the inferior quality of torpedoes by having a set of rules for dud torpedoes and a chart to roll on.  At its worst , none of your torpedoes may hit and in plenty of cases at least half will be duds! [Technically, this is not a totally new rule addition as U-Boat Leader 2nd edition has an optional rule for dud torpedoes.]

Allows for reloading torpedoes while on the Tactical Display.


These last two seem to me the most significant differences and one seems in part to balance the other.  However, I do not think that the ability to reload while on the Tactical Display is the big deal some comments on the game have made it out to be.


One other point worth mentioning is that the Event cards can be far more deadly than in U-Boat Leader and, overall, you will probably have to draw more too!


So, with that said, on to ...


Campaign Mission :
Turning The Tide
Short Scenario.


Stategic Segment


This gives me 40 SOs with which to purchase my submarines and any Special items.


I spend 36 SOs on submarines and the remaining 4 SOs on Special items.


Here's everything set up for the start of the Campaign, including my trusty dice tower!  On the left is the mounted play board which  has areas along the top for the Merchant Cards, the Escort Cards and the Naval cards and then beneath is nearly all the necessary information for conducting the Tactical Segment of a turn.  On the right is the Campaign Mission card with the map on which the subs operate in the Operational Segment of the turn.  The very blurred, vaguely bluish shapes are my four subs in groups of two.


Slap bang in the centre is the mounted Tactical Display board on which [surprise, surprise] the Tactical Segment takes place.   On the left side of this board are the holding boxes for the Event cards and Convoy cards and the rest is the lovely depiction of a sonar screen.  It's worth pointing out that this Tactical Display is part of the expansion pack.  It's brilliant, but the one that comes with Gato Leader itself is half the size and not as impressive because of the reduced area to play on.


My choices were:


Guardfish [Trained level + Torpedo Modifier]

Gudgeon  [Trained level + Radar] 

Both placed in Peal Harbour and formed as a wolfpack.  So, these two will operate together.

Silversides [Veteran + Torpedo Modifier]
Tautog       [Veteran + Radar]

Both placed in Freemantle and formed as a wolfpack.  So, these two will also operate together.

My decisions were based on the following reasons: the radar would gain a modifier in locating Convoys and the Torpedo Modifier would mean that the sub would roll one column better when checking for dud torpedoes.


A closer look at Guardfish, loaded up with 10 torpedoes Ready and another 14 Stored on board. 

It has markers showing its 6 gunnery factors and the Torp modifier.


Operations Segment


My first two subs left the port of Freemantle for the South China Sea, each drawing two Event cards.


Silversides


A Fatal Error                   + 3 Stress

Equipment Malfunction  + 2 Stress


[See what I mean about Event cards!  my sub is almost nearly up to its Shaken level and it hasn't even started to look for the enemy.]


Tautog

Lone Merchant - expend 1 torpedo and score 1 VP
Rough Seas         + 2 Stress


My other two subs left Pearl Harbour for the Marianas, each drawing two Event cards.

Guardfish

Nimitz Takes Notice  -  gain 2 SOs if you score equal or more than 10 VPs this turn.
Clear Weather            - no effect

[Well that draw went a bit better.]

Gudgeon

Rough Seas - + 2 Stress
Minefield [condition N/A, so gained default] + 1 Stress


The unfortunate Silversides which has picked up 5 Stress pts

just by sailing in to the South China Sea


 Tactical Segment


[N.B. all die rolls use a d10]


Tautog rolls for Contact


Contact die roll 6  mods +2 [number of subs in wolfpack],

+1[ radar], -3 [sub moved during the Operations segment].


Result 6 = 2 Contacts


Place Contact marker on the Campaign map board, draw a Convoy card and flip Contact marker from 2 to 1.

Contact card drawn is Card 043 [6 Merchants and 3 Escorts]  Unidentified markers are placed on the Tactical Display for all nine ships.


Convoy card 043 showing where the relevant unknown ship markers should be placed


The card only shows the 4 Centre Convoy Sectors and the 8 Short Range Sectors.  Beyond those are the 8 Medium Range Sectors and finally the 8 Long Range Sectors.  


Here are the six blue unidentified Merchant ship markers and the three unidentified escort ship markers, before I place my two subs in any of the outer Long Range Sectors.  


Once I do that, I choose for both submarines to submerge and move one sector nearer the revealed Escort Ikuna and the following enemy are revealed because of range : Merchants Santyo Maru, Katori Maru, Nanrei Maru and Hoten Maru.


As a result of Lag Movement, the two submarines move one sector towards the Convoy's wake.  [The top of the board is marked as the Convoy's course and the bottom is the Convoy's wake.]  The Escort Ikuna rolls for detection of the subs.  A 1 fails to detect the sub Silversides, but a roll of 8 detects Tautog and so, the other two unidentified Escorts converge along with Ikuna on Tautog.  The other Escorts are revealed as the Momi and Etorofu.  Ikuna and Etorofu are now directly in the same sector as my sub Tautog!


Also, the last two Merchants are revealed as the Harbin Maru and the Sakito Maru.


The image shows all the ships now identified and two Escorts in the same sector as the detected Tautog.  Tautog is just about to Deep Dive to try to avoid the Escorts attacks which are not rolled for, but Damage chits are automatically drawn.  In this case, it would have meant drawing 7 Heavy Damage chits in total - in all probability this would have been fatal for my sub!

*[At this point, with two Escorts at range zero, panic set in and I forgot that Tautog had the Aggressive quality and could have fired at the Escorts before they could fire at him.] 

Instead, not too surprisingly, the sub opts to Deep Dive to attempt to avoid the imminent attacks, first it takes 2 Stress points as a result of making the Deep Dive.  Though avoiding drawing damage tokens for attacks from the three Escorts, the sub still has to roll against its evasion rating and is successful for two of the three attacks, but fails against the other and so takes a temporary Flooding marker.  Not good, but could have been much, much worse if the Escorts' attacks had gone in.

[Crash Dive, which is what you do if you are attacked while on the surface, states quite clearly that an Evasion roll is made for each Escort attacking you.  With a Deep Dive, the rules are not 100% clear as to whether you make an Evasion roll for each separate Escort, as I did, or whether it's a single die roll.]

Because the Tautog has dived, it cannot attack. 

[Again, a point worth raising. In both Gato and U-Boat Leader, there are no restrictions on Escorts sailing into and through Convoy Sectors.  In my review of U-Boat Leader, I queried the historical validity of this total freedom.  Still not sure how appropriate this is.]

The other sub Silversides, however, now unleashes a spread of 5 torpedoes at the Katori Maru and another spread of 5 at the Hoten Maru.

Resolve those against the Katori Maru first.  The die roll for duds means that only half run true [i.e. 3 torpedoes out of the 5].  So, modifiers are +2 [3-1 for torpedo spread] +2 [sub's Torpedo Skill] -1 for range, giving a final mod of +3.

The torpedo rolls are 1,3, 9, becoming 4, 6 and 12.  Taking the highest result 12, this is compared with the target's stats and as 12 well passes the target's third number, the Katori Maru settles beneath the waves.  Silversides chalks up 4 VPs and 3 Experience Points.

So, the focus turns to the attack on the Hoten Maru.  All five torpedoes run true; no duds this time.  Modifiers: +4 [5-1 for torpedo spread, +2 [sub's Torpedo Skill] -2 [range] = +4.

Die rolls for the five torpedoes are 3, 7, 8, 9 becoming 7, 11, 12, 13.  like its sister ship, a final result of 13 is more than enough to sink the Hoten Maru and Silversides gains another 3 VPs and 2 Experience Points.

The Combat Resolution phase is over and so the Deep Dive marker is removed from the Tautog and a new round begins.

Silversides surfaces and moves 2 sectors away to the western most Long Range sector, while Tautog opts to attempt Silent Running and rolls a 1 [hurrah], so the detection marker is removed  and the sub's speed drops to zero.  As a result, in the Lag Movement phase, Tautog drifts two sectors south and out of detection range of the Escorts.


[In the image above, Tautog has just successfully rolled for Silent Running and its speed drops to zero.  Consequently, in the Lag Movement phase, the sub will move two Sectors due south, towards the Convoy's wake.]

* [I realised much later, I had made a mistake here.  The attack by Silversides would have placed an Alert counter on the Tactical Display which would have increased the Escorts' detection range by one and put Silversides in potential detection range of the Escorts.] 

Consequently, the Escorts roll for random movement.  End of Combat round.

For the next 3 rounds, the two subs lurk on the fringes, out of escort range, while Silversides reloads 2 torpedoes per round.

On the next round, both subs move into firing range of the Merchants.

Tautog fires 6 torpedoes at the Sakito Maru and half run true.  Modifiers +2 [3-1 for torpedo spread] +1 [sub's Torpedo Skill] -2 range = +1

Torpedo dice rolls are 10, 7, 1 becoming 11, 8 , 2

The Sakito Maru is sunk and Tautog gains VPs 4 : Experience Points 2.

Silversides launches 5 torpedoes at the Harbin Maru, but a pathetic die roll of 2 means that only one torpedo runs true and one of the torpedoes that miss errs dramatically off-course and hits its own sub!  This causes 3 Heavy Hits on the sub;  the first adds 2 Stress, the second is No Effect and the third causes lasting Hull damage.

To counter this appalling SNAFU, the 1 torpedo that strikes the Merchant rolls a 10 and with +1 total modifier the Harbin Maru is added to Silversides' growing total, gaining 3 VPs and 2 Experience Points.

On the next round, both subs surface in order to be able to move two sectors.  The Tautog is able to exit the Tactical Display, but Silversides can only reach the Western Long Range sector and so is easily detected by the Escorts who converge for the kill.  Silversides opts to Crash Dive and adds 1 Stress, so that the sub is now at 8 Stress, one away from the maximum it can take before becoming Unfit!  But all evasion rolls are successful.

On the next Combat round, the sub can exit the Tactical Display and the situation moves to the Post-Combat Resolution Phase.

Silversides records his 10 VPs and 7 Experience Points on the Campaign Log.

Tautog records 4 VPs and 2 Experience points.

Each sub gains 1 Stress at this stage.

Silversides moves to 9 Stress, and so I decide to place the sub back onto the Campaign Map in the Area's Searched Box.

Tautog, now at Stress 5, fully reloads and with 1 Convoy-sighted marker still on the Tactical Display, I decide to continue the Tactical Segment and draw a new Convoy card which reveals two Merchant ships and Escorts.  A second Convoy card is then drawn for its random Event.

Tautog decides to fire off 5 torpedoes at each Merchant ship [this causes them to be revealed as the Anyo Maru  and the Tatuwa Maru]. 

Firing at the Tatuwa Maru -  the roll on the dud table is low and only one torpedo hits the ship doing no damage, while one of the misses hits his own sub adding 1 Stress, Lasting Electrics damage and No Effect.

The other 5 torpedoes fired at the Anyo Maru all run true and with the best of his five dice being a 10, plus a small modifier, a final Merchant ship is sunk adding 4 VPs and 3 Experience Points to the tally.

In the next Combat round, Tautog immediately exits the Tactical Display to add one more Stress in the Post-Combat Phase, so the sub's Stress is now at 7.

Tautog also records 4 VPs and 3 Experience points.

With virtually no torpedoes left to reload and a high Stress level, I decide to call it quits and place Tautog in the Searched Box where Silversides has already been placed.

[... It was now the turn of my other two subs in the Marianas and I hope that you will allow me to draw breath at this point and pass over their exploits, until another day.  Otherwise this AAR is going to ... argh my two typing fingers have gone numb!

Some time later...

Once all your subs have been activated and gone through the processes that I've detailed, you move to the last Segment Refit.]

Re-fit Segment

Promote Submarines

Silversides  spends 5 of Experience points to promote the sub's commander to Ace level.

Tautog spends 3 Experience points to promote the sub's commander to Ace level.

As there is no Forward Operating Base in the area, neither sub can reduce their Stress level and neither sub has the Cool Special Ability which would allow 1 Stress point to be removed.

Any temporary damage received is removed, but lasting damage remains on the sub.

Finally the submarines are put back from the Searched Box into the South China Sea area and the process starts again.

With neither sub fit for much action, I simply return them to the Port of Freemantle from which they had started.  Of course, if subs travel further afield, you can head for the nearest Port or journey back drawing Event cards for moving into areas as you do so.  Thankfully for these two battered heroes, Freemantle borders the South China Sea and so they go straight into the Port Box.

Once in Port, each sub can remove the appropriate amount of damage, in this case 5 Stress points each for Freemantle Port.

This concludes 1 Patrol for each submarine which is the maximum they can do in a Short Mission.

Between them the Silversides & Tautog had notched up 18 Victory pts, enough to get me exactly half way to scoring the minimum total of VPs to earn the Adequate level in game terms!!


A FINAL FEW WORDS

First of all, this was a hugely enjoyable experience, though it took 10 A-4  pages of careful record keeping just to cover the details that covered half of the Campaign and several sessions that tallied about nine hours in total.  To play the game, without all the written record keeping to produce this AAR, is [I can assure you] a whole lot quicker!

I'd like to thank DVG, who very kindly sent with the game the Expansion Ship Miniatures and Battle Board which provides a mounted Tactical Display board twice the size of the smaller board in the game itself. But, as mentioned in my review of U-Boat Leader, the latter is rather small for the number of counters and markers likely to be placed on it. 

I love the expansion, but it does add another £22.99 to the cost of the overall package.

Both U-Boat Leader 2nd Edition and Gato Leader are for me excellent additions to my solitaire experience.  I imagine that the UK gamer may well settle for the former and the US gamer for the latter.  Both give equally satisfying and rewarding experiences.


hpssims.com