second chance games

Search This Website of delight

THE GREAT WAR published by Hexwar Hopefully you caught Jason's trailer for this computer version of Richard Borg's Comm...

THE GREAT WAR THE GREAT WAR

For your Wargamer, Toy soldier collector, MiniFig collector, military history nut. Reviews, interviews, Model Making, AARs and books!

THE GREAT WAR

published by Hexwar


Hopefully you caught Jason's trailer for this computer version of Richard Borg's Command & Colors The Great War, whose original board game I reviewed some months ago.  If you haven't  read that, I'd suggest a quick recap, as today I'm going to focus on how that translates to playing online. 

In the very simplest terms it is a direct translation from physical table top to computer screen.  Everything that you can do in the original you can do here.  When you first call up the game, it loads in seconds and there you are, as you can see above, with the exact same picture as the box art.  Should you not have the board game, the help button will bring up the rules booklet.  

Unfortunately, the print is so microscopic that you'll struggle to read it and, if you can manage to read it, you'll find that it is simply a condensed version of the board game's rule book, but with none of the many large colourful examples of play.   Though the rules are small print, there is a detailed and very clear set of large pictures of all the cards in the game.

What is missing is that there is absolutely nothing about the computer controls for playing the game online.  Admittedly, it is very easy to work out what you have to do, but a good knowledge of the C&C system certainly helps.

Click on Play followed by Start on the very first screen and a pop-up menu of Scenarios appears.  Select your Scenario, read the intro [purely informative], a further click of Play and you're good to go. 


The screen view is very clear and easy to scroll around, though you cannot obtain a complete view of the whole battlefield.  This is something I expect with most hex-based online war games, because their maps are often many hexes wide and deep, but with The Great War the dimensions are very limited.  So, I'd hoped for a more all-embracing view.


Apologies for the blurring, but here is a typical close up of a section of the battlefield.  Notice the appropriately cratered effect after several artillery barrages, the barbed wire and the Front line German trench.  The blue chevrons above the units signify basic infantry, while a clip of three bullets indicates a machine gun unit, as can be seen in the image below.


A neat feature is the orientation of the units.  So, the next picture shows a unit of British infantry that has advanced into the barbed wire, while next to them is a unit that has both taken casualties and just been forced to retreat.  This latter feature is purely cosmetic, as there is no modifier for orientation.  Still nice to see the distinction.


When it is your Turn to play, your hand of cards is displayed.  You can check each one before selecting and also review your Combat  cards as, where appropriate, one may be selected to be played in conjunction with your Command card.   This is one occasion where a brief run through of online instructions for play might have been useful.


Notice the slightly irregular line up, creating the effect of how you might arrange them when playing with the original physical components.   In close up below is one such card, identical in every way to the cards you would play with on the table. 


When you've selected the card you're going to play, the screen lights up those of your units that are valid for potential choice.  All you then have to do is click on each one that you want to activate and the hex that they are in will turn green.  I say "All that you have to do" but that is a little misleading.  It is at this point that the main flaw that I've come across in the game can crop up - selecting the unit.  Sometimes a single click may be enough, but sometimes I've had to click on a unit as many as ten times before the program agrees to select it. 

This doesn't just happen when you are selecting a unit for activation, it can happen for any and all of the occasions when you need to make a selection. Select a unit to move, select a hex for the unit to move to, select a unit to fire, select the hex to fire at - all these can bring up the attendant problem of repeated attempts being needed to be successful.  

I sincerely hope that this is a glitch that at some point a patch may be available to overcome, but it can be very wearing, because you do a vast amount of clicking in the course of a game!  On very rare occasions I have been totally unable to select a unit - when this has occurred, it seems to be a unit that is positioned on the edge of the board.

When a unit  is selected to move you will see all the hexes that it can move to and still fire coloured in white and those it can move to, but not then fire, coloured in green.  When you click on the destination hex, you'll see your little men run to it and, as with the board game, you move all your men first and then cycle through those who can still fire or engage in close combat. 

At this point, the game throws the requisite number of dice which tumble neatly across the board and many's the time you'll watch with trepidation as dice teeter backwards and forwards until settling onto one of their faces.  Will it be the necessary skull, if you are attacking in close combat or a more innocuous result?


When the dice have all come to rest, the results will be flashed on the bottom of your screen and if kills have been achieved a number of soldier figures will disappear from the targeted unit.


The use of Artillery is a particular visual favourite.  First, a very large targeting reticle appears above where the shells are going to fall and then gouts of earth appear and where appropriate the hex turns into that rich muddy brown with shell holes seen on earlier shots and, of course, if you have had a unit there soldiers disappear!

As in the original game, at the end of your turn, a new Command card will be revealed and added to your hand and then the next screen will present you with the choice of either two stars or an unknown Combat card.  For those who know the game, those stars are what fuel your ability to fire artillery and one or two other game functions.  Choose the Combat card and it will be turned from its generic side to reveal what you have drawn.

When the enemy A.I. takes its turn, you will see all the same things happening, except at an even quicker pace than you can manage. As always this is a strength of any computer version of a board game and with The Great War one of the other benefits is not having to set the board up and clear it away at the end of the game.

However, what has shown up for me after many repeated plays which hasn't happened with playing the board game is the similarity of each scenario and the repetitiveness of the experience.  I have no definitive explanation for this, other than that the effect of the simple variety of physical actions, [selecting a card to play, rolling dice, moving your plastic figures across a very attractive real board, holding the artillery template over the board, collecting tokens and, inevitably, the interaction with a ftf real human being] creates an experience greatly superior to doing little more than clicking on cards and clicking on units.

Nor does my preference for the physical board game result from  receiving the end of game screen message:


For me, The Great War fits an easy niche for when I want a swift, simple play of the board game and system that I really like, but have no ftf opponent.  But, if I want a thoroughly engaging computer experience of tactical warfare, then I would turn either to purely computer designs of WWII warfare or some of the excellent translations of WWII board games for the digital world.

However, notice that I've had to switch to WWII. So, it's worth adding that, for the moment, The Great War is the only game I have been able to find to provide a turn based tactical WWI experience of trench warfare online, the limited few other games that I have come across are all first person-shooters.




Streets of Stalingrad 4th Edition News!       The 4th Edition website has gone live!  This is the ultimate Stalingrad boardgame. ...

Streets of Stalingrad 4th Edition Streets of Stalingrad 4th Edition

For your Wargamer, Toy soldier collector, MiniFig collector, military history nut. Reviews, interviews, Model Making, AARs and books!

Streets of Stalingrad 4th Edition News!


The 4th Edition website has gone live!  This is the ultimate Stalingrad boardgame. A Kickstarter goes live in September.
 
Game will be reviewed when released on here!
 
This is one game you should start saving for now..you really don't want to miss out.


WARFIGHTER 2ND EDITION When Warfighter 2nd Edition , plus all the expansions and the Footlocker arrived in an awesome package, it ...

WARFIGHTER WARFIGHTER

For your Wargamer, Toy soldier collector, MiniFig collector, military history nut. Reviews, interviews, Model Making, AARs and books!

WARFIGHTER

2ND EDITION


When Warfighter 2nd Edition, plus all the expansions and the Footlocker arrived in an awesome package, it was like Christmas, my birthday and several other celebrations all rolled into one.  But first a brief outline of the subject, which the game's subtitle -The Tactical Special Forces Card game - helps to spell out.  In essence, modern small unit operations, specifically in the Middle East and the South American jungle.  The main focus of my review will obviously be the core game, but with appropriate asides regarding the multiple expansions.

Warfighter may not have the word "Leader" in its title, but at a glance you might be forgiven for thinking that it is a close relation.  If you have followed my series of reviews from air to sea to air/land campaigns via Phantom Leader, U-Boat and Gato Leader and most recently Tiger Leader, you might even think that there's not much to learn or be said.

Stick with me and I hope you'll shortly agree that you would have been wrong to switch off your attention now.  I have no hesitation in saying that, if my accumulating collection of DVG games were to be threatened by the classic scenario of my house going up in flames and I could save only one, then Warfighter would be the one.  Once more its quality, quality, quality all the way.  But, for once, before looking at the nuts and bolts of the game, I'm going to plunge straight into a major aspect of game play and the level that you are going to be playing at.

Similar to games in the Leader series, Warfighter's key element is cards.  Hundreds of them and at the very heart of the game are the cards that make up your force and you can't get much more tactical than this. You have three types of unit: the individual Player Soldier, the non-player soldier and the squad soldier, in what I would describe as a descending hierarchy.  But each soldier card comes with an individual name - a starting point for my love of this game.

I liked the call-sign names used in Phantom Leader that took me back to watching Top Gun, then came the U-boats with their named historical commanders on the card, followed by the named Commander cards integral to Tiger Leader.  Each increased the level of engagement and identification with your units, but now we're at the level where each soldier card has the name of a serving soldier and picture that they have personally submitted for inclusion in the game.  I don't think that you can get a more immersive effect than that.

You really do care for each member of your team [especially as you've chosen them], but perhaps unfairly you do care just that little bit more as you ascend the hierarchy that I talked about.  Your Squad soldier really seems like the basic grunt, whose card has a simple hit table for when they fire and the number of actions that they can perform depending on how many wounds they've taken.  Next in line is the non-player soldier - this time the table on their card covers purely how many actions they can take, as they come with a fixed set of named weapons, equipment and skills printed on the card. 


A line up of the three types of soldier card.

But top of the tree is the Player soldier, who has a set allowance of two actions, but then everything else is what you have decided to purchase from your stock of Resource points.  Even more important - each Player soldier has a hand of Action cards [depending on their current staus; typically 5 or 6 cards, if suffering no wounds] and these cards really are the engine that drives the action.   Inevitably they grab your attention and they will be the ones you try to protect at all costs.


No shortage of gear for these guys.

The next feature is one that takes the world of Warfighter away from the Leader series.  There are no large campaign card sheets.  Instead, three sets of Mission and Objective cards: one for the Jungle and two for the Middle East, where one group of opponents are Insurgents and the other Military.  There is another hierarchy here too - how tough the going will be: the Jungle set is the easiest [a relative term], next are the Middle East Insurgents and finally the toughest nuts to crack are the Middle East Military.  Oh, and while we're talking about your opponents , better wise up and get down to learning the correct game parlance.  These are Hostiles!

So, choose your Mission card which lists the number of Resource points to spend, the number of turns in which to complete the Mission, an Objective number*, a Loadout number [bit more about these later] and finally any specific Mission text.  Then choose your Objective card.  Of course, if you wish, you can just draw each of these two cards randomly for maximum variety.

From here on, the sequence of play should be pretty familiar to any of you who know the Leader games and/or have read my other reviews.  Spend the Resource points to build your team of soldiers, buy their equipment and skills, draw the correct number of Action cards [that's new] and get your boots on the ground.

So, now's the right time to consider the game's playing board which is where you'll be placing your soldiers and a lot, but by no means all, of what you're going to be playing with.  That playing board has come in for a lot of criticism.  At first sight , it looked perfect.


Suitably dark and menacing, a seemingly very good size, clearly marked boxes for the Action deck and discards, a similar set of boxes for the Hostile card deck and discards, the Set Up sequence and Attack Sequence, an Attack Matrix, a turn track [called Mission Timer] and 10 numbered boxes, the first of which is labeled Mission and the Objective card goes in the numbered box that corresponds to the Objective number* [see above].  Unfortunately, it just isn't adequate for what has to be laid out in the game.

Consider first of all the neat, numbered Location boxes.  When you decide to play a Location card that you've drawn from the Action deck, it will be placed in the next Location box.  But as can be seen, most of those boxes are in the landscape orientation, so that the all-important information on the card is harder to read. 


The start of the problem.


Even worse you draw a number of Hostile cards that will occupy the Location card and these may be 5 or 6 cards.  Where do you put them?  After all, only one fits the Location space and then you couldn't read the Location card beneath it at all.  Nor can you stack them, as each Hostile card has a combat table on them and you will also need to place Suppressed or EKIA markers on them at some point.  Above the Location is too cramped and soon obscures other tables.


Even more of a problem -
laying out the Hostile cards


In quite a number of on-line posts about this, the gamer simply did away with the board and you'll certainly find useful files on BGG that have been created to print out Location mats to help.

Acknowledging the problem, DVG has produced a new board, which comes in the Warfighter: Locker expansion.  So, problem solved... ah, well, no [sigh].  It is an improvement.  I love the top-notch, even higher physical quality of this board and its even more striking appearance.


A partial solution

But, as you can see above, it is by no means a complete solution.  There is more room for laying out those Hostile cards.  In the photo, I drew 4 Hostiles that time.  In my very first attempt at this Mission, I drew 6 Hostiles.  Also, you'll now notice that to accommodate the Hostile cards, my discard piles have to be placed to the side of the board.  And finally, whichever board you have, there is no allocation of space on it for your all-important Soldier cards, their Skill cards and their Equipment cards.  To achieve that you'd have to have two boards and a price that frankly would be becoming stratospheric.

In total you have a LARGE footprint for this game.  I can see why some have simply jettisoned the board altogether.  That will certainly work, but not a decision I have been prepared to take.  What you see above is my preferred choice.  I would not want to give up the atmosphere and sumptuous feel, when I play the game using the redesigned board.   But it's going to cost you.  The Footlocker Case costs slightly more than the basic game itself.  So, you're looking at about £95 in total.  Add in all the other expansions and you're putting nearly another £115 on the bill, taking you to about the £210 mark.

Having aired the one question mark that hangs over the game - its playing board [called the Tactical Display Sheet ]- let's continue with the game play that takes place on it.  Your Soldiers in the form of small numbered chits assemble on the Mission card.  The Kickstarter included plastic soldiers [the weakest physical pieces in the whole product] to go with the chits.   I shall be buying and painitng some quality models to enhance further the all-enveloping feel of the game.

Their task will be to make their way, Location card by Location card, until they reach the Objective card, activate it and accomplish [or fail to accomplish] the Objective goals stipulated by the card.

To help them achieve that goal will be the weapons you've selected and paid the necessary Resource points for.  Below is a very small selection from the wide range at your service.


If you look closely at the lower right hand corner, you should be able to make out a small orange square where you place the designated amount of ammunition for the weapon.  This is a small, but telling detail, that adds to the atmosphere of the game.  Most weapons have a reload number which, if rolled, involves the topmost counter being flipped to its empty side and you'll then need to spend one of your precious actions to reload by removing that counter.

If you think a weapon is going to need more ammo than its basic allowance, then you need to buy extra before you start the Mission and you can also add refinements to these weapons from the Equipment cards that you can also buy.  These are easily distinguished by their blue colour, so that they can be paired up with the weapon they've been bought for.  Though, as you can see with the First Aid Kit below, some of the equipment is stand alone material that will be assigned to a particular Soldier card.


All this adds immensely to the game play and one of the reasons that you may find yourself being seduced into buying some, if not all, of the expansions.  Each Expansion has a particular focus, but brings with it additional cards in nearly all the basic categories.


Here is most of the whole magnificent array.  Lined up in front are the seven sets of expansion decks.  Hiding behind them is the Container from the Footlocker Expansion, with the Scenario Booklet and extra rule set on top and the deep counter tray on the right.  Most of the counters in the tray come from the basic game, whose box is in the top right of the picture, along with over two thirds of the extra counter sheet contained in the Footlocker.


Each Expansion also includes a set of the special bullet dice and there are four sets of them here on display.  These look the part, but like many other gamers I think they're more ornamental than practical.  They roll and roll and, when at last they stop rolling, it's often not easy to tell exactly which side they are lying on and the slightest nudge to your table will change the result. 


Finally, here's the Footlocker itself, from the outside, with its near 3D effect!


and peering into its capacious depths.


The whole ensemble is of the finest quality and incredibly solid.  Inside the box, there is a secondary compartment in three sections.  Each section has been designed so that the cards can be sleeved and still sit perfectly within the column.  The central column at the moment contains all the original cards from Warfighter 2nd Edition, plus the cards from four of the expansions.   There is just so much space and another feature of the container is the card dividers, made of solid plastic  Not only do they make sorting and locating all your different types of cards so easy, but again their finish, look and durability is exceptional.


The inner compartment is perfect for the Tactical Display Sheet, Rule book, Scenario book and counter tray to sit securely on top and still leave room for more ... if necessary!

The 2nd edition rule book couldn't be clearer and steps you through everything in a logical progression and even has a very broad topic outline index on the front cover, though it will not direct you to the many specific details in each section.  However, once I'd played a couple of Missions, I found that I rarely needed to look back at the rules. 

Combat which can be a tricky area in many games works very smoothly on a simple matrix of 1d6 and a variable number of d10s.  The single d6 is rolled against the target unit's cover value, while the d10/s are rolled against the soldier or his weapon's attack value.  If both the d10s and the d6 miss, then you've achieved absolutely zilch.  Roll at least one d10 hit, but the d6 fails then you achieve a Suppression.  Roll no d10 hits, but succeed with the d6 cover roll and you still get a Suppression.  Roll at least one d10 hit and succeed with the d6 cover roll and you achieve a KIA. This Attack Matrix is on the game board, but you'll never need to refer to it, it's so easy.

There is even a basic prepared scenario with Mission and Objective selected and a small team of soldiers with their equipment and skills too.   This is used to teach you the sequence of play once you have begun your Mission and includes at the end of it a few Optional rules and a very short description of how to create a Campaign.  The rule booklet, as always, ends with a thorough Sample Mission described from start to finish and I really like the fact that here they have chosen to follow through and use the above pre-planned scenario that has taught you the sequence of play. 

Though I find the whole pre-Mission launch part of buying your team and equipment and skills a great part of the whole game's appeal, it is sometimes very nice, especially when time's more restricted ,just to be able to sit down, choose a pre-planned Mission, quickly lay out out all you need and get into the Mission.

For this, the Scenario book is admirable with a great range, BUT that range is in large part achieved by drawing on materials and above all soldiers from the many expansions.  In some cases, it is possible to substitute equivalent men and equipment from the basic game, but there is no chart to help you do this. 

Indeed, even if you do have everything, the Scenario book does not indicate which expansions material has been drawn from.   As I have each category [soldiers, equipment, weapons, skills, etc] sorted in order starting with the basic core cards and then in numerical order of expansion, this is a fairly quick and easy process.   It does need good organisation and the willingness to put everything back in its correct slot at the end of a session - a task some might not relish!


As for game play, brilliant.  The tension is palpable as your soldiers move forward from Location to Location with the clock ticking against you.  Sometimes, your hand of Action cards for a soldier will contain no Location cards and so one of the precious allowance of two actions per turn will have to be spent on discarding some or all of your hand to draw more cards.  This can be an even more excruciating decision if your hand contains some powerful/helpful cards.  But it is rarely worth discarding only one or two of them in hope that you'll get lucky and immediately draw a Location card.

Each new Location placed demands its draw of Hostile cards; how tough will they be?  How many will you encounter?  Each Location and each Hostile card has a point value.  So you keep drawing Hostile cards until you reach the Location value.  Obviously a card of value 0 with be nowhere near as dangerous as one of value 5, but draw a lot of low value Hostiles and they can be more of a problem to deal with than a single powerful card.

Some are geared to immediately move forward into your soldiers' current Location and prevent them leaving it until they have been dealt with; others increase the cost of entering a Location; while yet others may represent up to five Hostiles to be eliminated.   

An excellent rule prevents the Hostiles all directing their attention on your key soldiers. At the beginning of the Mission, each soldier is allocated a number and usually about four chits for each numbered soldier is put into a draw bag or container. As each Hostile card is drawn, you draw a numbered chit from the container that becomes that Hostile card's target.  When it is the Hostile Phase of each turn, the Hostiles will open fire, if the target soldier is within range, and if not the Hostiles will move one Location towards their target. 

But before that can happen, each Location that contains at least one of your soldiers has a reinforcement value that might result in an additional Hostile card being added.  This is an object lesson in keeping your men together and not getting strung out across several Locations.

However, the most exciting part is mastering the sequence of actions of your soldiers and the interplay of the cards within your hand.  Who fires first?  Who enters the next Location first?  When to draw more cards?  Fire your carbine, throw a hand grenade, engage in hand to hand combat, reload now, bandage a wound - everything is there.  Even the basic game has a wide range of potential actions and each expansion adds more and more alternatives and possibilities.

However, it's not advisable just to let your Action deck keep expanding, otherwise the ratio between the Location cards and all the other Action cards becomes too great.  There are several ways that you can deal with this.   One solution is to keep all the Action cards together and simply deal out about 75 of them and then shuffle in about 15 Location cards.

Personally, I've chosen to keep the original basic deck separate and at the beginning of each Mission I randomly remove 10 cards from it and substitute a mix of 10 from the expansions.  In particular, I've kept the stealth expansion Action cards separate and only add those in when a Mission is particularly dependant on stealth.  Obviously, this is only a problem if you succumb to buying all or most of the expansions.  But be warned, it's hard not to resist the siren lure of just the next expansion and the next and well just one more! 

With the basic game, if you were changing from say playing a Jungle Mission to a Middle East Mission, you always had the fag of having to extract the Location cards appropriate to the previous Mission's geographical region and then adding in the new region's Location cards. 

The Footlocker contains one of the biggest helps to avoid this task by introducing a set of generic Location cards.  These can remain permanently in your Action deck and when you draw one, you simply randomly draw a Location card from the appropriate region's set of Location cards. 

As you can see I have tried to incorporate a wide perspective drawing on the essential Warfighter 2nd edition as a base point, but giving you some aspects influenced by the expansions.  Now I want to conclude with a few very specific observations. 

For me, Warfighter 2nd edition is an absolute must have in my collection and in anyone else's: must have for its tactical experience; must have for its quality, its atmosphere and its game play; must have for its wealth of superb cards; must have for its solitaire play; must have for the sheer enjoyment and excitement of playing this game.  I say this, despite the fact that you may ditch using the game board and I strongly wish that DVG would make the board that comes in the Footlocker the standard one to be sold in the basic game.  Also it's a great shame that some of the best additional features cannot easily be accessed by a simple additional purchase.

Of course, if you become truly hooked, now there is Warfighter: WWII waiting to steal away your time and feed your appetite for tactical solo wargaming.  Don't say you weren't warned!


B17..Get it here!!     The amazing solo boardgame B17 Queen of the Skies on your PC..for free..   This is a great little time k...

B17 PC Emulator here B17 PC Emulator here

For your Wargamer, Toy soldier collector, MiniFig collector, military history nut. Reviews, interviews, Model Making, AARs and books!

B17..Get it here!!


The amazing solo boardgame B17 Queen of the Skies on your PC..for free..
 
This is a great little time killer...sadly work finished on it along time ago, however it's totally playable. Enjoy!


Battle Brothers, from Overhype Studios, is a game which, upon playing for the first time, my immediate reaction was to wonder how in the...

Early Access Preview: Battle Brothers Early Access Preview: Battle Brothers

For your Wargamer, Toy soldier collector, MiniFig collector, military history nut. Reviews, interviews, Model Making, AARs and books!


Battle Brothers, from Overhype Studios, is a game which, upon playing for the first time, my immediate reaction was to wonder how in the world no one had made a game quite like this before.  It can somewhat be described as a mash-up of concepts from games like Mount and Blade, Darkest Dungeon, X-COM,  and Final Fantasy Tactics. If that gets your attention, by all means go buy the game right now, because you will love it. Come back and read this while it downloads.

The game puts you in command of what's left of a company of mercenaries, immediately following the death of your captain and most of your fellow mercenaries in an ambush. You start off with three decently equipped soldiers and a limited supply of funds. You then set out to make your way in a randomly generated world full of opportunities. Movement on the campaign map is very much like that of Mount and Blade, with your company represented by an icon traveling the world and encountering other groups of people, be they trade caravans, peasants, or bandits. Combat takes place in turn-based battles on a hex-based grid. I'll save a more detailed description of the gameplay for my review when the game is closer to release (there is one last big patch coming before then). Today I simply wish the regale you with the tale of my first campaign. 


Battle Brothers uses the "Busts of soldiers bumping into each other" art style. Which works nicely here.

Following the previously mentioned ambush and near annihilation of the Battle Brothers mercenary company, the survivors resolved to rebuild and hunt down the murderous bandits. Unfortunately, the only volunteers willing to join our force were a couple of bored villagers, the town drunk, and a vagrant or two. Fortunately, these men came cheap, leaving me with enough money to buy them some gear. Even a stone-cold mercenary captain can't send men into battle wearing tattered rags and wielding wooden sticks. He can't have his investments *ahem* loyal soldiers cut down in a single blow.

We had to travel to a larger village down the road to find better weapons for the men. This gave me time to get to know them better. Each man had a story to tell. Some were simply bored with the life of a peasant, feeling they were destined to travel the world and do something greater. Others were down on their luck after repeated misfortunes, and saw joining a company of mercenaries as a chance to climb out of the gutter. I sympathized with their tales, but, honestly, I needed warm bodies to fill the ranks and they were the best I could afford.


What happens when you bump into an orc raiding party before you are ready.

After assembling all the men and equipment I could afford with my starting funds, I returned to our previous employer who sent the company after those bandits in the first place. He would pay good money to have the bandit leader killed once and for all, and knew where the scumbag was hiding.

My rag-tag band tracked the bandits to their camp and moved in for battle. The ensuing chaos was almost too much for my untrained soldiers, but with superior numbers we were able to overwhelm the bandits and take out the leader. Sadly, he was able to cut down one of the original members of the company in the melee. Another man, the beggar from the village, was wounded so badly that he would never be the same with a sword or spear, but I still needed him in my fighting line until I could hire a replacement. Regardless, victory was ours, as well as the loot and payment that came with it. With these new funds I was able to hire and equip a couple of new men. I also treated the company to a round of drinks at the tavern to lift their spirits.

We were still a pitiful looking rabble, but we were able to find work escorting a convoy on a journey that would take a few days. I negotiated with the caravan master for some funds up front, and used that restock our food and medicine supplies. Along the way we were attacked by some roaming highway men, but came out victorious once again, though battered and bloodied by the fighting. After reaching our destination and getting paid, I decided to let the men rest for a couple of days. I also picked up a few more pieces of gear, including some real armor. Well, leather armor. Chainmail and plate was far beyond our current budget. 


The world map of Battle Brothers will be familiar to anyone who has played Mount and Blade.

Once everyone was healed up, we took another contract escorting a caravan back towards where we started out. This time there were no bandits. We were still paid in full, despite only marching for a few days. Now that's my kind of work. This pattern continued for a couple of weeks. Escorting caravans and tracking down thieves. Despite humble beginnings, my company was starting to come together. Most of the soldiers now had real weapons and armor, and some were becoming much more proficient at combat. I had also lost a couple of soldiers here and there, but each town along the road had its share of desperate men looking to join for one reason or another. Overall, things were looking good. My over-confidence would be my downfall.

Having gained a small reputation, we were offered a lucrative contract by a local lord. He wished us to go on a lengthy patrol of the roads to several nearby towns. We would be paid a moderate amount for this, but, more importantly, would also be paid a bonus for each bandit head taken along the way. The men buzzed at the thought of slaying every bandit we could find along the roads. 

The first leg of the patrol was uneventful. Not a bandit in sight. Myself and the men were disappointed. Our payday would hardly cover our travel expenses if the rest of the patrol went like this. Little did we know we were about to walk into the hornet's nest.

Our maps showed most of the surrounding area, but one uncharted region lay between us and our next destination. No matter, we were a company of killers at this point, and no bandit mob would be able to take us. Venturing into the unknown, we finally stumbled across some bandits. It was a small group, no match for the dozen men now under my command. We struck them down and moved on, looking for more victims. Another group appeared, slightly larger than the last. We fought a good fight and wiped them out, suffering only a few injuries. The men were giddy at the thought of the ever growing payment we would receive in a few days.

Yet another group of bandits appeared, just a handful, and we swooped in. To our shock, these bandits were not the usual mangy lot, they were real fighters and carried real weapons. This proved a tough fight, despite our 2:1 advantage in numbers. A couple of my men fell in the fighting, and more were wounded. We survived though, and could carry on. A little further and we would be out of this wild area. Then we saw it. An abandoned fortress turned into a bandit stronghold. That must have been where all the bandits were coming from. The lord who hired us would want to know about this.

Just before we cleared the uncharted area and made it to safety, another bandit party found us. This one was almost as large as our force, and was as well equipped as the last group we fought. We had to run, contract or not. Unfortunately, we could not run fast enough. The group caught us and surrounded my company in a forest. Attacked from all sides and hemmed in by trees, the men were unable to support one another. They fought valiantly, but were cut down one by one. In the end, every man on each side was dead or dying, save two. The last surviving member of my original company was still standing, a crossbowman who had saved the day more than once. With his last crossbow bolt he had cut down an axe-wielding bandit, but his luck ran out as another bandit rushed forward through the mangled corpses. My soldier pulled out his knife, all he had left to fight with, and stabbed uselessly at his well armored foe. Seconds later he was slain. My mercenary company was completely wiped out, just like that.


Battle Brothers promises to be one of the best strategy games coming out this year. It's got a bit of RPG, a bit of team management, and lot of tactical combat. The full game promises to have world shaping events and quests for your mercenary company to participate in, but the game is already a massive success in my eyes simply based on the core mechanics. It very much captures that feeling of freedom and choice that you get in Mount and Blade. Traveling around from village to village, recruiting men, buying equipment and supplies, ultimately creating a deadly fighting force. Except here it's done even better. Every soldier has a back story and individual stats, as well as special traits. Almost everything in the game uses procedural generation, but it doesn't feel like it.

I did not know very much about this game going in, having simply not seen it mentioned anywhere. However, I was completely blown away by my initial experiences. The game is still in early access, but is completely playable and feels very polished. Once it comes out the price will go up, so if you think you would like it at all I seriously recommend picking it up now.

Look for my full review in the next few weeks!

- Joe Beard

Follow us on Twitter @_AWNT_


Vikings At War By Kim Hjardar  and Vegard Vike  What a cast Viking history has: Ragnar, Ivar the Boneless, Cnut, Harold...

Vikings At War by Kim Hjardar and Vegard Vike Vikings At War by Kim Hjardar and Vegard Vike

For your Wargamer, Toy soldier collector, MiniFig collector, military history nut. Reviews, interviews, Model Making, AARs and books!


By

Kim Hjardar  and Vegard Vike


 What a cast Viking history has: Ragnar, Ivar the Boneless, Cnut, Harold Hardrada, Eric the Red, and his son Leif, Olav Tryggvason. Let us also not forget Snorri Sturluson without whom we would know next to nothing of the Norseman history and culture.

 This book is easily the best  book on Viking history I have ever read. To qualify that, just look at my last name, and the fact that my father tried to name me Olaf. It purports to be a book about Vikings at war, but it is really so much more than that. It is really a book of this, and of Viking history. It is a history of not only the Vikings in northern Europe, but of everywhere the Vikings went, and it also goes deeply into  the actual facts of Viking warfare. It has lists of all all of the Viking rulers and kings from Ireland to Russia. The book itself is a large 'coffee table' book that has on almost every page an illustration, map, or inset on some important person or weapon etc. This book escapes the deficit that most books on Vikings have about only talking about the Vikings in Britain, Ireland, and France. 

 This book shows the history of the Vikings in the following: Spain, Ireland, Britain, Russia, and the Mediterranean. Most people would be surprised that the actual word Russia comes from a Viking ruler called Rus. The Vikings even had the temerity to attack right up to the gates of Constantinople, one of the largest and most fortified cities on the globe. Their ferocity in battle gained them a place of honor in the Byzantine emperors' Varangian (a word for Viking) guard. Harold Hardrada, the king of Norway, who led one of the Viking invasions of Britain in 1066 was a member of the guard in his youth.

 Don't think that the book's primary focus has been short changed. It is also a compendium of Viking weapons, strategy, and tactics. Separate chapters go into axes, spears, swords, and armor.

 Viking seafaring has not been left out either. The authors explain how the Vikings actually got to the far flung lands they visited. Their different ship types and how they were sailed are also delved into.

The Oseberg longship


 The authors should be proud. The book brings to life the Viking age, but also brings to life some of its main characters. Maybe with this book we can finally put to rest all of the silliness of horned helmets. Wearing one while wielding an axe or sword would be near impossible. 

 The tale of Harold Sigurdsson, nicknamed Hardrada (hard counsel), is one of my favorites. His escape from Norway as a child, to his battles as part of the Byzantine army, and then his return to Norway to become king til his death at Stamford bridge is the stuff of legends.

 Their bravery on land is not to be questioned. However, it was their bravery at sea that is still more astounding. To take to the North Sea in their longships would have seemed to many others as pure madness. At a time when ships hugged the coast and put in every night for safety, the Vikings were sailing right in the middle of some of the roughest seas known to man.


Robert


Sovereignty: Crown of Kings, published by Slitherine and developed by The Lordz Game Studio, is an interesting new take on the grand s...

Sovereignty: Crown of Kings Sovereignty: Crown of Kings

For your Wargamer, Toy soldier collector, MiniFig collector, military history nut. Reviews, interviews, Model Making, AARs and books!


Sovereignty: Crown of Kings, published by Slitherine and developed by The Lordz Game Studio, is an interesting new take on the grand strategy genre. If a fantasy version of Europa Universalis with hex-and-counter tactical combat sounds like something you might enjoy, come see what this title has to offer. 

Sovereignty is a fascinating mix of ideas that I have not seen put together quite this way in any other game out there. The game takes place in a well developed fantasy world where 35(!) unique realms are available for the player to choose from. You take the lead of one of these realms and attempt to achieve a specific set of objectives. Your options as leader include engaging in diplomacy, managing the economy, developing spells, and of course building armies and taking them to the battlefield. I'll explore all of these in detail separately later.


Sovereignty takes place in a detailed and complex fantasy world.

The first thing you will realize when trying to decide on a realm to play is that each one has a fairly detailed back story, and that many of them are interlinked. By reading these different backstories you can get a feel for the world. There are two major human empires rivaling for power in the south, orc realms threatening on the borders, and various flavors of elves that are separated at the start, but can seek reunification. There are also human barbarian tribes in the north, a colony of pirates in the south, and swamp full of undead in the middle. There is certainly something for everyone, and every realm has a different set of goals to pursue.

I found these unique goals to be one of the game's most interesting features. Unlike the open ended gameplay of most other 4X titles, here you begin each campaign with a specific set of objectives to achieve. For example, in my first (disastrous) campaign I played the High Elves of Sonneneve. Their goal is to form a powerful alliance with the other two elven realms, the Wood Elves and Dark Elves. These other elven realms are a fair distance away, have different alignments (realms can be good, evil, or neutral) and if either one is destroyed, you lose. So right out of the gate, I can see that diplomacy will be important for this campaign, as well as having a military force capable of getting me closer to those realms and aiding them in inevitable conflict. If you go play as those other elven realms, your objectives will be similar but distinctly different in one case, and completely different in the other. 

Some of the especially unique victory conditions include searching for clues to a hidden treasure (the aforementioned pirate realm), capturing a bunch of prisoners (the ice realm of the Winter Witch), and taking complete control of the seas (an England-like island realm). There are trade focused campaigns, campaigns focused on specific political rivalries, and of course several that require simple conquest of particular provinces. You can also choose to play each realm with more generic objectives like conquering the entire world, or taking out a particular rival. 

For my second, much more successful, campaign, I decided to be the Germanic barbarian themed Vessoi realm. Now my goal was to control the four "totems" so I could call the Horde to sweep across the land. I also had to ally with two of my northern neighbors. The twist here is that in order to control all of the totems, I would have to attack and conquer land from one of those neighbors, and use diplomacy to cozy up to the other, which was led by the isolationist and kinda spooky Winter Witch.

Once you have settled on a realm to play, the game begins. Gameplay is split between the strategic layer and the tactical combat layer, both being turn based. You spend your time between battles on the strategic layer, purchasing units and buildings, making trades, and moving armies around. When one of your armies encounters an enemy army, the combat takes place on a more detailed map using a hex-grid. 


My soldiers form a line and await the undead hordes.

First, let's talk about the strategic layer. In a world where Europa Universalis IV exists, any game that occupies the same niche is going up against some serious competition. I don't think there is any game development studio out there that is going to top the sort of excessive options and extreme detail found in a Paradox grand strategy game, so I won't fault Sovereignty for coming up short in a direct comparison. It's not that Sovereignty does a bad job of giving you information and options for how to shape your realm, but, overall, it can't help but feel a bit crude in the shadow of Europa Universalis IV. For example, every other realm has a relationship with you ranging from friend to enemy, but why the rating is what it is, and what variables are influencing it, is not readily apparent, compared with EU where you get a detailed breakdown of your relations and how they are changing over time.

Diplomacy and trade in Sovereignty is handled in a manner that will immediately be familiar to any experienced 4X gamer. Deals can be made for resources, gold, treaties, and so on. What makes Sovereignty a bit different is that you are limited by how many "agents" you have available for assignment. Several turns are required to complete trades with realms that are further away, and your agent cannot be used for anything else in that time. Some nations have several agents available and can constantly be wheeling and dealing, while others may have only a single agent to work with. In that case, you must try to make every exchange count, since these agents are also needed for spying and influencing diplomatic relations. I was pleased to find that the AI in Sovereignty was actually willing to make fair deals with me. Too often in other 4X games I don't even bother with negotiations, since the AI usually wants an arm and a leg for even the least valuable resources. Here you can usually expect to make a deal that is both reasonable and beneficial. 

There are about a dozen or more resources like iron, gems, and beer to be found in Sovereignty, and acquiring access to them through trade or conquest is a critical part of the game. Any non-basic unit, and almost all province upgrades, require one or two of these resources to build. The resources are produced by specific provinces scattered across the map, which generate one unit of that resource per turn. This means that the amount of a given resource in the game world at any time is finite, making them quite valuable. 

At the start of the game you will often only have direct access to a couple of the resources, and will need to acquire the others somehow. There are a few ways to do this. Negotiating for a couple units of iron is simple, but inefficient, since you will immediately use them up and need more. Going to war with a neighbor in order to conquer their resource producing provinces could be a lengthy and costly endeavor, but will get you unlimited access to that resource. The third option is something that should have been a great feature in the game, but currently feels incomplete: the stock market. The market lets you sell resources for cash, or buy resources that other realms have sold. The price of the resources is supposed to depend on supply and demand.  Unfortunately, the market didn't seem to work quite like it should in theory. All prices are exactly the same at the start of the game, and in my experience playing they never budged one way or the other. On most of your turns there will only be one resource available to purchase, if any. This should be a lively and interesting part of the game, but in the current iteration it is not.


Besides specific resources, the most important part of your realm's economy is gold. You begin the game with a healthy income, and your primary expenses will be buying new units and paying maintenance on existing ones. There is little reason to stockpile cash on hand, so you will always want to keep your income-expense ratio pretty tight by building the biggest and best army you can afford. You can invest in upgrades to provinces to make them produce more, so you will want to keep that in mind while setting your budget as well. The more income you have, the bigger an army you can field.

Another important money sink is the magic system. Every realm has a set of spells available to them, but these spells must be earned over time by gathering research points. The points can be generated by specific provinces and buildings, and can be purchased each turn in exchange for gold, with the cost per point being different for each realm. Once you have enough points, you can either unlock a new spell, or open up a new tier of spells. This is the closest the game has to a tech tree, and while the options are somewhat limited, the spells available are quite useful. Some give you a strategic layer bonus of some sort, while others can upgrade a specific unit. Higher tier spells can make powerful, and sometimes permanent, changes to provinces and units. I really enjoyed this system, since every realm had a unique array of spells available, and there was always something useful to work towards.

The final way to spend your funds is the most fun, building an army. While diplomacy and trade are features of the game, make no mistake, you will need to have a large army in the field at almost all times. Units are broken down into six categories: infantry, irregulars, archers, cavalry, siege units, and naval units. Within each category you will have usually have two or three choices. The exceptions being naval units, which are not available at all to some realms, and siege units which usually have fewer options when available.


The unit production screen. This dwarven realm has a lot of infantry options, but no cavalry.

Now, you might be thinking that only a couple of options for infantry and cavalry sounds limited, but this is another area where the game offers a ton of variety between its 35 realms. While some units in different realms may share the same art, they all have unique names and stats. In addition to their stats, many units have attributes which further shape their role on the battlefield. Some can move across difficult terrain types with ease, others can resist cavalry charges, some strike fear into enemy units, while others can offer a morale boost to the entire army, or give you a scouting bonus on the strategic map. There are a ton of different attributes in the game, and individual units can even gain more as they survive battles and level up. The armies of most realms have some kind of theme, and these attributes go along with it. The better units require specific resources, as mentioned previously. At the start of the game you have access to all of your possible units, but not the resources needed to build them.

One thing that disappointed me about the units was that they have no accompanying description or flavor text. There is a box for it on the unit purchase screen, but for every unit it is either blank or contains a quote from a real world historical figure like Sun-Tzu or Otto von Bismark. It's a bit odd that these descriptions are absent, since there was clearly a lot of effort put into giving each army a distinct style and interesting units. A user mod on the Steam Workshop is available to rectify this, but I would prefer official descriptions.

In addition to regular units, you can recruit heroes to lead your forces. These heroes do not appear in the battle, but instead give you one-shot abilities that can be used to turn the tide in your favor. As your heroes lead battles, they can level up, at which point you get to choose a new ability for their arsenal. There is a lot of variety in these abilities. Since you can only use each one once per battle, you will want to time it carefully to maximize the effect. This adds an interesting wrinkle or two to each fight, and makes your individual armies feel more distinct, even if they contain the same list of units.

That covers all of the elements of the strategic layer, so let's take a look at what happens when two armies collide. You are first given the option to fight it out manually or auto-resolve. I really liked the auto-resolve feature in Sovereignty compared to games like Total War. Instead of simply clicking and getting a result, here the auto-resolve is broken into three phases, offering you multiple chances to retreat or press the fight. There is also more suspense, as you watch the unit icons smack each other around one at a time until one side retreats or is annihilated.

In most cases though, the best result will be gained by taking direct control of your forces. This option takes you to the tactical battlefield, where all the abilities discussed before come into play as you maneuver units around a hex-based grid depicting the local province. This phase of the game handles much like Panzer General and similar titles, so will be easy to jump into for most strategy gamers. I found this portion of the game to be surprisingly good. It offers a light wargame feel where the unique attributes of your various units really shine. Terrain plays a major role in the battles, and the home team will often have some kind of advantage in this regard. Attacking across a river can be especially tricky. Common sense tactics, like forming a solid line of infantry backed by archers, will give your forces the edge. Cavalry must have flat ground and open attack lanes to fully maximize their charges, which are more powerful the further away they start from the target. Archers can deal a lot of damage at range, but are helpless if melee units reach them. You will want to keep units alive, since they can level up and gain better stats or special abilities. These experienced units can make short work of freshly recruited foes later in the game.

While the early game battles feature mostly standard units slugging it out, the fighting only get more interesting as more exotic options become available. You are limited to four each of your "elite" units, and they can take many turns to build, but once you get them on the field they really light things up. In my Vessoi campaign I was always excited to get my Shapeshifters (think werewolves) into the action, where they made mince meat of most foes. Other higher tier units include dragons, unicorns, walking trees, undead nightmare creatures, and all sorts of other fantasy genre highlights.

The primary downside here is that the AI is not the best. Every battle involves the attacker trying to occupy two or three cities while the defender holds them off for X turns. A human player can often trick the AI into maneuvering its forces poorly, and either seizing the objectives when attacking or distracting the AI long enough to run out the clock when defending. This assuming your forces aren't strong enough to simply crush the AI army in direct battle. That isn't to say I won every battle against the AI, because I certainly got my rear end handed to me a few times.

So, between all of these interesting pieces, how does the whole stack up? For me, the game somewhat remains a diamond in the rough, even after almost two years in early access. There are a lot of things here I really like, and I love the concept of the game. However, it still feels not quite finished in some ways, as I mentioned earlier. There are reports of bugs from other players, and I experienced a few myself. I also found that the UI was at times clunky, with one open window covering another, or not displaying the information I expected it to display as I moused over various parts of the screen.

Despite those issues, I do really like what The Lordz Game Studio is doing here. The game is a one of a kind experience, letting you jump into something like a basic version of Europa Universalis set in a fantasy world of dwarves and orcs and elves. Unlike EU, here you get to take direct control of your forces in battle and lead them to victory or defeat, instead of watching some numbers tick as the invisible dice roll. While there are other fantasy 4X's out there, none offer such a detailed and ready made world to explore. The world of Sovereignty feels like it has history, and the events that unfold during the game add to that story. Every time I started a new campaign I was confronted with a very different set of circumstances, and few games can make that claim. Fewer still can do so while offering thirty-five different choices of nations to lead. Considering the game's very reasonable price of $25, I think anyone interested in a strategy game with a fresh take on things should give it a shot. With a touch more polish and elbow grease, this game could rise above it's current shortcomings and become a great game that stands alone in style and substance.


Joe Beard

Follow us on Twitter @_AWNT_


Sovereignty: Crown of Kings is available directly from Matrix Games/Slitherine, and on Steam.

Zama Hannibal vs Scipio Folio Game  From  Decision Games  Ah, a folio game. I think the first time I purchased and pl...

Zama Hannibal vs Scipio Folio Game From Decision Games Zama Hannibal vs Scipio Folio Game From Decision Games

For your Wargamer, Toy soldier collector, MiniFig collector, military history nut. Reviews, interviews, Model Making, AARs and books!


From 


 Ah, a folio game. I think the first time I purchased and played one was in the mid 1970s. These are usually about one battle, with a small number of counters and a short rule book. That is not to say that the folio games are simple or beer and pretzel games. The folio games are simplified compared to larger board games. The small map and easy to understand rules means that players need not take up too much space for too long.


 The battle of Zama was fought in October of 202 B.C. It would mark the end of the Second Punic War between Rome and Carthage. Hannibal versus Scipio: what else could a wargamer envision? This is one of the few times that military masters have met on the field of battle. The Second Punic War happened because of Hannibal's trek first through northern Spain and then France to invade Italy in 218 B.C. The actual battle of Zama occurred because of Scipio's invasion of the Carthaginian homeland, now in modern Tunisia. One of the reasons that the Carthaginians had run rings around the Romans for most of the war was their use of their allies' (the Numidians) light cavalry. Numidia was one of the few places that the Romans never actually conquered outright. It was to prove a thorn in their side a hundred years later. Scipio was able to get the use of the Numidians at this time under their King Masinissa. The Numidians had switched sides in the war because of Scipio's invasion. After Scipio's invasion of their homeland, Hannibal was recalled from Italy. The stage was set for either Scipio, and his veterans from his conquest of Spain, or Hannibal who had never been defeated in the field to win this final battle of the Second Punic War.


 The game is normal for a folio or magazine wargame. The map is 17"X22", and there are only 100 counters. The rule book starts with the standard rules for the series and then gives you the separate rules for the Zama game itself. The hex scale is 150 yards. The documentation lists playing time as one to two hours. The complexity is listed as low, and the suitability for solitary play is listed as high. I can attest that it is easy to play the game by oneself. Of course almost all board wargames can be played solitaire, although with some you have to fiddle with the rules or actions more than others. 

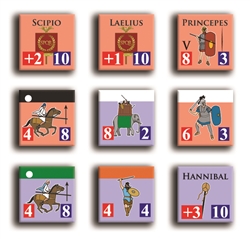
 The counters are also standard fare for these types of games. They seem a bit thinner than I remember, but perfectly useful for their purpose. You will need to cut your small cardboard armies out, and if you are so inclined cut away some of the extra cardboard from some corners. I never felt the need in any game I own, but I know a lot of people also clip the counter corners. To each their own. The graphics on the counters are also fine, but not striking. You can easily see the numbers and read anything written on them without a problem. The Romans and allies have a red background, and the various Carthaginian forces have a purple one. The one point on the counters that is purely subjective is the strength and quality of each unit. The Leader units add a 'strength additive' number to any unit they are with in a hex. In this game Hannibal is given a '3' and Scipio is given a '2'. There are many, although I am not among them, who believe that Scipio was the greatest Roman general ever. I do not have a problem having Hannibal have a higher combat rating than Scipio. This shows the versatility of board games. If you choose you can change the numbers to what you believe is correct. You could even make your own counters and substitute them for what you, or whoever you game with, feel should be more 'correct' numbers. While some computer games have editors that can help with these changes, most don't and you are stuck with developers' ratings on units and leaders.

Game setup


 The game piece setup in this game is again standard for ancient warfare games. Most battles were fought on flat ground, so many times terrain wasn't an issue at all. With Zama, the entire battlefield is made up of 'clear' hexes. The map is marked with where you are supposed to put your counters for each side. There are rules for variable deployment so you can try out different strategies once you get the game rules down pat. Another few rules are in place to make the Carthaginian player follow Hannibal's game plan. One of these is to force your elephants to move, on turn one, into a Roman piece's 'zone of control', or adjacent to a Roman piece. Any elephant counter that does not do this is considered to have run amok and is eliminated. The other rules make it so the different commands of Hannibal's army are released to attack the Romans at different times. So the second and third line of Hannibal's troops can only move once a Roman piece moves to 'X' hex line. Hannibal's plan was to try and tire the Romans out by attacking them in waves. These rules are put in place to show how the actual battle was fought, but again once you are comfortable with the game it is flexible enough for you to use free movement for all of the Carthaginian troops. The Romans have no movement restrictions placed on their troops. There is also another ancient wargame standard, 'the berserk elephant rule'. Elephants were notorious for being both battle winners and losers. If the elephant unit receives a retreat or a hit (1/2) on the combat results table it becomes berserk and immediately charges off in any of six directions, decided by a die throw, and attacks whatever is in its way, friend or foe.

Carthaginian first turn elephant attack


 The command and control rules are meant to simulate the problems of commanding an ancient army in battle. The troops are split into sub-commands for this rule and each sub-command must make a one die roll throw for each movement phase. If they are successful with the die roll, that sub-command can move that turn. There are four sub-commands for the Romans, and five for the Carthaginians. For example, the Roman citizen legions have to roll from a one to a five to be able to move that turn; if they roll a six they are unable to move. This also puts the element of surprise into the game. There is nothing worse that coming up with a great battle plan and then realize you cannot follow it because your troops are not in control this turn. The game uses another old friend to compute losers and winners in attacks: the 'combat result table'. By simply adding up the attackers points and the defenders, while adding or subtracting for leaders etc., you divide the numbers and come up with a number for the odds of the combat. If you have 8 attacking points and  4 defending, the odds would be 2-1. You check the 'combat results table' on the equivalent column and then roll one die. The one to six result is then taken on the counters. I know most of us are old hats at this, but we need new blood in the hobby. We as grogs are getting older by the day. These folio games are perfect in their complexity, price, and size to attract new players to our hobby. We don't want them running away by pulling out an old 'Europa' game first off.

 The game play is quick and tight, and the rules are not going to have you scratching your head. For us old players it is a trip down memory lane with a well conceived old friend. For anyone that is looking to get their feet wet into board wargames it is also highly recommended. There are many eras and wars that fall through the cracks of computer wargaming, so it is lucky for us that there are still companies like Decision Games making board ones. if you missed it, board wargaming has been having a resurgence lately, and that is also good news.

 There is one point about the Carthaginian setup that I had Decision Games answer a question of mine with it. On the map there are three Carthaginian setup hexes for cavalry on both sides of their infantry setup, but the game comes with only four Carthaginian cavalry counters. As I assumed, you just use two cavalry units per setup area.


Robert


Developer: Decision Games 
Date of Review: 1/24/2017
hpssims.com