second chance games

Search This Website of delight

BARBARIANS: THE INVASION from TABULA GAMES In essence, a worker placement and resource management game.  Just that your workers a...

BARBARIANS: THE INVASION BARBARIANS: THE INVASION

For your Wargamer, Toy soldier collector, MiniFig collector, military history nut. Reviews, interviews, Model Making, AARs and books!

BARBARIANS: THE INVASION

from


In essence, a worker placement and resource management game.  Just that your workers are barbarian champions and Domination Points are your "rose by any other name" i.e. Victory Points.  One avenue to gain them is by conquering lands in the world of Fenian - not quite sure what Irish gamers will make of that choice of name.  Still, as a student of W.B.Yeats' poem The Wanderings of Oisin and the stories of  Cuchulain and the mythos of the Red Branch Cycle, this world of warchiefs and gods & goddesses fits perfectly into the images presented in Barbarians: The Invasion.  However, on a more accessible note, just by glancing at the box art seen above, I'm sure most of you will immediately associate the theme and art work with the character created by Robert E. Howard, namely Conan the Barbarian. 

In fact, the whole physical creation of this game impacts immensely to the benefit of this product in so many ways, but for one feature and that is directly linked to my reference to Conan the Barbarian.  The card art and wonderful array of miniatures  strongly echoes the graphics so familiar both in the many books of Conan's adventures and even more so the films of Arnold Swarzenegger.  Bulging muscled warriors and berserkers and scantily clad female warriors and goddesses. 

It is the latter that has drawn disapproval from some gamers and may influence ultimately your own choice of this game.  In total we're talking almost exclusively about seven cards out of a vast array and several miniatures in each players set of figures.  Sensibilities may have changed in recent years, but nothing here seems out of line with images from computer games/comic book heroes and the current appetite for their T.V and cinematic interpretations .

What is unquestionable is that in total this is an awesome product and project.  Admittedly I have been fortunate to receive the Iron level Kickstarter package to review.  From the start I had followed the progress of this game and been amazed by what I'd seen and read. For many months, both the games I've received for review and those I've bought myself reflect the quality of modern production and each seemed to lift the bar ever higher. Barbarians: The Invasion has certainly pushed that bar up several more notches. 

On lifting up the lid, I was bowled over - another cornucopia, as item after item was lifted from the box!  How did so much  get crammed in here and you'll certainly find it's not easy to packing it all back.  For a start, I've abandoned the insert.  
This is just the top level containing the miniatures and the decks of cards.  Below lies the item which has caused the most excitement from the very beginning - the volcano!
This brings the concept of the rondel to new heights - in this case literally, as you will see in later shots, because it is a 3D plastic construct with three levels that can be rotated both clockwise and anti-clockwise.  Sitting snugly at each level are the thick cardstock  inserts on which your Barbarian "meeples" will be placed each turn. 

Below them lay the individual player boards on which you will track your five inert resources: food, wood, iron. stone and gold and your human troop resources: archers, berserkers and raiders.
Lurking beneath the player boards, you can just about see one of three map boards of Fenian; the basic board, plus two alternative map boards.  Below is a close look at two of the boards you can choose to play on.
On the right is the basic game's portrait-oriented board, on its reverse is a landscape oriented alternative board that focuses on the northern regions and to the left in the picture above is the other alternative board.  Copies of the rule book come in four different language booklets, besides English.  Initially I was overwhelmed by the sheer scope and multiplicity of pieces - you will need a fairly substantial amount of room to lay everything out, but my standard dining-room table has proved well able to host the full four-player game.
This demonstrates the full panoply of contents that will be on your game table, though not set up quite as it would be for actual play. [Notice - one of the figures in my picture was about to find that this barbarian world is flat and you can fall off the edge!]

Nor are the rules as complex as at first they may seem to be.  The core is the Action Phase when each player in turn places one of his three "workers" - Barbarian Champions - to gain resources, buy cards and, of course, go to war. The first Phase, Maintenance, couldn't be simpler, simply collect the requisite resources from as many building cards as you have the ability to use.  The final, appropriately named, End Phase is equally straightforward as you choose those benefits/avoid penalties that you can afford to pay for.

The rule book itself I found clear and well organised with the mechanics easy to understand, but initially there have been some uncertainties and contradictory interpretations.  Largely, this was because of the strong dependence on a profusion of symbols both on the game board and on the cards.  Intended to help language independence, they would have benefited immensely from a fuller play aid than the back of the rule book provides.  

M
astering and remembering the many symbols needed to understand the actions, along with the interplay between the various boards and tracks may seem daunting on an initial explanation.   Frankly, after a couple of plays I found that this all falls into place and becomes easy to remember. 

What remains slightly more difficult is the use of colour in the production.  It certainly adds to the dark image of a mythic barbarian world, but it can make it a strain being able to see clearly the multitude of icons on the volcano that tell you what action you have chosen.  This is not a game to be played in poor lighting!  By contrast the alternate side to the rings on the volcano which is used with the Hunt Expansion is much more readable.


A closer look at the main board with the volcano in place

Equally, the similarity in colour between the backs of the various terrain cards has caused problems.  I hasten to add that none of these are insurmountable issues: printing a simple play mat for the terrain cards with the location and colour printed on needed just a few minutes spent on the computer and I've found that, after a few plays, recognising the icons on the volcano becomes much easier.

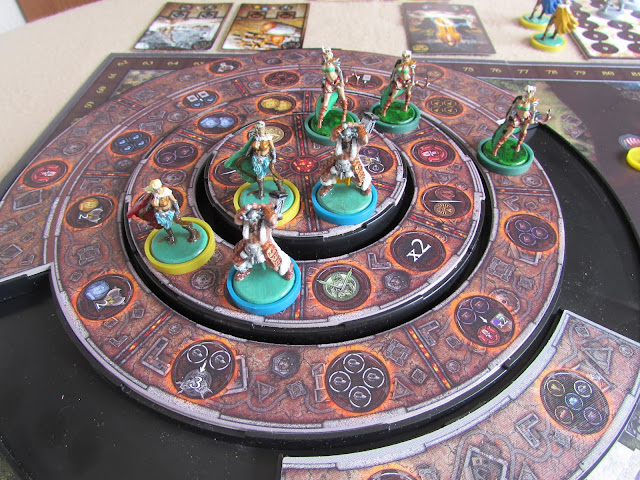
Leading the many substantial qualities of the package is first and foremost the volcano which is at the heart of the game and the focus for your Actions.  Placing your first Champions on the topmost ring and then descending step by step with each subsequent Champion is quite unlike any other game I've experienced. 
The 3rd Era has just begun

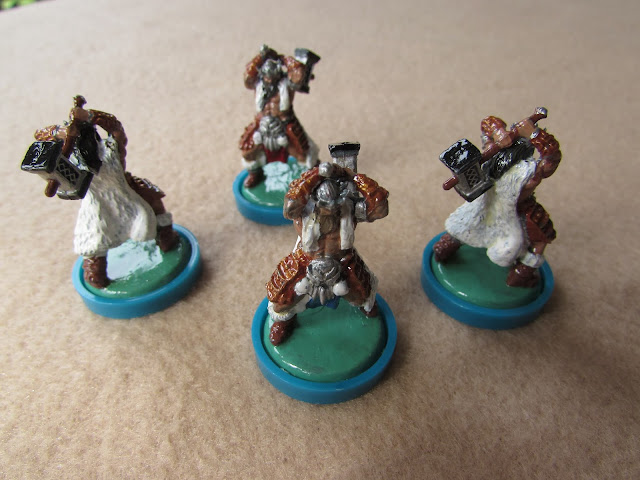
Do not be deceived by anyone who claims that a set of little wooden meeples and cubes of wood for marking your resources is all that's needed.  I say that as a gamer who is largely indifferent to bling and what in so many games is often a tacked-on theme.  In Barbarians: The Invasion the theme is reinforced by every aspect of the game and the sight of the barbarian miniatures as they start to throng the volcano is part of the strong visual pleasure and experience.  Even more so when you've invested some time in painting the miniatures, as subsequent pictures, like the next one, will reveal.

There is a vibrant richness to all the elements which  is strongly emphasised when all the cards are laid out for use, as again you can see from the photo taken from one of my four-player games at a recent convention.  It's worth noting that even including the explanation needed for three players who'd never played before everything was finished in just on three hours.

Game play is engrossing with the interaction of so many branching elements.  Everything begins with the all important choice of actions on the volcano.  These may lead directly to gaining the resources with which you can buy troops when taking the War Action on the map of Fenian or pay for the Warchief and God cards that supplement and aid various aspects of the game. 

Other actions help your personal markers advance on one of eight tracks [four Barbarian Tactics tracks and four Barbarian Knowledge tracks ].  The former reduce the number of battles you have to fight when trying to conquer one of the regions on the map and the latter support a range of benefits including your resource collecting, defence against the penalties of a lost battle, the ability to use from 1 to 4 buildings and how far out into the island worlds of Fenian you can voyage.
Another glimpse of the volcano,
with the Knowledge & Tactics Tracks to its right 
These are just some of the many diverse aspects that add both to the originality and the way the game draws you in and keeps your attention.  I particularly like the range of small, additional benefits and bonuses that accrue in many different ways, such as: some of the actions on the volcano, being first or second to reach the end of one of the eight tracks just discussed and especially through the bonuses granted by the Warrior and God cards. 

However, I'm sure that for many it is the fighting of battles that stands out and here this game has come up with a set of highly original concepts. First of all, you will be trying to conquer territory in the islands that make up the realm of Fenian.  At the beginning of the game, each region will have a random counter placed face-down and then all are revealed showing the colour of one of the four clans and its Domination value [i.e. VP value].
In a 3-player game, some of the regions have already been conquered as indicated by the players' individual banners.

To conquer the territory and place your faction's banner there, you will face a war made up of a number of battles. How many battles you have to fight will depend on how far a player has advanced on the Tactics track of the attacked clan [the maximum is 6 the minimum is 2].  Each battle is determined by drawing a card from the terrain deck corresponding to the region you are attacking.  To win the war and take control of the region and gain the VPs, you must win half of the battles [rounded up].

Already I hope you can see the originality of ideas and there are more to come.  Each type of terrain card shows which of three types of warrior [archer/berserker/raider] you will have to fight and also which of the three types is most likely to be encountered. Before you reveal any of the cards, you have the opportunity to spend combinations of resources to buy troops for the battle.    
Your player board [seen above] handles all this efficiently and easily.  On the left are the tracks to record your resources and on the right the superb miniatures that track the number of troops of each type that you have. 

Once you've purchased the troops you want, each battle card is turned over one at a time and you decide whether to spend the troops needed to defeat each individual turn of the card.  As you can imagine there is a whole little meta-game involved here.  

Do you take the war action early and face many battles in order to grab high point scoring tokens, but face draining loss of troops and the additional consequences of losing some battles or do you spend actions in the early part of the game to advance your Tactics tokens so that you face fewer battles later in the game.  Do you gamble on buying fewer troops to conserve resources for the many other purposes that they can be used for?  You also need to think about advancing the Knowledge track that allows you to attack more distant islands or the Defence track that helps you avoid the penalty of losing a battle. 

These are just some of the pressures, choices and decisions you face when contemplating the War Action.  At the same time, you have plenty of other decisions crowding in on you. The need to be buying among other things building cards that will give you extra resources in the Maintenance Phase and provide end game bonuses or Warchief and God cards that also give a variety of aids and additional abilities.  Regarding the God cards, there have been some criticisms of their powers being unbalanced and the fact that one is randomly given to each player at game set-up has drawn comments about the detrimental effects on the game.  All I can say is that from a series of 2, 3 and 4 player sessions, none of the players has felt there was any evidence of this problem and, as has been pointed out by other reviewers, a simple house-rule modifying their play or distribution at the start can easily be instituted. 

T
hough conquest and the end game bonuses on the building cards provide the main source of those game winning Domination points, there are many other sources for small incremental gains throughout the game.  These latter should not be overlooked or considered insignificant.  This is a game that rewards attention to the diversity of options and another reason why I rate it so highly.

And don't forget that if you want even more options, you can turn to the Hunt Expansion with new figures and cards or the other two Fenian map boards, whose configuration changes the avenues of conquest. 

All in all, Barbarians: The Invasion provides a multi-layered experience - starting with the variety of combinations and interactions of the effects of placing the players' pieces on the volcano and the ability to rotate levels of the volcano.  This is deepened by the interplay of using the many cards that can be bought and then crowned by the fascinating mechanics of the War Action.

It is a game that plays equally well with two, three and four players - a rare factor in many games.  Though I like to get in the full complement of players if possible, every two-player confrontation has been a real duel!  And finally, you can enjoy an equally riveting solo play. 

Personally, this is a game that has had and will continue to get many plays.  At conventions where I've introduced it, merely setting it up has drawn eager players and claimed the attention of a steady stream of passers keen to know more.  Another "keeper" in my collection and to entice you I'll end with just a few more pictures of the painted miniatures.  Good slaying!


The production line starts here!

The banners of conquest control.

Resource Markers

The Champions of the Green Player

The Champions of the Blue Player

Many thanks to Tabula Games, the indie games design studio, for the review copy.   This is a name to look out for.


What do your hear? Nothing but the rain! Good news for fans of Battlestar Galactica Deadlock, a new DLC has been announced for rel...

New DLC Announced for Battlestar Galactica Deadlock: The Broken Alliance New DLC Announced for Battlestar Galactica Deadlock: The Broken Alliance

For your Wargamer, Toy soldier collector, MiniFig collector, military history nut. Reviews, interviews, Model Making, AARs and books!


What do your hear? Nothing but the rain!


Good news for fans of Battlestar Galactica Deadlock, a new DLC has been announced for release in the near future! The Broken Alliance will add several new ships to the mix, and integrate new missions and a new subplot directly into the existing campaign structure. Here's the official description:

Tensions are rising during the First Cylon War.
Anti-Caprican sentiment threatens the Quorum alliance. Discontent and pessimism spreads throughout the colonies. While politicians and diplomats frantically negotiate to keep the alliance together, Colonial Fleet receives a strange request from Aquaria. It’s the start of a chain of events that could change the tide of the war…

New Quorum campaign

“The Broken Alliance” presents players with 8 new story missions that are integrated seamlessly into the single player campaign, and linked together into a brand new plot that explores the intricate maze of Colonial politics. New characters enter the fray, disrupting old pacts and forging new partnerships. The Broken Alliance expands the lore of the Battlestar Galactica universe, and brings a new story of intrigue and backstabbing to Deadlock.

New ships

The expansion comes with four brand new capital ships and two new squadrons, bringing new functionality and tactics to the First Cylon War.

Minerva-class Battlestar – The precursor of the Mercury-class Battlestar, the Minerva is a new addition to Colonial Fleet that concentrates artillery, firepower and life support into a compact hull. Although it has less staying power than other battlestar classes, the Minerva’s versatile gun placements and expanded missile capabilities have provided it with a reputation as a devastating capital destroyer.
Celestra-class resupply ship - The Celestra class is a Colonial research ship that uses a suite of drones to apply ablative armour plating to friendly units. A resupply depot has been retrofitted into the hangar, allowing Raptor crews to make supply runs mid-mission to fleet cruisers and battlestars.
Assault Raptors – Assault Raptors are an aggressive variant of the trusted Colonial utility vehicle. The external rocket pods on these ships are capable of significant anti-capital support, and the crews are trained in live combat support, at the expense of their usual ECM suites.

Argos-class Basestar - As Colonials continue to push fighter space supremacy as a force in the war, the Cylons continue to reply with their intent to overwhelm with numbers. Larger than the Cerberus and Basestar Mk I, the Argos contains an overwhelming array of hangars and missile tubes, but hosts little in the way of self-defense.
Hydra-class resupply ship - The Hydra is a Cylon resupply ship equipped with repair drones that are launched and attached to friendly units. Despite having no armaments of its own, the Hydra has a complex Fire Control system that is heavily integrated with its Tech Bay. This system allows it to coordinate missile strikes with nearby friendly units, significantly increasing the efficiency of the Cylon’s deadly missile tactics.
Scorpion Sentry – The Scorpion is a defensive sentry drone with high calibre guns and pin-point accurate anti-missile capabilities. Although they excel at area control, they are unable to operate until they have been stabilized after moving.


I'm personally very excited to get a chance to cover this DLC. I'm a huge BSG fan and always enjoyed the political infighting just as much as the space battles. I started a fresh campaign to experience how the DLC fits into the game, and as you can see in the above screenshot, I've just reached the point where the new story line begins. Expect more coverage soon!

- Joe Beard


Against The Odds magazine #42 With The Game: A Thunder Upon The Land: The Battles of Narva and Poltava   This will be a...

Against The Odds Magazine Issue #42 With The Game: A Thunder Upon The Land: The Battles of Narva and poltava Against The Odds Magazine Issue #42 With The Game: A Thunder Upon The Land: The Battles of Narva and poltava

For your Wargamer, Toy soldier collector, MiniFig collector, military history nut. Reviews, interviews, Model Making, AARs and books!


The Battles of Narva and Poltava


 This will be a two part review. the first part will be about the magazine itself, and the second part will be about the game 'A Thunder Upon The Land'. 

 I love food, a picture would prove it. However, if given a choice between reading and eating, food for the mind or soul wins every time. Wargaming magazines have been around for about fifty years or so. They have usually been filled with pretty pictures, but we really do read them for the articles. To think of Jim Dunnigan wandering about in his pajamas and a pipe in his mouth is a bit disconcerting. He is, however, our Hefner (I know S&T started earlier, but it really took off under him). 


 This is my first Against The Odds magazine. I have to save I am mightily impressed. Physically, the magazine is impressive. The maps are especially well done and extremely informative. I have been reading about Charles XII of Sweden for fifty years, so I was very surprised to find new information about him in the background article. I learned that unfortunately Charles XII was an object of hero worship by the Third Reich. The other articles are just as well done as the article about the game history. This will not be my last copy of ATO by a long shot, and I can recommend it to any wargamer.


 Magazine wargames have always gotten a bad rap for some reason. I have never understood why. Some of my favorite games, and gaming moments, have come from them. The rules of this game are sixteen pages long. Physically, they are of the same high quality as the rest of the magazine. One excellent part of the rules is that you can take out the two middle pages of the magazine and have a players aid sheet for both players. There are actually two separate tactical games included. One is the Battle of Narva in 1700, and the other is Poltava in 1709. The map is two sided and is large at 22" x 34". I can say it is one of the best magazine maps I have ever seen. The colors and drawings are extremely well done. The counter colors are vibrant, and they are easy to read. The counter attachment to the cardboard sprues and the left over cardboard on the counters is the only thing about the game that is middle of the road.  


 Narva is either looked at as a master stroke, or the luck of a madman. Poltava is described as a bad piece of luck, or the comeuppance that Charles XII deserved. I believe that Poltava could very well have turned out differently had Charles not been wounded before the battle. Charles had the very bad luck not to have been killed by the bullet that shattered his foot. If he had been killed, his unbroken string of victories would be looked at differently, and Poltava would have been blamed on others.


 The Russian Army that you either command or fight with in Narva is nowhere near the Russian Army of Poltava. So the game shows the progress of the Russian military through the years of the Great Northern War.


 Tsar Peter I was very busy in his reign. He almost single handedly pulled Russia from the Middle Ages to the eighteenth century. he did this by literally pulling his nobles by their beards as they were kicking and screaming. 

 The game sequence is as follows:

Initiative Determination phase (on turn one of both games, this is by default the Swedish player)

Activation Phase
  Command Activation Segment
  Out-of-Command units Segment

End Phase
 Replacement Segment
 Recovery Segment
 Victory Determination Segment

 The game comes with zone of control, facing, and command rules. Morale and disruption also play a big factor. These are pretty much what you would expect in a tactical wargame of the early eighteenth century. 


Narva Map


 The player with the initiative uses an AM (Activation Marker) to activate units that have a LOC (Line of Command) to its command leader. This LOC has to be four hexes long, counting the units hex, but not the leaders one. The rest of the AMs are put into a container to be pulled randomly. There is also a 'High Command' AM that is available to each side in the Battle of Narva scenario, but only on the Swedish side at Poltava. This will allow certain listed units to activate once more even though they may have done so with their normal activation marker. In the replacement phase, a unit that does not move or take any other action and is within command range of certain command units, allows the unit to be flipped back to its original strength. The recovery segment is where units that are disrupted or routed can attempt by die roll to rally. Victory is determined by capturing certain hexes, or by unit step loss or leader elimination. 


Poltava Map


 The game has rules for cavalry charges and counter charges. Infantry charges, a Swedish favorite, are also represented in the game. One rule that sticks out is that infantry can form square. From my reading, I believe that historians are still arguing about when the infantry square came into being, so I was a bit surprised about the rule. The game also comes with many optional rules. You can add volley fire to the mix and use it to increase your chances on combat results. There is also a 'Swedish Desperation' optional rule. If the Swedish player has the initiative and is losing the game, he can make a die roll on the 'Desperation Attack Table'. This will show you how many desperate attacks the Swedes can make that turn. One unit in an attack has its attack factor doubled for the attack, but suffers disruption immediately after it. One optional rule that is not really represented is having Charles XII not wounded at the time of Poltava. There is an optional rule to have him appear in the Poltava battle but he does not turn up until turn four. Charles was actually dragged around the battle in a litter, but was not really able to influence the outcome at all. The Swedes saw him as a good luck charm. His military skill and Swedish morale could very well have turned the tide at Poltava.

 The rules for the most part are easy to read and understand. The designer Paul Rohrbaugh has been very helpful to people with rule questions on BGG. 

 The games play out much like in history. At Narva the Swedes attacked in a snow storm, and they were not even supposed to be near the Russians. Charles broke most of the rules of warfare at the time, and in doing so won a spectacular victory. On the other hand, the Russian Army at Narva is brittle and the rules for that scenario help to make it a historical battle. Poltava is thought by some to be completely unwinnable by the Swedes according to most historians. As the Swedish commander, you have to fight through a line of redoubts and then actually attack a fortified Russian camp; and did I mention the Russians have plenty of artillery? Even with Charles able to conduct the battle, it is a very hard task. Under the historical conditions with both Swedish commanders hating each other it is almost impossible. I like these two games. One of the big reasons is that the designer did not fiddle with history to make it more 'gamey', and to give each side a level playing field. The optional rules, if you choose to use them, do add a little more historical flair to the games, but also make it a bit easier at times on both sides. 


 Unfortunately, the battles of Charles XII and his generals have not really been made into too many games. The most produced game of this war is usually Poltava. I will admit that being of Swedish descent I have always had a love and hate relationship with the battle. For the longest time it was the only battle that you could game, but the situation is a desperate Swedish attack into Russian field works with really no other option. With the Battle of Narva, the Swedes can decide exactly where and when they will attack. The treatment of both battles in this game are first rate, and anyone who is interested in the time period should check them out.

 
Robert


German Heavy Fighting Vehicles of the Second World War by Kenneth W. Estes  This book is only about the German heav...

German Heavy Fighting Vehicles of The Second World War by Kenneth W. Estes German Heavy Fighting Vehicles of The Second World War by Kenneth W. Estes

For your Wargamer, Toy soldier collector, MiniFig collector, military history nut. Reviews, interviews, Model Making, AARs and books!


by


 This book is only about the German heavy fighting vehicles that were actually built to some degree. This book does not include the Third Reich's flights of fantasy, or designs that were still on drawing boards. From The Tiger I to the E-100 these vehicles were either used in battle or at least had a hull manufactured.

 The book starts with German tank development from 1918-1939. Then there is a small chapter on the German heavy tank program in general.

 The next part of the book has separate chapters on the various types of heavy fighting vehicles, from the Tiger I to the Sturmmorser Tiger (Sturmtiger). It then continues with a history of the numerous German heavy tank, or antitank, units in the war. The middle of the book is filled with sixteen pages of colored photos, most of them of the inside of a Tiger II.

 The most interesting part of the book are the five appendices. These are either US or British evaluations of German heavy tanks, or interrogations of German engineering doctors involved in the production of them. In the epilogue, there is a list of all the remaining German heavy fighting vehicles that can be seen, and what museum they are in. The small amount of them remaining means that few of us will be able to see any of them in person.

 One of the recurring themes of the book is the detrimental effect Dr. Ferdinand Porsche had on the German heavy vehicles program. His interjections into most of the programs seem to be a Godsend to the Allies. From what the book shows, he should have stuck with Volkswagens and race cars.

 The author also shows us that the hurried nature of the development of these behemoths led to tons of teething troubles. We are also shown how the actual engine development lagged far behind the rest of the parts of these vehicles. The engines and transmissions of these large tanks and tank destroyers were always their Achilles heel.

 This is a well written book for the military reader to see the inner workings of German engineering and back story to the development of these vehicles.

Robert

Publisher: Fonthill Media
Distributor: Casemate Publishers

War of The Rats: Stalingrad by  Russ Schulke of 626 Designs LLC  "War of the Rats: Stalingrad” NEWS We recentl...

War of The Rats: Stalingrad by Russ Schulke of 626 Designs LLC War of The Rats: Stalingrad by Russ Schulke of 626 Designs LLC

For your Wargamer, Toy soldier collector, MiniFig collector, military history nut. Reviews, interviews, Model Making, AARs and books!

War of The Rats: Stalingrad


by


 Russ Schulke of 626 Designs LLC 


"War of the Rats: Stalingrad” NEWS

We recently touch bases with Russ Schulke of 626 Designs, LLC and asked about the status War of the Rats: Stalingrad boardgame.

“It has been a busy year; most of this time has been directed to updating the new game to meet the parameters of the boardgame section of the U.S. Copyright Office.

Last winter, a few members of the Winterfest Wargamers club playtested the airwar and the Volga Flotilla components of the game. The playtesting went well, and clearly showed the conceptual charting results and the reality of the actual gameplay, changes were made.

Last month, I purchased the rights to the game box artwork from the Mary Evans Picture Library. This artwork was first published in the Illustrated London News, 23 October 1942.

Last week, Greg S. (1990, University of Cambridge) joined the team and will be the lead proofer (quality control) for the map, scenario sheets, charts, and tables. Hopefully, his Queen’s English will come in handy.

A formal webpage should be up mid-summer and right now I am still assessing the P500 (Pledge 500) or Kickstarter route to release the game"
 

 Box Artwork


Game map: 3 sheets 35"x 60" (Total size 102" x 60") 1" overlap per map. The map folds are strategically placed, and each sheet can be folded to the minimal size for most scenario requirements. Alternatively, you can back-fold and add a few more maps printed charts. The game comes with a complete set of hand-held aids, charts, and tables. This project was created with AutoCAD (85%) and Photoshop (15%).


Game map: Game Scale: Company/Platoon  Hex scale: 300 meters  


Game map: The game map was created from 1942 German reconnaissance maps tied to GPS. 220,000 buildings and factories represented, the digitizing and colorization took about five months total.  


River crossing tracker: Units of the Volga Flotilla are preparing to cross the Volga River. 


Day tracker (morning/afternoon/night), weather and river ice tracker.


 Thank you Russ, for the update on what is shaping up to be a great game about Stalingrad. 

Waterloo The Truth at Last Why Napoleon Lost The Great Battle  by Paul L. Dawson   To merde or not t...

Watrloo The Truth at Last by Paul L. Dawson Watrloo The Truth at Last by Paul L. Dawson

For your Wargamer, Toy soldier collector, MiniFig collector, military history nut. Reviews, interviews, Model Making, AARs and books!

by


  To merde or not to merde, that is the question. Did General Cambronne say it, or did he utter "The Guard dies but never surrenders", or was he as this book says lying unconscious on the ground? 

 This book is large at roughly 500 pages, and it is jam packed with first person accounts of the battle. What makes this book different from so many others is that these accounts do not gel at all with the history as we have been told until now. We have been taught through word and screen that the Old Guard was destroyed by English troops. The author shows more than just a few accounts that say the Old Guard was actually destroyed by the Prussians. Another 'myth' the book tries to do away with is why the French attack was so delayed. We have been taught it was because of the condition of the ground that morning. There are many accounts and the author shows us that the French were just not ready to attack early. The author also questions if this army was one of the better ones that Napoleon commanded. This has been put forth in many written accounts of the battle.

 Mr. Dawson backs up his assertions with a lot, and I mean a lot, of facts and figures. The book can stand on all of the points the author shows that can be backed up by figures etc. The only problem with these first hand accounts is what if they are not correct, or are remembered incorrectly? 

 This book is one that everyone should have in their library, whether they agree with all of its findings or not. It is good to have a book that makes us question what we have believed in for the past two hundred years. The only thing I can fault the book for is a total absence of maps. A map to show where the author believes the Old Guard was destroyed/surrendered would have helped the reader to understand what exactly, and how much, the author was trying to correct the historical record. Even with the lack of maps, it is still a great book for a reader to ponder over. Do yourself a favor and read the author's other books on the campaign.

Robert

Book: Waterloo: The Truth at Last
Author: Paul L. Dawson
Publisher: Frontline Books
Distributor: Casemate Publishers


Hitler's Secret Weapons by David Porter  Readers who are looking for a story about the history of the Third Rei...

Hitler's Secret Weapons by David Porter Hitler's Secret Weapons by David Porter

For your Wargamer, Toy soldier collector, MiniFig collector, military history nut. Reviews, interviews, Model Making, AARs and books!


by


 Readers who are looking for a story about the history of the Third Reich's secret weapons should look elsewhere. For those of us who are enthralled by statistics and diagrams, this book is for us. The book does not only dwell on one weapon system, but shows all of the different types manufactured or on the drawing board. The author also starts out by going backwards in history, and shows us a little about the large caliber guns that were German secret weapons in World War I.

 The book takes us through the tanks, jets, and rockets, along with much more, that were used or dreamed up by the German engineers in the Second World War. There are tidbits of information on every page. Did you know that a Panzerkampfwagen IV, and Panther cost about the same to make as a Sherman tank? The same chart shows that a Tiger I or II cost roughly three times more than the aforementioned tanks. There are also charts that show the monthly production rates for the Tiger I and II tanks. Charts and diagrams that show the different speeds, armor thickness, and gun calibers of some Allied and German tanks are shown. According to the book, an IS2 tank was slower than a Tiger I, and a Churchill VII crawled along at only 15.5 MPH. The Maus is here along with the unbelievably huge land battleships of the 'P Series Land Cruisers'. These had 11" guns the same that were in the Scharnhorst battleship/battle cruiser.

  The book also shows the different railroad guns Germany made, and a chart compares their various muzzle calibers.So the largest gun ever built, the railroad gun Gustav, is here. Its smaller brothers of 'Anzio Annie' fame are shown here also. The author also shows us the state of the art infantry anti-tank and anti-aircraft weapons.

 Each weapon has a small write up about it. The main focus of the book is the charts and diagrams that are liberally shown throughout the volume. Land, Air, and Sea weapons are shown, from the largest battleships ever dreamed of to miniature submarines. From 'Mistel' bombs (a fighter with a bomber attached to the bottom of it filled with explosives) to jets that actually made it off the drawing board and were produced by other countries after the war, this book has them all. So if anyone needs a reference book that has the dimensions of a E100 tank or a H-45 battleship, this is your book.

Robert


Book: Hitler's Secret Weapons
Author: David Porter
Publisher: Amber Books
Distributor: Casemate Publishers

CHARIOTS OF ROME from VICTORY POINT GAMES First there was Circus Maximus [Avalon Hill, 1979], then there was Circus Minimus [20...

CHARIOTS OF ROME CHARIOTS OF ROME

For your Wargamer, Toy soldier collector, MiniFig collector, military history nut. Reviews, interviews, Model Making, AARs and books!

CHARIOTS OF ROME
from
VICTORY POINT GAMES

First there was Circus Maximus [Avalon Hill, 1979], then there was Circus Minimus [2000].  Along the way was Ave Caesar [1989] and very recently Chariot Race [2016].  These are some of the key precursors to Victory Point Games' Chariots of Rome [2018] and, of course, behind them all lies Lew Wallace's novel, Ben Hur, though I suspect that is really only known by most of us from the film, Ben Hur, starring Charlton Heston [please do not mention the remake!].

For me Chariots of Rome is definitely the offspring of Circus Maximus and a cleaner version.  By "cleaner" I'm not talking less blood and violence, but smoother systems, far more accessible rules and the advantage of modern graphics and physical quality.  The board is very similar in shape and concept, but seeing that they're both reproducing the famous hippodrome in Rome that's only to be expected.

The board folds out in three panels and so far, whatever measures I've taken, both end panels become slightly bowed during play.  Despite that, the standees - which you can see in the picture above - sit well on the track and don't slide or topple.  All components are serviceable.  No doubt it would be possible to go down the deluxe route and produce the sort of tank-stopping quality of game board such as seen in Tide of Iron and add in brilliantly sculpted miniature chariots.  But for a fairly light chariot-racing game would you really want to pay the substantially heavier cost?

Unlike the uber chart-heavy tables of Avalon Hill's game and a large record sheet for each player to log speed, damage etc., all this is handled very effectively by player boards [again shown above].  Each chariot in play has such a display. They are quite thin card stock, but work fine to chart endurance, rattled status, tactics and speed.  These are all recorded on the various tracks with cardboard markers whose size and quality tend to mean that they aren't subject to problems of being displaced, but it can be very easy to forget which actions need a loss of endurance or increase in damage.  This is especially true when the action hots up and chariots are vying for position.
Here, for example, as three chariots are closely bunched together on the bend is just such an occasion when the focus is likely to stray a bit when paying for some actions. [You might also notice that the red chariot appears to be going the wrong way - several of us laughed when the rules stressed making sure that you faced your chariot in the right direction!] 

The other main components are three decks of cards.
and two specialised dice.


Game play is very streamlined.  All players start with 12 Endurance points, no Rattle points and a set number of Tactics points [the latter depend on the number of players involved and you can never hold more than 8 Tactic points].  Lose all 12 Endurance points or reach 6 Rattle points and you're out of the race.  There are only three Speed levels to choose from that respectively allow you to move 4/7/10 spaces - the first two give you small bonuses [either removing penalties, at times a vital, life-saving benefit, or gaining Tactics], while the top speed inevitably has a penalty.

The best element for me is that virtually all the mechanics of the game depend on the use of a single, fine deck of Action cards.  
The four major functions of the game can simply be referenced by drawing the next card and identifying which is relevant.  The first three [Corner, Ram and Whip] should need no explanation.  Danger occurs in a few specific situations; the main ones being when you crash or are forced to overtake another chariot by passing through its position on the track.

The procedure for negotiating corners is one of the best I've encountered.  As you enter the first position on a corner, you add your speed to your current Rattle factor, then deduct the speed number on that line of the track.  This produces the number of action cards you draw.
So, if your speed was 10 and your Rattle factor 3 and you enter the corner at the lane marked VI [Who doesn't know their Roman numerals?] you would draw 7 Action cards!

That's a lot of potential harm coming your way!  So, is there any way to mitigate it?  First and foremost you can use Tactics points.  For each Tactic point you pay, you draw one less Action card.  The rules would have you draw all 7 cards and then return as many cards to the deck as Tactic points you spend.   That process is carried out without revealing or knowing what is on the Action cards.  A far simpler and quicker process which we've adopted is to pay the Tactics points and then draw the requisite number of cards.  Continuing the example above, needing to draw 7 cards, you decide to pay 4 Tactics points and so draw only 3 cards.

How you execute these cards is an equally effective refinement to many race games.  For each space you enter you reveal one of the cards and follow the symbols on the top line [appropriately labelled "corner"  - sometimes "no effect" ensues at others loss of endurance or swerving or gaining a Rattle point [consider the latter to be a type of damage point, either directly to the chariot or to the charioteer's mental or physical state].   If you've drawn rather a lot of cards, you may even find yourself having to continue to play out the remaining ones as you start your movement on the next turn!

On the whole though the effects of moving through a corner tend to be relatively mild!  Whipping another player's chariot - is that the horses or the charioteer you're aiming at? - tends to be more likely to cause harm and ramming is even worse.  Though, the latter may have ill consequences for the person doing the ramming, worst of all are the possible consequences of crashing when you consult the bottom line of the Action cards that read "DANGER"!  As you can see from the card above, even here you may be lucky with a No Effect result.

Though Swerving sounds fairly innocuous, when the track is crowded the result of chariots being forced to move into the space of other chariots can have nasty knock-on effects.  Initially too they were the only rules that caused any degree of uncertainty in what is a short and very clear set of rules.  In fact, the main fault of the rule book for me was the size of the print!!  The instruction "Read the small print carefully" takes on a whole new life of its own when coping with the text.


Adding a few other refinements to play are the Fate cards, Charioteer Skill cards and two dice.  Starting with 4th Round of play, the first player to take their turn rolls the Fate die which provides a small bonus for all players or the draw of a Fate card.  The other die in the game can be rolled for the cost of losing an Endurance point by each player on their turn to gain from 1 to 3 extra movement points. 

The last item is the Chariot Skill cards - each player draws one at the beginning of the game to give an individual ability.  This is the one and only feature I have some reservations about as the Skills do seem to vary considerably in the quality of their benefits.  This is particularly true of the card that allows a Charioteer to look at the Initiative Deck and move one card to whichever place they like in the Deck - no surprise that the player with this card tends to place their card first in the Deck!  More about that in the following view of game play.

So, how does it play?  Well my view is that it depends quite a lot on how you play the game!  My first experience with a large group of players was underwhelming.  As mentioned above, one player drew the Skill card that allowed him to manipulate the Initiative Deck, placed himself first and romped home in that position!

However, there was a distinct lack of player interaction i.e. except for myself and one other player, virtually no one chose to whip or ram their opponents.  Verdict by the group: too simple, unbalanced not a great deal of fun.  My verdict - that's not how the game should be played.  If the central mechanic of a game depends on Action cards for which three-quarters of the decisions involve whipping, ramming and actions that lead to Danger, then not taking actions that involve them is missing out on a major aspect of the game.


A corollary to what I would describe as "the lack of conflict" approach described above also led to comments that the ability to use Tactics points to negate/mitigate Endurance loss and Rattle gain was too easy.  So, by contrast  the "aggressive" approach brings out a whole different game.  Lights, camera, action! 

Boxing in opponents so that they are forced to overtake, whipping and ramming fairly frequently, focusing on not giving the lead player/s an easy ride produces a much more dynamic and exciting experience.  Chariots/charioteers will fail to make it to the end of the race, their chariots left behind as debris and potential obstacles.  The game becomes a real contest, the turn of an individual card becomes far more crucial at times.  Tactics points rapidly get spent and become far more critical a need and all the elements of the game come in to play.

I've already praised the way cornering is dealt with. I'm equally in favour of this game's use of a randomly shuffled set of Initiative cards, one for each chariot, that not only determines the order in which chariots move, but as one card is revealed at a time means that there. So many race type games suffer from the leader-goes-first mechanic and should you decide that the power of the Charioteer Skill that would allow the owner of it always to go first is too much, then it's easy enough to house-rule a modification to how often it can be used - though my advice would be just gang up on said leader!

So, whip up your horses [and whip your opponents] - oh, and don't forget to point your chariot in the right direction!

As always thanks to Victory Point Games for providing a review copy.


Bloody Monday by Ventonuovo Games  Bloody Monday, not a day in some insurrection against an invading power, or ...

Bloody Monday by Ventonuovo Games Bloody Monday by Ventonuovo Games

For your Wargamer, Toy soldier collector, MiniFig collector, military history nut. Reviews, interviews, Model Making, AARs and books!


by


 Bloody Monday, not a day in some insurrection against an invading power, or a day that the Stock Market crashed. This is about the Battle of Borodino. Borodino is a city that is right on the direct route in Russia from Smolensk to Moscow. In both 1812 and 1941, titanic battles took place there to decide the fate of Russia.  


 In 1812, Napoleon invaded Russia to put a seal on his conquest of Europe, and to force England to its knees through the Continental System (The Continental System was thought up by Napoleon to force all of Europe to stop trading with England). The Russians had been backpedaling since the beginning of the campaign. This strategy was put in place by the 'Fox of The North', Marshal Kutuzov. He wanted to harass Napoleon, and let the breadth of Russia and its weather destroy him. Some other generals in the Russian army did not want to give up Moscow without a fight, and forced Kutuzov to stand at Borodino. Napoleon was approached by Marshal Davout about attacking the Russians from their flank, but Napoleon would not even think about it. He was too worried that the Russians would escape him once again. So the stage was set for the bloodiest day of the Napoleonic Wars. Much like Waterloo, it was  a straight up slug fest between the combatants. Between the two armies, 250,000 men fought and suffered 70,000 casualties. 


 In this game the players take the commend of each army, and put themselves in Kutuzov's or Napoleon's shoes. The game is a block game about the battle. You are provided with stickers to place on the blocks to represent the troop units and different generals of each side. The units are as follows:

Infantry
Jaegers -  Light Infantry
Militia
Light Cavalry
Heavy Cavalry
Tactical leaders
Foot Artillery
Horse Artillery

 This player aid will show the sequence of Play:


  The map is a large one at roughly 24" by 34". It is also very colorful, if a bit busy. The setup for the block units are also put right on map. It is an area map instead of hexes. This is what it looks like:


 The game rules are longer and more involved than other block games that I have played. The rules take up eighteen pages, with the last three being optional rules. The game also treats leaders differently than most games. Leaders can be destroyed in this game, and one of the ways to win is to destroy the enemy Supreme Commander. I like that the game rules include a chance for leaders to be eliminated. The game itself is only four turns long. The turns are:

6:00-9:00
9:00-12:00
12:00-15:00
15:00-18:00

 The other victory conditions are that you control all seven victory areas, or eliminate ten enemy blocks (Russian Militia, Jaegers, and Cossacks do not count toward destroyed units). 

 The units are divided into 'fast' and 'slow'. Fast units are Cavalry, Horse Artillery, Tactical Leaders, and Supreme Commanders. These all have a movement allowance of five. Slow units are infantry and Foot Artillery, and these have a movement allowance of three. As usual, the units have their current strength points at the top of the block in the 12:00 position. Losses to the unit will involve flipping the block counter-clockwise one side.


 The sequence of play is:

1.Logistics phase (not on turn one)
2.Impulse Phase
     A.Tactical Action
     B.Initiative Action
     C.Pass
3.Final Phase

 In the Logistics Phase, both the players may call for reinforcements, restore artillery, tactical leaders and Combat Units.

 During the Impulse Phase, players take turns performing single impulse actions (a tactical Action, a Pass, or a Initiative action). The Impulse Phase ends after two consecutive Passes.

 During a Tactical action, which is the most common action undertaken during the game, the Phasing Player:

 1.activates his Tactical Leaders
 2.moves his Units
 3.resolves battles

 During the Initiative Action (which can only be done if the phasing player has and spends the initiative Disc) the Phasing Player may move his Units and resolve battles without activating any Tactical leader.

 During a Pass, the Phasing Player may move only one of his units.

 The Final Phase is just moving the Turn Track marker forward one space to the next turn.


 Besides being able to be destroyed, the Supreme Commander's Unit has a few other interesting design choices. Both Supreme Commanders can only be activated a maximum of three times, and the actual block has to be turned over so that the enemy can see where it is located if it is activated. Without activating your Supreme Commander, a player cannot call for reinforcements or restore any unit's strength. The logistical value of each Supreme Commander unit is lessened by each time it is activated. The block is flipped one side each turn it is activated. Both Supreme Commanders start with four stars, and these can be used for three turns so that they will become two stars on the third activation. This is a large part of the game because the logistic value is totaled up between the stars on the Supreme Commander, and the number of victory areas its side is in charge of. So you will have to choose wisely when you want to use your Supreme Leader activations. The initiative disc is moved between each player by its use. On turn one, it starts with the French Player. If it is used by them to call for reinforcements etc. it is then expended, and handed to the Russian player until he uses it, and so on. After two consecutive passes, one for each player, that turn ends.


 As was mentioned, this is a stand up brutal battle. The French player will have to batter and then pry the Russian player from the Raevsky Redoubt and the Fleches. This is not easy, and comes at a high price. As The Russian player, you will have to tenaciously defend and guess when to counterattack. Your job is made a little easier because of the straight forward nature of the French attack. However, you have to deal with the Grande Armee during one of its last hurrahs as a fighting force. 


 I have five boardgames and a few computer ones that deal with the Battle of Borodino. The design choices made in this game have made it a clear winner for me, and has been put on my favorites list. I can readily endorse this game to any gamer.


Robert

 They just had a KS on their game 'Stalingrad Inferno on the Volga'. It has a huge map, but is playable in only 1-2 hours. It also has what they call an AI to be able to play either side in solitaire. I am very interested in the game's mechanics. Here is the webpage if you are interested also:

http://www.ventonuovo.net/games/stalingrad-inferno-on-the-volga


Rome, Blood & Politics by Gareth C. Sampson  Murder and mayhem in the waning years of the Roman Republic; what ...

Rome, Blood & Politics by Gareth Sampson Rome, Blood & Politics by Gareth Sampson

For your Wargamer, Toy soldier collector, MiniFig collector, military history nut. Reviews, interviews, Model Making, AARs and books!


by


 Murder and mayhem in the waning years of the Roman Republic; what more could you ask for in a book? This is a tour de force of the public and private machinations of the different characters in this time period of the Roman Republic. Not only that, but the book also goes back in time to show the violence that had erupted at different times all through the Republic's life. The cast of characters is out of a Hollywood epic. Sulla, Marius, The Gracchi, Pompey, Crassus, and all of the other players are here. 

 The book starts off with a background into the history of the Republic, specifically its political history. You will learn how the Tribunes and Consuls (among other elected officials) were supposed to, and actually did, interact in their different capacities. The author shows that violence and mob rule did not start with Tiberius Gracchus. It was simmering right below the surface of the Republic for many years.

 The book comes with eight pages of black and white photos of the principal players and the historic backdrops. The book ends with three appendices. The first, titled "The Butchers Bill: Murdered Roman Politicians 133-70 B.C.", gives us a list of the men and also the reason for their murder. The second, "Who Were The Tribunes", gives the reader a list of all of the known Tribunes for the dates listed. The third appendix gives us a list of the sources used by the author in writing this book. The book also comes with four maps of the Republic in different years in which it takes place.

 I will admit to being extremely biased toward this time in history. I have read almost every book on the time period. I find this book to be not only an enjoyable read, but also indispensable as a handy reference of the time period that it shows. I can easily recommend Dr. Sampson's book to anyone who has an interest in not only the workings of the Roman Republic, but also the time period. I have read other books by the author, and have enjoyed them also. Now, if we can get a military biography of Pompeius Magnus from the author it would be spectacular.


Robert

Publisher: Pen And Sword
Distributor: Casemate Publishers


hpssims.com