second chance games

Search This Website of delight

THE WAR OF THE WORLDS from DVG With the last DVG game I reviewed, I spoke of how they had stepped into the multi-player world o...

THE WAR OF THE WORLDS THE WAR OF THE WORLDS

For your Wargamer, Toy soldier collector, MiniFig collector, military history nut. Reviews, interviews, Model Making, AARs and books!

THE WAR OF THE WORLDS

from

DVG

With the last DVG game I reviewed, I spoke of how they had stepped into the multi-player world of light Euro-style games, but for me a little too light.  With this latest product, The War of The Worlds, we're back on the familiar ground of solo gaming, but still with a Euro-game feel.  

From my early childhood copy of H.G.Wells' novel, through the L.P. [yes I am that old!] of Jeff Wayne's soundtrack with Richard Burton as the narrator and the less than faithful films that have been made, the story has been part of my DNA.  So, it was great to have received this from DVG for my latest review, but I was a little apprehensive about how this seminal story had been handled as a game.

Two previous games had focused on the geography of the novel keeping setting in the limited environs of London and the south-east of England as a more or less conventional hex-based war game.  DVG have gone for a broad-brush strategy approach featuring the whole of the UK [and. as you'll see, potentially further!].

I've no hesitation in saying that from  the moment of lifting the game out of its, as always, safe and secure packaging I was hooked.  My first delight was the box graphics that promised a wholly appropriate Victorian feel to the game. London where some of the most violent moments in the novel take place  is immediately evoked by the central image of the Houses of Parliament and Big Ben, with people in panic-stricken flight from the Martian machines.

This authentic feel was instantly reinforced on unfolding the superbly presented game board [which my camera work does not do anything like justice to].
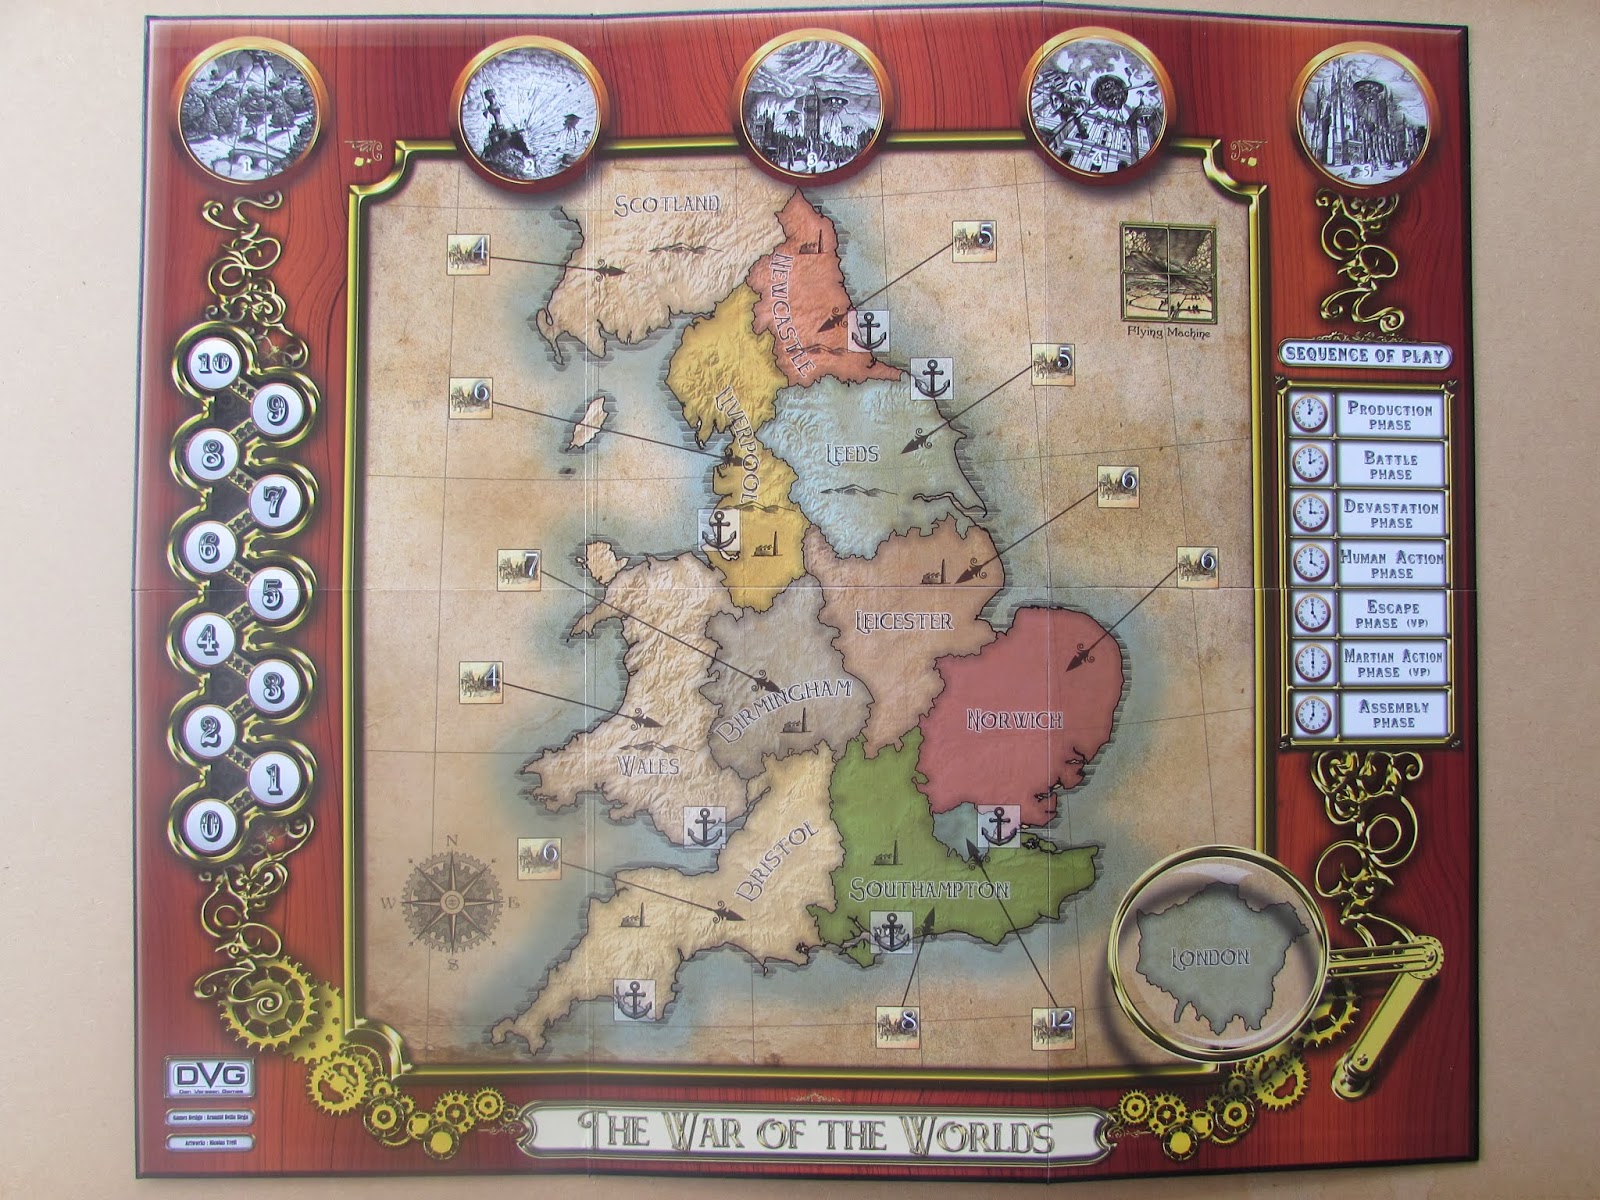
In particular, the picture does not bring out the rich wood-effect of the deep surrounding edge to the board with its stylish cogs and gears that have an almost 3D quality.  The five roundels along the top [four of which are also displayed on the box lid] will be used to hold the different waves of Martian machines [Tripods] and the magnifying glass in the bottom right corner serves as an enlargement of the capital city London to make game play easier when that area is inevitably invaded.  


This sort of attention to small details is admirable.  It's great to see these functional needs turned into further ways to reinforce the game's artistic appeal and reinforce the visuals of the original story. This emphasised on inspecting the four superb glossy counter sheets.  The Martian machines [the Tripods] are done in bold primary colours, while most of the rest are in a faded shade.  Favourite for me among so many are the individual counters for figures who featured in Wells' narrative: the Narrator, who tells the first-person account, and his wife, the curate he meets in the ruined building, the artillery man and so on.  Best touch of all is using both on the box cover and the counter an image of Wells himself for the Narrator!

Above I've gathered the counters for most of the individuals who can appear in the game through some of the random Event cards - more about the cards later.


The Thunder-Child battles the Martian machines.


The all-embracing conception of the art complements the theme perfectly.  Though Wells focuses the events in his novel on a small portion of southern England, we can see it as a microcosm for the whole world.  It certainly allows for this core game [The War of The Worlds: England] to span the whole of the United Kingdom and enterprisingly beyond to other editions subtitled East Coast America, France and Japan!  An option, called League of Terran Nations, is offered at the end of the rule book, which allows you to play multiple nations simultaneously.  Though I know that I'll never aspire to this challenge, it is a nice extra.  


The rule book is typically attractive and admirably laid out with plenty of illustrations and examples supported by a first class play aid [see below]. 


Three pages of component exposition and roughly one page of set-up brings you to a step-by-step explanation of each Phase of a turn.  Unlike most of DVG's solitaire games that demand substantial pre-planning that is very much a part of the game experience, TWoTWs has the simplest of set-ups that reflects the moderately low complexity of the game and its predominantly strategic level.

Three Handling machine counters begin the game on the map; one in Scotland, one in Wales and one in Leicester.  Leicester?  Very strangely the substantial Zones [that cover several counties] in England are named after various cities.  Next, Wave 1 of the Tripods is randomly placed according to a die roll [and that Zone's Production marker is replaced by a Devastation marker] - none of the possible locations are anywhere near where Wells' chose for them to land in his novel.  In fact the most likely arrival spot is Scotland.  Again, game mechanics designed to give you, the Human player, a chance of victory overcome the facts of the source novel.  The final item to roll for is the placement of the first Cylinder which will ultimately produce a subsequent Wave of Tripods.   

Once everything is set up, it's down to acquiring the rules to begin play.  Most of the stages in the play sequence are brief to read and equally brief to execute.  The A.I. for the Martian side is governed by die rolls and card draws and many of your own actions will be executed by rolling the same special dice that contain three green faces, two yellow ones and a single red one.

However, do read the rules carefully, especially as the sequence of Phases is quite unusual and contains small elements that may trip you up.  The sequence is as follows:


First up is the Production Phase where you gain points mainly to buy and place on the board the units and other items essential to winning the game.  A very simple action, but as always deciding what to purchase with your limited resources is the  problem.  Typical items are Infantry, Cavalry and Guns, but also rather oddly Harbours [which are randomly selected when purchased]. Imagine the scenario: I want to escape from Liverpool, oh sorry, sir, that Harbour hasn't been one of the lucky ones to be bought yet!   Like some other aspects of this game, a clever mechanic, but wholly unrealistic! 

The Battle Phase follows next.  Here there is a more to take in. The key point to have in the front of your mind is that this Phase only occurs when you have a Wave counter in the same main mapboard Zone as a Field Gun or Siege Gun.  This tripped me up initially. finding it strange not to have a Battle because you only have infantry or cavalry units.  It was equally strange to discover the roles these units play: Infantry are used for dice rolls to gain the all-important Earthworks that protect and conceal your guns, while Cavalry provide similar dice rolls to gain Battle Plans.  The latter as expected give you various advantages in the upcoming battle.

Should the Battle Phase thus occur units are shifted to a small tactical board.  It would have been an added richness if this had also been mounted, but the glossy thin cardstock is adequate.  The placing of the Tripods and their actions during the battle are governed by the draw of battle cards.  Inevitably there is a strong element of chance here, but not only is it essential to a solitaire game to have some sort of A.I., but it adds greatly to the tension of the game and the cat and mouse feel.
The right hand board is for use in the Battle Phase
The Tripods are randomly placed, according to card draw, in the top row.  You choose where to place any Human characters and units in the bottom row of hexes and your guns and any accompanying earthworks are placed in any of the hexes in the row above [marked with artillery symbols].  There are some strange peculiarities here that remind me that this is more a Euro-game than a war game. 

Why will the Tripods only fire at guns and only those that have been revealed by having all their earthworks stripped away?  Why do all the Human units cluster in the hexes on the bottom row and cannot move?  This is especially strange as all Human units in a hex that a Tripod enters are captured and gain the Martian side a victory point.  So, they just sit there hoping that the cards that move the Tripods send them on past without entering their hex.  It adds a great deal of tension, but there's little skill on your part whether your units live or die.  

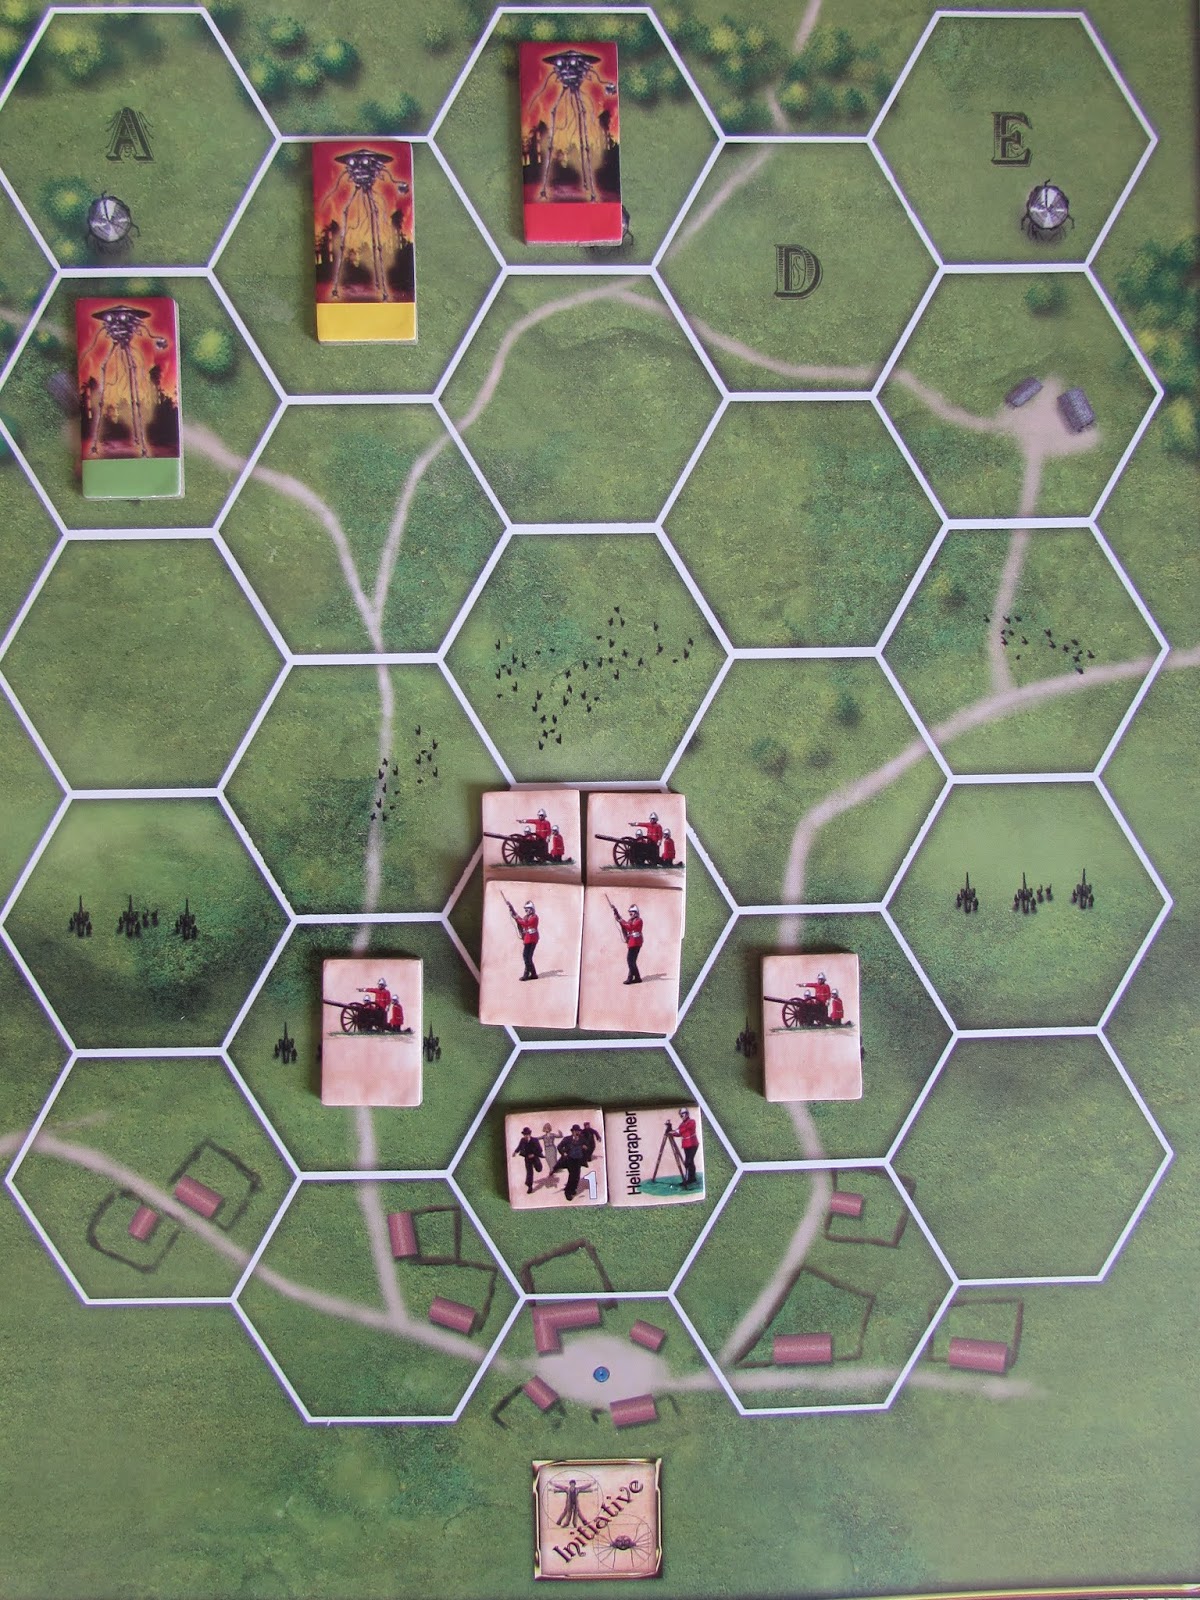
A rare moment when the tripods were heavily outumbered


There are some inconsistencies too; for example, we are told that any guns in the bottom row hex are destroyed if a Tripod enters the hex, but guns set up on the row above.  Is this a hangover from an earlier rule that didn't get caught in proof-reading?  I've assumed that the rule is simply applied to the hex row the guns are set up in.  Also the rules occasionally omit or at best leave the player to make an assumption.  Typical of this is the instruction that the end of a battle comes when there are either no Human units on the board or no Tripod units.  What isn't made clear is that ultimately the Tripods will be forced by the movement instructions to exit the bottom edge of the board. 

I mention such points, as they have led to a range of uncertainties and questions.  Nothing major, but these small points do add up and an especial warning if, like me, you often look online to BBG [Boardgamegeek] for useful playthrough/how to play videos.  Though only 3 months old the video provided by Kevin and Dan Verssen contains many significant differences in the rules from what's there in the published game!

Having survived [or not] any Battles, you move straight on to the Devastation Phase where - surprise, surprise - a die roll is made in every Zone where there's a Wave marker.  This quickly and very abstractly will determine a variety of losses, including some or all of the following:  1 or 2 Human VPs, 1 Human unit and upto 5 Workforce, as well as creating a number of Refugees. The next Phase, Human Action, will pass just as quickly.  All Human units/Characters can move one Zone and Infantry instead of moving can roll either to see if they destroy a Tripod that hasn't yet emerged from a Cylinder or to place a Powder Keg.

The Escape Phase promises exactly what it says.  Any Refugees currently in a Zone with a Harbour roll to attempt to escape.  The first roll determines whether they are successful in fleeing with a two thirds chance of success.  Otherwise they stay put in the Zone, but if you think that having successfully fled the danger's over, it's not!  All it means is that you've successfully boarded a freighter to take you to safety.Now you roll again - 50% chance of making a clean get away, but if not you'll have to fight your way to safety against either one or two Tripods on the Naval Board.  

A Naval Battle has similarities to a Land Battle, though frankly is more enjoyable as you have to manoeuvre your freighters - and possibly a Warship or two if you can afford to buy them - from the top of the board to the bottom.  Meanwhile the Tripod is governed by the same card drawing and die rolling process as in a Land Battle to randomly move and fire on your ships.  It's enjoyable, but seems a rather prolonged process in order for you to gain usually at best one or two VPs or for the Martians to gain one or two VPs.

Rather oddly it's at the end of this Phase that you tot up how many VPs you've earned this turn, one point for every Refugee escaped and 1 point for every Production site not devastated.  As you start the game with 10 out of your 11 Production sites operable, that's a 10 VP start at the end of the first turn.  10 VPs turn into 1 Germ and 10 Germs win you the game - so, a simple bit of maths and it's  100 VPs for a win.  [Spoiler alert - avoid next paragraph, if you haven't read Wells' novel, The War of The Worlds, and you want to do so before playing the game].  

Why Germs?  Well, as a nod to the novel - the plucky British don't triumph against all odds, a deus ex machina, good old Mother Nature does the job - germs kill off the Martians!  So, let's turn VPs into germs and then if you win, hey presto, you can say the germs got them - though in game terms, it's escaping Refugees, killing Tripods and mainly having undevastated production Zones giving you VPs each turn that brings you out victorious.

So, back to our game.  Only two swift Phases left.  First the Martian Action Phase, which is far less dramatic than it sounds.  Another simple die roll for each Zone that contains a Martian Wave marker.  The possible results are as follows: the Wave moves to a different Zone [that's right roll the die to find out which one], the Wave gains an extra Tripod or part of the Flying Machine is built.  There is usually a one in six chance of the latter happening and if all four parts of the Flying Machine get built the Human player loses the game.  This single detail has so far been the most criticised aspect of the game, as a series of early bad rolls and you are toast.  In my most recent game, I was doing very nicely on 84 VPs, the Narrator's Wife had safely escaped [a nice thematic touch] with the Martians trailing on 54 VPs, when the fourth part of the Flying machine was built. Game over.

Just to prove how near I got!

The last task in this Phase is to roll for each Zone that has a Destroyed marker to see if it turns into a Red Weed Zone and add up Martian VPs. 2VPs for each destroyed Zone and 4 VPs for each Red Weed Zone.  Like the Human player, 10 VPs are turned into a Colonisation Point and 10 Colonisation points mean that the Human has lost.

The final Phase is the Assembly.  In every Zone where there is a Martian Handling machine and a Cylinder, roll the die and if the colour matches the colour of the Handling Machine, the Cylinder is replaced by the next numbered Wave marker.

The only other feature to mention is the deck of Event cards.  I really like how this is handled, as the deck is made up of Events labelled for every Phase of the turn, but the top card is only played when it matches the current Phase.  So, at least one Event card will definitely be played each turn, but the earlier the Phase that this happens the more likely it is that you will get the next card matching a later Phase in the turn and so on.  Some turns I've had a single Event card playable, at others up to four and once five!

A typical selection of the many Event cards that add greatly to the thematic element of the game.

So, final conclusions.  A fairly swift and easy game with some minor uncertainties in the rules that have largely been cleared up on BGG, but as yet no definitive Errata/FAQ published.  Components are excellent and greatly add to the flavour of the game.  A light game that depends heavily on dice rolling which brings in an equally heavy slice of luck. For me, it's not so much the luck element as the lack of major choices on the player's part that makes me want more control.  That said, there are often many micro-moments of decision that add to the already frequent tension generated by so many of the die rolls, especially as the game moves into its later stages.  DVG are obviously looking to widen their appeal and I think this game has a potential to hit the lighter end of the market, but for my own tastes I prefer their typical meatier historical war games.

Once again many thanks to DVG for supplying the review copy.


Standard Price
$59.99

£55.99

And my next review up will certainly cover a very heavy weight grognard's historical war game on three battles of the Crimean war!

So, look out for Bloody Steppes of the Crimea in a few weeks' time.


At Any Cost Metz 1870 by GMT Games  The Franco-Prussian War; not many besides historians and wargamers have even ...

At Any Cost Metz 1870 by GMT Games At Any Cost Metz 1870 by GMT Games

For your Wargamer, Toy soldier collector, MiniFig collector, military history nut. Reviews, interviews, Model Making, AARs and books!


by


 The Franco-Prussian War; not many besides historians and wargamers have even heard about it. The Franco-Prussian War is really the catalyst for the events of the next seventy-five years in European history. If France had not lost this war, and had Germany not taken Alsace-Lorraine from her as one of the spoils our world might be very different. France's burning desire for revenge and the return of those areas was one of the main reasons behind World War I. Had Germany not lost World War I there would have been no need for a second war with Germany looking for revenge. The Franco-Prussian War was the last act in Bismarck's successful attempt to unite Germany under Prussia. 


Full Map


 The next part about the Franco-Prussian War was not just how France lost, but how she lost so badly. There have been few wars where one side had weapons that were so technologically enhanced over the other side yet still lost (except for wars of liberation). The French rifle, the 'Chassepot', had a range twice that of the Prussian rifle. It also had a higher rate of fire. The French also had the Mitrailleuse that was the first well functioning machine gun used in large numbers on the battlefield. Time and again, the Prussians and their Allies stormed into the hail of lead that was thrown at them by the French forces. The Mitrailleuse was, unfortunately for the French, used as an artillery piece, and rarely made its presence felt as much as it should have. The war came down to a lop-sided game of chess between the efficient Prussian Generals, and the lax, and almost comatose French generals. The French High Command acted like prey transfixed by the eyes of a serpent. More than a few times, the Prussians and their Allies broke or almost broke under the weight of French fire while attacking. The French High Command could not overcome their malaise, and constantly pulled defeat from the jaws of victory.


First Counter Sheet


 At Any Cost is a simulation (I hate using the word 'game' for a wargame) of the French Army under Marshal Bazaine's attempt to escape from the environs of the fortress of Metz, and meet with another army under Napoleon III. The six scenarios of the game take place during August 15th to August 18th 1870. They run from small two corp battles on each side to two different campaign scenarios. 


Second Counter Sheet


 This 'game' uses the 'Blind Swords System' to play out the different battles. It is essentially a chit-pull system that emphasizes the three 'FOWs' of war: fog-of-war, friction-of-war, and fortunes-of-war. The Blind Swords System is meant to put the player on the horns of a dilemma and to keep him there during the entire game. The game itself is based upon infantry brigades, cavalry, and artillery. This was the last war where cavalry really made any useful contribution on the actual battlefield. The situation that the Prussians find themselves in is that they have lost the French Army. The Prussians outnumber the French, but due to fatigue and weather Bazaine's Army has escaped their grasp. The French forces are trying to go West, however their somnambulist state plays against them at every turn. The Prussians find the French, but assume that it is their rearguard. Unfortunately for them it is actually the slow moving French vanguard. 


Map Close up from the 'A Day Of Battle' scenario


 So what do you actually get with the game:

 RuleBook - With play examples
 Playbook - This contains the scenarios, and the historical notes
 Game Track Card
 Prussian Strategic movement Card
 4 - Player Aid Cards ( 2-Prussian, 2-French)
 4 - Ten-sided Die (1-Blue, 1-Red, 2-White)
 22" x 34" map
 Two Standard Size Counter Sheets

 The six scenarios are :

 The Afternoon Crisis (Small Battle Scenario)
 Twilight Of The Guards (Small Battle Scenario)
 A Day of Battle (Full Battle Scenario)
 Bloody Thursday (Full Battle Scenario)
 A Beckoning Victory (Campaign Scenario)
 It Will Cost What It Will (Campaign Scenario)

 The sequence of play is:

1. Planning Phase
2. Chit Draw Phase
3. Activation Phase
 A. HQ Command Step
 B. Fire Combat Step
 C. Movement Step
 D. Assault Combat Step
 E. Rally Step
 F. Out Of Command Step
4. End Turn Phase
 A. French Command Step
 B. Prussian Command Step
 C. Victory Determination Step
 D. Housekeeping Step
 The Rulebook is twenty-eight pages long. Both it and the Playbook are in color and well set up and easy to read. The counters and map are your typical GMT fare. Which means they are extremely well done with great artwork. On the map each hex represents 500 yards. 

 This is a few of the French Event Chit Descriptions:
 Beaten Zone: Play immediately of hold. Any one French Infantry or Mitrailleuse unit conducts an immediate fire combat following all normal procedures.
 Command Initiative: Hold. Play at the end of any enemy's HQ Command Step (after the opponent assigns an Order to the activated HQ units). Roll a die and apply the following.
 1-2 = Active HQ unit is given a different Order by the Prussian Player.
 3-4 = Active HQ unit is given a different Order by the French Player.
 5 = Active HQ unit must be given a March Order.
 6 = Active HQ unit must be given a Defend Order.
 7 = Active HQ unit must be given a Regroup Order.
 8 = Active HQ unit must be given an Attack Order.
 9-10 = National Doctrine: French HQ must be given a Defend Order. Prussian HQ must be given an Attack Order. 

 So, you can see by the chits how the Blind Swords System at times actually gives your opponent the chance to change your own forces' orders. This unique use of the chit pull system has now become the ultimate in fog-of-war. You,as the French Player, could give your HQ's defend orders only to see the Prussian Player able to change your orders to attack and vice versa. Remember that the chief goal of the French Player is to escape (in the campaign scenarios). So, not only is good play needed on the tactical level, you must also be ready to have all of your well thought out plans thrown to the winds. The system took an old grog like me a little bit of getting used to. Then I was able to embrace it, and see how artfully it depicts not only the fog-of-war, but also the friction, and fortunes-of-war. 

This is the setup for my favorite scenario 'Twilight Of The Guards'

 I have been a student of this war since I was a child. I have played out these battles in my mind and table for the last fifty years. I can say, unfortunately for me, this game is the best tactical representation of the conflict I have played. I said unfortunately because I have always wanted the French to win these battles. The smaller scenarios, including my favorite 'Twilight Of The Guards' are able to show how close the French came to victory, and can actually have the French winning them. The campaign scenarios are a bit tougher on the French side to win. The 'French Army Morning Deployment Rule' (they are essentially laying in their tents waiting for water to boil for their cafe) in the campaign scenarios really hamstring the French Army's retreat. This is not a bad thing, and is totally historic, but it is tough to overcome. I have liked the postings I have seen by the designer Hermann Luttmann, and his very prompt answers to game questions. He also does not treat the rules as if they were etched in stone, but encourages players to experiment with changes to them. That is the one thing that board games will always have over computer ones. If you find a rule that is non-historical or doesn't work, don't use it and make your own. It's your game.

 I can unequivocally recommend this game to anyone with an interest in the era. I can also recommend the Blind Sword System to grogs who are looking for a change of pace. The system is going to be used in a number of upcoming games from the 19th century.

 This is a link to the Rulebook:

 This is a link to the Errata and FAQ:
 This is an excellent write up about the Battle of Gravelotte-St. Privat:

Robert

We're finally getting a first look at the big sequel to Panzer Corps, the aptly named Panzer Corps 2! In what should be th...

Panzer Corps 2 - Dev Diary #1 Panzer Corps 2 - Dev Diary #1

For your Wargamer, Toy soldier collector, MiniFig collector, military history nut. Reviews, interviews, Model Making, AARs and books!


We're finally getting a first look at the big sequel to Panzer Corps, the aptly named Panzer Corps 2! In what should be the first of many developer diary posts, we finally get to see some details on the features of the sequel and some screenshots to gawk at. You can head over to the official post here, or see the contents below:


Welcome to the first issue of Panzer Corps 2 Developer Diaries. The initial announcement of Panzer Corps 2 was a little while ago now, and we understand that it left many people waiting for more information. In this issue we will try to provide a general overview of where we are going with this project and what to expect from it. We will provide much more information on each individual aspect of the game in future diaries.


Gameplay changes

Panzer Corps was intended as a spiritual sequel to the classic Panzer General series, and we were very careful to preserve the traditions of that series that made it so great for its day. We are taking the same very careful approach to game design in Panzer Corps 2. We are not trying to fix things which are not broken in the first place. Many aspects of the game, including the list of unit classes and unit stats, remain unchanged, and Panzer Corps veterans will feel themselves instantly at home with the new game. At the same time, we are giving the player a number of new tactical options, which will make the playing experience even more interesting and engaging. Here are some examples of these options:

Overrun. This was probably the most requested feature in Panzer Corps, and we had no other option other than to include it. Overrun is a unique ability of tanks to run over crippled enemy units and destroy them in the process, without spending their move or attack action. This feature not only helps to better represent the role of tanks in WW2, but also gives many interesting tactical implications from a pure gameplay point of view.

Encirclements. Panzer Corps is a “wargame” in the first place, and for most players its “war” aspect is the most interesting of all. On the other hand, moving around non-combat supply units, counting supply points etc. is much less fun. For this reason, we decided early on that the new game would not include a full-blown realistic model of supply. However, we felt that cutting enemy units from supply was a very interesting and useful tactical option, so we have included it in the game. It works like this: when a group of units is encircled by the enemy (only “passable” terrain needs to be blocked), it no longer receives any supply, and on top of this, encircled units will get a progressive combat penalty every turn. So now, the player has a choice: tackle the next objective head on, or try to encircle it and weaken the defenders before dealing with them.


Infantry unit is isolated on a small peninsula by the sea and the enemy. It does not get any supply here.

Splitting units. In Panzer Corps 2 any unit can be split into two equal halves (of course, at a cost of additional unit slots) which will act on the battlefield as two independent units. Splitting has countless tactical uses, especially in combination with encirclements as described above. Certain unit classes can especially benefit from it, like recon.

Captured units. Captured units in Panzer Corps campaigns were so popular, we’ve decided to make them a part of core game mechanics. When you force enemy unit to surrender, its equipment is captured and added to a pool. Later you can use this pool to create new units or replenish existing ones for free. This adds yet another tactical consideration: shall I destroy this unit, or try to make it surrender instead?

Unique hero abilities. Unlike Panzer Corps, where heroes only gave stat boosts to units, in Panzer Corps 2 they will have many unique tactical abilities, and some of these abilities will be synergistic. So, using your heroes in the best way possible will be a different task in every playthrough.

Air and Naval Warfare. Other major changes will happen in air and naval warfare. Ground combat was the most sophisticated and interesting part of Panzer Corps. With so many different rules, unit classes and terrain types, ground war was a varied and rich gameplay experience. We felt that air and naval warfare was somewhat lacking in comparison. Our ultimate goal in the sequel is to make them interesting enough to allow dedicated “naval only” and “air only” scenarios, and to achieve this goal, we are looking at various “naval only” and “air only” hex-based wargames for inspiration.
The most important change in the air war is that all aircraft act from airfields now, and return to their base automatically at the beginning of their turn. Also, just as in real life, the effectiveness of aircraft drops as the distance to their base increases. This means that all air rules and mechanics from Panzer Corps (like mass attack, interceptors etc.) remain in place, but at the same time the airfields, their location on the map, timely capture and proper defense become key elements in air warfare.
As for naval war, naval terrain is “by definition” less interesting than ground terrain, with endless sea hexes going in all directions. To compensate for this, ships themselves will be more complex entities, with various factors (like orientation and position of turrets) affecting combat effectiveness, and a damage model (inspired by Pacific General) going beyond the simple “strength number” under the ship. Carrier and submarine classes will be much better fleshed out to represent their unique roles in naval war. A more advanced naval model will allow this series to branch out into any theatre of war in the future, including the “naval-heavy” Pacific, something which Panzer Corps never did.

Napoleon and his Marshals by Two Generals Games  I have been looking for a game to replace or better Avalon Hills &...

Napoleon and his Marshals by Two Generals Games Napoleon and his Marshals by Two Generals Games

For your Wargamer, Toy soldier collector, MiniFig collector, military history nut. Reviews, interviews, Model Making, AARs and books!


by


 I have been looking for a game to replace or better Avalon Hills 'War and Peace'. I believe I might have found it. This game has incredible detail, and seems so far to play out historically. By that I mean that it wouldn't play the same if you were using tank units or foot soldiers.  


 The first thing you should know about this game is the packaging. You get a rolled up map in a circular tube. Then you get the counters in a small plastic wrapped bag. The next thing you receive is a small plastic case that you would usually keep washers or small screws in. So after separating the counters it has its own little case for them. What you do not get is the rules or scenarios. These are downloaded from the company's website. This is also nice, and is something a lot of companies are doing now so you can peruse the rules and scenarios before you buy the game. 


 We will look at the actual physical pieces you get now. The counters are 5/8 of an inch square. They are mostly your typical strategic game counters with just strength and their movement factor listed. The counters are physically different than any I have ever seen. They seem to have some plastic or something added to them to make them almost pliable. It also seems to make them more durable than the usual cardboard ones. The map is also different than normal. It almost feels and rolls up like it is made of leather. I assume it has gotten the same treatment as the counters. Whatever it is, I love it. When you spread it out it flattens immediately so there are no folds etc. It almost seems like you are unfolding a map from the period. I have not tested it, nor will I, but I believe the map would survive a drink being poured across it. As far as looks, the map is a standard hex map of Europe. This map goes from the French Atlantic coast to the border of Russia, and from the top of Italy to Denmark. The map's size is 23" x 30". The colors of the map are so much more vibrant than any other I have seen. There are maps just as beautiful out there, but none that pop out at you like this one. I assume this also has to do with the manufacturing process. 


 The rules are long at seventy-nine pages. This might make some people pause. However I believe most of us have tablets or phones that it can be downloaded to. As mentioned, you do not get the rules or scenario booklet with the game. If this was to save money to make the counters and map better, then it worked.


  The unit counter types in the games are as follows:

Infantry
Cavalry
Artillery
Leaders
Supply/Depot
Naval

 Forts are also in the game, but they are shown on the map.


The map


 The games turn mechanics are a bit different from the norm. There are six two month strategic turns (Jan-Feb). Within the six strategic turns are six operational turns for each strategic one. This is not just an operational game, but a strategic one. So in effect you are running your entire country or countries' war and peace efforts (in the campaign game). As a king or emperor you have to decide your country's production, replacements, and policy, and also mobilization and demobilization. Each strategic turn, the phasing player may purchase 'Command Points' which are used to activate leaders, units, or other actions. Movement and combat take place during the operational turns.


The outside of the counter box/tray


 Supply and lines of communication are important in the game. As a matter of fact, they take up four pages of the rule book. Lack of supply and attrition can kill your armies much quicker than losing battles.

 Leaders and their various abilities, and the rules of what they can do is another important part of the game and rule-book. Leaders affect activation, movement, combat, reinforcement, and also have special abilities. Napoleon has the ability to 'split' the coalition armies that he is fighting into their separate national units. Wellington can remove disruption on British units that suffer it during battle.


The inside of the counter box/tray


 As I mentioned, the rules and scenarios are a download only, but that means anyone interested in looking at them can peruse them at their leisure.The rules for combat are unique and quite involved. There is a CRT, but there are no dice rolls. First the attacker figures out the defender's losses and then the defender checks on the attacker's losses. They both take place at the instance of combat. Meaning that the defender doesn't take casualties, and then checks on the attacker's losses after his losses are deducted. So if both the attackers have a combat number of twenty, twenty would be where on the CRT you would check for casualties to both (terrain etc. are also added in). The leader with a stack can 'protect' or absorb losses. So the higher the number of the leader the easier to absorb losses. In this, the French have an ace up their sleeve until the latter years of the Napoleonic conflict. I am making it seem more involved then it really is. I will include a link to both the scenario rules and the rule-book at the bottom.


 So what we are looking at is a game that tries to recreate the Napoleonic years in a game format. The following is a list of the scenarios and the 'game set' you need to play them:

1805 Introductory Scenario - (solo, or two players; requires only basic set) Napoleon attacks Austria in 1805, culminating in the Battle of Austerlitz in which he decisively defeated Austria and Russia.The French can follow the Danube(historical), attack through Bohemia, or come from Italy. Will Austria fall back to join the slow Russians and risk losing
most of its production, or stay forward and risk losing most of its army?
1805 - 1807 Campaign Game - (requires only basic set)
France must be prepared to take on three opponents at once (Russia, Austria and Prussia), plus a fourth one (Britain) that finances the others. Napoleon must nimbly defeat each one at a time, or risk facing them all together.
 2-France, All other nations
3-France, Austria/Britain, Russia/Prussia
4-France, Britain/Russia, Austria, Prussia
5-France, Britain, Russia, Austria, Prussia
1809 Scenario - (requires only basic set)
Austria has completed Army Reform and increased the size of its army and is ready to take on Napoleon again, but without Prussia or Russia to help.
2-Franceand Russia, All other nations
     3-France, Britain/Austria, Russia(only recommended if the optional       rule for full Russian participation is included)
1807-1810 Scenario - (requires basic set plus Peninsular War set
and expansion maps are optional) Napoleon must deal with the "Spanish ulcer" and a resurgent Austria at once.
2-France, All other nations
3-France, Britain/Prussia, Austria/Russia
4-France, Britain/Prussia, Austria, Russia
5-France, Britain, Russia, Austria, Prussia
1811-1814 Scenario - Zenith and Nadir(requires all games in set)
France is victorious everywhere but Spain, and that is encouraging Russia to resist once again. Can Napoleon defeat the Russians once and for all while handcuffed in Spain, or will he try to defeat Spain before Russia can liberate Germany and get Prussia and Austria as allies?
2-France, All other nations
3-France, Austria/Britain, Russia/Prussia
4-France, Britain/Russia, Austria, Prussia
5-France, Britain, Russia, Austria, Prussia
1812 Scenario -The Patriotic War
(requires basic set plus expanded maps)
Napoleon puts together his largest army ever to defeat his biggest continental rival. But can LaGrande Armee repeat its successes in such a large nation against a foe that is prepared to fight it?
    1813-1814 Scenario - German and French Campaigns  (requires basic       set or add on Peninsular War)
Following the loss of most of his army, Napoleon must scramble to retain his client states, and rebuild his army. Can he hold the now united Coalition off long enough to achieve the impossible yet again?
1815 Scenario (requires basic set and Peninsular War set)
Can Napoleon retake France and return it to glory? Or will he face another Waterloo?
2-France, All other nations
1807/1809-1814 Peninsular War Scenarios (requires basic set plus Peninsular War set) A long scenario, starting in either 1807 or 1809, with a small number of units, the players will have to face the limitations of a small war in a poor nation with terrible terrain for campaigning and a long sea coast that favors Britain's best asset-the Royal Navy.
2-France, Britain & allies
1805-1815 Campaign Game (requires basic game and all expansions)
The entire French Napoleonic Wars, from 1805 to 1815. Up to 396 operation turns and 66 Strategic Turns. Expect to play
for 130 hours or so. That's about 32 weeks if you play 4 hours once a week. Play tests averaged about 4 months.
2-France, All other nations (the Coalition)
3- France, Russia, Britain/Prussia/Austria.
Alternatively, Russia with either Prussia or Austria, Britain with either Prussia or Austria
4-France, Britain, Russia, Austria/Prussia


The counter setup for the 1805 scenario

 As you can tell, I am very impressed by the game's components. As far as the game play I am somewhat impressed. This might be because as a person who has rolled a die for most of the last fifty years on a CRT, new things are hard to learn. I have played other games that do not use die rolls for the CRT, but those have made the function of combat in these games relatively easy. Combat in this game was a bit hard to get a grasp on until I worked through a few examples for myself. The rule-book does have examples and I probably just needed hands on to get the gist of it. As I mentioned at the beginning, I was looking for a replacement for a tried and  true friend. I am not sure I have met the replacement as added another good friend to my table. The game has so much more to offer (marching to the guns etc.), than I can mention in this small space. Please take a look at the link below.

http://www.twogeneralsgames.com/index.php/news/109-update-napoleon-rules-and-scenarios

Robert


As you may have heard, in the grim dark future, there is only war. So what to do when you create a 4X strategy game in the universe of...

Warhammer 40k: Gladius - Relics of War Warhammer 40k: Gladius - Relics of War

For your Wargamer, Toy soldier collector, MiniFig collector, military history nut. Reviews, interviews, Model Making, AARs and books!


As you may have heard, in the grim dark future, there is only war. So what to do when you create a 4X strategy game in the universe of Warhammer 40k? You go all in on that last X, eXterminate. WH40k: Gladius - Relics of War (let's call it Gladius), is the first WH40k game to enter the 4X world of titles like Civilization and Master of Orion. Gladius strips down the classic trappings of the genre to only those elements which make sense in the 40k setting. The most notable feature lacking is any kind of diplomacy. All factions are at war from the start and there are no truces or trade agreements. Other aspects of classic 4X games are here, but streamlined down and serve only to facilitate the production of bigger and better units for the combat which kicks off early and rarely lets up. If I could describe Gladius in the simplest terms possible, I would call it the deathmatch mode of 4X gaming.


Gladius was developed by Proxy Studios and published by Slitherine Games. The same duo previously created the underrated Pandora: First Contact, which was something of a spiritual successor to Alpha Centauri. Now the team is trying to do something fresh with the 4X genre; instead of adding layers of mechanics and complexity, they are trimming things down to create a fast paced combat focused strategy game. We'll cover each X in turn, leaving the best for last.

eXplore
Whether you're playing as the Space Marines, Orks, Necrons, or Astra Militarum (Imperial Guard), the first thing you will need to do at the start of the game is explore your surroundings. You'll start with a handful of units and the option to place your starting base anywhere you choose. Each hex shaped tile in the game world has different resource bonuses and finite spaces for buildings. Finding some easily defensible terrain is worth considering as well. When playing on the default medium sized map setting, your neighbors will come calling before you know it.

The battlefield you will be fighting over is the scarred and ruined remains of Gladius, a planet that was, until recently, a thriving Imperial world covered in cities and loyal followers of the God-Emperor of Mankind. Then a cataclysm of ill fortune hit the world. An Ork invasion, a Necron awakening, and a giant warp storm. All of these events have left the surface of the world an ugly and toxic place. Though there are some surviving patches of green here and there to keep things from getting too bleak.


While scouring the landscape, you will find special resource tiles which can be captured to provide a resource bonus and offer your units a defensible outpost in a world filled with dangerous wildlife. The "wildlife" ranges from packs of kroot hounds up to giant guardian automatons and Enslavers, particularly dangerous enemies which can mind control one of your units. With danger comes rewards, however, since the first faction to fight their way through the baddies will find numerous resource boosts and relics which grant various bonuses like passive healing or extra movement to all of the units of whichever faction controls them.

eXpand

As you might expect, you won't be building trade networks or art galleries in Gladius. Expansion has only one goal in this game: build bigger deadlier units and more of them. There are several resources to juggle, but the economy is pretty simple. You'll need a bit of everything, so keep an eye on the numbers and build whichever resource building is lacking (in the tile with the highest respective bonus) and you should be golden. Each type of production building you create has its own production queue, so there is little need to create additional cities at the beginning of the game. In fact, the Space Marines can never second city, but instead can occasionally drop down fortresses next to desirable resource nodes.


The tech trees in Gladius, the contents of which are completely unique for each faction, are structurally simple. There are ten tiers of research and about a half dozen options in each tier. Research two techs in one tier and you unlock the next. The vast majority of the techs either unlock a unit, building, or combat upgrade, but there are also some resource bonuses and special powers scattered around. This simplicity creates some stark decisions. Do you focus on providing upgrades for your starting grunts, climb the tree to find more powerful and exotic units, or try to build up your war machine? 

eXploit


So what are you doing on Gladius anyway, what is the goal here (other than killing and destruction, obviously)? Each faction gets some nice flavor text and "quests" to offer them direction throughout a match. This was one of the best features of Endless Legends, and it works just as well here. Completing these objectives as they come up will give you bonus resources and units. After the first few simple tasks, the story objectives will require you to venture out into the map for one reason or another, inevitably leading to conflict with neutral units and other factions. This gives the game some nice replayability, since each faction has its own story to follow and different goals to achieve. In the end though, only one faction can win, and the others must all perish. This brings us to the final X:

eXterminate

While some other 4X series like Civilization have tried to make combat more of an option than a necessity in recent iterations, Gladius goes all in on warfare.  While research and production is streamlined, combat units have detailed stats and options to consider. Units have health, armor, morale, perks, experience levels, sometimes multiple weapons, and so on. All of the variables can be improved through new technologies. For example, the lowly Imperial Guardsmen begin the game at a disadvantage against literally everything else. However, with some researched upgrades, later in the game they can have decent stats and multiple special abilities.  All of the favorite units from WH40k lore are here. Dreadnoughts, Killa Kans, Baneblades, and many more all take to the battlefield in a surprisingly short period of time. Where in Civilization, by the time you hit turn 50 you've probably said hello to a couple of neighbors and built a second city, in Gladius you will already be skirmishing with multiple opponents, by turn 100 it's a full scale war that doesn't let up. Whether you find that to be a positive or negative will determine if this is a game for you or not.  Combat is very much the meat of the gameplay.


I've only played the game on the default map settings so far, and it makes for a real knife fight compared to other 4X games. Three and even four way battles are common sights. It's fun to watch a battle for one of the special resource tiles swing back and forth between two or three factions, as units are destroyed and reinforcements arrive to counter-attack. As the battle rages your units that survive can gain up to ten experience levels, making a battle hardened veteran from the early game a really potent tool in your arsenal. You can give such units a distinct name if you like, creating a bit of extra attachment with them. 


Hero units in particular can be devastating to lose, since they unlock multiple extra powers and abilities as they level up. Each faction gets three hero types, typically some variations of a warrior, mage, and support. Each hero has three starting abilities to choose from, and a more powerful ability unlocked at level 6. All of these abilities can be upgraded multiple times, allowing you to customize your heroes as you see fit.  

All of these elements taken together make for a simple, but fun 4X game focused on combat and building cool units. The missions given to each faction give some context to all the fighting, though it wouldn't hurt to see some extra variety there. Each faction always gets the same set of goals, which can railroad some of your early build order decisions if you know what is coming. 


The game looks very nice for a 4X, with especially good animations and weapon effects. I saw a lot of comments on my preview video from people saying that the game looked too brown and ugly, but I found that most of the randomly generated maps feature a decent amount of green grass and other colorful areas, in addition to the obligatory ruined cities and wastelands. It certainly feels like a world beset by a warp storm and multiple alien invasions. It's a hostile and dangerous place to be for everyone involved. 

Although the game only features four factions, each is completely distinct and will give you different experiences. Fans of Endless Legends will feel right at home playing factions with radically different mechanics. One really fun mechanic is the Ork "WAAAGH!" meter; keep the fights coming and your units will all get extra attack damage that builds more and more. Each faction has a different starting difficulty rating, and you should pay attention to it. I stubbornly attempted to play as the Imperial Guard several times, despite the HARD difficulty warning, and got my tail kicked on each attempt. Hopefully we'll get to see some more factions added to the game. It would be great to see the Eldar, Tau, and Chaos Space Marines joining the fray, among many others.


WH40k: Gladius - Relics of War succeeds at what it sets out to be. This is the arena shooter of 4X games, where combat is the primary focus of each campaign, and moves at a much faster pace than you might expect. Just when you think you're unstoppable, the enemy will show up with a next tier unit and rain on your parade. This creates an enjoyable back forth with fluid front lines. I didn't get a chance to play multiplayer, but I can only imagine that a group of friends would have a fun afternoon exterminating each other. The fast paced turns and relatively simple gameplay mean that you could potentially play an entire match in one long sitting.


The drawback of this streamlined approach is of course that the game could suffer from a lack of variety after you've tried out each of the four factions. The winning strategy is always war, never diplomacy, science, or culture, they aren't even an option. This may be a relief for some gamers, however, who just want a good fight and not to worry about establishing the most efficient trade routes or converting others to your religion (this is 40k, you purge anyone who isn't your religion with gratuitous violence!). For those players, I can safely recommend this game if they are at all interested in the setting. For myself, I have enjoyed all the time I've spent with the game so far, and haven't managed to win just yet, so I'll be heading back out there shortly to claim Gladius for myself. 


Warhammer 40k: Gladius - Relics of War releases July 12th on Steam and GoG. The regular price is $45, but you can get a 10% discount if you hurry. The GoG version comes with a free copy of WH40k: Rites of War if you pick it up before July 26th!

 - Joe Beard


hpssims.com