second chance games

Search This Website of delight

ZERO LEADER FROM DVG At long last the wait is over and in some ways it was for me almost bound to be an anti-climax.  Why?  Well, this is th...

ZERO LEADER ZERO LEADER

For your Wargamer, Toy soldier collector, MiniFig collector, military history nut. Reviews, interviews, Model Making, AARs and books!

ZERO LEADER

FROM

DVG

At long last the wait is over and in some ways it was for me almost bound to be an anti-climax.  Why?  Well, this is the latest in a series that has already a proven record of success from a company whose quality of components is superb.  How do you top what is already the top!?

Added to that is the fact that Corsair Leader [the Allied mirror image of Zero Leader] had already introduced the crucial new elements which tipped the balance to send it to the very pinnacle of my choice for a solo air game.  First of all both are set in WWII, a period which far outshines modern air warfare and that is obviously a very personal opinion, not a fact.  The only vague possibility for future additional excellence might be the path to... WWI!  I know you could argue that their Down In Flames does the job, but surely there might be a place for a Sopwith Leader or Richthofen Leader?

Anybody listening out there at DVG?  One can but dream and hope.

Ok back to reality.  I hardly need to say that quality remains supreme in all departments from the familiar abstract mounted map board to  counters and the massive number of aircraft cards.

The familiar abstract mapboard

A superb nine sheets of counters
Stacks and stacks of aircraft cards!

Rounding everything off is the consistently handsome rule book.  As always its apparent thickness is misleading.  First of all, of its 49 pages, only the first 34 are necessary to play the game.  The remainder cover optional rules, rules for the Ace expansion and the Rookie/Trainee Expansion, very welcome information on each type of Japanese aircraft, a 4 page crossover rules set for Zero Leader & Corsair Leader and 4 pages of charts relating to Target Destruction effects for both games.
Secondly, when you consider those essential 34 pages, the layout is so expansive and luxurious that  many other rule books would probably condense them down to half the number.  An amazing amount of white space is used to provide one of the easiest on the eye reads that you could ask for.

Even an example of one of the most detailed page is set out in two broad columns with double-spacing, as seen below.

The rules themselves follow a pattern that will be very well known to anyone who owns one of the Leader series that deals purely with air warfare.  So, what follows is very much aimed at those less familiar with any of this solo series. 
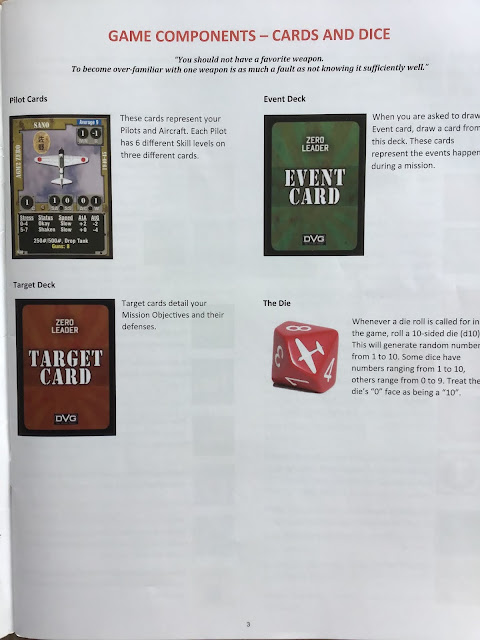
Most steps in this game are fairly quick and easy to execute, with one major proviso and that is the need for a very careful initial sorting of components.  This is particularly advisable for all the Pilot cards, which, I suggest, need to be grouped according to some system that you feel comfortable with.  No solution can cover all the multiplicity of year ranges perfectly.   So, my own preferred, personal choice is by plane type and then according to the earliest year in which a given Pilot first appears.
As in all this series, there are 3 double-sided cards for each Pilot taking them from Newbie to Legendary level which you need to keep grouped together.  
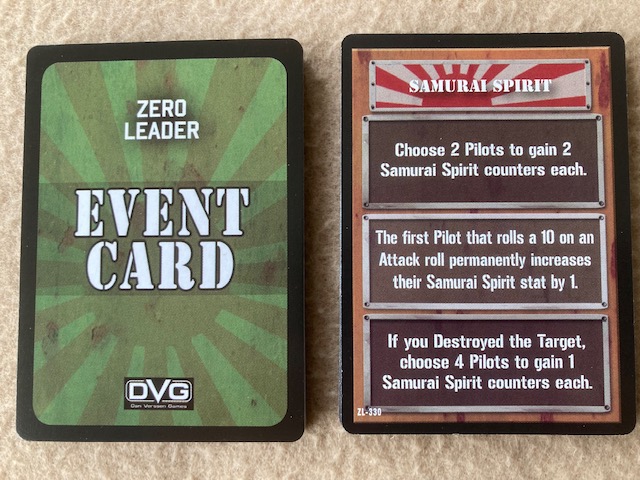
With Target cards simply keep them in numerical order, draw the numbers needed for a specific Campaign and make sure they get slotted back at the end of a game.  Event cards are a boon as they are always shuffled at the beginning of a game!
For the many counters, the most important to sort are Site, Bandit and Bomber counters by year.  Though not as necessary, sorting the pilot counters by plane type is very helpful, though small groupings by alphabetical order is a good alternative.  

With that out of the way, you can get down to play where your first task is to choose one out of the fifteen Campaigns on offer.  This is the identical number to those in the Corsair Leader game, though I was pleased to see a few different choices here.  Each Campaign can be played for a Short/Medium/Long duration.  As a starter, I'd suggest an Introductory Campaign such as Midway [a personal favourite] played for a Short or Medium duration.  Next you'll select the appropriate Target cards as numbered on the well presented Campaign Card.

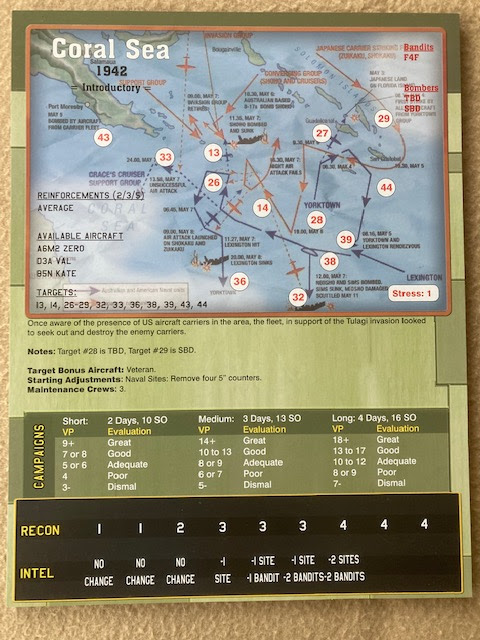
Among the many other details on the card are the types of Japanese  planes involved and the types of Allied bandits and bombers, you may come up against.  
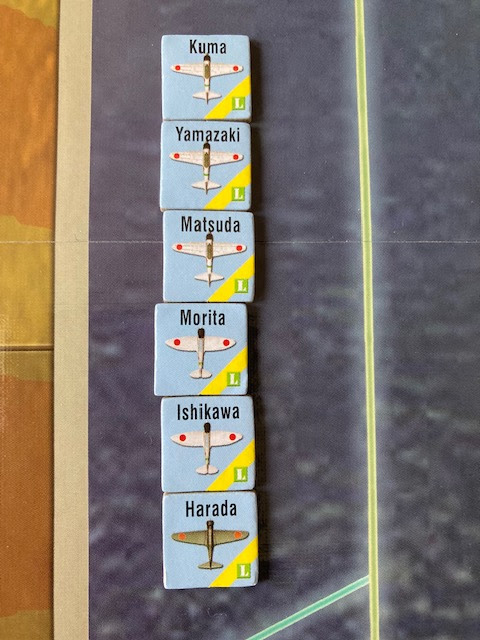
Next you will select from among the named Pilot cards for the appropriate plane types and the year of the Campaign and the number of pilots allowed in your Squadron.  The rule book supplies the latter information on the number of pilots as well as the typical experience composition for the appropriate year and Campaign duration.  So, continuing as an example Midway and a Medium duration, I would choose 10 pilots made up of the following experience levels - 1 Newbie, 2 Green, 4 Average, 1 Skilled and 2 Veteran.  It's also worth noting that all Pilots are also divided into two categories;  Fast and Slow.  This is important for combat, as will be discussed later.
These details will be recorded on the Player Log [either a photocopy of the one supplied with the game or a downloadable copy from the DVG site] along with the number of Special Option [SO] points for the Campaign that allow you to further fine tune your Squadron by using them to upgrade experience or acquire specific skills to assign to individual pilots or improve the quality of a plane.

Above is a partially filled in Log for a short Midway Campaign.  I tend to include the type of plane under the Pilot name.  Each letter to the right indicates the pilot experience level and the black dots indicate in the first column the current Cool quality of the Pilot and in the second column their aggression.  Apart from keeping the completed Logs as a reminder of a Campaign, they're very handy if you want to quickly assemble a squadron and you don't have time for making a lengthy choice of a new squadron.
The duration of a Campaign will tell you how many days the Campaign will last and on each day you will be able to fly at most one Primary Mission and, possibly, one Secondary Mission.  Though the longer the Campaign the more pilots you will have in your assembled squadron, one of the delights/dilemmas/pressures of the game is how may pilots you assign to a given Mission.  Obviously the harder the Mission the more pilots is a pretty obvious decision, but so many factors come into play that it is rarely an easy choice!
I'm now going to step you through the basic play Sequence.
PRE-FLIGHT
Draw target card[s] and select one primary Mission. Determine and place sites according to info on the Target card. assign Pilots to the Mission - later in the war you may have the option to select Kamikaze aircraft or Ohka pilots. Finally prepare for the Mission.  This mainly involves choosing the weapons [essentially the bomb ordinance allowed by your plane] and drop tanks for added fuel.  However, Situational Awareness counters and Samurai Spirit counters may be assigned if purchased or originally allocated as part of your Pilot's profile.  Both obviously provide special benefits.
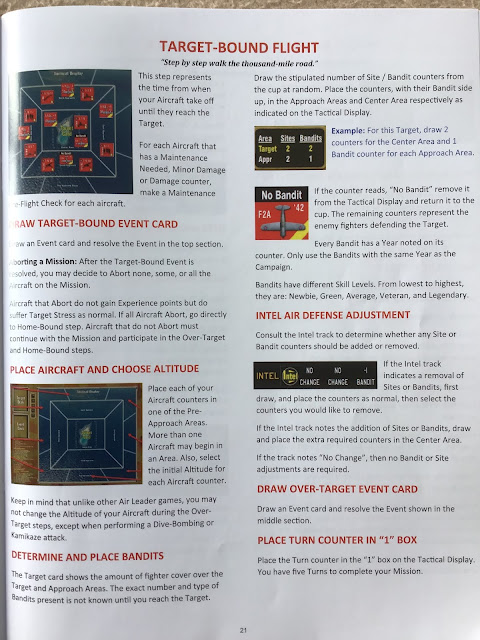
TARGET-BOUND FLIGHT
Draw an Event Card and consult the top box.  


After the Event is resolved, you can even abort at this stage - but I've found making that choice is very rare, unless you are doing very well in a Campaign or conversely very badly!
You then place your aircraft counters on the mapboard in one of the Pre-Approach Areas.  You also have to choose the altitude of your plane [either High or Low], as unlike all the modern era Leader games you won't be able to change this later, unless you are a dive-bomber or a kamikaze!

Here's one occasion when I went for all planes in one Pre-Approach Area, but beware as you don't know the exact Bandit [i.e. enemy plane] composition in the Approach Areas yet.  So, the next step is to draw them and you may get lucky and find that some of your draws may be No Bandits - great!  On the other hand, there may be some nastier opposition than you expected - not so great! 
Finally, you draw another Event card and consult and execute the instructions in the middle box and then place the Turn marker in the 1 position.  You now have 5 turns in the next Phase in which to complete your Mission.

Mission Pilots weaponed up!
OVER-TARGET RESOLUTION
At this stage you have 5 turns in which to complete your Mission. Each turn follows the same sequence:
[1] Dive Bombers or Kamikazes dive to low altitude. 
[2] Fast Pilots may make one attack on a Site, a Bandit or the Target - the choice will depend on the plane's location, altitude, appropriate range and weapon.
[3] Sites and Bandits attack
[4] Slow Pilots may attack
[5] All Pilots may move
[6] Bandits move
What happens will depend on whether you are in a Pre-Approach Area, an Approach Area or the Target Area.  If in a Pre-Approach  Area, not much more than moving your planes into an adjacent  Approach Area or adjacent Pre-Approach Area is likely to happen. But once into an Approach Area or the Target Area things are guaranteed to heat up!
It is also here that the main complexity of play also increases and is the major difference between all the modern era Leader games and Corsair Leader and Zero Leader.  That's because we're in WWII and DOGFIGHTING comes into play!

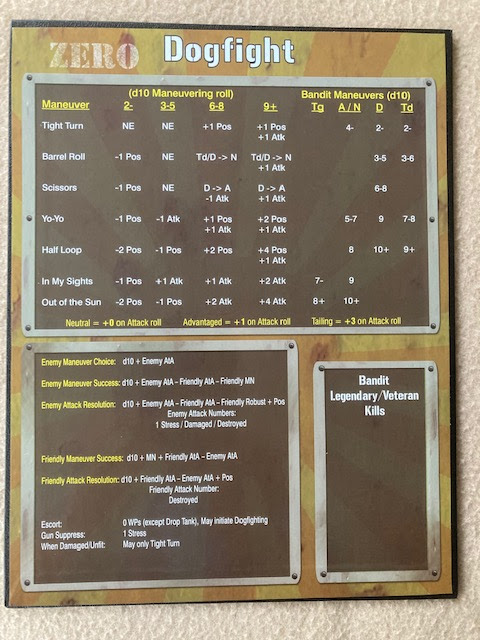
As can be seen it even has its own special mounted chart.  Unengaged, Engaged and Positioning all play their part with a matrix of manoeuvres bringing a series of potential modifiers and choices into play.  Some of these will also depend on qualities inherent on the Pilot card or Skills purchased with SO points. The element of Dogfighting was the one I was most looking forward to in this and its companion game.  It adds greatly to the level of detail, but I must admit it does add significantly to the many small rules that you need to master to play the game well.  
Herein lies the major complexity of playing Zero Leader.  The basic stages and rules of the game are clear and fairly easy to grasp and retain without too much return to the rule book.  However, the many skills, qualities and attributes when combined with the modifiers on the Dogfight chart and how they affect them, allowing usage of some and not of others can lead to a much greater level of checking and rechecking that I've got things correct.
Regular play of the game obviously smooths the path, but this is not a game that you can easily lift down from the shelf for the occasional and infrequent session.  Play is engrossing and as always, a system which has named Pilots invests the action with an element of personal involvement as Stress levels mount, planes suffer damage and for some go down in flames.
Battling through the Bandits and the defensive sites in both the Approach Areas and the central Target Area, eventually you get a crack at the target itself which may range from a simple shore battery all the way up to a carrier.

And here are my heroes taking on those shore batteries
This will have taken at least two or three of your five turns and so you'll find yourself with at the most three turns to destroy the target to gain your main victory points.  Whatever degree of success you've had, however, the game's not over yet - there's still one last stage to work through.
HOME-BOUND FLIGHT
One last Event card is to be drawn and instructions on the bottom row of the card carried out.

 In what's called a debriefing section, the success of your mission and the number of VPs gained is entered on your Pilot Log.  The quality of your Recon and Intelligence abilities on the game board may be improved to give your future benefits in new missions. Stress gained by all your participating pilots is recorded.  Experience points may be gained, leading to possible pilot promotion; stress may be recovered from and finally your Maintenance Crews come into play.  Yes, you even have a chance to put in some repair work, mend damage that might have been taken and by rolling on a special table, you can even push your crews to additional work at the risk of them gaining fatigue and at the very worst making a mistake in their efforts.
The game may be played out on a very stylised and abstract mounted board, but a great amount of realistic detail of this brutal war is packed into Zero Leader.  Consulting your Campaign success at the end of a gruelling 6 day Long Campaign from the VPs you've accrued may sound anti-climactic, but I can tell you it's not.  There is a profound sense of satisfaction even if you've only achieved Adequate and just don't ask about what went wrong if the result is deemed Dismal!

Once again it's many thanks to Dan Verssen Games for providing my review copy and ... as a foretaste of my future reviews.  Next up will be a further venture into the Pacific war - this time in its entirety with Phalanx's new edition of Fire In The Sky and then it's back to DVG to review their production of David Thompson's most recent design, Soldiers In Postmen's Uniforms.


Publisher: Dan Verssen Games
Players: 1
Playing time: 90 minutes +
RRP: £87.95


Micro Macro Crime City is the 2021 Spiel de Jahres winner and despite hearing the title and listening to various gaming podcasts, I had no r...

Micro-Macro: Crime City by Johannes Sich Micro-Macro: Crime City by Johannes Sich

For your Wargamer, Toy soldier collector, MiniFig collector, military history nut. Reviews, interviews, Model Making, AARs and books!


Micro Macro Crime City is the 2021 Spiel de Jahres winner and despite hearing the title and listening to various gaming podcasts, I had no real conception of what it was until I played it for myself.  It is quite unlike any boardgame I’ve experienced before and more like Where’s Wally*: The boardgame.


*Where’s Waldo for our American readers.


It comes in an attractively slim box (which is still too large for the components) and one game plays in about 15 minutes or so.  However, I defy anyone to only play just one game of this before packing it away.  Each ‘game’ you’ll find yourself trying to work out who, why and how a particular crime was committed across an expansive fold-out isometric map of the eponymous ‘Crime City’.


Gameplay

During each case 1 to 4 players will pore over the large map of the city trying to find clues to answer the questions posed by the Case cards.  Only when you’ve found the right answer can you go onto the next card and after ten or so cards, you’ll find you’ve solved the case.


There are 16 increasingly difficult cases in the box which I completed in 4 games sessions, with friends and family alike.  Anyone can jump in to help you solve a case and you could even put this in front of someone with no experience of board games and they’ll do alright and have a good time.  All you need is a pair of eyes.  They do provide you with a plastic magnifier to look at some fine details, but this wasn’t used / necessary in my groups.


Each crime scene on the map can be referenced by coordinates round the outside (confirming you’ve got the clue’s answer right) and you’ll then use the hints left in the artwork to find the next answer.  Each element of the crime is unique to that crime so in order to find the next answer you’re left searching the now huge map for another appearance of that unique item.  These will appear some distance away from the last answer, but I was often surprised at how quickly our eyes homed in on the next object.  Meaning it never bogs down into boredom just searching and squinting for the smallest of details.


I would describe this as a very relaxed experience; players could easily drift in and out of the game.  I distinctly recall during my first session of this with 5 other players (3 kids, 2 adults), after the third case the adults drifted away, probably to get some time without kids if I’m being honest, and the kids kept playing the case by themselves and even started and finished the next case.  It’s incredibly simple to explain and fun to play and that is why I think it won the SdJ.  You’ll even be able to start playing the game before you’ve opened the box – how many board games can say that?


However, is it a boardgame? I’m not so sure…it’s a fun experience in its own right and I am impressed at how much detail the artists have got into the map, in fact there are more puzzles and scenes to solve both in the manual and online.  So I can’t really say I’ve completed it, but after finishing the 16 main cases I don’t have any desire to revisit the map / cases / game?  Like with any escape room style game, each case is for one time use only.


The best endorsement I can offer this is that it suffers from ‘one more turn’ syndrome, or in this case ‘one more case’.  You’ll be surprised at how many cases you’ll get through in one sitting, although thankfully they do get significantly harder at the 4 and 5 star levels.

Components

Just as the game is quite simple so are the components.  You’ll get 16 decks of cards (one for each mission) and a large paper map of the city.  I was initially concerned that repeated unfoldings and foldings would obscure some details but it’s stood up just fine, to where I would happily give it away to another family.  The main map damage has come from our bellies and bodies leaning over the map and creasing the corners.


The map itself is just black and white line art, however I think it is this simplicity that makes this game work and has become a recognised trade mark of the title.  My daughter wants to colour-in the whole map which although would look spectacular, I doubt would ever get finished and the colours would actually hinder gameplay.  Thankfully so far she’s not been brave enough to start and I think she’s forgotten…


The box provides a small micro-cosm of the City and poses one case to players even before they’ve opened the game.  This could be a fun diversion whist trying to pick new games in your FLGS but shows just how simple this game is to teach, play and involve all types of people.


Criticisms

I can’t really criticise the game for what it is.  I think it does it pretty much perfectly, ‘it’ being a fun, quick simple filler and why the SdJ chose it as their Kritikerpreis.  And although I did enjoy the experience of playing this with others it’s not a game (or its expansions) that I’ll be seeking out again.  It’s just not in wheelhouse and I’m finding more and more that my tastes don’t necessarily jive with the SdJ.  

Conclusion

I would heartily recommend this to gamers and non-gamers alike.  It’s cheap and different from pretty much anything that I’ve experienced before.  It plays quickly and is an enjoyable experience for everyone (if you’re comfortable climbing over each other to view the map from the best angle), and I’m pretty sure that you’ll suffer from ‘one more case’ as well.  It’s an extremely simple concept and it is done brilliantly here. 


I’d like to thank Asmodee UK for sending this review copy. You can use this link https://www.asmodee.co.uk/contentpage/find-your-game-store to find your Friendly Local Game Store, which need all the help they can get at the moment.


Designers: Johannes Sich
Playtime: 15 minutes +
Players: 1 - 4

  Parma 1734 The Battle of Crocetta by Aleph Game Studio  The Eighteenth Century was as full of warfare as the preceding centuries in Europe...

Parma 1734: The Battle of Crocetta by Aleph Game Studio Parma 1734: The Battle of Crocetta by Aleph Game Studio

For your Wargamer, Toy soldier collector, MiniFig collector, military history nut. Reviews, interviews, Model Making, AARs and books!


 Parma 1734 The Battle of Crocetta


by


Aleph Game Studio


 The Eighteenth Century was as full of warfare as the preceding centuries in Europe. We mostly think of these two wars: The War of the Austrian Succession, and The Seven Years War, up until the Wars of the French Revolution. There were, however, quite a few wars that erupted, two of them being The War of Jenkin's Ear, and The War of the Polish Succession. The Battle of Crocetta was part of the War of the Polish Succession. It was fought near Parma on June 29th 1734, between the Austrian Army, and the Franco-Piedmontese Army. France and Austria had been fighting over Italy for hundreds of years and would continue until 1859. The French were originally commanded by Marshal Claude Louis Hector de Villars (of The War of the Spanish Succession fame), but he gave up the ghost on June 17th 1734. The French were then commanded by Marshals de Broglie, and Coigny. The Piedmontese were commanded by King Carlo Emanuele III of Savoy. The Austrians were commanded by Marshal Claudio Florimondo di Mercy, and Prince Federico Luigi of Wurttemberg-Winnetal. The battle was very hard fought, and both sides suffered higher than normal casualties given the amount of troops on the battlefield. The Austrians withdrew after the battle, giving the French a dubious victory. So, let us see what is in the box:


1 game map

3 countersheets

6 scenario cards

2 player aids

1 10-sided die

1 rulebook

Players: 2

Time: 2-5 hours


  The map is done very well with some really nice touches added for the buildings on it. There are no ambiguities about what a hex consists of etc. The counters are large at just under 3/4", and they also come pre-rounded. Each one has what is really a small artwork done it to differentiate between infantry, cavalry, artillery, and leaders. The Movement Allowance and all of the numbers on them are nice and big for old grognard eyes. There is one Player Aid for each player, so no need to share one. It has the Terrain Chart, Infantry Fire Table, Artillery Fire Table, Shock Combat Table, and the Sequence of Play on each. Their are six Players' Aid sheets for the setup of both scenarios. These are in full color, and instead of just a list of what counters go where it shows the actual counter full sized on the sheets. This is a really nice touch. All of the Players' Aids' are made of hard stock. The Rulebook is twenty-eight pages long. It is in full color, and uses large print throughout its pages. An altogether very well manufactured game.


 This is the Sequence of Play:


"1. Command Phase

During this phase the players organize their army.

Both players:

• simultaneously assign their Priorities of Order to

the Army for the current turn;

• check the status of the Troop Command;

• place reinforcements as indicated in the

Scenario Cards.

2. Opening Artillery Fire Phase

In this phase the players use their artillery

batteries. Players take turns firing one battery at

a time. The rules of the Scenario usually indicate

who is the first player of the phase, otherwise

each side rolls a die and whoever gets the

highest result will be the first. In the event of a tie,

both players roll the die until one of the two gets

a higher result than the other. The winner will

become the Active player and will activate his

first artillery battery.

3. Initiative Phase

In this phase is the players determine who will be

the Initiative Player. The players each roll a dice,

the player with highest result die roll is the

Initiative Player for the current turn, while the

other will be the Reactive Player. In the event of

a tie, both players roll the die until one of the two

gets a higher result than the other.

4. Wing Impulse Phase

In this phase, players take turns activating their

Wings, based on how they distributed the Order

Priorities during Phase 1.

This is the sequence that is carried out within this

phase:

a) Impulse of the Initiative Player (1st action):

the Initiative Player reveals and activates his

own Priority Wing in this sequence:

1. Movement of units

2. Activated units Fire Combat

3. Activated units Shock Combat

4. Mandatory moves caused by Shock

Combat

5. Advance after Shock Combat

b) b) Reactive Player Impulse (1st action): the

Reactive Player reveals and activates their

Priority Wing in this sequence:

1. Movement of units

2. Activated units Fire Combat

3. Activated units Shock Combat

4. Mandatory moves caused by Shock

Combat

5. Advance after Shock Combat

c) Other impulses: repeat the same sequence

as the previous impulses for the other Wings,

in order of priority assigned:

1. Initiative Player's Impulse (2nd flanking

action)

2. Reactive Player Impulse (2nd flanking

action)

3. Initiative Player's Impulse (3rd flanking

action)

4. Reactive Player Impulse (3rd flanking

action)

5. Impulse of the Initiative Player (support)

6. Reactive Player Impulse (support)

5. End of Turn Phase

During this phase, end of turn checks are

performed. In particular, this sequence must be

respected, starting with the Initiative player:

1) Check the Army morale (see 12.0);

2) Rally of units (see 13.0);

3) Remove 1st Shoot/1st Volley/Fired markers.

Finally, the Game Turn Marker is advanced."


 I wanted to include the full Sequence of Play so that the gamer sees that this game does not use a simple cut and paste set of rules from other games series. It is a deep game that tries, and succeeds, in simulating eighteenth century warfare. 


 The scenarios that come with the game are:


1. Tutorial: Clash Of The Vanguards (8-10 AM)

2. The Battle Of Crocetta 


 The game has unusual Victory Conditions as well. The designer understands that eighteenth century warfare was not usually a battle to the death, or even a battle to one side being routed. So, the game's intent is for each side to force the other to fall to 10% of its Initial Morale Value. This then forces the side that hits that percentage to order a General Withdrawal Order. These are the values etc. of the two sides:


French/Piedmontese Army:

Initial Value - 88

Demoralization  - 44

Withdrawal - 8

Austrian Army:

Initial Value - 96

Demoralization - 48

Withdrawal - 9


 Demoralization causes an army to suffer its movement capacity halved, leaders to lose 1 point of Command Range, and all Discipline checks suffer a +2 modifier to the die roll.


 Each separate regiment also has its own Regimental Breaking Point Value. This is a rule that is not often seen in games.


 This a breakdown of some of the chrome added into the game:


Infantry can be in either:

  Line

  Column

There are four different types of Cavalry:

  Heavy Cavalry

  Cuiraissers

  Dragoons

  Hussars

Artillery can be either:

  Limbered

  Fire Capable

Leaders have a Command Range


The designer knows that divisions were not used at this time in warfare, and battles were fought by 'Wings'.


 The game is a very taut see saw battle between two pretty evenly matched armies. The rules were designed to put the player into the shoes of a Marshal of the period. This means each player needs to learn the limitations of warfare at this period. The only thing missing from the rules are ones about sending dispatch riders out to your formations. Thank you Aleph Game Studio for letting me review this great and very interesting game from your stable. If a player is looking for a detailed engrossing game about eighteenth century battlefields they need look no further.


Robert


Aleph Game Studio:

Aleph Game Studio – A new beginning in gaming

Parma 1734: The Battle of Crocetta:

Parma 1734 – Aleph Game Studio

  FOR GLORY FROM SPIELCRAFT If you don't know your ludus from your lanista, you soon will after playing a game of For Glory and there&#...

FOR GLORY FOR GLORY

For your Wargamer, Toy soldier collector, MiniFig collector, military history nut. Reviews, interviews, Model Making, AARs and books!

 FOR GLORY
FROM
SPIELCRAFT

If you don't know your ludus from your lanista, you soon will after playing a game of For Glory and there's no doubt that the picture on the box is rather an obvious clue!

So, without further ado, here we are in Ancient Rome tasked with being an owner of a gladiatorial school and training up gladiators to fight in the arena.  The lanista - well that's your role in life - and ludus is your school, in this case a training establishment for gladiators.  It's a neat point that the other meaning for ludus is a game.

Now there have been quite a few games on the theme of gladiatorial combat from the super deluxe Hipplomachus to many, often minor publishings, some with figures included or just traditional cardboard counters, some with arena boards and some without.  All have taken us purely to the arena and the gladiators and the combat; many are quite simple encounters, a few have been relatively detailed affairs.  None, as far as I've been able to ascertain, have covered the ground that For Glory does.

For Glory presents us with a compact, deck-building treatment that can just about be squeezed onto my all-purpose gaming board.  In the picture you can see everything except the game box and rule book.

In essence, it is a quick-playing, two-player, deck-building game.  On the right, you can see the cardboard coins, blue glory tokens and the wooden, red wound markers.

In this close-up, you can also see the gladiator's helmet token which designates the 2nd player.  All the components are of very good quality and I particularly like the art work of the many different cards and its extensive use in the rule book itself.
The rules themselves are a player's delight.  They are thorough, exceptionally clear and very easy to follow.  This is both because they are well written as well as exhaustively illustrated and exemplified.  Each type of card has its own separate picture and explanation of how to read its symbols.  The fact that there is degree of repetition when a feature of one type of card mirrors that of another type should be a great asset to anyone new to deck-building.

For those familiar with this popular mechanic, it makes assimilating the information a swift and effortless process.  As a result after a couple of games, I found play rarely needed any reference to the rule book.  However, should you need to, there is a very handy alphabetical reference section at the back of the rule book, though there is no numbered index to the rules.

The  excellent, easily assimilated set of rules

In brief, a Round is divided into two Phases
     Machinations Phase
     Arena Phase
However, in many Rounds you will only play the Machinations Phase.  But to help understand the flow of the game, it's worth briefly explaining the table layout which is appropriately presented at the very start of the rule book.


On the left side are the three Supply Decks: Economy, Gladiator and Training.  These Decks are where you will buy the cards to develop your own personal playing deck.  On the right are all the necessary markers, while running down the centre is your playing area tableau, the three potential Arenas where your gladiators will fight and your opponent's playing area tableau.

Taking a closer look at the very heart of the game, we have the three Arenas.

The left and centre Arenas are called the Fleeting Glory Arenas and the one on the right is the Lasting Glory Arena.  The Lasting Glory Arena can always have gladiators placed there, but as soon as the first gladiator is placed at one of the Fleeting Glory Arenas, the other Fleeting Arena cannot have gladiators committed to it. Note carefully the blue Glory tokens on each Arena card as these are you vital reward for victory in the Arena.  They are also how you eventually win the game, as the first player to gain six of these tokens is the winner.
An important factor is that the Arena Phase does not take place every Round.  Instead there is a gradual build up.  Each gladiator card that is committed to an Arena has a Bloodlust value and an Arena Phase will only occur when the combined total of Bloodlust points reaches a set number.  The mechanics of this is an element I strongly enjoy in the game, especially as there are two important balancing constraints.  
One is that the check for whether an Arena Phase has been reached is only carried out after the 2nd player has taken their Machination Phase.  In other words, the first player can't suddenly pile in several gladiators to reach the required total without the second player being able to respond.  The other is that an Arena Phase begins with Late Registration - this allows each player to commit alternately one new gladiator at a time to an arena by paying three coins.
This produces a very satisfying uncertainty about when and which gladiators to commit  and adds a good potential for bluffing.  My advice is to watch carefully which gladiators your opponent acquires and which have been committed to the arenas.
However, before any combat can take place, you will have taken several Machination Phases and I can assure you that these Phases are just as absorbing and exciting as the fights!
Picture of combat in the arena taken from the rule book
For those who may just revel in the hack and slash of combat, perhaps this may not be the game for you.  But for those like me who want a more nuanced experience, the Machinations Phase is just the thing.  As with many deck-building mechanics both players begin with an identical deck of 14 cards containing 2 identical and rather limited gladiators and the rest are mainly coin cards.  Each Round, you will draw 7 cards and you will want to try to use all of them to maximum effect, as any unused cards are placed in your discard pile. 
Here is your starting deck of 14 cards

Initially, buying cards will predominate and what you can buy is handled very well, because there are the three decks already mentioned: Supply, Gladiators and Training and there will always be three cards from each deck to choose from.  Having this range of nine cards is a major plus, as you rarely find yourself in the position I've encountered in some deck building games where too often crucial cards keep appearing and being claimed by others just before your turn. Nor have I experienced the dreaded "killer" cards of some games that are so overpowering they totally skew game play.
There's a wide range of choice and effect that effectively bring in strong thematic historical elements to the game.  Particularly important are Patrons, who you will add to your player tableau.  Not only do they often add bonus effects, but their essence is the amount of Influence they bring with them.  This is crucial because Influence is what you need to allow gladiators to enter an Arena and for them to stay there.
Your Patrons will remain permanently in your tableau, but if you use their bonus effect/s, then as in most deck builders you have to exhaust them by turning them sideways.  If you do that, you lose their Influence until the next Round.  As a result you may not have enough Influence to maintain all your gladiators.  I love these sort of dilemmas in a game that force simple, but difficult choices and are also a realistic reflection of the theme.
Here's the basic layout of your tableau part way through a Round.  In the centre is your player board which handily outlines both Phases and the steps you can take.  To the left are placed your Patrons and just above them any Glory tokens you've gained, while to the right are cards that you have Reserved and above them any coins that you've acquired.  Finally below, on the left, is your deck of cards from which you will deal your next Round of cards  and to the right any discards.  What you cannot see in the photo are the cards that you still have in your hand to play that Round.
So, over a number of Rounds of Machination Phases, you and your opponent have placed enough gladiators to reach the Bloodlust level for an Arena Phase to take place.  The photo below shows the excellent example of this in the rule book. 
Initially this will happen fairly quickly, as only 6 Bloodlust pts are needed to trigger the first Arena Phase, but after that the totals for triggering rise in the following sequence: 14,19,24, 24.  
Though this is hardly a difficult item to remember, the game [following its excellent provision of superb visual aids] has a small deck of Boast cards with the Bloodlust numbers on.  What's more they are illustrated with a suitably boastful gladiator raising a sword and axe aloft and an equivalently boastful text - one of which, at least, shows a fairly high level of articulate literacy for a gladiator.
This level of attention to reinforcing theme through constant visual art is one of the game's many strong qualities.
Finally, in the Machination Phase never forget the ability to place Tactic and Reaction cards into your Reserve Area.  The ability to suddenly bring them into your hand during the Arena Phase could just be the difference between victory and defeat, but don't forget that you'll need enough coins to bring all of them out at one go!
The Arena Phase
As mentioned earlier, this begins with both players having the opportunity for Late Registration - but remember, you will need to pay 3 coins for each gladiator you want to now put down and will have had to lay cards during previous Machination Phases that provide sufficient spare Influence for this to be allowed!
That done, at last it's down and dirty to the combat.  A Fleeting Glory Arena must be resolved first followed by the Lasting Glory Arena.  It is, of course, possible for only one Arena to have had gladiators assigned to it.  Initiative is determined and then the players take combat turns alternately until both pass consecutively.
In a player's combat turn, a gladiator that is Ready [i.e. hasn't already attacked and been Exhausted] must attack and one Tactic may be played.  The latter may be a Tactic card played from your hand or a Tactic ability on one of the cards already set out in your tableau.
Should you have no gladiators left able to attack, you may still keep taking Combat turns, if you have any remaining Tactics playable.
Once both players have passed consecutively, if both players still have gladiators in that Arena alive, then they are all made Ready and the Combat process begins again. Ultimately the player who has at least one gladiator left alive will win the combat and gain the blue Glory token.  It is possible that both players might simultaneously lose their last gladiator, but it's not something I've yet experienced!

Once again, the level of interaction works to draw you into the atmosphere of gladiatorial combat.  There are many different types of gladiator, each with a differing ability and not always when they attack.  For example, some gladiators' effects. only come into play after they have attacked and are Exhausted.  Combine these with the abilities on Tactic cards, the Tactic abilities of some of your Patrons and the effect of Reaction cards and some Patrons' Reaction abilities and you have an engrossing set of mechanics.  

Even the Arenas play their part and this explains the names of the two types of Arena: Fleeting Glory and Lasting Glory.  If you win the combat in a Fleeting Glory Arena, you gain one Glory token and gain the ability of that Arena the next time you fight in it.  Should you lose in that next combat, your opponent will gain its ability for the moment.  Hence the name Fleeting Glory.  Whereas, if you win in the Lasting Glory Arena, not only do you gain two Glory tokens, but you gain the Arena card and its ability for the rest of the game and a new Arena card is turned over from the extensive deck of Arena cards to become the new Lasting Glory Arena!

To sum up For Glory ... good things come in small packages.  It's a both well designed and well presented game.  All the components and especially the art work on the many cards support the theme perfectly, especially when laid out in front of you in play.  The rule book too uses its design to great effect to make it an exemplary model for organisation and clarity. But more than anything else, it's an engaging, fun game to play and an excellent addition to the lighter field of two-player games

Obviously there's only one thing left for me to say, after thanking Spielcraft for generously providing me with this review copy of For Glory ...
  
Ave Caesar, nos morituri te salutant


  Napoleon 1806 by Shakos Games  The Third Coalition was brought into existence by English money (subsidies) to defeat Napoleonic France. Pr...

Napoleon 1806 by Shakos Games Napoleon 1806 by Shakos Games

For your Wargamer, Toy soldier collector, MiniFig collector, military history nut. Reviews, interviews, Model Making, AARs and books!


 Napoleon 1806


by


Shakos Games


 The Third Coalition was brought into existence by English money (subsidies) to defeat Napoleonic France. Prussia, oddly enough, had not joined it. The consensus of historians that they were biding their time until either side had given them enough of a bribe. They hadn't counted on Napoleon, and the completely trained and incredibly formidable Grande Armee. Before anyone realized what was happening, the Austrian General Mack (and 50,000 soldiers) were swept up by Napoleon without really a fight. This sent the Austrians reeling back to meet their Russian Allies. However, a little battle called Austerlitz put the Third Coalition down for a dirt nap. Prussia was just starting to think it would be a good idea to join the Third Coalition before it was no more. So with the Grande Armee and its roughly 200,000 troops sitting in Germany or nearby on the border, the Prussians came up with one hell of an idea. The Prussian court had a war party headed by their lovely Queen. This war party finally talked the King and his ministers to go to war with France virtually on their own. What was wrong with the drinking water in Berlin I guess we will never know. Russia had not concluded peace with France, so the Russians could help in the long run. The Prussian Army was led by octogenarians who had been weaned on Frederick the Great's battles. One of their youngest generals was Blucher, who was in his sixties. The Prussian staff seemed to have no idea of what actually to do. They staggered slowly toward the French border with no real plan. They also decided to split their army in two without having any idea of where the French were. The lion that was Napoleon had no trouble dispatching the sheep that were the Prussians. As a matter of fact, the 1806 Campaign is usually listed as the first blitzkrieg. The French went through Prussia like poop through a goose, probably only stopping at times to procure more maps of each new area they were rampaging through. This is one of those games where it is almost impossible to do as bad as your historical counterpart. The history being done, let us see what is in the box:


1 mounted game board 60 x 60 cm

1 rulebook

1 quickstart booklet

2 player aids (orders of battle)

2 player screens

2 sets of 36 cards

1 sticker sheet (54)

More than 220 wooden pieces

10 combat dice

1 cloth bag


  Opening up the box leads a person to exclaim 'C'est Magnifique! This is another European wargame that mixes a real honest to God wargame with a Euro game's look. The map is a beauty, and has a real historical feeling to it. The stickers are little pieces of artwork. They have the countenances of the Prussian King Frederick III and his various generals. These are countered by portraits of Napoleon and some of his Marshals. The two Orders of Battle are made of hard stock and are also a pleasure to look at. The Quickstart Guide is a very large four page fold out. It has a simplified rundown of this information on the first and fourth page:


Setup

How To Win

How To Play

How To Move

Fatigue

How To Engage In Combat


The middle two pages have a complete picture of the map and the Orders Of Battle and a Sample Card. The information needed for using the Orders Of Battle and Cards are also printed there. There are two Player Screens, one in blue, and one in gray. On the inside of the Screens are The Game Sequence and information on combat etc. The two Decks of Cards are also well done, and the Cards themselves do not feel flimsy. The manufacture of the wooden block pieces was done with excellent quality control. I found no mismatched sizes in the different pieces. The Rulebook is a work of art in itself. It is filled on most pages with colorful illustrations of what is being written about on the page. It is twenty-three pages in length. The actual rules take up fourteen pages. There is also a Short Scenario added for those who can only fit in time for a short game. A section called 'Rules For The Grognard' is added to add some historical flavor, and fog of war to the mix. Next is a section called 'Rules Of The Marshal"; this is a setup to play a tournament of the game. For conventions etc. this is a nice addition. What follows is a three page rundown of every Card and their meanings. The end of the Rulebook is a four part History Of The Campaign, and Design Notes. You also get a nice bag for the different pieces. The picture on it is a gold Napoleonic Eagle done on a blue background. The actual game pieces are a carbon copy of what you would find in Shakos Games 'Napoleon 1807' game. I will have a link to my review of that game below.


 The Sequence of Play is easy to remember:


Draw -  Each Player Draws Three Cards

Initiative - The Player With The Highest Value Card Wins

Operations - Movement And Combat

Recovery - Each Player Can Remove Fatigue From Some Corps


  The game rules allow for games to be played quickly. However, there is so much that a player can choose to do each turn that it can be a longer game. This totally depends on what depth each player wants to put into each of their moves. The Grognard Rules really add a lot to the game. These are:

Hidden Setup

Fog Of War

Cavalry Vedettes


 The Map is a point to point movement type. With the Order Of Battle Cards being hidden from play, your opponent will have no idea of what is in front of him strengthwise. The Cards Decks add to the 'friction' of war. While the French Grand Armee is still near its peak the Prussian Army, if not led as it was historically, can still give the French a run for their money. This game is another example of a designer wanting to have a game based in history, as much as possible, but still make it an excellent 'game', and a relatively easy one for two players to enjoy.


 Thank you very much Shakos Games for letting me review this beautiful and great playing game. It deserves to be right up with its brother Napoleon 1807 on your shelf. They have also come out with Napoleon 1815, so it is now a trilogy of games. I also had a chance to review their Saladin game. I will have the review in the links also.


Robert

Shakos Games:

Shakos | Historical board games

Napoleon 1807 Review:

Napoleon 1807 La Campagne de Pologne by Shakos Games - A Wargamers Needful Things

Saladin Review:

Saladin by Shakos Games - A Wargamers Needful Things


hpssims.com