second chance games

Search This Website of delight

Showing posts with label Compass Games. Show all posts

  Pontiac's War: Frontier Rebellion, 1763 - 1766 by Compass Games  I was an avid reader of Allan Eckert and Francis Parkman books in my ...

Pontiac's War: Frontier Rebellion, 1763 - 1766 by Compass Games Pontiac's War: Frontier Rebellion, 1763 - 1766 by Compass Games

For your Wargamer, Toy soldier collector, MiniFig collector, military history nut. Reviews, interviews, Model Making, AARs and books!

Compass Games


 Pontiac's War: Frontier Rebellion, 1763 - 1766


by


Compass Games


 I was an avid reader of Allan Eckert and Francis Parkman books in my youth. They both wrote about the early frontier days of the thirteen British Colonies in North America. I had always read about the indigenous people since I was old enough to hold a book. I am not sure if it was in an Eckert book or somewhere else that I first read about Pontiac (Obwaandi'eyaag) the Odawa (Ottawa) War Chief, and his rebellion against the British. This was just after the end of the French & Indian War. British hubris, especially commanding General Jeffery Amherst's, was in full swing and their treatment of the natives was part of this. The British believed that they had beaten the French and that now most of North America belonged to them. This was without any thought of the natives who actually lived there. The Indians were no part of the peace treaty between France and England. The frontier turned into a powder keg after the French troops left and the English took over their forts. This game is about what happened after the fuse was lit.


 This is what Compass Games has to say about the game:


“I mean to destroy the English and leave not one upon our lands.”  Pontiac

“It is not in the Indian’s power to affect anything of consequence.” Major Gladwin.”


"Pontiac’s War: Frontier Rebellion, 1763-1766 followed on the heels of the French and Indian War which ended in 1763. Thanks to Indian resentment over the French surrender of their lands and the harsh policies of General Jeffery Amherst, governor-general of British North America, 20+ Indian nations rose up under the charismatic leadership of the Ottawa sachem, Pontiac and the Lenape Holy Man, Neolin. When the powder-smoke cleared, 450 British soldiers and countless Indians had lost their lives. Two thousand settlers were either killed or captured and 4000 more had been displaced. Moreover, Britain’s foreign conflicts had put the Crown 140 million £ in debt. These expenses led directly to a series of unpopular taxes in North America which in turn led directly to another uprising, our colonial revolution.


Pontiac’s War attempts to recreate the reaction of Indian leaders to British mishandling of frontier politics and the impending colonial crisis it presaged. Building on the point-to-point system and loose Indian alliances used in King Philip’s War and Blood on the Ohio, this design expands frontier conflict using Battle cards to introduce combat chaos, British expenditure on troops, Uncertain Indian Arms supply, siege rules, the capture of prisoners, French interference and trader influence.


The game offers five short introductory scenarios (15-30 minutes), three one-year campaign scenarios (2 hours), and one three-year grand campaign (5-6 hours). Although not a solitaire design, it is solitaire friendly. Players will appreciate the high-production quality of the components which includes a MOUNTED game map and large, 5/8″ size punch-out counters."


Product Information:


Complexity: 4 out of 10

Solitaire Suitability: 5 out of 10

Time Scale: Seasonal turns (approx. 3 months per turn)

Map Scale: Point-to-Point map (approx. 60-75 miles between points)

Unit Scale: 30-50 men, 4-6 artillery guns, individual officers and sea vessels

Players: 1 or 2 (best with 2)

Playing Time: from 15 minutes (intro scenarios) to 6 hours (grand campaign)


Components:


One 22 x 34″ MOUNTED game map

Four Counter Sheets of deluxe, 5/8″ punch-out counters

106 Game Cards

16 Wooden Cubes

11 Player Aid Cards

Rules Booklet

Eight 6-sided dice

Box and Lid


This is the center part of the map. I am still trying to figure out the best placement for the Indians in the first turn.


 The game comes with a colorful mounted map. It shows the territory from Wisconsin to New York and Pennsylvania, along with all of the area in between. The English forts are displayed on the map. The many and varied Indian Nations villages are also on display. The map has all of the pertinent information on it. The turn track, razed forts, and Indians arms, among others, are all right there for the player. The writing on the map is nice and large. The map has point-to-point movement. The game comes with two Off-Map Forces sheets. These are made of card stock and are a half page in size. Next up are two full sized Player Aids. These have the Charts and Tables on one side, and the Combat Sequence on the other. These are both full sized pages and are both made of card stock. The last Player Aid has the 'Indian Nation Activation' rules on it. It is also full sized and made of card stock. It is only single-sided. The Rulebook is 36 pages in length. However, the rules themselves only take up the first 18 1/2 pages. Then comes the information to play the three shorter scenarios and the campaign game. This is followed by a description of some historic sites and then the Designer's Notes. This is followed by a first turn playthrough from page 25 until page 36. This is a very nice addition to be able to see the game being played and the rules you need to use. The game comes with four counter sheets. The counters are nice and large and very easy to read. Both sides have their own deck of cards. Each side has a deck of 50 cards. They are of normal game size, but they do seem to be sturdier than most. The game actually comes with 16 six-sided die, eight per side, and small plastic cubes (these are for use on the Indian Nation Activation Player Aid).


This is the same area of the map (I am still debating my first turn placement) with the addition of a card form both decks. Atrocities on both sides were the name of the game in this conflict. 


 The game rules show us the actual realities of the conflict. The Indian Nations are disjointed and have their own agendas. The British forces are, of course, under their officer's control but are hamstrung in different ways. The Indians' pressing concern is to keep their Arms Track, guns and ammunition, as high as possible. To do this they must take forts and win battles. One of the major reasons that the war took place was because the British were starving the Indians of powder and ammunition that they now used for hunting. By taking forts and winning battles, they can replenish their limited supply of guns and ammunition. Great Britain nearly bankrupted itself during the Seven Years War. This was a global conflict that taxed even the British treasury. So, the number of troops in North America was pared down to keep costs low. As the British player you can add to your forces, but the amount of these forces and their shipping etc. comes with a cost in victory points. So, the Indian player needs to attack, and spend Arms points to do so, but they have to weigh out the loss in arms compared to their possible gain. 


 The game is played in seasonal turns. British Officers and Indian Sachems are prime targets for their enemies. The Indians will be hard pressed if they lose the five victory points for the loss of both Pontiac and Neolin. Neolin was the Lenape/Delaware Prophet. As in some other Indian Wars a native prophet (Neolin) was preaching a return to a lifestyle before the Colonials appeared. There are no stacking limitations, except in forts and during winter (the Off-Map Player Aids come in handy). The game has rules about captives, ambushes, and the destruction of both settlements and native villages. The Indians have to raze as many British forts as possible, and the British can knock the different Nations out of the war by destroying all of their villages. The Indians can move ten points per turn, and the British can move eight. Captives play a large part in the game. The game also gives both players a deck of Combat Cards to be used with, you'll never guess, Combat. Some of the cards also affect the game in other ways in the bigger picture. In the Campaign Scenario the British player has a historical setup to adhere to. In that same scenario there are some rules to adhere to setting up the Indians, but the player is given a lot of leeway. The big question for the Indian player is whether to try and take Detroit on the first turn or not. You can have enough different Nations warriors at Detroit to try it. The other strategy is to spread out your forces and sweep up the numerous smaller English forts first. Historically the latter idea was tried with Detroit trying to be taken by a coup de main. The additions of the cards to play along with luck of the die makes either one a viable option for the Indian player. The victory conditions are based upon the realities of that moment in time. Obviously, the British and Colonials, given their power and population and time, would eventually steamroll over the different tribes. At best, historically, the Indians could have kept the status quo for a decade or more. 


 The game comes with these scenarios:


The Rising - Spring, Summer & Fall 1763

The British Response - Spring, Summer & Fall 1764

The Inconclusive Conclusion - Spring, Summer & Fall 1765

Pontiac's War - The Full Campaign 1763 - 1765

There are also five Introductory Scenarios. Four of them are of two turns each and the fifth has four turns.

The designer has also added six optional rules to help give the players even more replayability and ways to use their gray matter.


This is the Sequence of Play:


Indian Reinforcement

 1. Optional Annual Activation

 2. Key Leaders

 3. War Belts

British Reinforcements

 1. Militia Volunteers

 2. (Spring) Guinea Loans

Indian Movement/Combat/ Both sides replenish cards

British Movement/ Combat/ Both sides replenish cards

Supply/ Siege Attrition

Rebuild Forts & Rally

Lift Sieges/ Wintering

Determine Victory Points

Advance the Turn Marker


 There is a sheet of errata that can be downloaded here:

Pontiac's War Official Clarifications Sheet

You can also download the Rulebook.


 Thank you, Compass Games for allowing me to review this very well-done game on Pontiac's Uprising. I also want to thank the designer John Poniske for developing a game on this important historical period.


Robert Peterson

Pontiac's War: Frontier Rebellion, 1763 - 1766

Compass Games

The Doomsday Project: Episode 2, The Battle for the Balkans by Compass Games   This is a subject I lived through and until very recently I d...

The Doomsday Project: Episode 2, The Battle for the Balkans by Compass Games The Doomsday Project: Episode 2, The Battle for the Balkans by Compass Games

For your Wargamer, Toy soldier collector, MiniFig collector, military history nut. Reviews, interviews, Model Making, AARs and books!

Compass Games


The Doomsday Project: Episode 2, The Battle for the Balkans


by


Compass Games


  This is a subject I lived through and until very recently I did not really explore game wise. Strangely enough, another title that I reviewed for Compass Games gave me the bug to start gaming the era. For those of you that do not know, this series of games takes place in 1985 when the Cold War goes hot. It has a neat and believable historical premise behind the game series. More on this will be below. So, sit back and put the laser disc in and we will watch: Back to the Future, Commando, Pale Rider, and St. Elmo's Fire. Of course, we will also ruminate on where the time has gone. Then we will get down to wargaming business.


 This blurb on the game is from Compass Games:


"Although the World War Three scenario of NATO versus the Warsaw Pact never happened, it happened countless times on the wargaming table. It may not be part of history, but it is part of our hobby’s history. The Doomsday Project is a subseries of the Operational Scale System featuring wars that never happened. There will be games on the Persian Gulf, Central America, The Battle for Northern Europe, Manchuria, the strategic naval war, and of course, a game of total nuclear war. All the games will feature rules that allow you to play some, part or all of the great war that never happened. The first game in the series will feature the fight that could have happened in Germany. Chemical weapons, tactical nuclear attacks and politics will be present – as well as all the forces that were stationed in the region in 1985. Both sides, notably the United States, were reequipping their forces with many new weapons joining the line. The process had started but is not yet completed.


This is the fourth game in the “OSS” system; and the second game in the Doomsday series. This game will cover the battle for the southern front of Europe. The map will stretch from Northern Italy to the Bosporus and all the nations that could have fought in this area will be represented in the game. This series is made to be highly playable and to be completed in far shorter a time that is common for this size game. Low counter density and a concentration on conceptual complexity is the focus of this series. While still mechanically simple, The Doomsday Project will also have all the necessary rules to cover this theater and period. In Episode Two, The Battle for the Balkans game, as you will see in all additional games in The Doomsday Project, will add another facet to the mechanics of the system. Sophisticated political rules will make their appearance. Players will have to content with heads of state and their positives and negatives in play. Rules to retrofit these rules into the Germany game will be provided as well."


Don't they look just beautiful!


 This is what comes with the game, plus some other information:


Complexity: 7 out of 10

Solitaire Suitability: 8 out of 10

Time Scale: 1 day per turn

Unit Scale: Divisional/Brigade/Regiment

Players: 1-2

Scenarios: 5 (+1 massive campaign game with The Battle for Germany)


Components

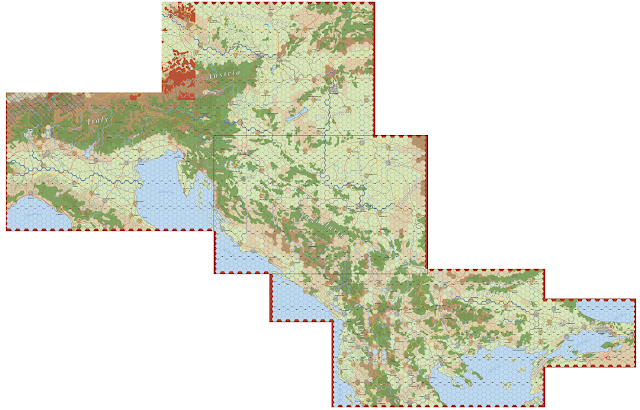
Four Maps at 22” by 34”

One Map at 11" by 17"

One Map at 8.5” by 11”

Five Countersheets

Eight Player Aids, Charts, and Displays

One Rulebook

One Scenario book

Two 6-sided dice and two 10-sided dice

1 Box and lid


Game Credits

Designer: Adam Starkweather

Graphic Artist: Nadir Elfarra


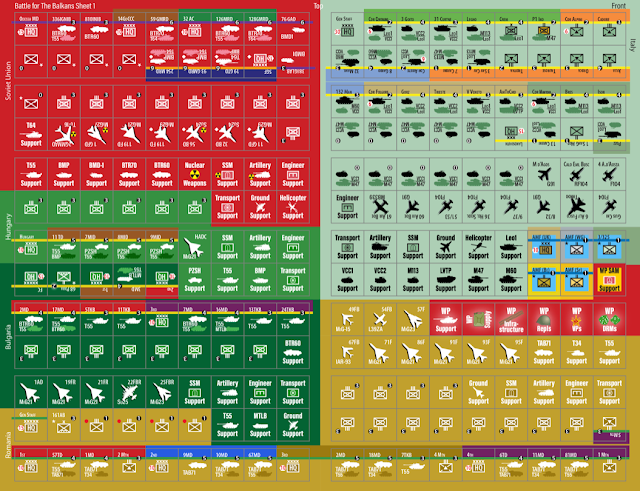
Counter Sheet #1


 First up I will be talking about the maps. You get six maps in the game, and they are made of paper with a bit of lamination on them. Four of them are the usual 22" x 34" variety. Then you get an 11" x 17" map of Istanbul and the mostly Turkish territory in Europe, and a small bit of Turkey proper. The 8.5" x 11" map is for filling in between two of the larger maps on the Adriatic coast. I like the maps. Their size is 12 kilometers per hex. The colors to me were a good choice. As far as terrain, it is easily distinguishable between the types of terrain. The Rulebook is forty-two pages long and is in full color. They are made of a flatter finish instead of the glossy magazine type we are getting used to seeing. It has double column spacing and the type size is large enough to easily read. The Scenario booklet is twenty-eight pages in length. It is made the same exact way as the Rulebook. First you have the setup and rules for the game's six scenarios and then you get a four-page example of play. There are seven thick card stock Player Aids. Six of them are one-sided and then there is a double-sided terrain chart. One side is the Terrain Effects Chart, and the other side is the Restricted Terrain Table. The six one-sided are:

Nato Player Aid
Warsaw Pact Player Aid
Warsaw Pact Air Display
Nato Air Display
Military Leaders/Political Leaders Charts
General Game Display

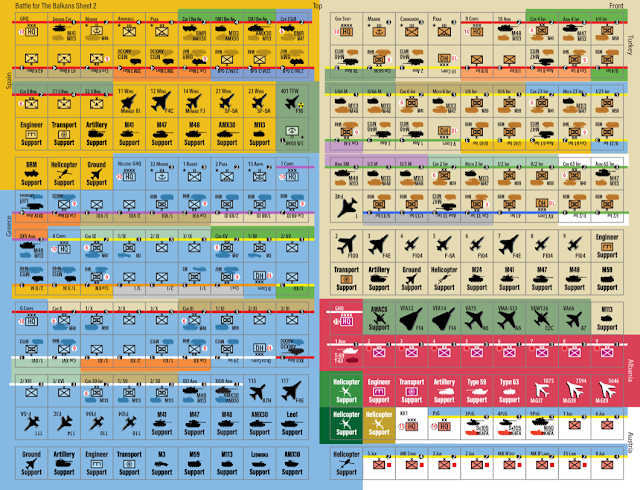
 They all have decent sized printing on them, except for a small part on the Military Leaders/Political Leaders page. The counters are very well done with either a silhouette for tanks and APCs, and a top-down view of aircraft. The five countersheets come wrapped in plastic, which is great because they want to fall out of the cardboard sprues. This is just like the counters I have been seeing in other Compass Games products. The political leader counters are small portraits of the leader it represents. The first thing you will notice is there are no numbers on them for movement and attack/defense (I know- heresy). The only numbers on them show the size of the unit. The game rules and die rolls take care of how strong or weak a unit is. There are also a fair number of counters to show unit losses and its state. The components are a mirror image of the first game in the series: The Battle for Germany. If you liked them, and I do, then you can be assured to like these.


Counter Sheet #2


 The game has no need of movement rates on the counters. All units are considered to be motorized except for an actual leg unit. The basic unit movement rate is five. The terrain is much more difficult than in The Battle for Germany maps. The road network is not like what is present in The Battle for Germany. The units can have primary and secondary equipment listed on it. This is usually shown with APCs and tanks, although a unit can be of only one type of armament.

 If you are looking for history and plausibility, then look no further. This game has these and many more besides:

Armor/APCs
Surface-to-Surface Missiles
Helicopters
Fighters/Bombers
Airborne
Warsaw Pact Guards Units
Marine Units
Air Transport for both supply/attacks
Nuclear Weapons possible use
Fresh/Spent Units
Supply Points Usage
Poor/Penal Units
Spetsnaz
Leaders (not seen very much in games of this scale)

 Guaranteed that if it was ever in a wargame, it is in this one.


 Below shows some of the sequence of play:

The Strategic Phase
 Check Weather
 Check Communications
 Place Arriving Reinforcements
 Air Allocation Phase
 Resolve All SSM Attacks
 Supply and Infrastructure Phase
 Strategic Air Mission Resolution

Warsaw Pact Activation Phase
NATO Activation Phase

Activation Sequence
 HQ Activation Segment
 Unit Activation Segment
 Cadre Segment
 Initial Movement and Combat Declaration Segment
 Reserve Movement Segment
 Bonus Movement Segment
 Combat Segment
 After Combat Loss Segment
 Check Stacking Segment
 HQ Movement and Refresh Segment
 Bivouac
 Night Battles

End Phase
 Eliminate Friendly Units Phase
 Victory Check Phase
 Victory Check Segment
 Politics Phase
 Time Phase


 As you can see, the game has just about everything in it that was ever discussed about a Third World War game. Compass Games has it listed as seven out of ten on the complexity scale. The one great bit about it is that the game has suitability of solitaire ranked as high. I can attest to this. It is actually rather easy to play solitaire because there is so much to do each time you change sides the slate in your mind is wiped clean.

 This is a list of Special Units in the game:

Warsawa Pact Regiments and NATO Battalions
VKK Units
Spetsnaz
Military Commanders
Refugees

 A game at this level that also has the player dealing with Military Commanders and Refugees is pretty remarkable. There are six Refugee counters. One is put in the Refugee Box of the NATO Players Aid if one of these occur:

A Combat Chit is placed in a city hex.
Nuclear Attack Marker is placed on the map.
Chemical Attack Marker is placed on the map.

 The NATO Player can spend supply points to remove the Refugee counters. For each two still on the Player Aid Box the NATO infrastructure is reduced by one.

 The Military Commanders can have these five traits:

Pensive
Deliberate
Prudent
Aggressive
Reckless

 Military Commanders can be in use for both land and air units. Military Commanders are only used in a campaign game or a combined game (Battle for Germany).


 Yes, to learn the game you have to put your thinking cap on. This is not a series where you can just sit down and read a manual for ten minutes and be ready to play. The game comes with five scenarios to play. The first Austria Stands Alone would be the smallest and best to learn the game on. There is a sixth scenario and that is if the player has the first game in the series, Battle for Germany, and has enough room to play with all the maps from each game. The designer, Adam Starkweather, has also done some YouTube videos on how to play and learn the game. 

 Unlike a lot of other games, combat uses the most time and gray matter. The first thing is that there are four types of combat. These are:

Meeting Engagement : 1 MP if Cross Country or 1/2 in Road Column.
Hasty Attack: 2 MPs if Cross Country or 1 MP if in Road Column.
Prepared Attack: 3 MPs if Cross Country or 2 MPs if in Road Column.
Deliberate Attack: All MPs(may not be in Road Column).

 You actually have to spend movement points to place a combat chit on a hex. The combat chits also show which die to use (either the D6 or D10). Then the attacker can decide on whether to add Artillery Support, Air-to-Ground Support, or Helicopters. The Combat Chips have to be drawn. Some of them have a Random Event possibility on them. The Combat Chit also has an A, B, or C on it to tell you which of the three Random Event Tables to use. There is so much more to just talk about with combat let alone the rest of the game. The game also shows the lethality of the almost modern battlefield. While you do not have to worry about drones you will still have to husband your forces to take your objectives. All of your well-thought-out plans will fall into the waste bin when presented with what Clausewitz called 'friction'. This game differs from The Battle of Germany in having a full-fledged political segment in its rules. 


 Victory is also a bit different than other games. This is from the Rulebook:

"8.2.1: If a player has 21 points and gains victory points, those points are deducted from the enemy total. If a player has fewer victory points and what they might lose in victory points through play, the remaining victory points that cannot be lost are instead added to their opponent's total."

 "Players may "pay" victory points to do several game actions. They may do this even if they have 0 points but by adding the victory points to his opponent's total."

 So, you may 'bet' upon you getting more victory points by using them earlier to try to get a larger victory.


 I really like the system. So much in fact that I had to purchase a copy of The Doomsday Project: Episode 1 The Battle for Germany, just to have the complete game series, at least of the published games. The next in the series, Episode 3, will be taking place in northern Europe. I think I will also have to purchase the other two games in the OSS (Operational Scale Series) series Vietnam: A Rumor of War, and A Test of Faith: The Arab-Israeli War of 1973. Both of those games were also designed by Adam Starkweather. Thank you, Compass Games, for allowing me to review this great game. I can recommend it to anyone who is a true grognard and likes to get into meatier games. 

 Compass Games next Expo will be here:

Compass Games Expo Fall 2023 will be held November 9-13, 2023 at the Comfort Inn & Suites in Meriden, CT.

 They also had a Spring Expo this year so hopefully that continues to happen. 

Robert


  Death in the Trenches The Great War 1914-1918 by Compass Games  'The Great War', 'The War to End All Wars', these were epi...

Death in the Trenches: The Great War 1914-1918 by Compass Games Death in the Trenches: The Great War 1914-1918 by Compass Games

For your Wargamer, Toy soldier collector, MiniFig collector, military history nut. Reviews, interviews, Model Making, AARs and books!

Compass Games


 Death in the Trenches


The Great War 1914-1918


by


Compass Games


 'The Great War', 'The War to End All Wars', these were epithets that have been used to name the First World War. This war was a first for many reasons: aerial bombardment, poison gas, tanks, and masses of machine guns were used in it. Death and destruction of civilians was not a new thing. It had been happening since the dawn of wars. The First World War just took it to a new and frightfully unprecedented level. The western countries have always looked at it from the mostly static trench lines in France. The Eastern Campaigns usually had more freedom of movement and only stayed in one place for at most a year and usually not even that long. Four great empires were dissolved by the carnage of World War I: the German, Austro-Hungarian, Russian, and the Ottoman empires all fell. The horrific loss of life led straight to the devil-may-care 1920s. All of the soldiers who escaped this abattoir were scared by it, whether mentally, physically, or both. In this game the designers have tried to put you into the shoes of the Entente or Central Powers from a strategic viewpoint. You will be in control of your forces across the globe, whether it be in the sky, on the ground, or at sea. 


 Compass Games has once again produced a game about World War I. As I mentioned in another review, they seem to be on a roll as far as games taking place during it. So far, their batting average has been excellent as far as each game goes. Let us see if they can keep this streak going.


 This is what comes with the game:


1 34×22″ map covering Europe and the Near East – Mounted

3+ countersheets (9/16″) of military unit counters, markers and chits – total 400 (double sided)

1 rules booklet (Game System and Random Events included)

6 8½ x11″ color player aid and display sheets

10 six sided dice

1 full-color box and lid set


 This is the hex size and turn length etc.:


Complexity: Medium (about 6 out of 10)

Playing Time: 10+ hours

Solitaire Suitability: Excellent

Time Scale: 1 turn = 3 months

Map Scale: 1 hex = approximately 80 miles

Unit Scale: Army and Corps

Designers: R. Ben Madison and Wes Erni

Artist: Jonathan Carnehl


 This is a blurb from Compass Games that I believe is worth reading:


"Death in the Trenches is a strategic-level World War I game covering the entire war, from the opening shots in Serbia and Belgium to the final defeat (or victory!) of Germany and its allies in 1918. The map, executed by Jonathan Carnehl, is designed to give you a feel for 1914 by using textures and colors featured in atlases of the time. It stretches from the Pyrenees to Moscow, and from Norway to the Sudan, covering every square inch of territory in Europe and the Near East which saw combat from 1914 to 1918, in a manageable 34×22″ format. Colonial battles around the world take place on an additional 8½x11″ map showing Germany’s empire.


The game also features 456 beautifully-illustrated counters depicting all the national armies that fought in the war – from the Germans, French, British and Russians all the way down to the Persians, Montenegrins, Armenians, South Africans, and a host of specialized units (French Foreign Legion, Gurkhas, Italian “Arditi”, Cossacks, Tyrolean Kaiserjäger, Zionists, Bavarians, “Dunsterforce”… even China may send a small expeditionary force).


For the World War I buff, the game’s simple off-map system of Allocation markers fills your world with historical detail: Tanks, Alpenkorps, artillery barrages, flamethrowers, poison gas, Krupp guns, Mustapha Kemal, the Royal Air Force, French elan, Rommel’s mountain tactics and Galliéni’s taxicabs… while the great wartime leaders all leave their mark (good or bad!) on history: Bruchmuller, Haig, Hoffmann, Mackensen, Hindenburg and Ludendorff, Rennenkampf and Samsonov, Sarrail, Von Francois, Foch, Brusilov, Nivelle, Plehve, Putnik and Yudenich. All this detail is added without forcing you to remember special rules.


What other WWI games make ruthlessly complex, Death in the Trenches simulates with elegant simplicity. Face-up units are entrenched; face-down units aren’t! Simple as that. Emphasis is on the fun stuff rather than the boring stuff; there is no bean counting of production points, supply rules and strategic redeployment are easy, and in combat there are no complicated terrain modifiers to memorize – those are baked right into the combat die roll."


 Let us first take a look at the components. The heft of the box is pretty good. However, now that so many games, this one included, come with mounted maps this is no longer a variable denoting gaming goodness (it actually may never have been). We grognards were always sucked in by large and heavy boxes. 

 The map has been judiciously set up to give the player the entire European and Near Eastern areas where campaigns took place, and more, on one normal sized map. That the designers were also able to include the turn record track and some other tables, and a subset map of India, is even more impressive. The map, while appearing plain, has an innate beauty, at least to me. The major cities that did and could have been a part of the campaigns are included. It would seem from the amount of area squished into the map that it would lose something in the conversion. However, at eighty miles a hex it seems just perfect for a strategic view of the area. Naturally, with this large of an area depicted you do not get much of the tactical obstacles, or benefits. The map's muted colors seem to match the somber tones that should accompany this war. There is a one sheet mounted map that has the areas in the Pacific, German East Africa, German Cameroon, and German South Africa that were also fought over during the war. This game is one of the very few that depict these areas. 

 The Rulebook is in full color and is twenty-eight pages long. The type is a bit on the small size. The rules go out of their way to explain that this is not your father's wargame. The game rules etc. have been based on Wes Erni's calculations and his WESCOM (the Warfare Equivalency System and Combat Operations Model). I will have more to say about this later in the review. The Events Book is twenty pages long and has a little color but is mostly in black and white. The first few pages are for the game setup. The next few pages are a complete catalog of what is in each hex. I do not remember ever seeing this in a game before and it is a nice touch. The last eleven pages are of all the events that can take place in each year. The game comes with six hard stock Player Aids. There are two fold out Omnibus Markers Track sheets. One is for the Entente and the other for the Central Powers. Then we have two Special event sheets, one for each side, that both have twenty-five events on them. Then there is a Battle Board and an Attacker Battle Chart. Some of the printing on this is also on the small side. Next up, we have four countersheets. These are adorned with the owning country flag on them. They come pre-rounded and easily come out of the sprues. These would be the most colorful part of the game. A few of them also come adorned with ships, artillery, and planes. The package on the whole is one that your game table will be calling for. 


 Now we will have a blurb from the Rulebook on WESCOM:

"WESCOM (the Warfare Equivalency System and Combat Operations Model) was created by Wes Erni, for the game Absolute Victory (designed in the 1990s but not published until 2016 by Compass Games; the first edition of Death in the Trenches was actually published first). It has been used in several other
games. The principle behind WESCOM is to engage a player’s personality in the Battle system, so that a player’s own level of aggression, or timidity, is vividly expressed in the way that player approaches each individual battle. The key to the WESCOM system is the infamous “Overroll”, where the player rolls as many dice
as he wants to, trying to achieve a die roll as high as possible but without going over a limit; if you go over the limit, you achieve nothing! In this way, the aggressive player constantly risks disaster. While critics who don’t understand the system complain (“What do you mean I rolled all those dice and did no damage?!”), thoughtful players of these games enjoy the emotional roller-coaster that the system forces them to ride. Firepower is essentially an index of offensive power, and takes into account morale, equipment, low-level commanders, and national temperament.

Fortitude is essentially an index of defensive strength, and takes into
account morale, equipment, low-level commanders, and national temperament.

In DEATH IN THE TRENCHES, Fortitude ratings are a little hard to decipher as they have been abstracted to show vast disparities in unit sizes. But the effect is to make every Division worth “one” on attack and defense, which enormously simplifies Battle mechanics for the player compared with the First Edition. Players should note that while Firepower seems like an “offensive” quality and Fortitude seems like a “defensive” quality, both ratings are used by both sides
in a battle, because Battle is simultaneous. While most games have a simplistic "I attack you all along the front, then you attack me all along the front” system, WESCOM accurately represents the intricate ballet of forces on the battlefield."

 Per the above, I hope that I am seen as a 'thoughtful player'.


 This is from the designers describing their thoughts on each country's relative strength:

"The basic unit of force in the game is the “division,” abbreviated “Div”. The exact size of a Div in the game is a mathematical
abstraction, but conceptually you can think of a Div as equaling approximately this many men: AH 20,000; USA 19,000; Russia 18,000; Italy 17,000; France 16,000; Turkey 15,000; Britain 14,000; Germany 11,000. Those numbers are not trivial! The Battle and logistical systems in Death in the Trenches are driven by Wes Erni’s finely tuned mathematical calculations. For game purposes, for instance, an Austro-Hungarian Division is nearly twice the size
of a German Division. This means that an Austro-Hungarian Division has a Battle advantage over a German Division, if only on account of its enormous size. The effect in the game can seem bizarre at first glance – Austrian units actually perform better on attack than Germans do! This is only because they are so much
larger. The flip side of this, however, is that Austrians are much harder to replace, because their casualty rates are so much higher. While this may feel like the Austrians are hard-to-replace ‘élite’ units while Germans are below-average ‘grunts’, the per capita effect is exactly the opposite. Just be aware that this entire system is extremely counterintuitive and takes some time getting used to. "

 Precisely because the system is so 'counterintuitive' is why I have decided to post the designer's words in full. On the outside this game seems like a cross between Axis and Allies and the old Avalon Hill game 'Guns of August'. While the ideas are simple, they do seem to be completely different than almost any other wargame. Most wargames battles are still based on a CRT and a set of modifiers. In simple games it will only be a few modifiers while in others it will be a list as long as your arm. Having a game based upon how lucky or belligerent a player feels means that you get a game where you can have battles like the Somme or Verdun. The battles can be absolutely brutal as far as casualties go. 

 Another interesting concept from the game is Reserve Divisions. These can be used by the player for:

Strategic Redeployment

Building Armies

Special Event Loss

Destroyed in Battle


 I must admit having been taken in by the look of the game. I was not expecting the game to be anywhere near as deep as it actually is. The game mechanics also help with the counter clutter. You do not feel as if you are a God that is using a tweezer to negotiate the buildings of the Manhattan Skyline. The designers have actually gone with a KISS style to the game. The only thing the player needs to do is to open himself up to new ways of thinking about wargames and their rules. Without, hopefully, beating a dead horse, they are counterintuitive. However, they work and work very well to simulate World War I. The game is listed as being as either one or two players. It is also given high marks for playing in solitaire mode. I can agree wholeheartedly with this assertion.

 Some of the Events are:

Achtung, Panzer - Germany's lumbering clumsy A7V tanks attack. This gives +7 firepower to any German attack in a clear hex.

Bruchmüller - Artillery genius, great for surprise attacks. This gives +30 firepower to any German attack

Strosstruppen - This gives +10 firepower to any German attack.

Foch - At the start of any EP pulse, you may "unflip" one stack of French Armies.

Voie Sacrée - At the start of any EP pulse roll three die. The French may add that many Divisions to Armies in any one hex in France.

Smith-Dorrien - At the start of any EP pulse, you may "unflip" one stack of EP Armies (at least one Army must be British).


 This is the Sequence of Play:

2.1 First Random Events Phase
1. Draw one chit to determine what Random Events occur (see 3.0).
2. Divisions are now added to Reserves/Armies by the Events just drawn (3.1).
3. The EP player may now transfer Fleets from Sea to Sea (8.2).
4. The CP player may now transfer Fleets from Sea to Sea (8.2).
5. Players may now challenge Naval Supremacy (see 8.3).

2.2 CP Logistics Phase
1. Each CP unit in a CP Units Holding Box may be built, or rebuilt, by the CP
Player (5.3). You may leave units in the Holding Box if you choose. Armies built at this time may also be reinforced by attaching Divs from Reserves (as in step #3 below).
2. CP may transfer Divs from one unflipped Army to another unflipped Army of the same nationality within 3 hexes (marching distance).
3. CP may transfer Divisions from Reserves, to unflipped Armies (Rule 6.4). This includes the transfer of Minor Forces (4.3) from the Minor Forces Reserve Box to the map.
4. CP may now transfer Divisions from unflipped Armies, to Reserves (Rule 6.4). This includes the transfer of Minor Forces (4.3) from the map to the Minor Forces Reserve Box.

2.3 EP Logistics Phase
The EP player repeats the preceding steps (2.2), using his own Armies and Divisions. Both Players can do this simultaneously if they trust one another.

2.4 Pulse Phase (see 6.0 and 7.0)
[2.4.1] During the Pulse Phase, play proceeds by a series of alternating pulses, kind of like chess moves. First one player goes, then the other player, and back again, alternating until both sides either have nothing left to move, or don’t want to move anything.
[2.4.2] The player who moves first in the turn is indicated on the Turn-Record Track next to the turn number (CP on Turns 1, 2, and 3; EP on Turn 4, etc.)
[2.4.3] During a Pulse, the player who is moving (“the phasing player”) moves one stack of units as explained in Rule 6.0. If this results in the moving stack entering an enemy-controlled Hex occupied by enemy units, the Battle occurs, as explained in Rule 7.0.
Certain Special Events (3.4) are done during, or instead of, movement.
[2.4.4] A player may also “pass” during his Pulse, and hand the right to move to his opponent. If both players “pass” consecutively, the Pulse Phase ends. (So be careful – don’t give the other Player a chance to end the Turn unless you’re prepared to live with the consequences!)

2.5 Unflipment Phase
1. All Armies on the map which were flipped, now “unflip” and return to printed-side-up.
2. Spend Divisions to Repair forts (8.4).
3. Roll for Armenian Massacres (14.2).
4. Surrender Checks (12.0); check Russian “Hammer and Sickle” cities (13.2).

2.6 Second Random Events Phase
1. Draw again for Events, as in 2.1 (every turn).
2. Divisions are now added to Reserves/Armies by the Events just drawn (3.1).
3. Put all Event Chits back into the cup for use during the next year (Fall turns only: see rule 3.0).
This concludes one turn. The cycle repeats until one player resigns, or Fall, 1918 has ended (see 16.0).

 As you can see, deciding to when to 'Pass' during the Pulse Phase is an important decision on the player's part. 

 Another interesting rule is 'Reds' (Partisans). If any Great Power Surrenders (except Russia), the victor places two Reds Armies in the territory of the surrendered nation. These will be commanded by the opposite player. So, if France surrenders, the Reds would be under the control of the Central Power Player. The Russian Revolution has its own set of rules. 


 Thank you very much Compass Games for letting me review this great addition to World War I games. The most important thing about our hobby is to learn things, at least to me. This game does not really teach you that much history, you should already know all of that. It does make you open your mind to learn a new way of thinking toward playing and understanding wargames. A day without learning something is a day wasted. I have really enjoyed playing this game.

 Please remember that Compass Games Expo is coming up on November 10-14, 2022. This will take place at the beautiful Comfort Inn & Suites in Meriden Ct. I hope to see you there.

 It is also that time of year again. Compass Games yearly sale is in full swing. Please take a look.

Robert

Death in the Trenches: The Great War 1914-1918:

Compass Games:

Compass Games Expo:

  War for America The American Revolution, 1775-1782 by Compass games  'The World Turned Upside Down' is actually a song from 1640 a...

War for America: The American Revolution, 1775-1782 by Compass Games War for America: The American Revolution, 1775-1782 by Compass Games

For your Wargamer, Toy soldier collector, MiniFig collector, military history nut. Reviews, interviews, Model Making, AARs and books!

Compass Games


 War for America


The American Revolution, 1775-1782


by


Compass games


 'The World Turned Upside Down' is actually a song from 1640 and laments that Christmas can no longer be celebrated due to an Act of Parliament. So, it would seem to be a strange tune for the British to play at their surrender at Yorktown. However, whilst the words have nothing to do with the occasion, the songs title fits perfectly with it. Washington had refused the British the 'Honors of War' (they would have been allowed to fly their colors and normally play a French or American song), because the British had denied them to the  American Army who had capitulated the year before in Charleston. It seems that some historians doubt it was that song, but they are a cantankerous bunch. 


 Strategic games about the American Revolution have had a large growth spurt after around 2000. Before that, there were many battle games/simulation but not that many on the strategic level. This is actually Compass Games second strategic game on the American Revolution. The other is 'End of Empire 1744-1782' which also covers the French and Indian Wars leading up to the Revolution. It is an excellent game on one of my favorite eras for wargaming, but I digress. Trying to compare the two would be like apples to oranges Bart. 


 This is what comes in the box:


2 Map sheets

2.5 Countersheets of 9/16″ and 5/8″ unit-counters (432 counters total)

6 Player Aid Cards

1 Sequence of Play Card

2 Army Organization Displays

1 Setup Card

51 Action Cards

1 Rulebook

1 Playbook


 This is a Compass Games blurb about the game:


Complexity: Medium

Time Scale: Seasonal turns (6 turns per year)

Map Scale: Area point-to-point map

Unit Scale: 1,000 men per strength point, individual capital ships, and leaders

Players: 2

Solitaire: Medium

Playing Time: 8 hours (15+ hours for Campaign Game)


 The game comes with two maps that are each 22" x 34". They show from Nova Scotia to the top of Florida. One has an inset for travel to Europe and the other has a large inset that includes the Caribbean Islands. While these were not important to the Revolution, they were important to England, France, Spain, and the Netherlands after the three latter joined the war. The maps are not just paper. They have a coating on them to help them last. The Action Cards seem sturdier than most cards that come with games. These are easily read and understood. The cards come with small pictures on them of period pieces or other depictions of people and places of the Revolution. There are six separate Player Aid Cards. These are the obligatory hard stock and in full color. They are:


British Reinforcement Chart

Colonial Reinforcement Chart

British - Patriot Start Positions/Terrain Effects Chart

Six Nations Card/Foreign Entry Card

Charts And Tables/Sequence of Play


 The Rulebook is twenty pages long including the Index. It is also in full color. The writing is smaller than I would like, but still readable. There is enough separation between the paragraphs etc. to make it not really difficult to read. The Playbook is twelve pages long. Six of these are for examples of play. The other six pages are comprised of Scenario Setups, Card Check List, Gazeteer of Place Names, Designer Notes, and Bibliography. Physically it is the same as the Rulebook. The counters are square in shape. So, if you are a wargamer who cannot live without rounded counters you will have to do this yourself. They are scored better than you would get with an older game. This means that very little snipping of any excess is needed. The strength points are generic. Most major commanders from both sides are represented by counters. These have small portraits on them. The counters are easily read and not 'busy' at all. The components easily pass muster.


The two Maps together


 The Sequence of Play is:


"Step 1: Reinforcements

  Both players place reinforcements according to their own

Reinforcement Chart. British first. (8.1)

All Turns:

  Both Reinforcement Charts are consulted and reinforcements are

placed.

  Units moving from the Europe Box by Naval Transport do not

consume an AP.

  Leaders are Promoted/Demoted/Removed/Transferred.

Early Spring Turns Only:

  Both players position their available magazines (British first).

If St. Eustasius is not controlled by the British, the Colonial player

receives a bonus magazine in the Deep South.

  Cards which have been set aside by year, are introduced commencing in 1776 and shuffled into the Draw Deck along with the cards

from the Discard Deck.

  Each player then draws enough Action Cards to fill his hand to a 3

card maximum.

  If a player already has 3 Action Cards, he can draw 1 Action Card

and then discard any card of his choice.

  The Colonial player rolls on the CLT to raise and place new SP.

Winter Turns Only: 

After both players have moved two Action Rounds:

  Colonials check for Expired Enlistments.

  Both sides check for over-quartering.

  Both sides remove all magazines at turn’s end.

  Six Nations units return to their villages

  If British Withdrawal is in effect, 12 SP must be removed to their

Caribbean possessions.

Step 2: Initiative 

Players roll a D6 for 1st initiative. The player with the higher result 

performs the 1st AP of the Action Cycle.

Step 3: The Action Cycle (9.0)

The player having the initiative moves and has combat with one single 

force from one single space. He performs any ‘free actions’ (9.10) during

this AP, at any time and in any order of his choosing. He can perform 

these at the beginning or end of his AP. It is entirely his choice. When he

has completed his actions, the other player proceeds with his AP in a 

similar manner.

Step 4: Administration Phase

  Check for Victory. (4.0)

  Advance Year/Season markers on the Turn Record Track"


Close up


 This is a big game in both size and scope. It comes with two scenarios: The 1775-1782 full scenario and the 'The French are in 1778-1782' scenario. This is a bit of a shame. With the maps conveniently splitting the colonies almost in half it is a shame there were not smaller scenarios for just the Southern and Northern Colonies. Perhaps a Burgoyne and Cornwallis scenarios could have been added. Do not get me wrong, what the game portrays in the two full scenarios it has it does very well. This is the first game that really adds some strategy to the Caribbean theater instead of just an off map box. The game also shows how seapower was the one really decisive part of the war. Without seapower there is no Yorktown. This not only goes for actual fleet actions, but also for supply. So, the game mechanics really show how the war was fought and what you need to do to win it. 
 
 The Colonial Militia and its disappearing and reappearing act throughout the war is taken care of simply and elegantly during the battle phases. In the early years of the war the Militia was absolutely needed for any Colonial Army to stand a chance against the British. 

 As mentioned, the game is physically large. You also have to invest a good amount of gaming time to it. The full campaign game can last up to twenty hours or several game sessions. This is not a game where you are going to be able to set it up and play in one night. There is nothing wrong with long or short games for that matter. It all depends on your appetite (thank you Billy Joel) at the moment. Getting immersed or lost in a game is one of my favorite pastimes. I agree that it seems harder to do this in 2022 than it used to, but I still love to do it on occasion. If you are like me in that respect you will be very pleased with the game. 

 The game gives a player so many different strategies to try out. I do not think anyone will ever get bored or find the game repetitive. Each side has its own strengths and weaknesses. This is a recipe that is needed for good gaming. 

 We do have to deal with the elephant in the room though. This would be the page of errata that comes with the game. You can, however, look at this in two different ways. You can castigate Compass Games for having the need of any errata. This mind set is really not something that is useful in the real world. When I was young I had a boss that told me "that is why they have erasers on the end of pencils". We are human and mistakes will be made. Also if you can find any game that was released without any errors at all I would be amazed. You could look at it and thank Compass Games for giving you the errata right in the box when you open the game. This saves you from searching online for the correct wording etc. It also could have been released six months after you bought the game, and you had to download it also (I have seen this more than once). So, I guess errata can be looked at like half full glasses. It is all in the mind of the beholder.

  The only real point of contention between myself and the game is William Howe's Command Rating. I have always had a soft spot for the Howe brothers.


 The games victory conditions are these:

"Three main factors influence the various Victory 
Conditions (VC) which must be met to win the 
game. 
• The year victory is obtained
• Before or after France enters the war
• The Political Will of each side
Hint: The British have their best chance of victory
during the early stages of the rebellion before 
French seapower can swing the balance. Victory 
will be much harder to achieve once the
‘Declaration of Independence’ Action Card has 
been played or the French have recognized the 13
Colonies.
4.1 British VC Prior to French Entry
Accomplish either:
• Reduce the Colonial PW/VP to ‘0’ after any 
Colonial AP.
• In 1775, control all the colonies in New 
England while not losing both Montreal and 
Quebec.

4.2 Colonial VC Prior to French Entry
Accomplish either:
• Reduce the British PW/VP to ‘0’ after any 
British AP.
• Cause the surrender of a second British army or 
force of at least 5 SP of regulars at the end of 
any combat.

4.3 British VC After French Entry
Accomplish one of the following:
• Reduce the American PW marker to ‘0’ after 
any Colonial AP.
• Capture all French ports in the Caribbean while 
not losing any of their own, at the end of the 
game.
• Control 4 colonies at the end of the game.
• Control all the following port spaces in the 13 
Colonies in the following chart at the end of the 
game while still controlling Halifax, New York 
City and Norfolk, VA.
Boston, MA Baltimore, MD
Newport, RI Alexandria, VA
New London, CT Wilmington, NC
New Haven, CT Charleston, SC
Wilmington, DE Savannah, GA

4.4 Colonial VC After French Entry
Accomplish one of the following:
• Avoid the British Victory Conditions.
• The British are unable to move 12 SP of 
regulars to the Caribbean for British 
Withdrawal. 
• Capture both Quebec and Halifax at the end of 
any British AP.
• Capture all British ports in the Caribbean while 
not losing any French Caribbean ports at the 
end of the game.
• Capture both Montreal and Quebec while 
preventing British control of New England and 
the Middle States at the end of the game.
• Prevent the British from controlling any of their
possessions in the 13 Colonies at the end of any 
British AP. (The specific cities listed in rule 
4.6) 
• Prevent the British from controlling any of the 
13 Colonies while not losing any French 
possessions in the Caribbean at the end of the 
game."

VC - Victory Condition
AP - Action Pulse
PW/VP - Political Will/Victory Points

 So, the game is essentially cut in two segments once the French become involved. The British should also really push in 1775 to end the war as quickly as possible.


I think it is an odd choice of a picture of good old Banastre. Instead of the usually dashing cavalryman he looks a bit stodgy


 Thank you very much Compass Games for letting me review this very good game. As usual I have been very impressed by the components and gameplay from one of their stable. 


Robert

Compass Games:

Compass Games – New Directions In Gaming

War For America:

War for America: The American Revolution, 1775-1782 – Compass Games


hpssims.com