second chance games

Search This Website of delight

Showing posts with label area movement. Show all posts

 SAIGON 75 FROM NUTS!PUBLISHING Back in 2019,  I had the opportunity to preview Nuts!Publishing 's proto-type of Saigon 75 , just before...

SAIGON 75 SAIGON 75

For your Wargamer, Toy soldier collector, MiniFig collector, military history nut. Reviews, interviews, Model Making, AARs and books!

area movement

 SAIGON 75

FROM

NUTS!PUBLISHING


Back in 2019,  I had the opportunity to preview Nuts!Publishing's proto-type of Saigon 75, just before its launch on Kickstarter.  Now I can provide you with a deeper delve into the recently published edition and its highly professional quality.  Though even the proto-type had largely wooden pieces with sticky labels on with some cardboard counters, the final product has gone the full mile with its embossed  wooden pieces and  a distinctly COIN style appearance.  Even this peek inside the box shows what I mean.

Getting everything lined up for set-up makes it even clearer.  As promised the dice are customised and very attractive too and finally the cards remain identical in their layout and each individualised picture on them, but with that expected touch of refining in their rounded corners and subtle smooth finish.  And, of course, let's not forget the mounted map board which has the factor I prize - it folds out perfectly flat first and every time; no ridges, no back-folding.  Perfect from the minute it's laid out on your table.

With the preliminary rules that I received being a simple, very basic black and white printout, turning to the finished professional product is a stunning revelation.  The well-nigh obligatory division these days into a Rulebook and Playbook maintains such high standards that it's a pleasure just to pick them up and feel the quality.  The smooth gloss is combined with a bold text size in the rule book that makes reading it so simple, even if you hold the book at arms length. 
Typical of the quality of full-colour examples of play

Illustrations abound whether they be historical photographs or sumptuous large full-colour examples of the rules and not only does the Playbook have a full play through of the first turn and a half, but the Rule Book itself provides an example from a solo turn.  No complaints here then, I hope, from the those who absolutely must have a solo mode.  An additional feature of the Playbook is that not only does it have a four-page historical narrative, but that is followed by a section in which every single one of the 20 Event cards is pictured with an accompanying explanatory historical background.  Fantastic attention to detail here.
Just a few of the 20 cards with their historical background
Some of the actual cards

The game takes us from Summer of 1973 to Spring 1975 in eight seasonal turns.  Both the relatively short time span and seasonal turns highlight the broad sweep of the game.  They also indicate the first reason why the game is quick-playing; the second reason is that each player rolls for how many activations they get per turn.  The South Vietnamese units are largely divisions of the Army of the Republic of Vietnam [ARVN] with a diverse range of small unit American troops, including Ranger battalions, Marine and Paratroop brigades, two River patrol units and several mechanised regiments.  Grouped under the abbreviation SV, it is the American troops that tend to give flavour to the game.  Opposing them are 14 North Vietnamese divisions and 8 Viet Cong battalions, abbreviated to NV.  Only the divisions of both sides have the equivalent of two steps.  Being octagonal wooden pieces, when one of these is reduced in combat it is replaced by an identical piece half the size.  All the other units are half-sized ones and so one hit and they're gone!  Adding further visual appeal to the game are the star-shaped Quyet Thang markers [essentially NV control markers] and NV infiltration markers, while the variety of coloured pieces that represent American units are supplemented by black air support/air transport markers.

To emphasise and help pick out the units, I've placed everything with its embossed star uppermost.  In playing the game, these begin face-down and a unit is only turned star-end up to show that it is activated.   You'll notice too the compact footprint of the whole game.  Everything fits perfectly onto my 24"x24" board.
NorthVietnamese Divisions
Viet Cong Battalions
Quyet Thang markers
Game play itself is very smooth and the rules are a brief 8 pages long.  Each turn is divided into an NV Phase followed by an SV Phase.   Before starting both players need to agree on how the Event cards will be handled.  The standard process is for each player to draw eight Event cards and hold them secretly.  One must be chosen and used each turn.  An alternative is offered for those just learning the game where you only start with three cards and draw a new one each turn.  Obviously the idea is not to overburden a new player with too many decisions as to how you might be going to plan out the the course of all eight turns.  Personally, I like the easier approach, not because it's easier, but because it combines an element of control with having to react to what turns up! - a combo I've always liked in a game.
Both player's Phase begins with an Activation roll to determine how many units can be activated.  For the NV player it is the number of infantry divisions[whether at full strength or reduced strength] + an optional 2 Viet Cong units.  It is slightly different for the SV player as their activation points can also be used to bring airstrike/transport units on, but once the latter are in play, their use is free each turn, while they survive.
Low unit density reduced even more by the activation process and all units having 1MP [movement point], except for the few mechanised units that have 2 MP create a swift playing game.  This is helped even more by maximum stacking of five units per side and a quick and easy combat system that allows a maximum of 5 dice to be rolled in any one attack.  
The Customised Combat Dice

Combat is not mandatory and not all units in an area need attack, though all defending units in an area must be attacked.  Add to all this are customised dice that show either a blank or one of two symbols [the cross hairs symbol indicates a casualty and a running man indicates a retreat.]  One player deducts the number of retreats from the other player and the excess have to retreat.  So, as the rule book's example shows: if the NV scores 2 retreats and the SV scores 3, then the NV player has to retreat one unit.  Each side has some potential minor combat bonuses; for the SV it's air support and for the NV it's infiltration markers and the Quyet Thang markers. But, always bear in mind that 5 dice is the maximum rolled by either side. Both sides have a number of small differences that create each side's individuality.  For the SV it's mainly the variety of units and greater movement flexibility and for the NV it's mainly the range of combat bonuses.  Nothing too overwhelming, but this type of asymmetry is an aspect of a game system that I relish and so I was pleased that Saigon 75 has been announced as the first in an intended new series labelled UP! [Under Pressure]. 
The solo mode briefly mentioned earlier is designed purely for the SV player with the NV player controlled by a random card draw from the Solo Deck which in turn prioritises the draw made from the NV Event Deck. The Solo card also gives an order of preference for NV targets, details of its activation and how combats and retreats are handled.  I was surprised and welcomed the amount of detail that can be included in just two and a half pages of rules.  As always I'm personally happy to use the methods of my gaming origins [and I confess age!] that demanded simply that you played both sides to the best of your ability, but here is a solo system, both easy to follow and quick to execute.
A final point made in the opening sentence of the rulebook is that the games in this series are aimed to be played back-to-back.  Sometimes, I've found in the past that if games were designed that way, it often turned out to mean that one side is distinctly less interesting to play than the other.  That's not at all my view of Saigon 75.  I will willingly sit down to play either side with just as much expectation of enjoyment and anticipation of a tense match.
Once again, Nuts!Publishing have come up with a streamlined winner and one that I must thank them for, especially in letting me have to bites of the cherry by reviewing both the prototype and the polished published copy.

LINK to review of the prototype

 LIMITS OF GLORY:  BONAPARTE'S EASTERN EMPIRE FROM FORM SQUARE GROUP The Prologue Recently I first heard of this game's title - noth...

LIMITS OF GLORY: BONAPARTE'S EASTERN EMPIRE LIMITS OF GLORY: BONAPARTE'S EASTERN EMPIRE

For your Wargamer, Toy soldier collector, MiniFig collector, military history nut. Reviews, interviews, Model Making, AARs and books!

area movement

 LIMITS OF GLORY: 

BONAPARTE'S EASTERN EMPIRE

FROM

FORM SQUARE GROUP


The Prologue

Recently I first heard of this game's title - nothing more and I instantly headed over to BGG for enlightenment.  At that point the only message was "No discussions" and three photos.  Despite - or was it because of this lack of information - I determined to contact the company to see if they might provide a copy of the game to review.  But first I had a board wargaming convention to get to soon.  
A little later...I arrived at a venue near Coventry where PunchedCon 2023, a new board wargame convention which was started and held for the first time last year was being held for its second time!
Walking into the large gaming hall, I was surprised to see there was a person setting up a demo stand for Form Square Games, the future publishers of Limits of Glory: Bonaparte's Eastern Empire.  Not only was this person the publisher, he was also the game's designer, Andrew Rourke.  Several conversations with Andrew and his fellow gamer, Ray, and a play through of the game later and I was back home with a proto-type copy from the designer [many, many thanks] and straight on to BGG to post my first very brief impressions of the game and a promise to write a full review.  The rest, as they say, is history or rather this review of what, from now on, I shall for brevity's sake call Bonaparte.  And why Bonaparte and not Napoleon?  The answer is for historical accuracy.  The game is set in the period when he ranked as General of Division Bonaparte. His crowning of himself as Emperor Napoleon lies in the future.  This points to the fact that, though this may be considered a light game, it is one for which the designer seeks to create the right feel and historical verisimilitude for the period.
In The Beginning
The campaign in Egypt, for this is what the game portrays, is generally not widely known.  If it is, then the Battle of the Pyramids and the naval Battle of the Nile in 1798 [sometimes called the Battle of Aboukir Bay] along with the British landing three years later, also at Aboukir Bay, are the main and only events usually mentioned.  The other famous fact is that the French expedition led to the discovery of the Rosetta Stone, so important in the later deciphering of Egyptian hieroglyphics.  My one and only board wargaming experience with this campaign has a map that is widely considered fairly off-putting and it was the map for Bonaparte that immediately grabbed my attention.  Here it is, remember that it is a proto-type and then read on.


Perhaps your reaction was similar to mine. It certainly grabbed my attention and my curiosity, but my impressions and reactions were mixed.  Its parentage was clearly a cross between Eurogames and more traditional board wargames..  The colours were strong, vibrant, perhaps even, dare I say, garish. And what had happened to the sea?  As I commented on BGG, it was a " strangely pale and un-blue sea. This turned out to have been a designer's typical nightmare, as Andy showed me a photo of the board's colours that went off to the printers with a lovely pale blue sea and came back with...well. a different colour."  Thank goodness, only the proto-type!  To emphasise the point my photograph here doesn't even give you an accurate representation of the printer's incorrect colour, turning it into a far more sludge-like one!!
The board, as you can see, is very simple, and mainly an area movement map of parts of Egypt, Syria and the Mediterranean.  But what was the purpose of that dominating numbered track and what are those cartoons dotted around and why are they there?  Answers to those two questions will come later.
In part, I'm trying to recreate for you my experience and what yours may be if you see and buy this game. I was intrigued, I was puzzled, I did want to know more. It didn't look like the normal game I would buy, despite being an avid board wargamer for 47 years and a similar Eurogamer for a mere 15 years.  Particularly, would it satisfy me to play as a grognard board wargamer and here I'm going to leap ahead, just in case you give up reading at this point, it did.  I was hooked! 
The game has its abstractions, but models the campaign surprisingly well. It provides both an historical feel with an exciting game and a system which has more unique features than I've come across in any game in a long time.  Even more unique features than in my previous recent review.
 The System
I'm going to start by looking at the two key points of the system.  The first is that the numbers 5 and 6 govern everything.  To move from one area to another whether on land or sea, you need to roll at least one 5 or 6.  


How many dice you roll depends on the those numbers you see printed in each area on the map.  Want to move from an area designated with the number 1, then you get just one dice to roll to achieve your critical numbers 5 or 6. That's a tough area to move from.  An area is marked with a 3, that's easier to leave because you've got 3 dice to roll and you only need the one 5 or one 6 to be successful.  In combat, want to inflict a hit on an enemy unit, yes roll a 5 or 6 and you've achieved a hit.  This time the number of dice you roll is always four.  So, you might inflict up to 4 hits.  Sounds all too simple.  Well, those basic rules couldn't be simpler or easier to understand - a feature generally of the rules in fact.  Despite this, there is plenty of subtlety incorporated, especially in the combat system. 
However, the second and even more important key feature of the game's system is Glory Points.  This will take a little longer to explain, but is just as easy to learn and apply.  It also explains the generic part of the game's title, Limits of Glory. This heralds that the game is the first in a series and the second game design is already underway. To understand more, we need to turn to the two sides' separate Leader Displays.  As the game is focused on Bonaparte, it's the French Display I'm going to use as an example.

Each Leader has two markers on the display.  The first time a Leader is placed on the map board, one Leader marker is placed directly on the map, while his other Leader marker is placed on the Glory Track after rolling for his Glory Points as indicated on the Display Chart.  Their purpose will be explained later as we move into the Sequence of Play.

A closer look at the Glory Track

Set-Up
Before all this, you will have set up the map with all the appropriate units on it and all other necessary charts and displays.  Besides the main map and the Leader Displays are two other Charts of very thick solid cardboard.  The first is the Events Clock and again a definitely new approach that I enjoy whole-heartedly.

The Events Clock

The other chart is the Combat one and, dare I say it, here is yet another unique approach.  In fact there are several original features embodied in this Chart that I'll discuss when exploring Combat.
Combat Chart

Sequence of Play

First of all there are three Phases to this game and it's important to note that this refers to three separate stages in the course of the game, not that there are three phases each turn.
The first stage is the Invasion Phase.  This is a brief "cat and mouse" section involving three French fleet markers of which two are dummies and one is the real fleet, commanded by Admiral Brueys, and one British fleet commanded by, of course, Nelson. The three French fleets set out respectively from Toulon, Genoa and Civitavecchia.  I love this stage of the game as the French player tries by how he/she manoeuvres the fleets to deceive the Allied player as to which is the real fleet, while endeavouring to reach the coast of Egypt without being discovered and, if possible, visit Malta en route and Nelson simply tries to intercept and discover the real fleet.

Nelson fails to reach me, before I'm about to disembark!

There are three possible outcomes;  [1] the French Fleet will be intercepted at sea [2] the French Fleet will be intercepted while disembarking the French troops in Egypt [3] the French Fleet will disembark without being intercepted.  Whichever happens, you move on to the Disembarkation Phase.
Disembarkation Phase
First, consult a chart that tells you what actions to take, how many troops Bonaparte lands with and where, as well as how many Glory Points to calculate for him, plus 2 VPs if you did manage to visit Malta. [I can't help adding that in the game I am using for photos, I managed to visit Malta, scoring 2 VPs, land without Nelson intercepting the French fleet, thus arriving with his maximum number of troops and chalked up 63 Glory pts for Bonaparte to use - one less than the maximum.]

Here he is having disembarked safely, by the way there are 26 infantry and one artillery unit in that stack!  It's a lot bigger than it looks.  I also love the counter to the right, Les Savants, and the attention that this game design gives to creating such an historical atmosphere.  These were a group of scientists and intellectuals that as the French player I have to get to the Valley of the Kings and maintain them there as part of achieving an automatic victory.  Frankly that's the easiest part, for the rest of an automatic victory the French only need to capture all the built-up areas that award VPs!! 
Other enjoyable narrative elements that add historical colour in this very brief Phase are the possibilities that you might have some Mamluks to fight or a Bedouin marker that causes a test that may mean a minor loss of Glory.  All these little details add so much flavour and enjoyment to this game with such simplicity and ease of rules.   After disembarking, it's on to the last and longest and most important Phase of the game.
Conquest Phase 
At the beginning of each turn in the Conquest Phase, an Event roll is made on this chart.  At first you will roll a single die and locate the Event on the Chart corresponding to the number rolled.  As the game progresses, certain Events will lead to an increasing number of dice [up to an eventual maximum of four] being rolled and added up to find the Event that has happened.  Some Events happen each time that number is rolled [indicated by the letter R after the number], others when rolled are replaced by a new Event.  This is an ingenious and engaging device that is another important factor in producing that historical ambiance.  It also creates a degree of linearity to events, while allowing some potentially never to occur while others may appear earlier than expected.  
Lurking among those Events is the one located at the crucial number 14 - roll this number and the Peace of Amiens occurs and the game immediately ends!  


But look carefully at the Event instructions; you need to have reached the maximum of rolling four dice before there is any possibility of the game ending, but, once it is a possibility, the tension starts to ratchet up.
After the Event roll, each Turn then proceeds with the French player always active first and the Allied Player active second. Each player's half of the turn begins with a Momentum roll of 4 dice and. like every other roll in this game. a 5 or 6 will gain you a Momentum marker and each payment of a glory point allows you to reroll a failed die.
A player's turn is very, very fluid, being a mixture of movement and combat.  An initial area will be chosen and, as described earlier, a number of dice are rolled according to the number in the area that you are attempting to leave.  A single roll of 5 or 6 is a success and rerolls can be attempted by spending glory points from the senior commander.  There is so much possibility for variation here.  For example, if there were three leaders and a number of units in the area, all could move into an adjacent area together or each leader could move into a separate area with or without accompanying troops.  If any moved into enemy occupied areas, then combat would have to take place in all such areas before any other further movement could be taken.  Provided a group has not failed in moving or combat, they can continue further movement and combat as the active player wishes.  Any failure results in one of the Momentum markers being placed in the area where the failure occurs.  Once all the Momentum markers gained by the first player at the beginning of their activation have been placed on the map, then their activation is over and the second player follows the identical process.

Above you can see the French steam-roller led by Bonaparte has momentarily been halted, while Menou has been dispatched to garrison the adjoining Cairo area.  Meanwhile on a different route seen below, Lannes is about to overwhelm a small leaderless force on his way ultimately for a massive confrontation with the Ottoman leader and a strong force at Acre.   


Obviously, the French player carries the burden of the attack from the beginning of the game onwards with generally superior leaders allowing the potential for major marches and magnificent victories to be won, but they get precious few reinforcements and attempting an automatic victory inevitably leads to separating some leaders and troops, while the necessary victory areas must be garrisoned with at least a leader, if not some troops.  Slowly the game is likely to begin to swing toward the Allied player whose automatic victory conditions are much less grandiose than the French ones.  He/she simply has to capture and retain control of Cairo and Alexandria until the end of a turn.
If neither player wins an automatic victory, then the game ends when Event 14 occurs and the player with most victory points wins.  Inevitably, this is the most likely way the game will end.  At the start of the game, the Allied player occupies all the victory areas and so has 25 VPs, while the French player has none. Slowly or swiftly, the French will start to capture and take control of those VP areas.  In a demo game that a friend played at PunchedCon, he was barely in the lead and desperately hoping for the ending Event 14 to be rolled.  In my current game, my huge initial success as the French has led me to gamble on splitting my forces and driving for an automatic win.  Probably hubris, but what satisfaction if I can pull it off.  Combats have decimated the Mamluks with barely a French unit lost.  Soon a contingent will be marching with the Savants to the Valley of the Kings, while Buonaparte will be hastening to Alexandria and Kleber with his subordinate leader, Lannes, are already about to capture Arish and then on to Acre and a very tough siege against the city manned by a substantial Ottoman force.  Meanwhile, My Allied opponent is lurking off the Egyptian coast and a fairly substantial Ottoman force and fleet has appeared in Rhodes!  The clouds of opposition are gathering! And there's no doubt that combat and sieges play a crucial and exciting part in the game, using the distinctively original Combat Chart and combat system.
This is a major element in the game and a favourite of mine.  Above all, it allows by the use of leaders' glory points significantly smaller French forces the ability to defeat much larger Allied ones and substantially adds to the concept of that Series title, Limits of GloryThis is by far the most complex part of the game rules, but is very quickly and easily learnt.  The combat system begins by placing your Combat Pawn in the box where the total combat value of your troops on the top horizontal row of the chart intersects with the vertical column for nation and command.  [e.g. the Allied player cross-referencing 9 Mamluk value of troops led by a Mamluk leader would place their combat pawn in the box with the large number 17 and the information that a 6 will score one hit and a 5 will score none.]
Next, both players roll 4 dice.  Each player then decides whether to spend glory points rerolling failures and finally each player decides whether to spend glory points forcing their opponent to reroll successes.  If the total of the final 4 dice is equal to or greater than the large number in the box where your combat pawn is then you look at how many hits a 5 or 6 scores.  Yes, you did read that correctly - the number of hits scored by rolling a 5 or 6 varies.  Generally the French player will score more hits per 5 or 6 than the Allied player.  Even more unusual, however, is the rule that, if the total of your 4 dice is less than the large number, then you have scored no hits at all!!  As I keep emphasising, there is a lot of originality in this game design.  This game doesn't just have an historical feel and appeal, it has its very own distinctive game feel and appeal.  These were both very important factors in firing my enthusiasm for and enjoyment of Bonaparte's Eastern Empire.
On top of all that, there are those strangely familiar artists named in the credits: George Cruikshank, Isaac Cruikshank and James Gillray. If you haven't guessed who they are from the box art, then one look at the board and all the leader counters should do the job. They are the trio of cartoonists from the late 1700s and early 1800s whose satirical lampoons of the great and the good brought them to fame.  On the box is Bonaparte scrabbling to reach the top of the Great Pyramid, while on the board there's Nelson cracking the heads of tricolour flag-draped crocodiles.

Each cameo head and shoulder image on each leader counter is similarly drawn from the contemporary historical drawings of these three men. This game really is unique in so many different ways and this art work is just one more feature in that uniqueness.  The one major component that I can't fully comment on is the rule book, because as a proto-type I'm working from a simple, stapled booklet of black on white A4 pages.  What I can say is that the booklet is well organised in much the same order as I have followed in my review. The rules are clear and easy to understand, presented in what I would describe as a narrative format rather than the minutely regimented multi-case number format.  Layout with good sized print and spacing adds to that easy reading.
All in all, I hope I've been able to share my enthusiasm for everything about this game.  It's certainly one that I shall be adding to my collection with every intention of following the series and for those who might be heading to UK Games Expo this weekend, I'd strongly suggest dropping in on Four Square Games to have a good look at Limits of Glory: Bonaparte's Eastern Empire.  Otherwise, look out for information about the game's launch on Gamefound towards the end of June/beginning of July.


 SONG FOR WAR FROM INVICTA REX GAMES Look out for this new simulation on the whole of the Mediterranean conflict in WWII - the first game la...

SONG FOR WAR SONG FOR WAR

For your Wargamer, Toy soldier collector, MiniFig collector, military history nut. Reviews, interviews, Model Making, AARs and books!

area movement

 SONG FOR WAR
FROM
INVICTA REX GAMES


Look out for this new simulation on the whole of the Mediterranean conflict in WWII - the first game launched by a new company, Invicta Rex Games.

Look out too for a special review exploring this stunning project here on A Wargamers Needful Things next month.

 VON MANSTEIN'S TRIUMPH FROM NAC WARGAMES Initially, I was drawn to Von Manstein's Triumph purely by the bold dynamic box art.  It ...

VON MANSTEIN'S TRIUMPH VON MANSTEIN'S TRIUMPH

For your Wargamer, Toy soldier collector, MiniFig collector, military history nut. Reviews, interviews, Model Making, AARs and books!

area movement

 VON MANSTEIN'S TRIUMPH

FROM

NAC WARGAMES


Initially, I was drawn to Von Manstein's Triumph purely by the bold dynamic box art.  It may be good advice not to judge a book by its cover, but I'm more than glad that this striking picture caught my attention and made me explore further! 
The game is published by NAC Wargames, itself a branch of the Spanish Publisher, Ediciones MasQueOca.  Up to now, the latter company's focus has been on providing Spanish and Portuguese language versions of well-known designs. The company's avowed intent now is to focus on historical wargames that relate to the history of Spain.  
Though Von Manstein's Triumph may geographically and in terms of nationality lie outside this intent, I can only express my delight that this superb design from Francisco Ronco has been one of their choices.  It's also warm thanks to NAC and Ediciones MasQueOca for providing this copy for me to review.
First of all, its components live up to the extremely high standards of the company's past publications and secondly, the design brings a series of new twists both to the field of block units, area movement and card-driven games.
Though Manstein features in the title of a fair number of wargames, including at least two that cover the siege of Sevastopol, all those that I am aware of utilise the standard hex and counter system that is the basis of much wargaming design.
Starting with the components, every item ticks the box for excellence.  The map is a deluxe mounted version sporting a Spanish text version on one side and an English version on the other.

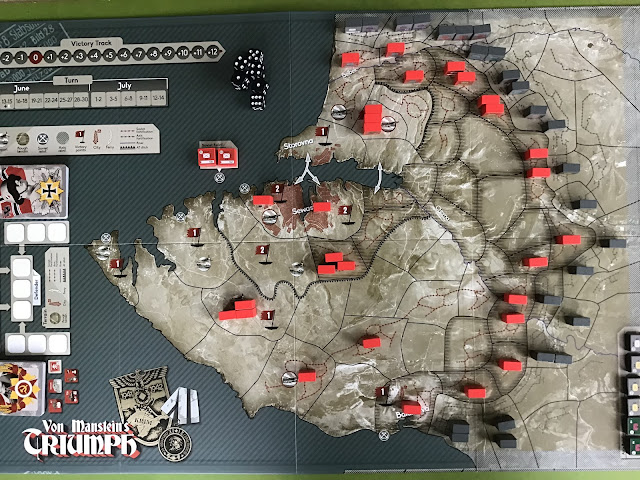
This direct, overhead view picks out clearly the sombre relief, the trench defences, clearly marked VP flags, ferry points and heavy soviet shore batteries, along with all necessary charts and a simple combat display for transferring your units to.  Your forces are wooden blocks of first-rate smoothness.  I mention this because of the tendency of several more recently purchased block games I possess to have slightly ribbed or striated surfaces - not as good for sticking power. 
An additional point in this attention to quality is the inside of the sturdy box, which instead of the usual plain white cardboard is printed with similar details to those on the Playbook.

A touch of box quality
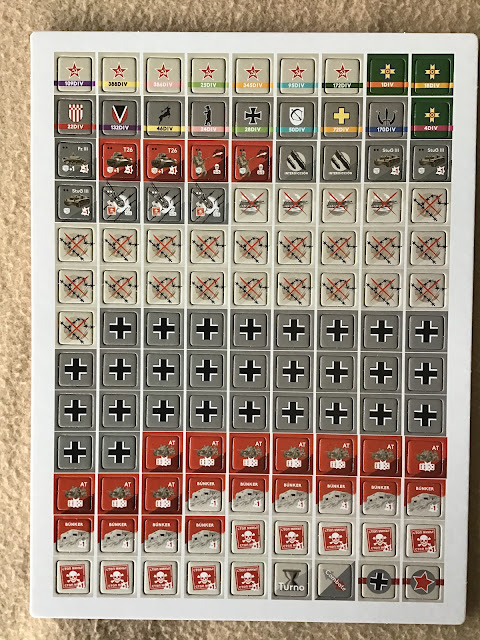
 As usual there is the familiar set of adhesive labels to apply, though as the photo shows this is a relatively low block count - so not an onerous task.  The units are based on divisions that possess from 2 to 4 individual blocks identified by colour-coding and a number of  independent units identified by white colouring.  It is this colour coding which brings my single criticism of the presentation.  First, the typical black dots that indicate the strength of a unit are very small and hard to make out against the generally dark background of the labels. but the major problem lies in distinguishing the colour-coding of the divisions when playing under artificial lighting.
Having initially played in normal daylight, they were perfectly identifiable and attractive, but later play on a wintery evening revealed the problem of clearly differentiating units, especially as divisions begin to intermingle.
On the other hand, praise goes out for the sheet of counter stickers containing two identical sets.  Although I've never had a problem with ones peeling off other games, this is always a nice sign of a company's careful attention to potential player needs.
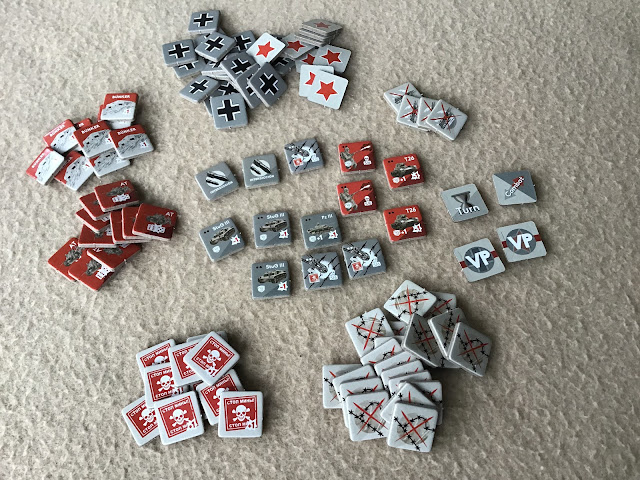
Next up is a single sheet of cardboard markers, ranging from the obvious turn marker to a colourful range of assets, including bunkers, anti-tank guns, armour and pioneers, as well as minefields, area control markers for the German player, and trench destroyed markers.

They all punch out perfectly with the much appreciated, rounded corners that are becoming a more familiar item from many companies.


At the heart of game play are the two decks of cards, one for each nationality.  I find the backs of the cards particularly appealing, with their strong feel of wartime propaganda posters.  

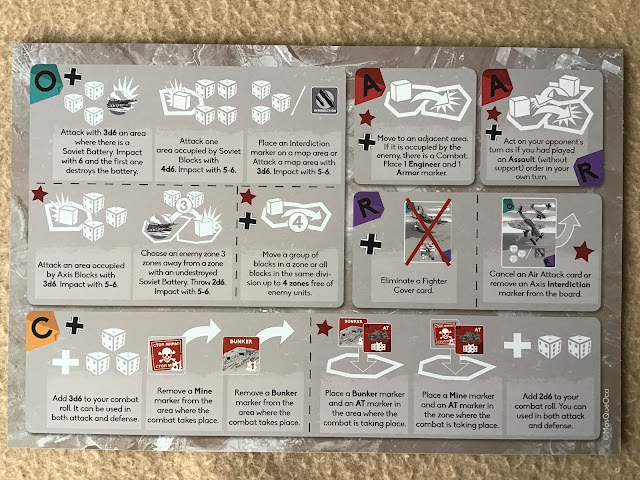
Included with them are similar-sized cards giving each player's card manifest, terrain effects, counter and marker effects, a very useful short-hand list of modifiers to the number of dice thrown in combat and finally the Sequence of Play.  All these and the larger Play Aids, one for each player that summarise the usage of all the different cards in the Player Decks, are helpfully printed in Spanish on one side and English on the other. 
Play Aid detailing usage of cards in the Player Decks
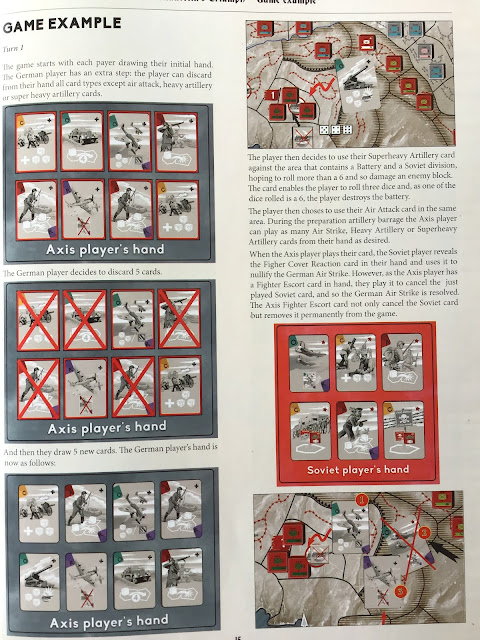
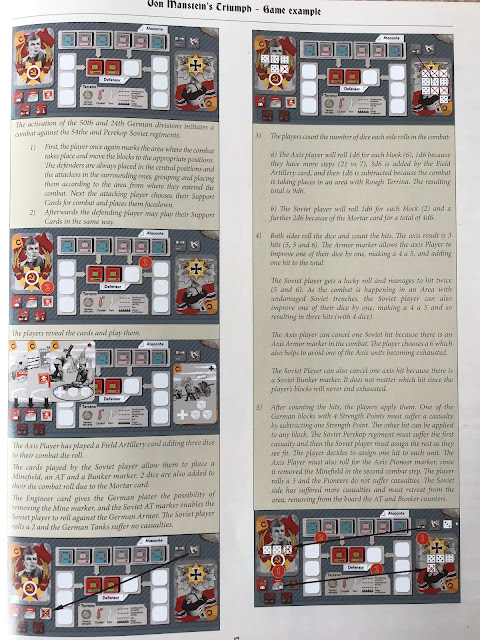
All in all, an admirable package, completed by what's becoming almost the norm in board wargames, a separate rulebook and playbook.  Both are very glossy products with an abundance of illustrations.  The Playbook starts with 5 pages of photographs that show the Set-Up map section by map section; a very useful asset indeed.  Next is a page and a half of Design Notes and slightly more than a page of Player Notes, followed by six pages of Historical Commentary.  All this is rounded off by a five-page example that takes you through the first turn of the game - once more a feature that is always welcome, however easy to understand the rules are.

These two photos show the consistently high level of illustration used throughout.


The Rulebook is supported to the same degree with pictorial examples and, basically, the Sequence of Play is ultra-simple.  Apart from a preliminary German Bombardment on Turn 1, each Turn follows two identical Phases; the German Action Phase and the Soviet Action Phase.  Each Player's Deck of cards contains four different types: Assault, Reaction, Order and Combat Support.  Though essentially simple, play is by no means simplistic and what might, at first, seem an igo-ugo system has a degree of back and forth play that means that both players are totally involved and engaged.
Another distinctive feature that helps the game to shine is the asymetrical design of the decks.  Both players have a core element of Assault cards, but even here there are distinct differences, as the German player has far more of these that are dual action allowing them to interrupt the Soviet Action Phase.  In the same way both the Order and Combat Support cards include a mix of near identical cards and those specific only to one player. By these means the decks create the appropriate emphasis between the attacking besieger and the defensive besieged. [Here I would love to see the system adapted for ancient or medieval siege warfare.]  A final point to make about the cards is that both players draw to full hand size at the end of each Player Phase rather than at the end of a complete Turn.  This adds greatly to keeping both players constantly absorbed in the game play
Player Aid summarising the effects of all the different cards
As the cards are the very heart of the system, I can think of few games that go to such lengths to make sure that you both understand them and then can use them with the minimal amount of effort and rule checking.   First of all, they are introduced in detail, step-by-step early in the rule book and then a three-page section at the end of the rulebook summarises each one.  As shown above, each player has a player aid that sums up the use of both his cards and his opponents, as well as most of the counters used in the game.

One of three pages summarising each card's usage

Oddly there are one or two German counters not included on the large player aid, though they are all clearly explained in the rule book and covered by the three small playing-card sized aids that cover Terrain effects, Counters and Markers and Combat dice.  Finally, each card in your Action Deck pictorially shows how to use it.  Consequently, after a few games, you'll find yourself playing smoothly with each card's use easily fixed in your head.  

Front cover of the Playbook

So, how does the game play out.  Being the besieger, the drive and onus of the action is naturally on the German player.  They have certain advantages, the most obvious being hand-size which is 8 cards as against the Soviet player's 6 cards.  They also have more cards that can inflict hits as opposed to the Soviet ability to place bunkers and minefields and, though both sides start in defensible trench areas, predominantly it's going to be the German player who's leaving their own protection behind to advance into the Soviet trenches.   As mentioned earlier, the German player also has more double-use cards that allow an immediate reaction during the Soviet player Phase.
Generally, the German player will be seeking to soften up areas with air strikes and heavy or superheavy artillery in order to weaken Soviet blocks and destroy the fixed coastal batteries printed on the map.  The Soviet player for their part has field artillery and the power of those coastal batteries, as well as the ability to place bunkers and minefields.  Other abilities from card play cover ATs, Stugs, fighter cover and fighter escorts and mortars, while the map itself includes those powerful coastal batteries that are so important for the German player to destroy, ferry crossing points an anti-tank ditch and a plethora of trench lines.
It is, like any siege, a difficult grind forward for the attacker, but the variety of action and play and counter-play of cards, all so simply, but effectively introduced whether as Actions, Orders or Combat Support, makes the experience a continually dynamic and tension filled one.   Whichever side you play, you'll find yourself fully engaged and immersed the whole of the game.
 
hpssims.com