second chance games

Search This Website of delight

  Across the Bug River Volodymyr - Volynskyi 1941 by Vuca Simulations  The Germans launched Operation Barbarossa on July 22nd, 1941. They ha...

Across the Bug River by Vuca Simulations Across the Bug River by Vuca Simulations

For your Wargamer, Toy soldier collector, MiniFig collector, military history nut. Reviews, interviews, Model Making, AARs and books!


 Across the Bug River


Volodymyr - Volynskyi 1941


by


Vuca Simulations


 The Germans launched Operation Barbarossa on July 22nd, 1941. They had split their forces into three main forces: Army Group North, Army Group Center, and Army Group South. While each of the three had their own Soviet forces to deal with, by far Army Group South was faced at first by the largest concentration of Soviet Military power. This Soviet concentration of power in the south of Russia has led some authors to believe that the Soviets were planning to strike into East Europe. Most historians do not agree with their assessment. So, Vuca Simulations have chosen to give us a sim/game about a small piece of the titanic struggle that was unleashed by the German Invasion. This is a piece of the Rulebook from Vuca Simulations that explains the situation at the start:

"The Situation
Early in the morning of June 22, 1941, the 
German army unexpectedly crossed the borders of Soviet Russia, thus launching Operation Barbarossa. One of the resistance points on the Molotov Line - the 2ndfortified area near Volodymyr-Volynskyi 
- found itself in the advance zone of Army Group South. 
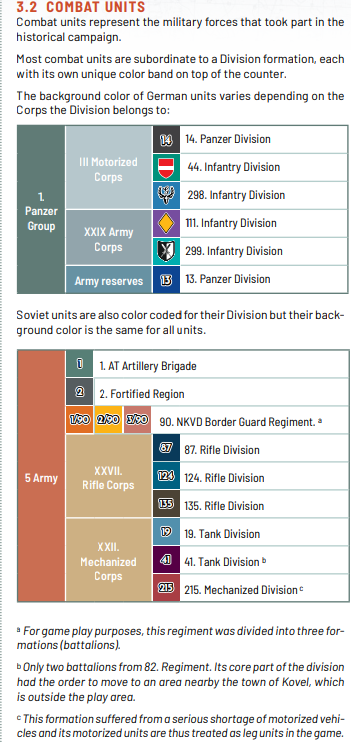
The Breakthrough in this place was supposed to be done by III. Motorized Corps, element of 1st Panzer Group v.Kleist and by 
XXIX Army Corps, part of the best known German Army, the 6th.
At the outbreak of the war between Germany and Soviet Russia in the Volodymyr-Volynskyi region there were elements of 5th Army – 41. Tank Division of XXII. Mechanized Corps and 87. Rifle Division from XXVII. Rifle Corps – most of the remaining elements of both corps were far from the border. The situation was not improved by the fact that the 41st Tank Division was ordered to go to the Kovel area, north of Volodymyr-Volynskyi, where the main 
strike was expected. Only two tank battalions from 82nd regiment were left to support 87th Rifle Division in delaying the 
German advance."


 This is what comes with the game:

One rulebook
One mounted map board
382 large counters of which 181 are combat units
Four player aid charts
Full color setup charts
Full color reinforcements charts
Two ten-sided dice 


 This is the third game I have reviewed from Vuca Simulations and I am still surprised at the components and attention to detail that you find inside the box. The map is mounted and reminds me of a mural instead of a game map. The terrain is easy to see with no ambiguities. The counters are very nicely done with a lot of color. The only knock on them is that they are maybe too 'busy' and have smaller lettering and numbers on them than we have become used to now. However, you will not have any problem distinguishing the different divisions etc. that each counter belongs to. The four Player Aid Charts (two sheets, one chart on each side) are made of the same material as the mounted map. These are very easy to read, and the fact that they are not just flimsy paper is such a good idea. They are done in full color. The two Setup Charts/Reinforcement Charts are made exactly the same way. These are also very easy to read and are also in full color. The Rulebook is in full color and twenty-five pages long. It has a good number of play illustrations in it. On page twenty-one starts the Designer Notes, Historical writeup, and Developer Notes. There are also tips for both players. The Counters, Map, and Player Aids etc. are all extremely well done, and have become a Vuca Simulations trademark. It is amazing how small touches to the game components really make the player feel good about their purchase.


 This is the Sequence of Play:

"Across the Bug River is played in a varying number of game turns, 
depending on the scenario. 
A game turn usually consists of an Administrative Phase (Admin 
Phase), followed by the Operations Phase (Ops Phase), existing of 
a varying number of so-called Operations (Ops) Cycles. 
The first turn of scenario skips the Admin Phase as is indicated on 
the turn track. Therefore, the Ops Phase is explained in the rules 
before the Admin Phase.
The Standard Procedures are general rules, which apply at any 
time during each turn."


 As in all Barbarossa Campaign games/scenarios, the German player has to get from one side of the board to the other as quickly as he can. If he can inflict substantial losses on the Soviet player so much the better. The Soviet player is attempting to sacrifice troops to slow down the German juggernaut. For me, playing as the Soviets is always harder, because you have to always try and judge when to retreat and stop trying to inflict casualties on the Germans. My play style can almost always be summed up as "Il nous faut de l'audace, encore de l'audace, toujours de l'audace!". This has been attributed to both Danton and Frederick the Great. I am not sure who said it, but I have always liked the sentiment. So, my attempts to stem the German tide in games resembles a general who just got a call from Ioseb Besarionis dze Jughashvii ( No wonder he changed it. Hard to get a chant going with that name), or 'Koba' to his friends. 


 Air power is abstracted by interdiction points that are decided by a rolled die by the German player. These can be either a 0,1, or 2. This is an important rule of the game:

"8.1.2 Interdiction Level Adjustment
The German player rolls one die and consults the Interdiction Table to determine the Interdiction Level (0, 1 or 2) of the current 
game turn.

Interdiction Effects:
• The German player applies the Interdiction Level as an additional Initiative DRM.
• The Soviet player uses the Interdiction Level to determine Soviet Formation Activation Recovery levels.
8.1.3 Soviet Formation Activation Level Recovery 
The Formation Activation Level Recovery of Soviet Formation is 
not fixed, but based on the individual Formation Activation Recovery Rating and influenced by the Interdiction Level of the current game turn.
• The Soviet Player checks the Formation Activation Recovery 
Rating of his supplied formation and cross references this rating 
with the Interdiction Level on the HQ Recovery Table to obtain 
the result. 
This means that the Soviet player does not know the exact Interdiction Level and Recovery values for a given Recovery Segment during the preceding Ops Phase!"

 This really can make the Soviet player's heart skip a beat, and destroy all their well thought out plans. This is just one example of the 'friction' of war that is built into the game.


Not the final artwork


 This is a great, tense game that shows both the fragility of both the Soviets and German forces in the first days of the war. The game also shows that there are plenty of battles that Vuca Simulations can develop using the formula. So, a company does not have to make the hundred and fiftieth Kursk game to let players have a great romp on the Eastern Front. For those of you who have to have Tigers and Panthers in your force pool, either broaden your horizons or look elsewhere. The amount of Panzer IIs that were still being used in 1941 will astonish you. Ivan had to take a nine count in 1941, but rose again to victory. Mayhaps with you as a general you can do much better than your real counterpart, and not get sent to the Gulag or worse.

 Thank you Vuca Simulations for the chance to review another of your excellent games. I will also put some links below to the other two games I reviewed for them. 

Robert

Vuca Simulations:

Across the Bug River:

The Great Crisis of Frederick the II:

Crossing the Line - Aachen 1944:

 March on the Drina WWI by Princeps Games  Just as envisioned by Bismarck, a great Europeans war did occur because of "some damned fool...

March on the Drina WWI by Princeps Games March on the Drina WWI by Princeps Games

For your Wargamer, Toy soldier collector, MiniFig collector, military history nut. Reviews, interviews, Model Making, AARs and books!


 March on the Drina WWI


by


Princeps Games


 Just as envisioned by Bismarck, a great Europeans war did occur because of "some damned foolish thing in the Balkans". The Austria-Hungary grab of Bosnia Herzegovina is where it really started. By foolishly adding more Slavic people to its domains, Austria-Hungary had started the clock on a time bomb. There were two wars in 1912 and 1913 in the Balkans. First between the different Balkan kingdoms and Ottoman Turkey, and then between the Balkan countries over the spoils of the first war. Serbia had close ties to the Russian Empire and had always been at loggerheads with Austria-Hungary, especially after their grab of Bosnia Herzegovina. The bullet from Garolav Princep set in motion a slow starting and moving avalanche that soon crushed all before it. Three empires and their rulers would be swept away by the tide of World War I. Only after the greatest conflict up to that time had taken place did the dust somewhat settle. Many historians now classify the Second World War as just a continuation of the first. Did the freedom fighter/assassin (depending on your view) have any inkling what he had started in motion after he shot?


 The Drina River is 215 miles long and was the western border of the Serbian Kingdom and the Austria-Hungary states of Bosnia Herzegovina. The Austro-Hungarian General in Chief Conrad von Hetzendorf believed that a part of his army could conquer Serbia very easily and then get on trains to fight Russia. This was actually in his timetable structure of the war. The Austro-Hungarian Army and Conrad were in for a very rude awakening. The Serbians fought like lions and not only defeated the Austro-Hungarian attacks, but also pushed some of their forces behind their starting lines. Serbia would not be conquered until Germany, and Bulgaria decided to help the Austro-Hungarians. Even then, the Serbian Army stayed together and helped defend Salonika (in Greece) after they were pushed out of Serbia proper. 


 So, this then is the game. You can either take control of Serbia or the forces of the Central powers (Austria-Hungary, Germany, Bulgaria) against her. The game can be played with two to four players. For a four-player game, both Germany and Bulgaria have a player, and for three player, Germany/Bulgaria is played by one person. This is what comes with the game:

Mounted Game Board

Rulebook

4 Player Cards

13 General Cards

42 Luck Cards

4 National Military Capacity Chart

Calendar

Minimap Sheets

24 Control Markers

18 Albanian Orders

45 Military Capacity Units

31 Infantry Units

18 Cavalry Units

15 Artillery Units

13 General Units

84 Tokens

84 Counters


 The game components are definitely a mix of a wargame and a Euro game. The mounted map is beautiful, and nice and large for the play area. The map hexes have either clear, city, or impassable terrain. There is no benefit/penalty between a city or a clear terrain hex. The Rulebook is set forth very well and it is easy to follow along, or to look for a particular rule, etc. It is only twenty pages long. Then there another eleven pages of pictures of the fans who helped make the game possible. The nicest touch is that the pictures of these fans were put right on the counters. The unit counters are rectangular and are meant to set into small round stands. This is another part of the Euro game feel to the components. There are small round magnets that can be added to the troop stacks (no more than two per stack). 


  The Sequence of Play is:


 It is played in rounds, with each country's turn as follows:

Austro-Hungary

Germany

Serbia

Bulgaria


 This is from the Rulebook:


"Each round is played as follows:

• The Calendar is adjusted to the next period.

• Players apply the effects which that period brings.

• Players play their turns at the order listed above. At the end of his turn, a player collects MCU (Military Capacity Units). When his turn comes, a player decides whether he will move all units, some units or no units. A player decides whether he will engage in combat or not. After that phase is finished, a player collects as much MCU as it is shown on NMCC (National Military Capacity Chart) and in that way he finishes his turn. When all players finish their turn, a round is over, The Calendar is adjusted to the next period and a new round begins."


 The rules for the game are simple. Each unit can only have three strength points assigned to it. Only one unit at a time may attack. So, you cannot try for a two or three hex attack on one hex of the enemy. The Luck Cards mean that you can only guess at your actual attacking and defending strength. A Luck card is drawn by both the defender and attacker. Their value goes from zero to plus three. With its simplicity and the fact that there is no terrain benefit or hindrance the game may put off the real grognard players. This is a shame, because this is a great game to have around to play with newbies to the fold. The game mechanics of building up your forces or rebuilding them is deceptively deep. So, there is some meat there for grognards to chew on. I think the game is a nice change of pace from playing a really in-depth game with hundreds of counters etc. I believe Princeps Games have done a wonderful job on their first game. It introduces players to a very overlooked part of World War I and does it in a simple and easy way. The components are really well done and definitely catch the eye when you open this large box for the first time. 


 Princeps Games second game has been released. It is called 'Downtown Chase'. It is not a wargame, but from what I read it is a good game night Euro game. Links will be below.


Robert

March on the Drina:

March on the Drina - Princeps Games

Princeps Games:

Home - Princeps Games

Downtown Chase:

Downtown chase - Princeps Games


 STARGRAVE: THE LAST PROSPECTOR from OSPREY GAMES Stargrave  transports the fantasy RPG  Frostgrave  lock stock and barrel to a science fict...

STARGRAVE: THE LAST PROSPECTOR STARGRAVE: THE LAST PROSPECTOR

For your Wargamer, Toy soldier collector, MiniFig collector, military history nut. Reviews, interviews, Model Making, AARs and books!

 STARGRAVE: THE LAST PROSPECTOR
from
OSPREY GAMES


Stargrave transports the fantasy RPG Frostgrave lock stock and barrel to a science fiction setting.  Behind it all are Joseph McCullough, the prolific writer and creator of these two worlds and many other novels too and the publisher's Osprey Games.

Though RPGs are very much the outer rim  of my gaming world, how could I resist the kind opportunity given to me by Osprey Games to preview this latest expansion to the Stargrave canon, especially when I discovered that it's due to be released on 28th April - my birthday!

In case any of you are totally unfamiliar with its origins, I'm going to start with the briefest of outlines .  This core was presented in a substantial hardback book that gives you all the background, rules, stats and scenarios etc. Thematic art work and photos of diaramas taken from games adorn and enliven the text.  We're dealing with a small unit, miniatures skirmish game set in a typical devastated and blighted galaxy.  The rather long subtitle to the core game says it all- Science Fiction Wargames in The Blasted Galaxy.

There is a substantial gallery of miniatures that have been sculpted purely for this game, but it really is one game where you can bring virtually any existing figures, terrain and buildings you possess to your gaming table.  

Your first task is to create a team made up of a captain, first mate and assorted crew then follow through the scenarios.  Like most RPGs, the wealth of written material provides an excellent resource to create your own scenarios.

A free supplement introduced solo play, while the first published expansion, Stargrave: Quarantine 37 , landed your crew slap bang into a deserted research station where you can compete through the scenarios against other crews in two mini-campaigns or take on a solo mini-campaign.

The Last Prospector, the second supplement similarly presents a range of new elements and a new region of the galaxy to explore.  The presentation is a glossy softback book of 86 pages. The introduction had me hooked at once.  Though only two pages long, in it Joseph McCullough gives us a clear, succinct explanation of his intentions and inspirations.  Three things leapt out at me.  

Foremost was his desire to explore the connection between the genres of science-fiction and the western.  This is a pairing very familiar to me as were his seminal references to Star Wars and especially Firefly, the sadly curtailed Josh Wheedon series and the film Outland which, as he notes, has often been compared to High Noon Firefly in particular struck me as a particularly important influence on the geography and geopolitics of The Last Prospector.

The region in question, the Honoreb System, has become a backwater of the galaxy, though still a mineral-rich asteroid belt.  Among its locations that will feature in the scenarios are Penthalia Station, a once vibrant and important hub, now largely decaying and derelict; Honera, a steamy jungle planet with originally three enclosed bases and Saint Mollia [or "Molly" for short] a vast titanic though abandoned ore carrier.

Next to seize my attention was his desire to depart from the linear progression of so many, many RPGs.  Instead the Campaign provides a ten scenario arc of which only the opening and final episodes are fixed.  The other eight can be played in any order.  The suggestion is that the game players take turns choosing a scenario usually based on what each thinks will be most immediately advantageous and suited to the qualities, powers and abilities of their crew.  My own instant reaction was, at some future date, to offer up this order to the random gods of the dice world! 

The third detail that I was highly enthusiastic about is summed up in the following extract"...instead of a focused narrative , this campaign is based around a mystery and a location ... to solve the mystery, the crews must travel all over the system , searching for clues."  Great idea was my immediate reaction - a game with not just sci-fi, not just westerns, but a whole touch of Sherlock Holmes: Consulting Detective too.  Sadly this was my one disappointment.  The disappearance of the old friend, the eponymous Last Prospector and his rumoured "big score" are simply what Alfred Hitchcock would have called the McGuffin.  In other words they are the motivating trigger for the game's plot that sends your crews hither and thither across the Honereb System.


Just one of the many pieces of artwork that enliven the text

At this point, I think  one other sentence from the introduction is important to quote: "I leave it up to the players to fit my work into their own imaginative framework."  As Joseph McCullough stresses in his introduction, it's entirely up to the gamer whether you stick closely to his detailed descriptive script or not.  This is very important comment for the whole creation of your table-top, as you'll see in the next section where I explore some of the scenarios.  The fact that all bar the grand finale of the game is designed to be played on a 3'x3' table is a big plus for the gamer with limited space. However, the setup for many of the scenarios could task the physical terrain resources of the average gamer.

The fixed opening Scenario of the Campaign screams its influence from the classic western mythos in its title: The Barfight!  The setup specifies the classic bar down one edge of the gaming table and various other familiar accoutrements such as tables and chairs.  However, later scenarios grow more taxing in their requirements, such as a cavern floor with an upper level shelf running all around the edge of the scene.  This is where the comment about using your own "imaginative framework" applies - in other words "do the best with what you've got".   I've got to say that the suggestion of using 3" strips of paper didn't appeal.  So, substantial quantities of packaging from a recent home purchase, plus extensive Stanley knife work, are going to be pressed into service. 


The transformation begins!

Similarly, broken bits of polystyrene are in the process of being transformed into rocky outcrops that may serve both in some of the underground locations and on the planet's surface.


However, the thick jungle of a scenario like The Devil's Punchbowl will stretch my current resources considerably, though it will be one of the cheaper to beef up.  Though behind my nascent rocks lurks one of the rare items that I possess which I need to greatly expand and spend on to furnish my jungle settings.

On the other hand, left-over creations made for my son's long past days of Warhammer 40K and Necromunda, plus my own Deadzone 2 building collection will certainly feature prominently in other scenes, as will many of the figures pressed into service from those games. 


The one above I particularly like and feel it will work both in a jungle setting and also can be adapted to serve as a mine entrance.

Before looking at the typical Scenario outline, it's important to explain a narrative feature that I strongly like.  This region of the galaxy is split between six factions each with their own ideals, culture and needs.  Each player's crew will be affected by their shifting "standing" with each faction that will be affected by how they perform in each Scenario.  Outcomes will be positive or negative and, not surprisingly, will bring rewards or disadvantages that feed into other Scenarios.*[see below]   This adds a lot of colour to the story and game play - a definite winner for me, as it also sits well with the "western" influence, making me think of the factions successfully played off by Clint Eastwood in A Fistful of Dollars!

Each Scenario is presented in a well organised pattern:-
A brief narrative introduction to set the storyline scene.
Crew - these details usually introduce specific factors that may change the constituents of your crew, introduce limitations, exceptions, additional equipment or even additional units.
Set-Up - outlines the terrain/physical details to create the scene, the placing of loot tokens and the positioning of figures.
Special Rules - fairly self-explanatory!
Faction Advantage - changes in each player's crew standing with the factions in the game and the benefits and disadvantages resulting [*see above]
Outcome - what may generally be summed up as victory conditions, in that this section tells you what you'll gain or lose by certain actions.
Loot and Experience - usually this results in players rolling on the core game book's tables for these two factors plus special ones just for this supplement.

The typical start to a Scenario's organisation

As you'd expect with any supplement, there are new additions to all elements of the game.  They start with new backgrounds and powers for the two most important characters in each player's crew, your captain and first mate.  There are new soldier types , ship upgrades and advanced technology, a series of new attributes and in the section labelled Bestiary there are ten new creatures that you'll encounter through these Scenarios.  I'm not quite sure that a Foreman or Miner would be too happy finding themselves in a chapter entitled Bestiary or be lumped among "creatures"!

One of my favourite figure illustrations

All in all this is a very attractive and well produced addition to the Stargrave canonThere's plenty to read and its well illustrated with many exemplary photos and artwork.  The Scenarios cover a good range of situations culminating in a lengthier three-part finale and as the author observes, there are plenty of hooks and dangling storylines in the narrative to chase down by creating your own scenarios.  

With the Western influence in mind, I can already envisage a captain and first mate with five other crew members finding themselves called upon to defend a rag-tag group of isolated and down-trodden settlers from the brutal oppression of the nastiest elements of one of the system's six factions.  My captain might just be called Chris!

So, look out for Stargrave; the Last Prospector and its publication date on 28th April!


  Trench War by Wisdom Owl/Fellowship Of Simulations  Le Grande Guerre, or The Great War, was a cataclysmic event that completely changed th...

Trench War by Wisdom Owl/Fellowship Of Simulations Trench War by Wisdom Owl/Fellowship Of Simulations

For your Wargamer, Toy soldier collector, MiniFig collector, military history nut. Reviews, interviews, Model Making, AARs and books!


 Trench War


by


Wisdom Owl/Fellowship Of Simulations


 Le Grande Guerre, or The Great War, was a cataclysmic event that completely changed the world. The brutality of war was highly evident in it from the first day to the last. Flame Throwers, Poison Gas, and whatever could be used to kill was implemented. Even the combatants in World War II did not use gas on each other (of course, it was used in the death camps and by Italy in its grab for colonies). The term for the daily number of deaths on the Western Front was called 'wastage'. In actuality, World War I and II are now looked at by a lot of historians as the same war with a short peace in between, much like the Peloponnesian Wars. 


 I am finally okay with block games, and I do not break into a sweat anymore when a map does not have hexes. However, I am still a bit leery of a wargame played with cards. I have played a few, and have reviewed two I believe, but my pulse rate still quickens when I see it is a card game. Exposure therapy has worked for area movement, and for blocks. So, one would assume, after a few more card games I should be fine with them.


 Let us see what comes in the box:

50 Troop Cards
58 Bonus Cards
1 Gameboard
1 sheet of Counters (Markers)
1 Rule book
1 Optional Card


 This is a blurb from the creators:

"Trench warfare is a simple game for two players on the theme of the Great War. With games of less than 45 minutes, each player uses a deck of cards containing soldiers, tanks, planes and support weapons to take the opposing trench. With a simple rule, this game creates tense situations full of attacks of counterattacks."


 As you can see the game is a pretty minimalist one. However, the game makes up it sparseness with having very well done components. The gameboard is nicely illustrated to match the destruction of World War I. The cards are little pieces of artwork. The German cards have the Pour Le Merite on the back of their Bonus Cards, and the German Flag on their Troop Cards. While the French ones have the Knight of the Legion of Honour on their Bonus Cards, and the Tricolor on their Troop Cards. The Rulebook is in full color and it has plenty of play examples for only being twelve pages long. The game markers are round and it is easy to understand their meanings.

This is the Game Sequence of Play:

Each Player receives six Command Points (CPs) per turn.
These can be used to do any of these actions:

Discard up to eight cards (1 CP cost no matter how many cards are discarded).

Place a Troop Card (You pay the CP cost in the upper left hand of the card).

Move a Troop Card (1 CP cost).

Attack with a Troop Card (1 CP cost).

Place a Bonus Card (You pay the CP cost listed on the Card).


 The game is set in the last year of the war, and it is only between French and German combatants. Like many games this size the rules are simple. This does not mean that the game is a beer and pretzels one. It is a tense and well thought out game that gives the player plenty of choices to play well or mess up badly. The shortness of the game means that you could play more than a few times on game night. The smallness of its footprint means that setup and cleanup is a breeze. In my own games, and reading about the game, many times it comes down to the wire with the last card or cards being the difference between victory or defeat. I can easily recommend the game for a change of pace for us cardboard pushing grognards. Hell, the artwork alone is worth the cost of the game. 


 Thank you, Fellowship of Simulations for helping me to broaden my wargaming with this exquisite little game. 


Robert 

Trench War:

Fellowship of Simulations:


 Medieval Military Combat Battle Tactics and Fighting Techniques of the Wars of the Roses by Dr. Tom Lewis  The War of The Roses, between th...

Medieval Military Combat by Dr. Tom Lewis Medieval Military Combat by Dr. Tom Lewis

For your Wargamer, Toy soldier collector, MiniFig collector, military history nut. Reviews, interviews, Model Making, AARs and books!


 Medieval Military Combat


Battle Tactics and Fighting Techniques of the Wars of the Roses


by


Dr. Tom Lewis


 The War of The Roses, between the Lancaster and York factions, is a seminal point in English history. The Hundred Years War, fought between England and France, had given the various magnates and Lords of England an outlet for their rivalries and quest for more lands etc. The War of The Roses meant that England could no longer think of overseas expansion and had to deal with a war on their own island. This war saw the change from arrows to artillery and even handguns. Plate armor and the non-novelty of the longbowmen meant that these battle winners, according to most histories, in the Hundred Years War were just another force to be reckoned with on the battlefield. A longbowman was trained from childhood, through his whole life, to be effective on the field. The book informs us that that the archers' effectiveness in battle relied on many different things. 


 The author comes to a few conclusions in this work that will likely surprise people. His first one is, how long were the actual battles. Towton was supposed to have been a daylong affair. The book shows us that two lines of medieval soldiers hacking away at each other could only have gone on for a limited time. Soldiers on both sides had to break away from each other at least a few times. The weapons of the infantry, mostly poleaxes, and their armor would have made fighting for more than 10 to 15 minutes at a time the most one could expect from a human. Dr. Lewis also makes an interesting point about the actual reported losses in these same battles. Using Towton again, 28,000 men were supposed to have been lost. The figures for other battles are not as large but do represent a great number of bodies. The problem is that there are very few, to no mass graves, that would accommodate such a slaughter. Certainly, the lords would have been normally found and brought back to the family for burial, but not the average soldiers. He also suggests that even during a rout an armed soldier was not the 'easy pickings' that are usually portrayed. The routing soldiers were not throwing away their costly arms and stripping their armor off to run away as fast as possible. Plus, how fast could infantry actually chase the routing soldiers. Certainly, cavalry would be able to run down some, but how much physical endurance could one expect from a normal horse with an armored knight on its back?


 This is an excellent book for the reader to learn about the actual fighting of a medieval battle compared to the Hollywood version we have stuck in our minds. It made me question my long-held beliefs that were instilled into me by earlier forays into books about the subject.


 Thank you, Casemate Publishers, for letting me review this book. This is another fine addition to their large library.


Robert


Book: Medieval Military Combat

Author: Dr. Tom Lewis

Publisher: Casemate Publishers


  FROM SALERNO TO ROME FROM DISSIMULA EDIZIONI This is only the second game to be published by Dissimula Edizioni   and I would like to than...

FROM SALERNO TO ROME FROM SALERNO TO ROME

For your Wargamer, Toy soldier collector, MiniFig collector, military history nut. Reviews, interviews, Model Making, AARs and books!

 FROM SALERNO TO ROME

FROM

DISSIMULA EDIZIONI


This is only the second game to be published by Dissimula Edizioni and I would like to thank this small Italian games company for providing me with a zip-lock edition of this second game.  The focus on the 10 month Italian Campaign of WWII was what first drew my attention.  Then the pictures that I saw of From Salerno to Rome grabbed my attention even more because of the apparent quality of production.  The real thing, when it arrived, fully lived up to those images.  I would single out the two maps that overlap perfectly to form the full campaign playing area.


It stretches from Rome on the north edge of map 2 to south of Salerno on the south edge of map 1.  Details are perfectly clear and the muted colours work well to portray the Italian landscape.  The units and markers are well rendered, in particular the Corps and Division counters that are used on the Army display charts are very attractive.  


Unfortunately my photo of the Allied units in their counter sheets don't do them justice and distorts the colour, but this close up of one sector gives a more accurate impression.
 

 I deliberately chose to show some of the counters as they are when just pressed out of the counter sheets and some after I had clipped the corners.  Though a lengthy process, I would strongly recommend it for the additional effect created on the map.

All the play aids are of a similar good quality, ranging over the unit displays for the Campaign game [including a very useful set up map] and the Operation Diadem Scenario, a full colour terrain and combat chart and each player's Operational Costs chart and Army Displays.
Setup Chart for the full Campaign Scenario
The final element is the Rule book which is printed on such good quality gloss paper that it feels almost like thin card - definitely a substantial production.

In all there are five Scenarios, each of which is played on a single map, providing substantially shorter sessions than the full 10-turn, 2 map Campaign.

Scenarios
Ortona :  1 Turn
Salerno : 2 Turns
Anzio:    2 Turns    
Operation Diadem: 2 Turns
The Kesselring Option [hypothetical] 2 Turns

The full Campaign: 10 Turns

You will certainly make use of those shorter Scenarios for a number of reasons.  The first is that they make good games in their own right, especially the Salerno and Anzio ones. The second is the length of time the whole Campaign will take to play, unless the typical Sudden Death victory condition is achieved and finally the third is their need to help in learning the rules.

This is not a simple game in terms of the rules themselves, nor in the sense of understanding them.  The translation from Italian into English has some familiar issues, such as lack of correspondence in subject and verb between singular and plural, inexact use of prepositions and slightly ungrammatical phrasing or a lack of idiomatic phrasing.  However, none of these hinder understanding.  Rather the difficulties veer between the innovative concepts and the broad explanation of some of them.

First of all, however, I'd like to take you through the overall course of a turn and look at some of the uncertainties and ambiguities, while pointing out the many strengths of the design.  Perhaps the major point to be aware of is the inaccurate picture given by the Sequence of Play Chart provided for each player.  

Each Turn begins with the recording of that Turn's Action Points on the player's Army Display Chart, one for the Allied Player and one for the Axis Player, as seen below.


The most important point to grasp is that a Turn is made up of a variable number of Impulses.  In the first Impulse of every turn [except the first turn] both players will have the opportunity to use limited Replacement Points to build up flipped units on the map or rebuild eliminated ones.  In designated Impulses, Reinforcements first become available, but may be delayed by a player's choice.  All other aspects of an Impulse are identical.  They involve a simultaneous Planning Phase and then an Igo-Ugo Operations Phase.  Though the Initiative Player performs all their Moves and Combat first and then the Non-Initiative Player does likewise, this does not convey the interactive nature of an Impulse, which is among the strong points of the system.   

This interaction stems primarily from the use of Reserves and the ability of many units to React.  What I found unusual was that most Axis units possess this latter factor, whereas hardly any Allied ones do.  This is one of several areas where I desperately wished for some Design Notes to explain the thinking behind the decision. 

However, let's look at Planning.  Each Player has a Chart of Operations that they can select from: the Allied Player has a wider range of choices, virtually all of which need to be paid for from that Turn's Action Point [AP] allocation, whereas the Axis Player has fewer options, but several cost no APs.

On each Player's Army Display, you have Corps and Division HQ markers that will be turned to their Activated side if they are chosen for Operations that Impulse.  Should the number of Operations be few, you may be able to remember exactly what you have chosen, but for a more extensive range of Operations, I'd strongly recommend a handy note pad to jot them down!

The full range of Allied Operations options takes in  a few that are optional rules, such as Intelligence which allows you to examine a number of enemy stacks and several very simple choices such as additional airplanes.  The core of your choices is the activation of Divisions or Corps, including the ability to reassign Divisions to other Corps and even to other Armies.  Again the Allied Player has to pay for these Operations with APs, while the Axis Player can do so for free.  This disparity is open to question, though I assume that it depends on the reputed German ability to cobble together their units as needed by defence and desperation.  [Oh Design Notes where are you?] 

Whether this gives the Axis an edge which may affect play balance, I don't yet have enough playing time to comment on.  However, if it should, an easy remedy will be to introduce some relevant AP cost
similar to the Allied one.  Also there is one Allied action choice that can be made only ONCE in the whole game and that is a Major Landing.  Considering that the historical Campaign had both Salerno and Anzio and these are individual scenarios in the game,  I was a bit surprised that the Allied Player can only launch one!  Still that can also be house ruled should you wish to or feel it necessary.

Overall the Planning Phase is one that, I strongly enjoy and welcome as a concept rarely met with in board wargames design. You really do feel like you are genuinely a senior commander, having to decide what operations you are going to undertake and when.  This is especially true as noted above for the Allied Player with their choice of when exactly to launch that one and only Major Landing Operation. 

The obvious drawback to the Planning Phase is that it does add considerably to the length of each Turn, as it is being undertaken not once a Turn, but once every Impulse!  That said, it is a feature I wouldn't miss for the world!  

The number of Action Points each player spends in an Impulse then determines who has the Initiative and moves and fights first in the Operations Phase of that particualr Impulse.  This too has a subtle influence on game play.  How much to allocate and when?  Commit too much too soon and your opponent may have too much of a free hand in a later Impulse that turn.  Or can you strike a strong early blow that may mitigate your opponent's ability to retaliate later.  This is another excellent conundrum created by this part of the game system  and another big plus to chalk up for the game.

So too is the choice between planning several single division operations and Corps Operations.  The first allows a succession of small move/fight actions one after the other that might punch a hole and then exploit it, while a Corps Operation allows several Divisions all to move and then all fight.  Obviously the perfect choice is several Corps Operations in hope of creating bigger holes and greater exploitation!  All of these are very positive main elements in the game's design. 
Always useful - a full colour Reinforcement Chart

Running alongside is a mixture of smaller details that combine to create the fluidity and "feel" of From Salerno to Rome.  In no particular order, I'd like to outline a few and comment on them.  First off is naval, artillery and air power.  All can be used either for bombardment or combat support - but none of the three elements can be combined together. [Another question as to why not for the Design Notes.] 

The handling of air power I really like - a basic two planes plus an additional one based on a die roll are free for the Allies every Impulse, while the Axis have only a guaranteed single plane plus an additional one to be rolled for.  On top of that the Allies can acquire more by capturing airfields - for every three factors captured, you gain an extra airplane!  Simple, but effective.  However, it did take a question or two to shake down just how combat support worked.  In effect the use of any one from planes/artillery/naval allows a roll on the Combat Support Table to gain a DRM [Die Roll Modifier] or column shift on the Combat Table for a given combat.

Another good aspect that also took a little sorting out was the use of Reserves.  First of all, you create them by placing Reserve markers on units or stacks of units belonging to a Division when you first activate it.  After the Division has moved and had combat you can activate individual Reserve units or stacks to move and have combat one hex at a time.  So no combining Reserves from different hexes to attack, though a meaty Allied single stack can pack a reasonable punch!

Should the non-Active opponent have Reserves, they can interrupt by activating a single unit/stack.  This can produce an exchange of small actions.  However, some aspects of these rules were only brought to light through posing questions on BGG.  In particular, the fact that if either player passes on this exchange of Reserve activations, they cannot activate any more Reserves that Impulse.

Both the Movement and Combat Rules are remarkably short and straightforward, while covering all the familiar, typical features.  So Movement includes Strategic Movement that quadruples or triples movement allowance, provided the unit remains at a specified hex distance from an enemy unit and as always there are the benefits of road movement, bridge blowing, bridge repair and construction.  The one major surprise was that all units can move from hex to hex when adjacent to the enemy at the cost of +1 Movement point.  Very unusual! 

Combat is covered in less than two pages.  It's a standard odds ratio table with DRMs and column shifts, embracing terrain, armour bonus and tank shock, combat support, encirclement, retreats and advances.  All very easy to understand and apply.

The final unusual feature is that there are no Artillery units, only markers for Army, Corps and Divisional artillery.  The latter can be redeployed at the beginning of every Impulse!  Thankfully there are not large numbers of artillery or this might have been a chore. This allows for a fluidity I find strange, though the fact that the markers always remains where placed until the next Impulse makes for very careful placement. It also means that attacking units will often move out of range of artillery support especially at the Divisional level.
Again a curious feature for which I'd love more design explanation.

I like the fact that there is a range of minor Optional rules that are integrated at the appropriate point rather than bundled together in a separate section later.  I also like that they are additions [some intended to add historical detail] rather than modifications that change, modify or amplify existing rules.  

Overall, the rule book itself is an attractive production, though very limited in illustration, until you reach the 4 page Example of Play which does encompass most major elements of the rules.  Below is a good illustration from the Example of Play.

I certainly found this a great help to understanding the interaction of some of the rules.  As I've pointed out interpreting accurately some of the rules isn't always easy.  Sometimes play helps to clarify, but equally some of the uncertainties arose during play.  The system is definitely not one for the beginner and, as I've indicated there were several times when the rationale behind some rules would help especially when they didn't seem to fit with what I know of the historical elements. 

However, this is both a system and a campaign of WWII that I feel is well worth the effort to master.  The flow of the game and the situations in the shorter scenarios that I've played have been both enjoyable and engrossing.  The visual appeal of map and counters when set up is excellent and the feel and involvement of both players at all times very rewarding.  I only wish that I had the room to be able to leave the full two map campaign set up for the very lengthy period of time necessary. But that will have to wait until the sort of three or four day gaming conventions that I used to enjoy return to normality.

Once again thanks to Dissimula Edizioni for providing a review copy and I certainly hope that they will take this system to other WWII theatres.  Until they do, I'm looking forward to their next project which takes us to the American Civil war - another of my favourite wargaming periods - and the Chancellorsville Campaign.


hpssims.com