second chance games

Search This Website of delight

  Death in the Trenches The Great War 1914-1918 by Compass Games  'The Great War', 'The War to End All Wars', these were epi...

Death in the Trenches: The Great War 1914-1918 by Compass Games Death in the Trenches: The Great War 1914-1918 by Compass Games

For your Wargamer, Toy soldier collector, MiniFig collector, military history nut. Reviews, interviews, Model Making, AARs and books!


 Death in the Trenches


The Great War 1914-1918


by


Compass Games


 'The Great War', 'The War to End All Wars', these were epithets that have been used to name the First World War. This war was a first for many reasons: aerial bombardment, poison gas, tanks, and masses of machine guns were used in it. Death and destruction of civilians was not a new thing. It had been happening since the dawn of wars. The First World War just took it to a new and frightfully unprecedented level. The western countries have always looked at it from the mostly static trench lines in France. The Eastern Campaigns usually had more freedom of movement and only stayed in one place for at most a year and usually not even that long. Four great empires were dissolved by the carnage of World War I: the German, Austro-Hungarian, Russian, and the Ottoman empires all fell. The horrific loss of life led straight to the devil-may-care 1920s. All of the soldiers who escaped this abattoir were scared by it, whether mentally, physically, or both. In this game the designers have tried to put you into the shoes of the Entente or Central Powers from a strategic viewpoint. You will be in control of your forces across the globe, whether it be in the sky, on the ground, or at sea. 


 Compass Games has once again produced a game about World War I. As I mentioned in another review, they seem to be on a roll as far as games taking place during it. So far, their batting average has been excellent as far as each game goes. Let us see if they can keep this streak going.


 This is what comes with the game:


1 34×22″ map covering Europe and the Near East – Mounted

3+ countersheets (9/16″) of military unit counters, markers and chits – total 400 (double sided)

1 rules booklet (Game System and Random Events included)

6 8½ x11″ color player aid and display sheets

10 six sided dice

1 full-color box and lid set


 This is the hex size and turn length etc.:


Complexity: Medium (about 6 out of 10)

Playing Time: 10+ hours

Solitaire Suitability: Excellent

Time Scale: 1 turn = 3 months

Map Scale: 1 hex = approximately 80 miles

Unit Scale: Army and Corps

Designers: R. Ben Madison and Wes Erni

Artist: Jonathan Carnehl


 This is a blurb from Compass Games that I believe is worth reading:


"Death in the Trenches is a strategic-level World War I game covering the entire war, from the opening shots in Serbia and Belgium to the final defeat (or victory!) of Germany and its allies in 1918. The map, executed by Jonathan Carnehl, is designed to give you a feel for 1914 by using textures and colors featured in atlases of the time. It stretches from the Pyrenees to Moscow, and from Norway to the Sudan, covering every square inch of territory in Europe and the Near East which saw combat from 1914 to 1918, in a manageable 34×22″ format. Colonial battles around the world take place on an additional 8½x11″ map showing Germany’s empire.


The game also features 456 beautifully-illustrated counters depicting all the national armies that fought in the war – from the Germans, French, British and Russians all the way down to the Persians, Montenegrins, Armenians, South Africans, and a host of specialized units (French Foreign Legion, Gurkhas, Italian “Arditi”, Cossacks, Tyrolean Kaiserjäger, Zionists, Bavarians, “Dunsterforce”… even China may send a small expeditionary force).


For the World War I buff, the game’s simple off-map system of Allocation markers fills your world with historical detail: Tanks, Alpenkorps, artillery barrages, flamethrowers, poison gas, Krupp guns, Mustapha Kemal, the Royal Air Force, French elan, Rommel’s mountain tactics and Galliéni’s taxicabs… while the great wartime leaders all leave their mark (good or bad!) on history: Bruchmuller, Haig, Hoffmann, Mackensen, Hindenburg and Ludendorff, Rennenkampf and Samsonov, Sarrail, Von Francois, Foch, Brusilov, Nivelle, Plehve, Putnik and Yudenich. All this detail is added without forcing you to remember special rules.


What other WWI games make ruthlessly complex, Death in the Trenches simulates with elegant simplicity. Face-up units are entrenched; face-down units aren’t! Simple as that. Emphasis is on the fun stuff rather than the boring stuff; there is no bean counting of production points, supply rules and strategic redeployment are easy, and in combat there are no complicated terrain modifiers to memorize – those are baked right into the combat die roll."


 Let us first take a look at the components. The heft of the box is pretty good. However, now that so many games, this one included, come with mounted maps this is no longer a variable denoting gaming goodness (it actually may never have been). We grognards were always sucked in by large and heavy boxes. 

 The map has been judiciously set up to give the player the entire European and Near Eastern areas where campaigns took place, and more, on one normal sized map. That the designers were also able to include the turn record track and some other tables, and a subset map of India, is even more impressive. The map, while appearing plain, has an innate beauty, at least to me. The major cities that did and could have been a part of the campaigns are included. It would seem from the amount of area squished into the map that it would lose something in the conversion. However, at eighty miles a hex it seems just perfect for a strategic view of the area. Naturally, with this large of an area depicted you do not get much of the tactical obstacles, or benefits. The map's muted colors seem to match the somber tones that should accompany this war. There is a one sheet mounted map that has the areas in the Pacific, German East Africa, German Cameroon, and German South Africa that were also fought over during the war. This game is one of the very few that depict these areas. 

 The Rulebook is in full color and is twenty-eight pages long. The type is a bit on the small size. The rules go out of their way to explain that this is not your father's wargame. The game rules etc. have been based on Wes Erni's calculations and his WESCOM (the Warfare Equivalency System and Combat Operations Model). I will have more to say about this later in the review. The Events Book is twenty pages long and has a little color but is mostly in black and white. The first few pages are for the game setup. The next few pages are a complete catalog of what is in each hex. I do not remember ever seeing this in a game before and it is a nice touch. The last eleven pages are of all the events that can take place in each year. The game comes with six hard stock Player Aids. There are two fold out Omnibus Markers Track sheets. One is for the Entente and the other for the Central Powers. Then we have two Special event sheets, one for each side, that both have twenty-five events on them. Then there is a Battle Board and an Attacker Battle Chart. Some of the printing on this is also on the small side. Next up, we have four countersheets. These are adorned with the owning country flag on them. They come pre-rounded and easily come out of the sprues. These would be the most colorful part of the game. A few of them also come adorned with ships, artillery, and planes. The package on the whole is one that your game table will be calling for. 


 Now we will have a blurb from the Rulebook on WESCOM:

"WESCOM (the Warfare Equivalency System and Combat Operations Model) was created by Wes Erni, for the game Absolute Victory (designed in the 1990s but not published until 2016 by Compass Games; the first edition of Death in the Trenches was actually published first). It has been used in several other
games. The principle behind WESCOM is to engage a player’s personality in the Battle system, so that a player’s own level of aggression, or timidity, is vividly expressed in the way that player approaches each individual battle. The key to the WESCOM system is the infamous “Overroll”, where the player rolls as many dice
as he wants to, trying to achieve a die roll as high as possible but without going over a limit; if you go over the limit, you achieve nothing! In this way, the aggressive player constantly risks disaster. While critics who don’t understand the system complain (“What do you mean I rolled all those dice and did no damage?!”), thoughtful players of these games enjoy the emotional roller-coaster that the system forces them to ride. Firepower is essentially an index of offensive power, and takes into account morale, equipment, low-level commanders, and national temperament.

Fortitude is essentially an index of defensive strength, and takes into
account morale, equipment, low-level commanders, and national temperament.

In DEATH IN THE TRENCHES, Fortitude ratings are a little hard to decipher as they have been abstracted to show vast disparities in unit sizes. But the effect is to make every Division worth “one” on attack and defense, which enormously simplifies Battle mechanics for the player compared with the First Edition. Players should note that while Firepower seems like an “offensive” quality and Fortitude seems like a “defensive” quality, both ratings are used by both sides
in a battle, because Battle is simultaneous. While most games have a simplistic "I attack you all along the front, then you attack me all along the front” system, WESCOM accurately represents the intricate ballet of forces on the battlefield."

 Per the above, I hope that I am seen as a 'thoughtful player'.


 This is from the designers describing their thoughts on each country's relative strength:

"The basic unit of force in the game is the “division,” abbreviated “Div”. The exact size of a Div in the game is a mathematical
abstraction, but conceptually you can think of a Div as equaling approximately this many men: AH 20,000; USA 19,000; Russia 18,000; Italy 17,000; France 16,000; Turkey 15,000; Britain 14,000; Germany 11,000. Those numbers are not trivial! The Battle and logistical systems in Death in the Trenches are driven by Wes Erni’s finely tuned mathematical calculations. For game purposes, for instance, an Austro-Hungarian Division is nearly twice the size
of a German Division. This means that an Austro-Hungarian Division has a Battle advantage over a German Division, if only on account of its enormous size. The effect in the game can seem bizarre at first glance – Austrian units actually perform better on attack than Germans do! This is only because they are so much
larger. The flip side of this, however, is that Austrians are much harder to replace, because their casualty rates are so much higher. While this may feel like the Austrians are hard-to-replace ‘élite’ units while Germans are below-average ‘grunts’, the per capita effect is exactly the opposite. Just be aware that this entire system is extremely counterintuitive and takes some time getting used to. "

 Precisely because the system is so 'counterintuitive' is why I have decided to post the designer's words in full. On the outside this game seems like a cross between Axis and Allies and the old Avalon Hill game 'Guns of August'. While the ideas are simple, they do seem to be completely different than almost any other wargame. Most wargames battles are still based on a CRT and a set of modifiers. In simple games it will only be a few modifiers while in others it will be a list as long as your arm. Having a game based upon how lucky or belligerent a player feels means that you get a game where you can have battles like the Somme or Verdun. The battles can be absolutely brutal as far as casualties go. 

 Another interesting concept from the game is Reserve Divisions. These can be used by the player for:

Strategic Redeployment

Building Armies

Special Event Loss

Destroyed in Battle


 I must admit having been taken in by the look of the game. I was not expecting the game to be anywhere near as deep as it actually is. The game mechanics also help with the counter clutter. You do not feel as if you are a God that is using a tweezer to negotiate the buildings of the Manhattan Skyline. The designers have actually gone with a KISS style to the game. The only thing the player needs to do is to open himself up to new ways of thinking about wargames and their rules. Without, hopefully, beating a dead horse, they are counterintuitive. However, they work and work very well to simulate World War I. The game is listed as being as either one or two players. It is also given high marks for playing in solitaire mode. I can agree wholeheartedly with this assertion.

 Some of the Events are:

Achtung, Panzer - Germany's lumbering clumsy A7V tanks attack. This gives +7 firepower to any German attack in a clear hex.

Bruchmüller - Artillery genius, great for surprise attacks. This gives +30 firepower to any German attack

Strosstruppen - This gives +10 firepower to any German attack.

Foch - At the start of any EP pulse, you may "unflip" one stack of French Armies.

Voie Sacrée - At the start of any EP pulse roll three die. The French may add that many Divisions to Armies in any one hex in France.

Smith-Dorrien - At the start of any EP pulse, you may "unflip" one stack of EP Armies (at least one Army must be British).


 This is the Sequence of Play:

2.1 First Random Events Phase
1. Draw one chit to determine what Random Events occur (see 3.0).
2. Divisions are now added to Reserves/Armies by the Events just drawn (3.1).
3. The EP player may now transfer Fleets from Sea to Sea (8.2).
4. The CP player may now transfer Fleets from Sea to Sea (8.2).
5. Players may now challenge Naval Supremacy (see 8.3).

2.2 CP Logistics Phase
1. Each CP unit in a CP Units Holding Box may be built, or rebuilt, by the CP
Player (5.3). You may leave units in the Holding Box if you choose. Armies built at this time may also be reinforced by attaching Divs from Reserves (as in step #3 below).
2. CP may transfer Divs from one unflipped Army to another unflipped Army of the same nationality within 3 hexes (marching distance).
3. CP may transfer Divisions from Reserves, to unflipped Armies (Rule 6.4). This includes the transfer of Minor Forces (4.3) from the Minor Forces Reserve Box to the map.
4. CP may now transfer Divisions from unflipped Armies, to Reserves (Rule 6.4). This includes the transfer of Minor Forces (4.3) from the map to the Minor Forces Reserve Box.

2.3 EP Logistics Phase
The EP player repeats the preceding steps (2.2), using his own Armies and Divisions. Both Players can do this simultaneously if they trust one another.

2.4 Pulse Phase (see 6.0 and 7.0)
[2.4.1] During the Pulse Phase, play proceeds by a series of alternating pulses, kind of like chess moves. First one player goes, then the other player, and back again, alternating until both sides either have nothing left to move, or don’t want to move anything.
[2.4.2] The player who moves first in the turn is indicated on the Turn-Record Track next to the turn number (CP on Turns 1, 2, and 3; EP on Turn 4, etc.)
[2.4.3] During a Pulse, the player who is moving (“the phasing player”) moves one stack of units as explained in Rule 6.0. If this results in the moving stack entering an enemy-controlled Hex occupied by enemy units, the Battle occurs, as explained in Rule 7.0.
Certain Special Events (3.4) are done during, or instead of, movement.
[2.4.4] A player may also “pass” during his Pulse, and hand the right to move to his opponent. If both players “pass” consecutively, the Pulse Phase ends. (So be careful – don’t give the other Player a chance to end the Turn unless you’re prepared to live with the consequences!)

2.5 Unflipment Phase
1. All Armies on the map which were flipped, now “unflip” and return to printed-side-up.
2. Spend Divisions to Repair forts (8.4).
3. Roll for Armenian Massacres (14.2).
4. Surrender Checks (12.0); check Russian “Hammer and Sickle” cities (13.2).

2.6 Second Random Events Phase
1. Draw again for Events, as in 2.1 (every turn).
2. Divisions are now added to Reserves/Armies by the Events just drawn (3.1).
3. Put all Event Chits back into the cup for use during the next year (Fall turns only: see rule 3.0).
This concludes one turn. The cycle repeats until one player resigns, or Fall, 1918 has ended (see 16.0).

 As you can see, deciding to when to 'Pass' during the Pulse Phase is an important decision on the player's part. 

 Another interesting rule is 'Reds' (Partisans). If any Great Power Surrenders (except Russia), the victor places two Reds Armies in the territory of the surrendered nation. These will be commanded by the opposite player. So, if France surrenders, the Reds would be under the control of the Central Power Player. The Russian Revolution has its own set of rules. 


 Thank you very much Compass Games for letting me review this great addition to World War I games. The most important thing about our hobby is to learn things, at least to me. This game does not really teach you that much history, you should already know all of that. It does make you open your mind to learn a new way of thinking toward playing and understanding wargames. A day without learning something is a day wasted. I have really enjoyed playing this game.

 Please remember that Compass Games Expo is coming up on November 10-14, 2022. This will take place at the beautiful Comfort Inn & Suites in Meriden Ct. I hope to see you there.

 It is also that time of year again. Compass Games yearly sale is in full swing. Please take a look.

Robert

Death in the Trenches: The Great War 1914-1918:

Compass Games:

Compass Games Expo:

  Black Cross Red Star Air War Over the Eastern Front Volume I Operation Barbarossa by Christer Bergström Please see the link below for my r...

Black Cross Red Star Air War Over the Eastern Front: Volume I Operation Barbarossa by Christer Bergström Black Cross Red Star  Air War Over the Eastern Front: Volume I Operation Barbarossa by Christer Bergström

For your Wargamer, Toy soldier collector, MiniFig collector, military history nut. Reviews, interviews, Model Making, AARs and books!


 Black Cross Red Star


Air War Over the Eastern Front


Volume I Operation Barbarossa


by


Christer Bergström


Please see the link below for my review of Stalingrad: New Perspectives on an Epic Battle Volume I


 Mr. Bergström has started a new company called Vaktel Books. This company will be publishing new books from him and updated versions of some of his classic books. Lombardy Studios is the distributor for these books in North America. Black Cross Red Star is definitely in the classic category when it comes to books about warfare on the Eastern Front in World War II. This edition is listed as both updated and expanded. So, you can imagine my glee when I was able to get this book into my hot little hands. It seems the first time the book was printed was in 1999. The passing of twenty-two years is more than enough to uncover more information about the campaign.

 This is a blurb about the book from Lombardy Studios:

"The original first volume in the Black Cross * Red Star series began in 1999 and quickly sold out. The new 2021 BC*RS volume one has been updated and expanded – it has more than double the word count and 300+ photos, many from the personal albums of veteran pilots. It is similar in format to Stalingrad with links to film clips of the air war on the Eastern Front plus 6 downloadable maps and a huge downloadable index listing aviation units, pilots and other key personalities. BONUS: 15 color aircraft profiles! (See the Kickstarter banner above for two of these profiles.)"


 Here are some color prints from the series:


The above is a Lend-Lease P-40 (from another volume), and the plane below is a BF-109 F-4


Yermolayev Yer-2


 This is a link to a large excerpt from the book:


 These two volumes shown above are already here in the U.S and are available for purchase. There is a Kickstarter campaign for the other books in this series, plus other books. The Kickstarter is only to measure how many of these fine books to import. The cost of international shipping has skyrocketed, as you know, so this is just so Lombardy Studios does not end up with a warehouse full of books.

 Okay, so now onto the book itself. If you already own the first publication, good for you. If you do not have it already, what are you waiting for? I can see that owners of the previous printing might be a little hesitant. So, let us look at the differences:

 The book is now over 380 pages! (It has more than double the word count)

 It comes with 300+ black and white pictures, some of these from the pilots' own collections.

 There are fifteen color aircraft profiles.

 It comes with fourteen QR code videos.

 The downloads that you can receive with the book are absolutely enormous in quantity. 


Stuka Divebombers


Werner Mölders on the left


 As for the book itself, it has long been considered the bible as far as the air war during Operation Barbarossa. The book is large, almost like a coffee table book, and has 384 pages. Most of the pages have a photograph on them. The photographs are all in black and white. There are numerous maps to follow the actual campaign. The book follows Operation Barbarossa from June 22, 1941 until right before the Soviet counterattack before Moscow on December 6, 1941. 

 The author shows us how and why the Germans had almost total air superiority throughout the first few months. He also shows us how quickly the Soviet air service (VVS) was able to bounce back and become a problem to the Germans in the latter months of 1941. 

 There are a total of nine appendices. Some of these are:

Luftwaffe Aircraft Combat Losses on the Eastern front June 22 - December 31, 1941

Luftwaffe Order of Battle, June 21, 1941

VVS Order of Battle, June 21, 1941

The Structure of the Soviet Air Forces in June 1941

The Highest Military Awards (for both countries)


Shturmoviks - These were a large reason for the Soviets' eventual victory


Soviet Airmen


 I mentioned earlier that if you do not already have the original printing of the book, this is an excellent time to add this much needed history to your library. There are also more than enough reasons to buy this new edition. 

 Hitler was correct; the world did hold its breath when the Germans invaded the Soviet Union in 1941. He was also completely wrong about the rotten structure collapsing. The Germans found out once more how resilient the Russian Army could be on the defensive.  With surgical precision, the Luftwaffe de-taloned the Russian eagles. The Soviet Air Force was caught just as asleep as its Army. Even Göring doubted the claims that his Luftwaffe destroyed 2,000 Soviet airplanes on the first days of the campaign. The author shows us that in actuality new information shows it was around 3,000 planes that were destroyed on June 22nd and 23rd. The losses in airframes and pilots were staggering. 

 The book is separated into Parts I - VII and then into chapters. These are some of the chapters of the book:

The Machines

The Men and the Methods

The Greatest of all Air Battles

Stopped at Kiev

The Blitzkrieg is halted

Under the Polar Sun

In the Crimean Skies

Operation "Typhoon": The Most Decisive German Victory

Shturmoviks in Defense of Moscow

 
 To sum it up, the book is both beautifully produced and full of as much information and history that you can handle (and probably then some). Thank you, Lombardy Studios for allowing me to review it. I cannot wait for the further volumes. If you owe yourself a present or for any reason whatsoever, click on the links below and pick it up. You will not be sorry.

 Below are all the links that you need.

Lombardy Studios:

This is the link straight to the Kickstarter for Black Cross Red Star:

The Kickstarter for Mr. Lombardy's new wargame: Streets of Stalingrad, reborn or Streets of Stalingrad IV:

This is my review of 'Stalingrad: New Perspectives on an Epic Battle:

Robert


  Attack at Dawn: North Africa by Panzer Division Games  So, as you can see, we are off to North Africa to refight that World War II Campaig...

Attack at Dawn: North Africa by Panzer Division Games Attack at Dawn: North Africa by Panzer Division Games

For your Wargamer, Toy soldier collector, MiniFig collector, military history nut. Reviews, interviews, Model Making, AARs and books!


 Attack at Dawn: North Africa


by


Panzer Division Games


 So, as you can see, we are off to North Africa to refight that World War II Campaign. At one time, the history of this campaign really had no draw for me. I think it is because I had no particular interest in Rommel. I was always interested in the Italian forces that fought in the Mediterranean, but not his battles. This has changed in the last several years. I have been exposed to some very good board wargames and books on the subject in those years. Let us see what is under this engine and if I am just looking at a Panzer General clone or not.


  "Attack at Dawn: North Africa is a strategy game set in WW2 North African theatre. It is an operational level wargame which features 3 campaigns and 15 scenarios. It can be played as a real-time, or turn-based (WeGo) game. The game begins with the German troops probing into the Libyan region of Cyrenaica, and finishes either with the total defeat of German-Italian Panzer Armee, or with the British loss of Egypt and their retreat across the Suez Canal.


Development History

Tomislav Čipčić: "Ever since I was 6, I have been fascinated with the North African campaign. The name Tobruk has stuck in my mind ever since. A couple of decades later, I've started a game project with a group of friends.

That project didn't end with the finished game, since we were all young and inexperienced. We've reached for the secret too soon ..

However, after several years and after publishing one successful tabletop wargame - I decided to have another try. The development started in 2018 with a prototype of operation Battleaxe. After that, I decided to go all in with the original idea for the game, that's how the "Attack at Dawn: North Africa" came to be. After several years of development, we have designed a solid, polished and fun game."


Features

Fast and Intensive Gameplay - the game can be played in a real-time, or turn-based (WeGo) mode. That reflects the speed and chaos of the desert mobile warfare. Combine this with the fog of war, and the experience of being in command vehicle of a Panzer Corps comes to life. The game will immerse you in one of the most intensive and nerve-wrecking experiences of the Second World War.

Polished Interface - game map and the units have been designed to be informative and easy to understand. With the ability to zoom out and see the entire battlefield with a glance, the player will have the best possible situational awareness.

Historical - the scenarios have been created after studying the historical orders of battle, and battle histories. Attention was given to the composition of the armies, combat values of individual units and overall authenticity of each scenario.

Large Map - the game features a large map, covering a distance of almost 2000 kilometres – from the bay of Sirte in Libya, to Suez Canal in Egypt. The terrain varies between sea, desert and mountains; wadis and sebkhas; villages, birs and ports. There is one long metallic road – Via Balbia, spanning the whole length of the map. And a handful of well-known desert tracks leading from the road towards the deep Sahara in the south."


 As you can see, you are given all of the battle scenarios from the appearance of the Afrika Korps until the Second Battle of El Alamein. You are also given three campaign choices. These are:

The Full Campaign

The 1941 Campaign

The 1942 Campaign

 There are also fifteen scenarios to choose from. Seeing that you can play them from either side, that gives you thirty different scenarios to play. Because the game has a real campaign built in, some of the scenarios are actually hypothetical. Plus, you also have the scenario editor.


  Panzer Division Games looks to have been working on this game for a long time. The game has many great parts to it that you usually do not see in a Steam wargame, let alone a first game from a developer. It is like PDGs worked like Dr. Frankenstein and added the really good bits from other computer wargames and then stitched them all together. 


 The first thing you will notice about the game is the sheer size of the maps. There are actually three of them of the area of the North African Campaign from 1941- 1942. This gives us electronic generals lots of room to move and fight in. It also is a Godsend to the gamers who will use the scenario editor, but more on that later.


 Usually, when you talk about a wargame you start talking about movement or combat of your cyber units. The old adage 'Amateurs talk strategy. Professionals talk Logistics!' is right at home here. The supply and logistic part of the game is one of the best I have seen on a computer wargame. It goes far beyond: is your unit in supply or not and it will be okay on the next turn, as it then will get magically supplied. You can see the actual amount of time until your next supply and the time that your supply trucks have to make to complete a full circle from your supply source back to the unit. That is one excellent addition to a wargame and a great achievement for the programmers. It also adds to the immersion factor. It makes you feel more like a general rather than a cyber pusher.


 The next thing we will talk about is the myriad of options that you can use with the game as far as aesthetics etc. If you must, you can have your little tanks and infantry, although I do not know why you would want them. I think they distract from the immersion in games. However, that is my own personal opinion. 


Scenario Editor


 So, the Scenario Editor makes the game almost a blank canvas to work with. Panzer Division Games really understood the gamer who wants to tinker with scenarios or just completely start from scratch. It is a much easier Scenario Editor Tool than I am used to working with.


The blank slate that you can work your magic on in the Scenario Editor


  The game is very nice looking (which is an accomplishment for the North African Desert). How exactly does it play? Well, it seems that you also have multiple choices in how you play the game. These are:

Difficulty
 Easier
 Normal
 Harder

Unit View
 Counters
 Models

Hex Darkness
 Hidden
 25% - 100% dark hex lines


Model View


Counter View


 I was very pleasantly surprised by Attack at Dawn: North Africa. Almost invariably wargames that appear on Steam, not ones that are released by wargaming companies and then go to Steam, are beer and pretzel Panzer General wannabees. This game is a deep and well thought out deep wargame. For those of us who play both board and computer wargames, this is really a must buy. Even if you are not really interested in the North African Campaign, this game needs to be in your Steam library. There are so many innovative features in the game that it really needs to be played to see how the sum is so much greater than its parts. I can write until the cows come home, but unless you experience the game play yourself it will not really hit home. Thank you, very much Panzer Division Games, for allowing me to review this coded silicon beauty.


One of the multiple Zoom In modes


Zoomed Out View


 Please check out all of the updates and news that is available from Panzer Division Games:

 Especially take a look at the Scenario Editor Tool.

 Here is a link to their excellent Brotherhood and Unity boardgame:

Attack at Dawn: North Africa, is currently $29.99 US on Steam. It is worth every penny.


Robert

Attack at Dawn: North Africa:

  TIME OF WARS EASTERN EUROPE 1590 - 1660 from STRATEGEMATA This latest game from the Polish games company, Strategemata, may signal clearly...

TIME OF WARS TIME OF WARS

For your Wargamer, Toy soldier collector, MiniFig collector, military history nut. Reviews, interviews, Model Making, AARs and books!

 TIME OF WARS

EASTERN EUROPE
1590 - 1660
from
STRATEGEMATA


This latest game from the Polish games company, Strategemata, may signal clearly the historical period covered and its location, but for most western gamers I suspect that does little to enlighten us.  Despite familiar names like the Holy Roman Empire, the Ottoman Empire, the Kingdom of Sweden and the Tsardom of Russia, we are very much taken to the eastern most regions that border the maps and wars that have featured in typical western Europe focused board wargames.  
Many of us have gamed the battles of Gustavus Adolphus during the Thirty Years War [which appears as an Event card], but few will have knowledge of Charles X of Sweden's later wars that are covered by one of the Scenarios in this game.  The other shorter scenarios reflect even more unfamiliar episodes; the Khemelnytsky Uprising and the Dimitriads Time of Troubles being perhaps the most esoteric titles!

However, in many ways I feel these shorter scenarios featuring two or three powers are essentially helpful learning exercises for the real essence of the game.  But at its core, Time of Wars is a multi-player game for five players and only five players.  Inevitably this may be a drawback for many potential buyers and so the several shorter scenarios offer some attraction for those who may rarely be able to summon the magic "five" to the table! 

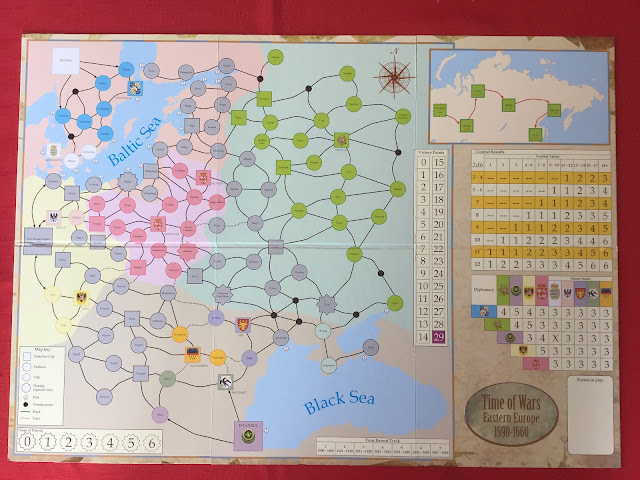
This multi-player game's antecedents are acknowledged in the introduction and designer notes.  The strongest influence is Here I Stand, which can be seen immediately on comparing the two games' maps.  Both are strategic maps in pastel colours with point-to-point movement between circles and squares.

 
Personally, I'm not a great fan of these blander colours, but have to agree that they do prevent the counters disappearing into the background as some games manage to do.

Both maps are equally functional.  Though overall slightly smaller in size, Strategemata's handsomely mounted map has the distinct edge. This is not only because of its looks, but because it contains a much larger, easily readable diplomatic matrix between the contesting nations, as well as the inclusion of the combat table and this all add to its playability.  
The rules too have striven to provide a more pared down experience with the obvious intent of overcoming the potential longeurs of many multi-player games.  Unfortunately, it has not managed to eliminate what I consider to be the main problem of this genre of game and that is the sheer number of small nation-specific rules.  Not only does this affect the initial learning process, but prompts the question of how to teach it to other players.  Here again, the shorter scenarios can serve a useful purpose, but I find the prospect daunting of sitting down to the task of providing a general overview to four other gamers who have little or no working knowledge of the rules.
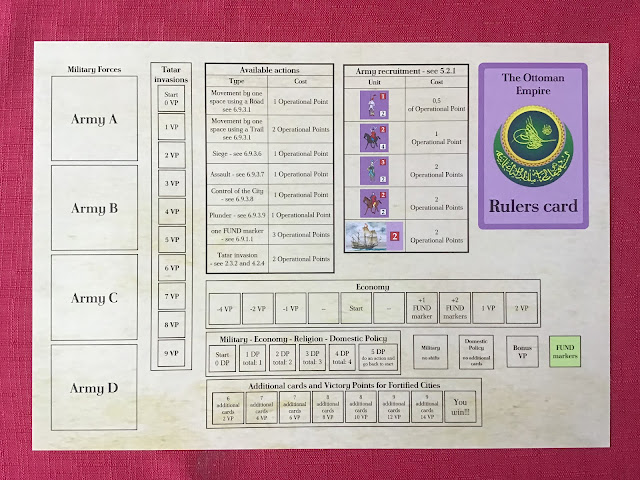
A starting point for this learning process is each player's SuperPower Sheet, as exemplified by that of the Ottoman Empire below.

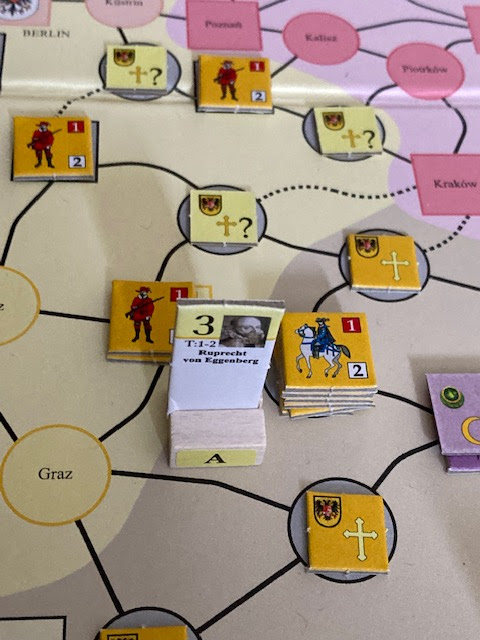
The essential holding boxes for markers and the current ruler card, available actions a player can take and recruitment costs for your units present a good starting point and the holding boxes for the maximum of five armies promise that the map will not become too counter cluttered.  Just as in Here I Stand and in Strategemata's excellent ACW game, How The Union Was Saved [see my earlier review], each army leader appears in the form of a useful standee.
here are just some of those leader units

A particular feature of each player's Superpower Sheet that I like is the range of images of the various types of unit available to each player which mirrors the actual troop counters placed on the map or in the Army Holding Boxes.  Instead of using a few identical standard infantry/cavalry/artillery images for each nation, care has been taken to individualise such things as colouring on uniforms, the stance of infantry units and variety of cavalry.  Though they may play only an artistic visual role, they do give a sense of the differences between the look of each nation's army.
This is something Strategemata's games strive for and history is reinforced in this game by the supplementary information [printed on the back of each Superpower Sheet] that expands on each historical event featured in a player's deck Event Cards.

The Holy Roman Empire's expanded historical Events
As I've observed when reviewing a range of Strategemata's games, it is the Rule  and Scenario booklets that lack the finished quality of the major companies.  This is most noticed in the rule book which is a purely black and white production with very limited pictorial illustration.  What, however, I miss most is a solid set of play examples.  Only a single page is devoted purely to an example of Interception and Land Battle.  Compare this with the excellent eight page Extended Example of Play for the infinitely simpler game system in How The Union Was Saved.  This lack can be felt just by looking at the Turn Sequence.

Game Turn Phases
 1.  Funds gaining
 2.  Cards drawing
 3.  Rulers changing
 4.  Commanders changing
 5.  Negotiations
 6.  Religious unrest
 7.  Mercenaries hiring
 8.  Strategic deployment of one army
 9.  Players' impulses
10. Armies' return to Capital Cities
11. Removal of auxiliary markers
12. Rulers' Domestic Policy

Don't be put off by the number of steps, most of them are very quick to execute, especially as many are simultaneously carried out by each player.  The thorniest and possibly the longest could be the Negotiations Phase where there is simply too much freedom of action.  Two key sentences stand out:
"Players can make secret arrangements to coordinate their strategies" and "After secret negotiations, all arrangements are announced in public."  
Just how much time is your gaming group going to spend here?  Are you going to dare play this game with someone you don't know?  And there are some I do know that I definitely wouldn't dare play this game with!  Be warned, an executive decision might just be a necessity so that the the appropriate full focus is directed to the real heart and enjoyment of the game - PLAYER IMPULSES.
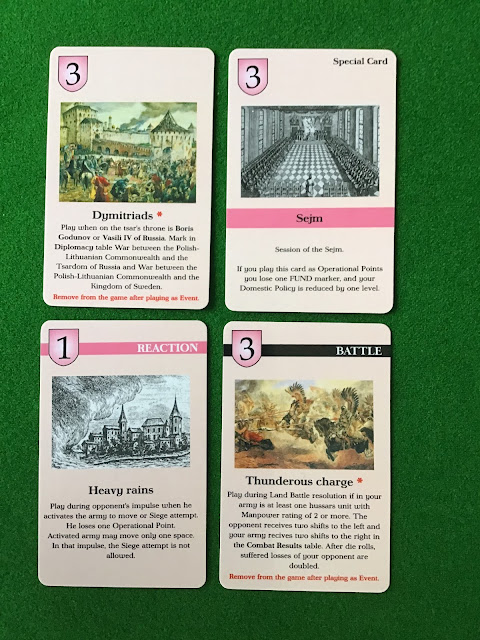
This is where the game really shines with its magnificent individual 50-card, player decks, one for each player.  All are illustrated with a superb mix of full colour scenes from paintings or black and white line prints.  Very striking is that so many of the cards with coloured scenes illustrate historical events or circumstances special to that one player alone.   This is one aspect which singles out Time of Wars from many other CDG productions.

A close-up demonstrates the quality of the black and white line drawings


Also among the pluses in this CDG design is the inclusion of + cards that can be combined with another card, an idea that the designer indicates was drawn from one of my favourite CDG games, Mark McLaughlin's Wellington: the Peninsular War.  You'll note, as well, other typical elements of CDG decks, such as the inclusion of Special Cards that are always returned to your hand at the end of a turn, Battle and Reaction cards and the ability not to use but preserve some cards for use in the next turn and, of course, the all-important Operations Points number in the top left hand corner which you'll spend to undertake any of the available actions in the game.
As you'd expect for the historical period covered, there's a fine mix of religion economic actions, domestic policy and military action and the chance to expand your knowledge of Eastern European affairs.

Once again a big thanks to Strategemata for providing this review copy. 


 Mac and Lee by Hollandspiele  The 1862 Peninsula Campaign was at the very beginning a bold stroke to move around the Confederate Army in No...

Mac and Lee by Hollandspiele Mac and Lee by Hollandspiele

For your Wargamer, Toy soldier collector, MiniFig collector, military history nut. Reviews, interviews, Model Making, AARs and books!


 Mac and Lee


by


Hollandspiele


 The 1862 Peninsula Campaign was at the very beginning a bold stroke to move around the Confederate Army in Northen Virginia. In actuality, it turned out much like the Anzio invasion. A whale had been beached, and that was about it. Little Mac (George McClellan), could not, for the life of him, understand the reality of the situation. The Pinkerton Agency told him that he was outnumbered two to one and he either believed them outright or used it as an excuse for his own doubts and fears. Whatever it was, his attack on Richmond progressed slower than a sloth descending a tree to do its business. Joseph E. Johnston had his own fears and doubts to deal with. He let Little Mac saunter ever so slowly to the very gates of Richmond. Had it actually come to a siege Little Mac's artillery would have pounded Richmond to dust. If, that is, he let them actually open fire. His nightmares of massive Confederate forces clouded his campaign from start to finish. Once Johnston was wounded, when he finally attacked at the Battle of Seven Pines, Robert E. Lee was summoned to take command of the Confederate Army. From this moment on Little Mac believed to his core that he had to be vastly outnumbered for the Confederates to attack him. He went into an almost mental breakdown and left his forces to mostly deal with the Confederates on their own. Lee was presented several times with opportunities to deal the Union forces a crushing blow. Instead, his forces rarely did anything correctly from a military point of view. He either could not get his subordinates to do anything, or they decided to attack the Union forces where they were the strongest. Porter Alexander believed that during this period, now called the Seven Days Battles, was the only time that the South could have won independence. Is it actually possible to put such a strange campaign into a game? Let us find out if Hollandspiele and the designer John Theissen have actually succeeded in doing so.


 This is what comes with the game:


22" x 34" mapsheet

184 counters

8-page series rulebook

12-page module rulebook

2 display sheets

1 double-sided player aid

28 special event cards

1 six-sided die


 The box and its contents are standard Hollandspiele fare. The map needs some coercion to lay flat. A piece of plexiglass or a few books on top for a bit fixes the issue. The map is reminiscent of a spruced-up map from SPI or AH. It is meant to be a wargame map and not a wall decoration. In this it serves its purpose admirably. The terrain is easy to discern and there are no ambiguities. About one third of the map is taken up by charts and tables. These are in large print and have enough separation so that all the information is easily discernable. The counters are a little dark in color, but their information is large enough to be read without squinting. The number of actual units on the board is very small, which is a hallmark of Hollandspiele's American Civil War Operational Series. They are Corps sized for the Union and Division for the South (Not until after this campaign were Corps introduced to the Confederate Armies). The Series Rulebook is eight pages long. It does have some color thrown in for aesthetics. The print is nice and large. The Module Rulebook is actually ten pages long. First is an excellent five page write up about the campaign by Doug Miller. Then there are four pages of Module rules for Mac and Lee. This follows the same format as the Series Rulebook. There are three Player Aids. These are standard size and in full color. The first one has the Terrain Chart on one side with multiple tables on the reverse side. The other two Player Aids are Strength tracks for both sides in the two scenarios that come with the game. Next up are the Special Events Cards. These are the standard game size and are nicely done. The only problem with the cards is that they contain so much information that the type is rather small. Again, the above components are the standard fare for Hollandspiele. There is nothing wrong with this. They just veer toward meaty games in play instead of artwork for the components. 


 The Sequence of Play is:

A. First Player

  1. Reinforcement

  2. Movement

  3. Combat

  4. Recovery

B. Second player same as above.


 The scale of the game is:

Time: One day per turn.

Hex size: 4.9 miles per hex

Men: About 3000 men per Strength Point.


 A game can be incredibly plain Jane in the components and still be on your table for months at a time. Conversely, some games belong in the Louvre but are never brought out to play. So, now we will go into the game itself.


 As I mentioned, this is an incredibly hard campaign to design a game around. Little Mac should have been able to swamp the Confederates and been in Richmond in no time flat. There have been many theories put forward to explain his actions, or more correctly non-actions, during the campaign. So, the designer has to take into account that the Union Army was operating with a large ball and chain attached, mainly its commander. Then on the Confederate side you have Johnston who seemed just as reticent to engage the Union troops (This was shown throughout the war). The designer chose to simulate this with a Caution & Uncertainty Roll. Each side's Caution Level is kept track of, and this simulates the oddness of the first part of this campaign. Both sides are like old Walruses who are stuck in the mud glaring at each other. At times this will be a bit maddening for the player, just as it was for Abraham Lincoln and Jefferson Davis. Once Robert E. Lee shows up, the campaign usually turns abruptly into constant battles. This again shows how much the designer worked to make the game historically accurate. As Little Mac you cannot just ignore his foibles and and use your army to say, maybe fight the enemy. As Johnston, you can retreat only so far before you are heading toward the Appalachians. I love games where the designer puts you into the shoes of the commanders but also gives you the opportunities and restraints that those commanders had to deal with. This includes seeing hordes of butternut soldiers where there are none. The game also comes with 'Dummy Counters' for the Confederate Player to use to confuse Little Mac that much more. 


 The Victory Conditions for each scenario are based mostly on the control of Richmond (again historically based). The Union Player receives ten points if they occupy Richmond at any time and another ten points if they control it at the end of the game. If the Union Player never scores these points the Confederate Player receives twenty points at the end of the game. You can also get Victory Points for disrupting and eliminating the other side's forces as long as any of your units are not disrupted or eliminated in the combat. Each side must also take a Rest Turn during each quarter-month segment. This is not enforced during the first turn or during July. 


 Thank you very much Hollandspiele for allowing me to review this game. I am a deeply read student of the campaign and I am very impressed on how Mr. Theissen has been able to give us almost a simulation of it. Hollandspiele has just released an expansion to 'The Grass Crown: Battles of the Roman Republic'. It is called 'The Grass Crown II' and it includes eight new scenarios. The link to my review of The Grass Crown will be below. They have also released 'Horse and Musket V Age of Napoleon'.


Robert

Hollandspiele:

Hollandspiele

Mac and Lee:

Mac and Lee – Hollandspiele

The Grass Crown review:

The Grass Crown by Hollandspiele - A Wargamers Needful Things


hpssims.com