second chance games

Search This Website of delight

  Korsun Pocket 2 Little Stalingrad on the Dnepr Designed by Jack Radey  Published by Pacific Rim Publishing  Operation Barbarossa had taken...

Korsun Pocket 2: Little Stalingrad on the Dnepr Designed by Jack Radey Published by Pacific Rim Publishing Korsun Pocket 2: Little Stalingrad on the Dnepr Designed by Jack Radey Published by Pacific Rim Publishing

For your Wargamer, Toy soldier collector, MiniFig collector, military history nut. Reviews, interviews, Model Making, AARs and books!


 Korsun Pocket 2


Little Stalingrad on the Dnepr


Designed by Jack Radey 


Published by Pacific Rim Publishing


 Operation Barbarossa had taken place on June 22nd,1941. It had surged through the Soviet Union like a massive wave. The wave had finally broken against the Soviet defenses at Leningrad, Moscow and Rostov. In 1942 the Germans' Operation Blau was directed at the Caucasus and Stalingrad, or more accurately the Volga River. In late 1942 the Axis Allied armies were smashed and roughly 250K Germans and Allies were trapped in the Stalingrad pocket. There was a relative lull after the Spring fighting, and then the Germans launched Operation Citadel. This was to encircle and capture and crush the Soviet forces around Kursk. The autumn battles in 1943 saw the Germans forced back through the Ukraine. These battles had bled white both the German and Soviet forces. Unfortunately for the German forces, they were running out of replacements. The Soviets were still able to call upon a larger, but dwindling, mass of untapped manpower. This sets the stage for 1944 on the Eastern Front.


Just some Soviet Eye Candy


 The German Army Group South, commanded by von Manstein, was very depleted of men and armaments as the new year started. The Soviets had decided to not take a breather and saw an opportunity to encircle two Germans corps. The two German corps were the XI, commanded by General Wilhelm Stemmermann, and the XXXXII commanded by Lieutenant General Theobald Lieb, along with the attached Corps Detachment B from the 8th Army. The Soviet forces that were going to make the pocket were the 1st Ukranian Front, commanded by Nicolai Vatutin, and 2nd Ukranian Front, commanded by Ivan Konev. The reason there was a chance at all for the Germans to be encircled is that Hitler demanded that these forces stay on the western shore of the Dnepr River. The rest of Army Group South had already been pushed back from the river. To complete the encirclement the two Soviet forces would have to attack and move around 110 kilometers. The fighting would take place in January and February of 1944. Playing as the German player, you are trying to escape the pocket, or never let a pocket be made. Playing as the Soviet, you have to encircle the German forces as quickly as possible and defend against attacks from both inside and outside the pocket. So, onto the game.


 This is what comes with the game:

12 counter sheets of 200 die-cut backprinted counters each

Four 25 x 38 inch game maps

Six German Order of Battle Charts — III Panzer Corps, VII Corps, VIII Flieger Corps, XI Corps, XLII Corps, XLVII Panzer Corps

Ten Soviet Order of Battle Charts — 1st Ukrainian Front, 2nd Ukrainian Front, 5th Guards Tank Army, 2nd Tank Army, 6th Tank Army, 4th Guards Army, 27th Army, 40th Army, 52nd Army, 53rd Army

One 28-page Rules Booklet

One Scenarios Booklet

One Commentary, History, and Designer’s Notes Booklet

Two double-sided 22 x 34 situation maps (25 January, 1 February, 10 February, one blank for planning purposes)

Two 11 x 17 player turn record track cards

Two player chart and aids cards

One six sided die

Box


Section of the Map


 No doubt about it, this is a monster wargame. The four 25" X 38" maps prove it along with the 2000+ counters. The situation maps are an excellent addition to the game, especially the blank one for planning. Even if you are playing the one map scenario you are still going to need a good amount of space for the Player Aids etc. So, this is a game that you are going to need space and are going to need to leave it on the table for a while. 


 I really like this statement from the designer Jack Radey:


"Commentary

If you approach this game as a dice and probability table contest, and push each counter separately without regard for organization, I think that you will not have much fun, and will spend a lot of time looking for just the right amount of combat strength to nudge the odds one column higher. Not my idea of wargaming. I strongly urge you to do serious planning, map study, and organize your forces as they were organized historically, or some variant on that. Thinking in terms of "this army has those objectives, and to gain them I will push this corps along that road, reinforcing it with these artillery units" you will do far better than thinking in terms of "where can I find another six points of attack strength?"

 In simple terms the game will award you for playing historically. I am not talking about forcing you to do exactly as was done in 1944. It does what not enough games do and guides the player to wargame in a historical manner, instead of throwing all of your counters Willy Nilly across the map. This game will really impress the grognard who tries to play in a historical manner.


 We will now go through the components. The counters are a 1/2" in size. They have to be that size or almost no one would be able to play this game. The colors on them are muted. They do come with a good amount of information on them, but strangely enough they are still easy to read. The counters also have the correct silhouette of the tanks that were in each unit. I think this is a nice touch. Next up, we have the four full-sized maps. They are of paper but do have some kind of coating on them. This campaign was fought in the snow, so the clear hexes are white. The terrain in each hex and moving out of a hex is very well defined. The maps come with no ambiguities. The sixteen! Order of Battle charts are extremely well done. There is no bunching up of the different OOBs. They are made of hard stock and come in all sizes, from the small VIII Flieger corps of the Luftwaffe to two large page foldouts for some of the Soviet units. The Rules Booklet is in black and white and has two columns per page. There are no examples of play. The only illustrations show how to read the counters and all of the information on them. However, the text is nice and large. As was mentioned, it is twenty-eight pages long. It does not have an index, but with it only being twenty-eight pages long it is not hard to find what you are looking for, unless you are a member of U2. The Scenario Booklet is thirty-two pages in total. The first sixteen pages are for the actual scenarios. After that comes a four-page Example of Play, then an eight-page Historical Notes section. This is extremely well done. I would always say to read books on the battles you are going to play. However, this short synopsis is really all a player needs. The author also sneaks in the word 'mendacity'. I have been a fan of that word since first seeing Cat on a Hot Tin Roof. I still hear the word mendacity in Burl Ives voice in my head. The Booklet is also in black and white with the same large print. The situation maps I have already touched upon. The different Players Aids are also very well done. They come with the same large type that the Booklets have. When you open the box you will be pretty amazed at the sheer amount of OOBs and Player Aids that are in there. The 2K+ counters are also a sight to behold. Be careful with the counters - they do want to jump of the cardboard sprues.


 The original Korsun Pocket was released in 1979 by People's War Games. So, Mr. Radey has had over forty years to tinker with the game. Most of the games made by People's War Games were and are as valuable as a gold bar. 


 These are the Scenarios:


Scenario 1 - Vatutin Attacks - This uses maps A and C and is 15 turns long.

Scenario 2 - On to Zvenigorodka - This uses maps B and D and is 15 turns long.

Scenario 3 - The Pocket is Formed - This uses all 4 maps and is 18 turns or longer if you use night turns.

Scenario 4 - "I Will Rescue You" - This uses map C only and is 21 turns long.

Scenario 5 - von Vormann Tries Again - This uses maps B and D and is 21 turns long.

Scenario 6 - Testing the Ring - This uses all 4 maps and is 27 turns long.

Scenario 7 - Massacre on the Gniloi Tikich - This uses all 4 maps and is 24 turns long.

Scenario 8 - The Korsun Pocket Campaign - This uses all 4 maps and is possibly 72 turns long.


"Sequence of Play:


Each Game Turn represents the AM, PM, or Night

portion of a day. At the end of a Night Game Turn

there may be an Extra Night Turn (20.0). The First

Player is determined by the scenario being played.

The player whose turn it is is the phasing player

and his opponent is the non-phasing player.

Each Game Turn consists of the following sequence

of actions.

3.1 Weather Determination If using historical

weather (7.2), adjust the markers on the Weather

Conditions Track to indicate the current

temperature, ground and atmospheric conditions.

If using variable weather (7.3), the first Player rolls

twice on the weather table for temperature and for

atmospheric conditions. If precipitation is possible

a third die roll is made.

3.2 Air Availability Phase Both players consult the

current weather and ground conditions and

determine which of their air units are available

(16.12)

3.3 Supply Phase Both players determine the

supply status of their units (15.21, 15.22).

3.4 First Player Turn The player designated First

Player by the scenario instructions becomes the

phasing player.

3.41 Movement The phasing player may move all,

some, or none of his units. (5.0 Movement)

3.42 Building and Demolition The phasing player

may initiate, continue, or complete building and

demolition (17.0).

3.43 Counter Battery and Surprise Attack The

phasing player may conduct counter battery fire

against enemy artillery units that are both 

observed and In Battery (14.71). The Phasing

player may conduct Surprise Attacks (10.33).

3.44 Defensive Barrage The non-phasing player

may now conduct Defensive Barrage (14.72).

3.45 Combat The phasing player is the attacker

and may now conduct Combat in which the nonphasing

player is the defender (9.0, 10.0).

3.5 Second Player Turn The player who was the

non-phasing player now becomes the phasing

player and the sequence of phases 3.41 through

3.45 are repeated.

3.6 Fatigue Reduction Phase Both players reduce

the Fatigue Level by one for each of their Tired or

Exhausted units that is not in an Enemy Zone of

control (20.7).

3.7 Game Turn Indication Phase The Game Turn

marker is advanced to the next turn and play

proceeds unless it is the last turn in which case the

players should engage in lively banter about the outcome."


Weather Variables


 Weather is a large part of the game. However, so is visibility which is usually not taken into consideration in wargames. This is the combination of what Mother Nature can throw at you.

1. Ground Condition

Frozen Ground

Muddy Ground

Deep Mud

Snowy Ground

2. Atmospheric Condition

Blizzard

Snowing

Raining

Fog

Cloudy

Clear

3. Temperature

Cold

Warm


One of the Situation Maps


 While both sides are forced by the rules to do their utmost best to keep an intact line of counters or zones of control in a unit's area. The German player is allowed to breakdown his battalions into companies.


"18.0 BATTALION BREAKDOWN, COMPANIES,

AND DISMOUNTING

18.1 Battalion Breakdown

18.11 Only German full strength non-artillery

battalions may be broken down into companies.

Battalions that break down into companies must

break into companies of the same type as the

battalion — for example, foot mobile infantry

break down into foot mobile infantry companies,

motorized infantry into motorized infantry

companies, etc.

18.12 To breakdown a battalion into companies, at

any point during the German player’s movement

phase remove the battalion counter from the board

and place it on the player display in the “Battalion

Breakdown” box.

The German player pays two movement points to

breakdown a battalion. Replace the battalion on

the board with company counters of the same type

according to the Battalion Breakdown Chart on the

German Turn Record Card.

18.13 The companies placed on the map have the

same number of movement points that were

available to the parent battalion at the time the 2

MP cost was paid, and may continue to move, in a

stack or individually, after breaking down.

18.14 The number of battalions that may

breakdown is limited by the counter mix, if there

are not sufficient number of company counters of

the same type available, a battalion may not break

down."


 This game has one of the highest ratings for complexity on BoardGameGeek that I have seen at 4.43. While there is a lot going on each turn, I think that is a bit high. The Rules Booklet does add a few rules for each scenario, which is totally normal, but this does not push the complexity up anymore. If you are used to the large soapbox games from SPI, you should be able to play this game. As I said, there is a lot going on, but the rules are written out to hold your hand while playing. Is this game for everyone? Of course not. Some like higher complexity games and to others they are an anathema. The Korsun Pocket battle or campaign was a different sort of animal than a lot of wargames. The Germans and the Soviets are like two fighters in the fourteenth round. The German player is not going to run rampant with his tanks. A Panzer Division was lucky to have forty tanks at this time. The Soviet player has one strong army (4th Guards), but his other units are as in bad a shape as the Germans. This game is a nail biter about taking the next hex. You are not going to be racing around the maps. The German player has to work to get the most out of his units trying to get to the pocket. At the same time, he has to keep the Soviets from crushing the pocket. The Soviet player needs to think about stopping the German reinforcements while still looking over his shoulder at the pocket. The fact that the game was designed for the players to use their counters in a historical manner is the icing on the cake. 


 Thank you, Pacific Rim Publishing, for allowing me to review this excellent game. I have to go because I have one more hex to take before I can link up with the skeletal remains of the pocket. Isn't this why we got into wargaming? While I am thinking about it, how come Grognards do not have a special day?


Robert

Pacific Rim Publishing:

Pacific Rim Publishing (justplain.com)

Korsun Pocket 2:

Korsun Pocket 2 | Pacific Rim Publishing (justplain.com)

Korsun Pocket 2 Designer Notes:

Korsun Pocket 2 Designer Notes by Pacific Rim Publishing - A Wargamers Needful Things

My Review of 'Across the Pacific':

Across the Pacific by Pacific Rim Publishing - A Wargamers Needful Things


  Barbarossa Army Group Center, 1941 by GMT Games  On July 22nd, 1941, Hitler launched Operation Barbarossa against the Soviet Union. Barbar...

Barbarossa Army Group Center, 1941 by GMT Games Barbarossa Army Group Center, 1941 by GMT Games

For your Wargamer, Toy soldier collector, MiniFig collector, military history nut. Reviews, interviews, Model Making, AARs and books!


 Barbarossa Army Group Center, 1941


by


GMT Games


 On July 22nd, 1941, Hitler launched Operation Barbarossa against the Soviet Union. Barbarossa (Red Beard) was the nickname of Frederick I Hohenstaufen the Holy Roman Emperor. He is supposed to be in a cave somewhere in Germany waiting until the country really needs him (much like King Arthur). It seems when we look back, it was an insane move made by a lunatic. However, at the time it wouldn't have looked like a bad decision. The Soviet Union had just finished the Winter war against Finland. This had not gone well at all for the Soviets. It was only because of the tremendous size difference between both countries' armed forces that Finland was finally defeated. The German officers also remembered how in World War I the German forces were able to consistently beat the Russian horde. So, how were they to know that the Soviet Union had made such strides in a little over twenty years.


 The plan to attack the Soviet Union had three German Army Groups attacking at the same time. These would be Army Groups North, Center, and South. The high command's plan always envisioned Army Group Center and its attack straight to Moscow as the biggest and most important part of Operation Barbarossa. It was given two Panzer Groups (while the others only had one). These were Panzer Group II under Guderian, and Panzer Group III under Hoth. The first six months of this titanic struggle saw another struggle in the German High Command over which Army Group was the most important. The High Command really wanted to conquer Moscow. Was this hubris because of Napoleon's capture of the city, or was it based on definable reasons? Hitler was more interested in the Ukraine and Leningrad.


Half of the Scenario 3 Map


 These are the game's components and features:

Four 22x34 inch full-color maps (Series Maps C, D, H, and I)
One 22x8.5 inch map (Map WA) (in 2nd edition only)
1400 multi-colored die-cut ½ inch counters
Rule Book
Play Book
4 - 22" X 17" Double-Sided Scenario Setup Cards (Axis and Soviet)
1 - 8 1/2" X 14 " Soviet Setup Card
1 - 22 X 17" Double-Sided Hard Stock Map (Scenarios 3 and 6)
1 - 8 1/2" X 11" Hard Stock Double-Sided Card (One side is the map for Scenario 1, the other side is the Axis Super-Heavy Artillery Effects Table)
2 - 22" X 17" Hard Stock Double-Sided Player Aids (Identical)
2 - 22" X 17" Hard Stock Double-Sided Player Aids (Identical, with the Expanded Sequence of Play)
1 - 8 1/2" X 11" Hard Stock Turn Record Track (One-sided)
1 - 8 1/2" X 11" Hard Stock Step Reduction Organization Card (One-sided)
2 - 8 1/2" X 11" Hard Stock Player Aids (One-sided, one for each side)
2 - 22" X 17" Hard Stock Double-Sided Player Aids (Numerous tables and charts)

TIME SCALE 2 days per turn
MAP SCALE 5 miles per hex
GROUND UNIT SCALE Division/Regiment
AIR UNIT SCALE 40-80 aircraft per counter
NUMBER OF PLAYERS One to four


 Can you say plethora! I thought I was handed instructions to build a small Ikea house. Yes, the game has tons of players aids and is extremely large all by itself. However, the designer Vance von Borries has been working on the Eastern Front The Russo-German War Series since the late 1990s. The idea is to have the games and maps complement each other so that someone with an unused room in their house could have the entire Eastern Front sprawled out in front of them. You can see above that the map scale is five mile per hex! You might think that this is a game that you might want to wait until you are retired to dive into. This is not the case. The game and scenarios are designed for the grognard to get into the pool slowly without getting overwhelmed. If you look at some of the earlier games in the series right now you would definitely suffer sticker shock. These are:

Typhoon: The Drive on Moscow, 1941

Barbarossa: Kiev to Rostov, 1941

 Fortunately for we grognards, it looks like GMT is reissuing the series. Barbarossa Army Group North and Army Group North are on GMT's P500 right now. Do yourself a favor and pick them up now instead of when they are priced like hen's teeth.


Information from GMT about the game:

"Eight scenarios allow players to vary their level of involvement, complexity, and starting point, from introductory to full campaign
An asymmetrical sequence of play that highlights Axis armored breakthroughs and Soviet difficulties in combined arms warfare. This includes a “non-op” Soviet HQ system to simulate the rigid, yet fragile, Soviet Command structure. Detailed air rules which integrate with land combat and weather rules. Incredibly detailed Order of Battle, including special coverage of artillery, rocket artillery, engineers, bridge units, armored trains, and much more
Modifications to the proven “EFS” include many revised rules and procedures, as well as new Order of Battle information
Extensive bibliography and design/historical notes"


 So, the blurb about the maps is not really accurate. The game actually comes with five laminated paper maps and three hard stock ones of various sizes. The three hard stock are for small learning scenarios. The maps are gorgeous, in a subdued manner. They are uncluttered and you are able to distinguish all the terrain in the hexes. The counters are all 1/2" in size. They have to be, or the game would be twice as large and twice as costly. They are color coded to help the player see which belongs to what units, etc. The counters are not crowded or too busy looking. However, just because of their size I can see some people needing their specs to see the different formation information on them. As mentioned, the Player Aids are made of hard stock. If you took the time to add them up, you will see that there is an astonishing seventeen of them! Every one of them is also in full color. For your first few playthroughs it does take a bit of time to find the exact table or chart you are looking for. Soon you will become an old hand at it. The Rule Book is sixty-four pages long. It has some parts of it in color but is mostly black and white. Each page has two columns of type that is large enough for easy reading. It has both a Table of Contents and an Index. These will both come in handy when you will be starting out with the game. The Playbook is fifty-two pages long. It is printed out the same as the Rulebook. The first twenty-five pages start with some information about setting up the scenarios and the scenarios themselves. Pages twenty-six to thirty-nine are full of play examples. The next four pages are called the Designer's Section. These include the Designer's Historical Notes and Second Edition Notes. Next, we have the Counter Manifests. The last few pages are the Expanded Sequence of Play. All of the components are produced at a level that we have come to expect from GMT.


 These are the map/size needs for the scenarios:

Scenarios One, Three, Five and Six use only one map or the smaller maps.
Scenarios Two and Four use two maps.
Scenario Seven uses three maps.
Scenario Eight uses all of the five larger maps.


 This is a game that is not really meant for the tyro or neophyte entering our wargaming hobby. While it is true that there are smaller and simpler scenarios, you will not get the full panoply of the game until you have played some of the larger ones. It is a large game and has a rule book that is sixty pages long. 

This is a list of some the units:

Ground Unit Type Symbols:
Armored (motorized) units
Armor
Armored anti-tank
Armored engineer
Assault gun
Motorized Units
Reconnaissance (Recon)
Motorcycle infantry
Motorized infantry
Motorized engineer
Motorized anti-aircraft
Motorized anti-tank
Non-Motorized Units
Infantry
Mountain infantry
Airborne infantry
Parachute infantry
Security infantry
Border guard
Ski infantry
Engineer
Cavalry
Base unit
Headquarters
Anti-aircraft
Anti-tank
Special Units
Armored train
Flotilla
Artillery Units
Field artillery
Coast defense artillery
Rocket artillery
Railroad artillery
Super-Heavy Artillery (mobile mode)
(range value is blank)
Super-Heavy Artillery (firing mode) (silhouettes
vary) (includes an attack DRM and range)

 To this list you would need to add Air Units and Ground non-combat Units.


 The game has two types of Supply. They are General Supply and Attack Supply. Supply should always be a part of deeper wargames. A unit is in General Supply if it can show an unbroken supply line of seven hexes, not including the unit itself. This is subject to Zone of Control and terrain in the hexes that make up the supply line. Attack Supply is shown on the map by MSUs (Mobile Supply Unit). These can also be turned into Supply Dumps. Units also have to make a seven hex supply line to Attack Supply (both MSU and Supply Dumps). A unit can attack without Attack Supply, but it will suffer various negative effects during the attack and in losses that might happen when deciding the attack.

 The game also gives the player a large amount of historical detail in the rules. Take for example, the difference in plans on the German side. Most scenarios start with the German player using the OKH (Oberkommando des Heeres) Plan. On game turn sixteen the German player is forced to change it to the Hitler Plan. He can try to change it back to the OKH plan on turns seventeen to nineteen (the player loses two victory points and rolls one die), then checks on the table. If it is moved back to the OKH Plan, it automatically goes back to the Hitler Plan on turn twenty-six. 

 To help you with the record keeping these are also in the game:

Player Aid Markers:

Activated
Ammo Level - S-HA
Axis Logistics Pause
Bridge (completed)
Bridge (under construction)
Bridge Destroyed
Citadel Destroyed
Declared Attack
Declared Attack - Mandated Attack
Do Not Move GT 1 (front)
Do Not Move GT 2 (back)
Emergency Supply
Ferry (completed)
Ferry (under construction)
Fired
Fortified Belt Destroyed
Fortified Line Destroyed
Fuel Shortage
Game Turn
Garrison Hex
Interdiction Level (Axis and Soviet)
Mandated Attacks Not Yet Made
Naval Evacuation [use only with Naval Module]
Number marker

 These are only about half of all of the markers used in the game.

 This is a game for a grognard to sink his teeth into. There is so much put into the game including:

Soviet Armored Trains
NKVD Units
Soviet Militia
Garrisons
Engineers
Bridges
Ferrys
Flotillas


 If you wanted to, a player could get lost in the minutia. However, the original rules were printed in 1998 and have been repeatedly revised over that twenty-five-year span. This is some statements about the series two rules:

"
Without a doubt this area presented the greatest challenge.
The whole rules book has been rewritten, reorganized, added
to and trimmed of excess, and it includes more clarifications.
In our discussions we determined the original rules also needed
clarity and to be more accessible. Accordingly, we made more
use of bullet points, brief examples, and references to related
rules sections. The old rules had too many instances of critical
points scattered over the length of the rules. We prioritized
bringing these points together as opposed to a strict following
of the sequence of play. The Expanded Sequence of Play should
answer most of your questions on sequencing of functions. We
also provide a rules index to facilitate finding a rule. Then here
in the Playbook you can find several comprehensive examples
of play to illustrate important concepts."


 When I first opened the box this phrase popped into my mind "To drool or not to drool, that is the question". My love of large deep wargames goes back probably to 1976 or so. That means that for almost fifty years I have been overawed by games like this. 
As far as the gameplay goes there is not much to say. When it was first released, the series captured a large amount of grognard fans. This is the beginning of the Russo-German War brought forth in all of its glory for wargamers. The German player is placed on a knife edge of two disparate thoughts. The first is how much damage can I inflict on my opponent while using my Panzer Groups to slice through the Soviet lines and surrounding them. The second is how the devil am I supposed to keep my units supplied? In the rules, there is a separate section for Axis Fuel Shortage. The Soviet player must have a mindset of Marshal Zhukov. Throw everything at the invaders including the entire contents of the kitchen and not just the sink. You must always try and save what you can from the pockets that will be created while also building defense lines farther back. Be prepared to see your opponent break through your carefully made defense lines time and time again. The game length is fifty turns, from June 22nd until September 29th. Some players will doubtless say that one side or the other has an easier time of it. Others will look like Sherlock Holmes while examining the rules. My take on the game is just enjoy it for what it is, a grognard's dream come true. Either side can win the campaign or the separate scenarios. I believe Mr. von Borries and GMT have created an excellent and deep game of the first part of the first campaign in the war. Thank you GMT for allowing me to review this game.

Robert

GMT Games:

Barbarossa Army Group Center, 1941:


TASK FORCE  CARRIER BATTLES IN THE PACIFIC FROM VUCA SIMULATIONS Task Force has an exceptional pedigree.  Designed by Ginichiro Suguki and o...

TASK FORCE CARRIER BATTLES IN THE PACIFIC TASK FORCE CARRIER BATTLES IN THE PACIFIC

For your Wargamer, Toy soldier collector, MiniFig collector, military history nut. Reviews, interviews, Model Making, AARs and books!

TASK FORCE 

CARRIER BATTLES IN THE PACIFIC

FROM

VUCA SIMULATIONS


Task Force has an exceptional pedigree.  Designed by Ginichiro Suguki and originally published as a boxed game by Epoch Co in 1982, it re-appeared as an issue of Command Magazine Japan in 1996 and then returned once more in a boxed format for Japan Wargames Classic 1 in 2009.  Now Vuca Simulations has brought out a stunningly up-gunned edition.  The company has already established a reputation for quality and this latest game deserves to have deluxe appended to its title!

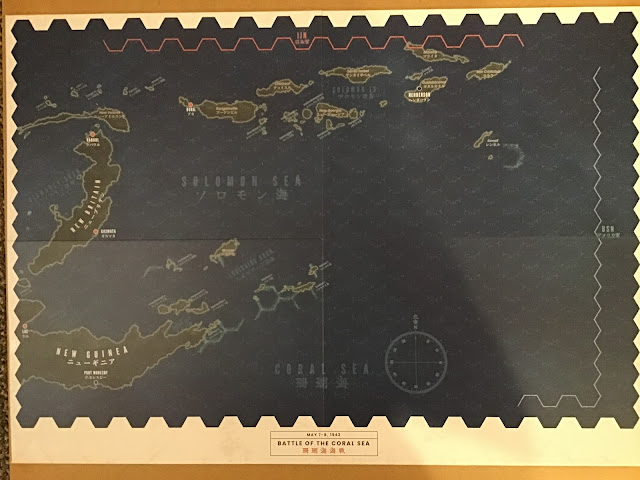
It arrived as a very weighty package indeed.  Not surprising, as the contents are some of the most substantial imaginable.  The description in the section Game Equipment Explanation is very misleading, especially the simple statement "Four map sheets."  Admittedly, one is a small paper map for the Introductory Pearl Harbour Scenario, but the other three are double sided mounted mapboards.  Two are 59cm x 42 cm and one is 40cm x 28cm. All are impressive, if perhaps a little dark.


Mapboard for Battle of the Coral Sea
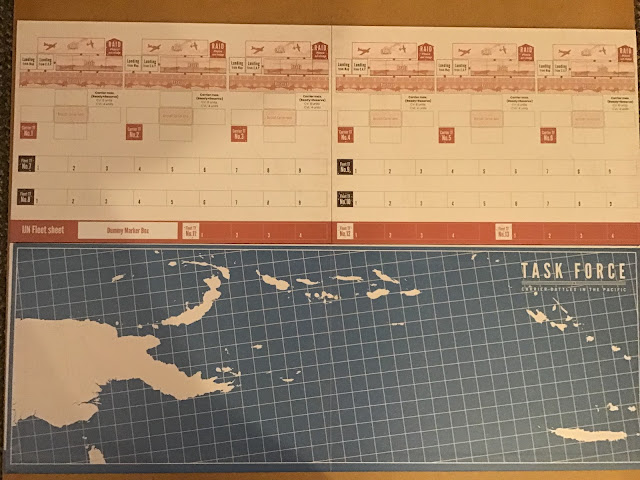
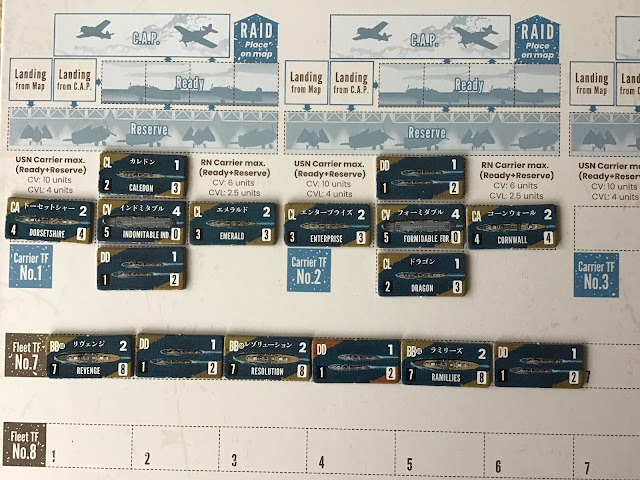
There are two identical fleet formations sheets, similarly mounted  and each is 59cm x 21cm.  For much of the game this is where virtually all your units will be displayed.  What you see below is further evidence of the attention to quality that Vuca Simulations have rapidly gained a reputation for.  The top half of the picture is the Japanese fleet display itself, the bottom half is simply the reverse side of the Allied fleet display - not as expected a blank white expanse, but a coloured, stylised map grid.  A third mounted display sheet is shared by both players for their land bases.
Front and back of the Fleet Displays

Before you even get to the many counters and markers [588 in total!], there are a further  8 play aids, comprising two identical Player Aid Charts and 6 double-sided Scenario Set-Up displays.  Unlike most games, all these are not paper or thin flexible card, but thick, rigid card-stock.

Front and back of a Player Aid Chart


Just one of the six Scenario Set-Up Cards
Just looking at the set up card gives a hint of the quality of the unit counters and markers - five sheets in total.  The combat units are, as to be expected, predominantly US and Japanese, but also covering the United Kingdom, Australia and the Netherlands.  


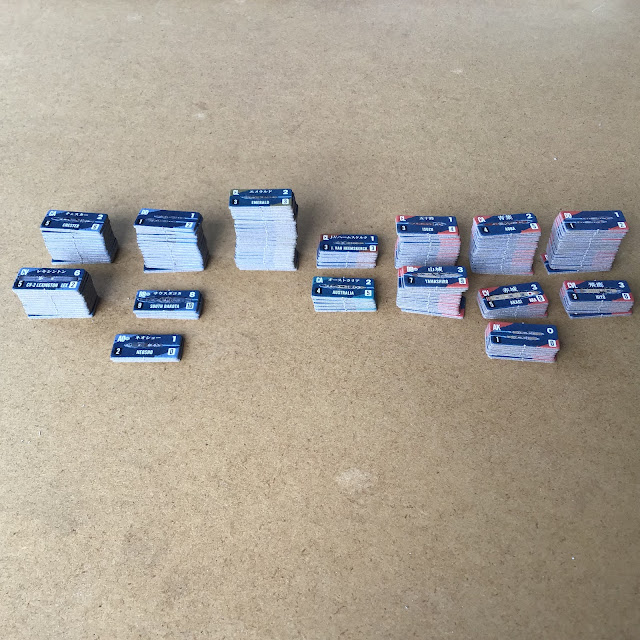
They reflect the same high quality of all the other components being perfectly die-cut with rounded corners.  The naval units are standard double length style, with all having a dark blue background and the nationality differentiated by a coloured diagonal in the top left corner.  Named ships are in both Japanese characters and English script.  Aircraft are the typical smaller square counters, carrying the abbreviated name of either their carrier or land base -  a very helpful detail.


Lovely piles of the many naval units

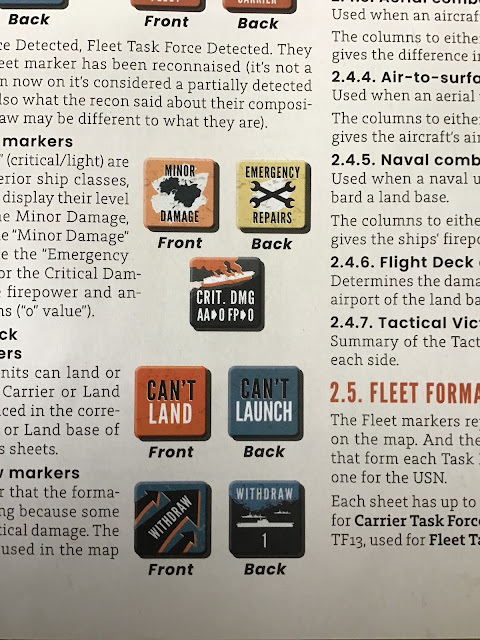
Rounding out the playing pieces are a wide range of markers, covering fleets [including dummies], naval unit damage, reconnaissance chits - always important in carrier warfare games - flight deck damage and ship withdrawal .


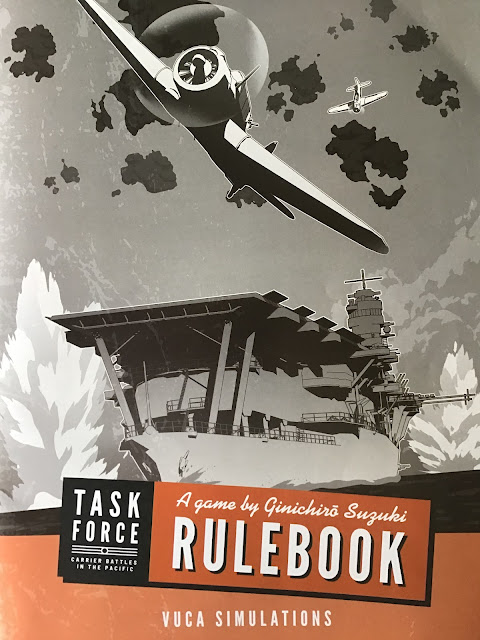
The all-important Rulebook

Last to be mentioned, but as always absolutely critical to any game are the Rules Booklet and Scenario Booklet.  Both are attractive glossy, double columned products.  The Rules Booklet I was very interested to see is only 20 pages even when counting the front and back cover.  I was immediately interested to read in the Rules' introduction that you could approach them in two ways; either by reading the whole rulebook or learning with the help of tutorial scenarios.  It is stressed that the latter is very much for beginners, but I thought I'd have a look at the approach using the learning tutorials, which involve the first four Scenarios.  My expectations were based on my early years of learning to play the celebrated Squad Leader in which you progressed from section to section of the rules, with each section followed by a scenario that provided a fully fledged game..  

Task Force takes a very different route.  You are directed to the Scenario book and are told which numbered rules' cases to use in Scenario 1, play it and then go on to Scenario 2 where you're advised which rules you need to add on to those learnt in Scenario 1 and so on through the first four Scenarios.  I would have been happy with this method, except for the fact that I'd count only the fourth and last of the tutorial Scenarios as giving anything that resembles a game, as each of the first three can be played in under ten minutes.


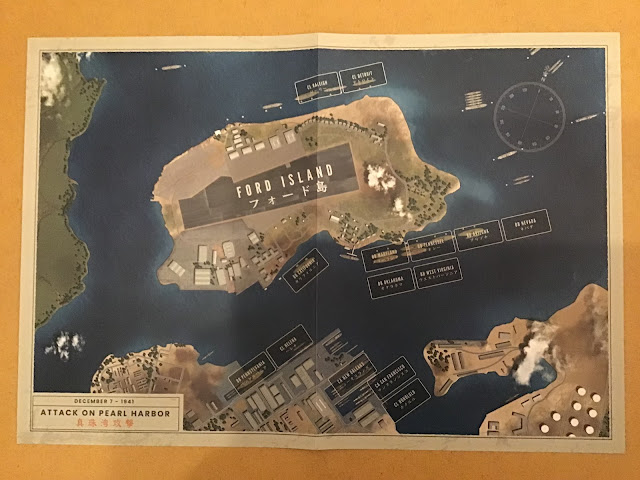
The very attractive Pearl Harbour map

The first, Pearl Harbour, has its appeal, partly because of its subject and its lovely map, but it is purely a very simple, brief solitaire experience of Air to Surface combat with victory conditions that I can't imagine achieving without exceptional dice rolling.  Still it does the intended job of introducing air to surface combat and application of the novel damage system which is a feature I really like.  Scenarios 2 & 3 are very, very brief and I feel are essentially there because they were part, I assume, of the original game.  They play their part for the absolute beginner and the more experienced gamer would probably have set out some counters in a similar way to practice parts of the rules.  Still, I felt that having a whole double-sided board produced purely for these two Scenarios was unnecessary, as they could just as easily been played out on either side of the board for Scenario 4 and Scenario 6.  

Apart from this one aspect, my view of the game is wholly positive.  Not only are the rules clear and easy to assimilate, but they accomplish all that I would look for in focusing on a purely naval and air simulation of moderate complexity.  

The first section, Game Equipment Explanation, presents all the necessary standard information about the types of units.  For naval units the key numerical factors are anti-air, firepower and durability.  The latter is for me one of the best concepts in the game and one that I'll shortly discuss in depth in the next section which includes combat and damage.  It then outlines the different markers, the tables on the Player Aid Charts and Fleet and Aircraft Status Sheets.

Next, Standard Procedures, explores the differences to play of Night and Day turns, ZOCs, the use of Fleet Markers and Setup of Scenarios and, very significantly, Combat Hits and Damage, which I'll explore in some detail now.  This is where the durability factor is crucial and it's important to note that only naval units have durability.  The number of hits inflicted in combat is measured against a ship's durability factor to see what damage is taken.  There are three levels of damage: Minor, Significant and Critical.  As an example of how this works, take a ship with durability factor of 8.  Any hits less than this durability factor of 8 would cause no damage at all.  If exactly 8 hits are scored, then place a Minor Damage Marker on the ship.  If a ship suffers no more hits before the Admin Phase of the current turn, the Marker is flipped to its Emergency Repairs side.  However, if a ship takes exactly one more hit than its durability, the unit is flipped over which shows that it has Significant Damage. With our example ship of durability 8, 9 hits would cause the ship to be flipped over to its reverse side.  The reverse side shows a smaller durability factor.  Any new hits less than this durability factor will cause no damage, new hits exactly equal to its new durability factor would cause a Critical Damage marker to be placed and any further hits  would sink the ship.  To read this sounds much more complicated than it is when you have the ships in front of you and the necessary chart and damage markers.  Hits against all aircraft and destroyers and transports are handled by conventional losses.

Various markers including detailing crucial information

This section of the rules also handles how Fleets are formed, merged or rearranged and the use of dummy fleet markers.  The latter are particularly important for this system, as for most of the game, the Fleet markers are all that will be placed directly on the map.  Unlike some naval games, this is not a double-blind system where each player sets up all their ships on their own separate map that remains hidden behind a player screen.  Instead each player has their own Fleet Display Sheet, on which all their units are placed.  Surprisingly, keeping these displays hidden is an Optional rule, explained in the section on setting up a scenario, by the fact that the game is designed for beginners.  For any players other than beginners, I would say that keeping your displays hidden is an absolute must for enjoyment and excitement. 

The final part of Standard Procedures covers elements of SetUp which mainly relate to a variety of distinctions between the composition of Carrier and Fleet Task Forces and a few points about the Aircraft Status Sheet.

All this constitutes the first 10 pages of the Rule Book and the final 10 pages take you through the Sequence of Play, which has 5 Steps.

Naval Movement Phase

Mainly this covers the movement of your Fleet Markers, both real and Dummy ones.  The only other markers that appear on the maps are Withdrawal markers that indicate individual or very small groups of ships that have been forced to withdraw because of the extent of their damage.  The result is a very uncluttered map and plenty of uncertainty as to what each Fleet marker contains and whether it is a dummy or not.  As a result, this Phase moves very swiftly, especially until the point at which fleets are within potential reconnaissance range.  Any Dummy Fleet markers in the ZOC of an enemy Fleet marker are then removed from the map.

Naval Combat Phase

Any genuine opposing Fleet markers that are adjacent and in each other's ZOC are now turned up to reveal their Fleet number and combat takes place.  If there are several fleets on each side adjacent in a single group, the Initiative player decides which fleet will participate in which battle and the order in which they will be carried out.  During a night battle, it is very simple - all ships engage in fire; naval battles during the day are handled differently.  With these day battles, a curious rule involving gun range determines which ships can fire. Normally only ship types with the longest range may fire, unless both sides agree that a ship type of a shorter range and all those of higher ranges may fire.  I cannot see the realism in this rule, but it does make for some interesting choices at times.  The Initiative player allocates all targets first and then fires; the non-initiative player then does the same.  Normally, the results of all fire is applied simultaneously, unless a Scenario specifically rules otherwise or both players agree to incorporate the optional Surprise Attack rule in a custom-made scenario.


The image above shows the different displays for a Carrier Fleet TF [circle defence] and a purely Naval Fleet[linear defence].

Aircraft Operations Phase

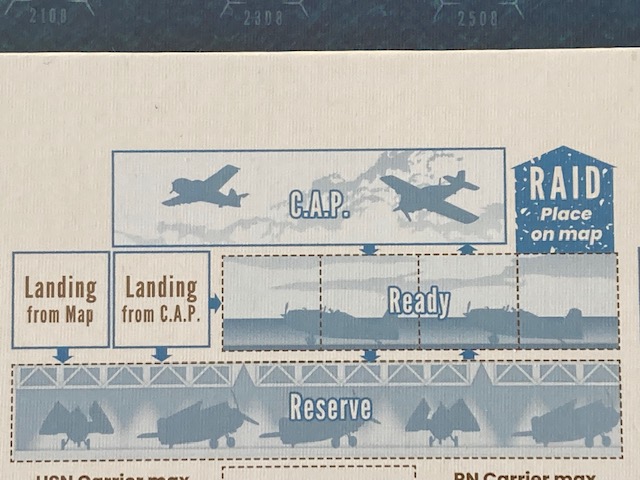
For me, this is the heart of any carrier game and where clarity of rules is at its most important.  Task Force Carrier Battles succeeds admirably, especially in its use of Aircraft Status Displays, as shown below.  This level of detail is an absolute delight for me, with planes on deck [the Ready boxes] or below deck in the hangar [Reserve boxes], the ability for allocation to Raids and CAP and finally boxes for the aircraft returning from Raids and CAP.


The rules take you carefully through each step, marshalling the sequence clearly and effectively.  Full marks to the rules here, which I have often found clumsily or confusingly described in many other carrier games.  Carrier displays provide opportunity for several nuances that I like, all of which are evidenced in Task Force.  An essential one is that carriers caught with aircraft in the Ready box may suffer aircraft losses and extra damage damage to the carrier. Others include the fact that launching or landing aircraft may be affected by ship damage or that aircraft may return to alternative carrier or land bases if within range and able to receive that type of aircraft [absolutely essential if your original base is damaged or sunk!].  A limit of 4 full units may be in the Ready box and it's noted that if you wish to create your own Scenarios set in the later war years this maximum can be increased.
Aircraft Display being used for British Carrier Formidable

Once in the air and on a Raid, all the expected actions come in to play.    Both players first move their planes simultaneously to their targets - a good point is that raids can be made only against Fleet markers that are either detected or partially detected.  I love the comment in the rules at this point, " Now that you have both finished moving your aircraft, let's move on to the serious part of the Operations Phase."  Much as I enjoy the essential cat and mouse search element of the game, I'd also add the phrase " most exciting" to "serious"!
 So, each battle is resolved in the following order:
Air-to-Air combat: defending Cap must pair off against enemy fighters, before any may be assigned to attack enemy bombers.
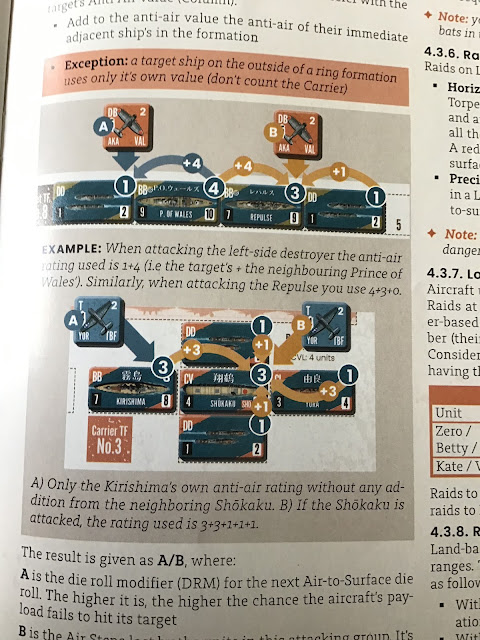
Air-to-Surface combat [i]: surviving bombers are allocated to individual ships or land base and anti-air fire is resolved. *[see note on illustration below]
Air-to-Surface combat [ii]: surviving bombers carry out their attacks
Return to Base : surviving aircraft, both attackers & defending CAP return where possible to a carrier or land base.  Note that there may be CAP that was flown where no Raid took place, but you still need to return them too.

*The image above exemplifies how you might allocate your aircraft when attacking the two different types of Fleet. I'd strongly recommend producing a larger display for this, mainly to avoid using and thus revealing the hidden displays, but also to enable spacing out all the units very easily.

Reconnaissance Phase

Not surprisingly, reconnaissance is skipped during night turns, in addition you can't conduct searches on the final two turns of daytime either.  I assume this might be explained by the risks of returning in dwindling daylight.  However, it does mean that only six out of the 12 turns in a full day can be used for searches.  

These searches do not involve the actual movement of your aircraft and are allocated slightly differently for the two sides.  The Allies receive them on the basis of 2 Recon chits per CV and CVL and 1 or 2 Recon chits per land base depending on the Scenario, while the Japanese receive 1 chit per CVL, 1 chit per land base and 1 chit per CV up to and including Midway, after Midway this increases to 2 chits per CV.  An explanatory note attributes this difference to the less diligent Japanese reconnaissance that took place until after the defeat at Midway.  These little details either explained in  design notes added alongside a rule or built directly into a rule are among some of the factors I value in any game and contribute neat touches of flavour to Task Force.

The resolution of your searches is carried out by your placing randomly drawn Recon chits from a bagful of them and your opponent reporting on the results on the unrevealed side.  Again an excellent touch and, as you can only search within 8 hexes of your own ships, do make sure that you have more than one fleet marker within range or you've just given away your own position!

Administrative Phase

This is very swift to carry out. First of all, any ship that had an Emergency Repair marker on at the beginning of the turn and has not received any hits this turn removes the marker.  Next any ship that has received a Minor Damage marker this turn flips it to the Emergency Repairs side.

Next, move the turn marker on one box and, if it's now the first Night turn of the day, return all Recon chits used during the current day to the draw bag or whatever container you're using.

To sum up the rules, they are clear, well set out and easy to understand and refreshingly short for the overall detail achieved.  Turns flow swiftly and smoothly.  Ship to ship engagements, if and when they occur, are very quick and easy to execute and the central focus of any carrier battle game, the raids on the opponent's fleets and bases are worked out with great satisfaction and enjoyment using the well designed fleet and carrier displays.

The Scenario booklet is equally well presented and contains a rich diversity of material.  The first three Learning Scenarios have good brief historical outlines, with the Pearl Harbour one providing a detailed list of the full forces historically involved and even a run-through of an exemplified play through.  The Main Scenarios are rated as Beginner, Intermediate or Advanced  and once again provide succinct historical background, full set up instructions and any special rules.

Here is a full list of Scenarios followed by a few personal comments on some of the Main Scenarios.

  Learning Scenarios

Scenario 1 Pearl Harbour

Scenario 2 Sinking of Prince of Wales and Repulse

Scenario 3 Battle of the Java Sea

Scenario 4 Carrier v Carrier [fictional]

-----------------------------

Main Scenarios

Scenario 5 Battle of the Coral Sea

Scenario 6 Battle of Midway

Scenario 7 Battle of the Eastern Solomons

Scenario 8 Combined Fleet v Pacific Fleet [fictional]

Scenario 9 Indian Ocean Raid [fictional]

Scenario 10 The Battles of Santa Cruz Islands and Second Naval Battle of Guadalcanal

Scenario 11 Solomon Islands [Custom Scenario]  This last Scenario

Inevitably, Scenario 6 Midway, though classed as Beginner level, has a special appeal having gamed this in so many different ways over the years.

Scenario 10 The Battles of Santa Cruz Islands and Second Naval Battle of Guadalcanal.  

I'd strongly recommend this, as it constitutes two battles with the results from the first strongly influencing the nature of the second battle - an element I  wholly enjoy and it involves Guadalcanal, another battle zone I've played over in many other games.

Scenario 9 Indian Ocean Raid [fictional]

Though I much prefer historical scenarios in any game, this I found fascinating.  Rather than calling it "fictional", this is a classic "what if scenario?"   The historical raid might be called a damp squib, as prior warning allowed the commander to have diverted most of his ships away to another base.  This scenario allows you to explore how the battle might have played out if those diverted ships had been there.  It also means that as a Brit, I get a proper battle, even if I might lose it!

Scenario 11 Solomon Islands [Custom Scenario]  This last Scenario is especially important as it helps to exemplify how to create your own custom scenario and was originally published in Command magazine Japan.  Wholly enjoyable in its own right, it also serves as a lead in to the final section of the Scenario Booklet - Creating New Scenarios.  Alternate orders of battle are provided drawn from a mixture of updated OOBs and differing source opinions on the battles.  The developers have even included a number of additional units in the counter mix to facilitate this.

There's even a brief section on running a double-blind version with separate boards and a referee and, last but not least, there are two pages of Strategy and Tactics tips divided into Basic overall ideas and a few specific pointers for the main Scenarios. 

I hope your stamina has got you this far, but Task Force Carrier Battles in the Pacific is packed with such a diversity of material to explore and is definitely a rich addition to Vuca Simulations well deserved reputation for quality.  So, it's many, many thanks to them for providing this review copy and allowing me to take you on a journey through it. 

hpssims.com