second chance games

Search This Website of delight

WARFIGHTER WWII MEDITERRANEAN & NORTH AFRICA FROM DAN VERSSEN GAMES Thanks to the generosity of DVG , the Warfighter series has become ...

WARFIGHTER: MEDITERRANEAN & NORTH AFRICA WARFIGHTER: MEDITERRANEAN & NORTH AFRICA

For your Wargamer, Toy soldier collector, MiniFig collector, military history nut. Reviews, interviews, Model Making, AARs and books!

WARFIGHTER WWII

MEDITERRANEAN & NORTH AFRICA

FROM

DAN VERSSEN GAMES


Thanks to the generosity of DVG, the Warfighter series has become a corner stone of my games collection.  They began with the original foundation, The Tactical Special Forces Card Game, and its many subsequent expansions including the massive Footlocker and continued with Warfighter WWII.  Once more DVG were kind enough not just to provide me with a review copy of the core game, but the Ammo Box Expansion, [an equally enormous equivalent of the initial modern series' Footlocker] along with a stack of the many expansion decks, only to be followed by the WWII Pacific game!  All of this can be charted through my series of reviews, links to which can be found at the end of the review of this current addition.

And what an addition for which I must extend huge thanks to DVG for once more giving me the opportunity to review them. Not just the two main new editions to the Warfighter WWII canon, Mediterranean & North Africa, but a further 20 expansion decks.  [For a detailed look at the core system I would refer you specifically to the links to my first review of the Warfighter system and the review of Warfighter WWII at the end of this article.] What follows is the briefest of outlines for anyone who is totally new to this system. I would sum it up as follows.  It is essentially a tactical game of solitaire or cooperative play.  Played on an abstract board.

All missions, objectives, locations, friendly and enemy units, equipment and many skills and abilities are represented by cards.  Along with these, there is a wide range of cardboard counters representing physical items ranging from ammunition, grenades and satchel charges to canteens of water and bandages and markers for such things as suppression and killed, the identifying number of each of your soldier units, the number of individual actions each possesses, wounds etc, etc. 


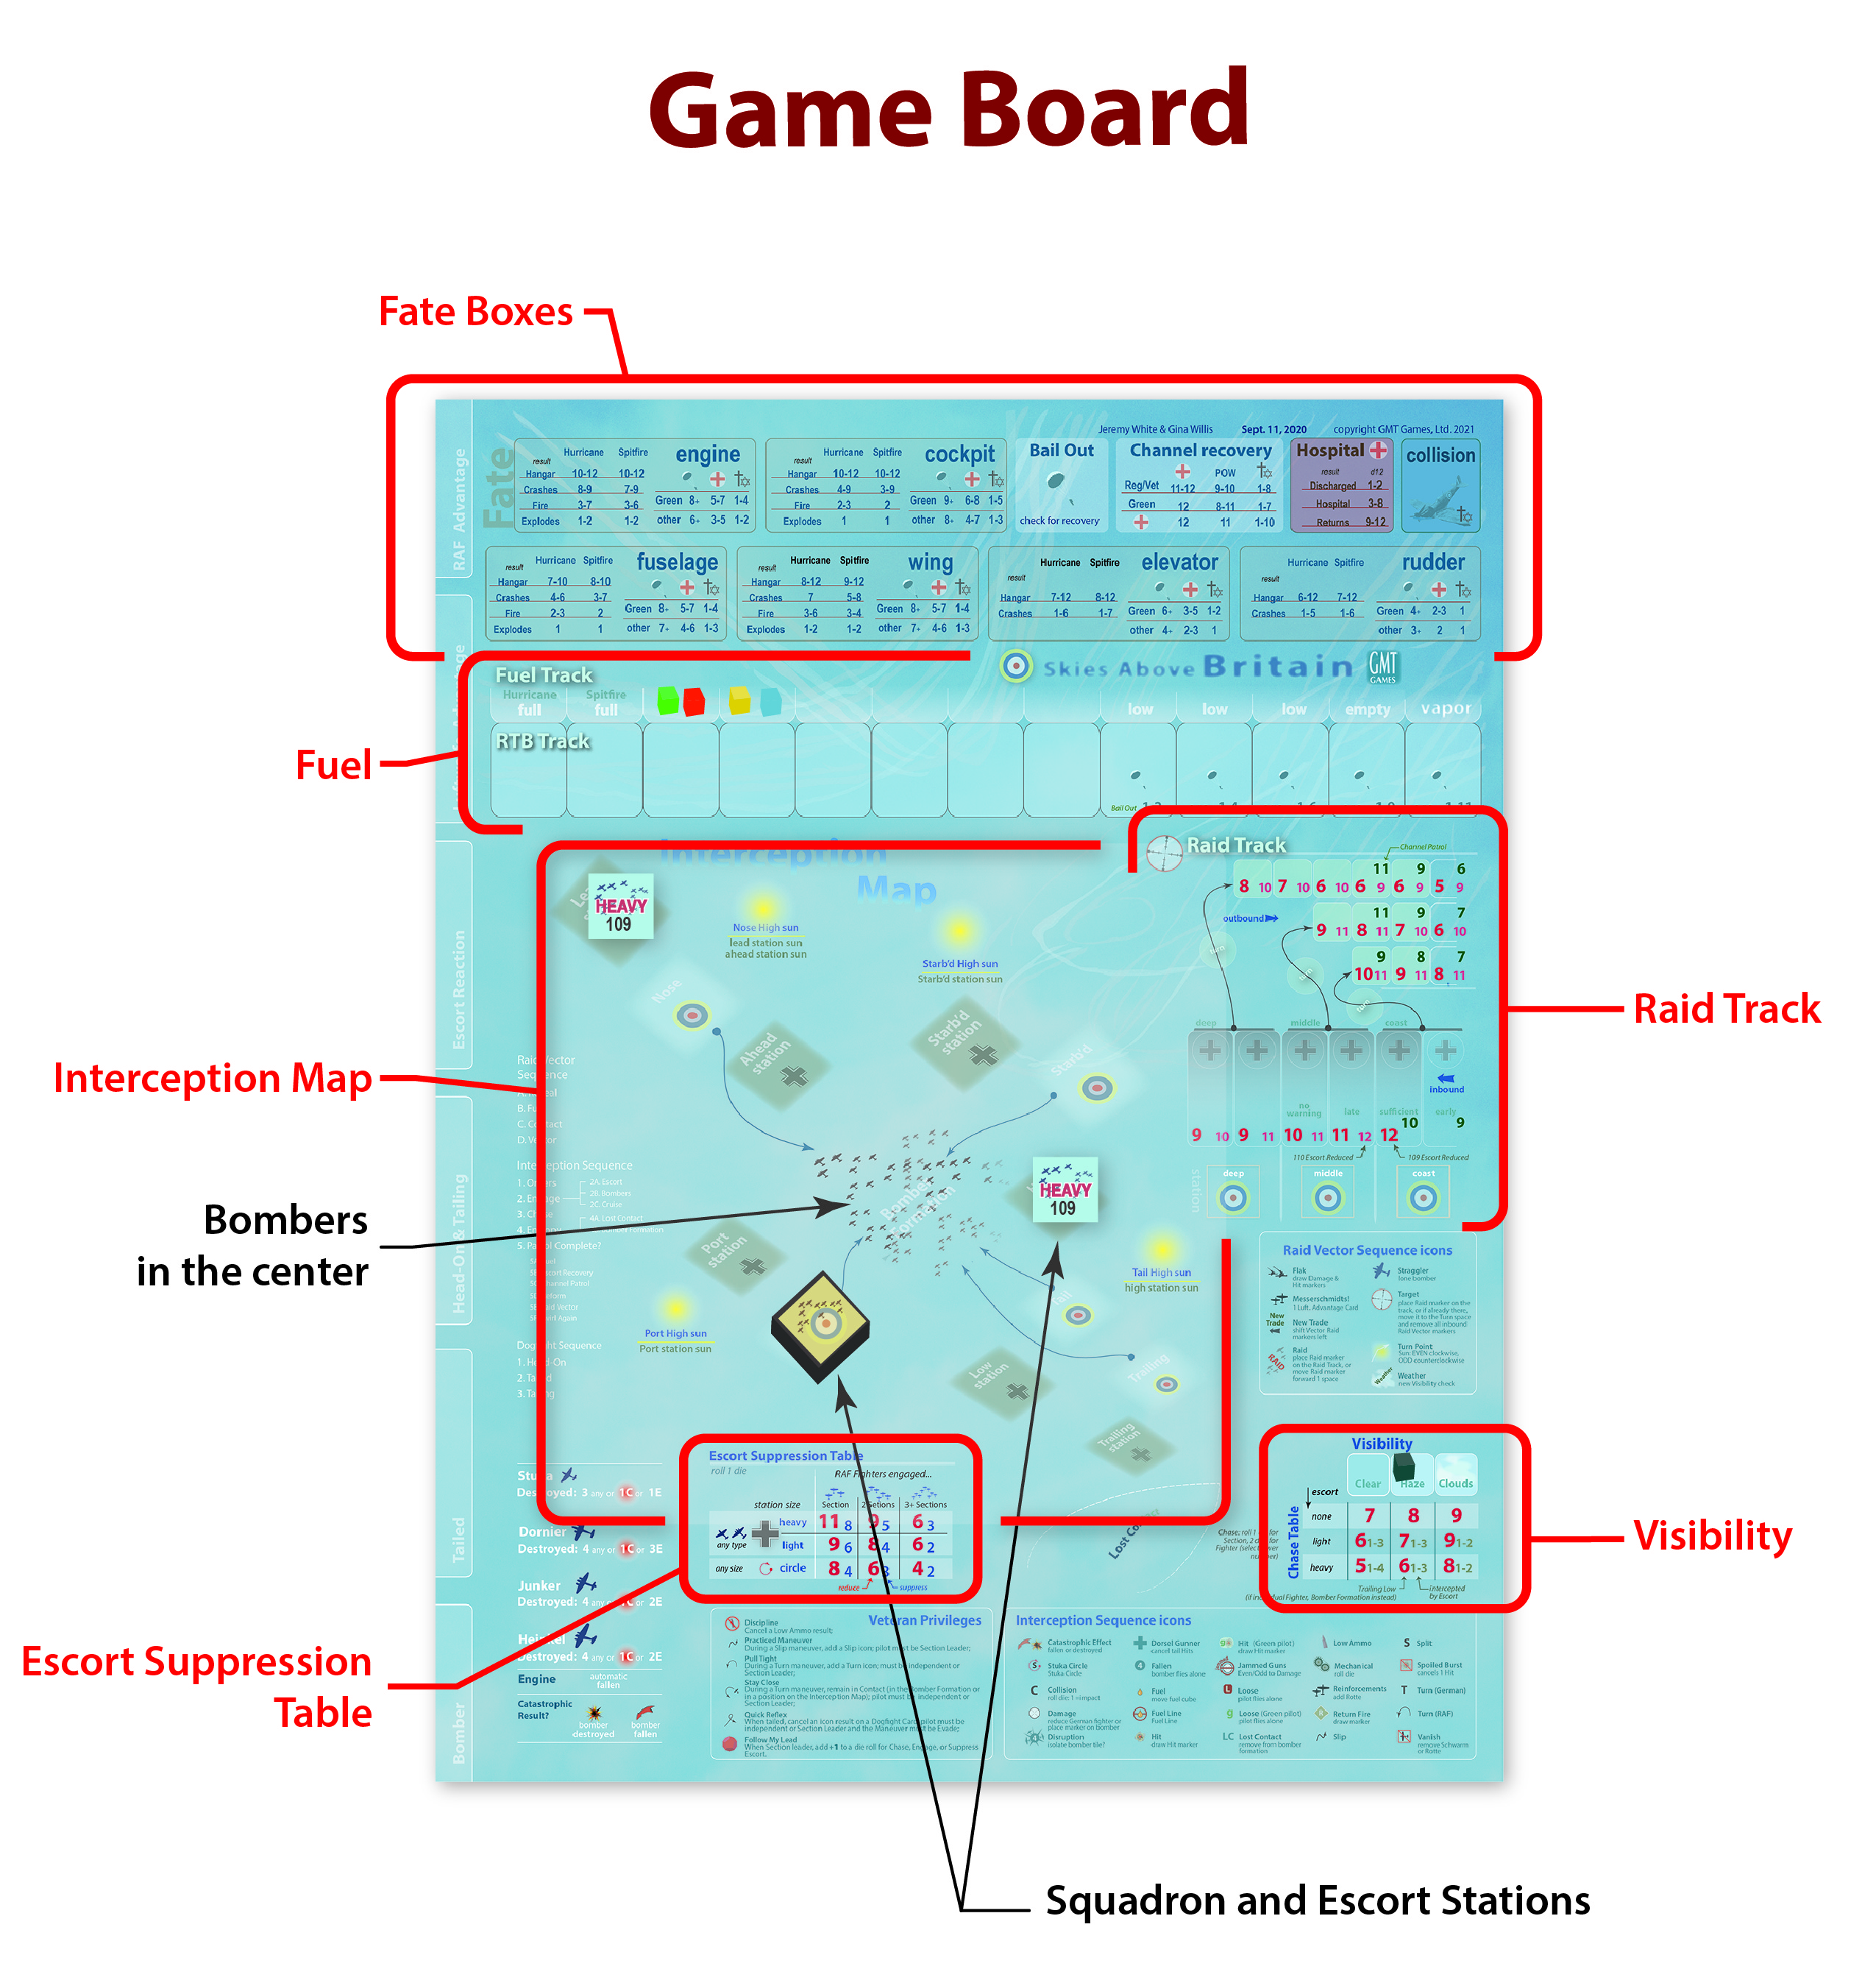
The image above gives you a picture of the game in full flow. Everything is handled by the decks of cards that you see down the left edge of the board and the information on the cards and, of course, plenty of D10 dice rolling.  It may look daunting, but after just a few turns you'll be immersed in a game that consistently produces nail-biting action narratives!  However, for the player unfamiliar with this game, I would strongly recommend buying the core Warfighter WWII game because of its excellent rule book.
The reason I advise this is because these two new games both contain the new massive, compendious Warfighter Universal Rulebook

The 100 page Universal Rule Book

This is an attempt to bring together everything in one all-encompassing rule book that will bind together what exists, what has just been published [Warfighter Fantasy] and what lies in the future [possibly Sci-Fi, possibly Vietnam, possibly WWI].
In his introduction, Dan Verssen attributes the inspiration for this to... you, the players of this series, and your insatiable desire for more and more Warfighter! I certainly welcome such a compendium of rules and I've tried to provide an outline at the end of my review of what has swollen the initial core book to this mammoth volume.  However, as many others have already commented, I hope that this is not what will now appear in every new game.  I personally think that this should have been offered as a stand-alone purchase for all who would like it.  I have consistently praised the previous rule books for their accessibility and clarity when learning the game and ease when checking back on a rule.  The new all-embracing rule book has the first two strengths, but it does not ease initial learning or help in checking rules when you have to locate it among so many pages. 

Typically, while playing Missions from both the Mediterranean and North Africa boxes, I have largely relied on my earlier core WWII rule book, with only occasional reference to this new Universal Rule Book for a few very specific points,

For me, the most significant novelty is contained in the Warfighter Mediterranean game and that is because it is the first to handle an Axis nation, the Italians, as the main player and the Hostiles are Allied troops, specifically the British. Perhaps because of this I have been drawn to this game and this has been reinforced by the topics in several of the Expansion Decks.  Like all the preceding Decks, they contain the expected mix of new Soldier and Hostiles cards, added Skills, Equipment, and most important of all are those Soldiers, Missions, Objectives and Locations related very specifically to an historical event or location.  For me, three Expansion decks stand out.
Expansion Deck #82: Raid on St. Nazaire 
Expansion Deck #76: Crete 1
Expansion Deck #77: Crete 2
The first of these will need the Warfighter Europe core game too, but the deck contains 7 Objective Cards, 8 Missions and 13 Locations that are specific to the famous raid on St. Nazaire along with a number of Soldier cards for specific British participants who you will be playing.  
The two Crete Expansion Decks purely relate to the Warfighter Mediterranean game and both naturally introduce a similar combination of Missions, Objectives and Locations relating to the battle for Crete.  Along with them and a major plus for me, Crete 1 includes several named New Zealand soldiers for you to play while Crete 2 brings in German airborne soldiers, parachutes, gliders and supply cannisters.
Obviously, I am biased as to my choices, partly by being a Brit, but I suspect many like me will be drawn to the two Crete decks. A long sequence starting with Avalon Hills' Air Assault on Crete and SPI's Descent on Crete have given me a life time's fascination with the campaign.  However, I restrained my impulse to turn straight to these expansion decks in order to give the Mediterranean box a proper airing.   Inevitably, the basic preparation for every session remains the same: choose your Mission and Objective and build up a suitable selection of Soldiers and their skills and equipment and then the meat of the game follows as you fight your way towards the Objective.

My leading Soldier, armed and dangerous!

Nevertheless, this game whichever core box you may be playing, never fails to deliver.  A typical example was the play of the same scenario twice.  The first play saw some of the worst possible locations turning up for the slog to the objective and a devastating array of the most powerful British hostiles.  Half way through I knew there was no possibility of victory, only more of my soldiers dying!  A quick reset with exactly the same selection of soldiers met with a wholly different experience.  Easy locations to enter and initially light resistance saw my force surge ahead... until the sudden appearance of a Sherman tank at the provincial viaduct threatened to bring this to a crushing halt.  Fortunately, obstructing terrain blocked this killing machine's sight to its target and a fortuitous turn of an air support card and high rolling dice achieved its elimination and allowed me to move on and eventually achieve my goal.


Turning to Warfighter North Africa, all the same qualities naturally are repeated.  They start with the pleasing fact that just as the Pacific board was imprinted with  a wholly appropriate background scene, so too does the North Africa board reflect its desert terrain.  Not only is the background one of sweeping sand dunes, but the fore-grounded figures are British soldiers in a sandbagged emplacement.  


The colouring too ranges from sand to light tan and on to darker brown and the crowning touch is the familiar Desert Rats image identifying where your Mission card is placed!


The vast range of photos on the cards as always add to the historical setting of each core box.  This continues to be reflected across the whole range of different card types.  For example, Location Cards, such as Wadi, Salt Pan, Camel Bushes and Coastal Road.  How many of us have fought up and down, attacking and retreating along that very coastal road in many another North Africa game?  Event Cards like Oasis, Mirage and Heat Haze; the Cauldron Mission Card; the Benghazi Handicap Objective Card - all emphasise where we are for this game.  However, it is perhaps to be expected that the Expansion Decks are what dive deepest into the desert war.
Here are just a few of those location setting scenes taking you closer and closer to the action.


Just as I thrilled to the many Mediterranean Expansions that brought more history to the game, so too with Warfighter North Africa.  I expected to have a major toss-up between which of two groupings won my praise.  On the one hand there is the group consisting of Desert Rats and Vehicles Desert Rats matched by Afrika Korps and Vehicles Africa [why the change of spelling?] Korps and on the other hand is the grouping of the Battle of Bir Hakeim, the Battle of Bardia and the Battle of Damascus.  [What - no Battle of Tobruk?]  Not forgetting two other significant Expansions: Gurkhas and Long Range Desert Group.  Glad to see both of those getting a look in.
To be honest, in the first grouping I was disappointed with the Desert Rats Expansion, as 43 out of the 55 cards were Frontline/Elite British Hostiles!  I really hadn't expected to spend my time fighting against the Desert Rats rather than with them..  Even the Afrika Korps deck consisted of just over half the cards being German Hostiles, though this was compensated for by having 18 German Soldier and 2 German vehicle cards.  The two co-related Vehicle decks were almost identical in that, out of 55 cards in each, 45 were composed of two types of cards, anti-vehicle and vehicle.  I was intrigued by these, as though these type of cards and the concepts/rules related to them had featured in four earlier Expansion Decks, they were not an area that I'd previously explored.  These latest Decks certainly will be getting plenty of attention from me this time round.
The essence of their use is that you can buy Vehicle cards for a Mission just as you would Soldier cards.  They introduce a series of new concepts and the anti-vehicle cards form a new Hostile deck that a card must be drawn from for each vehicle you have in your group when you come to the Hostile Reinforcement Step. 
Much as I'm going to enjoy that strong element, my personal taste for adding more historical details to my Missions means that the three Expansions covering named Battles ultimately won my favour.  Bir Hakeim and Damascus both introduce French Soldiers and specific French weaponry and all three battles include a mix of historical features in Mission, Objective and Location cards, as well as generic elements relating to desert warfare.  Even more interesting is that Damascus includes as many French Hostiles as it does French Soldiers and finally Bardia to my delight brings in the Aussies.  I can envisage quite a bit of my time being spent digging into all three of these Expansions, as well as considerable research reading.  Heading the list will be Damascus which is a battle I'm totally ignorant about. 
Just as I was pleased to see nationalities such as the French, Australians and New Zealanders making an appearance, it was equally pleasing to find a whole Expansion focused on the Gurkhas. It cam as no surprise that most of the cards are fairly equally divided between the Gurkhas as Soldier cards and as Hostile cards.  With their reputation of service in the British army, I'm expecting to find them a daunting force whether I'm playing with them as my mission group or I'm the Axis group fighting against them.
So there you have, it a positive feast of material for a system that continues to grow and grow and grow.  Heading for the future my personal vote would be for Vietnam.  Meanwhile I have so much now that I suspect it might take considerably longer than WWII lasted to play the vast combination that I can marshal. 


LINK 1 for Warfighter review
LINK 2 for Warfighter WWII review
LINK 3 for Warfighter WWII Pacific review

Appendix 1: new elements and expansion of existing elements introduced in "Warfighter Universal Rule Book"
A 2 page introduction.
Skill Cards expanded to a full page.
Engage in Hand-to-Hand Combat becomes Striking Counter
Deploy the Decks omitted.
Select Your Mission has been substantially expanded from half a page to ten pages.  The core books only refer to Standard Missions covered by a specific game.  This refers to types of Mission cards found throughout various expansion packs.
Introduction of Team Soldiers.
Melee cards appear to have been renamed HtH [Hand-to-Hand] cards.  In sequence of Play HtH becomes Engage In Striking Combat.
Section on Armor Cards and Shield Cards included relating to new  Warfighter Fantasy release.
The inclusion of details on doors/beneficials/obstacles/traps expands section on Placing Location Cards
In Soldier Attacks there has been a small addition of Shadow elements.
Hostile Cards section includes the introduction of Double Reticles and mainly 2 extra pages relating to Warfighter Fantasy.
Hostile Turn slight amplification.
11 pages devoted to Shadow war
6 pages devoted to Private Military Contracts
5 pages devoted to Warfighter Fantasy.

Appendix 2: Expansion Decks specific to the Mediterranean Core Game
Exp #71 Royal Italian Army
Exp #75 Operation Tombola
Exp #76 Crete 1
Exp #77 Crete 2
Exp #78 Battle of Rimini
Exp #79 Gothic Line: Fortification
Exp #80 Italian Partisans
Exp #81Italian Airborne "Folgore"
Exp #82 Raid on St. Nazaire [needs Warfighter Europe Core Game]
Exp #83Savola Cavaleria
Exp #86 Vehicles Italian

Appendix 3: Expansion Decks specific to the North Africa Core Game
Exp #69 Long Range Desert Group
Exp #70 Afrika Korps
Exp #72 Battle of Bardia
Exp #73 Battle of Bir Hakeim
Exp #74 Battle of Damascus
Exp #84 Vehicles Africa Korps
Exp #85 Vehicles Desert Rats
Exp #87 Gurkhas
Exp #88 Desert Rats


  Storm Clouds Over the Pacific 1931-1941 War In the Far East by Peter Harmsen   There used to be a dearth of books about the real beginning...

Storm Clouds Over the Pacific 1931-1941 War in the Far East by Peter Harmsen Storm Clouds Over the Pacific 1931-1941 War in the Far East by Peter Harmsen

For your Wargamer, Toy soldier collector, MiniFig collector, military history nut. Reviews, interviews, Model Making, AARs and books!


 Storm Clouds Over the Pacific 1931-1941


War In the Far East


by


Peter Harmsen


  There used to be a dearth of books about the real beginning of World War II. It was not in Ethiopia or in Spain, but in China where the fuse was lit. We have had some books lately that deal with the Second Sino-Japanese War. However, the field is nowhere near the rest of WWII as far as books written about battle and campaigns.


 This book starts right at the beginning of the conflict (others start at 1937 and the Marco Polo Bridge Incident). Japan is looking for resources and their own lebensraum in the Asian landmass. The author shows us the slide the Japanese took from a rather open slightly democratic nation to a militaristic fascist like state. There are wonderful bits of history that I have never read before. He informs us that a group of young naval officers (we usually associate the Japanese Army officers with rebellion) had determined to kill the prime minister and a completely harmless Charlie Chaplin during a visit in 1931. They were actually going to assassinate more government officials also but were stopped in their tracks by the secret police. One wonders if Mr. Chaplin was ever aware how close he came to death. The book is filled with these golden nuggets of history.


 The book goes on to explain the Japanese invasion of northern China and their conquest of Manchuria (afterwards changed to Manchukuo and given the last Chinese emperor Puyi as a puppet leader). The writer shows us all of the assassination attempts and successes of the young Japanese military officers against their own government. Then we see the slow slide to all-out war between Japan and China in 1937. The author shows us the drifting of Japan toward the other Axis powers. The book also shows the different attempts of the western powers to stop the war in China. It also shows the intense rivalry between the Chinese Communists and Chiang Kai-shek's government.


 We are then taken to the final desperate attempts from some on both sides to stop a war breaking out in the Pacific between Japan and the western powers. The author then takes us to the various Japanese attacks and invasions in December 1941. These include Pearl Harbor, the Philippines, Malaya, and the Dutch East Indies.


 The book is just under 200 pages long. It has a large section of Endnotes and a list of literature in Chinese and other languages. It comes with thirty-two pages of black and white photos of the actions and personalities shown in the book. It also has a small number of some very well-done maps. Thank you, Casemate Publishers, for allowing me to review this outstanding book. This is a fine history book on its own and hopefully will attract more writers to the subject.


Robert

Book: Storm Clouds Over the Pacific 1931-1941 War in the Far East

Author: Peter Harmsen

Publisher: Casemate Publishers

  Retreat Through the Rhone Valley: Defensive Battles of the Nineteenth Army, August - September 1944 by Jörg Staiger Translated by Linden L...

Retreat Through the Rhone Valley: Defensive Battles of the Nineteenth Army, August - September 1944 by Jörg Staiger Retreat Through the Rhone Valley: Defensive Battles of the Nineteenth Army, August - September 1944 by Jörg Staiger

For your Wargamer, Toy soldier collector, MiniFig collector, military history nut. Reviews, interviews, Model Making, AARs and books!


 Retreat Through the Rhone Valley: Defensive Battles of the Nineteenth Army, August - September 1944


by


Jörg Staiger


Translated by Linden Lyons


 This is another book that is part of the 'Die Wehrmacht Im Kampf' series that is published by Casemate Publishers. This book was originally published in 1965 and was, as the whole series was, written in German. The books were usually written by officers who were intimately involved with each of the operations. In this case, the author is a German historian.

 Operation Dragoon was the invasion of southern France in 1944 by the Allies. It was definitely the red-headed stepchild of the two invasions of France that year. The Normandy invasion, due to its size and importance, has always pushed Operation Dragoon into the shadows. Now we get an invaluable insight into the German operations to escape back to the northeast of France. 

 The author takes us through each side's different plans before the actual landings in southern France on August 15-17, 1944. He shows us that the German Nineteenth Army was, on paper, much too small to defend the entire coastline. The Nineteenth Army was also used as a reservoir of men and machines for the German armies fighting in Normandy. So, by the time the invasion came its generals knew it would only be fighting a rearguard action no matter what Berlin said.

 It is a short book of only eighty-seven pages before you get into the appendix and index. The retreat of the Nineteenth Army takes up the last fifty pages or so. The author goes into how the army was not only fighting the Allied forces but also the French Resistance. The book has a good number of maps. These are in German, but you can catch the drift of what is going on better with their help. 

 The book is a short but very informative one about a part of World War II that not many are familiar with. In it you will not find copious quotes from the normal soldier. It is a story of the campaign from a more operational standpoint. Thank you, Casemate Publishers for allowing me to do a review of this succinct but still full of history volume. I can recommend the book to anyone who is looking for information on the campaign.

Robert


Author: Jörg Staiger, and translated by Linden Lyons

Claude Whalen about him and his games and his newest offering 'Conquering the Valley' from Tiny Battle Publishing   Before we start ...

Claude Whalen about him and his games and his newest offering 'Conquering the Valley' Claude Whalen about him and his games and his newest offering 'Conquering the Valley'

For your Wargamer, Toy soldier collector, MiniFig collector, military history nut. Reviews, interviews, Model Making, AARs and books!


Claude Whalen about him and his games and his newest offering 'Conquering the Valley' from Tiny Battle Publishing


  Before we start a discussion on "Conquering the Valley", let me give you some of my gaming background.


I got my first wargames over fifty years ago: Tactics II, Gettysburg (1964) edition, Waterloo, Battle of the Bulge, Gettysburg (1977) and more Avalon Hill classics. Santa's workshop must have only made AH products because that is all that I ever got. Since I still have most of those games, I would say that Gettysburg (1977), Waterloo and Battle of the Bulge got the most play.


My main gaming interest leans towards the American Civil War for two reasons; I share January 19th as a birthday with Robert E. Lee (we had a print of Lee in our house) and I went to "Washington & Lee University" for my undergraduate work. Though it may seem like I'm from the South, my mother's family is from Pennsylvania and Massachusetts and my father's ancestors are from Illinois. Other than my time at Washington & Lee, I've never lived in the South and none of my ancestors served for the Confederacy.


As for the Napoleonic era, I would have to say that it is a rather distant second era of interest but I still have dabbled in those types of games. Though I have always had an interest in the Second World War, I find less and less time available for studying it so all my old Avalon Hill WWII games have been moved to the back of the game shelves.


I got started in game design/development/testing in late 2016 when I saw a GMT pre-order advertisement for "Longstreet Attacks". I signed up and noted that they mentioned a game called "Stonewall's Sword" that would be a good introduction to Hermann Luttmann's system. I went ahead, ordered the game and started to learn the "Blind Swords" system. I then got "Thunder in the Ozarks" and continued to comment about the games online (BGG & Consimworld). Roger Miller of Revolution Games mentioned that they were always looking for new designers so I asked if I could give it a try. We decided to start with "Kernstown" and that is how I first spoke with Rick Barber. While I was just starting with Kernstown, GMT released Hermann's "Longstreet Attacks" game and it ended up at Revolution Games. I managed to join with Fred Manzo and Steve Poitinger in play testing the game (which had initially caught my eye in the first place).


Longstreet Attacks Counters


Testing "Longstreet Attacks" lasted for eleven months, and it was a great introduction to game design and development. With guidance from Hermann Luttmann and Roger Miller (Revolution Games), we played, tweaked, replayed, tweaked again and then moved on to the next scenario. When we got to the final full battle scenario, we had to tweak a few more things and so we then went back and rechecked the smaller scenarios just to make sure that they still worked. It turned out to be quite an experience and I will always be thankful for being allowed to join the group.


Speaking of the group, I traveled to Gettysburg to meet with a few of the guys and that is how I actually met Rick Barber. Since I live outside of Pittsburgh, PA, I could drive over to the Harrisburg area, pick up Rick (he didn't drive) and take him down to Gettysburg. Wow what an experience that was; Rick was truly an artist and that first trip into his basement to see all of his maps was amazing. First of all, how he could do all of his great mapwork in a dark, cramped basement that looked more like a hermit's cave than an art studio was a mystery to me. Once his mother passed away, he moved everything up to a much larger, light and airy studio but that was probably only for 18 months before he passed away.


More importantly, walking the Gettysburg battlefield with Rick was truly an eye-opening experience. Instead of concentrating on monuments, statutes and cannons, Rick pointed out the lay of the land and some tips on how to read it. Right after the first controlled burn around Little Round Top and Hood's attack route, Rick and I visited the field with a last draft of the "Longstreet Attacks" map. Since the ground had just been burned two weeks before, we were able to walk and observe what Hood's men crossed as they headed for the Union forces. As I walked that ground with Rick's map in hand, I was truly amazed at how many details that Rick got exactly right. If Rick put a tree line on one side of a hex, it was there; if there was a large rock on the map, there was a large rock on the field too.


Once I started to look at the land like a cartographer, it was like I was back at Gettysburg for the first time. I still checked monuments and cannons but now I was looking at the line of sight and lay of the land issues. I changed my focus towards mapping issues and now I try to get to all the battlefields that I may use in a game. I get a much better feel for the fight because books and maps are great but little things lurk on the actual battlefield that are important for game design. Besides making for a better game, looking at a battlefield this way makes visits to familiar battlefields new again.


Using those lessons, I went to Kernstown in January of 2017 and then a number of times during the summer. I got to meet a nice group of people  (Kernstown Battlefield Association) who are working hard on preserving a smaller battlefield and doing a good job at it. I was able to apply Rick's "eye" to my observations and then report back to Rick on how his map matched the actual land. Since the core area to the west of the Valley Turnpike is still saved, Rick got that ground right. The ground to the east of the Valley Turnpike has been graded and developed so that had to be drawn from old maps; overall I like Rick's work on Kernstown.


Kernstown Map


My next game was "Thunder at Dawn" (Wilson's Creek) and that ended up being the last map that Rick Barber worked on. He sent the final copy in to Revolution Games two weeks before he died. While that was going on, I worked with Hexasim on Quatre Bras and their combined game that included Ligny. In addition, I worked on "Fire on the Mountain" with John Poniske and Legion Games. Finally, I continued to work with Hermann Luttmann on "The Devil To Pay" with Tiny Battles and "A Most Fearful Sacrifice" with Flying Pig Games.


"A Most Fearful Sacrifice" was another 11-month monster project and it included Rick Barber's last map on Gettysburg. Though it took forever to complete, Rick hand drew and colored the 60" x 41" map and he really created a masterpiece. As for the process, Mark Walker was extremely generous in allowing us to do pretty much whatever we wanted. If we wanted different hats for the Iron Brigade, "sure". Add dog mascots to the appropriate counters, "why not". Tweak the uniforms for various units, "let's do it". The graphics for the game really deserved their CSR Award.


As for the switch from chits to cards, it was really very simple. We started out with chits but by the time that we realized that there were over 30 chits in the cup for day one alone, it was time to do something different. Hermann wanted to do cards and so we made the switch. As it worked out, it was one of the best changes that we made to the original "Blind Swords" system. After the numerous changes, we decided to change the game system name to something based on "BS". Since Dan Sickles' unusual move was something totally unexpected, we went with "Black Swan" for those utterly irrational events that just seem to crop up throughout history. As we kept testing the scenarios over the 11-month period, we kept raving over how much we liked the game. Though there was more than one comment that we "were preaching to the choir", the CSR Awards were a nice affirmation that we indeed created a great game.


Both Beautiful and Big!


After "A Most Fearful Sacrifice" was finished, Mark Walker asked Hermann if he wanted to do a simpler series of games for Tiny Battles Publishing and Hermann was kind enough to ask me to join in; hence the "Shattered Union" series was born. Trying to use some of the key parts of the "Black Swan" system, these games are supposed to be faster playing battles at a lower price point. Hence, they lack a mounted map board or extravagantly detailed counters but they should be fairly easy to understand if you are familiar with the "Black Swan" system. Hermann's "Champion Hill" was the first game and he also took Fredericksburg. I got "Conquering the Valley" and Gettysburg-July 4th. After some discussion, the Gettysburg-July 4th game became another scenario for the second printing of "A Most Fearful Sacrifice" and I decided to do Brawner Farm (2nd Manassas) on a demi company scale.


Using Rick Barber's cartography lessons from Gettysburg, I surveyed the ground at Brawner's Farm for two days. I spent two days walking the ground at Fredericksburg and bothering Frank O'Reilly with detailed questions about the ground there. He was extremely helpful and I passed my notes onto Hermann. Finally, Rick Barber gave me a name of one of his contacts who lived in Port Republic and so I traveled down there in August of 2017. Rick's associate was both a gamer and a very knowledgeable resident so I got a VERY detailed tour of the grounds. After his day tour, I spent the next day re-walking the ground and taking a few hundred pictures of the lay of the land. Since it took five years to finally get the game published, I am glad that I took those pictures to remind me of certain quirks on both battlefields.


Though Port Republic is the final battle of Jackson's Valley Campaign, Cross Keys is really more than just a prelude to the key battle. If the bridge over the North River is burned, Jackson's force is in serious trouble and even if they win, they probably cannot get to Richmond in time to help Lee during "The Seven Days". Union General Fremont was very aggressive in his pursuit of Jackson but once Jackson turns to fight, Fremont suddenly becomes very cautious. If he had been much more aggressive at Cross Keys and damaged Ewell's forces there (especially the "Louisiana Tigers"), Jackson may not have had enough fresh troops to defeat Tyler at Port Republic. With that being said, Cross Keys is more than an afterthought and is a battle worth fighting.


From my field survey at Cross Keys, there were a few things that stuck out. If you don't have a local guide, you probably would not find Trimble's ambush position for the 8th NY Infantry. It is just rolling farmland like many fields that you see driving through the Shenandoah Valley and if it wasn't for a small set of markers at the fence line Trimble occupied, you would never know that anything of any importance happened there. Another thing that stuck out was that Ewell's position above Mill Creek was VERY, VERY strong. Using Rick's "eye" training, it is very clear that Ewell's left flank is a much easier route to attack. The only problem with this route is that it is the furthest point from the North River bridge and even if you push Ewell back, he will just retreat towards that bridge anyway.


The key to the whole fight was the ridge that Ewell occupied behind Mill Creek. Here actually walking the ground and remembering Rick's guidance really paid off. Ewell's line was perched along a ridge that rose up from Mill Creek. The ridge is VERY steep and you needed to put your hand on the ground in order to balance yourself as you scrambled up the slope. It had to be nearly impossible to load and fire a rifle while making the climb. As it turned out, there was a small logging trail that started at the base of the ridge on Ewell's right front and it then rose up the slope and finally reached the top of the ridge on Ewell's left. Though the Rebel skirmishers could run up the slope in order to get back to the safety of their line, any Union troops couldn't have maintained a line of battle as they went up the slope two by two. They also would have exposed their left flank to any Rebel infantry on top of the slope.


Picture from Conquering the Valley


One final problem faced the Union at Mill Creek, as they approached the creek, the ground sloped down towards the water which made it even harder for them to fire at troops on the top of the ridge. After actually looking at the lay of the land, you understand why the Union troops only attempted a half-hearted frontal attack. Looking at a map never would have shown these problems to a game designer.


Moving onto the Port Republic battlefield, the first problem that both sides faced was the issues presented by the North River, South River and the South Fork of the Shenandoah. It had been a wet spring so all three rivers were running higher than normal. The North River and the South Fork of the Shenandoah were impassable without proper bridging and looking at the actual rivers, it was clear that they were substantial barriers. The bridge over the North River was the only reliable way to cross and it turned out to be a key to the battle. On the other hand, the South River was a river in name only. When I actually saw it, I thought that Antietam Creek was more of a barrier. Rain swollen at the time of the battle, it was more of a problem so Jackson had a bridge made from wagons and his troops crossed that way. Still, it was a "wagon-bridge" and it became a choke point for the Confederate troops, which caused them to trickle into the battle against Tyler's Union forces.


Though Jackson burned the bridge over the North River around 10:30am and thus prevented Fremont's troops from linking up with Tyler's force, things could have been much different. Turner Ashby was killed a few days before the battle and so the Confederate cavalry was in disarray at the time of the battle. Some Union cavalry were able to ride into Port Republic on a surprise raid, captured some of Jackson's staff and almost snagged Jackson himself. They also had a chance to destroy Jackson's ammunition supply. Though their orders were to NOT burn the bridge, the cavalry captured the North River bridge and positioned their one cannon at the south end of the bridge. All Rebel forces were on the north (Cross Keys) side of the bridge and were cut off from their ammunition. Faced with advancing Rebel infantry, the Union cavalry decided to burn the bridge. The Rebel infantry charged into the covered bridge and somehow the Union gun managed to MISS the Rebels as they came onto the north edge of the bridge. The Rebels chased the Union cavalry off, put out the fire and saved their ammunition train. The "what If" scenario came very close to being the actual Battle of Cross Keys.


The final two points about the Port Republic battlefield would not be noted unless you actually walked the field; maps wouldn't have shown these key points. The first point is that there is a ridge running down the middle of the cornfield. Since the North River makes a hard left-hand turn when it merges to become the South Fork of the Shenandoah River, this ridge was obviously an ancient river bank. When we drove down Lewiston Lane, the road cut through this ridge and it became clear that this ridge was a substantial ground feature (easily 15 to 20 feet deep where the Lane cut through it). Add on any crops growing on it at the time of the battle and it clearly would have blocked Line-of-Sight from one side of the valley to the other. Hence for the infantry on the floor of the valley, they couldn't see the entire field. Once you were up on the Union artillery platform on "The Coaling", the ridge DIDN'T conceal troops or limit the artillery Line of Sight. Though high ground is always important, this Line-of-Sight feature made "The Coaling" the dominant, key position of the battle. Possess it and you could control most of the battlefield.


Close-up from Conquering the Valley


The last point was the actual size of "The Coaling". Though the modern woods may have encroached on the site, it still is a remarkably small ledge. There is room for guns but not much else. Also, the Louisiana Tigers route of attack is tough terrain, heavily wooded and a sloped hillside. The only advantage that they would have had is that once they came out of the woods, they would be able to rapidly close on the Union guns. It is all very interesting ground and if I hadn't actually walked and climbed it, no map would have been able to show me what was actually there.


It is an interesting set of battles and I feel that the game gives you a good idea of what all three armies faced during those two days in June of 1862. Ewell had the easiest job, just hold the Union off. On the other hand, Jackson had to manage getting his troops over the North River Bridge and to safety while also getting enough troops up the valley to win the fight against Tyler's Union force. I found it fun and enjoyable to create this game and hopefully others will find it enjoyable to play. Now on to Brawner Farm!


CTW


Tiny Battle Publishing:

Tiny Battle Publishing

Conquering the Valley:

Conquering the Valley | Tiny Battle Publishing

  7 WONDERS  EDIFICE EXPANSION   FROM  REPOS PRODUCTION A brief interlude to introduce the latest expansion for 7 Wonders  which Asmodee ki...

7 WONDERS: EDIFICE 7 WONDERS: EDIFICE

For your Wargamer, Toy soldier collector, MiniFig collector, military history nut. Reviews, interviews, Model Making, AARs and books!

 7 WONDERS 

EDIFICE EXPANSION 

FROM 

REPOS PRODUCTION


A brief interlude to introduce the latest expansion for 7 Wonders which Asmodee kindly sent me a review copy of.  I doubt that the core game needs any introduction, as it certainly seems to be a staple in every boardgaming club or games cafe that I've visited.  On top of that, the 2 player version 7 Wonders Duel is the game that I most often play in real-time online Euro-gaming. 
Edifice is for me a very satisfying addition, as I'm not greatly fond of those that seem to take over the main game or radically alter it.  
So, lets start with a quick look at the contents.  Familiar features are a few additional coins of value 6 and additional Military Conflict tokens and a score pad that includes rows for scoring when using any of the Leaders, Cities, Armada expansions and, of course, this Edifice expansion.  Pleasant, but nothing out of the ordinary.  There are three copies of the sheet that describes the effects of the two new Wonders that are included.  Both playing boards for these two, Carthage and Ur, are very attractively detailed. 

Carthage simply adds a new alternative choice of playing board that can be used with the core game and any of the many expansions.  The Ur board, on the other hand, in its concept reminds me very much of the Babel expansion, as it can only be chosen when the Edifice expansion is being incorporated into the game.
Finally, there is a single four-panel folder that contains the changes to set up when playing with this Expansion and, most important of all, the rules of gameplay introduced.  


In the latter respect it has further clear echoes of Babel in that players have the chance to share in constructing three Edifices [ok, buildings to you and me, but Edifice sounds more dignified in keeping with building Wonders!].  

The front of one Edifice [unbuilt] and the back of another [built]

There's a good range of 5 for each Age, from which one is randomly chosen for each Age at the start of the game.  Rules for when and how you can contribute to the building are short and clear and supported with some simple plastic building pawns to mark your participation.


If the building is completed within the specific Age, all those contributing immediately gain a small reward.  Of more significance is what happens if the building is not completed!  Then those contributing simply gain nothing, but those who didn't help at all suffer penalties.
All in all, I like this Expansion.  It's well presented, visually pleasing and easy to incorporate into the core game.  Two things are most important for me.  The first is that the rules have all the pleasing clarity of the original game and mesh perfectly, the second is that the effects are light and neither drastically change the game play nor, even worse, add scoring swings that overwhelm good strategic play.  So, definitely thumbs up for a welcome addition.


  Skies Above Britain by GMT Games  It is 1940 and Britain stands alone in Europe against Germany and Italy. So many books have been written...

Skies Above Britain by GMT Games Skies Above Britain by GMT Games

For your Wargamer, Toy soldier collector, MiniFig collector, military history nut. Reviews, interviews, Model Making, AARs and books!


 Skies Above Britain


by


GMT Games


 It is 1940 and Britain stands alone in Europe against Germany and Italy. So many books have been written about Churchill's 'Few' that I would be surprised if any grognard hasn't read at least a few of them. To either soften Britain up before Operation Sea Lion or to win the war all on its own, both have been put forward as German plans. The Luftwaffe is ready to take on the Royal Air Force. From Norway to the French coast Heinkel 111's, Dornier 17's, and Messerschmitt 109's are starting their engines to start flying over Britain. It starts with Aldertag (Eagle's Day) which was August 13th, 1940. The Battle of Britain actually started in July. Aldertag was the start of a massive German attempt to bring the RAF to its knees. Luckily for the free world the British won the battle. In actuality the Germans lost so many aircraft that they had to switch to night bombing at the end of the blitz. By the end of October 1940, the Germans had pretty much given up on anything more than nuisance raids. The British Spitfires and Hurricanes had won the day.  


 This is what GMT Games has to say about the game:

 "Skies Above Britain is a solitaire game depicting a Royal Air Force squadron of Hurricanes or Spitfires waging a desperate effort to disrupt and destroy German daylight bombing raids over southeast England in the summer of 1940. The player’s individual aircraft—each represented by a stickered block—must locate the incoming raid, intercept it, and evade or defeat swarms of escorting German fighters that usually outnumber you and whose pilots have superior experience and tactics. The game simulates the dogfighting and fighter-vs.-bomber action at an individual aircraft level using a card-assisted system that simulates key tactical decision-making without losing the feel of fast-paced aerial combat. A player can fly scenarios representing an individual patrol or use the patrol generator to create an endless variety of realistic individual patrols, multi-patrol campaigns, or larger campaigns covering the entire Battle of Britain. Each patrol will take a half hour or more to play, while a campaign can last anywhere between 6 and 28 patrols."


 So, the game follows in the footsteps of 'Skies Above the Reich' and 'Storm Above the Reich'. It is a solitaire game where the player tries to stop the German bombers at all costs. 


  This is what comes with the game:

1 Interception Game Board
1 Squadron Display Game Board
1 Me-110 Circle Display
4 Counter Sheets
1 Rules Booklet
1 Situation Manual
1 Optionals Booklet
3 Player Aid Cards
200 Playing Cards
1 Pad of Roster Sheets
2 Historical Log Sheets
1 Sheet of Stickers
38 Wooden Blocks
10 Wooden Cubes
1 Wooden Cylinder
2 Dice

 So, compared to the last two games in the series you now get to fly for the good guys. You also get to tackle bombers that are much less dangerous to your fighter than B-17s and B-24s were to the German fighters. Of course, your weaponry in 1940 is nowhere near the strength of the weapons on a 1944 German fighter. Your planes are mostly armed with eight .303 caliber machine guns, essentially the size of a rifle round. 


 The games in the series have two things in common. One, you are flying fighters against enemy bombers. Two, the boxes are heavy enough to start a curling routine with. Once opened, a cornucopia of items seem to come spilling out of the box. Looking quickly at the six decks, pilot logs, and all the other components might lead you to think "what have I gotten myself into", or "this is too much of a game for me". Then you get a glimpse of the three different rules/manuals that come with the game, and you are certain you have bitten off more than you can chew. Just relax and sit back and take a few slow breaths. It is nowhere as bad as it seems at first. 


 The first thing that you will look at upon opening the box are the above stated three rules/manuals. The Rulebook is sixty pages in length (remember to breathe). Even though it is the same size as most rulebooks it just seems larger to me. It is made with glossy paper, and it comes with wonderful extremely large printing. Everything about the Rulebook is big. On every page is a beautiful full color example of play or illustration to help you learn the rules. Next up, we have the Situation Manual. This has the different scenarios and is also chock full of example of play. It is fifty-one pages in length and is also made of glossy paper and has large print. The Optionals manual is produced the same as the other two and is nineteen pages in length. It comes with the optional rules and a historical pilot roster which can be copied and used. I think this is a very nice touch. Then comes a page and a half of Designer Notes followed by a nice sized bibliography. 

 One difference from the other games is that the German bombers come on large tiles, as counters, instead of them being on the game board. There are two full counter sheets of these large tiles. These represent the Heinkel 111, Junkers JU-88, Dornier Do-17, and Stukas that you will be trying to shoot down. Then come two more counter sheets. These are mostly 5/8" in size with some being as large as one inch. These come with either nicely done pictures of different fighter pilots, or the different control markers needed for the game. They are very artistic in their style and are some of the most pleasing to the eye counters I have seen. Next comes a small sticker sheet which are used on the wooden blocks that come with the game. These are just as artistic as the counters. The thirty-eight wooden blocks are mostly black squares that the stickers will be attached to. A small amount of dexterity is needed for this, unless you have some freeloaders (sorry, I meant children) around to do this for you. There are six decks of cards: Escort Reaction, RAF Advantage, Luftwaffe Advantage, Bomber, Tailed, and Head on & Tailing. These are heavier than usual cards that do not feel flimsy to the touch. The front of the card has one of the names above while the back shows you one or more example of how it is used. Then comes two card stock Pilot Rosters. On one side is a squadron with names and on the back are Squadron Logs. These Pilot Rosters are also historical for the 303 and 54th squadrons. You also get a pad of the same with no names of pilots or a squadron number on them. As I mentioned above, the addition of some historical names really helps with the immersion and is a great addition. There are three large folding Player Aids that are made of card stock. They are for the Interception Sequence, Pilots, Raid Vector Sequence, RTB Sequence, Intercept Bombers, Intercept Escort, Sequence of Play. So, everything is right at hand without having to peruse the Rulebook each turn, at least in the beginning. There is also a 'Circle Display' for the defensive maneuver that BF 110s used. Next is a small, mounted map with the Squadron Display on one side and the Advanced Squadron Display on the other. Last, but not least, is the mounted Game Board which is mostly taken up by the Interception Map. It also has some other charts and tables on it. These are exactly the type of manufactured components that we have come to expect in a GMT game. The heft of the combined components has already been mentioned for those of us who still give some credence to the weight of the box and its worth.

 
 Apparently, the idea of a Skies Above Britain for a game was not received by some as actually a game that could be designed. Here is a quote from Gina Willis, one of the designers:

"Call me stubborn, but the cold water that Mark and Jerry (Jeremy White and Mark Aasted designers of Skies Above the Reich and Storm Above the Reich) tossed on wishes for a "Skies Above Britain" only made me more curious to see if and how such a game really could be made to work."

 These two quotes from Gina Willis are about the design itself:

"Since German bombers depended more on escorting fighters for protection than their own armament, a Battle of Britain "Skies" would need to move the fighter-vs.-escort aspect of combat more to the foreground than it was in the earlier volumes."

"One new wrinkle was putting the bombers on moveable tiles instead of printing them in a formation on a board. Tiles on a tabletop could be removed or pushed apart to show disruption and attrition effects on bomber formations in a direct, spatial way."


 Some of the Optional Rules are:

Confirmed Kills - Bomber kills are recorded one for one. However, to show how many times claims were not accurate, four fighter kills equal one kill.

Weave - One section will fly above and behind as a lookout. This costs more fuel.

Random Events - Self-explanatory, and too numerous to list.

Cratered - Your aerodrome has been damaged and you must fly from a nearby one. Parts and replacements are not there, and no one can return from hospital.

Graduated replacements - This replaces the one pilot replacement after every patrol. It is done by die roll now.

 Some of these can only be played when using the Advanced Squadron Display. The Advanced Squadron Display adds more rules to the game. It is much like playing with basic and advanced rules.


 As far as my opinion of the game: do I like it? No, I love it. This next information will tell you exactly how the wargaming community in general viewed the game:

2022 Charles S. Roberts Awards Winners Announced
Best Solitaire or Cooperative Wargame:
WINNER: Skies Above Britain, GMT Games, designers Jerry White and Gina Willis

 That pretty much sums up my feelings as well. One of the best parts of the design is the fact that the Rulebook actually tells newbies "You don't have to read the whole Rulebook to start playing." Even with the number of things in the box and the three different rules/manuals, it is still an easy game to learn and to start playing. You can start the dogfighting pretty much right away. The way that the designers have added so much historical flavor to the game is also a wonderful bonus. Let us not forget the RPG part of the game. You actually feel for your small fighter pilot friends. To be able to, hopefully, follow them through a campaign let alone a single sortie is a sign of a great designed game. The tension in the game is palpable. Do you break off with your ammo getting low, or do you choose to go for that one lone bomber? Each of your decisions can be found to be the wrong one by the game's highly, (I cannot say intelligent), evolved matrix of choices the designers have given it. Just like in reality ditching your plane over Britain is usually followed by a safe parachute flight. However, woe to the poor pilot who has to eject over the Channel. This is one of those games where you look at the clock and see four hours have passed but you still sit and play a few more sorties. 

 Thank you so much GMT Games for allowing me to take Skies Above Britain out for a spin. I knew the history more from the German point of view rather than the British. This game has made me read some books that deal with the British side of the Battle of Britain. If that is all I got from the game, it is worth playing but there is so much more than that in this box.

Robert

GMT Games:

Skies Above Britain:

Link to the Rulebook:

My review of Storm Above the Reich:


They Came Only to Die: The Battle of Nashville, December 15–16 by Sean Michael Chick    I knew of the author long before I saw this book bec...

They Came Only to Die: The Battle of Nashville, December 15–16, 1864 by Sean Michael Chick They Came Only to Die: The Battle of Nashville, December 15–16, 1864 by Sean Michael Chick

For your Wargamer, Toy soldier collector, MiniFig collector, military history nut. Reviews, interviews, Model Making, AARs and books!


They Came Only to Die: The Battle of Nashville, December 15–16


by


Sean Michael Chick


 I knew of the author long before I saw this book because he is a prolific wargame designer, and a very good one at that. So, I was very curious to see how his writing compared to his game designing skills. Not that I really had a doubt in my mind. I just wanted to see how much of a crossover there actually was.


 The Battle of Nashville was certainly a battle that did not need to be fought. Lieutenant General John Bell Hood was in charge of the of the Confederate Army of Tennessee. Hood had started the Civil War in Virginia commanding a brigade of Texans. As a brigade, and later division, commander he was in the Army of Northern Virginia under General Robert E. Lee as one of its finest officers. He was wounded in the left arm at Gettysburg; the arm was left pretty much useless. Then his division was sent west with the rest of Lieutenant General James Longstreet's corps to fight under Lieutenant General Braxton Bragg. Hood fought in the Battle of Chickamauga where he was wounded in his right leg, and it had to be amputated. After his recuperation he was first made a corps commander under Lieutenant General Joseph E. Johnston in the Army of Tennessee. He then replaced him and became commander. So, he was a field commander of an army with only one leg and one arm and constantly in pain from his wounds. He fought the Union General William T. Sherman for the city of Atlanta and lost. At this time Hood came up with a plan for his Franklin-Nashville Campaign. In a nutshell, the plan was for Hood's army to go north and in doing so force Sherman to follow him. This did not happen because the size of Hood's army was no more than the Union troops defending Tennessee. This put into motion the terrible battles of Franklin and Nashville.


 The author shows us the background to the Battle of Nashville and also the history that led each of the commanders during it. He says that many times Hood has been excoriated in print and that he does not deserve it. He feels he was a commander who was put into a desperate situation and did the best he could under the circumstances. The situation that the Army of Tennessee was in, lacking almost everything that an army needs, even before their invasion of Tennessee, is shown to the reader. The actual battle and the terrible retreat that the Army of Tennessee faced in the middle of winter is explained in detail.


 The author also gives us little biographies of every commander that is mentioned in the text. The book is full of black and white pictures of the combatants and the different areas of the campaign. The one thing that I love are the maps. These are as clear and full of information as a reader could possibly want. 


 This is an excerpt from the book:

"Total Rebel losses in two days of battle were at
least 6,000 with 4,462 prisoners. Fifty-three cannon
were in Union hands. Federal losses were at least
3,000. With most casualties coming within a few hours
at the end of each day, Nashville had a fairly high loss
rate per hour. In addition, it was the most lopsided
victory achieved by an attacking army in the Civil War,
with the possible exception of Five Forks and Sailor’s
Creek, which involved fewer troops and casualties
than Nashville."

 
  The book ends with many descriptions and photos of what the intrepid amateur historian will find when going to the many historic sites mentioned in the book. I have read several of the great books that are in the Emerging Civil War Series from Savas Beatie. I am pleased to say that this volume follows in its older brothers' footsteps. This is a perfect introduction to someone who just wants an overview or a reader who plans to dig into the subject more deeply. Thank You Savas Beatie, for allowing me to review this very good volume on a little-known part of the war in the west.

Robert


Publisher: Savas Beatie


hpssims.com