STUKA LEADER
FROM
DVG
After the amazing package of the latest Warfighter WWII boxed games and the huge stack of expansion decks that I recently reviewed, I am again indebted to Dan Verssen Games for their generosity in providing me with not only a review copy of Stuka Leader but all seven expansion packs!
If you've followed my reviews, you'll know that over the years the Leader series in the air, beneath the waves and on land have been a familiar feature among the many games I've reviewed here on A Wargamers Needful Things and in some ways it's hard to do more than say, "Wow, they've done it again."
If somehow you haven't experienced any of these stunning games before, I'd suggest that you have a quick look first at both my earliest and my most recent review of the air games in the Leader corpus - links to which can be found at the end of this review. This will give you all the background knowledge to this excellent system and how it works. [For those of you new to the series and of an impatient disposition, I've copied in a lengthy extract at the end of this review that you might like to read now from my Zero Leader review that gives you an overview of the Sequence of Play.]
For those of you already familiar, I know it's been quite a lengthy wait for this much anticipated addition, but I hope you'll agree that, as always, your patience has eventually been rewarded with another amazing offering.
Component quality maintains the highest possible standards in all areas, with continued tweaks and additions that just add that extra touch of pizzazz.
It starts here with the mounted Tactical Display board where all the action takes place. The information is much the same, but presented with just that touch more detail and style. Where you will place your air unit and the opposing enemy units has been upgraded from a simple black or blue background to an aerial map image. This alone would be a nice cosmetic improvement, but the game comes with seven double-sided overlays to chime in with the many differing campaigns and locations you will be flying over. From heavily urban dock waterfronts to what looks like a bend in the Thames through London and on to a convoy probably in the English Channel, each adds an element of historical depth to the situation.
The turn track has been given just a little more clarity and prominence at the top left of the board and I love the sequence of holding areas illustrated with an ambulance, a fuel bowser and a supply truck, where you will place your medic tokens, fuel barrels and supply cubes.
As always there is a massive number of unit counter sheets, eleven in all, and five packs of cards encompassing the expected stacks of pilots (83 in total), Event Cards and Target Cards. The fifteen substantial Campaign sheets all on flexible A4 card stock, in fact, offer the ability to fight a massive total of 30 campaigns - all of which can be played as short, medium or long in turn length.
To help you in your choice of Campaign, the back of the Rule Book contains 2 Appendices, both of which list the degree of difficulty of each campaign ranging from Introductory level, through Standard and Skilled to Expert level. One Appendix records which German fighters and bombers are available in each year and the other does the same for Enemy Aircraft.
- not too surprising, it's a favourite of mine!
Of identical quality are four Play Aids: Key Terms, Hit Result Definitions, Player Help sheet and Skills, while the final two Play Aids: Stuka Dogfight and Turreted Bombers are substantial rigid A4 boards. Love the pic of Marlene Dietrich in the top corner.
The final essential form is the Player Log, which remains, for what reason I've never understood, on thin paper, but at least this time it has been upgraded to the same glossy sepia colour as all the other Aids.
Among these many items, I was particularly thrilled by the range of Target Cards. They cover so many tantalising situations from larger missions like bombing an airfield or radar installation to attacking a convoy of trucks or hitting an AA battery and even conducting an Air/Sea Rescue mission.
The rulebook remains almost identical in every way to previous Leader games that deal with the war in the air. The same high quality of paper and print is matched by the attention to detail in drawing all the many illustrations and examples from the appropriate German material, even to a smattering of quotations from the Luftwaffe flying ace, Adolf Galland. The rules, though detailed, are well-honed to perfection by now and continue to be in a layout that makes use of an exemplary use of white space. As a result everything progresses in meticulous order from a thorough explanation of components through Set-up and into the exact Sequence of Play and ending with Aces expansion rules. a single page of very simple options and ending with five pages of aircraft data.
Though you get a few brief Aces rules, to use them you'll need the last of the seven Expansion packs that DVG so generously sent me. Below is what each package looks like, before opening and unzipping.
They cover the following theatres of the war.
Expansion 1 Eastern Front 1
Expansion 2 Eastern Front 2
Expansion 3 Mediterranean 1
Expansion 4 Mediterranean 2
Expansion 5 Spanish Civil War
Expansion 6 What If?
Expansion 7 Aces
Despite there being several Eastern Front campaigns in the core box, I know that this is a focus I'll be drawn back to. Though for me first on my list to explore has been the Spanish Civil War expansion, a period I've repeatedly been drawn to both in historical accounts and novels as well as board wargames. Each Expansion pack includes a full counter sheet, a deck of cards containing mainly more pilots, but also a few Event and Target Cards and much to my delight not just one new campaign Sheet, but two! The sequence of photos that follow come from the Spanish Civil War expansion
There's no doubt in my mind that this is not just a fantastic addition to the Leader series, but for me it's probably going to me my preferred choice- that is unless we can have a Spitfire Leader or Hurricane Leader. Come on guys ... I know you can do it!
Extract from Zero Leader review detailing Sequence of Play
Most steps in this game are fairly quick and easy to execute, with one major proviso and that is the need for a very careful initial sorting of components. This is particularly advisable for all the Pilot cards, which, I suggest, need to be grouped according to some system that you feel comfortable with. No solution can cover all the multiplicity of year ranges perfectly. So, my own preferred, personal choice is by plane type and then according to the earliest year in which a given Pilot first appears.
As in all this series, there are 3 double-sided cards for each Pilot taking them from Newbie to Legendary level which you need to keep grouped together.
With Target cards simply keep them in numerical order, draw the numbers needed for a specific Campaign and make sure they get slotted back at the end of a game. Event cards are a boon as they are always shuffled at the beginning of a game!
For the many counters, the most important to sort are Site, Bandit and Bomber counters by year. Though not as necessary, sorting the pilot counters by plane type is very helpful, though small groupings by alphabetical order is a good alternative.
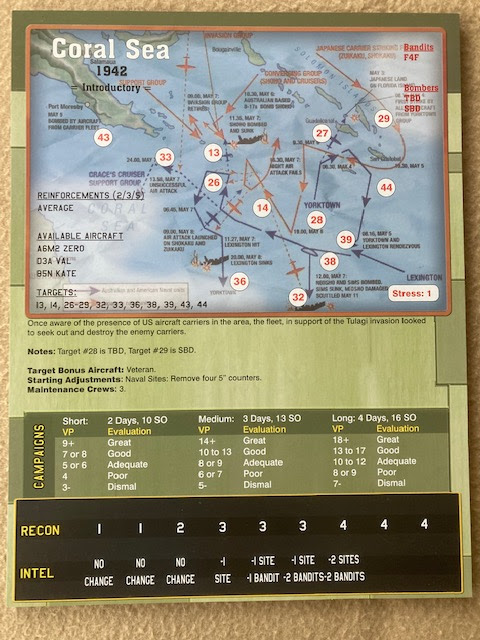
With that out of the way, you can get down to play where your first task is to choose one out of the fifteen Campaigns on offer. This is the identical number to those in the Corsair Leader game, though I was pleased to see a few different choices here. Each Campaign can be played for a Short/Medium/Long duration. As a starter, I'd suggest an Introductory Campaign such as Midway [a personal favourite] played for a Short or Medium duration. Next you'll select the appropriate Target cards as numbered on the well presented Campaign Card.
Among the many other details on the card are the types of Japanese planes involved and the types of Allied bandits and bombers, you may come up against.
Next you will select from among the named Pilot cards for the appropriate plane types and the year of the Campaign and the number of pilots allowed in your Squadron. The rule book supplies the latter information on the number of pilots as well as the typical experience composition for the appropriate year and Campaign duration. So, continuing as an example Midway and a Medium duration, I would choose 10 pilots made up of the following experience levels - 1 Newbie, 2 Green, 4 Average, 1 Skilled and 2 Veteran. It's also worth noting that all Pilots are also divided into two categories; Fast and Slow. This is important for combat, as will be discussed later.
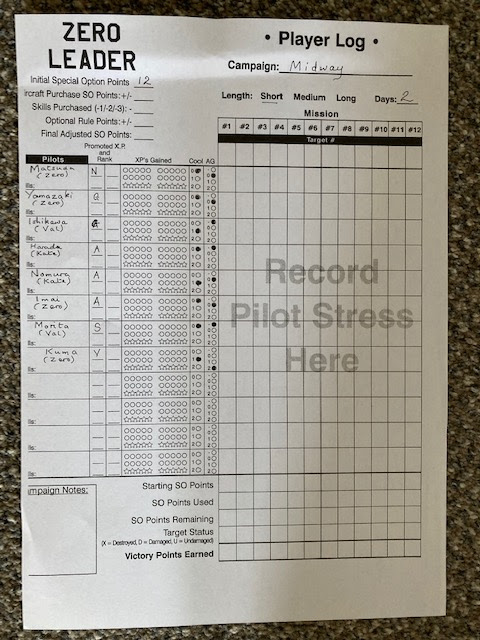
These details will be recorded on the Player Log [either a photocopy of the one supplied with the game or a downloadable copy from the DVG site] along with the number of Special Option [SO] points for the Campaign that allow you to further fine tune your Squadron by using them to upgrade experience or acquire specific skills to assign to individual pilots or improve the quality of a plane.
Above is a partially filled in Log for a short Midway Campaign. I tend to include the type of plane under the Pilot name. Each letter to the right indicates the pilot experience level and the black dots indicate in the first column the current Cool quality of the Pilot and in the second column their aggression. Apart from keeping the completed Logs as a reminder of a Campaign, they're very handy if you want to quickly assemble a squadron and you don't have time for making a lengthy choice of a new squadron.
The duration of a Campaign will tell you how many days the Campaign will last and on each day you will be able to fly at most one Primary Mission and, possibly, one Secondary Mission. Though the longer the Campaign the more pilots you will have in your assembled squadron, one of the delights/dilemmas/pressures of the game is how may pilots you assign to a given Mission. Obviously the harder the Mission the more pilots is a pretty obvious decision, but so many factors come into play that it is rarely an easy choice!
I'm now going to step you through the basic play Sequence.
PRE-FLIGHT
Draw target card[s] and select one primary Mission. Determine and place sites according to info on the Target card. assign Pilots to the Mission - later in the war you may have the option to select Kamikaze aircraft or Ohka pilots. Finally prepare for the Mission. This mainly involves choosing the weapons [essentially the bomb ordinance allowed by your plane] and drop tanks for added fuel. However, Situational Awareness counters and Samurai Spirit counters may be assigned if purchased or originally allocated as part of your Pilot's profile. Both obviously provide special benefits.
TARGET-BOUND FLIGHT
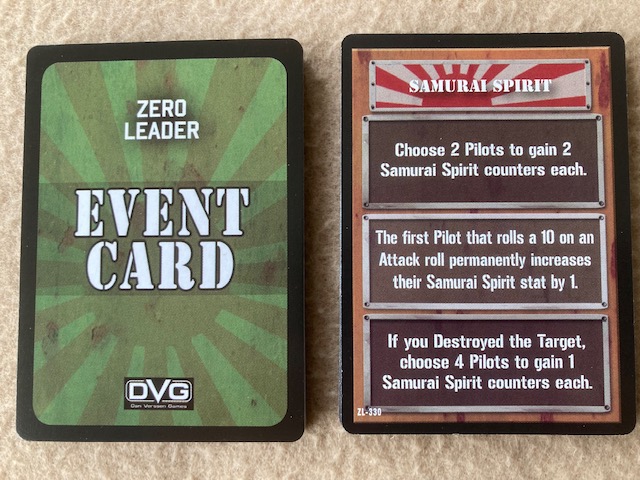
Draw an Event Card and consult the top box.
After the Event is resolved, you can even abort at this stage - but I've found making that choice is very rare, unless you are doing very well in a Campaign or conversely very badly!
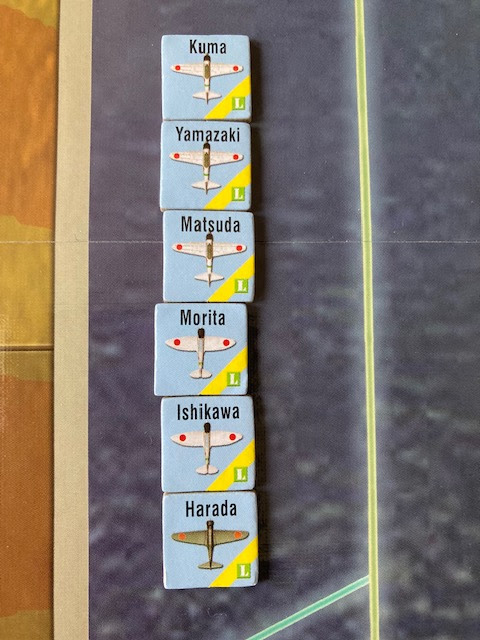
You then place your aircraft counters on the mapboard in one of the Pre-Approach Areas. You also have to choose the altitude of your plane [either High or Low], as unlike all the modern era Leader games you won't be able to change this later, unless you are a dive-bomber or a kamikaze!
Here's one occasion when I went for all planes in one Pre-Approach Area, but beware as you don't know the exact Bandit [i.e. enemy plane] composition in the Approach Areas yet. So, the next step is to draw them and you may get lucky and find that some of your draws may be No Bandits - great! On the other hand, there may be some nastier opposition than you expected - not so great!
Finally, you draw another Event card and consult and execute the instructions in the middle box and then place the Turn marker in the 1 position. You now have 5 turns in the next Phase in which to complete your Mission.
OVER-TARGET RESOLUTION
At this stage you have 5 turns in which to complete your Mission. Each turn follows the same sequence:
[1] Dive Bombers or Kamikazes dive to low altitude.
[2] Fast Pilots may make one attack on a Site, a Bandit or the Target - the choice will depend on the plane's location, altitude, appropriate range and weapon.
[3] Sites and Bandits attack
[4] Slow Pilots may attack
[5] All Pilots may move
[6] Bandits move
What happens will depend on whether you are in a Pre-Approach Area, an Approach Area or the Target Area. If in a Pre-Approach Area, not much more than moving your planes into an adjacent Approach Area or adjacent Pre-Approach Area is likely to happen. But once into an Approach Area or the Target Area things are guaranteed to heat up!
It is also here that the main complexity of play also increases and is the major difference between all the modern era Leader games and Corsair Leader and Zero Leader. That's because we're in WWII and DOGFIGHTING comes into play!
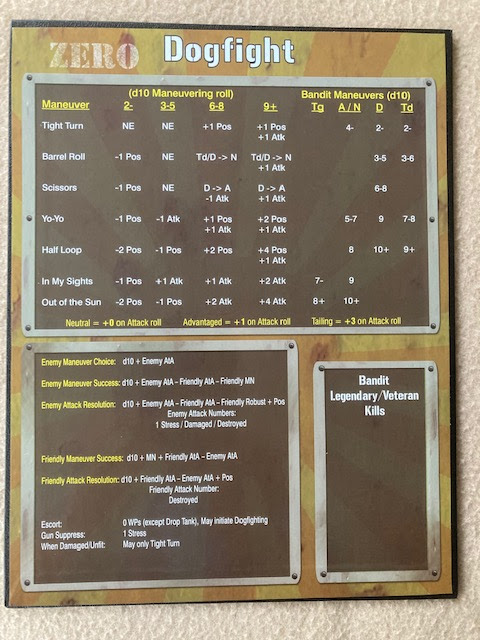
As can be seen it even has its own special mounted chart. Unengaged, Engaged and Positioning all play their part with a matrix of manoeuvres bringing a series of potential modifiers and choices into play. Some of these will also depend on qualities inherent on the Pilot card or Skills purchased with SO points. The element of Dogfighting was the one I was most looking forward to in this and its companion game. It adds greatly to the level of detail, but I must admit it does add significantly to the many small rules that you need to master to play the game well.
Herein lies the major complexity of playing Zero Leader. The basic stages and rules of the game are clear and fairly easy to grasp and retain without too much return to the rule book. However, the many skills, qualities and attributes when combined with the modifiers on the Dogfight chart and how they affect them, allowing usage of some and not of others can lead to a much greater level of checking and rechecking that I've got things correct.
Regular play of the game obviously smooths the path, but this is not a game that you can easily lift down from the shelf for the occasional and infrequent session. Play is engrossing and as always, a system which has named Pilots invests the action with an element of personal involvement as Stress levels mount, planes suffer damage and for some go down in flames.
Battling through the Bandits and the defensive sites in both the Approach Areas and the central Target Area, eventually you get a crack at the target itself which may range from a simple shore battery all the way up to a carrier.
This will have taken at least two or three of your five turns and so you'll find yourself with at the most three turns to destroy the target to gain your main victory points. Whatever degree of success you've had, however, the game's not over yet - there's still one last stage to work through.
HOME-BOUND FLIGHT
One last Event card is to be drawn and instructions on the bottom row of the card carried out.
In what's called a debriefing section, the success of your mission and the number of VPs gained is entered on your Pilot Log. The quality of your Recon and Intelligence abilities on the game board may be improved to give your future benefits in new missions. Stress gained by all your participating pilots is recorded. Experience points may be gained, leading to possible pilot promotion; stress may be recovered from and finally your Maintenance Crews come into play. Yes, you even have a chance to put in some repair work, mend damage that might have been taken and by rolling on a special table, you can even push your crews to additional work at the risk of them gaining fatigue and at the very worst making a mistake in their efforts.
The game may be played out on a very stylised and abstract mounted board, but a great amount of realistic detail of this brutal war is packed into Zero Leader. Consulting your Campaign success at the end of a gruelling 6 day Long Campaign from the VPs you've accrued may sound anti-climactic, but I can tell you it's not. There is a profound sense of satisfaction even if you've only achieved Adequate and just don't ask about what went wrong if the result is deemed Dismal!
LINK 1 Phantom Leader
LINK 2 Zero Leader





0 comments :