second chance games

Search This Website of delight

  The Deadly Woods by Revolution Games Designed by Ted S. Raicer    So, we have another Battle of the Bulge game to enter the fray. Three ba...

The Deadly Woods by Revolution Games The Deadly Woods by Revolution Games

For your Wargamer, Toy soldier collector, MiniFig collector, military history nut. Reviews, interviews, Model Making, AARs and books!


 The Deadly Woods


by


Revolution Games


Designed by


Ted S. Raicer


 So, we have another Battle of the Bulge game to enter the fray. Three battles pretty much flood the board wargaming industry: Waterloo, Bulge, and Gettysburg. Some would argue that enough is enough. Those same people might also like to eat turkey, ham, or whatever. You do not hear them being upset that someone has cooked their favorite meal again. To me, The Battle of the Bulge in wargaming is an acquired taste. It is one of those battles that one side has the scales all tipped in their favor. The German generals were pretty much in agreement that the plan was slipshod at best. Even Sepp Dietrich, rabid Nazi that he was, thought the plan was beyond the resources assigned to it. That, and the atrocious weather needed to keep the Allied planes grounded, also affected the ground troops of both sides. As it was, the German Schwerpunkt (main point of attack), the SS Panzer Sixth Army in the north, did not punch through the American lines. The American troops bled and died there on the Elsenborn Ridge to stop them. The deepest penetration during the battle was actually further south by von Manteuffel's Fifth Panzer Army.


 This is what comes with the game:


Components

22x34" game map

11x22" setup map

1 1/2 x 5/8" countersheets

Rulebook

Player aids

Game box or ziploc


This is a blurb from Revolution Games about The Deadly Woods:

"In December 1944 Hitler launched a massive offensive against the weakly held Ardennes forest section of the Allied front in Belgium. Achieving complete surprise, the Germans nevertheless faced tough resistance from the battle's opening days, and the offensive was virtually over 10 days after it began. Their followed a bloody Allied counterattack which gradually erased the bulge the Germans had created in the Allied line.

But you probably know all that. Yet another Battle of the Bulge game? Why yes. But one with a different approach. Specifically, award-winning designer Ted S. Raicer has taken a modified version of the chit pull system pioneered in GMT's The Dark Valley: The East Front 1941-45 and brought it west for an exciting new take on this classic wargame subject.

So another Bulge game, but one with the historical action and decisions of games with a much bigger footprint and playing time. And with a unique take on the chaos and friction of the battle that makes it a great choice for solo play. Even if you are bulged out, you'll want The Deadly Woods in your collection!"


 Exactly why do we want another Battle of the Bulge game? The key point to the information above is the name Ted S. Raicer. That name should get you to perk up your ears like a dog. ​

  
 As you can see above, the map is smaller than most Bulge maps at three miles per hex. However, this also means that a lot of the necessary items for play, Turn Record Track etc., have a place on the map. This gives the game a smaller footprint. The size of the map fits right in with the design for a smaller, easier to play, Bulge game. Not simple, just easier setup and shorter play time. The map itself is well done and is fully functional instead of heading in the artsy direction. It is after all a map. The game also comes with a small 'Setup Map' that makes it easier to see where the starting units are placed. The oversized hexes of the map allow the counters to be larger in turn. All of the unit counters are 1 1/2" in size. Their size allows all of the historical and pertinent game information to be read easily. The units that start on the board have their 'Setup Number' on them for ease in setting up the game. The other counters, out of supply etc., are still large at 5/8". We old grumblers always appreciate that in a game. The Rulebook is in black and white and is twenty-three pages long. The rules do not come with a historical background simply because this is a game about the Bulge. However, the Designer Notes are an interesting read. There are three Players Aids that are in full color and are hard backed and not just sheets. They are akin to the rest of the components in having large print. One thing I have to mention is the artwork on the box. For us grognards it might seem a bit strange. There is no Peiper or at least a Tiger or a Sherman adorning the cover. In fact, it is bereft of any soldiers or weapon of war. It is simply a picture of trees, mostly conifers, in a winter setting along with snow. After looking at it for a bit though, I get a bit of the foreboding that was put into it. What is in those trees? So, the cover as a piece of art is to me a really well done, suspenseful looking and feeling picture.


 The game is slated as playing well both for single player and two player games. I can attest that it plays well as a solitaire game. Most of the units have stepped counters, so there are not large amounts of counters to deal with each turn. A minimalist Bulge game is what we are looking at. This seems completely contrary to the norm in Bulge games. Usually, they try to go down to the level of individual tanks etc. I am jesting, but you know what I mean. Most come with four to five maps and hundreds if not thousands of counters. This game, although much smaller, has been able to add in all of the glitz of the Bulge as in:

Supply
Bridges: intact and blown
Divisional Integrity
Artillery
Airborne Units
Engineers
SS Withdrawl
Operation Greif

 The design is based on Mr. Raicer's 'Dark' series of games. Due to legality etc., the campaigns he is designing for Revolution Games will be called 'Deadly'. Beyond the name change, there is not supposed to be much difference in the play. So, anyone playing the Dark series should have no trouble understanding the Deadly series and getting down to playing them rather easily. The game is easy to learn and the rules are setup well. As the Germans, just as historically, you have to get the 6th SS Panzer Army moving. The 'easiest' way across the Meuse is at Liege. Of course, the Allies know this too, unless your opponent's map reading skills are subpar. As the Allies you have to hope that your troops can pull off another miracle at the Elsenborn Ridge. The game comes with two scenarios. The first is the 'German Attack' and it lasts six turns. The other is the "Campaign' which lasts twelve turns. There are nineteen Victory Point hexes with nine of them being across the Meuse. Do not, repeat, do not as the Germans expect to get there. There is a 'Sudden Death' victory for the Germans if they are able, at the end of any turn, to have five Victory Point hexes with a line of supply or have nine or more Motorized steps across the Meuse in the British Area in the north of the map. If you are playing the Attack scenario, the Germans win if they have four Victory Point hexes with a line of supply. If you are playing the Campaign scenario, the German player needs either two, if he withdraws the SS, or three Victory Point hexes with a line of supply if he does not withdraw the SS.

 The bottom line is that this is a refreshing take on the Battle of the Bulge. A relatively simple design, certainly not beer and pretzel, and it is a quick playing 'fun' game. Its small footprint allows for the player(s) to try many different strategies without having to worry about the space the game takes up. I can easily recommend this game to both grognards and people starting out in the hobby. Thank you, Revolution Games, for letting me review this game. Please check out their other fine games when you go to their website. 


Robert


Revolution Games:

Revolution Games | Main Page

The Deadly Woods rules in PDF:

1 (revolutiongames.us)

This is my review of 'Longstreet Attacks' another fine game from Revolution Games:

Longstreet Attacks by Revolution Games - A Wargamers Needful Things


 Cradle of Civilization Includes Two Games: Sumeria to Persia & Alexander vs. Darius by Compass Games     The ancient Near and Middle Ea...

Cradle Of Civilization by Compass Games Cradle Of Civilization by Compass Games

For your Wargamer, Toy soldier collector, MiniFig collector, military history nut. Reviews, interviews, Model Making, AARs and books!


 Cradle of Civilization


Includes Two Games:


Sumeria to Persia

&

Alexander vs. Darius

by

Compass Games


 The ancient Near and Middle East had a deep and centuries long history. Three of the West's largest religions had their birth there. The first law codes were written down and implemented there. The area had two of the four places around the world where civilization started to flourish first. It is pretty amazing to think that Cleopatra is closer to us than the people who built the pyramids. 


 So, Compass Games has bitten off a lot with two games in one box. We are used to having two games using the exact same rules in one box, but this is different. They have a civilization building game that goes from Sumeria to the Persian Empire. Then there is a totally different game about Alexander's successful attempt to conquer the Persian Empire. The first is listed as easy to medium on difficulty, and the second is listed as medium difficulty.


 I will tackle the Alexander game first. You have to read the designer's notes to understand the game. Their belief that Alexander's winning is not the cut and dried outcome that most have been taught. They think that Darius III had a good shot at beating Alexander except for getting some bad breaks. The worst of these was the death of his general Memnon very early in the contest. Memnon did not, unlike the Persian Satraps (governors), want to battle it out with Alexander. He wanted to use a Fabian type strategy against him. Memnon knew that in a straight up battle between the two forces the Macedonians would win. What he wanted to do was attack Greece with the huge Persian Navy, then always shadow Alexander and try to cut him off from home and getting supplies. In this game you get to see if it would have worked.


 The other game, Sumeria to Persia, is an altogether different  beast. Compass Games always knows where my armor is thinnest. I am a wargamer at heart, and they will have to hit a home run for me to get interested in this kind of game. I have played more than a few of this genre on a board or on the computer, but none so far has been able to keep my interest. So, let us see how they do. The Map board is the same for both games, and the counters only differ in what is pictured on them. Therefore, my assessment of the components will be done together. 


 This is the official Compass Games take on the two games:


Components:

One mounted map (22 X 34 inches)

Nine full sheets of large 0.65” counters

Two rules booklet

Six player reference cards

Forty-Eight Nation/City/Epoch tiles

Twelve 6-sided dice

One box and lid set

Complexity: 2 out of 10 (Sumeria to Persia), 4 out of 10 (Alexander vs. Darius)

Solitaire Suitability: 1 out of 10 (Sumeria to Persia), 7 out of 10 (Alexander vs. Darius)

Players: one to six

Playing Time: 3 hours


Game Credits:

Designers: Sean and Daniel Chick

Artists: Bill Morgal and Shane Hebert


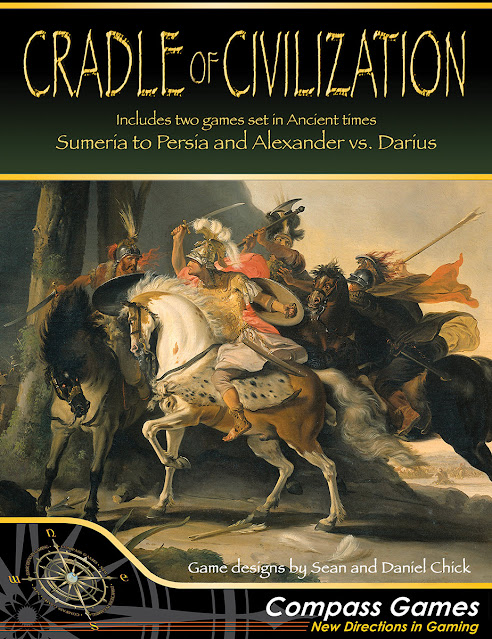
 The box is both heavy and large. It is the size and girth of a game that delights us gamers to open. Of course, you should never judge a book by its cover. However, we all do it. We love to spread out all of the box's contents and glory over it like a dragon over its hoard. 

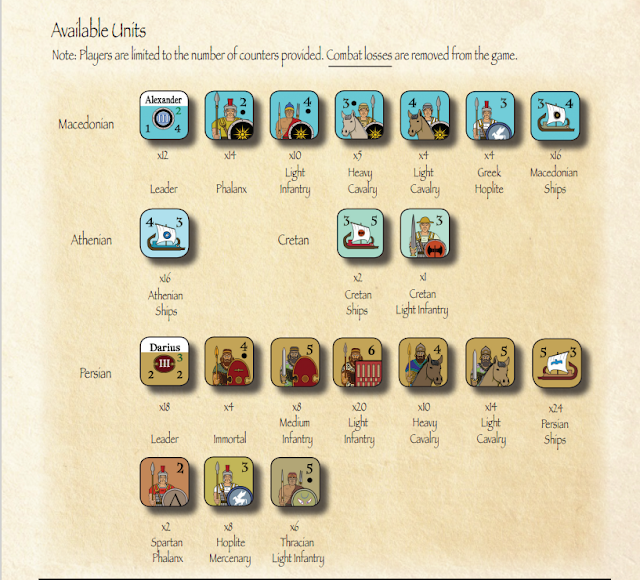
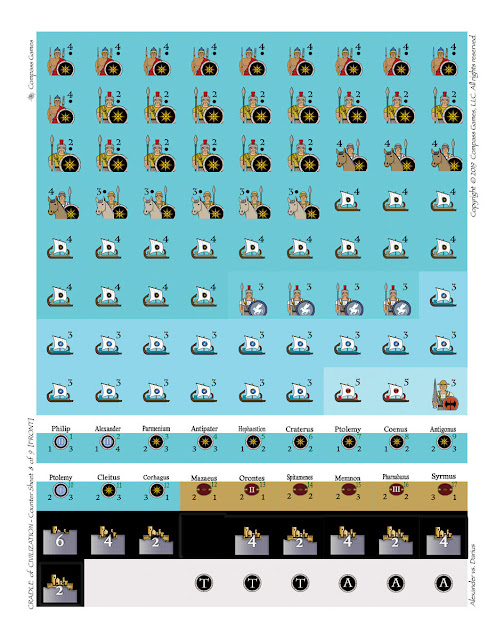
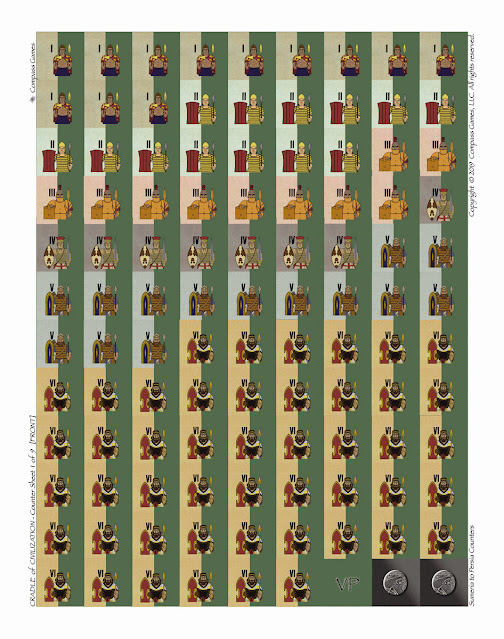
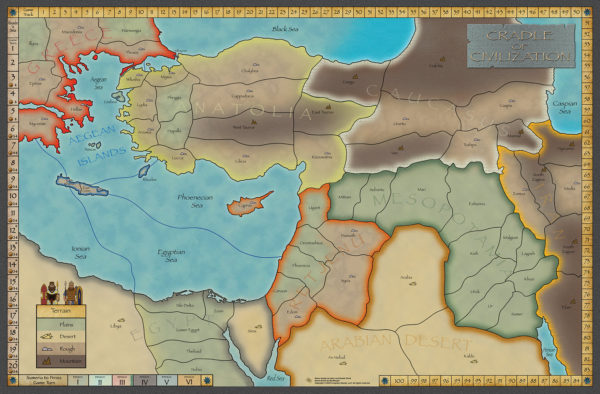
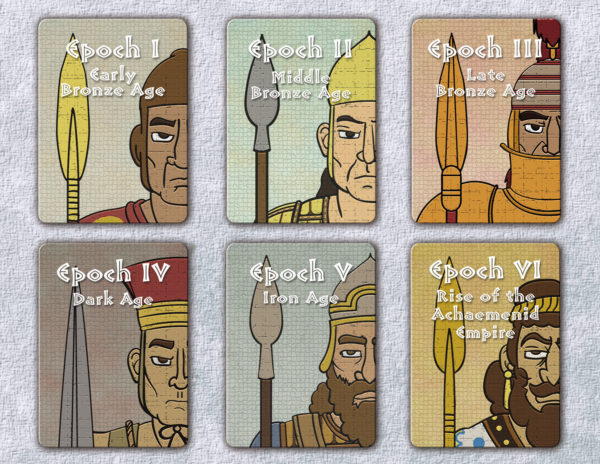
 As you can see above, the mounted map goes from Macedonia to the eastern parts of modern Iran. It folds out completely flat the first time you spread it out. The map is also very sturdy, so it should last through many games. Its colors are easy on the eyes, and still make it easy to see the different areas on it. It is subdivided for area movement instead of hexes. The counters have beautiful pictures on them. They are also large, and they come with the corners already clipped. As far as thickness, these are some of the thickest counters I have ever held. These are very easy to read and see even with old eyes. Now we come to the cards, or should I say clay tablets. The cards are the same thickness as the counters! I assume that they were made to look and feel like millennial old clay tablets. If that is what they were striving for, then Compass Games hit the nail on the head. If you sharpened the edges of the cards you could have some useful shurikens. The game comes with four sets of Player Aids: Two different ones for both Alexander vs Darius, and Sumeria to Persia. These are done in very hard stock, and could be easily used to swat flies. The writing is in large print and the sheets are colorful. Both games have their own Rulebooks. Alexander vs Darius Rulebook is twenty pages long. The rules are only nine pages long. The rest is taken up by the setups, Events Table, and the Designer Notes etc. Sumeria to Persia Rulebook is also twenty pages long. The rules for this game run a little over nine pages. A small write up about each culture in the different Epochs (there are six of them) makes up the rest of the Rulebook. As far as components, Compass Games has hit it out of the park. 


 These are two tidbits from the Designer Notes:

 "The idea for this game was born out of a moment of gaming frustration. In all my readings and studies on history and 
warfare I’ve found at least one historical truth: war is messy and its outcome uncertain. Alexander the Great is always held 
in such a certain esteem among military historians for his bravery and daring. He pulled off one of the most ambitious 
invasions in history and succeeded. His victory over the Persian empire is stunning in its entirety. Yet, Alexander’s victory 
is almost seen as inevitable. Persia is in disarray. Darius lacks military skill and daring. The Phalanx is dominate in the 
field. Therein lies a contradiction: How is Alexander’s victory over Persia simultaneously a great military endeavor and 
inevitable?

The design of this game was kept simple and accessible in order for it to be picked up quickly. The design of the battles 
are also kept simple, but also very bloody in its losses. I wanted a game that was fast enough to make sure almost every 
decision you make matters and must be weighed carefully but not too carefully. Playing it too safe will not win you the 
game. I hope I have succeeded in doing that and I also hope you enjoy this game.
As Alexander himself said “I am not afraid of an army of lions led by sheep; I am afraid of an army of sheep led by a lion.”


 I love, worship, and adore Ancient Wargames, and I have noticed exactly what the designer has. Alexander's Uncle went so far as to say, " I have fought men and Alexander faced women" (when he invaded Italy). However, I still accept the "great men" thesis of history. What happens if it wasn't Darius III on the Persian throne, or if Memnon hadn't died from illness? This is an excellent game to find out. It is also fast paced, so you can try more than one strategy on game night, or even have a few more games. The rules are simple to learn, while still giving you the flavor of the war. You also get to play with the world beating Phalanx, and Persian Cavalry (which if handled correctly could have given Alexander a run for his money). I think it says a lot that Alexander wanted to seem to be a legitimate King of Kings in the Persian Empire's eyes, and not just some barbarian usurper. He adopted almost everything of the Persian customs, and this is what probably got him killed (if not a pickled liver). Alexander vs Darius is fun even playing on the losing side. The Events Table adds a certain doubt in your mind for every move you make. This is the Sequence of Play of the game:

The game is divided into 20 turns. These turns represent 
each season over a 5 year period. Each player will take 
turns taking certain actions during these turns. The number 
of actions you can take will depend upon the amount of 
treasure you have to spend.

Phases
1. Generate Treasure
2. Take Actions Until Both Players Pass
3. Supply and Recruitment
4. Spartan Rebellion (Starting turn 3)
5. Maintain Armies and Navies 


 These are some of the events that you can get on the Event Table die roll:

Crete Aids Alexander
Illyrian Raids
Egypt in Revolt
Persian Court Intrigue
Poris Invades
Scythian Raids

 You will have to deal with rules about these and other subjects:

Sieges
Force March
Leaders
Out of Supply Armies
Maintaining Your Forces


 Sumeria to Persia is a different game. Here is Mr. Chick again with some designer notes about it:

"Sumeria to Persia is an update of sorts to the mechanics of History of the World, adding rules for wonders, colonization, 
and old civilizations still enjoying steady growth. The system, without modification, breaks down a bit with the Neo-Assyrian and Persian Empires. Both were massive. Indeed, Neo-Assyria enjoyed two periods of particularly robust growth, 
while Persia all but covered the map by the time the Persians were defeated at Marathon. The answer was to have both 
periods of Assyrian growth simulated, while Persia would cover only Cyrus the Great’s conquests. The Persian army is 
large, but its growth is erratic, making the choice of Persia a calculated risk. Any player who is behind will want them, but 
that is no guarantee of victory."

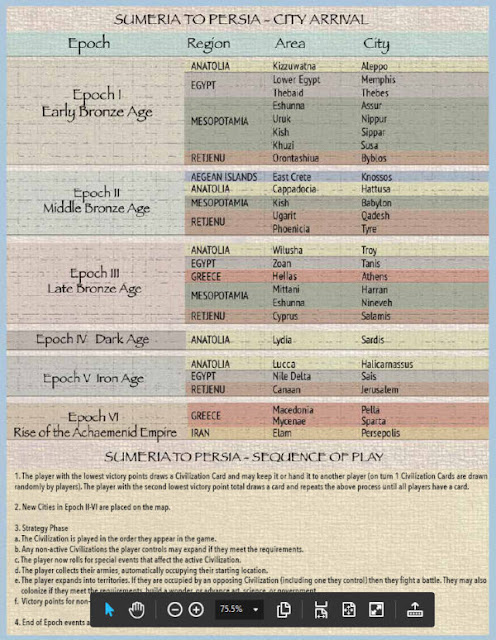
 This is the games sequence of play:

The game is played in six Epochs (or Turns). Each Epoch is 
divided into three phases:
 1) New Civilization Allocation Phase
 2) Strategy Phase
 - Player Civilization Rounds
 - Player Scoring
 3) End of Epoch Phase

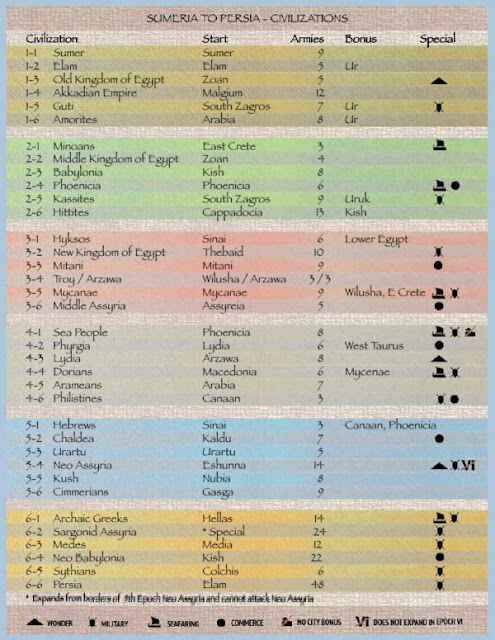
Sumeria to Persia was not really the type of game I thought it would be. It does have civilization growth and fall in it. However, it is also a game about conquering territory, which is right up my alley. My favorite part about the game is its sheer scope. I have seen games that had ancient Egypt, Babylon, and Israel in them as playable. have you ever seen a game where you could play the Mitanni? Here is a list of some of the nations/city states that you can play:

Sumer 
Elam 
Old Kingdom
Akkadian Empire
Minoans
Hittites
Hyksos
Mycenae
Troy
Assyria
Sea People
Urartu
Archaic Greeks

 Besides conquering, you also get Victory Points for building a Wonder, colonization, and advancing your culture. To try and build a Wonder you must take one of your armies out of play and challenge the fates with a die roll. 

 Once again, Compass Games has taken me to a place I never really had interest in before playing this game. Then they didn't just take me there, but ensured I had fun doing so. 


 Naturally, because of my wargaming bias, I prefer to play Alexander vs Darius. That is not to say that Sumeria to Persia is not a good game. The Epochs that it represents, especially the early ones, I am extremely interested in from a history point of view. How the 'Land of Two Rivers' became so important to the budding world is great stuff. Thank you, Compass Games for allowing me to review both of these games. I was very interested when I found out Sean Chich was one of the designers. I have a good number of his other games, and I felt with him you cannot go wrong, at least so far. On the games' websites below you can read both of the Rulebooks of the games. Peruse the site at your leisure. I have a ton of their games, and am in the queue for a good many more. 

Robert

Cradle of Civilization:

Compass Games:

While you are at Compass Games check these two upcoming games:


I am drooling over both of them.


  SOLDIERS IN POSTMEN'S UNIFORMS FROM DAN VERSSEN GAMES If by any chance the company Dan Verssen Games or the games designer David Thom...

SOLDIERS IN POSTMEN'S UNIFORM SOLDIERS IN POSTMEN'S UNIFORM

For your Wargamer, Toy soldier collector, MiniFig collector, military history nut. Reviews, interviews, Model Making, AARs and books!

 SOLDIERS IN POSTMEN'S UNIFORMS

FROM

DAN VERSSEN GAMES


If by any chance the company Dan Verssen Games or the games designer David Thompson are unfamiliar to you then you're in for a Christmas treat.  If you are familiar with this combination and haven't bought this game, then there may just about be time to make up for that lack and get it on your immediate Christmas list.

This is the third  design in he Valiant Defenders Series that began with Pavlov's House {PH}and was followed by Castle Itter [CI].  As such it is much closer to the latter than the former in scale and system.  It also continues David's Thompson's ability to find and focus on little known, but fascinating small scale encounters.  The first thing that intrigued me was the jump from the very end of WWII to the very first day of that war.

The game takes us to a desperate situation in the city of Danzig [now Gdansk] on the first day of the German forces' invasion.   Polish Post Office No. 1 was one of two locations with orders to defend and the game covers the single brutal day of its defence.  Unlike C.I. where you know that the outcome for the historical defenders was one of victory, this game is overshadowed by the knowledge that the historical day will end with the post office set on fire and the surrender of those surviving.  As with other of David Thompson's designs, there is an excellent companion booklet available to buy or download, as well as fascinating and extensive design notes.

Though much closer in appearance and design to C.I, Soldiers In Postmen's Uniform has a number of significant differences that make for deeper and more thoughtful game play.  This is reflected in the board and layout.

The left half presents the sort of aerial view used in CI; in the foreground is the L-shaped post office with a number of variously coloured tracks to show the advancing routes of the attacking German troops.  The right half is a schematic layout of the interior of the post office designed to show clearly the three levels - basement, ground floor and upper floors.  

As with the previous two games, the colour-coding between the two halves of the board provides the exact LOS [line of sight] correspondence that makes targeting so easy.  Nearly all the other physical components echo the previous games both in design and usage.

Square counters are used for the defenders, with the person's picture and name, accompanied by various data essential to game play.  These are mainly combat value, morale adjustment and special actions and attributes.  The colour of border to each counter distinguishes whether they are trained or postal workers or non-combatants.

The German units divide into circular Assault counters and square Support counters and, as always, there are numerous tokens covering action, disruption, suppression and movement along with morale, defence, weapons and ammunition tokens.  Finally there are the many cards that drive the German actions.  So far, so familiar for those who have the previous games, but I would say that even for those wholly new to the Valiant Defenders Series, this is still a very accessible system.  

All set up ready to play!
The structure of each turn remains the same: an Enemy Phase, a Defense Phase and a Clearance Phase. The Enemy Phase is the German A.I. phase governed by the draw of cards and then the Defense Phase is your player turn.  The main new development is that the whole game is now divided into three Attacks: Morning, Midday and Evening with three separate German card decks, one for each Attack.  Through the cards drawn either Assault units or Support units will be placed and various types of fire may occur.  The former are the round counters that include units such as leaders, riflemen and machine gunners.  As usual a die roll will place them on the initial  space of one of the four different coloured tracks.  Should that be occupied, it will cause each unit already on that track to move forward one space.
A closer  look at some of the punched units and markers

Several new details have been introduced.  The first is that not all of the four tracks are immediately in play.  This relates to the fact that the game divides into three Attacks, with the Germans taking different avenues of approach as the day drew on.  The second new element is that each track has an obstruction point.  When the first German unit reaches this barrier, it must stop and a new card the Grenade Bundle card is shuffled into the current Attack deck.  Any subsequent units will start to pile up at the barrier, until the Grenade Bundle card is drawn.

At that point a marker cube is placed to show the destruction of the barrier.  Following the logic of several other commentators on the game, I've reversed the process by placing the cubes to represent the barriers at the very start of the game and then removing each cube as the barrier is destroyed.  When the barrier goes, all the units that may have piled up at the barrier are pushed forward one space each.  
Rules explaining a breached barrier

Ultimately the Post Office will be breached and here comes the next most important change and one that introduces a whole new exciting level of action.  Previously that would be the end of the game - Defeat!  Now, the game does not end. Instead you play on until the last card of the current Attack deck has been played.  What then occurs depends on which of the three Attacks is taking place.

If it is Attack 1 or Attack 2 and there is at least one German Assault unit in the Post Office and one German Leader anywhere on the board, you shuffle all discarded cards and play through the Attack again until the end of the deck.  At this point check again. If there is no German Assault unit in the Post Office or there is no German Leader anywhere on the board, the Attack ends.  Having reached the end of an Attack, all adverse tokens, such as disrupted and exhausted, are removed and all your exhausted units returned to their fresh side, while German Assault counters are all removed from the board, but German Support counters remain.  Everything is then reset to begin the next Attack.

This new aspect of the game fuels a very different approach, where it becomes all important either to eliminate any attackers who enter the Post Office or eliminate every leader on the board by the end of an Attack.  The obvious outcome is that the game has the potential to take longer to play. This is counterbalanced by the introduction of a new "sudden death" defeat based on your morale level being forced down to zero.

However, should you have avoided a morale defeat and reached Attack 3, there are specific set up rules for German units and a special card introduced - the Fire Truck - which is shuffled into the final Attack deck according to where you are on the morale track track.  When this card is later drawn, it heralds the last turn of the game including a one-off Escape Phase, after which victory points are added up. 

To round up the picture of the changes, the Defense Phase instead of just giving you 4 Actions allows 4 units to move and then 4 different units to take one action each.  Combat is slightly more detailed, with the need for ammunition and weapons.  Having a building with three levels and specific entrances, plus fighting taking place within the building all add small extra details which minimally extend the rules, while augmenting the engrossing game play. 

There is an even greater sense of tension with the apprehension that you are always on the brink of disaster and, I confess, disaster is all too often the outcome for me.  Should you wish to pitch it at an even more difficult level, there's an excellent set of Tactics Cards, one deck for each Attack.  With these and variable additional German forces being set up on board at the beginning of each Attack, you can go all the way to Elite difficulty [or what I call Fiendishly Impossible!]
The three Attack Decks and their corresponding Tactics Decks

I think you can see that I'm 100% sold on this new addition to the Valiant Defense Series.  Provided you don't suffer an early Morale defeat, game play is longer and does demand more thought than Castle Itter, but it does so with only moderately more rules.  For me David Thompson has racked up another huge success that deserves to be in your collection.

Once again great thanks to Dan Verssen Games for providing a copy of the game to review.


 FIRE IN THE SKY FROM PHALANX From the close-up tactical air war in the Pacific soloing the Japanese in my previous review, we switch to a t...

FIRE IN THE SKY FIRE IN THE SKY

For your Wargamer, Toy soldier collector, MiniFig collector, military history nut. Reviews, interviews, Model Making, AARs and books!

 FIRE IN THE SKY

FROM

PHALANX


From the close-up tactical air war in the Pacific soloing the Japanese in my previous review, we switch to a two player strategic level treatment spanning the whole Pacific War.  This game is a  
re-implementation of the game originally published by MMP.  Inevitably, the comparable artistic qualities of both games have come under scrutiny, starting with the box art.  In terms of solidity and durability, the new edition wins easily, as it is both larger and far more solid.  Other than that it may be argued that all the rest is personal taste.  Having owned the original game, here are my views.

I much prefer the new box art in part because of the colour palate. I really did find the total yellow/ochre background of the original insipid and rather muddy.

While some found the minimalist art work stylish and effective, I prefer the archetypal image of carriers under attack and the dogfight in the skies of the new edition.
The maps too couldn't be more different.  The original was a strongly coloured, striking paper map which gave the feel of a more realistic aerial view especially with the many additional sculpted clouds.  Viewed by itself I rather liked it, but with the images of the bases on the map combined with the many counters, I ultimately found it overwhelming and not the easiest to read or identify locations.

The new mounted map sits at the opposite extreme.  A steely grey, it is both more sombre and more functional.  In the end, I've come to prefer it mainly for the greater ease of being able to read off at a glance where all the key locations are and for how the counters stand out against it.  Considering that this is a very long game to play as well, it's also much more restful on the eye.

Most important is that you can read locations' names when counters are placed on them.

The counters too have drawn mixed reactions, again largely through contrasts with those in the original game.  Once more my preference is for the new style which, like the map, I find easier on the eye.  I particularly didn't like the overwhelming pink of the Japanese counters and the white blossom emblem and the dominating image of the American bald eagle in the first edition.  No doubt if that earlier imagery really pleased you, then the new style may be less to your taste.

Criticism of the new counters has mainly focused on the blue of the US counters - a heavy negative view has been expressed that it is too dark and that the numbers lack distinction and so are hard to read.  As someone with not the sharpest [old] eyes, I considered them neither too dark, nor had any problems reading the numbers or symbols.

The second criticism - some quite vehemently expressed- is that there is a slight imperfection in some of the cutting as the next image reveals.
If you zoom in on the Interpid [sic]  Franklin, you can see what is meant.  Personally, this is no big deal and when on the map it is neither noticeable nor impedes play.  [If I was bothered at all it might be about the misprint of Intrepid!]  I mention this criticism merely for those who might have seen some of the more extravagant outbursts about poor quality control, which I don't think is justified.

For me the major improvement is the decision to make the naval units square, the air units hexagonal and the land units round.  This simple distinction is very helpful during play. Your mix of forces is obvious at a glance, instead of having to work your way through a uniform pile of counters.  Other simple physical aspects that I welcome are the attractive Task Force screens...

and the Battleboard, which continues the more restrained colours of this new version.

The final elements are the rule book and scenario book.  Both are a major step up from the typical average quality paper of the time to today's high quality gloss printing.  Also the layout has been much improved  in the rule book, though the rules themselves are [and here, I'm relying mainly on memory, as I no longer have the first edition] virtually identical.  The significant change is the doubling of Transport costs accompanied by a similar doubling of Transport available. This may seem a pointless exercise, but it does away with the first version's often occurring division sums involving fractions!

Rule and Scenario Books

On the face of it, the basic rules - a mere 16 pages - seem more than accommodating, especially when merely looking at their apparent brevity and well spaced layout, but this can be deceptive.  In part, this is caused first of all by the organisation of the rules into Core Concepts followed by the General Course of Play.  The former are often closely tied to the latter with information in the one being needed or relevant to understanding the other.  This doesn't help either in learning the rules or finding crucial aspects of them again, as you play the game.  

Each turn is based on the seemingly old-fashioned Igo-Ugo system, but the inclusion of a Reaction Phase introduces more interaction than at first appears likely, as does some of the asymmetrical elements of each player's turn.  

In  all, the Sequence of Play breaks down into ten Phases.  What happens and when can sometimes seem strange; for example the first Phase is Economic. In the Japanese player's half of the turn this allows the transfer of Oil Pts and/or DD units, whereas in the Allied Player's half of the turn the Economic Phase is totally different, as the Japanese Player may first undertake anti-submarine warfare followed by the Allied Player undertaking submarine action.  


There is a lot of novelty, both here and elsewhere.  It makes for a unique and fascinating experience, but it doesn't ease the learning process.   The next Phase: Reinforcements, for all its brevity, is not a simple matter and took repeated checking to make sure not only that I understood them properly, but that I realised the consequences of my choices.  Almost all the information pertains specifically to the Japanese player, while the Allied player is left by contrast with a very, very brief and simple set of actions.

Each Player's turn involves no less than five Phases that involve movement of one sort or another. For the Phasing player there are the First [Major] Deployment Phase, the Operational Movement Phase, the Return to Base Phase and the Second [Minor] Deployment Phase while the Non-Phasing player has a Reaction Phase,  which inevitably involves movement.  Each time there are mixes that incorporate different distances and requirements depending on type of unit whether air, naval or land, which Phase it takes place in and different numbers of Transport Points for both sides, while sometimes the cost of movement is paid for in oil but only by the Japanese player.  

Remembering accurately and consistently all the differing factors and qualifications is not only a formidable task, but one which I've found slows the game down considerably.  What I find even more frustrating is the lack of any explanation of the design intent behind many of the actions.  For example, the already mentioned Transport allowance is a very important factor and I appreciate the restraints and limitations that are imposed on both players.  Still I would like to understand better the reasoning behind some of the variations for each player.  Similarly, considering the significantly large distances involved in the sea hexes, I wonder why aircraft exert air zones that impact on and restrict the movement of naval vessels and supply lines.

With Movement itself so complex, it's no surprise that Combat is convoluted too.  Even the Submarine Attack Segment has three steps, before we even reach the Battle Segment.  The latter is divided into:- 
Battle Board Preparation Step
Air Combat Step [broken down into 4 stages]
Surface Combat Step [broken down into 4 stages]
Sea Control Step
Land Combat Step [broken down into 5 stages]
Administrative Step

The Battle Board is certainly both an attractive and useful feature that helps in this process.

This looks even better when units are laid out on it, but weaving your way through the steps and bearing in mind all the nuances of the rules is again a slow and steady process.

Units are divided into Carrier Task Forces and Bombardment Task Forces, while Naval, Air, Long Range Air and  Land units all have separate boxes on the Battleboard, if they are not part of a Task Force.  Fortunately, not all types of units and types of Combat occur in every battle that takes place.  What seems strange is that, despite a fair degree of complexity, air and land combat ultimately involves rolling modified fives or sixes to hit. 

Naval combat demands a different approach, amplifying a very familiar system from the classic Avalon Hill game, Victory In The Pacific [VITP]In this, one player - the one without Air Superiority - lines up his ships and the other matches one for one.  If one player has more ships involved than the other player, they can assign the excess ships in any way they wish. 

However, one side or the other can then choose to withdraw.  Though the player who chooses to withdraw relinquishes the ability to fire, any withdrawing ships that are faster than their attacker avoid being fired on - another feature seen in VITP.  If neither player withdraws, then fire is simultaneous, but unlike air and land combat, the hit number needed is found by cross-referencing Fire Power against Defence Rating. 

Up to this point, I had really liked this part of the system.  It involved no modifiers [hurrah!], yet took account in a simple way of different types of ships firing at each other.  However, now you have to look up the effect of the hits on each ship by rolling two dice plus any possible modifiers and comparing this with the ship's defence rating to see if it is damaged or sunk!

A smaller engagement, though still encompassing all types of combat

To add to all this, you have to calculate the differing effects of damage to carriers, to ships, to air units and to land units.  There are no simple consistencies across your forces as to modifiers, rules for influencing factors or how to calculate them or their effects.  Some damage causes losses to the Transport Pool, some damage causes a ship to be placed on the turn track, some damage causes a reduction in strength and so it goes on ...   

There are many cumulative elements and factors with no logical connections to make remembering them easier.  As a result I found myself checking and rechecking rules and constantly referring to the Player Aid card for modifiers.

The final substantial component of this game, the Scenario Booklet, is intended to help you thread your way through the rules.  As such, it might have been better to present them in reverse order and that is partly how I used them.  The seventh and last Scenario, Battle of Midway is just that.  It needs only the Battleboard and a very small number of units, mainly carriers.  Frankly I would have appreciated similar micro-scenarios designed to practice such things as Naval Combat or Land Combat and Amphibious Landings.  The next shortest [two Turns] is Scenario 6 Guadalcanal Campaign is billed as a short learning scenario too, but suffers from needing an additional series of special rules to explain rule elements that are not used. 

Scenarios 3, 4 & 5 [3 Turns, 10 Turns and 4 Turns respectively] reduce playing time by presenting portions of the whole game.  The latter also shortens play by using only a portion of the map.  Finally, Scenarios 1 & 2 present the war in its entirety, the only difference being that Scenario 1 [classed as the game's main scenario] omits Turn 1 : Pearl Harbour.

These large Scenarios would benefit greatly from Set-Up Play Aids to reduce set up time and help  sort out the many units and where they are placed on the map, along with the position of various important tracking markers on the board.  

Last and by no means least, as it is 17 pages long, is a massive Example of Play. [incorrectly labelled Scenario 2, it is in fact Scenario 1] that takes you through all of Turn 2.  Once again high hopes of its help were not wholly realised.  Despite its extensive thoroughness or perhaps because of it, following the information and understanding it, especially the numerical aspects and calculations, proves a major undertaking in itself.  Much of the time I found myself having repeatedly to sit, rules in hand, to make sense of how  the numbers were derived.

This is not a game for the faint hearted, nor is it one that can easily be taught by a player however familiar with the rules to someone who isn't.  Perhaps, if this were to be your go-to strategic level game for the Pacific war with expectations of frequent play, your efforts may be rewarded, but as yet they elude me.

As always many thanks to Phalanx Games for their kindness in providing a review copy of Fire In The Sky.


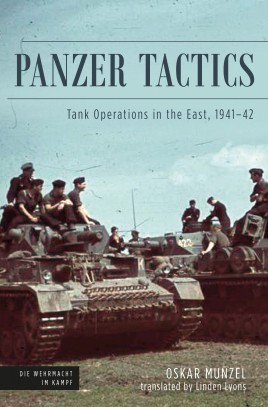
  Panzer tactics: Tank Operations in the East, 1941-42 Oskar Munzel Translated by Linden Lyons  This is part of a set of books that were wri...

Panzer Tactics: Tank Operation in the East, 1941-42 by Oskar Munzel and Translated by Linden Lyons Panzer Tactics: Tank Operation in the East, 1941-42 by Oskar Munzel and Translated by Linden Lyons

For your Wargamer, Toy soldier collector, MiniFig collector, military history nut. Reviews, interviews, Model Making, AARs and books!


 Panzer tactics: Tank Operations in the East, 1941-42


Oskar Munzel


Translated by Linden Lyons


 This is part of a set of books that were written in Germany in the 1950's, and 1960's. It was meant to be a history of World War II operations from the German point of view. Because of the Cold War, the NATO countries were all interested in the German accounts of fighting Russia. Considering they had the Warsaw Pact breathing down their throats, it is not surprising. 


 This author served in the 6th Panzer Regiment of the 3rd Panzer Division from June 1941 until September 1943. He rose to become commander of the regiment. After that, he served in several staff positions, and then became the commandant of the tank school. He commanded at the division and corps level before the war ended. In 1955, when Germany created the Bundeswehr in 1955, he became the commandant of the tank school once again. So, you can see he was the perfect person to write about panzer operations during the war. 


 The book is around 160 pages, and goes from the beginning of Barbarossa to the drive to the Caucasus and retreat in 1942. This is a history of the 6th Panzer Regiment, and in a broader scope, the attack of Army Group South during that period.


 The book is well written, and the translation seems to have been done very well also. It is an easy read for those who already have some knowledge of the Eastern Front in WWII, and specifically panzer operations. The book has twenty-one maps! The only caveat is that they are just copies of the original ones in German. They do, however, allow you to follow along with the author's prose to get a good look at the operations he is describing.


 This is a great work on a small slice of operations on the Eastern Front during the first two years of the war. It shows just how tough the Russians were in 1941 (the Germans lost about a million men that year). This is not a paean of praise for German troops. The author gives his thoughts on what the Germans and Russians did both right and wrong. Being a trained staff officer, he was appalled at the decision to attack toward both Stalingrad and the Caucasus at the same time. Thank you, Casemate Publishers for letting me review this very informative record of these operations.


 Robert


Book: Panzer Tactics: Tank Operation in the East, 1941-42

Author: Oskar Munzel 

Publisher: Casemate Publishers


 Against The Odds: A Journal of History and Simulation Rome, Inc. Issue #53  Against The Odds magazine has had a great history so far as the...

Against The Odds: A Journal of History and Simulation, Rome, Inc. Issue 53 Against The Odds: A Journal of History and Simulation, Rome, Inc. Issue 53

For your Wargamer, Toy soldier collector, MiniFig collector, military history nut. Reviews, interviews, Model Making, AARs and books!


 Against The Odds: A Journal of History and Simulation


Rome, Inc. Issue #53


 Against The Odds magazine has had a great history so far as the games that have come with the magazine, despite the fact that many wargamers slightly hold their noses up at 'magazine wargames'. Basically, if it didn't come in a three inch box it wasn't really a wargame.  Some of my greatest memories have come from playing magazine wargames, a few of them from games that came from ATO. Unfortunately, a lot of gamers look at wargaming magazines as teens look at Playboy magazine. They rip open the plastic just to find the game inside. A little like emptying the box of Cracker Jacks to find the prize. The articles that come with the magazines are just as important, if not more so, than the game inside. Yes, we are wargamers, but we were history nuts long before we found our first wargame (unless you were lucky enough to have a wargamer in the family). Here is a list of the written pieces that come in this issue:


The Whiff  of Grapeshot: This touches on the sweeping history of the issue's contents. This one also has a touching farewell to David W. Tschanz, a long time wargamer and contributing author. He also was a former editor of 'Cry Havoc'. Even while battling cancer he made sure to contribute an article on Marius's Mules.


Order of Appearance - Information on upcoming issues

Rome, Inc: The Roman Empire from Augustus to Diocletian, 27BCE - 286CE

 The Republic

 Julian Emperors

 Claudian Emperors

 Flavian Emperors

 Adoptive Emperors

 Antonine Emperors

 Severan Emperors

 Barracks Emperors

 Illyrian Emperors

 Appendix 1: Incorporating Rome

 Appendix 2: Bread & Circuses

 Bibliography

The above are all from the pen of Philip Jelley

On Guards : Who Guards the Praetorian Guards? - Philip Jelley

Gaius Marius and the Reform of the Roman Legion - David W, Tschanz

And the Data Shows:

  Good Pop, Bad Pop - This is Mostly About Some of the  Egyptian Pharaohs and Then Goes Into Louis XI, and Louis XIV of France - Ed Heinsman

Simulation Corner:

 War on the Installment Plan - This is About Resources/Money in Games - John Prados

The Fifth Columnist:

 In-Depth Book Reviews From Behind the Lines - John D, Burtt


So, you can see that there is a ton of history to read about between the covers of Issue #53. It is amazing at times the amount of nuggets that one finds in articles like these.


 The game that comes in this issue is Rome, Inc. This is a solitaire game that places the player as the CEO of the Roman Empire. Your job is to see the Empire through all of the tumults that can possibly happen during those years. Many times the threat to your plans will come from inside the Empire, and not from barbarians without. A good number of the Roman Emperors did not die in bed. You are sometimes stuck with an Emperor that you would probably like to get assassinated ASAP. This is what comes with the game:


Map - One full color 22" x 34" mapsheet

Counters - 280 full color 1/2" die-cut pieces

Rules length - 12 pages

Charts and tables - 2 pages

Complexity - Medium

Playing time - From 3 to 4 hours per scenario

How challenging is it solitaire? - Excellent

Design - Philip Jelley

Development - Dave Boe

Graphic Design - Mark Mahaffey


 This is one of ATO's blurbs about the game:

"You decide where to allocate resources (capital spending), raise new forces (hiring), undertake prestige projects (public relations), pleasing the mob (shareholders), or even setting aside a reserve for a rainy decade or two. You’ll need to blend military expansion with careful administration, as well as intrigue, making the most of what you have each turn, just like any modern-day business.


ROME, INC. will give you a new perception of how war is a cost, business is a benefit, and empire is somewhere in between. It’s up to you to find a balance."


 So, a solitaire game on a period of history that I am all too familiar with. Not by my own choosing, probably eighty percent of the books written about Rome are in the Empire period. I much prefer the Republican Era, but it is not like I am adrift here. I have a liking for a few of the Emperors. One of my favorites was a Thracian named Maximinus Thrax. He was a giant of a man that was the first Emperor to not be of the ruling classes. In fact, he was a lowly soldier that worked his way to the top. I also know that having an Emperor with a 'C' starting your name was not a good thing. Hence, Caracalla, Commodus, and Caligula (I know it is not his real name, in fact it means 'little boots', but everyone knows him by it). You also get to deal with some 'baddies' (from the Roman point of view). Queen Zenobia, who was a much greater threat to Rome than Cleopatra was. She actually conquered a good amount of Roman territory. She is hardly known about at all, compared to Cleo. 


 As the game states, "The player, a CEO of this vast corporate empire, appoints consuls and governors, raises taxes, deploys legions, fleets, and auxiliaries to garrison provinces, and fights wars to expand the prestige and power of Rome." I would add, to also try and keep the Empire alive. However bad the 3rd century was for Rome, the 4th was much worse. So, the player gets a break in only having to last until Diocletian. The game goes from the first Emperor Octavian (the other name will not be mentioned), to the emperor Diocletian.  With murder, and mayhem galore for roughly 300 years. My favorite Emperor story is Octavian wandering about the palace beating his head on the walls shouting "Quintili Vare, legiones redde ( Quintilius Varus, give me back my legions).


 One thing about the game that you need to know is that it is a 'big' game. 'Big' in the fact that there is a lot to do, not in space. Myself, and others, have been amazed when we opened the rulebook, and saw what we had bought into. I had really assumed that it would be close to a beer and pretzel game than the simulation it turned out to be. If you are not looking for an in depth simulation of the period, then look somewhere else. I would liken it to any other deep empire building game, which instead of building an empire, you try and keep this one off life support. I would say remember what Kenny Rogers said "know when to hold them, know when to fold them",  keep an eye out for the next great Emperor, and then try and keep him alive as long as possible.


 The game/simulation shows exactly how tough it was to keep the Empire in statis, let alone to try and conquer more territory. You do not want to roam about your house like Octavian. 


  The game is very deep, and dare I say, excellent. It shows you in an extremely small footprint the history of Rome in the first three centuries. Naturally, after the beginning setups in each scenario it becomes the history of your Rome. You will, however, feel all of the pressures that were put on the empire at different times. The scenarios are:


27 BCE Scenario

70 CE Scenario

138 CE Scenario

222 CE Scenario

Any of these may be combined into campaign games.


 The magazine articles are top notch, and they only lend to the player's feeling that "he has chosen well". Thank you, Against The Odds Magazine, for allowing me to take this issue's game for a spin. Thank you also for all of the deep history of the Roman Empire that you have crammed into your magazine.


Robert

Against The Odds Magazine

Against the Odds (atomagazine.com)

Against The Odds Magazine Issue #53

Against the Odds (atomagazine.com)


hpssims.com