second chance games

Search This Website of delight

  Piacenza 1746 by Europa Simulazioni  The War of the Austrian Succession engulfed Europe in 1740. The war was caused by many of the same ci...

Piacenza 1746 by Europa Simulazioni Piacenza 1746 by Europa Simulazioni

For your Wargamer, Toy soldier collector, MiniFig collector, military history nut. Reviews, interviews, Model Making, AARs and books!


 Piacenza 1746


by


Europa Simulazioni


 The War of the Austrian Succession engulfed Europe in 1740. The war was caused by many of the same circumstances as the War of the Spanish Succession. Before each of these wars all the European Powers were given a treaty to sign to stop any conflict that might arise from the succession in each country. The War of the Austrian Succession was preceded by the 'Pragmatic Sanction'. This was a law to allow a woman (shudder, gasp etc.) to inherit the Hapsburg lands. Every European power agreed with their fingers crossed behind their back, or with a stone in their hand (extra credit if you understood that last part). The minute Maria Theresa assumed power in the Hapsburg lands, the war drums in Europe started beating. Like buzzards around a dead body, the different Kings of Europe wanted their piece of the Hapsburg pie. The war pitted France, Prussia, Spain, and Bavaria on one side, while Great Britain, The Dutch Republic, and The Hapsburg Monarchy were allied on the other. There were numerous other small allies on both sides. Most people associate the war with the rise of Prussia and the start of the legend of Frederick the Great. The war was actually fought in many places in Europe. The Battle of Piacenza was part of the Spanish and French attempt to take some of the Hapsburg lands in Italy. 


Player Aid Cards


 This is what comes with the game:


One Map (roughly 23" x 25")

One Sheet of Counters

Rules Booklet

Complete OOB (Order of Battle) and Uniforms Booklet

Three Player's Aid Sheets

Two Die


Map and Rule Booklet


 I have a good number of games from Europa Simulazioni and I am always impressed by the components and work that goes into their games. The map looks a bit like a cross between a period piece and a new Euro one. The actual paper, or possibly a coating, feels much more resistant to normal wear and tear than normal maps. I believe it will hold up to many years of playing. The map is also easy to read, and the terrain is easily discernable. There are three hard stock Player Aid cards. They are double-sided and are in full color. Three of the pages are in Italian and three are in English. The first has the Terrain Effects Chart and the Turn Record Track on it. The second has all of the Combat Charts etc. on it. The third contains the map and has all of the setup hexes for the different units. The Rule Booklet is twenty-four pages long and is in full color. The actual rules take up just over eighteen pages. This is followed by a Historical Context essay which is about the whole war, but mostly about the Italian theater of operations. Then follows the scenarios and some Examples of Play. The OOB and Uniform Booklet adds a lot to the immersion of the game. It also acts as a manifest to check for missing counters if something untoward happens. I left the Counters for last. They are exceptionally well done. I know I have used the phrase before, but these are really little pieces of artwork. The Strength Points are easy to read, and they are color coded for which formation they belong to. Great Work Europa Simulazioni!


Full Battle Setup. The Wooden Pieces do not come with the Game.


 This is an abbreviated Sequence of Play:


"A) Wing Selection Phase

Each player must choose a Wing Commander. Whoever

wins the die roll (see below), may decide to go with his

Wing Commander OR let the other go. These two Wing

Commanders must activate, one in step A.1 and the other

one in step A.2. Exception: in the first game turn, the

Spanish left wing begins, followed by the Austrian right wing.

A.1) Activation of the first Wing. Activate one of the

two Wing Commanders (see Wing Activation, 3.1 or

below).

A.2) Activation of the second Wing. Same as point

A.1 above.

A.3) Repeat from A1 with other two Wing Commanders

until all WC have been activated.

B) Reorganization and End of Turn 

B.1) Reorganization. Both players may try to restore

units to Good Order. See Reorganization, Par.11.4

B.2) Markers removal. All “Smoke” and

“Changing” markers are removed. Feu de Billebaude

markers are not removed.

B.3) Turn. Advance the current game turn and start a

new game turn.

C) Proclamation of the Victor. If the Austrian

Player does not obtain an Automatic Victory (see 13.2)

before the end of the last game turn, check whether one

of the two players has reached his Victory Conditions. In

this case, he is proclaimed the Winner.


Wing Activation

 a) Removal of Feu de Billebaude markers

Units of the activated Wing Formations may try to

remove the Feu de Billebaude markers (see 9.1.2).

b) Movement

Move all, some or none of the units of the activated Wing

Formations. For details see par.5.

 c) Bombardment

Bombardment by artillery units, as described in par.8., is

performed

d) Combat

Fire, Melee or Charge combats as described in par.9. are

conducted by one Formation at a time for the activated

Wing, in the order chosen by the owning player."


Play Close up


 This is a pretty amazing game for its size and length of rules. It manages to catch the feel of 18th century warfare as has been described to us in books. It has many rules that you do not see in other games of the same era. These are a few:


Wing Movement and Activation

Commanders in Chief

Capture of Commanders

Line Formation

Cavalry Refusal to stay next to an infantry unit

Stacking

Presence of Smoke

Cannon Failure

Infantry Changing of Ranks 

First Volley

Second Volley

Feu de Billebaude - It means 'Firing at Will', which in 18th century warfare is not a good thing. The unit would be firing haphazardly in any direction.

 These really add to the immersion of the players. 


 The game comes with four scenarios of varying length:


Full Game - 12 Turns

Scenario One - 5 Turns

Scenario Two - 5 Turns

Scenario Three - 3 Turns

 The smaller scenarios take place on smaller portions of the map. 


 The game has a little twist to the victory conditions. The Franco-Spanish player has to choose four geographical locations out of a possible eight. The Austrian Player is not told which of the four he picked. So, he has to assume that everyone might be needed for victory. If the Franco-Spanish Player only holds onto one, it is an Austrian victory. If he manages to hold onto two, then it is a draw. Three or more of his chosen geographical locations means he has won.


Another Closeup


 I am very impressed with this game, really a simulation, of a battlefield from over 150 years ago. You can really see the change of warfare from the charge of the pike to Napoleonic warfare. The battlefield is now ruled by firearms and cannons, but not that much has changed since the Campaigns of Marlborough, etc. Playing this game is like gingerly strolling through a minefield. Will your commanders activate? What happens if some of your cannons are no longer usable? What happens to your well-made detailed plan after the smoke of an 18th century battle obscures everything? The Friction of War is here in droves. I absolutely love historical simulation type games. Oh sure, a pundit or two will argue about the finer points. Let them; I will be busy having a great time playing the game, not discussing it.


 Thank you very much Europa Simulazioni for letting me review this very good looking and playing game.


Robert

Europa Simulazioni:

Europa Simulazioni (italianwars.net)

Piacenza 1746:

Europa Simulazioni (italianwars.net)


  Tarawa 1943 by Worthington Publishing  The name of this battle is normally given as Tarawa. However, Tarawa is an Atoll that comprises sev...

Tarawa 1943 by Worthington Publishing Tarawa 1943 by Worthington Publishing

For your Wargamer, Toy soldier collector, MiniFig collector, military history nut. Reviews, interviews, Model Making, AARs and books!


 Tarawa 1943


by


Worthington Publishing


 The name of this battle is normally given as Tarawa. However, Tarawa is an Atoll that comprises several small Islands and a larger one named Betio. Betio Island is actually where almost all of the action took place and all of the videos you see are about the fighting there. 


 The U.S, Navy had decided to attack the Japanese straight through the middle of the Pacific Ocean. This put Tarawa on a line between Hawaii and the heart of the Japanese Empire. The Japanese also understood that their base there was in the first line of defense of their Empire. The Japanese had been given about a year to erect their defenses on Betio to repulse any American attempt to conquer the Island.  This would be the first real island invasion of WWII that most people have come to associate with the actions in the Pacific. The 2nd Marine Division were to be the troops assigned to capture Betio. In a quirk of fate, the Japanese Yokosuka 6th SNLF (Special Naval Landing Forces, the Japanese version of the Marines) was to be the defender. The island was ringed with barbed wire and many mines and obstacles to slow any attackers so that they could be slaughtered on the beach.  The attack was made by the marines on November 20th, 1943. The island was blasted by the naval surface and air units. The devastation brought by the bombs and shells looked like not much could live on the island. However, the Japanese had dug themselves in so well that it was really only superficial damage. This was to be a recurring theme in other island attacks. One island was later described as looking like it had been picked up and dropped from 10K feet. Unfortunately, the Japanese proved themselves as masters of defense. Enough of the history. The stage is set for the battle.


 Tarawa 1943 is a solitaire card driven game where you take command of the U.S. forces attempting to invade Betio Island. This is what comes with the game:


Hard Mounted Map Board

USMC green wooden markers

Japanese yellow wooden markers

Labels for the markers

black cubes

brown cubes

Japanese cards

USMC cards

dice

Rules

Battle manual with history, examples, pictures, etc

Battle archive

Storage tray


 As you can see by the map picture, Tarawa 1943 does not have hex or area movement. This game is designed much like two other Worthington Publishing games I have played: Freeman's Farm, and Chancellorsville 1863. Your success in battle will decided if and when your troops will be able to move from their starting positions. 


Map close up


 The Mounted Map is 22" x 17" in size. Even though it does not have the terrain etc. that a hex map has, it still is a very good depiction of the island at the time of the battle. The Dice Results for the two sides' attacks are on it, as are the USMC Battalion Cohesion Tracks. The green and yellow wooden markers are all the same size and do not have any points or any other deformity. This also goes for the brown, yellow, and red smaller cubes (these are for bunkers, or to keep track of cohesion etc.). Next up are the Japanese and USMC cards. These are the standard size cards used in most games. The top part of the cards has the game information needed, while the bottom part of most cards has a historical tidbit about the battle. This is a really nice touch and adds to the immersion. The cards are not little masterpieces of art, but fully functional, with some of the writing a bit small. The Rulebook is in full color and is only twelve pages long. The Battle Manual is twenty-four pages long. The first seven pages have an explanation for each card you can play. The last seventeen pages contain an excellent history of the actual battle. One other nice touch is the inclusion of the 'Battle Archive'. This is a small pad to keep track of the results of each battle played. As you can see, the components are up to snuff.


Stickered Blocks


  The rules are short and sweet and easily understood. Keeping track of the Cohesion of the USMC is also straightforward. I know I have said this before in other games, but just because a game's rules are simple does not necessarily make it a simple game. Some games do not have heavy rulebooks but are still very deep. This is one of those games. You are given lots of choices of what to do with your cardboard Marines. The AI bot in this game works extremely well. It could be the designer and it could be the small number of units. Of course, it could be a combination of both. The game footprint is pretty much the size of the Map Board. The length of the game is not very long (30 cards in each deck). You can adjust the difficulty of the game by adding and subtracting Japanese Cards. There is also an Optional Rule to land on the other side of the island. This was where the Japanese expected an attack.


Marine Cards


 This is the Sequence of Play:

"Before the first round of the game is played, the Special
Landing Phase is conducted.

SPECIAL LANDING PHASE: This only occurs once during
the game. Make an initial Japanese fire attack roll of 4
dice against each of the USMC occupied wave 1 positions
adjacent to an occupied Japanese position. Any die roll
of 1 are treated as no result during this phase. This phase
is only conducted before the first turn of the game. No
cards are played for either side during this phase.
After the Special Landing phase at the beginning of a
game, a series of rounds is played in the sequence below.
Each round consists of one turn for the USMC player followed
by a turn with the play of the Japanese AI.

Draw up to 2 new cards from the tactics draw deck and
place it face up into the USMC hand of tactic cards.
Maximum of 3 cards allowed in the USMC tactics hand.
PERFORM ONE OF THE ACTIONS BELOW:
» Place a new wave
» Regroup
» Rotate Battalions
» Move
» Attack
Note: A USMC tactics card may be played before,
during, or immediately after this activation.
Check for exhaustion for any USMC battalion that reduces
below 6 cohesion this USMC turn.
If no tactics card was played, the USMC player may discard
1 tactics card from his hand.

JAPANESE AI TURN
Draw the top card from the Japanese activation draw
deck and place face up in the discard pile.
Follow all instructions from the face up Japanese AI activation
card.

Note: A USMC tactics card may or may not be played
before, during, or immediately after this activation.
Check for exhaustion for any USMC battalion that reduces
below 6 cohesion this Japanese turn.
PLAY CONTINUES IN THE ABOVE SEQUENCE
UNTIL THE FOLLOWING OCCURS:
1. Once the last Japanese card is played, the game
ends after the next USMC player turn.
Note: The USMC player gets one last turn after
the last card is played from the Japanese AI deck.
2. The game immediately ends when the USMC player
controls all island positions at the end of the USMC
turn."

 That, my good gentlemen, is the game. It seems pretty simple, does it not? Your biggest job is to decide what action you will take with your USMC units. Your job is to take the island. However, you must worry about your units losing cohesion and/or getting exhausted. 


Japanese Cards


 These are the Victory Conditions:

"USMC:
» Marines receive 2 VP per USMC controlled island
position.
» Marines receive 1 VP per Japanese card remaining
after USMC control all island positions.

JAPANESE:
» Japanese receive 2 VP per USMC marker eliminated.
» Japanese receive 1 VP per USMC battalion
exhausted.
» Japanese receive 3 VP for each Japanese controlled
island position.

VICTORY RESULTS
» If the Japanese tie or exceed the USMC VP total it is
a Japanese win.
Catastrophic USMC Defeat: The USMC 2nd
Division is effectively out of action for 2 years as it
is rebuilt. The US island hopping strategy is abandoned
and Douglas MacArthur’s slower strategy is
adopted.

» If the Marines have more VP than the Japanese it is a
USMC victory determined as follows:
» 1 – 5 VP = Marginal (Historical Victory)
» 6 – 9 VP = Moderate Victory
» 10 VP+ = Smashing USMC Victory

USMC Smashing Victory: The island-hopping strategy
is confirmed as successful and continues but is
sped up and the war is ended 6 months sooner,
some islands are bypassed and losses for the US
side are reduced as a result."

 Again, these are straight forward and easy to understand. The only trouble for the player is in getting those victory points. Do not be surprised if you lose. I have seen it posted by a lot of Grognards that this AI bot is a tough cookie. 

 Thank you, Worthington Games in letting me review this on the smaller side gem. The next game I review for Worthington Publishing is 'Keep up the Fire'. This is about the siege of the diplomat zone in Peking during the Chinese Boxer Rebellion. The movie '55 Days at Peking' is a good starting point for a backdrop to the game. Oddly enough for Hollywood it is fairly historical. 

Robert

Worthington Publishing:

Tarawa 1943:


  Imperial Tide The Great War 1914-1918 by Compass Games   There was always a dearth of World War I games. Because of the nature of the West...

Imperial Tide: The Great War 1914-1918 by Compass Games Imperial Tide: The Great War 1914-1918 by Compass Games

For your Wargamer, Toy soldier collector, MiniFig collector, military history nut. Reviews, interviews, Model Making, AARs and books!


 Imperial Tide


The Great War 1914-1918


by


Compass Games


  There was always a dearth of World War I games. Because of the nature of the Western Front trench system many players and designers stayed away from gaming the war. Oh, here and there were excellent games on the subject, but never the amount that the war deserved. In the last few years that has thankfully changed. Compass Games is mostly to thank for this change of events. They have released a large number of games, from the strategic level on down to the tactical level. These are:


 On the Strategic level:

The Lamps are Going out: World War I, 2nd Edition

Balance of Powers

An Attrition of Souls

Empires and Alliances

Europe in Turmoil, Prelude to the Great War


Tactical Games, The Red Poppies Campaigns:

The Battle for Ypres

Last Laurels at Limanowa

Assault Artillery


 Solitaire Games:

Raiders of the Deep: Uboats of the Great War 1914-1918

Zeppelin Raider


Do not forget these two that are coming up:

Western Front Ace1916-1918 - Solitaire

Death in the Trenches - Strategic


 They also carry this game from Australian Design Group:

Fatal Alliances - World in Flames game set in World War I


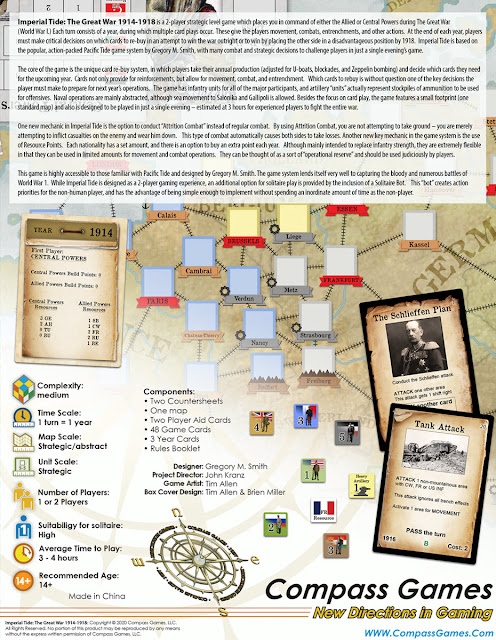
 This is what comes with the game:


One Rulebook

Two Counter Sheets with 216 Counters

One Solitaire Play Aid Card

One 22" x 34" Mounted Map

One Deck of 51 Cards

Two six-sided Die

There are three types of cards. These are Year, Central Powers, and Allied Powers cards.


 Sequence of Play:


Alternate card play or resource expenditure play. The first player is noted on the year card.

When both players pass without having played a card or used a resource point, the year ends.

At year end, any besieged forts are destroyed. Out of supply units surrender and are removed from play.

Put the next year card in the year card box. Zero out all resource points. Place new resource points per the new year card.

Receive the new year's cards for free and spend build points to rebuy previous cards.

Shuffle all the purchased, held, and new cards face down, deal two into two piles, and choose one pile randomly (or take the larger pile if uneven). The next turn starts.


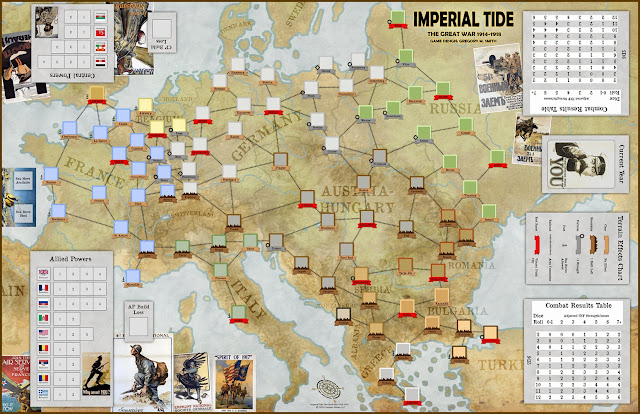
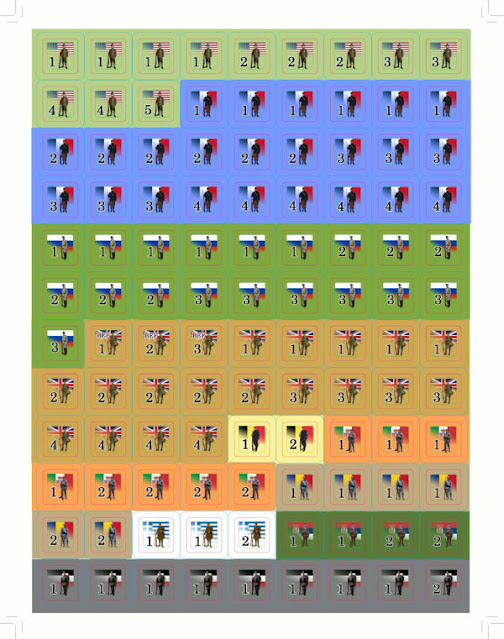
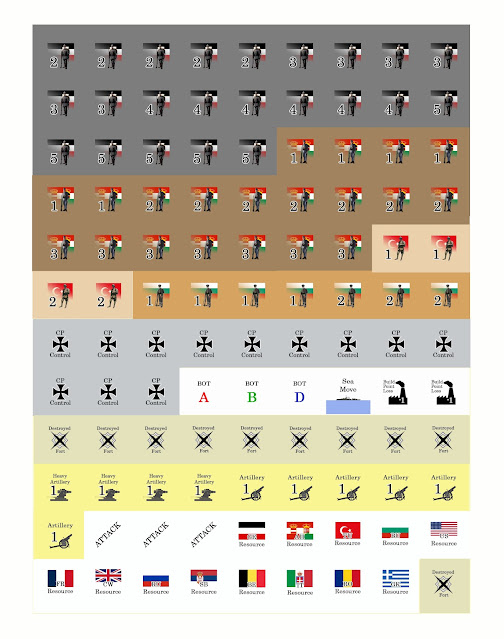
  Let us take a look at the components. The Mounted Map is very nicely done. It uses point-to-point movement so there is not much terrain on the map except for major rivers. The terrain for each point is at the bottom of each movement box. This makes it simple with no confusion. The Map also has all of the charts on it. So, you do not have to worry about off map sheets with tables. If you have room for the map in your playing space, you are good to go. There is only one Player Aid Card and that is for playing solitaire. A solitaire 'bot' or way to play is quickly becoming a must in our hobby. The Player Aid Card is two-sided and is made of hard stock. The Rulebook comes in color and is only thirteen pages long. It is easy to read and is written so that you will be up and playing in no time. There is also a page of a play example of the first year. The last page has the Designer Notes. I, like many others, love to read the thoughts of the designer of my games. The next part up is the counters. They are color and flag coded. They have generic numbers on them for strength, and they are large. They will pop out of the sprues in a small breeze and are pre-rounded. It might not seem like much, but the other day I bought an older game and was forced to pull out the old scissors and cut apart two counter sheets of small counters. I believe I now have Carpal Tunnel in my other hand. Compass Games components are some of the best in the marketplace. After dealing with the older counters, I was just so thankful that these counters were so easy to deal with. Next up is the Cards. These are your standard game size cards and have well done pieces of art on them. They are easy to read and simple to figure out. 


  So, what we have so far is: a strategic World War I game with very good components and a short, but informative Rulebook. It is a simple to learn game that has many nuances. The rules make you feel that you are playing a World War I game and not pushing Panzers around the map. By that I mean that is does not seem cookie cutter in play. Playing either side you will be forced to deal with the realities of early 20th century warfare. Naturally, this would be as the designer sees it. This game adds in the ability of both sides to use 'Attrition Combat'. This effectively just inflicts casualties on your opponent, but also yourself. However, this was used throughout World War I as a viable strategy. The game also uses Resource Points for each country in every year of the war. The design is meant for the player to use the Resource Points as an Operational Reserve for whatever use they are needed. 


 This is some of what Compass Games has to say about Imperial Tide:

"The core of the game is the unique card re-buy system, in which players take their annual production (adjusted for U-boats, blockades, and Zeppelin bombing) and decide which cards they need for the upcoming year. Cards not only provide for reinforcements, but allow for movement, combat, and entrenchment. Which cards to rebuy is without question one of the key decisions the player must make to prepare for next year’s operations.

The game has infantry units for all of the major participants, and artillery “units” actually represent stockpiles of ammunition to be used for offensives. Naval operations are mainly abstracted, although sea movement to Salonika and Gallipoli is allowed."


   The cards for each side explain to the players what effects they will have on play. These are some of each side's cards:

Central Powers:

Verdun
Poison Gas
U-boats Attack
Zeppelin Attacks

Allied Powers:

Messines Mine Attack
Miracle of the Marne
Brusilov Offensive
Salonika

The Year Cards show how many Build Points each side gets, along with their Resource Points.


 The gameplay is fast but deep and gives the player a lot of different options, while still putting on him the constraints of a commander in World War I. The designer, Gregory M. Smith, also designed the game Pacific Tide. So, if you are familiar with that game the learning curve is almost nil. Mr. Smith was looking to design a fun game that was playable in under three hours, along with sufficient depth to keep the players interested. I believe he has done just that.

 Thank you, Compass Games for letting me review this game. The next game I will be reviewing for Compass Games takes us back to the 18th century. It is 'War for America: The American Revolution, 1775-1782'. 

Robert

Compass Games:

Imperial Tide: The Great War 1914-1918:


  The Grass Crown by Hollandspiele   The Grass Crown was the Roman Republic's highest honor. It was given for actions that saved a legio...

The Grass Crown by Hollandspiele The Grass Crown by Hollandspiele

For your Wargamer, Toy soldier collector, MiniFig collector, military history nut. Reviews, interviews, Model Making, AARs and books!


 The Grass Crown


by


Hollandspiele


  The Grass Crown was the Roman Republic's highest honor. It was given for actions that saved a legion or the entire army. Some of the Romans honored with it are: 

Quintis Sertorius

Scipio Aemillianus

Lucius Cornelius Sulla (Felix)

Publius Decius Mus (received two Grass Crowns)

 The Grass Crown continued through the whole of the Republic to be thought of as the greatest achievement of a Roman. That is, until it was sullied and thrown in the mud when it was given to Octavian for being Caesar's heir or throwing up the most in his tent during a battle (sorry, just a bit bitter). This is why Hollandspiele chose the name The Grass Crown for their second game in the 'Shields and Swords Ancients' series. The Grass Crown is about battles during the Roman Republic.


Contents


 This is what comes with the game:


17" x 22" Mapsheet

(3) Countersheets

28-page Rulebook

12-page Battle Book

A Brief and Digressive (But Mostly Accurate) Military History of the Roman Republic, With Jokes, a 28-page supplement

(2) eight-sided dice


 This is the Hollandspiele write up about the game:

"This second game in the Shields & Swords Ancients series recreates ten battles spanning nearly three hundred years of Roman history. As was the case with the first game, With It or On It (2019), The Grass Crown is a fresh, innovative taken on familiar material. The primary unit of maneuver is a "Wing" which itself consists of ten or so individual counters. Losses can be resolved by flipping the individual unit that was attacked, or by flipping any unit adjacent to it. Unrelenting pressure in the right places can prompt a Rout Check, causing the line to collapse. As the result of a single attack, multiple units can find themselves in your dead pile.

This simple but compelling theme sees many variations thanks to special rules that chart the evolution of Roman warfare, and contrasts them with the rigid Greek Phalanx, the sophisticated army of Hannibal, and the ferocity of the Gauls.

The ten battles are: Heraclea, Asculum, Trebbia, Zama, Pydna, Second Citra, Vercellae, Pharsalus, Thapsus, and Munda."


The three counter sheets

 So, we have two battles with Romans against Pyrrhus. Then two with Romans versus Hannibal. The next two battles are of Romans versus Jugurtha in North Africa, and then against the Cimbrians. The group of ten is rounded out by three battles of Caesar versus the Republicans (Pompey, and Cato etc.). I understand the choice of battles, but I would have preferred to have one where Sulla is in charge and not just an underling to Marius (wow, that puts a bad taste in my mouth). The battles show the Roman Legions against a wide variety of different enemies. They face phalanxes, barbarians, and then other Romans, with various allies. I would also have liked to have Magnesia in the group, but it is essentially another battle against phalanxes. The game is also setup like the almost fifty year old SPI PRESTAGS games. Meaning, that with some reading you can come up with forces to play out any battle you want from these eras. 


 The components are your typical Hollanspiele ones. This means that we are going more for functional, rather than pieces of artwork. The map is a terrain free green one, made up of squares instead of hexes (more on this later). The counters are large at 9/16", and are both color and alphabetically coded. They are not 'busy' at all, and are very easy to read. The Rulebook is twenty-eight pages long and the insets are in color. The Battle Book is twelve pages long, and has the setups for the different battles. The last page of both the Rulebook and the Battle Book has the Sequence of Play, Combat Results Table, and other reference material. The Military History of the Roman Republic is twenty-eight pages long and is worth the price of the game alone. The illustrations in the book were done by John Leech (1817-1864). He was known for his work in the magazine Punch. They were originally used in the book 'The Comic History of Rome' published in 1851. They, and the writing, are hilarious. While the author, Amabel Holland, has her tongue firmly embedded in her cheek, it is nonetheless an accurate history. I read a history book of Rome by Isaac Asimov, and it is just as informative and entertaining as his book was. The components are all up to snuff. So, what about the game itself?


 As was mentioned, this is the second game in the 'Shields & Swords Ancients' series. After a while I fell in love with the first design. The non-use of hexes threw me at first, but it made a ton of sense in the end. You cannot expect phalanxes, or legions, to operate as 21st century skirmishers. 


  The first game, 'With It or On It', was about battles in Greece before Alexander the possibly Great. So, besides two battles that had the Persians in them (Plataea and Marathon) it was phalanx versus phalanx battles. The designer explains that the rules had to be increased for this game because of the difference between battlefield tactics and changes compared to the older battles in the first game. This game does show the growth and change that took place in the legions between the time period shown. Marius's Mules are much more competent and deadly than the Roman Armies faced by Pyrrhus, and possibly Hannibal. Rome was an eclectic society one all levels. Be they Gods, or battlefield tactics. The manipular legion though can be placed at the feet of Roman intellect, and it enabled them to rule most of the known world. 


 This is the Sequence of Play:


1. Command Phase

2. Action Phase

    a, Skirmish Phase

    b. Rally Phase

    c. Move Phase

    d. Combat Phase

3. Victory Phase

4. Initiative Phase


  There is way more to this game than meets the eye. When you first open the box, you might be thinking that this is a beer & pretzels game. In no way, shape, or form, is this one of those. One of the best things about the scenarios and the rules is that you can see the progression of Roman battlefield tactics, and their actual formations. I absolutely love it when a game can teach a player something. This does not mean that the game is just a boring rendition of history. There is just enough friction of war put into the mix to make the battles seem fresh each time. I admit I am a sucker for anything that games the Macedonian phalanx against the Roman legion. This game lets you play out those encounters to see the strength and weakness of each of those formations.

 One of the many innovative rules deals with 'brittle' units. When checking in combat if a unit receives an exhausted result the owning player must turn one of his units, or that one, to its reverse side. If it has two stripes, it is a brittle unit and is immediately eliminated. Just when things seem to be going your way a bit of friction will reduce you to a Nervous Nellie.


 I want to say thank you very much to Hollandspiele games for letting me review this, and other, games. I want to especially congratulate Amabel Holland for her design acumen and her sense of humor. This series of games is a must own for anyone who has the ancients bug. I see on BGG that an expansion is already planned with more battles and different units. Please take a look at all of their games, but especially the 'Horse & Musket' series. You will find many battles that have never been gamed before.


Robert

Hollandspiele:

Hollandspiele

The Grass Crown:

The Grass Crown – Hollandspiele

With it or on it:

With It Or On It – Hollandspiele


  Tolling of the Bell by Three Crowns Games  This is a game about the 'last' German offensive in World War II. Seriously, this is th...

Tolling of the Bell by Three Crowns Games Tolling of the Bell by Three Crowns Games

For your Wargamer, Toy soldier collector, MiniFig collector, military history nut. Reviews, interviews, Model Making, AARs and books!


 Tolling of the Bell


by


Three Crowns Games


 This is a game about the 'last' German offensive in World War II. Seriously, this is the last one. Last German offensives seem to keep cropping up like the Energizer Bunny. The Battle of the Bulge is sometimes called the last, also Operation Nordwind has been talked about with that sobriquet. On the Eastern Front, Operation Konrad (the relief of Budapest) has also been called the Germans' last offensive. Well, here we have 'Operation Spring Awakening', the absolutely, positively last German offensive. Operation Spring Awakening was carried out by the Heer's 6th Army, and the 6thSS Panzer Army. There were two other operations that the Germans tried to carry out. These were 'Icebreaker' and 'Forest Devil'. Icebreaker was an attack by the 2nd PZ Army, and Forest Devil by Army Group E. In Hitler's mind these operations would be able to break the Soviet Armies in the south and the German forces would be able to not only do this, but recapture Budapest, and then continue to reconquer Romania. It is amazing what tertiary syphilis or Dr. Morell could do to the mind. 

 This is the fifth game the Swedish company Three Crowns Games has produced in their WWII Battle Series. The others were:

Army Group Narwa
Konigsberg '45
Starguard Solstice
Plan West

 They also created the game Pax Baltica. Pax Baltica was released in conjunction with GMT Games. Revolution Games carries Narva and Konigsberg. 

 This is what comes with Tolling of the Bell:

One 23.5" x 33" (A1) full color map
Two dual-side printed countersheets (286 9/16" (15mm) counters)
One 16-page rulebook
Two single-side printed Player Aid Cards


Rulebook


 This is what Three Crowns Games say about the game:

Game Scale:
Game Turn: 2 days
Hex: about 3 to about 4 km
Units: Battalion to Division

Solitaire Playability: High
Complexity Level: Medium
Players: 2+
Playing Time: 3-10 hours
Note: Players will need to provide one 6-sided die for game play.

"Tolling of the Bell is taught in 30 minutes and easy to digest yet a challenge even for the more experienced players.
It utilizes a Command chit-pull system to activate HQ, which in turn allow their controlled combat units to move and attack."


Historical notes on one side of the Player Aid Cards


 If you have any of the other four games, you will know exactly what the components will be like. The map is very well done and is on high gloss paper. The map is mostly of the area south of Lake Balaton in Hungary. The terrain is easy to see, and you will not have to decide what terrain is in each hex. The counters are done with vibrant colors and are easy to read. They are also thicker than most counters. The two Player Aid Cards are of hard stock and in full color. All of the information on them is easy to read. The Rulebook is sixteen pages long. The actual rules are only thirteen pages long. The other three pages are for the game's setup, Designer Notes, and Random Events etc. It does also come with some Optional Rules. The Rulebook is in black and white. The components are very well done for a game of this price. 


Test Game


 This is the Sequence of Play:

Air Unit Phase
 Refitted Unit Return Segment
 Grounded Unit Refitting Segment
Random Events Phase
 Random Event Table Roll Segment
Command Phase
 Command Segment
 Movement Segment
 Combat Segment
Supply Phase
Reinforcement Phase
 Reinforcement Segment
 Replacement Segment
End of Turn Phase
 Out of Command Segment
 Turn Advance Segment


 The game would be recognizable to a wargamer from the 1970s. Albeit, with a good number of newfangled bells and whistles. The chit pull system adds to the fog of war enveloping both players, along with the Random Events that are possible. This is a wargame that a Grognard can sink his teeth into. I certainly wouldn't transition someone from Axis & Allies right into this game. That is not a knock, it is a good thing. The more real Grognard games the better. The weather in the game is both historical and a bit odd for a game. The weather for the first five turns is going to invariably be mud, not really something you would expect in a game about Panzer operations. At least both sides suffer the same effects from it. 

 The game's Victory Conditions are based upon city Victory Objectives Hexes. Each city is assigned its own value. The Russians and Germans both start the game with ten Victory Point Objectives. There are also Sudden Death Victory conditions. The player has to have a unit that is in supply in these hexes at the end of a turn. These are:

German Player - They have to occupy one of the bridge hexes across the Donau at either Dunafoldvaar, Baja, or Ercsi. 

Russian Player - They have to occupy either Nagykanizsa or Papa.

 The Tolling of the Bell is a very well-done wargame. Naturally, with it taking place in March of 1945 leads the German player having to do better than their historical counterpart. The German player is not going to be able to blitz his opponent, especially in the mud. As the German player you will need to play well to get more than a draw against a competent Russian player. The Russian player has four different types of victories. They are: Minor, Major, Overwhelming, and Triumphant. The German player can only get two: Propaganda, and Major. 


 For Grognards, the game is easy to learn and with the relatively small number of counters you should be playing in no time. This is the third game of the series I have played, and I have enjoyed all of them (Konigsberg, and Narva being the other two). Thank you very much Three Crowns Games for letting me review this game. They have two games coming up.

Iskra- Spark of Victory 1943

Mud & Blood, Lodz 1914


Robert

Three Crowns games:

Tolling of the Bell:


This is the opening scenario of the recently published A Most Fearful Sacrifice , the latest development in Herman Luttmann's Blind Swor...

AAR THE SLAUGHTER PEN AAR THE SLAUGHTER PEN

For your Wargamer, Toy soldier collector, MiniFig collector, military history nut. Reviews, interviews, Model Making, AARs and books!

This is the opening scenario of the recently published A Most Fearful Sacrifice, the latest development in Herman Luttmann's Blind Sword system for fighting ACW battles.  Though billed as a learning scenario, it gave a dramatic first outing with this superlative game.


The Slaughter Pen : Scenario 1

Gettysburg July 2nd late afternoon around 5 p.m.  Confederate forces seem to have made ground in their desperate assault on the Round Tops.  If successful this could unhinge the whole Union defence.


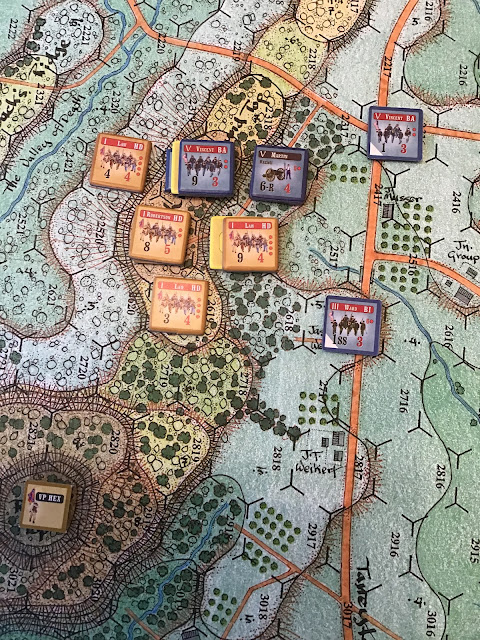
Events were soon to unfold an even more dramatic scene, as both sides witness their strongest units shaken by the loss of a colonel.  The first to recover seem to be the Union troops, as an element of Weed’s brigade suddenly appears on the lower slopes of Little Round Top.  This is rapidly followed by sight of Martin’s small artillery unit struggling to join them, while the strong, but shaken unit of Vincent’s brigade first moves onto the crest of Little Round Top and then recovers good order.  Offsetting this is the failure of Ward’s units to do anything and they’re soon to pay the price for their dilatory lack of action, as one group are fired on and fall back from their position.


A blizzard of bullets looks like a leader must surely fall, but when the smoke clears amazingly no one has been hit!  Hard on the heels of this comes the arrival of a Confederate courier.  Goodness knows what news he has brought, but all of Hood’s valiant troops, as one after the other the men of Law’s brigade surge forward. A new unit attempts the first assault on Little Round Top, but is forced back.  This is followed by a stronger unit crashing into a weaker Union force on the lower slopes and putting it to flight.  Heartened by this success they press on to attack the strongest of the Union units defending one end of Little Round Top.  Surely this is courting disaster!


To all the Union troops’ horror, this powerful unit is shaken and forced to retreat.  With part of the hill taken and Big Round Top already in Confederate hands from the previous hour’s fighting, Union hopes are looking slim.  To add to their woes, Ward’s small detachment of Sharpshooters is roughly handled and sent packing too!


A final renewed Confederate assault adds to the bill of slaughter and leaves the Confederates in what looks like an unassailable position with an hour of battle still left.


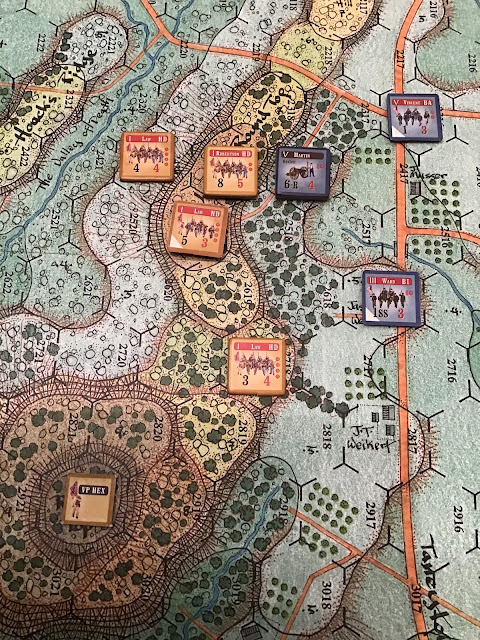
Can the Union still  snatch a pyrrhic victory by regaining full control of Little Round Top?  As 6p.m. arrived, Union artillery fire at last came into play and the strongest Confederate unit of Law’s brigade becomes battleworn.  This seems small consolation as in swift succession the remaining Union unit defending the peak of Little Round Top is first depleted and then shaken and forced to retreat.  Little Round Top is totally in Confederate hands.  Meanwhile Law’s battered Confederate force that suffered at the start of the hour sees its colonel hit and down, but against all the odds stands firm. Subjected to more fire it still holds, but a final assault forces it to retreat, but it does so by retreating onto the very peak of Little Round Top adjacent to its fellow unit.


Exhausted men everywhere can do no more and the remaining drama stutters to a close.   The Union force is well nigh destroyed and the Confederates hold the crucial ground.


Apologies for the lack of more pictures, as it was only the enjoyment of the game that led me to write it up as an AAR from the notes that I took during play. In the first photo, the yellow markers peeking out from under two of the counters indicate Shaken status.


hpssims.com