second chance games

Search This Website of delight

  TIME OF WARS EASTERN EUROPE 1590 - 1660 from STRATEGEMATA This latest game from the Polish games company, Strategemata, may signal clearly...

TIME OF WARS TIME OF WARS

For your Wargamer, Toy soldier collector, MiniFig collector, military history nut. Reviews, interviews, Model Making, AARs and books!

 TIME OF WARS

EASTERN EUROPE
1590 - 1660
from
STRATEGEMATA


This latest game from the Polish games company, Strategemata, may signal clearly the historical period covered and its location, but for most western gamers I suspect that does little to enlighten us.  Despite familiar names like the Holy Roman Empire, the Ottoman Empire, the Kingdom of Sweden and the Tsardom of Russia, we are very much taken to the eastern most regions that border the maps and wars that have featured in typical western Europe focused board wargames.  
Many of us have gamed the battles of Gustavus Adolphus during the Thirty Years War [which appears as an Event card], but few will have knowledge of Charles X of Sweden's later wars that are covered by one of the Scenarios in this game.  The other shorter scenarios reflect even more unfamiliar episodes; the Khemelnytsky Uprising and the Dimitriads Time of Troubles being perhaps the most esoteric titles!

However, in many ways I feel these shorter scenarios featuring two or three powers are essentially helpful learning exercises for the real essence of the game.  But at its core, Time of Wars is a multi-player game for five players and only five players.  Inevitably this may be a drawback for many potential buyers and so the several shorter scenarios offer some attraction for those who may rarely be able to summon the magic "five" to the table! 

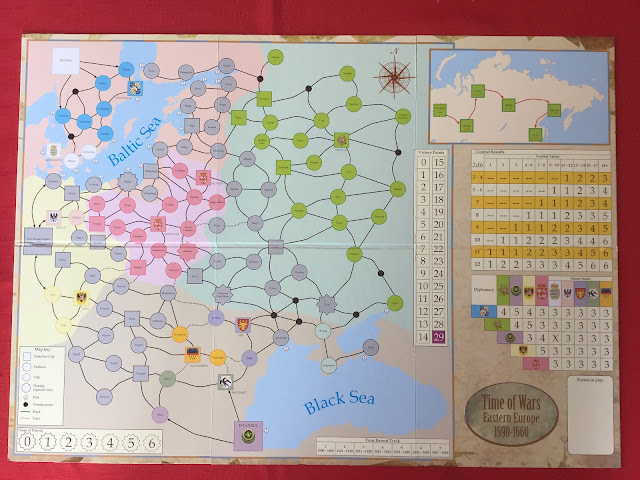
This multi-player game's antecedents are acknowledged in the introduction and designer notes.  The strongest influence is Here I Stand, which can be seen immediately on comparing the two games' maps.  Both are strategic maps in pastel colours with point-to-point movement between circles and squares.

 
Personally, I'm not a great fan of these blander colours, but have to agree that they do prevent the counters disappearing into the background as some games manage to do.

Both maps are equally functional.  Though overall slightly smaller in size, Strategemata's handsomely mounted map has the distinct edge. This is not only because of its looks, but because it contains a much larger, easily readable diplomatic matrix between the contesting nations, as well as the inclusion of the combat table and this all add to its playability.  
The rules too have striven to provide a more pared down experience with the obvious intent of overcoming the potential longeurs of many multi-player games.  Unfortunately, it has not managed to eliminate what I consider to be the main problem of this genre of game and that is the sheer number of small nation-specific rules.  Not only does this affect the initial learning process, but prompts the question of how to teach it to other players.  Here again, the shorter scenarios can serve a useful purpose, but I find the prospect daunting of sitting down to the task of providing a general overview to four other gamers who have little or no working knowledge of the rules.
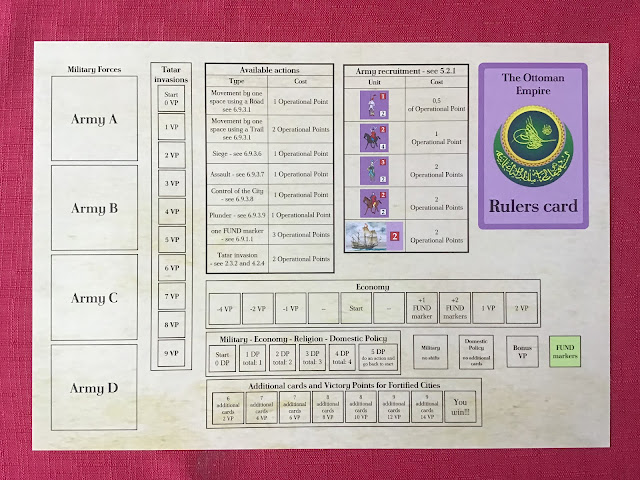
A starting point for this learning process is each player's SuperPower Sheet, as exemplified by that of the Ottoman Empire below.

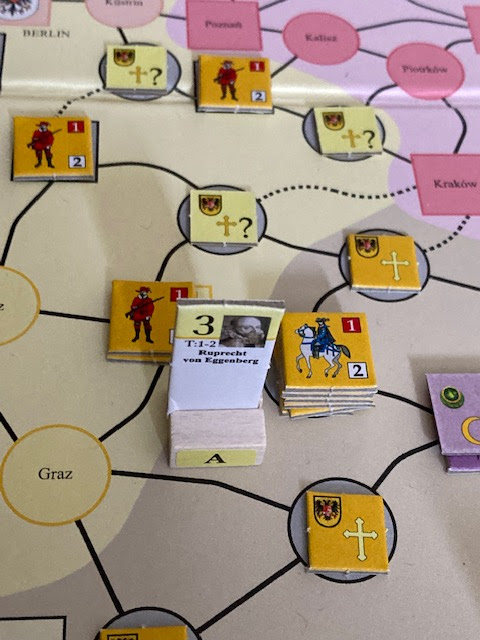
The essential holding boxes for markers and the current ruler card, available actions a player can take and recruitment costs for your units present a good starting point and the holding boxes for the maximum of five armies promise that the map will not become too counter cluttered.  Just as in Here I Stand and in Strategemata's excellent ACW game, How The Union Was Saved [see my earlier review], each army leader appears in the form of a useful standee.
here are just some of those leader units

A particular feature of each player's Superpower Sheet that I like is the range of images of the various types of unit available to each player which mirrors the actual troop counters placed on the map or in the Army Holding Boxes.  Instead of using a few identical standard infantry/cavalry/artillery images for each nation, care has been taken to individualise such things as colouring on uniforms, the stance of infantry units and variety of cavalry.  Though they may play only an artistic visual role, they do give a sense of the differences between the look of each nation's army.
This is something Strategemata's games strive for and history is reinforced in this game by the supplementary information [printed on the back of each Superpower Sheet] that expands on each historical event featured in a player's deck Event Cards.

The Holy Roman Empire's expanded historical Events
As I've observed when reviewing a range of Strategemata's games, it is the Rule  and Scenario booklets that lack the finished quality of the major companies.  This is most noticed in the rule book which is a purely black and white production with very limited pictorial illustration.  What, however, I miss most is a solid set of play examples.  Only a single page is devoted purely to an example of Interception and Land Battle.  Compare this with the excellent eight page Extended Example of Play for the infinitely simpler game system in How The Union Was Saved.  This lack can be felt just by looking at the Turn Sequence.

Game Turn Phases
 1.  Funds gaining
 2.  Cards drawing
 3.  Rulers changing
 4.  Commanders changing
 5.  Negotiations
 6.  Religious unrest
 7.  Mercenaries hiring
 8.  Strategic deployment of one army
 9.  Players' impulses
10. Armies' return to Capital Cities
11. Removal of auxiliary markers
12. Rulers' Domestic Policy

Don't be put off by the number of steps, most of them are very quick to execute, especially as many are simultaneously carried out by each player.  The thorniest and possibly the longest could be the Negotiations Phase where there is simply too much freedom of action.  Two key sentences stand out:
"Players can make secret arrangements to coordinate their strategies" and "After secret negotiations, all arrangements are announced in public."  
Just how much time is your gaming group going to spend here?  Are you going to dare play this game with someone you don't know?  And there are some I do know that I definitely wouldn't dare play this game with!  Be warned, an executive decision might just be a necessity so that the the appropriate full focus is directed to the real heart and enjoyment of the game - PLAYER IMPULSES.
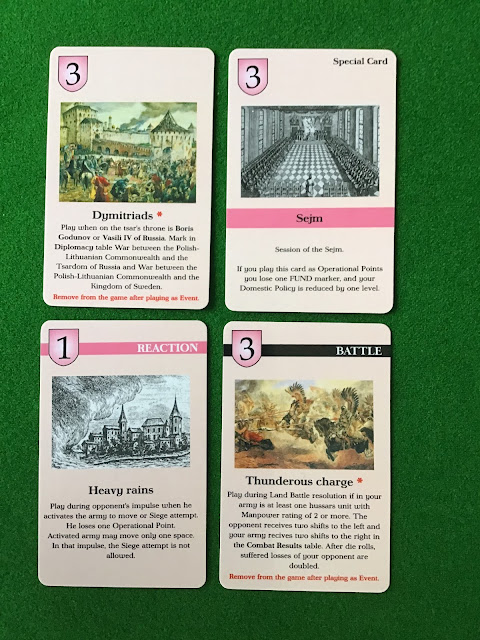
This is where the game really shines with its magnificent individual 50-card, player decks, one for each player.  All are illustrated with a superb mix of full colour scenes from paintings or black and white line prints.  Very striking is that so many of the cards with coloured scenes illustrate historical events or circumstances special to that one player alone.   This is one aspect which singles out Time of Wars from many other CDG productions.

A close-up demonstrates the quality of the black and white line drawings


Also among the pluses in this CDG design is the inclusion of + cards that can be combined with another card, an idea that the designer indicates was drawn from one of my favourite CDG games, Mark McLaughlin's Wellington: the Peninsular War.  You'll note, as well, other typical elements of CDG decks, such as the inclusion of Special Cards that are always returned to your hand at the end of a turn, Battle and Reaction cards and the ability not to use but preserve some cards for use in the next turn and, of course, the all-important Operations Points number in the top left hand corner which you'll spend to undertake any of the available actions in the game.
As you'd expect for the historical period covered, there's a fine mix of religion economic actions, domestic policy and military action and the chance to expand your knowledge of Eastern European affairs.

Once again a big thanks to Strategemata for providing this review copy. 


 Mac and Lee by Hollandspiele  The 1862 Peninsula Campaign was at the very beginning a bold stroke to move around the Confederate Army in No...

Mac and Lee by Hollandspiele Mac and Lee by Hollandspiele

For your Wargamer, Toy soldier collector, MiniFig collector, military history nut. Reviews, interviews, Model Making, AARs and books!


 Mac and Lee


by


Hollandspiele


 The 1862 Peninsula Campaign was at the very beginning a bold stroke to move around the Confederate Army in Northen Virginia. In actuality, it turned out much like the Anzio invasion. A whale had been beached, and that was about it. Little Mac (George McClellan), could not, for the life of him, understand the reality of the situation. The Pinkerton Agency told him that he was outnumbered two to one and he either believed them outright or used it as an excuse for his own doubts and fears. Whatever it was, his attack on Richmond progressed slower than a sloth descending a tree to do its business. Joseph E. Johnston had his own fears and doubts to deal with. He let Little Mac saunter ever so slowly to the very gates of Richmond. Had it actually come to a siege Little Mac's artillery would have pounded Richmond to dust. If, that is, he let them actually open fire. His nightmares of massive Confederate forces clouded his campaign from start to finish. Once Johnston was wounded, when he finally attacked at the Battle of Seven Pines, Robert E. Lee was summoned to take command of the Confederate Army. From this moment on Little Mac believed to his core that he had to be vastly outnumbered for the Confederates to attack him. He went into an almost mental breakdown and left his forces to mostly deal with the Confederates on their own. Lee was presented several times with opportunities to deal the Union forces a crushing blow. Instead, his forces rarely did anything correctly from a military point of view. He either could not get his subordinates to do anything, or they decided to attack the Union forces where they were the strongest. Porter Alexander believed that during this period, now called the Seven Days Battles, was the only time that the South could have won independence. Is it actually possible to put such a strange campaign into a game? Let us find out if Hollandspiele and the designer John Theissen have actually succeeded in doing so.


 This is what comes with the game:


22" x 34" mapsheet

184 counters

8-page series rulebook

12-page module rulebook

2 display sheets

1 double-sided player aid

28 special event cards

1 six-sided die


 The box and its contents are standard Hollandspiele fare. The map needs some coercion to lay flat. A piece of plexiglass or a few books on top for a bit fixes the issue. The map is reminiscent of a spruced-up map from SPI or AH. It is meant to be a wargame map and not a wall decoration. In this it serves its purpose admirably. The terrain is easy to discern and there are no ambiguities. About one third of the map is taken up by charts and tables. These are in large print and have enough separation so that all the information is easily discernable. The counters are a little dark in color, but their information is large enough to be read without squinting. The number of actual units on the board is very small, which is a hallmark of Hollandspiele's American Civil War Operational Series. They are Corps sized for the Union and Division for the South (Not until after this campaign were Corps introduced to the Confederate Armies). The Series Rulebook is eight pages long. It does have some color thrown in for aesthetics. The print is nice and large. The Module Rulebook is actually ten pages long. First is an excellent five page write up about the campaign by Doug Miller. Then there are four pages of Module rules for Mac and Lee. This follows the same format as the Series Rulebook. There are three Player Aids. These are standard size and in full color. The first one has the Terrain Chart on one side with multiple tables on the reverse side. The other two Player Aids are Strength tracks for both sides in the two scenarios that come with the game. Next up are the Special Events Cards. These are the standard game size and are nicely done. The only problem with the cards is that they contain so much information that the type is rather small. Again, the above components are the standard fare for Hollandspiele. There is nothing wrong with this. They just veer toward meaty games in play instead of artwork for the components. 


 The Sequence of Play is:

A. First Player

  1. Reinforcement

  2. Movement

  3. Combat

  4. Recovery

B. Second player same as above.


 The scale of the game is:

Time: One day per turn.

Hex size: 4.9 miles per hex

Men: About 3000 men per Strength Point.


 A game can be incredibly plain Jane in the components and still be on your table for months at a time. Conversely, some games belong in the Louvre but are never brought out to play. So, now we will go into the game itself.


 As I mentioned, this is an incredibly hard campaign to design a game around. Little Mac should have been able to swamp the Confederates and been in Richmond in no time flat. There have been many theories put forward to explain his actions, or more correctly non-actions, during the campaign. So, the designer has to take into account that the Union Army was operating with a large ball and chain attached, mainly its commander. Then on the Confederate side you have Johnston who seemed just as reticent to engage the Union troops (This was shown throughout the war). The designer chose to simulate this with a Caution & Uncertainty Roll. Each side's Caution Level is kept track of, and this simulates the oddness of the first part of this campaign. Both sides are like old Walruses who are stuck in the mud glaring at each other. At times this will be a bit maddening for the player, just as it was for Abraham Lincoln and Jefferson Davis. Once Robert E. Lee shows up, the campaign usually turns abruptly into constant battles. This again shows how much the designer worked to make the game historically accurate. As Little Mac you cannot just ignore his foibles and and use your army to say, maybe fight the enemy. As Johnston, you can retreat only so far before you are heading toward the Appalachians. I love games where the designer puts you into the shoes of the commanders but also gives you the opportunities and restraints that those commanders had to deal with. This includes seeing hordes of butternut soldiers where there are none. The game also comes with 'Dummy Counters' for the Confederate Player to use to confuse Little Mac that much more. 


 The Victory Conditions for each scenario are based mostly on the control of Richmond (again historically based). The Union Player receives ten points if they occupy Richmond at any time and another ten points if they control it at the end of the game. If the Union Player never scores these points the Confederate Player receives twenty points at the end of the game. You can also get Victory Points for disrupting and eliminating the other side's forces as long as any of your units are not disrupted or eliminated in the combat. Each side must also take a Rest Turn during each quarter-month segment. This is not enforced during the first turn or during July. 


 Thank you very much Hollandspiele for allowing me to review this game. I am a deeply read student of the campaign and I am very impressed on how Mr. Theissen has been able to give us almost a simulation of it. Hollandspiele has just released an expansion to 'The Grass Crown: Battles of the Roman Republic'. It is called 'The Grass Crown II' and it includes eight new scenarios. The link to my review of The Grass Crown will be below. They have also released 'Horse and Musket V Age of Napoleon'.


Robert

Hollandspiele:

Hollandspiele

Mac and Lee:

Mac and Lee – Hollandspiele

The Grass Crown review:

The Grass Crown by Hollandspiele - A Wargamers Needful Things


  General Erich Hoepner A Military Biography by W. Chales de Beaulieu Translated by Linden Lyons  This book is part of the 'Die Wehrmach...

General Erich Hoepner: A Military Biography by W. Chales de Beaulieu translated by Linden Lyons General Erich Hoepner: A Military Biography by W. Chales de Beaulieu translated by Linden Lyons

For your Wargamer, Toy soldier collector, MiniFig collector, military history nut. Reviews, interviews, Model Making, AARs and books!


 General Erich Hoepner


A Military Biography


by


W. Chales de Beaulieu


Translated by Linden Lyons


 This book is part of the 'Die Wehrmacht Im Kampf' series. These were written after World War II by German Officers about the Second World War II. These were used by the Allied armies to study the war through the eyes of the German command.


 As this is strictly a military biography, Hoepner's life is not really touched upon in the book. The author does devote a few pages at the end and the short Introduction touches upon it. Hoepner was involved in the June 20th, 1944, plot against Hitler. For his part in it, which is still debated, he was tortured and sentenced to death. However, we must not fall into the trap that many people do of assuming that the German generals were altruistic in their thinking. Some, if not most, had no problem with Germany attacking other countries. They just felt that Hitler was making a mess of it and wanted to fight the war their way. As long as Hitler was winning, they looked the other way to many other things. Hoepner himself had no problem with Germany attacking the Soviet Union etc.


 The book is separated into five chapters. These are:


The Campaign in Poland 1939

The Campaign in France 1940

The Advance to Leningrad 1941

The Assault on Moscow 1941


 General Hoepner was the commander of XVI Panzer Corps in the Polish Campaign. he also commanded it during the French Campaign. He was commander of Panzer Group 4 during Operation Barbarossa.


 The book was written by Hoepner's First General Staff Officer during the Polish Campaign, who then became his Chief of Staff during the French and Russian Campaigns. So, he had complete knowledge of General Hoepner's actions and thoughts during his service in World War II. 


 This book is unique in that you will usually find only a few lines written about the Polish Campaign. Those will invariably mention that the campaign went off like clockwork. This book shows how the vaunted German Heer was still very much learning from its mistakes in 1939. 


 When writing about the Japanese Military in World War II it is often stated that they suffered from 'victory disease', meaning that everything was going their way far too easily. I think we can see that the German High Command also suffered from this by the time of the invasion of Russia. The author shows how fearful at times the High Command was in 1939 and 1940 about the slightest hitch in any plan. Then he goes on to show us how they completely disregarded the facts and opinions of the German generals and the easily seen reality of the situation in 1941. The starts and stops that the German High Command forced the different commanders to deal with are revealed in the book. It also goes into what actually should have been done in each situation. 


 This is an excellent military biography of one of the chief Panzer commanders of the early part of World War II. The author shows us the thoughts and writings of Hoepner during these campaigns. It is a window into the inner workings of the Panzer forces early in the war.


Robert

Book: General Erich Hoepner: A Military Biography

Auther: W. Chales de Beaulieu

Publisher: Casemate Publishers

  Death of an Army Ypres 1914 by Revolution Games  "The Ypres Salient in Belgian Flanders was the most notorious and dreaded place in a...

Death of an Army Ypres 1914 by Revolution Games Death of an Army Ypres 1914 by Revolution Games

For your Wargamer, Toy soldier collector, MiniFig collector, military history nut. Reviews, interviews, Model Making, AARs and books!


 Death of an Army Ypres 1914


by


Revolution Games


 "The Ypres Salient in Belgian Flanders was the most notorious and dreaded place in all of the First World War, probably of any war in history. Typical was this British infantryman's reaction on being told that his battalion was to go there: "I mentioned Ypres and he cursed the place. Rumors of what waited ahead of us had disturbed everyone." This was said between men who had just gone through the ordeal of the Battle of the Somme, where more than 50,000 British soldiers became casualties on the first day.

 From the autumn of 1914 to the autumn of 1918 Flanders was, in effect, a gigantic corpse factory. Hundreds of thousands died there for ground where gains were measured in mere yards. It was where, in 1914, the British professional army was virtually annihilated, though it had stopped the German drive to capture control of the English Channel." (Winston Groom in 'A storm in Flanders')

 The Battle of Ypres in 1914 has many times been described as the 'Death of the British prewar Army. The actual name of this game should be 'Death of Armies'. This is because the German Army was also bled white here. The Germans have their own mythology about the First Battle of Ypres. This is called the 'Kindermord', roughly the 'Massacre of the Innocents'. On November 10, 1914, the Germans attacked the town of Langemarck (hex 0813 on the map). The story that was told was that eighteen-year-old German soldiers clasped arms and sang the German National Anthem while they marched to their death. While the actual history has found this to not be correct, the battles for Ypres did turn the area into an abattoir for the German reservist troops. As an aside, the British troops called it 'Wipers'. This is a game I have been waiting to have in my hot little hands for a long time.


 This is what comes with the game:

22" x 34" Map

Exclusive Rulebook

Series Rulebook

2.5 5/8" Countersheets

3 Player Aids

1 Scenario Setup Sheet

Box or Ziploc Bag

1 Six-Sided Die (Boxed Version)


 This is a blurb from Revolution Games about the game:

"The Battle of the Marne signaled the failure of the Schlieffen Plan and of German hopes to win a quick, decisive victory. In turn, this triggered the Race for the Sea as opposing armies attempted to outflank each other. Then, in a final bid to gain the upper hand, both Allied and German Armies clashed in the First Battle of Ypres. On these fields, the British Expeditionary Force, the professional army of Britain, and the strongest on the Continent, was bled dry.


Death of an Army, Ypres 1914 is a brigade/regiment level simulation of the First Battle of Ypres. Players assume the roles of the commanders of the German and Allied troops as they desperately fight for this valuable position in the line."


 The map shows us exactly why this small patch of territory was fought over for four years. These small ridges, 200' or so in height, are the only high ground to be found in Flanders. With their control of them, the Germans were able to see everything going on in the Ypres salient. Not only that, but their guns were able to target the area, thus turning the salient into a deathtrap for the French and British troops that were stationed there.


German Counters


 The Map is nicely done even though it is mostly made up of clear spaces. There are some important features, such as the canal and the ridge that is almost in the center of the map. The area was also sparse as far as woodlands. The towns and woods that are there are mostly named and will be remembered by people who are familiar with the later battles such as Polygon wood. The map also has the turn record track on it. It is made of the normal glossy paper that we have come to know over the last few decades. The scale of the Map is 1,350 yards per hex. The counters are large and are easy to read. They use the NATO symbols. The counters might look a little busy to some. However, I didn't mind them at all at 5/8" size. Two of the Players Aids are exactly the same. These have The Combat Results Tables on one side and the Terrain Effects on the other. The third Player Aid is one-sided and has a Markers Reference sheet on it. The Scenario Setup sheet is double-sided and has the information for the game's three scenarios on them. The Great War Battles Series Rulebook is twelve pages long and is in black and white with large type. Last but not least, the Exclusive Rulebook is only four pages long. The components some might complain, are Plain Jane, but they are infinitely better than what we used to play with. They also help to keep the game's cost down. You may not get all the bells and whistles with them, but all of Revolution Games productions I have played do come with a lot of gaming, which is really what we are after anyway.


Allied Counters


 As mentioned, there are three scenarios. These are:

Battle of Langemarck  - October 20th until October 24th

Fabeck's Attack - October 29th until November 4th

First Battle of Ypres (Campaign Game) - October 20th until November 12th

 The game plays out in daily turns so the Campaign Game is 24 turns long.

 This is the Sequence of Play:

First Player Turn

The first player is the phasing player and conducts the following events in sequence.

Coordinated Combat Phase: the first player may conduct 
coordinated combat with his units against opposing units (see 6.0).

Movement Phase: the first player may move his units (see 7.0).

Hasty Combat Phase: the first player may conduct hasty combat with his units against opposing units (see 11.0).

Surrender Phase: the first player checks whether any of his 
isolated units surrender (see 12.4).

Second Player Turn

The second player becomes the phasing player and conducts 
the same sequence of events as described for the first player.


Markers and a few more German counters


 So, what is the verdict? Just like any other Revolution Games effort I have played, this game is a winner. Not only if you are interested in the game for its history, but also if you are looking for a great gaming experience. This is early in World War I so air power and even air reconnaissance is in its infancy. You do not have to worry about tanks or poison gas either. This is a straight of battle of king of the hill. One thing a player has to keep in mind is that casualties will mount up and usually mount up quickly. This is the maneuver battle that all of the generals were hoping for after the trench system was built. Artillery is king of the battlefield, as it remains for the rest of the war. You can attack without artillery, or not enough of it, but be prepared to pay the cost. All of the Victory Conditions in all of the scenarios are based on the capture or defense of the high ground. It is a simple concept, and they are right there for you to see. Your problem is getting control of them. It is a rough and tumble affair that simulates the horrific blood loss of the year 1914. One thing really good games have is an ebb and flow to each side. The reinforcements that come in for each side at different times help greatly with the 'what happened, I was winning last turn', feeling that you get in this game.

 This is a blurb from the Designer Notes:

"For Ypres 1914, I wanted to create a simple, fluid game that moves quickly -- sort of a Napoleon at Waterloo for the First World War. Well, it didn’t quite turn out that way - simple, perhaps, fluid, not quite. There aren’t many innovative rules per se but one significant departure from most games is the reversal of the movement and combat phases. The decision to begin with a combat phase was intended to capture the general flow of the battle of the Great War. Most attacks were planned overnight and started at dawn of the next day. Generally, troops were positioned accordingly, often in plain sight of the enemy. After the initial attack, communications would falter, and the original plans would disintegrate. It then fell on the initiative on individual commanders leading smaller units to carry it on, with limited artillery support. The former reflects the co-ordinated combat and the latter the hasty combat procedure."

 I cannot wait for more games in the series.


 Thank you, Revolution Games, for allowing me to take this game for a spin. I will admit I was expecting a lot from the game. The books about the Ypres battles are some of my favorite reads. I was immensely happy that the game played out historically, and all of the outcomes were entirely plausible. While you are at their site, please take a gander at the rest of their games it is definitely worth it.

Robert

Revolution Games:


NAGASHINO 1575 & SHIZUGATAKA  1583 from  SERIOUS HISTORICAL GAMES Samurai battles - those words say it all - and, like so many, my inter...

NAGASHIN0 AND SHIZUGATAKE NAGASHIN0  AND SHIZUGATAKE

For your Wargamer, Toy soldier collector, MiniFig collector, military history nut. Reviews, interviews, Model Making, AARs and books!

NAGASHINO 1575 & SHIZUGATAKA 1583

from 

SERIOUS HISTORICAL GAMES

Samurai battles - those words say it all - and, like so many, my interest stemmed from that one evocative word in childhood - SAMURAI.

This was fed by films such as Kurosawa's early Seven Samurai and his much later Ran, though the latter is really transforming Shakespeare's play, King Lear, with no real historical relationship to the key period of feuding Japanese warlords.
In between these two films lay James Clavell's novel, Shogun, which - in fictionalised form and ahistorical names for the characters - opens in 1600 in the closing years of the Sengoku Jidai period, shortly before the battle of Sekigahara.

In game terms, I'd had a nodding acquaintance with various samurai influenced games at roughly 10 year intervals.  This started with Milton Bradley's Shogun of 1986 and was followed 10 years later by the much heavier GMT game, Samurai, a volume in their Great Battles of History series.  Wind on another 10 years [ok 11 years] to 2007 and out came their 12th volume in the GBH series, Ran!  So far a fairly intermittent acquaintance.

But from 2007 to 2022, the period and its name, the Sengoku Jidai, has grown in gaming parlance and familiarity.  Starting with Hexasim's, Kawanakajima [2009], it was followed by the excellent variation on the block game format, GMT's Sekigahara [2011] and then back to Hexasim's Tenkatoitsu in [2016].  Dotted throughout have been a variety of Euro games such as Queen Games' Shogun and CMON's Rising Sun,  as well as, of course, an entry in the Command & Colours pantheon - what else but Samurai, containing three scenarios drawn from the battle of Nagashino! [I have the earlier Zvesda edtion Samurai Battles with its magnificent figures and dual set of rules, one set being the C&C ones.]

Nearly all of these, both serious board wargames and lighter approaches, have passed through or are still included in my collection.  So, it was an absolute must-have when I first heard that a newly founded company, Serious Historical Games, was launching as its first game, Nagashino 1575 & Shizugatake 1583. 

I had even more reason to pursue this game when I found out that the company's founder and designer was Philipp Hardy.  Here was a name I was already very familiar with as a designer of many games for the Vae Victis magazine, an excellent French production that I have had over 90 subscription issues of.  Above all, I also have both boxed games designed by Philipp Hardy, Par Le Feu, Le Fer and Le Foi and Fate of Reiters.  These two sets cover ten battles of the French Wars of Religion, a period exactly corresponding to the later part of the Sengoku Jidai period in Japan.  Here was a pedigree I just had to follow up.

To outline briefly the historical setting, the period spans 150 years from 1467-1615, but most wargames draw on just the major events from 1560-1600 as does this game,  Nagashino 1575 & Shizugatake 1583.  It was a time of warring "Warrior States" and three names stand out of among the many leaders who feature in these two battles.  

Central to the story is the Oda clan and in the earlier of these two battles, Nagashino 1575, Daimyo Oda Nobunaga is the dominant power, though the Army Commander is his greatest subordinate general, Taisho Hideyoshi.  Also featuring in this battle is Daimyo Ieyasu, a clan leader once fighting for the opponents of Nobunaga, but by this battle he had wisely allied himself with Nobunaga. Opposing them is the Takeda clan, led by Daimyo Katsuyori, who were the historical losers.  Though warfare continues throughout the period, Oda Nobunaga is viewed in history as the first "Great Unifier" of Japan.

Moving on eight years later to Shizugatake 1583 and the situation has changed.  In the previous year, Oda Nobunaga had been ambushed and forced to commit ritual suicide, seppuku, though other accounts I have read describe him as being assassinated and at least one that he was poisoned!  His ablest general, Hideyoshi, seen as Army Commander in the first game in this package, took power, though like Nobunaga before him never becoming supreme ruler.  Though Daimyo Ieyasu briefly opposed Hideyosi in 1582, by the next year and the battle of Shizugatake, Ieyasu was once again supporting him in this equally successful battle.
Though his period of power is marked by ongoing struggles and disastrous campaigns against Korea, Hideyoshi is regarded as the second "Great Unifier".  And the third "Great Unifier"?  Well that eventually with be Ieyasu himself after the battle of Sekigahara in 1600, who does at last establish himself as Shogun! 

So, how does this design present this fascinating topic.  There's no doubt that it's a very attractive package, from very first sight of the dramatic box art of charging cavalry.  This is repeated on the cover of the single booklet which presents the rules and the two scenarios in both French and English.  
There are two sheets of counters and these are very well produced. They're a solid 18mm x 18mm, easy to read, easy to handle and highly evocative of the range of units. 


What I really like is that each of the two types of samurai unit has both an infantry counter and a cavalry counter and a simple mounting/dismounting rule.  The equally clear markers cover elements including isolation, two levels of disorganisation, army formation, division activation, charge, tactical bonuses and a counter to show your lead unit in attack or defence. 
Here, for example, are six of your seven army formation markers, ranging from very defensive to very aggressive.


These main elements are supported by a single double-sided play aid in English - a version in French is mentioned but was not in my copy. The double-sided map sized [23 1/2inch x 16 1/2 inch], I think, speaks for itself.   Stylistically and functionally, they're excellent.
Shizugatake
 

Nagashino
Later close-ups will reveal the artistic detail, but even at a distance, the maps provide a stylish and sympathetic background to play.  As with his previous games on the French religious wars, the designer's choice has been to work with areas or, to use the terminology of the rules, zones.  For displaying and actually moving units, as well as the question of ZOCs and line of sight too, this choice works very successfully. The simplicity and clarity of the applicable rules is equally important to how well these all work together.  Visually the counters stand out vividly and the stacking rules mean that there is never overcrowding, especially as opposing units can never be in the same zone together.  This departs from most area movement games featuring melee or close combat, but works perfectly here.

Here you can see the set-up for Nagashino with the small number of units stacked, but a closer look at a small portion of the map [from my first play-through] shows how units with disorganisation markers and an activation marker can all be accommodated. 


 In total each set of rules whether in French or English
comes to five and a half pages, with a further one and half pages of examples.  The first battle's Scenario details take up a single page and the second occupies exactly two pages. Finally, the centre pages of the rules contain striking images of each battle with the crucial historical stages mapped out.  Again, I love the concern given to presentation, as the left hand page [not shown here] has the information in French and this right hand page in English.
As I commented on BGG, in my first impressions of the game, there are a few very minor errors and the succinctness of the rules occasionally led to some uncertainties of interpretation.  However, Philippe Hardy has been immediate in his response with answers and clarifications both to my personal emails and questions in general  on BGG. This level of support is very much appreciated and has helped me to get the game straight on to the table and launched into the earlier of the two battles.
From that experience I'd like to take you through the basic steps of a turn with some comments on them.  There are only three Phases to a Turn and both the first and last are very quick and easy to perform so the action of the game gets central focus.
[A] Initiative Phase
Each Army has an overall Formation that can range from Extremely Defensive through Flexible to Extremely Aggressive and can be changed by a simple die roll against the Army Commander's Quality Level [QL].  Each Formation gives a player five tactical markers from which a random selection is made at the beginning of each turn, again using the Army Commander's QL.  The more Aggressive the more positive the markers, the more Defensive the more negative the markers.  This is such a neat idea.  It means that the Aggressive stances add benefits totally or mainly to attacking, while the Defensive stances correspondingly furnish benefits totally or mainly to defending.  Logical, but a neat way of  imposing its own constraints. 
Check whether divisional leaders are within range of the Army Commander and place isolated marker if not.
Determine which player has the Initiative and activates first
Check for possible arrival of reinforcements.
[B] Alternating Divisional Activation Phase
A chosen division is automatically activated if its leader is in command or has to role against the leader's QL if isolated [i.e. out of command].
Active units in command range of the division leader may be moved and charges are declared.
The inactive player may fire against any adjacent activated units.
Melee follows and is optional, unless a charge has been declared which makes a melee mandatory.
The inactive player may make a counter-charge where it is possible.
[C] Reorganisation Phase
Remove or attempt to remove disorganised markers.
Remove tactical and activation markers.
Check for victory at the end of the last game turn.

A range of the games markers
There are quite a few innovative rules in this game, but all are remarkably easy to learn and remember without frequent reference to the rule book.  This is a major reason why I like this system so much,  as too is the fact that they interact on a simple level to cover a whole series of features seen in similar games.
Take the zone identification number.  It will begin with the number 0/1/2 which takes you from the lowest height level on the map to the highest.  The next two numbers like all area movement games is purely for identification purposes; then the final number is a Roman numeral either I/II/III.
This latter number covers a lot of ground: first of all telling you how difficult the terrain is.  No surprises that the higher the number the more difficult.  Next the number is the base cost of movement  for entry and finally it determines whether a unit in it projects a ZOC.  A unit projects a ZOC only if it is located in a higher number  . So, a unit in III projects a ZOC into II or I, a unit in II projects a ZOC into I and, of course a unit in I never projects a ZOC.  It also affects charges as you can only charge into a zone I.  Finally the colour of the box the zone identification number is in tells you whether the zone blocks line of sight.

This close up of the zone containing Shizugatake Castle highlights  the attention to artistic detail, so harmonious with the Japanese background, as well as illustrating the practical zone designation.  It also reveals other typical factors that come into play such as the border between zones that affects movement cost and charges too.


Take care when looking at terrain, as exemplified by this tract of forest just below the castle.  Most terrain II is forest in these battles, but differing prefixed numbers show that the height of the terrain varies and the borders to a single zone of forest often vary too.  One side may be shown by a dotted line as a trail or path crosses it, while another may have a single or double line to show increasing difficulty and so increased cost and finally one side of the zone may have a broad line showing that it is impassable.  All visually very nice and all very easy to remember!
Combat too has several innovative and artful touches.  Only a single unit may attack from a zone or be attacked in a zone whether by fire or melee and each player chooses their unit.  Normally in melee there is only one round of attack, though there are conditions when a unit may fight a second round.  Results only affect the chosen attacker and defender, though one of the modifiers in a melee does reflect a limited combination of different types of units present in either the attacker or the defender's zone.  
The process of a combat couldn't be easier: take the differential between the strength of the two units involved and then add all the applicable positive and negative modifiers.  The resulting number is finally added to a 2D6 die roll and applied to the appropriate Fire or Melee Table.  A key point to remember is that all modifiers are simply added together, they are not applied separately to the strengths of the units. Two states of disorganisation, step losses or quality checks are the possible results.  The only surprise for me was the lack of any rout result.  As well as my satisfaction with the overall simplicity of approach, I was very pleased with how rapidly most modifiers became second nature after only a few combats had been worked out.  One tip I'd suggest is that you make a simple numerical  scale on which to move a marker up and down as you apply modifiers. 
To augment the overall ease of understanding, the page and a half of examples works very effectively taking you through all the steps of a typical turn in order.  As you can see it is well detailed and displayed in full colour and, a point I always like, draws directly on a real play from the first battle featured in the game.
This leads me to the final thoughts on the two battles themselves.  Neither is massive in size and the first battle is especially good to start with; it can be completed in an afternoon or evening's play and both sides are very balanced in numbers.  Both battles feature unit losses counting for VPs and, as the prime target for victory, the capture of a castle.  Despite this similarity, they play out very differently.  In Shizugatake, the initial Oda forces are small and geographically split.  One group has to move to link with the other defending the castle, while fending off a much larger opposing force, until reinforcements start arriving.  The opposing Shibata forces have to try to overwhelm both small groups as swiftly as possible while capturing the castle and then holding it against those Oda reinforcements.  This is a swirling battle.
Set-up for the battle of Shizugatake

In Nagashino, the roles are reversed.  The Oda clan troops are defending the castle which will almost certainly fall, but they have their main strong force that has to fight its way across virtually the length of the map from south to north against a powerful, cavalry-strong enemy and also a secondary force of reinforcement moving upward from the bottom map edge.  Their opponents, the Takeda , historically were the aggressive army hurling their cavalry at the oncoming Oda. All I can say is that if you follow their lead, you'll probably suffer the same crushing defeat! 
 

Above shows the beginning of the conquest of Nagashino castle. As yet the relieving forces entering from the bottom edge of the map have failed to roll their release number.  So the castle will almost certainly be in enemy hands by the time they arrive. The final appeal of both battles is that both sides get good opportunities to attack and defend.  
This is a very successful opening game in all respects for Serious Historical Games and I'd strongly recommend that you get your hands on a copy.  The next two projected games promise to maintain the momentum to the full.  In particular, the intention to take the system begun here to the climactic battle of Sekigahara will be an eventual release that I'll eagerly await.  


hpssims.com