second chance games

Search This Website of delight

  Inferno: Guelphs and Ghibellines Vie for Tuscany 1259-1261 by GMT Games   Most people would equate the name Hohenzollern with the German E...

Inferno: Guelphs and Ghibellines Vie for Tuscany 1259-1261 by GMT Games Inferno: Guelphs and Ghibellines Vie for Tuscany 1259-1261 by GMT Games

For your Wargamer, Toy soldier collector, MiniFig collector, military history nut. Reviews, interviews, Model Making, AARs and books!


 Inferno: Guelphs and Ghibellines Vie for Tuscany 1259-1261


by


GMT Games


  Most people would equate the name Hohenzollern with the German Empire. These were parvenus to the Emperors of the Hohenstaufen dynasty of the Holy Roman Empire. Two Emperors from this line were named Frederick. The first was Frederick I Barbarossa (red beard), the second Frederick II was nicknamed 'Stupor Mundi' (the wonder of the world). Both had problems with the Italian city states and the different Popes. Since Pope Leo III crowned and invested Charlemagne as Holy Roman Emperor in 800 there had been a power struggle between the Popes and Emperors. The citizens of the Italian states were divided over their allegiance to Pope or Emperor. The Ghibellines stood behind the Emperors, and the Guelphs stood behind the Pope. This of course is a oversimplification of the rivalry and fighting for power between the Italian families and states. 

 On the back of the box is a quote from Dante Alighieri's Inferno:   "You thirsted for blood now drink your fill". Sometimes it is translated as “You did thirst for blood, and with blood I fill you”. The meaning is much the same. However, the latter seems to me to be an even darker way of saying it.

 This is what GMT Games has to say about the game:

"Tuscany, 1259. As wealth from crafts and foreign trade elevated northern Italy's urban families above the landed lords, rivalries within and among their cities hardened into conflict between two great parties. Ghibellines aligned with the Hohenstaufen imperial dynasty that ostensibly ruled Italy, while Guelphs backed rival imperial claimants and the greatest challenger to each Emperor's authority, the Pope. Should any faction gain advantage, others coalesced to resist.
 
The comuni (republics) of Firenze (Florence) and Siena dominated inland Tuscany at the head of these competing alliances. As Guelphs sealed their control of the populous Firenze, Ghibelline Siena turned to Hohenstaufen King Manfredi of Sicily for reinforcement. Local rebellions and reprisals escalated on each side, as political exiles stirred the pot. After Manfredi dispatched German knights to protect his loyal Tuscans, Firenze mustered its people and allies to march on Siena, which responded with its own great army. Pisa and Lucca, Lombardia and Orvieto joined in. Guelph and Ghibelline in September 1260 at last faced off en masse in the center of Tuscany, at Montaperti—the result, a bloody Florentine defeat. But when Ghibelline exiles returned as masters of Firenze, its Guelphs rallied to Lucca and Arezzo, portending an eternal conflagration.
 
Inferno—the third volume in Volko Ruhnke's Levy & Campaign Series—fires up the cauldron 13th-Century Tuscan warfare, factional conflict fueled by the gold florins and teeming populations of up-and-coming cities and well-to-do valleys. Expert Italian wargame designer Enrico Acerbi brings the age to life within Volko's accessible medieval-operation system. Gathering transport and provender may not be as much the challenge here as the sudden treachery of rebel towns and castles along key roads. Italy's plundering berrovieri horsemen, famed elite crossbowmen, and distinctive palvesari shield bearers are just a few of the unique inhabitants of this volume. Muster, mount up, and find out whose blood will make the Arbia run red!"


The Game Setup


 This is a few hundred years before Machiavelli, but the Tuscan Lords and all of the personages that took part in this bit of history seem to know his tenets by heart. The two earlier games in Volko Ruhnke's Levy & Campaign games (Nevsky and Almoravid), did make the player have to worry about treachery. However, in this game it becomes almost a byword. 


The Game Map


  This is what comes with the game:

One 17x22 inch Mounted Map
175 Wooden pieces
106 Playing Cards
Three full-color Countersheets
15 cardboard Lord and Battle mats
One Lords sticker sheet
Four Player Aid sheets
Two Screens
Rules Booklet
Background Booklet
Six 6-sided dice


Command Card Sample


 The components are as beautiful as any Euro game that I have seen. Which, of course, is exactly what the designers and artists were looking for. Let us take for example this next piece from the game. This will show you the artistry that went into the design of this game.


Front Picture From one of the Screens

 
 The map itself is on the small size. However, it is definitely bellissimo! I am not sure if wargames are male or female in Italian. From the illustrations that adorn it to the actual Middle Ages look of it, it oozes the work of an artisan. The map picture above makes it look much smaller and busier than it actually is. There is plenty of room on the map for things not to get congested. It has the Turn Record Track at the top of it. The wooden pieces are all copacetic as far as size goes. They also have smooth edges. They are on the small size and if your dexterity isn't what it once was it might be a bit of a problem. The Playing Cards are divided into four decks. Each side has a 'Command' and an 'Arts of War' deck. The Command Decks have a Lord or City name on the front side along with its associated coat of arms. In the Command Deck you will find both 'Pass' cards and 'Treachery' ones. The Art of War decks have a nice picture of a knight on the back. The front has the instructions for the use of the card along with some nice pieces of art around the sides of the card. The counters are very colorful and come in a few different sizes. The large rectangular ones are for the Lords or Cities. The most numerous counters are 5/8" in size and come pre-rounded. These come out of the sprues with ease. There are a number of 1/2" counters that need to be cut the old-fashioned way. If you have looked at either of the other Levy & Campaign games, then you know that they come with Lord & Battle Mats. These are hard 5" square mats to keep track of troops etc. I first saw these in Almoravid and have been a fan since then. The mats help keep track of each Lord and city thereby keeping clutter on the map down. Next up, we have the small round Lord stickers. These fit on top of the round wooden pieces. There are twenty-eight of them so, one for both sides of the Lord token. There are four Player Aid sheets. These are made of hard stock and are just as nice looking as the rest of the game components. One of the sheets shows the Guelph (boo hiss) Lords and Vassals while the other side has the Ghibelline Lords and Vassals (Yay!). The next sheet shows the Revolt against Guelphs and Ghibellines Tables. The obverse side has the Revolt & Treachery Summary. The next two sheets fold out to make four Player Aid cards, one for each player. On these are:

Commands
Forces
Battle & Storm
Sequence of Play


A Selection of Art of War Cards

Assorted Command Cards


  We have already talked about the Screens. The Rules Booklet is thirty-two pages long. It is in full color and the pages are shiny like a magazine with thick pages. The rules are twenty-five pages long. The next pages have the setup for the game's six scenarios. Then comes a two-page index. Now we come to the Background Booklet. It is sixty-four pages long and has to be seen to be believed. This booklet is chock full of full-page examples of play. Reading the booklet will give you all of the necessary information you need to know. I also think that reading it should give you at least one credit toward a college course on Medieval Italy. It also goes through the information on every card in the game. The bibliography spans two pages. The only problem for me is that the books that are in English I have already read. The rest of the books are in Italian. Unfortunately, the only Italian that has stayed with me cannot be used in mixed company. Oh, and there are six die. They are three for each side; one set is in purple and the other gold. 


Assorted Lord/City Maps

 This is the 'General Course of Play' per GMT Games:

"In Inferno, players take one of two enemy sides, Guelphs (purple) 
or Ghibellines (yellow-orange, hereafter “gold”). The wealthy 
city-state republic of Firenze leads an alliance of Guelph towns 
aligned with the Pope. The Ghibellines comprise city-states Siena 
and Pisa and allied landholders. Guelph expeditions from northern 
and eastern Italy can join in, while Manfredi Hohenstaufen, King 
of Sicily, sends German detachments to back the Ghibellines.
In turns covering 60 days each, Guelph and Ghibelline players 
will levy lords and vassal forces, gather transport, and recruit specialists. Each lord’s forces and assets are laid out on a mat. Players then plan and command a 60-day campaign with their lords.
Cylinders on the map show the lords’ movements, as they seek to 
take strongholds by siege, storm, or revolt and perhaps face each 
other in battle. Markers on a calendar show how long each lord 
will serve, varying by hunger, pay, political events, and success or 
failure in their campaigns"


Ghibelline Lords and Vassals Player Aid


  I understand completely why the years 1259-1261 were chosen for the game. If I had my druthers, I would wish that it took place earlier during Frederick I Hohenstaufen's campaigns to put down the Guelphs in Northern Italy. Putting my own thoughts aside, we have a game that, just like its brethren, give a wargamer the chance to try and herd Jello or cats if you like. Playing either side gives you a good look, not just a glance, into how medieval campaigns were run. You must make a plan for each sixty-day turn. Then you may or may not see the plan completely destroyed before the other player even moves a piece. Your Lords and Vassals may decide to show up and be a part of your grand scheme. However, they might decide to leave you in the lurch or even worse, try to stick a nicely made Italian dagger in your back. Each turn will see you being taught another lesson from the school of hard knocks. After all, this is the arena where Machiavelli learned everything he wrote down. So, while you are herding your vassals toward your objective, and looking over your shoulder for the glint of steel, good luck.  The immersion in the game is highly palpable. You might want to take a short course on impolite Italian and the correct way to bite your thumb at an opponent. 

 Logistics and supply are a large part of the game. It does you no good to have a group of knights ready to descend on your enemy, only to have them fall out of their saddles from starvation. This is where your planning each turn really shines. You must carefully amass enough supply and carts to assist your forces in their endeavors. Conversely, you can put a monkey wrench in your opponent's plans by stopping him from foraging and ravaging his lands.

 My favorite scenarios are C and F. Scenario C has German Knights from Manfredi Hohenstauffen helping to stop some Guelph rebellions. Scenario F is the Campaign Game. There is also a nice learning scenario about the Battle of Montaperti. This was the largest battle of the time fought in1260. This is included to teach you how a battle works in the game.
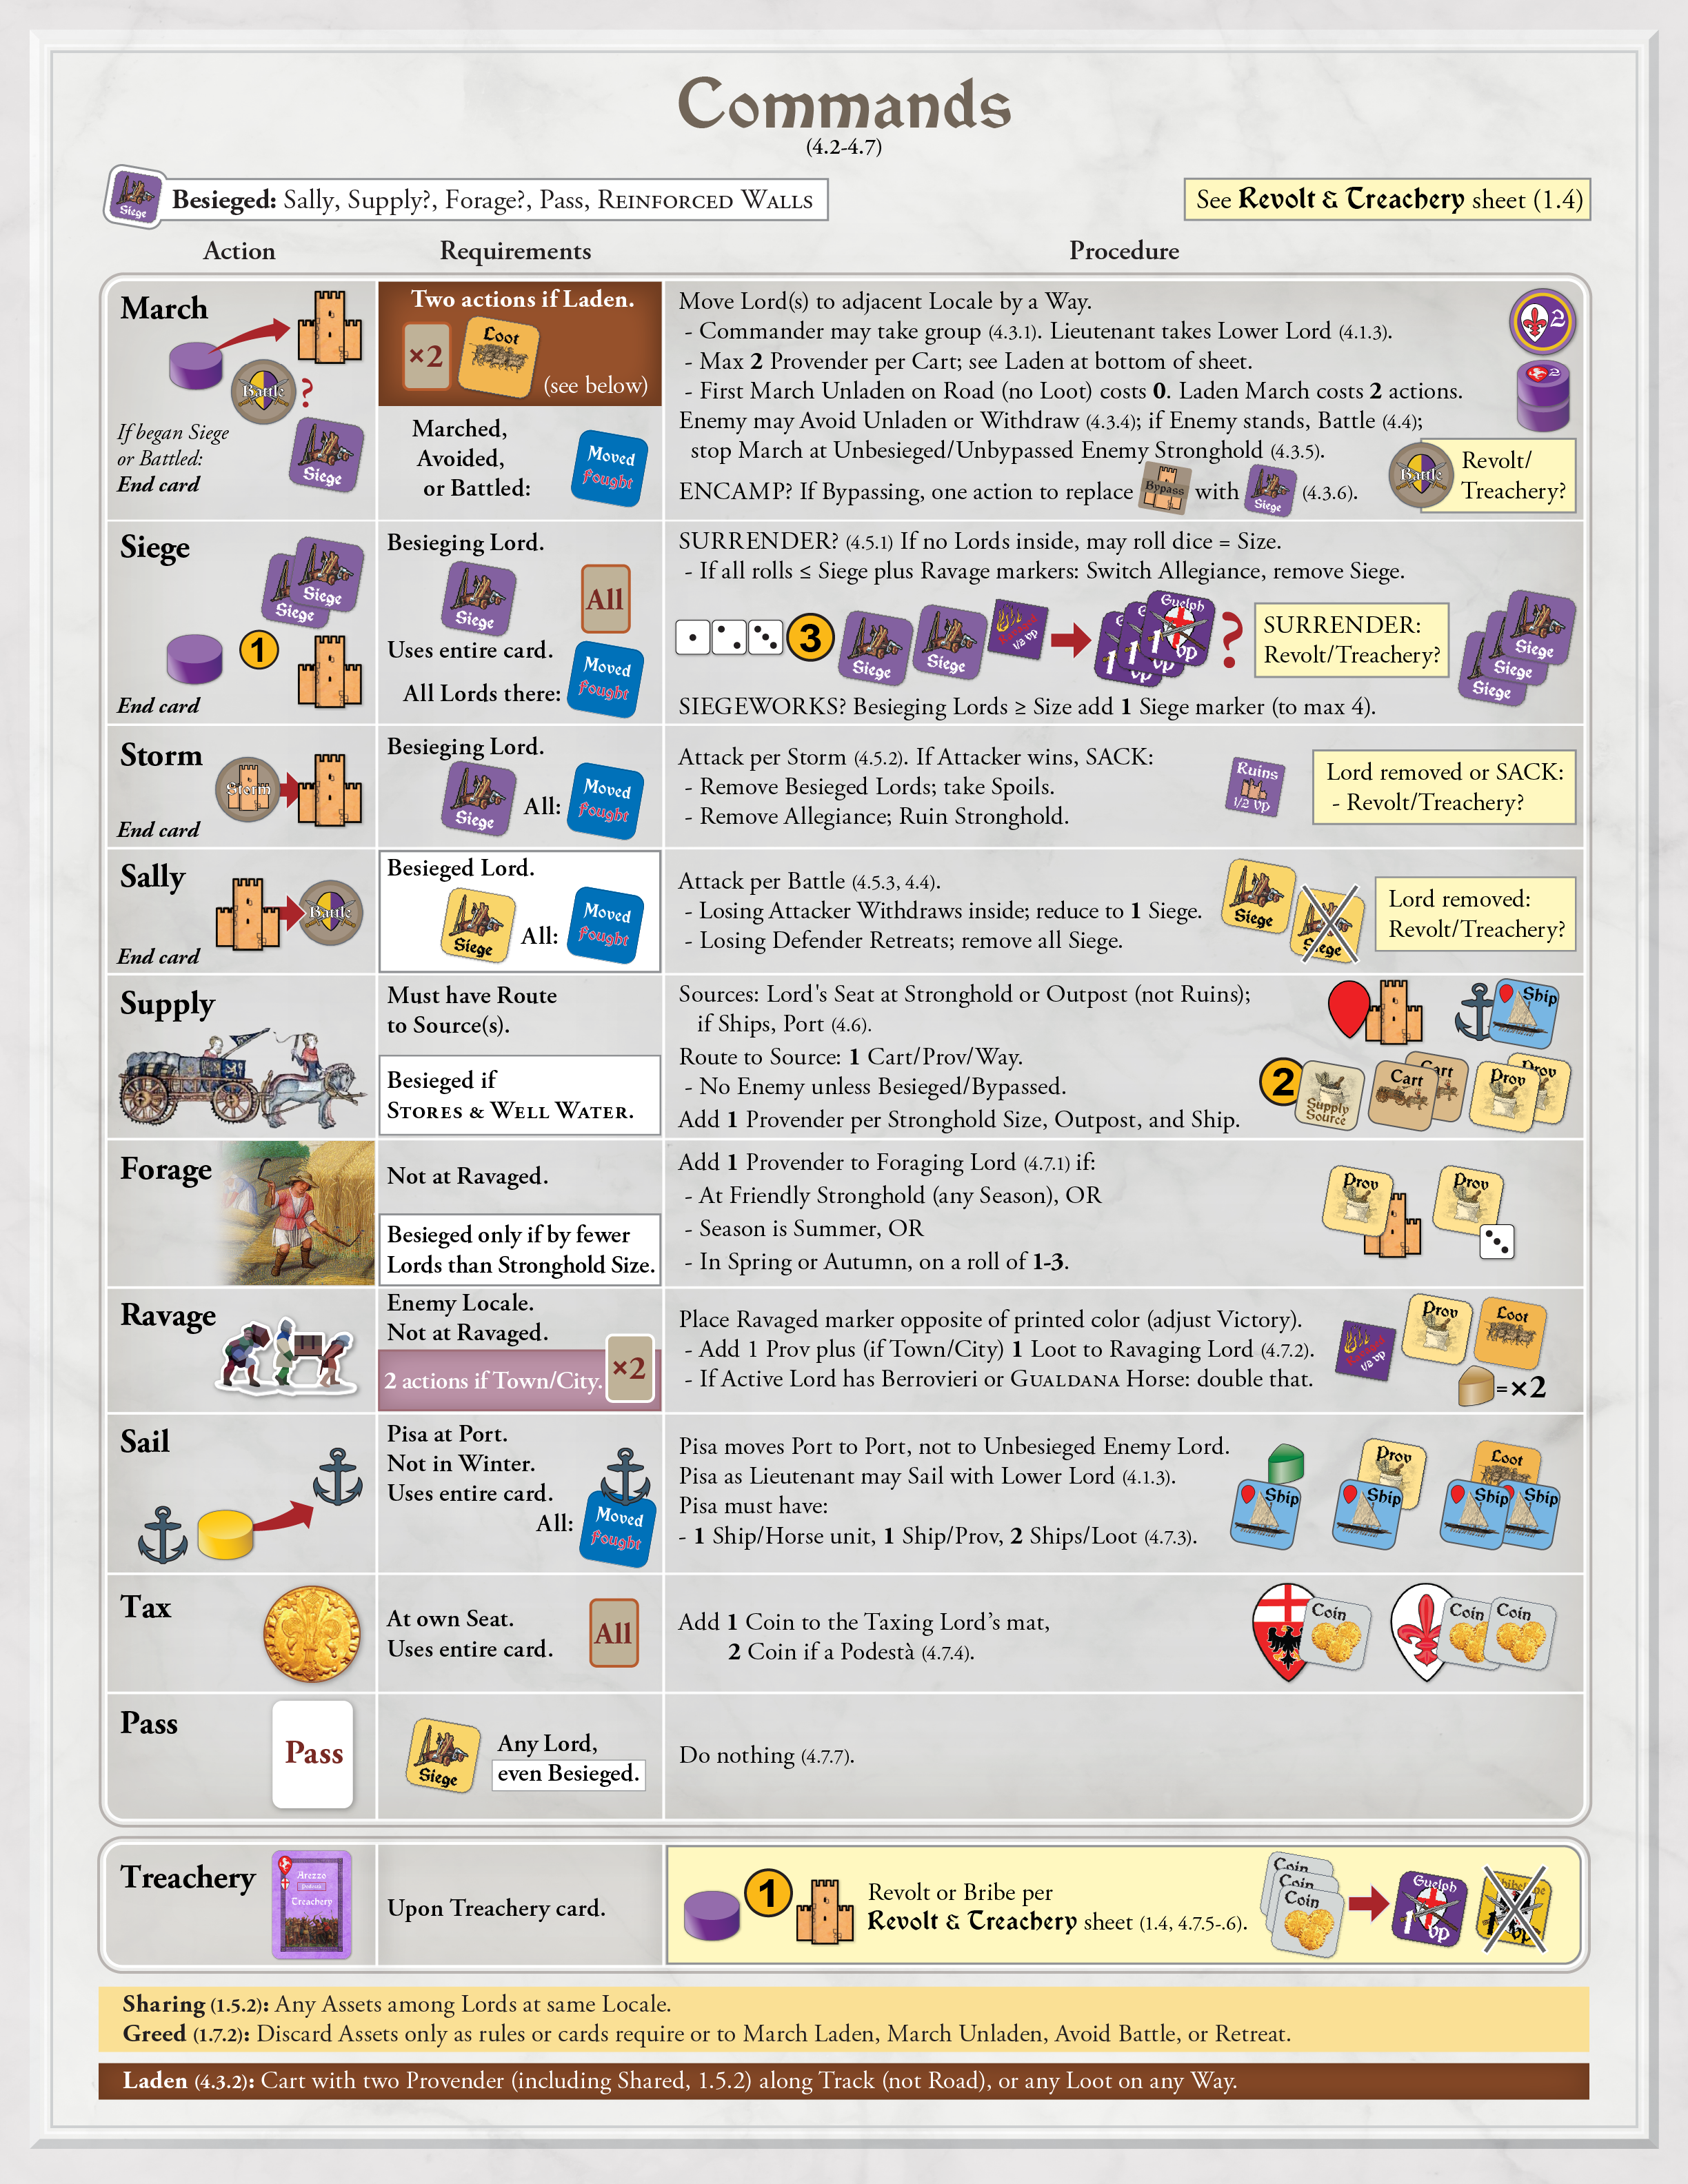
 

Commands

 "I come to take you to the other shore, into eternal darkness, into heat and chill" (Inferno III 86-87)

 Thank you, GMT Games for allowing me to review this bright new star in the firmament. All of the game components were designed for utility and also beauty. Even if the gameplay was sadly lacking, and it isn't, any player would be proud just to show off the game on his table. If you have played any of the Levy & Campaign games, then you will not find this game hard to play. Each of the Levy & Campaign games have to have some tweaks to reflect the different situation. However, gameplay is pretty similar across the board.

Robert

GMT Games:
Inferno: Guelphs and Ghibellines Vie for Tuscany 1259-1261:

  Red Blitz An Expansion for Old School Tactical Volume 1 Second Edition by Flying Pig Games   Flying Pig Games should have really used hog ...

Red Blitz an Expansion for Old School Tactical Volume 1 Second Edition by Flying Pig Games Red Blitz an Expansion for Old School Tactical Volume 1 Second Edition by Flying Pig Games

For your Wargamer, Toy soldier collector, MiniFig collector, military history nut. Reviews, interviews, Model Making, AARs and books!


 Red Blitz


An Expansion for Old School Tactical Volume 1 Second Edition


by


Flying Pig Games


 Flying Pig Games should have really used hog instead of pig for its flying porcine. Their games are enormous with massive maps that come with 1" hexes. The counters come in two sizes. The armored vehicles are 7/8" and the soldier, etc. ones at 3/4".


 This is what Flying Pig Games has to say about Red Blitz:

"In the vein of Old School Tactical Vol 2's Phantom Division we present Red Blitz. This boxed expansion will add more scenarios that occur during the vicious fighting of Operation Bagration in the summer of 1944.

Specifically, there are 6 challenging new scenarios, and an extended battle to be gamed on Vol I's Map 1. The extended battle is a multi-part legacy scenario, where the day's gains remain in your hands and reinforcements are fed into the battle. A running score is kept and the winning side is determined at the end of all the rounds.  

The "one-off" scenarios are fought on 4 new pocket maps, depicting summer and winter terrain. Additionally, Red Blitz presents new combatants, including the SU-76M, SU-85, OT-34, PT34, ISU-152, IS-2, StuH-42 and the Nashorn."

Red Blitz Includes:

4 new 11" x 17" game maps (4 x summer and 4 x winter).
A playbook with 6 new scenarios and a separate, new campaign.
A sheet of gorgeous counters, including--but not limited to-- the new units cited above.
A box to keep everything safe and warm.
This is an expansion. You must own Old School Tactical Vol I 2nd Edition to play.


 The expansions maps are up to Flying Pig Games usual beauty and usefulness. They are paper maps and not mounted. To me it is not big deal. I just break out the plexiglass. Some people may feel differently. The Maps are 'Pocket Maps' numbers four through seven. The Maps are identical on both sides except for one side is summer and one is winter. The counters are just as huge and little works of art like all of the Flying Pig Games I have seen. The vehicle/weapon cards are also up to the same high standards. There are four German cards and six Soviet ones. The Soviet player gets some monster tanks (IS 2, and ISU 152) along with a flamethrower T-34 and a mine sweeping one. The Playbook is fourteen pages long. It is in full color and has large type that is easy to read. All but one page is devoted to the new scenarios. The expansion's components are all comparable to the ones you get with the main games. 


 Once again, Flying Pig Games has given us a very nice expansion to one of their core games. To play the scenarios in Red Blitz you need to either have a copy of Old School Tactical Volume I 2nd Edition or the 2nd Edition Upgrade for the original Old School Tactical. The scenarios will also need some of the counters from the main game. The new maps and units, especially the units, bring a great amount of added value to the base game. Thank you, Flying Pig Games for allowing me to review this expansion. 

 If you have not looked at Hermann Luttmann's magnum opus 'A Most Fearful Sacrifice' game about the Battle of Gettysburg, you owe yourself to take a look. Here is my review of it:

Robert

Flying Pig Games:

Flying Pig Games Red Blitz:
 

  Japanese Tanks and Armored Warfare 1932-45 A Military and Political History by David McCormack  The Japanese tanks and their usage are usu...

Japanese Tanks and Armored Warfare 1932-45: A Military and Political History by David McCormack Japanese Tanks and Armored Warfare 1932-45: A Military and Political History by David McCormack

For your Wargamer, Toy soldier collector, MiniFig collector, military history nut. Reviews, interviews, Model Making, AARs and books!


 Japanese Tanks and Armored Warfare 1932-45


A Military and Political History


by


David McCormack


 The Japanese tanks and their usage are usually compared to the Italians in World War II. Both their tank tactics and the tanks themselves seem to be better suited to the 1930s than the 1940s. So, let us see if the author has some new insights on the Japanese tanks and warfare.

 It actually turns out that he does. For a country that had a very limited supply of automobiles and trucks and no home-grown plants to make them, Japan produced the first diesel powered tank in 1936. Using European tanks during the Manchurian incident in 1932, the Japanese had used tanks and trucks to move 320 kilometers in three days. This was by a combined arms ad hoc group of Infantry, tanks and towed guns. While it is true that the resistance they faced was not that great, it did show how some of the Japanese military was able to think in a manner very outside of the box for the time. This was the same as blitzkrieg or deep penetration that was written about in other armies, but just put on paper and never actually used. Britain was the first country to experiment with these units in the 1920s. However, lack of funds stopped all of their training in this direction.

 The author goes onto show how even though the Japanese thinking was very advanced, their manufacturing of tanks was slowed to a crawl. The Japanese Navy and Army were in a struggle for all of the limited manufacturing that Japan had during those years. The Japanese infrastructure was nowhere near the size that it needed to be to fight in World War II. 

 On page eighteen there is what first looks to be a small tidbit of information but in reality, is very significant. The author writes that the Japanese Army had an Achilles heel. This was their looking at logistics as an afterthought if it was thought about at all. I know we have read constantly that "amateurs talk about tactics, but professionals study logistics" (USMC Gen. Robert H. Barrow). On this page we find quotes from Edward J. Drea that shows that the Japanese actually looked down upon the transport and logistic troops. Military academy officers were not demeaned by being placed to such postings. He goes onto say that the troops assigned to logistics were not even eligible for promotion. This one page of the author's book explains away a lot of what happened during the Pacific War. The book has many other interesting points as well to share with us. 

 Thank you, Casemate Publishers, for allowing me to read this short but very deep book. This book is meant for anyone who has interest in World War II in the Pacific or the Japanese Armed Forces before and during the war.


Robert

Publisher: Fonthill Media
Distributor: Casemate Publishers

  Stalingrad New Perspectives on an Epic Battle  Volume 2 The City of Death by Christer Bergström  This volume has to fill a big pair of sho...

Stalingrad New Perspectives on an Epic Battle: Volume 2 The City of Death by Christer Bergström Stalingrad New Perspectives on an Epic Battle: Volume 2 The City of Death by Christer Bergström

For your Wargamer, Toy soldier collector, MiniFig collector, military history nut. Reviews, interviews, Model Making, AARs and books!


 Stalingrad New Perspectives on an Epic Battle


 Volume 2 The City of Death


by


Christer Bergström


 This volume has to fill a big pair of shoes to follow the publishing of volume one. The first book was one of the best military history books I have ever read, and I have read tons of them. 

 These are the chapters etc. that are in the book:

Part One: Street Fighting
Chapter One - Onto the Volga
Chapter Two - The Legendary Strongpoints
Chapter Three - Paulus's Fatal Mistake
Chapter Four - The City of Death
Chapter Five - The Battle for Red October

Part Two: The Turning Point
Charter Six - The Trap is Set
Chapter Seven - Success and Failure
Chapter Eight - The Stab-in-the-Back Myth

Part Three: Diary of a Dying Army
1: December 1942
2: January February 1943

Part Four: The Battle in Reality and in History Writing

Appendices
Appendix One - Axis Order of Battle at Stalingrad on September 12,1942
Appendix Two - Soviet Order of Battle at Stalingrad on September 12,1942
Appendix Three - Axis Order of Battle Stalingrad Don Area December 1, 1942
Appendix Four - The Soviet Terma of Surrender, Presented to 6. Armee on January 8, 1943
Appendix Five - Film Clips From the Battle of Stalingrad

There are also various Glossaries and a good number of well-done maps.

 So, this volume will take us from the hell of the street fighting in Stalingrad to the point where the Germans had managed to almost conquer the entire city. Then the story continues to the Soviet encirclement of 6. Armee and its final death throes. 

 This is what Vaktel Books has to say about the book:

330 pages hardcover. Format 6″ x 9″
Illustrated with many previously unseen photos
Large and clear maps
QR codes with relevant film clips

The realistic air bridge – and why it failed.
How could the Russians persevere?
General Paulus’s greatest mistake.
What happened to the civilians in Stalingrad?
The myths about ”Pavlov’s house” and the Mamayev Kurgan hill.
The German plan to evacuate Stalingrad – and how it failed.
A critical analysis of writing history about Stalingrad.

 This is an excerpt from the book:

"In a way, the Battle of Stalingrad was decided on September 12, 1942. That day, General Friedrich Paulus, the commander of German 6. Armee in Stalingrad, met Hitler at his Eastern Headquarters in Vinnitsa, and presented a plan in two stages, aimed at solving all problems in the Stalingrad area: First, the city of Stalingrad had to be
taken, in order to prevent the Soviets from bringing more troops across the Volga to strike a blow at the German flank. After this had been completed, all forces of 6. Armee and 4. Panzerarmee could be released for aims which truly would be decisive if realized: The former was to surround and annihilate the Stalingrad Front north
of the city and wipe out the dangerous Soviet bridgeheads in the northern part of the Don Bend at Serafimovich and Kletskaya; the latter was to carry out an operation called “Herbstlaub” (Autumn Leaf), intended to capture the Soviet positions south of Stalingrad at Beketovka and Krasnoarmeysk. If all of this was to be achieved, it was assumed that the Germans could occupy winter positions in relative calm."

 This volume does not have to look on its older sibling with envy. The second volume is just as well written and full of new information as the first. The writer moves effortlessly from the larger picture to the intimate recollections of the poor civilians who were caught up in the hellish maelstrom. 

 The author believes that Paulus had committed a 'fatal mistake' in the battle during the last days of September 1942. This is from the book:

"Paulus had indeed committed a grave mistake. Had the Germans continued to attack the northern industrial area instead of shifting their attention towards the Orlovka Salient, one might assume that the by then remaining Soviet forces would not have been able to withstand the pressure, and the Germans could have captured the whole area. The significance of this simply cannot be underestimated, since it would probably have caused the entire Soviet defense in Stalingrad to crumble, after which the LI Armeekorps could have been in an offensive to push the ne Don Front northward. This in turn could have avoided the whole Stalingrad catastrophe for the Germans." 


 These books are also on the cutting edge of technology. You have the ability to download materials and to actually watch videos of the actual events with the embedded scan codes and links.

 Thank you, Vaktel Books and Lombardy Studios, for letting me review this excellent book.

Author: Christer Bergström


Publisher Vaktel Books

North American Distributor: Lombardy Studios

Lombardy Studios is doing a new Kickstarter for 'Aerocatures':

As an FYI Lombardy Studios is working on releasing the wargame 'Streets of Stalingrad Death of a City' You can find more information here:

  PANZERKAMPF FROM TRAFALGAR EDITIONS The latest   game from Trafalgar Editions continues their   concentration on miniatures   related sys...

PANZERKAMPF PANZERKAMPF

For your Wargamer, Toy soldier collector, MiniFig collector, military history nut. Reviews, interviews, Model Making, AARs and books!

 PANZERKAMPF

FROM

TRAFALGAR EDITIONS


The latest game from Trafalgar Editions continues their concentration on miniatures related systems.  Their two Napoleonic games were a very happy marriage of board wargame and miniature techniques.  Panzerkampf is much nearer to Ships of the Line: Trafalgar 1805 in that it is purely a miniatures game to be played out on a convenient table top.  However, the focus is much different and the contents of this core game very small in number.  First of all, I would describe Panzerkampf as a light skirmish game of small scale tank encounters, unlike Trafalgar's fleet sized action.  The actual physical size of both games' components is 10mm, but a change from plastic to resin means that the tanks in Panzerkampf  have a much greater solidity and for their size the level of detail is clear and well executed.  Below you can see on the left the basic unpainted Russian T34 41and on the right the basic PzIV F1 with a simple undercoating of field grey and a light dry-brushing to pick up a few highlights.  

The basic core game provides for the German player three Panzer IV F1s, a Tiger VI and a Stug IIIA, while for the Russian there are three T34 41s, one SU 76M and a KV 1 and Trafalgar Editions very generously included all the supplementary models that will become available, but for the moment I want to focus on the rest of the core contents.
Being a miniatures game, the box feels rather light without the familiar paper maps or even heavier mounted maps that are becoming a familiar feature in many games.  Besides the vehicle models are two sheets of cardboard [one mainly of essential markers, the other mainly of terrain] and the rules book.  Having seen the proto-type counters, I was a little disappointed by the sombre hue to most of the markers, which caused some difficulties identifying details at times. 

I discussed this with the designer, Jose Luengo, who I must thank for his willingness to respond so swiftly to any of my queries.  He explained that the intention was to maintain a steely artistic palate in keeping with the armoured focus of the game.
The cardboard terrain elements were particularly important for me, as the 10mm scale doesn't match the very limited miniatures that I've dabbled in over the years.  That is something that I shall definitely have to rectify, as functional though the cardboard is, the photos I have seen of the game with even a modicum of buildings etc to scale greatly enhances the game.
Preparing for play
Here you see in cardboard the game's three buildings, a small section of walls just off centre and the woods markers which serve to delineate an area of woodland, just as some 3D trees would.  Just playing on my handy rough countryside playing mat was at least a help to the visual aspect of the game.  Also in view are a number of the other essential, helpful items. Near the bottom right is the card strip displaying the basic to hit numbers depending on terrain, which can be seen more clearly below, along with the very familiar basic movement marker [MU], as well as one of the building terrain pieces on its reverse side showing that the building has been destroyed.

Also to be seen in the photo above, labelled Preparing for Play, are more terrain pieces, the D6 dice and three useful devices [two shown below].

template for assisting in identifying angle of shot
template for assisting in turret rotation
Finally, there is a card for each type of vehicle that contains all the stats need to play the game.  Once again these have changed somewhat from the prototypes that I had seen, but this time I would say the final version is a definite improvement, with the use of coloured bars and labelled images adding to ease of use, a factor which I'll discuss in more detail when exploring the rules system. 


Rounding out the package is a 16 page Rule Book of which just over 11 pages are rules.  They are very well laid out in double columns with plentiful illustrations and double-spaced text which makes them so very easy to read.   Thumbs up all round, because they're not just visually clear, but totally clear to understand.  Though I would describe this as very much an introductory level miniatures skirmish game that would ease a beginner in with no difficulty, there is a pleasing degree of nuance delivered too.
Sequence of Play
{a} Initiative Phase
{b} Repairs Phase
{c} Movement Phase
{d} Turret Movement Phase
{e} Fire Phase

Initiative is determined by a simple D6 die roll by each player; highest gaining the Initiative and consequently moving second.  A neat marker not only shows which player has won the initiative, but also records an increasing negative modifier, so that, however poor your dice-rolling skills are, at some point you'll definitely get the initiative. 
Repairs can only be made to a damaged gun or turret.  Considering the brief  "real" time being covered, repairs more realistically might be thought of as malfunctions being rectified, but whatever the label this is just one of the little touches I like about the game.  Suffer damage to your vehicles tracks and that's you immobilised for the game and never mind the likelihood of gun fire doing the damage, just entering a wooded area or rubble has its risks! 
Movement too is swift to execute with Trafalgar Editions' typical MU markers and couldn't be clearer.

I particularly like two rules related to movement. The first is that you place a numbered chit that records how many MU you've used that becomes a modifier to the To Hit die roll in the Fire Phase making it harder to hit or be hit.  The second is that if you've used your maximum  MU in a turn - except when your maximum is 1 MU - then you must move at least 1MU at the beginning of the next turn.  I also like the fact that the marker is coloured differently on one side so that you always know whether the number is your maximum move or not.  No having to keep checking vehicle cards or trying to memorise all the different vehicles' movement stats! Again very simple, but very helpful.  
I was fascinated to see a Turret Movement Phase, where this handy little gadget [see below] comes in!

Hold it over your tank, with the barrel lined up and roll a D6.  A pivot up to 80 degrees is always a success, but to pivot more you need to roll the appropriate number.
Moving on to the Fire Phase is to come to the heart of the game, where once more a series of simple rules provide a subtle blend for very little effort.  First of all, a straight line from the gun barrel must touch some part of the target.  So for vehicles such as the Stug IIIA that can't rotate its barrel make sure your move gets you lined up.  Your first roll of 2D6 [modified for range and movement modifiers] is for Impact which is compared with the target's terrain number.  Roll too high and it's a total miss.
If you've scored a hit, then roll 2D6 for Damage - penetration is achieved by rolling less than the target's profile number [Front/Side/Rear] on the vehicle card, taking into account any defensive modifiers to the dice roll, as seen below.
The next step is to check whether the firer's shell penetration value at the given range is greater than the target's armour value.  If it is, then the target is destroyed.  Referring to the vehicle cards above, imagine that the German Panzer is firing at the Russian T34's front armour. The Pz IV fires an APCB shell at range D1, so its penetration value is 45mm, but the T34 has armour value of 52mm [as seen on the silhouette]. So, no direct kill.   
But there's still the chance of a Critical Hit.  This is dealt with easily, if the penetration value is greater than half of the target's armour value, you've achieved a Critical Hit.  In this example, the Russian 's 52mm armour is halved to 26mm, the German's penetration of 45mm is greater - so a Critical Hit.  Roll on the Critical Hit Table to see what has been damaged - gun/turret/hull/engine/track/crew stunned and place the appropriate damage marker against the tank.  The effect of each type of damage takes just a brief, succinct paragraph to explain. Through this simple three step process, the game achieves a surprising level of detail with all the typical effects you'd expect in a game of tank warfare.


The remaining details on the vehicle card are its maximum movement number, crew survival number and points value.  As in most miniatures' systems, the latter is used for creating battles by each side being allocated a total points to spend on buying units.   
All this is accomplished in a mere 8 pages of simple, brief and precise rules followed by 3 pages of optional rules. Most of these I'd have no hesitation in advising that you include from the very start, especially the Random Events rule based on drawing an Event chit whenever you roll a double for hit determination.  This adds a colourful extra layer of detail for all your games, while the optional rules for crew survival and crew types will appeal to those of you who want to play a mini-campaign or tournament.
So, how can you resist a system that potentially contains an 88mm mounted on a half-track - apologies that this model hasn't yet been touched up. 

So, I couldn't resist showing off what even a quickly done paint job can do to a Tiger VI.

To sum up, the core box gives you a hugely accessible, light system for creating swift, skirmish scenarios between tanks, but - be warned - you will want to buy in to the whole range of additional vehicles and I hope that some at least will come in multiple packs!

  Korsun Pocket 2 Little Stalingrad on the Dnepr Designed by Jack Radey  Published by Pacific Rim Publishing  Operation Barbarossa had taken...

Korsun Pocket 2: Little Stalingrad on the Dnepr Designed by Jack Radey Published by Pacific Rim Publishing Korsun Pocket 2: Little Stalingrad on the Dnepr Designed by Jack Radey Published by Pacific Rim Publishing

For your Wargamer, Toy soldier collector, MiniFig collector, military history nut. Reviews, interviews, Model Making, AARs and books!


 Korsun Pocket 2


Little Stalingrad on the Dnepr


Designed by Jack Radey 


Published by Pacific Rim Publishing


 Operation Barbarossa had taken place on June 22nd,1941. It had surged through the Soviet Union like a massive wave. The wave had finally broken against the Soviet defenses at Leningrad, Moscow and Rostov. In 1942 the Germans' Operation Blau was directed at the Caucasus and Stalingrad, or more accurately the Volga River. In late 1942 the Axis Allied armies were smashed and roughly 250K Germans and Allies were trapped in the Stalingrad pocket. There was a relative lull after the Spring fighting, and then the Germans launched Operation Citadel. This was to encircle and capture and crush the Soviet forces around Kursk. The autumn battles in 1943 saw the Germans forced back through the Ukraine. These battles had bled white both the German and Soviet forces. Unfortunately for the German forces, they were running out of replacements. The Soviets were still able to call upon a larger, but dwindling, mass of untapped manpower. This sets the stage for 1944 on the Eastern Front.


Just some Soviet Eye Candy


 The German Army Group South, commanded by von Manstein, was very depleted of men and armaments as the new year started. The Soviets had decided to not take a breather and saw an opportunity to encircle two Germans corps. The two German corps were the XI, commanded by General Wilhelm Stemmermann, and the XXXXII commanded by Lieutenant General Theobald Lieb, along with the attached Corps Detachment B from the 8th Army. The Soviet forces that were going to make the pocket were the 1st Ukranian Front, commanded by Nicolai Vatutin, and 2nd Ukranian Front, commanded by Ivan Konev. The reason there was a chance at all for the Germans to be encircled is that Hitler demanded that these forces stay on the western shore of the Dnepr River. The rest of Army Group South had already been pushed back from the river. To complete the encirclement the two Soviet forces would have to attack and move around 110 kilometers. The fighting would take place in January and February of 1944. Playing as the German player, you are trying to escape the pocket, or never let a pocket be made. Playing as the Soviet, you have to encircle the German forces as quickly as possible and defend against attacks from both inside and outside the pocket. So, onto the game.


 This is what comes with the game:

12 counter sheets of 200 die-cut backprinted counters each

Four 25 x 38 inch game maps

Six German Order of Battle Charts — III Panzer Corps, VII Corps, VIII Flieger Corps, XI Corps, XLII Corps, XLVII Panzer Corps

Ten Soviet Order of Battle Charts — 1st Ukrainian Front, 2nd Ukrainian Front, 5th Guards Tank Army, 2nd Tank Army, 6th Tank Army, 4th Guards Army, 27th Army, 40th Army, 52nd Army, 53rd Army

One 28-page Rules Booklet

One Scenarios Booklet

One Commentary, History, and Designer’s Notes Booklet

Two double-sided 22 x 34 situation maps (25 January, 1 February, 10 February, one blank for planning purposes)

Two 11 x 17 player turn record track cards

Two player chart and aids cards

One six sided die

Box


Section of the Map


 No doubt about it, this is a monster wargame. The four 25" X 38" maps prove it along with the 2000+ counters. The situation maps are an excellent addition to the game, especially the blank one for planning. Even if you are playing the one map scenario you are still going to need a good amount of space for the Player Aids etc. So, this is a game that you are going to need space and are going to need to leave it on the table for a while. 


 I really like this statement from the designer Jack Radey:


"Commentary

If you approach this game as a dice and probability table contest, and push each counter separately without regard for organization, I think that you will not have much fun, and will spend a lot of time looking for just the right amount of combat strength to nudge the odds one column higher. Not my idea of wargaming. I strongly urge you to do serious planning, map study, and organize your forces as they were organized historically, or some variant on that. Thinking in terms of "this army has those objectives, and to gain them I will push this corps along that road, reinforcing it with these artillery units" you will do far better than thinking in terms of "where can I find another six points of attack strength?"

 In simple terms the game will award you for playing historically. I am not talking about forcing you to do exactly as was done in 1944. It does what not enough games do and guides the player to wargame in a historical manner, instead of throwing all of your counters Willy Nilly across the map. This game will really impress the grognard who tries to play in a historical manner.


 We will now go through the components. The counters are a 1/2" in size. They have to be that size or almost no one would be able to play this game. The colors on them are muted. They do come with a good amount of information on them, but strangely enough they are still easy to read. The counters also have the correct silhouette of the tanks that were in each unit. I think this is a nice touch. Next up, we have the four full-sized maps. They are of paper but do have some kind of coating on them. This campaign was fought in the snow, so the clear hexes are white. The terrain in each hex and moving out of a hex is very well defined. The maps come with no ambiguities. The sixteen! Order of Battle charts are extremely well done. There is no bunching up of the different OOBs. They are made of hard stock and come in all sizes, from the small VIII Flieger corps of the Luftwaffe to two large page foldouts for some of the Soviet units. The Rules Booklet is in black and white and has two columns per page. There are no examples of play. The only illustrations show how to read the counters and all of the information on them. However, the text is nice and large. As was mentioned, it is twenty-eight pages long. It does not have an index, but with it only being twenty-eight pages long it is not hard to find what you are looking for, unless you are a member of U2. The Scenario Booklet is thirty-two pages in total. The first sixteen pages are for the actual scenarios. After that comes a four-page Example of Play, then an eight-page Historical Notes section. This is extremely well done. I would always say to read books on the battles you are going to play. However, this short synopsis is really all a player needs. The author also sneaks in the word 'mendacity'. I have been a fan of that word since first seeing Cat on a Hot Tin Roof. I still hear the word mendacity in Burl Ives voice in my head. The Booklet is also in black and white with the same large print. The situation maps I have already touched upon. The different Players Aids are also very well done. They come with the same large type that the Booklets have. When you open the box you will be pretty amazed at the sheer amount of OOBs and Player Aids that are in there. The 2K+ counters are also a sight to behold. Be careful with the counters - they do want to jump of the cardboard sprues.


 The original Korsun Pocket was released in 1979 by People's War Games. So, Mr. Radey has had over forty years to tinker with the game. Most of the games made by People's War Games were and are as valuable as a gold bar. 


 These are the Scenarios:


Scenario 1 - Vatutin Attacks - This uses maps A and C and is 15 turns long.

Scenario 2 - On to Zvenigorodka - This uses maps B and D and is 15 turns long.

Scenario 3 - The Pocket is Formed - This uses all 4 maps and is 18 turns or longer if you use night turns.

Scenario 4 - "I Will Rescue You" - This uses map C only and is 21 turns long.

Scenario 5 - von Vormann Tries Again - This uses maps B and D and is 21 turns long.

Scenario 6 - Testing the Ring - This uses all 4 maps and is 27 turns long.

Scenario 7 - Massacre on the Gniloi Tikich - This uses all 4 maps and is 24 turns long.

Scenario 8 - The Korsun Pocket Campaign - This uses all 4 maps and is possibly 72 turns long.


"Sequence of Play:


Each Game Turn represents the AM, PM, or Night

portion of a day. At the end of a Night Game Turn

there may be an Extra Night Turn (20.0). The First

Player is determined by the scenario being played.

The player whose turn it is is the phasing player

and his opponent is the non-phasing player.

Each Game Turn consists of the following sequence

of actions.

3.1 Weather Determination If using historical

weather (7.2), adjust the markers on the Weather

Conditions Track to indicate the current

temperature, ground and atmospheric conditions.

If using variable weather (7.3), the first Player rolls

twice on the weather table for temperature and for

atmospheric conditions. If precipitation is possible

a third die roll is made.

3.2 Air Availability Phase Both players consult the

current weather and ground conditions and

determine which of their air units are available

(16.12)

3.3 Supply Phase Both players determine the

supply status of their units (15.21, 15.22).

3.4 First Player Turn The player designated First

Player by the scenario instructions becomes the

phasing player.

3.41 Movement The phasing player may move all,

some, or none of his units. (5.0 Movement)

3.42 Building and Demolition The phasing player

may initiate, continue, or complete building and

demolition (17.0).

3.43 Counter Battery and Surprise Attack The

phasing player may conduct counter battery fire

against enemy artillery units that are both 

observed and In Battery (14.71). The Phasing

player may conduct Surprise Attacks (10.33).

3.44 Defensive Barrage The non-phasing player

may now conduct Defensive Barrage (14.72).

3.45 Combat The phasing player is the attacker

and may now conduct Combat in which the nonphasing

player is the defender (9.0, 10.0).

3.5 Second Player Turn The player who was the

non-phasing player now becomes the phasing

player and the sequence of phases 3.41 through

3.45 are repeated.

3.6 Fatigue Reduction Phase Both players reduce

the Fatigue Level by one for each of their Tired or

Exhausted units that is not in an Enemy Zone of

control (20.7).

3.7 Game Turn Indication Phase The Game Turn

marker is advanced to the next turn and play

proceeds unless it is the last turn in which case the

players should engage in lively banter about the outcome."


Weather Variables


 Weather is a large part of the game. However, so is visibility which is usually not taken into consideration in wargames. This is the combination of what Mother Nature can throw at you.

1. Ground Condition

Frozen Ground

Muddy Ground

Deep Mud

Snowy Ground

2. Atmospheric Condition

Blizzard

Snowing

Raining

Fog

Cloudy

Clear

3. Temperature

Cold

Warm


One of the Situation Maps


 While both sides are forced by the rules to do their utmost best to keep an intact line of counters or zones of control in a unit's area. The German player is allowed to breakdown his battalions into companies.


"18.0 BATTALION BREAKDOWN, COMPANIES,

AND DISMOUNTING

18.1 Battalion Breakdown

18.11 Only German full strength non-artillery

battalions may be broken down into companies.

Battalions that break down into companies must

break into companies of the same type as the

battalion — for example, foot mobile infantry

break down into foot mobile infantry companies,

motorized infantry into motorized infantry

companies, etc.

18.12 To breakdown a battalion into companies, at

any point during the German player’s movement

phase remove the battalion counter from the board

and place it on the player display in the “Battalion

Breakdown” box.

The German player pays two movement points to

breakdown a battalion. Replace the battalion on

the board with company counters of the same type

according to the Battalion Breakdown Chart on the

German Turn Record Card.

18.13 The companies placed on the map have the

same number of movement points that were

available to the parent battalion at the time the 2

MP cost was paid, and may continue to move, in a

stack or individually, after breaking down.

18.14 The number of battalions that may

breakdown is limited by the counter mix, if there

are not sufficient number of company counters of

the same type available, a battalion may not break

down."


 This game has one of the highest ratings for complexity on BoardGameGeek that I have seen at 4.43. While there is a lot going on each turn, I think that is a bit high. The Rules Booklet does add a few rules for each scenario, which is totally normal, but this does not push the complexity up anymore. If you are used to the large soapbox games from SPI, you should be able to play this game. As I said, there is a lot going on, but the rules are written out to hold your hand while playing. Is this game for everyone? Of course not. Some like higher complexity games and to others they are an anathema. The Korsun Pocket battle or campaign was a different sort of animal than a lot of wargames. The Germans and the Soviets are like two fighters in the fourteenth round. The German player is not going to run rampant with his tanks. A Panzer Division was lucky to have forty tanks at this time. The Soviet player has one strong army (4th Guards), but his other units are as in bad a shape as the Germans. This game is a nail biter about taking the next hex. You are not going to be racing around the maps. The German player has to work to get the most out of his units trying to get to the pocket. At the same time, he has to keep the Soviets from crushing the pocket. The Soviet player needs to think about stopping the German reinforcements while still looking over his shoulder at the pocket. The fact that the game was designed for the players to use their counters in a historical manner is the icing on the cake. 


 Thank you, Pacific Rim Publishing, for allowing me to review this excellent game. I have to go because I have one more hex to take before I can link up with the skeletal remains of the pocket. Isn't this why we got into wargaming? While I am thinking about it, how come Grognards do not have a special day?


Robert

Pacific Rim Publishing:

Pacific Rim Publishing (justplain.com)

Korsun Pocket 2:

Korsun Pocket 2 | Pacific Rim Publishing (justplain.com)

Korsun Pocket 2 Designer Notes:

Korsun Pocket 2 Designer Notes by Pacific Rim Publishing - A Wargamers Needful Things

My Review of 'Across the Pacific':

Across the Pacific by Pacific Rim Publishing - A Wargamers Needful Things


hpssims.com